Category: DIY Projects

Budget DIY projects to give your home a high-end custom look, but on a budget.

  • DIY Colorful Confetti Wall

    You could go with the wallpaper version….or you could go full-on DIY and save yourself some money AND time!

    I may be full of quick and easy projects, but Lord help me, I’m having a hard time getting them posted in a timely manner! The Air BnB project (The Loft at Local Depot) has been taking up lots of my time – it’s so close to being finished y’all! The kid and I have managed to squeeze in some time here and there to just about finish up her room makeover though. It’s about 90% done, like the BnB, but you know that last little bit always takes the most amount of time to complete, right?!

    Anywho, here’s our latest shenanigan.

    DIY Colorful Confetti Wall

    When we first started chatting about her room makeover, she found a confetti wallpaper that she fell in love with. It was adorable, it was also going to take a good chunk of her room makeover budget. The more I looked at it, the more I thought we could replicate the look ourselves without spending as much or having to put up wallpaper.

    And I was right.

    When I posted this wall on social media after we did it, there were so many people who commented and said, “This must have taken you days to do.” Nope, it sure didn’t. All that “confetti” was on the wall in about 30 minutes. The longest part of this project was painting the wall white for the base color and that wasn’t bad at all!

    This post contains affiliate links for your shopping convenience. Click here to read my full disclosure policy.

    How to Paint a Confetti Wall

    Supplies and Materials Needed:

    Steps

    Step 1


    Paint the wall with your base coat of white paint.

    Step 2

    Using one of your confetti colors, dip just the tip of a foam brush into the paint.

    How to paint a confetti wall easily with sample pots of paint.

    Tap the foam brush on the wall. Repeat this in a random pattern on the wall.

    Reload the foam brush with paint as needed.

    Step 3

    Repeat Step 2 with the rest of your confetti colors.

    After you’ve covered the wall with all your confetti colors, step back and fill in any empty spots as needed with confetti.

    Easy and Cheap Colorful Confetti Accent Wall

    That’s it! Told you it was super easy! If you wanted to add a fun pop of glam you could throw in a metallic as one of the confetti colors.

  • Simple Light Fixture Update for Less than $15

    Simple Light Fixture Update for Less than $15

    Trim + Peel N’ Stick Fabric Tape = A light fixture full of pizzaz all in 15 minutes or less.

    There’s this “rule” so to speak in the blogging world that you shouldn’t write a blog post and throw it up there just because you feel like you need to post something. I get that – to a degree. People don’t want their inboxes flooded with crap. Listen, I hit delete on probably 100+ emails a day – I get it.

    However, I think that this “rule” has snowballed somewhat and now lots of us feel like every blog post we write should be some detailed tutorial of an elaborate project that you never would have dreamed of before or an in-depth post on all the different types of painting techniques, types of paint, etc. I get that too – those posts are super valuable and awe inspiring sometimes, right?

    But what about those simple little projects that you may not see as much of anymore because they aren’t deemed “blogworthy”? What about those little gems that can be tackled in just that wee bit of time that we are able to carve out between school pickup and cooking dinner? We need more of those! Those are often the projects that give us that jump we need to tackle those bigger projects on the weekends, right?

    So here’s one of those projects. A simple light fixture upgrade with trim. It’s nothing monumental. It’s nothing that hasn’t been before. But it’s simple, added some pizzaz and took a whopping 10 minutes and costs about $15.

    This post contains affiliate links for your shopping convenience. Click here to read my full disclosure policy.

    The Circus was given a budget for her room makeover. Her paint and any other new items she wanted for her space had to come out of her budget.

    She said she wanted a new light fixture.

    I said that will take up more than half your budget.

    She said never mind.

    She’s a penny pincher, y’all.

    So I proposed the idea of using trim to run along her current light fixture’s shade as a way to upgrade it without killing the budget. She was in.

    We went to Hobby Lobby and I introduced her to the fabric trim aisle. Oh the possibilities, y’all. We were on that aisle for a solid 10 minutes (which is a long time for a kid) trying to decide between a tassel trim, a solid colors pom pom trim, or a tie dyed colors pom pom trim. Just as we were about to get the tie dyed colors pom pom trim cut, she changed her mind once more and ran back for the solid colors pom pom trim.

    Serious, life altering decisions, y’all.

    We came home and ran some Peel and Stick Fabric Fuse along the bottom edge of the light fixture’s shade, then the trim on top of it. All done in about 10 minutes.

    And in the end, she was confident she made the right trim decision. Thank you Jesus.

    There’s a sneak peak of the room coming together – guess we should really switch out those Christmas sheets, huh? Real life, folks.

    A few other ways we’ve utilized some fun fabric trim around the house…

    On the Circus’ shower curtain in her colorful boho bathroom…

    On a window cornice in my office…

    On an adorable step stool makeover…

    And on some storage boxes in my closet…

    I promise to be back soon with some elaborate post that will be absolutely mind blowing – or not. 😉

  • 8 Unique & Cheap Wall Decor Ideas

    8 Unique & Cheap Wall Decor Ideas

    Want to break away from the usual wall decor and stay on budget? These wall decor ideas are super affordable – you’ve probably already got a few laying around your house!

    Monday was a sad day in our house. Well, a sad day for Mama but a happy one for the Circus. We said goodbye to the adorable little text and object wall in her room.

    She’s been talking about a room makeover for the better part of a year now and it’s finally coming to fruition for her. Alas, the vision she has for her new room doesn’t include a wall all about her. Instead, she envisions a confetti wall there.

    While the wall is here no more, it will always be one of my favorite projects and one of the most unique ones I’ve done as well. Planning her room makeover and the design for The Loft at Local Depot has had me thinking out of the box for wall decor. Here’s a few of my favorites I’ve done in the past. The great part about these wall decor ideas is that you probably already have what you need for some of these laying around your house – so they are going to be especially unique to you and cheap too!

    8 Unusual Wall Decor Ideas

    Text & Object Wall

    Since we’re in mourning this week over the loss of this wall, let’s start with it…

    This wall was made up of vinyl lettering and objects. In the place of some words, I replaced the word with the actual object – like a horse or tutu. The whole wall was about the kiddo and her little personality. The complete how-to for the object and text feature wall is here.

    Special Mementos

    In the den at the farm, I used quite a few special little things to decorate the walls.

    I have the center piece from my Pap’s truck steering wheel mounted in a frame and his belt below it.

    On the opposite wall, I hung Grunt’s grandpa’s service hats.

    The kitchen wall at the farmhouse is full of treasures – one of my favorites though is this paddle that my Grannie got when she retired. See more of the farmhouse here – it’s filled with lots of treasures.

    Things they’ve outgrown…

    Our laundry room also doubles as a mudroom / pool room, so we went with a swimmer theme and bright colors in here. I framed my daughter’s first swimsuit for this space and it’s one of my favorite things in here!

    Hang Baskets on the Wall

    Another trick I use in my laundry room / mudroom – vintage metal locker baskets on the wall! These are perfect for corralling sunscreens and pool toys and look good while doing it. There are lots of other laundry room – mudroom ideas here. I also used baskets just like this once to create wall storage for cookbooks in my kitchen.

    Travel Souvenirs

    Y’all know part of my heart is in New Orleans. One time when we visited, I got an extra bag from Cafe du Monde and framed it – super cheap and it always reminds me of good memories made in NOLA.

    Related: Things to Do in New Orleans with Kids

    Loved Ones Handwriting

    When I redid my office, I really wanted a special reminder of my Pap in there. Something I could look up at when I was stressed or ready to give up that would remind me to pull it together and saddle up. I pulled out some cards he had given me and scanned in his signature and where he had written my name, then printed them out for wall art. You can also see more of my budget-friendly office makeover here.

    What kind of unique wall decor have you guys done before? I’m off to continue work on a colorful confetti wall!

  • 27 Projects You Can Do When You’re Stuck at Home

    27 Projects You Can Do When You’re Stuck at Home

    Now is a great time to be super productive at home, right? You’ve got unexpected time there and rather than worry constantly or veg out on Netflix all day, why not use that time wisely and even try to have fun with it?

    No doubt, everyone’s biggest concern right now should be their own health and the health of others. As I said in my post on Tuesday, we can combat that most effectively and do the most good right now when we stay at home.

    Keeping all that in mind, I’ve created a list of crafts, DIY projects, decorating ideas, curb appeal projects and even a couple cleaning tips to fill your time at home right now.

    The materials needed for these projects can all be ordered online and delivered straight to your door! However, I’m willing to bet many of you already have lots of these project supplies on hand already. Like electrical tape, construction paper, scrap fabric and other similar items. I’m right, aren’t I? I knew y’all were craft supply hoarders like me. 😉

    Crafts and Home Projects to Beat the Boredom

    This post contains affiliate links for your shopping convenience. Click here to read my full disclosure policy.

    Get Crafty

    Crafts projects for when you're stuck at home - Easter bunny vases.

    Some of these are perfect for kids!!

    Have the kids help with these Easter Bunny Vases. Guess what? Easter isn’t canceled! Everything to make these cute little simple bunny vases can be ordered online – I’m willing to bet you also have most of the supplies on hand though! Follow that link above for the supply list and tutorial.

    Use electrical tape for nothing it was ever intended for. I’m willing to bet you’ve already got a roll of electrical tape lurking around in your garage, toolbox or maybe a junk drawer. Am I wrong? Here are seven simple, cute crafts that use electrical tape. The kids will have fun with some of these too!

    Duck Tape Crafts. Speaking of tape, every American should have a roll or two of duck tape stashed away, right? Here are 20+ duck tape crafts for adults and kids to do.

    Hide wall sconce cords in style. If you’ve got even just a piece of pretty scrapbook paper, wrapping paper or wall paper hanging around and a touch of Mod Podge, the only thing you’ll have to order to disguise cords in style is this basic cord cover which is the base for this project. Here’s the tutorial for how to hide cords in style.

    Make beautiful silhouettes of your family. What better time than now to make silhouette portraits of your kiddos? If you’ve got black construction paper on hand, you’re ready to go! If you don’t, order some here, then use this tutorial for DIY silhouettes. This one would be fun for the kids too – let them make your silhouettes!

    Recover a lamp shade. Update a boring old lampshade with a fun print or pattern. If you don’t already have fabric on hand, you can order it online from Fabric.com or Online Fabric Store, then use this tutorial for recovering a lamp shade.

    Make faux crystals. And then turn them into magnets, lamp finials and more! The faux crystal tutorial is here and links to everything you need!

    Make mason jar lanterns. Another fun one for the kids to get in on here. I made glitter mason jar lanterns, but you could also use craft paint for yours! And they don’t have to be lanterns, they can be vases, pencil holders or fill them with citronella in the summer for bug repellant!

    Make pretty finials for your lamps. These agate slice lamp finials are incredibly easy to make and in my opinion are the icing on the lamp.

    DIY Home Projects You Can Tackle Now

    DIY projects you can do when you're stuck at home - green painted chair with black and white upholstery.

    Make a cowhide rug. A faux one that is! Just order this faux cowhide or another one of your choice and follow my faux cowhide rug tutorial!

    Make a bottle lamp. If you have a cool old bottle lying around (or say you polish off a bottle of Jack during this time 😉), you can easily turn it into a lamp with a bottle lamp kit you can order online. Follow this tutorial for how to make a lamp out of a bottle to put it all together.

    Makeover a piece of furniture. Have the paint shipped straight to you! My favorite furniture paint, Velvet Finishes will ship their paint and other furniture painting supplies straight to you. Velvet Finishes is also a small business so you’re helping to support them during this tough time. If you’re a newbie to the world of painting furniture, I’ve got lots of tips, tricks and info for ya on my Painting 101 page. If you’re an old pro at painting furniture, maybe one of my previous furniture makeovers here might inspire your next project!

    Paint an accent wall. For this accent wall, all you need is a sample pot of paint. Did you know that you can order sample pots online, but I’m willing to bet lots of you will already have a sample pot or two just hanging around.

    Paint your cabinets or a bathroom vanity. Again, you can have paint delivered straight to your door from Home Depot, Velvet Finishes and other online retailers. Here’s a guide to the best paint for cabinets and here’s a post about when I painted my kitchen cabinets to create a navy and white kitchen.

    Switch out your handrail. Ditch the dated handrail for a glam and modern lucite handrail. You can order everything you need, rail included, and have it delivered straight to you. Bonus – the acrylic rod for the handrail comes from a small business!

    Give your countertops a makeover. Order a can of chalkboard paint and you’re halfway to creating faux stone countertops.

    Refresh and Update Home Decor

    Home decorating projects you can do while you're stuck at home. Blue painted bedroom with black velvet headboard and orange bedding.

    Refresh Your Bedding. Did you catch my recent bedroom refresh? The pink walls are gone, replaced by blue and the bedding is begging for spring weather to arrive!

    Update and/or Add in Color with Runners. Bring a little more interest and pattern to your flooring by throwing down one of these cheap runner rugs. All are less than $30.

    Switch out your pillows. Freshen up your throw pillows with one of these affordable pillow covers. Available in all sorts of colors, patterns and prints. P.S. That list links to lots of pillow covers on Etsy which equates to supporting more small businesses!

    Working from home? Treat yourself to a new comfortable, but still stylish desk chair. You won’t believe how good a desk chair can look.

    Order fabric samples to inspire your next project. Now’s the perfect time to plot out a new room makeover. You can order fabric samples from Fabric.com or Online Fabric Store . Here’s a list of some of my favorite cheap fabrics by the yard.

    Make a design plan. Once you’ve got those fabrics chosen, here’s how to make a moodboard to plot out your entire design.

    Have fun accessorizing. Not with your daily outfit, but with your home decor! Trade out accessories in rooms, pull out treasures you’ve had stashed away. Mix it up and have fun! Here are my tips for accessorizing a space without over accessorizing.

    Work on Your Home’s Curb Appeal

    Outdoor projects you can do while you're at home - cut flower garden.

    Install or replace old dated shutters on your home. Simply measure and order online. These are the ones we put on our house a couple years back. Here’s a guide for how to hang shutters on brick.

    Make a flower garden. You can order seeds from Burpee and use my cut flower garden guide for beginners to get you going.

    Refresh your outdoor furniture. Most outdoor furniture can easily be painted with a few cans of spray paint. Home Depot has their entire line of spray paint available for purchase online. And here are 12 ideas to redo lawn furniture!

    Clean all Those Things You’ve Been Putting Off

    Cleaning projects for when you're stuck at home - restoring copper.

    Polish it up. Copper, Brass and Rusted Chrome are no match for Bar Keepers Friend. Here’s how to use it to clean your copper, clean tarnished cabinet hardware and remove rust from chrome.

    Preserve your upholstery. Grab a can of Thompson’s WaterSeal FabricSeal and go to town (well, actually just your living room or dining room) on your upholstery. Here’s how I use it to protect and waterproof upholstery fabric.

    Read a Good Book

    Don’t forget the power of a great book. As corny as it may sound, you can escape to a different world! Here’s a collection of my favorite books!

    What projects are you tackling at home right now?

    Want to remember this list for later? Pin the image below!

    Home projects to do while you're stuck at home.

    Follow on social media for more:

    Facebook | Instagram | Pinterest | Twitter

  • Five Minute DIY Stuffed Animal Storage

    Five Minute DIY Stuffed Animal Storage

    Does your kid have their very own, very complete stuffed animal zoo? Same here! They were taking over our lives until we got creative with our own DIY stuffed animal storage. Take advantage of your vertical space and learn how to store stuffed animals better below!

    As many of you may know, the kid and I are frequent thrift store shoppers. Thursday afternoons are what we like to refer to as ‘Thrift Store Thursday.’ I pick her up from school, we grab a snack from Sonic and onto the thrift stores we go to snag the treasures.

    One day at one of our usual thrift store haunts, the Circus and I noticed how they were displaying their stuffed animals vertically on chains. Now that I wrote that out, it sounds kind of like a 50 shades stuffed animal version, but I assure you that is not where this is headed. 😂

    Anywho, we analyzed their stuffed animal hanging storage that day and decided we could modify it and make it work perfectly in the Circus’ playroom.

    diy stuffed animal storage

    We came home, determined what we needed and pretty soon storing stuffed animals around here became so much easier. Did I mention that my kid is stuffed animal obsessed?

    Related: Need a different kind of toy storage in your kids room? Try these wall to wall shelves that we also use in my daughter’s play area!

    This post contains affiliate links for your shopping convenience. Click here to read my full disclosure policy.

    Hanging Stuffed Animal Storage

    This is an easy to install DIY project you can tackle in mere minutes!

    Supplies and Tools Needed:

    Steps

    Step 1


    Mark the location where you want your ceiling hooks to go. Keep in mind you want to come off the wall with them a bit as the stuffed animals will take up some space against the wall. We brought ours out about nine inches.

    Install the ceiling hooks according to the package directions.

    hanging stuffed animal storage - installing ceiling hooks

    Step 2

    Hang the plastic chain on the hooks.

    how to store stuffed animals - hanging chain from the ceiling

    Adjust the chain to the length of your liking.

    Step 3

    Clip the hooks onto the stuffed animals and hang on the chain.

    stuffed animal storage - hanging animals on plastic chains with clip hooks

    We did three vertical rows for the plush toy storage.

    stuffed animal storage ideas- hanging chain from the ceiling and hanging animals from clip hooks

    Organize stuffed animals to your liking. As you can see though, we have no organization method.

    storing stuffed animals vertically by hanging chains from the ceiling

    Let tell you though, having every last teddy bear, dog, rabbit, and all other species very visible has significantly reduced the risk of me breaking a leg in an attempt to find a certain animal.

    Related: Kids Play Table with Storage – perfect for playing farm, legos and more!

    Do you have any creative storage ideas for toys? Share them in the comments!

    Looking for another great idea for the kids? Here’s a few of our homeruns…

    Play Based Learning Play Stations – they won’t know they are learning while they’re playing too!

    How to Build a Kids Stage – and it has hidden storage for dress up clothes!

    DIY Wall Mounted Desk – this one has hidden storage as well and your kids will love having their very own creation station!

    Want to come back to this simple stuffed animal storage solution later? Just pin the image below!

    diy hanging stuffed animal storage from the ceiling - stuffed animals hung from the ceiling on chain.

    Keep up with more of myself and the Circus’ shenanigans on social media:

    Facebook | Instagram | Pinterest | Twitter

  • Mudroom Cabinets Makeover: From Yuck to Showstoppers

    Mudroom Cabinets Makeover: From Yuck to Showstoppers

    Ready to add some serious wow factor to your mudroom cabinets? This cabinet makeover will leave their jaws hanging!

    You know those chances you take sometimes where halfway through you realize there’s no going back?

    It’s not that you didn’t realize there would be no going back when you started but it just didn’t occur to you what you might do if it failed.

    Man, this is turning into some deep thoughts about plain old cabinets. 😆

    Anyway, that’s how I felt about my mudroom cabinets. I had hated the look of them since we moved into the 70’s Landing Pad four years ago. However, getting the mudroom space into shape was at the very bottom of the list; it’s pretty closed off from the rest of the house and for the most part, we’re the only ones who walk through it.

    While halfway through this project, the “oh shit, I’m in it now” feeling hit me, I’m happy to report that this project was a success…

    Green and White Mudroom cabinets with fabric inserts.

    Here’s what the mudroom storage looked like before…

    Mudroom Storage Cabinets Makeover - the blue cabinets before.

    Someone actually commented on this space saying it resembled what they think some prisons may look like. I was not offended at all. 😆

    I most definitely did not want to lose this great storage space in here. Here’s how I pulled the epic cabinet makeover off.

    Mudroom Storage Cabinets Makeover

    This post contains affiliate links for your shopping convenience. Click here to read my full disclosure policy.

    Supplies and Tools:

    Step 1

    As you can tell from the before picture, my mudroom cabinet doors had holes drilled in them. While these may have been purely for decoration, I think they had more to do with ventilation since this space is in a partially below ground basement in the south. And while previous owners may have liked the “decorative holes,” this current owner did not.

    The first thing I did was have the centers of the cabinet doors cut out to get rid of those holes.

    Mudroom Cabinets with Doors Cut Out

    While this was something I could have DIYed myself, I opted to hand it over to my cabinet guy. I knew he would do a better job of getting nice straight cuts and the same edge measurements for each door. I also knew he’d be able to knock it out in half the time of what it’d take me. I was right on all accounts and it was probably some of the best spent money on this space.

    Step 2

    Paint the cabinet doors and frames.

    After the centers of the doors were removed, I painted all the doors and cabinet frames with Bit of Sugar by Behr. I did two coats total.

    Step 3

    Once everything was good and dry, I put the doors back on the cabinet bases.

    Mudroom Cabinet Ideas - cut outs made in doors.

    I know it might seem weird to put them back up with them not being fully completed, but I felt it might make attaching the fabric easier if the doors were in place.

    I installed the doors using new hinges as the old ones were gross and had been painted over multiple times. I also went on and put the new knobs on at this time too.

    Step 4

    Finally, I attached the upholstery fabric to the backs of the cabinet doors.

    Roll out the upholstery fabric. Measure the openings in the doors and add about an inch or two to each side, then cut that measurement out from the fabric.

    Using a stapler, attach the fabric to the backside of the door with the pattern showing through the opening.

    Cabinet Makeover - attaching upholstery fabric to the backs of cabinet doors.

    I used my power stapler for attaching the fabric. It shoots all the way into the wood the first time, so no hammering staples down. It also goes much faster than using a regular stapler and it’s easier on your hands!

    The biggest thing to remember when attaching the fabric is to pay attention to the pattern on the front. Make sure you’re keeping the pattern straight. Of course if you have a more abstract patten or a solid color, you won’t have to worry about this.

    Mudroom storage cabinets with green and white lattice fabric and acrylic knobs.

    The acrylic knobs went perfectly with the green and white bamboo fabric – they complimented it nicely without distracting from the print.

    Don’t forget to accessorize a little too! I’ve never met a tassel I didn’t like! These from SmithHonig are some of my favorites.

    Colorful mudroom cabinets with decorative fabric panels.

    Window Shade / Pink Color on Door

    I had enough fabric left over to create a window seat on top of a couple of the cabinets. The Circus loves to climb up here and chill.

    The cool thing about this cabinet makeover idea is that if you ever want to change up the look of your space, you could switch out the fabric for a new print and create a whole new feel – and you’d never have to paint a thing!

    Share any creative mudroom cabinet ideas you have in the comments!

    Looking for more DIY cabinet ideas?

    DIY Built In Office Cabinets – all you need are basic stock cabinets from your local home improvement store!

    Best Paint for Cabinets – the lowdown on different types of paint for cabinetry.

    How to Make Cabinets Taller – if you ever need to raise your cabinets for home improvement projects…

    Want to remember this mudroom cabinet idea for later? Just pin the image below!

    Mudroom cabinets with doors that have fabric accent panels on the front.

    Hang out with me on social for more:

    Facebook | Instagram | Pinterest | Twitter

  • DIY Indoor Lattice Wall Tutorial

    DIY Indoor Lattice Wall Tutorial

    If you want to make a statement with your next accent wall, then look no further than this DIY indoor lattice wall. Your friends may think you’re crazy at first, but in the end their jaws are gonna drop.

    I had no idea that lattice walls would be such a hot topic, y’all.

    Many of you thought I was crazy. Hell, I kind of thought I was crazy.

    Many folks are seriously worried about how I’m going to clean them. To be honest, I don’t do a lot of cleaning, so there’s that. 😆 Really though, since everyone was so concerned, I put my thoughts on cleaning these at the bottom of this post.

    For me though, I’d been thinking about doing a lattice wall somewhere for quite a while and when the mudroom’s design led that way, I knew it was now or never. Well, probably not really never, we all know I’m a determined soul when it comes to an out-of-the-box decorating idea. I did put green astroturf carpet on a wall after all.

    While lattice walls will never be for everyone, they are most definitely a winner in my heart…

    Indoor Lattice Wall with Bird Wallpaper

    Thinking about working them into your own home? It’s actually a relatively easy feature wall to create….

    This post contains affiliate links for your shopping convenience. Click here to read my full disclosure policy.

    Lattice Accent Wall Tutorial

    Tools and Materials Needed:

    Steps

    Step 1


    Prep Work

    Before installing any lattice, you’ll need to determine what paint color you’ll be doing behind the lattice and paint the wall that color.

    Lattice Accent Wall Tutorial - painting the wall first.

    I had a lot of other colors and prints going on in this space, so I stayed with white-on-white for the walls and lattice. I have seen lattice accent walls that have one color on the wall and another on the lattice and it’s gorgeous. It just wasn’t the right move for this space.

    For reference, I painted my walls Bit of Sugar by Behr and left the white vinyl lattice as-is and both whites worked well together.

    If you’re planning to go with a color other than white for your lattice or if you’re using traditional wood lattice, you’ll also want to paint it first as well.

    Paint any other trim you’ll be installing on the lattice walls now as well – i.e. the single lattice trim pieces, the cap molding, etc.

    Baseboard also needs to be installed along your wall before installing the lattice.

    Finally, go ahead and mark your studs along the wall using a stud finder.

    Step 2

    Now it’s time to put the lattice on the walls! This is actually really easy.

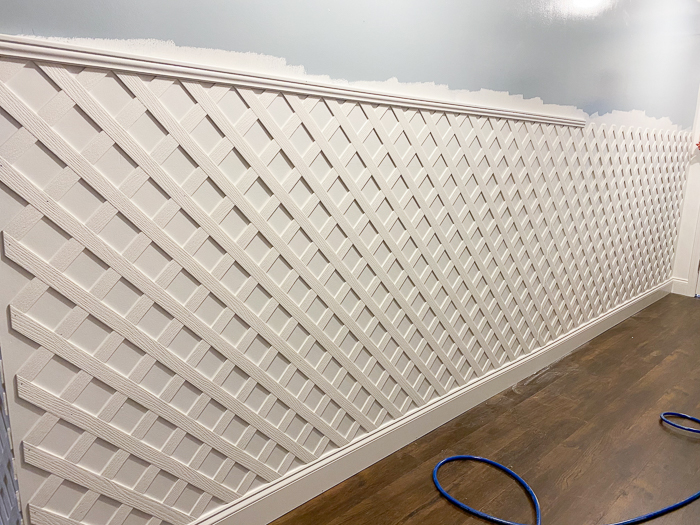
    The lattice panels come in 4′ x 8′ sheets. So, if you’re looking at the sheets horizontally, they are 4′ tall and 8′ long. I did not cut any of the height off my panels. I only cut down the length if need be.

    If you have a wall you are installing the lattice on that is longer than 8′, you should first determine where you want the seam to be where your panels will meet. I had one wall that was longer than 8′. I decided I would make the seam in the middle. I marked the middle and then used my level to draw a line.

    Note: If you will have to use two or more panels on a wall, I highly suggest placing the seams along where a stud is.

    Cut the lattice to length as needed. We used a circular saw for this.

    After drawing your level line, line up one end of the lattice on the line, then attach the lattice to the wall using a nail gun or finish nails and a hammer where you’ve marked your studs.

    Lattice Wall Decor - using vinyl lattice as interior wall molding.

    This is the seam on my long wall where two panels had to meet up. As you can see, there is a gap. Both the walls and floors here are not level, so that was working against me. No big deal though – that gap is easily going to be covered with a single lattice wood strip.

    The lattice should sit right on top of your baseboard, or be pretty close to it as shown below.

    Indoor Lattice Ideas - using it as wall molding.

    Continue installing the lattice panels around the rest of the room.

    Step 3

    Once all the lattice panels are installed, it’s time to make it look finished with your moldings.

    DIY Indoor Lattice Wall - installing a molding cap on top of the lattice.

    You’ll want to install the molding cap above the lattice before installing the single lattice pieces to cover seams and corners.

    We used this molding which has a lip on it so it smoothly sits right over the top of the lattice.

    Step 4

    Cut the single pieces of lattice molding to size and install those in corners, edges and panels seams.

    Lattice Accent Wall Tutorial - using single lattice moldings to cover the edges.

    This helps to give the lattice a framed-in and finished look.

    Step 5

    Fill any nail holes in the lattice and trim with spackling putty and touch up with paint as needed.

    Lattice Wall Decor Ideas - used as wall moldings in a colorful mudroom.

    Console Table / Similar Red Mirror

    I think this lattice wall decor brings gorgeous dimension and interest to a space.

    Lattice Ideas - using lattice as wainscoting.

    Wallpaper / Pink Door Color / Light Fixture / Similar Brass Chinese Symbols

    Keeping it white-on-white also complemented the other colors, patterns and designs in this space without having the walls take away from the overall feel of the room.

    DIY Lattice Accent Wall in a mudroom

    Green Tassel / Similar Brass Ginger Jars / Similar Blue and White Jars

    And I adore how it’s the perfect backdrop for decorative accents like these and that red mirror.

    And for those of you super worried about cleaning: since it was such a concern on this Facebook post, I tested out my Swiffer duster on them and that thing easily gets in all the nooks and crannies. The fact that I used the vinyl lattice panels which are thinner than traditional wood panels was key there too, I think.

    So….would you do it? Could you handle lattice on your walls? 😬

    Take the full tour of the mudroom featuring this lattice wall here!

    Want more great accent wall ideas?

    Washed Out Stripes Accent Wall – all you need is a sample pot of paint!

    7 Wall Treatments that Aren’t Shiplap – for all of us who haven’t jumped on that train….

    Black and White Gallery Wall Around the TV – makes your television disappear!

    DIY Wood Panel Wainscoting – super cheap way to bring wood tones and architectural interest into your home!

    Want to come back to this lattice idea later? Just pin the image below!

    Indoor Lattice Wall Tutorial with bird wallpaper.

    Stay up to date on social media:

    Facebook | Instagram | Pinterest | Twitter

  • Mudroom Progress: The Home Stretch

    Mudroom Progress: The Home Stretch

    If you came here today expecting the big reveal of the mudroom makeover, I’m sorry to disappoint you.

    Originally, today was supposed to be reveal day. But most of us gals had delays in receiving products for our spaces, so we’ve pushed the reveal back to next Tuesday. I’m still waiting on two things to arrive I need myself for this makeover.

    This post contains affiliate links for your shopping convenience. Click here to read my full disclosure policy.

    This past week has seen some decent progress though!

    Walls Painted and Prepped for Wallpaper

    All the walls going solid white and the portion of walls where molding will be have been painted a crisp white, specifically Bit of Sugar by Behr. I used a semi-gloss finish in their Marquee paint. If the name sounds familiar, it’s because I’ve used this white countless times. It’s my go-to, true crisp white. The semi-gloss finish will hold up to any rough and tumbleness that finds it way through this part of the house as well.

    While you can’t really tell, the upper half of the walls, which will get clothed in this beautiful wallpaper, have also been prepped using this wallpaper primer. I cannot wait to get that paper up!

    Trim and Moldings Partially Installed

    Wait for it….

    I’m putting lattice on the walls.

    I’ve went rogue, ya’ll. This was not part of the original plan. Originally, I had planned on putting a traditional board and batten style wall treatment along part of the walls. However, the more I thought about it, the more I felt like that was too farmhouse feeling and just didn’t go with the feel of the rest of my design plans – see those here. And then the more I kept thinking about it, the more lattice walls kept coming to mind. I have oohed and ahhed over interior lattice walls (like these) for quite a while now. And so I figured “Why not?! Let’s just do it!” And I did. And I love it so far. Are you team lattice? 😬

    As you can tell, the rest of the flooring has also been installed – read more about it here – and the hubs came home after working at the farm Sunday and took it upon himself to knock out all my baseboard in this space, which was a huge help to me.

    New Door

    The old door in here was just a hollow core, run-of-the-mill basic door. It needed to be switched out years ago when we first moved in as it was a huge energy loss (in terms of heat and air) for our house. Dollars literally going straight out the door. Of course, we just never got around to it until now. We still have to add a threshold and some weatherstripping to really lock that heat and air inside, but I’m so happy to finally have this little part of the project crossed off the list and it was only about a $125 fix! The door also got a nice coat of Bit of Sugar.

    I’ll be going full-force in here over the next week to get it all done! Follow me on Instagram for updates!

    A big thanks to our sponsors for this challenge!

    Be sure to see what all the other girls are up to as well:

    Casa Watkins Living // The Boho Abode // Delineate Your Dwelling // Haneen’s Haven // The Happy Housie // Homemade by Carmona // House by Hoff // Jeweled Interiors // Kaleidoscope Living // Our Fifth House // PMQ for 2 // Rain on a Tin Roof // Southern State of Mind // Taryn Whiteaker // This is Our Bliss // Thou Swell // Up To Date Interiors

  • Mudroom Progress: Installing the Flooring

    Mudroom Progress: Installing the Flooring

    If you’re looking for a durable, but beautiful floor that’s also an easy DIY install, this Select Surfaces Flooring might be your answer! This waterproof, vinyl plank flooring is not only easy to install, but can also go over most existing floors!

    We’re doing things a little backwards here. Normally, I would like flooring to be one of the last things going in – like after all the painting is done and there isn’t a chance I’ll spill paint on it – we all know how those “best laid plans” go though, don’t we?

    So no, the painting isn’t even close to being done and I’m still waiting on quite a few things to arrive, but flooring is going down.

    This post contains affiliate links for your shopping convenience. Click here to read my full disclosure policy.

    Select Surfaces Flooring Being Installed

    Grunt had yesterday off and as we all know – it’s best to take advantage of free grunt labor anytime you can. 😉

    He isn’t completely done, but he’s put a dent in it and that’s mostly thanks to this Select Surfaces Flooring being a relatively easy DIY install. The best part is that this engineered vinyl plank flooring can go over many existing flooring surfaces. We were able to put it right over the old linoleum sheet flooring and the bare concrete that were both in this space.

    On top of that, this flooring is waterproof, so it’s perfect for this room in the house where we have had a water leak before. Fingers crossed that doesn’t happen again, but just in case, our flooring will be ready.

    I also love that this flooring has that natural look of hardwood, but with the low-maintenance that comes with vinyl plank flooring. As all busy mamas will agree, low-maintenance is our preferred way to go. 😉

    How to Install Select Surfaces Vinyl Plank Flooring

    Materials and Tools Needed:

    Step 1

    If you are removing any existing flooring currently in place, do so first. This vinyl plank flooring can go over most existing hard surface floor coverings as long as it is smooth or can be made smooth. As I said earlier, we went right over both concrete and old sheet flooring.

    Step 2

    Adjust door trim if needed. If you want to be able to easily slide the flooring right under door jambs and trim, place a plank of the flooring up against the door jamb and mark where the top of the plank hits. Use an oscillating multi tool to remove this part of the trim as shown below.

    Cutting out door jambs to install Sam's Club Flooring

    Step 3

    Starting in the top left corner of the room, lay the first plank so that the head and side seam grooves are exposed.

    Installing click together vinyl plank flooring from Select Surfaces

    You always want those white parts you see to be on the outer edges so you can click more planks on.

    Remember, this is a floating floor – no glueing or nailing needed. Just lay that first piece down.

    Step 4

    Click another plank into place beside the first plank you laid.

    How to Install Vinyl Plank Flooring over Sheet Linoleum

    Place it at an angle over the exposed tongues and push down firmly.

    Tapping in vinyl plank flooring from Sam's Club.

    Use a rubber mallet and lightly tap all the seams tight.

    Tapping together vinyl plank flooring from Select Surfaces.

    Step 5

    Repeat until the floor is fully covered with your new vinyl planks. When you need to cut planks to fit, simply measure, mark with a pencil and then cut with a power saw. We used our miter saw for cuts.

    Step 6

    Once the flooring is fully installed, you can install baseboard and quarter round around the edges of the flooring.

    I’m super excited to have this incredibly beautiful and equally durable flooring in this space! This is one of the most high traffic areas in our house so it needs flooring to withstand it all!

    If you’re new to this challenge, you can view the entire design and ideas HERE!

    A big thank you to all our sponsors on this challenge:

    Be sure to see what the other challenge participants are up to:

    Casa Watkins Living // The Boho Abode // Delineate Your Dwelling // Haneen’s Haven // The Happy Housie // Homemade by Carmona // House by Hoff // Jeweled Interiors // Kaleidoscope Living // Our Fifth House // PMQ for Two // Rain on a Tin Roof // Southern State of Mind // Taryn Whiteaker // This is Our Bliss // Thou Swell // Up To Date Interiors

    Keep up with it all on social media too!

    Facebook | Instagram | Pinterest | Twitter

  • Tackling a Bathroom Remodel on a Budget: Nine Ideas

    Tackling a Bathroom Remodel on a Budget: Nine Ideas

    Tile, vanity, hardware, plumbing fixtures. It all adds up and it all adds up fast! These nine bathroom remodel ideas on a budget will help you save some serious dough! The best part? No compromising on style!

    Bathrooms and kitchens. The two rooms that will make or break your house when it comes selling time and that also tend to cost the most when it comes to renovations.

    If you’ve got the budget for an out-of-this-world bathroom renovation, then go for it! There isn’t a doubt in my mind, you’ll enjoy that bathroom for years and years to come.

    If, however, your bathroom remodel budget is closer to non-existent than anything else, no worries! I’ve got nine different ideas for you here that can help you save some serious dough on your bathroom remodel, without compromising style.

    Local Chattanooga folks – I’ll be teaching a workshop about remodeling your bathroom on a budget in November – more details here!

    Bathroom Remodel on a Budget

    Have your bathtub/shower painted instead of replacing it.

    Bathroom Remodel Ideas on a Budget

    When we redid the guest bathroom, we were on both a tight budget and a tight timeframe, however the shower needed some cosmetic help for sure. The door needed to go and that beige color was awful. We didn’t want to rip out the entire unit because it wasn’t in bad condition and this was the guest bathroom – we don’t have guests every weekend. And of course, because $$$. After some research, I discovered you could have your bathtub unit professionally painted. I called around and got some estimates and it only ended up being around $500 to have our unit painted. The finish is very similar to what they use in the factory. Our guy even removed the doors, filled those holes and you can’t even tell where the shower door was! He even custom matched the white to the white on the toilet so that the two whites didn’t stand out against one another! Huge savings on not ripping out the old unit and we didn’t have to deal with the mess from ripping it out!

    Ask for remnants or “scratch n’ dent” countertops.

    Bathroom Remodel on a Budget

    The vanity in the guest bathroom needed a paint job, but other than that and the hideous countertop, it was still a pretty solid vanity. The countertop was awful though. We visited a local countertop store and asked to see remnant pieces of countertop options left over from bigger jobs so we wouldn’t be paying as much. We found one that worked, but as it turned out there was a scratch on the countertop. But, it didn’t affect the stability of the counter and it was in the corner. Since I had planned to put a tray on the countertop anyway in that spot, it didn’t bother me a bit. We were able to get an extra $100 knocked off the cost of the counter because of the scratch. On top of all that, the scratch isn’t really even noticeable when the tray isn’t there, you really have to hunt for it. Top the new countertop off with a shiny new sink faucet and it will only look like you spent a million bucks. 🙂

    Instead of tile on the walls, go with a custom painted wall treatment.

    Ideas for a Bathroom Remodel on a Budget

    When I started planning the guest bathroom makeover, I found an image of a bathroom online that had this beautiful tile on the wall in horizontal narrow rows. Again though, this was the guest bathroom – not the master or any other bathroom that gets a lot of traffic, so I wasn’t going to spend hundreds of dollars on tile for the wall. I mimicked the tile look with paint though and I love how it turned out! And can you believe all I used to create the washed-out blue stripes was a roll of Frogtape and just a sample pot of paint?! See how I did this wall HERE!

    If you prefer to make a bigger statement in the room, go with a bolder pattern and color…

    Bathroom Remodel Ideas on a Low Budget

    This is an accent wall I did in one of the bathrooms at our previous house. I wanted a bold pop of color in here and a pattern that mimicked cane like you would see on the back of a chair. All it took was a little time to tape off the pattern and then a couple coats of paint. See how I did this cane inspired wall HERE!

    Put snap together flooring over your old tile flooring.

    Low Budget Bathroom Remodel Ideas

    Apparently, the guest bathroom is like the poster child for quick fixes on a budget. This space had to be turned around fast and ripping up the tile and putting down new wasn’t an option. Instead, we installed this snap together laminate flooring directly over the old tile. I love how it looks like wood flooring, but it’s not! There are loads of gorgeous vinyl flooring options out there these days! You can see how this space looked before HERE!

    Stalk discount stores for mirrors.

    Bathroom Remodeling Ideas on a Budget

    I’m not a big fan of the matchy-matchy mirrors that come with vanities from big box stores these days. I’m also not a fan of the plain Jane frameless mirrors that many bathrooms sport. I’d rather have something with a little more character that adds to the space instead of just being there to take up space. So, I always check out places like Home Goods, TJ Maxx, Marshall’s and Ross for mirrors that would be great above vanities. The mirror you see above was only $30 at Home Goods!

    Damaged walls? Cover with luan or beadboard.

    Bathroom Remodel on a Budget - Nine Ideas

    When we started working on the farmhouse, it was obvious something was going to have to be done about about the walls in the bathroom. The whole bathroom actually had to be nearly gutted. The tile on the walls were actually plastic tiles and lots of them were falling off. Again, no budget for retiling walls here! We pulled all the tile off, but the walls were still damaged underneath where the tile had been glued. For a fast and budget friendly fix, we covered the walls where the tile had been with luan panels and topped it with a chair rail. If you would prefer more detail, you could do this with beadboard panels instead.

    Go for timeless finishes that tend to cost less.

    Nine Ideas for Remodeling a Bathroom on a Budget

    Trendier finishes on faucets and hardware are usually going to cost more. If you want to save some money and keep your bathroom from dating too easily, go for finishes that will stand the test of time – like chrome. Chrome will always be in style and it tends to be cheaper.

    That being said, if you absolutely love whatever the latest finish trend may be, then go for it. I have Champagne Bronze in my master bathroom and I still adore the finish just as much as I did when we first put it in there.

    Paint the existing vanity and replace the hardware.

    Ways to Remodel a Bathroom on a Budget

    I’m sure you’ve heard this one a few times – paint your vanity instead of replacing it. As long as your vanity is in pretty good shape, go for it! If it’s falling apart though or has water damage for some reason, I’d seriously look at replacing it. The vanity in our guest bathroom was solid and had good classic lines, so I just gave it a couple coats of oil-based paint and new hardware – it made a world of difference!

    Add in wall-to-wall shelving for extra storage and decor space.

    How to Remodel a Bathroom on a Budget

    If you’re tight on storage space in your bathroom, build you some shelves! The photo you see above is about the 3rd time I’ve built shelves like these – they are so easy! Find out how to HERE!

    Any budget bathroom remodeling ideas you can share with us?

    Want more budget DIY and decorating ideas?

    20 High Style – Low Budget Knock Off Decor Projects – who knew knock-offs could be so pretty?!

    14 Real Life Bedroom Ideas – beautiful bedrooms that are actually attainable!

    20+ Living Room Ideas – loads of decorating ideas for every style!

    Want to come back to these bathroom ideas later? Just pin the image below!

    Bathroom Remodel on a Budget

    Join the Freak Show On…

    Facebook | Instagram | Pinterest | Twitter

  • DIY Witch Costume: Homemade Witch Costume Tutorial

    DIY Witch Costume: Homemade Witch Costume Tutorial

    Ready to cast spells in style this Halloween? That’s exactly what you’ll be doing in this DIY witch costume! You’ll need a couple of thrift store finds, some tulle and a few other basic materials to whip up this homemade witch costume!

    The Circus and I were chatting about our Halloween costumes the other day. When I showed Grunt a picture in the direction I was thinking about going, his response was, “Oh yea, I forgot how extra you are at Halloween.”

    Halloween is mine and the kid’s jam. Go big or go home.

    Last year, the Circus had three different Halloween costumes and I did two different variations of a witch costume – one more fancied up for our Halloween party and one more laid back for trick or treating.

    DIY Witch Costume

    In my opinion, a good witch costume is always a winner at Halloween. And while there are some great store bought Halloween costumes out there, I feel like a DIY costume always kicks things up a notch or two.

    I put together this halloween costume with a couple of thrift store finds, an easy-to-make tulle skirt and a few other fanciful accessories.

    This post contains affiliate links for your shopping convenience. Click here to read my full disclosure policy.

    DIY Witch Costume for Adults

    I’m going to break this down by top, skirt, makeup and accessories.

    For the Witch’s Top

    You’ll Need:

    • The top portion of a halter-style top two piece formal dress or another black fancy-ish top. (See below for more details and ideas.)
    • Black Feather Boa
    • Safety Pins

    For the top I found a black formal two piece dress with a halter style top.

    I see these kind of dresses at thrift stores all the time. If you can’t find one though, just keep your eyes open for a fancier style black top.

    To embellish the top, wrap the feather boa around the halter neck securing with safety pins. If there’s excess boa, then you can snip it off or tuck it into your skirt.

    If you can’t find a halter style top, you could still easily embellish the neckline with a feather boa, just follow along the neckline and secure with safety pins.

    For the Witch’s Skirt

    Folks, I’m not a seamstress. That being said, if I can make this skirt, anyone can.

    You’ll Need:

    • Tulle – lots of it. 😀 I used green and black strips. I had a total of 20 strips that were 48″ long and 58″ wide. You can adjust as needed – more details below.
    • 2 inch Wide Elastic Band that will fit snugly around your waist when sewn together – more details below. You can buy this by the yard at fabric stores.
    • Needle and Black Thread
    • Black Slip – this is the one I used.

    Step 1

    Sew your elastic band together, end to end, to create the waist of your skirt. Hold the band around your waist to determine how big to make it. This isn’t rocket science, you want the band to fit snugly around your waist so your skirt doesn’t fall, but not too tight that your uncomfortable.

    Step 2

    Cut your tulle into strips. I left the width of the tulle alone, I just cut strips that were 48″ long. You can cut these strips longer or shorter depending on your height. For reference, I’m about 5′ 3″. Again, I did twenty strips total – more black than green. I wanted the green to pop against the black, thus why I did fewer of those.

    Step 3

    Turn your sewn-together elastic band inside out.

    Take a tulle strip and gather it together at the top, then sew it to the band.

    This doesn’t have to be perfect. It doesn’t have to be pretty. When you’re done sewing all the strips to the inside of the band, you’re going to flip it right side out and no one is ever going to see your elementary sewing skills.

    Continue sewing tulle strips to the skirt until your satisfied with how it looks.

    Step 4

    This really isn’t a step, but it’s an important part of the outfit, unless you’re planning to moon someone.

    When you go to wear the skirt, be sure to wear a black slip under it. Obviously, the tulle strips don’t form a solid covering around your rear end, so the slip takes care of this.

    For the Witch’s Makeup

    I opted to go with greens and black for my makeup to keep with the green and black in my skirt. You can of course go with whatever colors you’d like. For my more casual take on this costume, I did purples and greens.

    Full disclosure: I am not a makeup guru, folks. I’m not even that good with it. I have no idea how to contour and all that other shit. So trust me, this is not complicated. I just played around with mine and added/blended/wiped away, etc., until it looked good. I did find that more is definitely more with this look though – it is Halloween, right?

    To get a look similar to mine, you’ll need:

    • Your Usual Primer, Foundation, Concealer, etc.
    • Eyeshadow Primer – this is the one I always use.
    • Shimmery Green Eyeshadow – I used this one in Jade.
    • Shimmery Black Eyeshadow – I used this one in Black Knight.
    • Eyebrow Mascara – I used this one in Brunette.
    • Mascara – your usual. This one is my new favorite because I have zero smudging with it.
    • Blush – I just used my usual blush, which is this one in Pink.
    • Highlighter – I used this one and it’s my all-the-time favorite.
    • Black Cream Lipstick – I used this one in Go Rogue.
    • Black Lipliner – I used this one.
    • Green Cream Lipstick – I used this one in Out of This World.

    Step 1

    Apply your primers, concealers and foundation as usual.

    Step 2

    Apply eyeshadow primer and let dry. Apply black eyeshadow on your eyelid. Come back with green eyeshadow around the edges of your eyelid and onto your brow bone blending out. Add more black or green to create more depth/color or to however you like it.

    Line your eyes, top and bottom, with heavy black eyeliner. Lightly smudge out the eyeliner using the black eyeshadow, then go lightly over the eyeliner again with a little of the green eyeshadow.

    Apply eyebrow mascara. Apply a couple coats of lash mascara. You’ve got lots of eyeshadow going on here, so don’t skimp on the layers of eyebrow and eyelash mascara, folks.

    Step 3

    Apply blush

    Step 4

    Apply highlighter along the bridge of your nose, above your Cupid’s bow, the center of your forehead, your cheekbones and chin. I just used my finger to do this as it made it a bit more defined than using a brush.

    Step 5

    Apply black lipliner heavily around your lips.

    Apply black lipstick all over your lips, but more heavily along the edges.

    In the center of your lips, apply the green lipstick. Blend as needed. You’re going for a fading of black to green look here.

    For the Witch’s Accessories

    You’ll need:

    • A witch’s hat of course!
    • A broom
    DIY Witch Costume

    I just went with a classic witch hat for this costume. You can find these all over the place during Halloween.

    For my broom, I used one of the DIY witch’s brooms I made, which honestly, I love more than any other store bought witch brooms I’ve found.

    That’s it! Pretty basic stuff, but packs a serious punch when put together!

    And what’s on tap for this Halloween? You’ll just have to wait and see….it does include a fur coat though, and black and white hair. 😉

    Have you made your own witch costume before?

    Ready to get in the Halloween spirit? Be sure to see these then…

    Dollar Tree Skulls Candleholder – one of my favorite Halloween decorations and it uses stuff from the Dollar Tree!

    Free Printable Spell Book Cover – every witch needs her a spell book, right?!

    DIY Skull Drink Stirrers – and every witch needs a drink stirrer topped with the skull of those poor unfortunate souls… haha!

    Easily come back to this costume tutorial later by pinning the image below!

    Keep up with our Halloween shenanigans on social media:

    Facebook | Instagram | Pinterest | Twitter

  • 20 High Style-Low Budget Knock Off Decor Projects

    20 High Style-Low Budget Knock Off Decor Projects

    We’ve all been there – what we want isn’t what our pocketbook will allow. Bummer, right? Well these knock off decor DIY projects will give your home that high end look you love, without hurting your wallet.

    Just about anytime I find something for my home that I love but has a steep price tag, I always ask myself, “Can I make that somehow?”

    More often than not, the answer is, “No, silly girl.”

    But sometimes, every once in a while, the answer is, “Girl, yes!”

    And so I do.

    Here are some of my best knock-off decor projects that saved me a wad of cash but gave me the look I wanted.

    This post contains affiliate links for your shopping convenience. Click here to read my full disclosure policy.

    Knock Off DIY Building Projects

    Why spend a fortune buying it when you can build it (simply!) and for a lot less?!

    Knock Off Decor

    DIY Chippendale Desk

    You can buy this one for over $1500 or you can make my version for about $100.

    Home Decor Knock Offs

    Oversized Wall Frame for $25

    Custom framing can be expensive – except when you DIY it. Find out how…

    Home Decor Knock Off Projects

    Modern-Rustic Bookshelf

    The inspiration bookshelf for this project was over $1K. Mine? About $50.

    Home Improvement Knock Off Projects

    Add instant WOW factor to your home with these projects.

    Knock Off Decor Projects

    How to Cover Dated Louvered Doors

    $25. That’s about all it will cost to update those dated doors – look at this before you spend all that money replacing interior doors!

    Home Decorating Knock Off Projects

    Faux Stone Countertops

    Ugly laminate counters? No problem! Use this tutorial to transform those eyesores to stone beauties! The cost? About $15.

    High End Knock Off Projects for the Home

    DIY Lucite Handrail


    Buy one here for about $300 or put together your own using my tutorial for about $100. You won’t believe how gorgeous these things are.

    Home Decor Knock Offs

    A few of my favorite home accessories and decorating projects that didn’t cost me an arm and a leg.

    DIY Knock Offs

    How to Make Faux Jadeite

    Love the look of jadeite, but not willing to pay the high price tag? Use this tutorial to scratch your jadeite itch.

    DIY Knock Off Projects for the Home

    Kate Spade Inspired Wall

    Ever visited a Kate Spade store and seen that gorgeous wall behind the counter? Here’s my take on that…

    Knock Off Lamp Finials

    DIY Agate Slice Lamp Finials

    I adore pretty lamp finials, but they can be pricey. This one though – a fraction of the cost of the real thing.

    Knock Off Home Decor Projects

    DIY Golden Snake Bud Vase

    A couple years back, there were some gorgeous gold snake home accessories out there – alas, they were out of my budget. My solution? A trip to the Dollar Tree’s toy aisle…

    DIY Knock Off Decor

    DIY Golden Snake Bowl

    Another project made possible with the help of the Dollar Tree toy aisle – and of course, a little spray paint. This bowl is a perfect catch-all for around the house.

    DIY Home Decor Knock Offs

    Mohawk Lollipop Holder

    I adore Jonathan Adler’s line of home decor, however much of it is out of my price range – like this lollipop holder. So I made my own…

    DIY Home Decor Knock Off Projects

    DIY Selenite Knobs


    I love taking my home decorating to a whole other level with fancy knobs on furniture. These selenite knobs didn’t have a big price tag at all though…

    DIY Knock Off Decor Projects

    DIY Bottle Lamp


    You’ve seen lamps like this one before and you’ve also seen the price tag on them. Did you know it’s easy to make your own though?

    Knock Off Cowhide Projects

    I love both the look of cowhide in home decor, but also because it reminds me of home.

    Cowhide Rug Knock Off

    DIY Cowhide Rug

    I love, love, love a great cowhide rug, but they are so expensive. So I took a chance and made my own – and I love how it turned out!

    Knock Off Cowhide Lampshade

    DIY Cowhide Lampshade

    Did you see these at Pottery Barn? Upwards of $100 per shade! Mine though? It just costs about $15 or so!

    Knock Off Crystal Projects

    I love using crystals in my home decor. In fact, I love them so much that I found a way to make my own faux crystals and then I used them to embellish all sorts of things around the house.

    Crystal Knock Offs

    Crystal Embellished Vase

    Make any boring vase look like a million bucks with this project!

    DIY Crystal Knob Knock Offs

    DIY “Crystal” Knobs

    Add serious wow factor to doors with these beauties!

    Crystal Lamp Finial Knock Off

    How to Make a Crystal Lamp Finial

    I can never get enough good finials in my life! I love the glam touch this one adds to lamps.

    Faux Crystal Magnets Knock Off

    How to Make Crystal Magnets


    Refrigerators deserve a touch of glam too! These crystal magnets do the job perfectly!

    Knock Off Lucite Projects

    Lucite is another one of my favorite interior design elements. Again, high price tag though – here are some knock off lucite decor projects I did.

    Knock Off Lucite

    DIY Lucite Trays

    Less than $5 and oh so so so simple!

    Knock Off Lucite Frame

    DIY Lucite Frames

    Easy to make and you can snag that free printable too!

    Will you be adding any of these knock off decor projects to your list?

    Looking for more budget-friendly, high style ideas for your home?

    Seven Wall Treatments that Pack a Serious Punch – and not a one of ’em is shiplap!

    9 DIY Countertop Makeovers – budget friendly countertop makeover ideas!

    Classic Black and White DIY Projects for Your Home – black and white is always right!

    7 Super Simple, Super Cute Electrical Tape Crafts for Your Home – yep, using electrical tape!

    Want to come back to this list of ideas later? Just pin the image below!

    Knock Off Decor Projects

    Get more ideas on social media:

    Facebook | Instagram | Pinterest | Twitter

  • Primp and Pamper Bathroom Update: Week 3

    Primp and Pamper Bathroom Update: Week 3

    Another week of the bathroom makeover and another week of me not getting as much done as I’d planned on. 😜

    But…

    We do have fully painted trim and walls and……wallpaper!

    Wall Trim / Flooring / Wallpaper / Vanity

    I spent part of Sunday and all of Labor Day hanging wallpaper. I forgot how much of a chore it can be.

    I also realized that I was going to run short about halfway through. I hopped on my computer to order another roll and of course, it’s out of stock. Leave it to me.

    So, I did some very strategic wallpaper hanging and managed to get everything covered, albeit there are a couple of places where the design doesn’t exactly meet up, but they are in inconspicuous places.

    Wall Trim / Flooring / Wallpaper / Vanity

    I think the moldings have turned out beautifully since it’s all painted now. The vanity is set and the countertop is on – just have to put up that backsplash piece. Today is my first full day of actually being able to work without interruption this week, so I’m hoping I can get the new mirror and new pendant lights hung by the end of the day!

    Tomorrow, I’m going to be dropping off some art to get re-matted for the space.

    I found this at Goodwill for a whopping $3 and knew it was perfect for the space. The purple in the flower will tie in nicely with the vanity. It just needs a new frame and mats!

    I’m also working on some custom art for the space as well. I’m channeling my inner Super Trouper and creating some ABBA inspired art for the Circus since they are one of her favorite bands.

    If you want to see the full design plan, read this post!

    TO-DO LIST UPDATE

    • Remove old vanity and toilet. 

    • Install chair rail, wall moldings, etc. 

    • Paint from chair rail down – in progress!

    • Hang wallpaper above chair rail.

    • Switch out pendant lights.

    • Install new vanity, faucet, toilet, etc.

    • Hang new mirror.

    • Add trim to shower curtain – hopefully picking up tomorrow!

    • Install new shower curtain rod and hang new shower curtain.

    • Gussy Up the Step Stool

    • Revamp, Create and Hang Art

    Still a lot to do, but it HAS to be finished by next Thursday, so let’s see how well I work under pressure. 😜

    Be sure to see what all the other gals are up to this week!

    Jeweled Interiors | PMQ for Two | House Homemade | Effortless Style | Haneen’s Haven | Kaleidoscope Living

    Find me on social media!

    Facebook | Instagram | Pinterest | Twitter

  • How to Cover Damaged Bathroom Walls on a Budget

    How to Cover Damaged Bathroom Walls on a Budget

    Looking for a simple and super affordable way to cover damaged bathroom walls left behind by old wall tile? We’ve been there too. We had little budget and lots of damaged wall in one of our bathrooms. Our solution cost us less than $100 – and it looks great!

    It seems I’m becoming quite productive since my crew has returned to school. Case in point: this blog post. This was a project we completed over two years ago, alas I never actually got around to sitting down and writing the post.

    Back in June, I taught a local workshop on remodeling your bathroom on a budget. I included this project in it and as I was writing up the presentation, it was then I realized I had never actually posted about it. Go me!

    So, if you’re looking for a super affordable, easy to accomplish solution for bathroom walls (or potentially any walls) damaged from tile or that may have huge gaping holes in them for other reasons, here ya go.

    Cover Damaged Bathroom Walls

    When we got the farmhouse, the bathroom looked like this:

    How to Cover Old Wall Tile

    I knew that before even laying eyes on it, the bathroom was going to need to be updated. It hadn’t been in that great of condition when my grandfather passed nearly 20 years ago. As you can see, the tiles were coming off the wall – and in multiple places, not just in that one place you see there.

    While I would have loved to retile the walls, that simply wasn’t in the budget. However, something still had to be done about those damaged walls left from the full removal of the tiles.

    This post contains affiliate links for your shopping convenience. Click here to read my full disclosure policy.

    Budget Friendly DIY Fix for Damaged Walls

    Materials & Tools Needed

    Project Notes

    • You’ll need enough luan, baseboard and lip molding to cover your damaged walls.
    • For us, the luan panels had to sit on top of the baseboard in order to reach far enough up the wall to cover all the damaged areas. This meant we had to buy a little wider baseboard as well. This can vary from space to space. Measure your space before buying and cutting. You may even be able to install your luan panels first, then your baseboard in front of the panel if you have a shorter area of damaged walls.
    • If you are installing new flooring in the space, you’ll want to install the flooring first, then do this project.

    Steps

    Step 1

    If you haven’t done so already, remove all the old tile and any trim or baseboard from your walls.

    Easy Fix for Bathroom Walls with Old Wall Tile

    I don’t have a photo of the space after I removed all the tile, but you can get an idea from above just how rough everything was once I started digging in.

    Step 2

    Using a stud finder, locate and mark all the studs along the walls.

    Step 3

    Using a miter saw, cut your baseboard to size and install it around your space.

    Step 4

    Using a circular saw, cut the luan panels down to the length of your walls.

    Apply construction adhesive to the back of the panels.

    Attach the panels to the walls where studs are located using finish nails and a hammer or a nail gun.

    Push firmly along areas where there are no studs and just the construction adhesive.

    How to Fix Damaged Bathroom Walls

    Step 5

    Cut your top molding down to size and install it over the top of the luan panels so that it lips over the panels a bit.

    Step 6

    If you have an area where two pieces of luan had to be used on one span of wall, use a small piece of wall trim to cover the seam. You could use a simple piece of lattice molding for this. This wasn’t the case for us as it was a small bathroom and we didn’t have any walls longer than 8 ft.

    Step 7

    Caulk all the corner seams where the panels meet. Caulk along where the baseboard and luan panels meet. Caulk along where the top piece of trim meets the wall.

    Fill any nail holes and sand smooth.

    Step 8

    Prime everything and then paint!

    Small Bathroom Budget Remodel

    Light Fixture / Mirror / Vanity / Faucet / Towel Hook / White Towels with Blue Stripes

    We painted the top half of the walls a creamy white and then the luan panel portion of the walls in Shipyard.

    Covering Old Wall Tile in a Bathroom

    Light Fixture / Mirror / Vanity / Faucet / Towel Set

    We spent a little less than $100 for all the materials to cover the damaged portion of the bathroom walls – waaaaayyyy cheaper than replacing the tile!

    For all of you wondering how it’s held up: Since I’m just now getting around to writing this post two years after we did it, I can say it’s held up really well. Everything is still in place just as it was. To clean the luan paneled portion of the walls, I just wipe it down with a wet washcloth – my kid is notorious for banging her toothbrush multiple times against the sink edge after brushing her teeth resulting in little white dots everywhere.

    What do you think of this solution for covering damaged walls?

    You can also see where we did a similar version of this project, but stained the panels here!

    Looking for more budget friendly fixes for your home?

    Here are more bathroom remodeling ideas on a budget.

    Here are nine DIY countertop makeovers.

    Here’s an easy $25 solution for covering those ugly dated louvers on doors.

    And here’s another budget bathroom remodel you might get some ideas from!

    Want to come back to this project later? Just pin the image below!

    Covering Up Bathroom Wall Tiles

    Are you following on social media?

    Facebook | Instagram | Pinterest | Twitter

  • Easy DIY Room Divider

    Easy DIY Room Divider

    Looking for an easy way to divide a space without it being permanent? This DIY room divider screen might just be your answer! It’s super simple to make and it’s easily removable!

    I know many people are all about “open concept” when it comes to homes these days. People want their kitchen, living and dining areas to all be together and open and “flowy”.

    Me? Not so much.

    That being said, the main living area at our previous home, the Beloved Foreclosure, was open concept. In fact, we tore down a couple walls to make it that way. The kitchen, living and dining room were all open to another. For that house, it was best that way though – the rooms felt really closed in otherwise.

    I really love having a little division between my kitchen and living room now though. I can jam out to my heart’s content while cooking dinner and not bother a soul.

    While our kitchen at the 70’s Landing Pad is it’s own space, separated by walls, from the living room and dining room, the living room and dining room open up to one another. It’s obvious that they are meant to be two different “rooms,” but there are no walls.

    For a while, I’ve been wanting to separate this space more. Not put up walls, but have a more clear definition of where the living room ends and the dining room begins. I wanted to be able to “fancy up” the dining room a bit more than the living room without it looking like I had only gussied up part of the space and never did anything with the rest.

    Enter gorgeous room dividers.

    DIY Room Divider

    Rug / Art Piece / Dining Chairs (similar)

    These hanging room dividers were the perfect solution to my dilemma. Best of all, they are super easy to make (I used prefab panels!) and they are easily removable if you ever need to take them down for any reason.

    O’verlays provided the panels for this project, however all opinions are 100% my own. This post contains affiliate links for your shopping convenience. Click here to read my full disclosure policy.

    DIY Hanging Room Divider

    Materials Needed

    *A note about the panels: If you get your panels from O’verlays, you’ll want to contact them for a custom panel. Your panel(s) will need to be about 1 1/2″ – 2″ shorter than your ceiling height. You’ll also want to get the 1/2″ thick panels so they will be a bit more sturdy than the usual panel thickness. You can choose the width of your panels depending on your room and taste.

    *For reference, I have 8′ ceilings and my panels are 94 1/8″ tall x 12 1/4″ wide and 1/2″ thick.

    Steps

    Step 1

    O’verlays come painted white. If you would like your panels a different color, go ahead and paint them first.

    Lady with Chickens Art

    Step 2

    Install screw eyes on the top edge of each panel. Place a screw eye 1″ in from the outer edge on each side.

    If you get wider panels than mine are, you may want to put in more than two screw eyes per panel.

    Step 3

    Place drywall anchors in the ceiling where you will hang your panels. The anchors should be the same distance apart as the screw eyes you just installed are.

    Using a framing square will help you keep the anchors in line with one another.

    Step 4

    Screw a cup hook into each of the anchors.

    Hang the panel on the hooks by placing the screw eyes at the top of the panels onto the hooks.

    Red Drapes / Rug / Art Piece / Dining Chairs (similar)

    Not only did these create a visual separation of the two spaces, but they added a gorgeous touch of drama and architectural detail to the space.

    Red Drapes / Rug / Dining Chairs (similar) / Bar Cart

    You may have noticed that they even prompted a little mini dining room makeover – I’ll share that soon!

    If you ever want to take them down, just slide them off the hooks.

    Isn’t this such an easy way of separating spaces without big effort or serious construction? What do you think of them?

    Looking for more big impact, little effort projects?

    DIY Louvered Closet Door Makeover – cover up those dated, dust-catching louvers easily!

    DIY Lucite Handrail – huge wow factor, easy project!

    How to Make Laminate Countertops Look Like Stone – easy and will just cost you around $20!

    Want to easily come back to this project later? Just pin the image below!

    Are you keeping up with use on social media?

    Facebook | Instagram | Pinterest | Twitter

  • 6 DIY Kids Pretend Play Stations for Play Based Learning

    6 DIY Kids Pretend Play Stations for Play Based Learning

    Looking for great ways to get your kids away from the screen and instead up and using their imagination? These DIY pretend play stations for play based learning will help to do just that! On top of it all, you’ll probably score major brownie points with your kids for making these for them!

    Summer is just around the corner! Just a few weeks of school left here and then it’s quality time with the kid. I see lots of pool time, yard saleing and hammock time coming our way. 🙂

    That being said though, we all know that keeping them occupied all summer long can sometimes pose a challenge. It doesn’t take too long before we all start hearing the “I’m bored!” cries.

    Here are a few pretend play stations you can make your kids – these will keep them entertained for hours and hours! They’ll love you for making them. Your sanity will also thank you for making them. 😉

    What’s even better is that these play stations will foster learning and development through playtime! I know, right?! When I made these for my Circus, that wasn’t even necessarily the goal, but it happened anyway. 🙂

    DIY Imaginative Play Centers For Kids

    Kids Stage with Dress Up Area

    Pretend Play Stations for Kids

    Not only has this stage served as, of course, a stage, but it has also masqueraded around as a restaurant, doctor’s office, zoo and more. This DIY kids stage is a super simple build. The stage even has an area in the back that can be used for dress-up clothes.

    DIY Kids Activity Table

    DIY Kids Pretend Play Centers

    This play table is another project that can pull double duty. Here, it’s a barnyard, but it could easily be turned into a racetrack, building zone, Lego table and more. It’s also on wheels, so you can easily move it around. Attach some hooks and baskets to the sides for easy access storage and organization!

    Lemonade Stand

    Kids Pretend Play Stations for Learning Through Play

    There isn’t a hard thing at all about making this DIY lemonade stand! You’ll just need a couple of crates and a few pieces of wood. If you can drill a hole and make a straight cut, you’re good to go! This is perfect for those little entrepreneurs in your life. The Circus loves setting up her lemonade stand at yard sales and she doesn’t make chump change doing it either! She made $70 in one day doing it! When they aren’t creating their fortunes though, it also makes a great grocery play station.

    Space Saving Wall Mounted Desk

    Young Children Flip Down Wall Desk

    No doubt, this is one of the best things I’ve ever made my kid. This flip-down wall desk is great for small spaces. You can even hide away and organize all the art supplies inside!

    Dress-Up Closet from a Bookshelf

    Learning Through Play - DIY Kids Dress Up Station

    Keep the dress-up clothes out and within easy reach with this dress-up closet! I made this from a bookshelf – an easy hack! If you’ve got the space, you can even work a mirror into it. If the clothes would cover the mirror on the back of the closet, then mount the mirror on the side.

    Crate Wagons

    Learning Experiences - Kids Wagon Crates

    Forgive the holiday-esque vibe going on with this image. When I made and photographed these wagons, it was right around Christmas. The fun thing about these wagons made out of crates is that the kids can really get in on the building process here – the handles are made from PVC pipe, so they can figure out how to put it all together!

    Have you created any DIY play centers for your child?

    Tell us about them in the comments!

    More great ideas for kids and their spaces:

    Kids Bedroom Feature Wall – this is a great and unique way to incorporate their own little personalities into their rooms!

    Playroom Wall to Wall Shelves – colorful, easy to build shelves that are UH-MAZING for toy storage!

    Super Easy to Make DIY Headband Holder – this headband holder is perfect for keeping all those adorable headbands organized and within reach!

    Want to hang onto this post for later? Pin the image below then!

    Play Based Learning Projects

    Find me on social media:

    Facebook | Instagram | Pinterest | Twitter

  • How to Hide Cords with a Custom Patterned Cord Cover

    How to Hide Cords with a Custom Patterned Cord Cover

    Ready to find out how to hide cords easily and stylishly? Make your own DIY cord covers in patterns or colors of your choice to fit with your home decor. It’s easy!

    I love that so many gorgeous sconces are now available with a plug-in option as opposed to just a hard-wired option. That being said, when going the plug-in route, you’re often left dealing with dangling cords on the wall.

    Thus was the case with the sconces I used in my recent closet makeover.

    The sconces were beautiful, but that dangling cord was a distraction.

    I didn’t want to use just plain Jane as-is cord covers you can find at your local hardware store. Even if you paint the cord cover to match your walls, it’s still obvious that it’s there. So, I opted to embrace the cord cover but give it a colorful spin.

    How to Hide Cords

    Wall Mirror / Sconce

    Isn’t it a fun punch of color? I gave my cord covers a custom look to fit with my space perfectly – and it was so damn easy, y’all.

    This post contains affiliate links for your shopping convenience. Click here to read my full disclosure policy.

    DIY Cord Cover Tutorial

    Supplies and Tools Needed:

    DIY Cord Cover

    Steps

    Step 1

    Measure how long the cord is that you need to cover. Cut a piece of the cord channel to that same length.

    How to Hide Cords on Wall

    Cut a piece of the scrapbook paper to the same length of the cord cover you just cut and a little over 1 1/2″ wide. Note: If you have a wider cord cover than the one I used, you’ll want to cut your width wider. Measure as needed.

    Step 2

    Apply a thin coat of Mod Podge to the cut cord cover.

    How to Hide Lamp Cords

    After applying Mod Podge to the cord cover, immediately apply the cut paper to the cord cover, wrapping it around the cover. Leave the slit in the cord cover (where the cord will slide in) open. If your paper covers this slit, just trim the paper as needed.

    How to Hide Cords on Sconces

    Press the paper smoothly onto the cord cover. Give the now paper covered cord cover another thin coat of Mod Podge.

    Step 3

    After the Mod Podge has dried, trim off any excess paper from the cord cover.

    Custom DIY Cord Cover

    Apply 1-2 more thin coats of Mod Podge to the cord cover, letting it dry between coats.

    Step 4

    Once the cord cover is dry, push your cord into the cover through the slit on the side. Remove the paper from the self adhesive backing on the cord channel then firmly push the back of the cord cover against the wall to stick it in place.

    How to Hide Cords from Sconces on Walls

    Wall Mirror / Sconce

    These are so much better than having dangling cords or just a plain white cord cover!

    How to Hide Lamp Cords on Walls

    The extra little pop of color these DIY cord covers give is a fun touch for this space as well! If you’re wondering about that floating makeup vanity table, you can find out how to make it HERE! It even flips down for hidden storage. 😉

    Do you have any tricks to share for how to hide cords on walls?

    If you liked this project, you should take a look at these too…

    Wall Mounted DIY Makeup Vanity Table – a simple build!

    Complete Closet Makeover & Reveal – where these beauties you just read about reside!

    How to Cover Old Hardware Holes on Your Cabinetry and Furniture – you won’t have to worry about your new hardware holes matching up!

    16+ DIY Lamp Ideas and Makeovers – find out how to DIY your own lamp, lampshades, finials and more!

    Be sure to follow on social media:

    Facebook | Instagram | Pinterest | Twitter

    Pin This Post
    How to Hide Cords with DIY Cord Covers
  • Easy DIY Lemonade Stand with Video

    Easy DIY Lemonade Stand with Video

    Looking for kids lemonade stand ideas for your little one? I’m willing to bet this is THE most simple to build DIY lemonade stand you’ll find! It’s also pretty darn cute! See below for how to build a lemonade stand your kiddo will love and use for years to come!

    Sometimes life doesn’t hand you lemons.

    Sometimes it hands you an adorable little girl with blonde curls full of personality who also tends to lean on the “hustler” side.

    She comes by it honestly though, bless her heart.

    And even when life doesn’t hand her lemons, she still likes to make lemonade – pink lemonade.

    Exactly 12 hours before a yard sale we had in the spring, the little girl with blonde curls asked for a lemonade stand to sell lemonade at during the yard sale.

    There was simply zero time to throw all that together in under 12 hours though and there wasn’t a lick of anything to make lemonade with in the house.

    With a sad face, she settled for my promise to make her a lemonade stand for the next yard sale.

    I didn’t let her down.

    Easy DIY Lemonade Stand - use this tutorial to make a simple lemonade stand for kids!

    This was such a simple simple simple build, y’all. Honestly, it’s hardly a building project at all, you’re just putting a few pieces of wood together!

    This post is sponsored by Velvet Finishes, however all opinions are 100% my own. This post contains affiliate links for your shopping convenience. Click here to read my full disclosure policy.

    How to Make a Lemonade Stand

    Tools & Supplies Needed:

    how to make a lemonade stand - supplies - Rain on a Tin Roof

    Steps

    Step 1.

    Cut your wood to size.

    The 1″ x 4″ x 12′ should be cut into three different pieces in the following sizes:

    • 5 feet long
    • 5 feet long
    • 2 feet long

    After you cut both your five feet long pieces, you should have your 2 feet piece. You can cut these pieces using a circular saw, miter saw or a chop saw. You can also have your local hardware store cut these pieces to size for you before you leave the store.

    The plywood panel should be cut down to 11 5/8″ x 18″. You can cut this with a circular saw or table saw. You can also have your local hardware store cut it as noted above.

    The crates will stay as is. The video below provides a visual of the cuts as well.

    Step 2. 

    Time to paint!

    You’re going to paint all the 1″ x 4″ pieces and the plywood panel in Velvet Finishes Bold. You’ll paint the sides of the crates in Velvet Finishes Baroque and alternate between that color and Bold on the slats. We used Reviver paint brushes for the painting. They are really great quality that minimize brush strokes and don’t lose their bristles on your pieces.

    The video below will walk you through the cuts we noted above, the painting of the pieces and putting it all together. It also stars a pretty cute kid. 😉
    [adthrive-in-post-video-player video-id=”GbGcoL9N” upload-date=”Thu Aug 03 2017 18:39:34 GMT+0000 (Coordinated Universal Time)” name=”Easy Diy Lemonade Stand” description=”Use this tutorial for an easy DIY lemonade stand to keep your kids entertained and making their own money!”]

    Velvet Finishes paint doesn’t require a piece to be primed beforehand and it already has a topcoat built-in, so no need to worry with that. I had mentioned in the video that I might put on an additional topcoat on the counter, but in the end I didn’t worry with it and it weathered the first lemonade sale just fine.

    how to build a lemonade stand using crates - rain on a tin roof

    Helpful Tips & Hints: 

    • It took two coats of Velvet Finishes Baroque and about 3-4 coats of the Velvet Finishes Bold. Yellows tend to take more time to get the color even, especially on raw wood, so give yourself a little extra time there. This paint dries really fast though, so it doesn’t take too terribly long to get the paint on.
    • If you want to save on space after your kiddos have their lemonade sale, you can easily just unscrew everything and store it away. When you’re ready to use the stand again, just screw it back together using the holes you already made.
    • I made the “Landry’s Lemonade” with my Silhouette. After cutting it out, I mod-podged on the “Landry’s,” then hot-glued the “Lemonade” to string and taped it up.

    kids lemonade stand - easy to build - rain on a tin roof

    The lemonade stand was a big hit – the kid made $70!

    cute lemonade stand - diy project to make for your kids - Rain on a Tin Roof

    She would ask nearly every person that walked up if they would like lemonade or a treat. And really, who could tell her no?!

    Here’s to life not always handing you lemons so you can make your own pink lemonade and little hustlers in the making!

    Share your cute lemonade stand ideas in the comments!

    Want more great DIY ideas for your kiddos?

    DIY Children’s Stage with Hidden Dress-Up Storage – this one provides loads and loads of entertainment!

    DIY Dress-Up Closet from a Bookcase – great and easy way to store all those dress-up clothes!

    How to Create an Object and Feature Wall for Your Little One – the perfect accent wall for a kid’s bedroom!

    How to Build Wall to Wall Shelving Easily – we have these in my daughter’s playroom and they are a lifesaver when it comes to toy storage!

    Want to save this post to look at later? Just pin the image below! 

    Build a Lemonade Stand Using Crates - Easy - Rain on a Tin Roof

    How to Make a Lemonade Stand Using Wooden Crates - Rain on a Tin Roof

    SaveSave

    SaveSaveSaveSave

  • Power Tools 101: How to use a Circular Saw

    Power Tools 101: How to use a Circular Saw

    A circular saw is one of the more basic, versatile power tools. Below, you’ll learn about using a circular saw and it’s various parts. Before you know it, you’ll be teaching someone how to use a circular saw! 

    I have to admit – I was worried that the Power Tools 101 series may not be such a hit.

    I was wrong.

    And I’m so glad I was.

    I’m thrilled you guys are finding this helpful! We want to empower you to get your DIY on!

    By no means, am I pro at using every power tool in the book.

    I still ask Grunt Labor questions about them all the time and I still make him put on any new hinges for doors because it seems I always drill the holes for those in the wrong place.

    That’s ok. 

    I know the basics and for the most part, that’s all I need to know.

    With that being said, here are the basics of how to use a circular saw.

    Using a Circular Saw

    How to Use a Circular Saw - Basics of a Circular Saw - Rain on a Tin Roof

    Disclosure: Rockwell Tools sent me their compact circular saw and Versacut to review. However, all opinions are 100% mine. This post contains affiliate links for your shopping convenience. Click here to read my full disclosure policy.

    Please use all appropriate and proper safety precautions when using tools and attempting projects. All projects and tool usage are attempted at the reader’s own risk.

    If you are a first time circular saw user, I suggest that you have someone nearby who is familiar with circular saws when you first use it – just in case you have any questions and for safety’s sake. If you ever don’t feel comfortable cutting something, don’t do it. Wait until you have someone to help you who is comfortable with it. Power tools shouldn’t be scary, but you need to be careful with them at the same time.

    Also, and this is probably the only situation in which I will say this, no cheap beer (or your preferred poison) while using a power tool, y’all.

    And….always wear safety glasses when you cut something!

    Ok, let’s get started.

    Parts of a Circular Saw

    Grunt Labor and I have a few different types of circular saws.

    Using a Circular Saw - Parts of a Circular Saw - Rain on a Tin Roof

    The one we have had the longest and use the most is a Ryobi Cordless Circular Saw, which is pictured in the photo above. I’ve also noted the basic parts of the saw.  There are also corded circular saws available.

    I use our circular saw for longer cuts where it usually doesn’t matter if its perfectly straight or just cut little cuts.

    If you buy a new circular saw, you will most likely have to put the blade on. There will be instructions for this included, but all you do is remove that bolt in the center.

    Another thing to keep in mind when buying a new circular saw blade is that a blade with more smaller teeth will give you a smoother cut. If you select a blade with bigger and fewer teeth, then your cuts with a circular saw won’t be as smooth.

    How to change a Circular Saw Blade - Rain on a Tin Roof

    The blade guard will cover the bottom of the blade unless you move it.

    Circular Saw Blade Guard and How It Works - Rain on a Tin Roof

    Once you start sawing something, it will move around the blade as you saw.

    There are also functions on the circular saw where you can adjust the blade depth and angle.

    To adjust the blade depth, there is a knob on the back of our saw (I believe it is on the back with most saws).

    Adjusting the depth of a circular saw blade - Rain on a Tin Roof

    You simply turn it and the bottom plate will slide out.

    There is also a place to adjust the angle of your cut.

    Adjusting the angle of a circular saw cut - Rain on a Tin Roof

    This is on the front of our saw. This is used for bevel cuts.

    In all honesty, we rarely ever use these two functions on our circular saw. We tend to make bevel cuts on our miter saw, which I’ll cover in another Power Tools 101 post. Its just good to know those functions are there.

    Let’s get to the fun part – cutting.

    Cutting Wood with a Circular Saw

    When you go to cut something with your saw, you must push in the trigger on the side of the handle and pull the trigger on the inside of the handle to start the saw.

    Triggers on a Circular Saw - Rain on a Tin Roof

    Typically, you will push in that top trigger first, and then the bottom one while still pushing the top trigger.

    Before you cut something, measure and mark your line on your board or whatever you are cutting.

    Measure and Marking Your Lines When Using a Circular Saw - Rain on a Tin Roof

    Use that notch in the saw (as noted above) as a guide to keep your cut straight.

    When you begin to cut something, you will want to have the saw level, and don’t have the blade directly touching the wood – just barely by it as shown below.

    Cutting Wood with a Circular Saw - Rain on a Tin RoofYou will also have to pull up the blade guard when you first go to cut. Push your triggers and begin pushing the saw gently through your wood. Once you get your blade into your wood, you can release the blade guard and place that hand on the handle of your saw. If you are cutting something that is easily moveable, you may need to put that hand on the board to hold it steady, HOWEVER, keep your hands and fingers clear from the blade.

    And that’s all you do to cut. Easier than you thought?

    Other Types of Circular Saws

    We also have two other types of circular saws which we just got.

    Types of Circular Saw - Compact Circular Saw - Rain on a Tin Roof

    Rockwell Tools just sent us their compact circular saw (shown above). The compact circular saw is well, just that. Its a smaller version of a regular circular saw that is corded.

    It also has two triggers as a regular circular saw does.

    Using a Compact Circular Saw - Rain on a Tin Roof

    Since this compact circular saw is smaller, it is easier to maneuver.

    Rockwell also sent us their Versacut circular saw.

    Versacut Circular Saw - Rain on a Tin Roof

    The Versacut has a few more bells and whistles than the regular compact circular saw, however it is still a compact size. It can cut not only wood, but tile, pipe, and more. It is also corded.

    It also has a two part trigger system.

    Using a Versacut Circular Saw - Rain on a Tin RoofYou have to push that red trigger first and then the yellow one.

    It comes with an edge guide which allows you to get a straighter cut. You move the right part of the guide out and over your wood to the desired width.

    Using the edge guide on a compact circular saw - Rain on a Tin Roof

    It will move along the edge as you cut to give you a straighter cut.

    Kreg also makes a guide, which they call a Rip-Cut that you can attach to a regular circular saw and use as a guide.

    Using the laser on a compact circular saw - Rain on a Tin Roof

    The Versacut also has a laser guide which is really helpful if the guide isn’t big enough for what you are cutting. We haven’t really had a chance to dive into using the new compact circular saws yet, but so far I am pretty impressed with their bells and whistles.

    Any questions? Please leave them in the comments and I will do my best to answer them!

    Please leave your tips for using a circular saw in the comments as well! 

    Looking for more help with learning to use power tools?

    How to Use a Drill– it can actually do a whole lot more than you might think.

    How to Use a Miter Saw – one of my favorite power tools.

    How to use a Heat Gun and 15 things to do with it– another tool that has loads of different uses.

    How to use a Sander– a must have tool for furniture flippers. 

    Need tool suggestions? Here are the best tools for DIYers at any level.

    If you want to hang onto this post to refer to later, just pin the image below.

    Power Tools 101: How to Use a Circular Saw - Rain on a Tin Roof

    You know you don’t wanna miss any of this crazy.

    Stalk Me Here:

    Pinterest / Facebook / Twitter / Instagram

    Basic Info and How To for Using a Circular Saw - Rain on a Tin Roof

    SaveSave

  • Back to the Basics: Flatware Chest Makeover

    Back to the Basics: Flatware Chest Makeover

    Turn that dated flatware storage chest into a stunner with this easy flatware chest makeover. Don’t need silverware storage? No worries – these chests are great storage for all kinds of different things!

    In February, a few friends and I decided to launch a “Back to the Basics” blog hop – good and simple DIY projects that aren’t expensive, require simple materials, basic DIY skills and maybe the occasional power tool, but nothing too convoluted. 😉 That was when I showed you how to make the DIY bathtub tray with a book holder.

    I was thrilled with y’all’s response to the Back to the Basics projects! It seemed like these simple projects were things you were missing around “blog land” and guess what – we were missing them too!

    We are all back this month and have a few extra folks joining in as well and I think you’re going to love this round of basic DIY projects too!

    If you’re hopping over from Lauren at Bless’er House, welcome! Weren’t her scrap wood cutting boards awesome?

    This time around, I did a simple makeover project, that resulted in a big “wow” factor…

    Flatware Chest Makeover

    Isn’t that the sexiest flatware chest you’ve ever seen? ? After this makeover, I’m starting to think there isn’t much a glossy red can of spray paint can’t fix.

    This post contains affiliate links for your shopping convenience. Click here to read my full disclosure policy.

    Easy Silverware Chest Makeover

    Before we get started on how this silverware chest turned into a raging beauty, here’s a shot of it in its former state:

    Dated Silverware Chest Makeover

    Sad, wasn’t it?

    While I was a “Southern Belle” in one my preschool plays, there isn’t much that would classify me as one these days. However, my love for using great grandmother’s china on holidays, flanked by a good monogrammed napkin and my great aunt’s silverware might put me an inch or two closer to the title though. haha!

    I had been looking for a good sized silverware chest to hold everything for a while, but none I’d seen in retail stores had impressed me. When I found this one at Goodwill though for $5, I knew it had potential.

    Supplies and Tools Needed

    Steps

    Step 1

    Remove all the hardware from the chest. Sand the chest with a fine grit sandpaper to rough up the surface a bit in order to give the paint a better grip.

    Simple Silverware Chest Makeover

    If you are switching out the hardware, place your new hardware on the chest and make sure it will work with the old hardware holes. If it won’t, fill the holes with wood filler as needed, let dry, then sand those if needed.

    After you’ve done all the sanding, use a tack cloth to remove any sanding dust and particles from the chest.

    Step 2

    If you want to preserve the interior of the chest , use painter’s tape and plastic wrap to cover it and keep paint from getting on it.

    Easy Flatware Chest Makeover

    While the interior of my chest was not the prettiest of greens, I wasn’t up for relining it, so I taped the interior of my chest off.

    Step 3

    Apply spray paint to your flatware chest. I did about three coats of Apple Red.

    Step 4

    Attach the hardware. If you’re reusing the old hardware, just pop it back on. If you are doing new hardware, then drill new holes as needed.

    Red Flatware Chest Makeover

    The holes for the knobs on the front of the chest still worked fine for the new hardware there, but I did have to make new holes for the new handles I used on the side. Also, as you can see, I didn’t worry too terribly much about making those old holes completely flush – I knew the handles would hide them most of the time.

    Remove the tape and plastic wrap at this time as well. You knew that already though, didn’t you?

    Red Flatware Chest Makeover

    I used a few of my easy to make DIY selenite knobs as the hardware for the front. I love the contrast between the white stones and the red on the chest.

    Red Silverware Chest Makeover

    I had a couple of these brass cobblestone pulls left over from the built-in cabinetry in our master bedroom sitting area that worked perfectly for the sides of the chest.

    Vintage Silverware Chest Makeover

    If you don’t have a need for a silverware chest, then these would make excellent storage for so much more as well. You could easily just pull the inside lining and dividers out and put whatever you want to in them. In fact, I love how this one turned out so much that I’m going to be on the lookout for more to makeover and use as decorative storage.

    Vintage Flatware Chest Makeover

    Did you notice those lovely yellow napkins beside the chest?

    Monogrammed Napkins beside Silverware Chest

    Those are actually the Circus’ first set of specially monogrammed napkins! One of her chores is to set the table for dinner and when she discovered we had monogrammed napkins she could use, she had a ball choosing different ones each night. When I found a set of plain yellow ones, I told her she could have them monogrammed with her initials. She selected the design, font and colors herself. As I’m sure you guessed – we currently use those more than any of the other napkin sets we have.

    Up next on the Back to Basics Blog Hop is April from House by Hoff! You have to see the beautiful charcuterie boards she made!

    Catch up on all the Back to Basics projects this month below:

    Flatware Chest Makeover from Rain on a Tin Roof – You’re here!

    DIY Charcuterie Board from House by Hoff

    DIY Crock or Pottery from Thrift Store Canisters from So Much Better with Age

    DIY Wood Planter from The Turquoise Home

    Coffee Table to Bench Makeover from The Happy Housie

    DIY Cutting Boards from Scrap Wood from Bless’er House

    Follow on Social Media:

    Facebook | Instagram | Pinterest | Twitter

    Pin This Post
    Flatware Chest Makeover
  • Easy Step Stool Makeover with Scrapbook Paper

    Easy Step Stool Makeover with Scrapbook Paper

    Banish those basic step stools in just an hour or two with this idea for an easy step stool makeover using scrapbook paper and Mod Podge! You’ll make a huge difference for little effort and money!

    Making our closet more functional by adding more storage along the top of the closet system came with a little problem for this short girl.

    This post contains affiliate links for your shopping convenience. Click here to read my full disclosure policy.

    Easy Step Stool Makeover with Scrapbook Paper

    Green Velvet Baskets / Black and White Bins / Tassel Trim / Black Bins / Leopard Print Rug / Closet System / Velvet Hangers

    I was going to need a step stool to get to those baskets on top that I would occasionally need. I didn’t just want any basic step stool though – this was a great opportunity to add a little color, pattern and personality to the closet!

    Step Stool Makeover with Mod Podge and Scrapbook Paper

    I found a step stool on clearance and turned it into this beauty. This little step stool makeover was one of the most fun projects I’ve ever done. It was super easy too. 🙂

    Colorful DIY Step Stool Makeover

    Supplies and Materials Needed:

    Step 1

    If needed, spray paint your step stool first.

    Step Stool Makeover - Before

    Mine started out looking like this and that most definitely would not work for my closet. 🙂 The entire stool won’t be covered with scrapbook paper; you’re going to have some of the edges showing, so pick a color that works well with your scrapbook paper.

    Step Stool Makeover using Scrapbook Paper and Mod Podge

    I gave my stool a couple coats of semi-gloss white spray paint as I knew that would be a safe bet to go with my tropical leaves paper.

    Step 2

    After the paint has dried, lay out one piece of your scrapbook paper along one of the steps.

    Easy Step Stool Makeover

    Fold the paper over the step front to create a crease.

    Put the paper on the cutting mat and place the ruler a little ways in from the crease.

    Simple Step Stool Makeover with Scrapbook Paper

    Cut along the edge of the ruler. You want to leave a little space between the ruler and the crease to have a border of the white on the stool around the paper. To me, doing this just makes it look more finished.

    Step 3

    Put a coat of Mod Podge on the step you just cut the paper for.

    Step Stool Makeover with Mod Podge

    Apply the paper to the step and put a coat of Mod Podge on top of the paper as well.

    Easy Step Stool Makeover

    Step 4

    After the Mod Podge has dried, apply one more coat over the paper.

    Step 5

    Repeat the above process on each step and the sides of the step stool.

    For the sides of the step stool, I had to use two sheets of paper as shown below.

    Colorful Step Stool Makeover

    Again, remember to cut the paper slightly smaller than your creases to allow for a white border around the paper.

    Step 6

    Once you’ve applied all the paper, coats of Mod Podge and everything has dried, you’re ready to apply the upholstery trim.

    Simple Step Stool Makeover

    To do this, simply run a small bead of hot glue around the edges of your step stool, then apply the upholstery trim.

    Easy Step Stool Makeover with Scrapbook Paper

    Leopard Print Rug Here – only $15!

    Isn’t this the happiest little stool you ever did see?

    See the full closet makeover HERE!

    Want more great, but simple DIY projects?

    DIY Agate Slice Lamp Finials – you won’t believe how gorgeous these are, but how simple they are to make!

    Duck Tape Fringe Pillow – add fringe to anything on the cheap by making it with duck tape!

    Pin This Post
    Easy Step Stool Makeover with Scrapbook Paper and Mod Podge

    Join the Freak Show On…

    Facebook | Instagram | Pinterest | Twitter

  • DIY Makeup Vanity Table

    DIY Makeup Vanity Table

    If you’ve been longing for a space to sit and do your makeup that’s functional, pretty, and doesn’t take up too much space, then I’ve got an easy build for you – a DIY makeup vanity table! This vanity table is wall-mounted so it keeps the space light and airy. And did I mention it also has hidden storage?!

    My favorite part of our recent closet makeover has nothing to do with clothes. However, the fact that we finally got all the clothing and shoes organized allowed for this little nook to happen…

    DIY Makeup Vanity

    My favorite part of the closet is my little makeup vanity area. It makes me happy and it’s something I needed in here. I’ve always done my makeup in the closet because it has better lighting than our bathroom. A month ago, you would have found me sitting criss-cross applesauce on the floor in front of the mirror attached to the back of the closet door.

    Now you’ll find me getting pretty here. 🙂

    This DIY vanity table is a pretty simple build. I had it fully built and the paint drying within a few hours time, then hung it on the wall the next day. All you’ll need to know to build a makeup vanity like this for yourself is how to make a few simple cuts and use a drill.

    Oh, and did I mention it has storage?!

    This post contains affiliate links for your shopping convenience. Click here to read my full disclosure policy.

    Wall-Mount DIY Vanity Table with Storage

    My DIY makeup vanity is 36″ long, just a tad over 12″ deep and 5 1/2″ thick. You can alter the length pretty easily if needed. If you want to alter the other dimensions, you’ll have to switch up your wood sizes below and reconfigure accordingly.

    Supplies Needed:

    Tools Needed:

    Step 1

    Cut each of your 1″ x 12″ pieces down to 36″ long.

    DIY Vanity Table

    These pieces will be the top and bottom of your vanity table.

    Step 2

    Take one of the 1″ x 12″ scraps you just cut. Cut two 4″ pieces from the scrap.

    DIY Makeup Vanity Table

    These two 4″ pieces will be the sides of your vanity table.

    DIY Makeup Vanity Table

    Step 3

    Put wood glue along one cut edge of each of the 4″ pieces you just cut.

    Build a Makeup Vanity
    DIY Vanity Table with Storage

    Attach one 4″ piece to each end of one 36″ long piece using your brad nailer or finish nails and a hammer.

    DIY Makeup Vanity with Storage

    Step 4

    Flip over everything you just put together.

    Wall Mounted DIY Vanity Table

    Run glue along the remaining cut edges of the 4″ long pieces. Place the remaining 36″ long 1″ x 12″ on top and nail together.

    Wall Mounted DIY Makeup Vanity Table

    Clamp the ends together while the glue dries.

    Build a Wall Mount Makeup Vanity

    Step 5

    Cut the 1″ x 6″ down to 36″ long. Set aside.

    Cut the 2″ x 2″ down to 34 1/2″ long. Set aside.

    Step 6

    After a few hours, paint both the vanity table and the 1″ x 6″ piece you cut. I used a semi-gloss black color and gave my pieces three coats. You don’t have to paint the 2″ x 2″ piece as it won’t be seen.

    Mounting the DIY Vanity Table to the Wall

    Step 7

    Go to the wall where you are hanging your vanity table. From the floor, measure up 29 1/4″ and mark in several places. Use a stud finder to locate and mark your studs around that 29 1/4″ area.

    Mounting a DIY Makeup Vanity to the wall

    Attach the 2″ x 2″ to the wall at 29 1/4″ high using your drill with the 3 1/2″ long screws where the studs are. Place a level on top of the 2″ x 2″ to make sure it’s level. Adjust as needed.

    This will allow your makeup vanity to sit at 30″ high. If you want it higher or lower, adjust as you wish.

    Step 8

    Determine which side you want to be the back of your table. Attach the corner braces on the inside of the back of the table where the studs are located on the wall.

    DIY Wall Mounted Vanity Table with Storage

    To do this, I held my table up on top of the 2″ x 2″ and made a few pencil marks on the table where the studs would meet up. As you can see, these corner braces may not be evenly space on your vanity table. That’s ok. Really, you might not even need these. I just wanted to add a little extra support for the bottom of the table.

    Step 9

    Lay the 1″ x 6″ face down in front of the vanity table. Attach the hinges as shown below.

    DIY Wall Mount Makeup Vanity

    Step 10

    Place the makeup vanity on top of the 2″ x 2″. Secure the table to the 2″ x 2″ by first drilling pilot holes along the back of the table and then fastening the table to the 2″ x 2″ with the 1 5/8″ long construction screws.

    DIY Wall Mount Vanity Table

    Do this also on each side of the vanity table in the top back corner where the 2″ x 2″ would meet the table.

    Step 11

    Open up the front panel and fasten the corner brackets in the back to the wall using the 3 1/2″ long construction screws.

    Attach your hardware knob to the front panel as well.

    Fill any screw holes with putty and touch up paint as needed.

    DIY Makeup Vanity Table with Storage

    Mirror / Sconces

    This DIY vanity table is just the right size for me. Its small profile that attaches to the wall keeps things open and airy in the closet.

    Build a makeup vanity table with storage.

    Zebra Art Print / Leopard Print Rug / Brass Brackets for Hats / Single Clip Hangers for Hats

    Plus the drop down front provides plenty of storage for all my makeup.

    DIY Vanity Table with Storage

    Brass Stool / Mirror / Plug-In Wall Sconces

    The baskets easily slide in and out as needed.

    DIY Makeup Vanity

    Of course, the mirror and sconces do their fair share of upping the “wow” factor in this space. 😉

    See more of the closet makeover HERE!

    Looking for more easy build projects?

    DIY Bathtub Tray with Book Holder – minimal cuts and easy assembly!

    DIY Chippendale Desk – one of my most favorite projects ever! A beautiful desk that doesn’t come with an expensive price tag!

    DIY Modern Rustic Bookshelf – a great bookshelf with good storage and a simple build.

    Pin This Post
    DIY Makeup Vanity Table

    Join the Freak Show On….

    Facebook | Instagram | Pinterest | Twitter

  • DIY Bathtub Tray with Book Holder

    DIY Bathtub Tray with Book Holder

    Need a place to rest your book and your wine glass during bath time? This DIY bathtub tray is the perfect perch for just that! You can make this bath tray with a book holder using basic DIY skills and for about $20.

    If you read my Caftans and Cocktails post, then you may remember I talked about how I wanted to share more simple DIY projects this year – doable, non-expensive projects that require simple materials, basic DIY skills and maybe power tools occasionally – but no fancy ones.

    Good, simple DIY.

    As promised, I’ve rounded up a few of my favorite blogger friends and we are going to share with you a simple DIY project every other month throughout the year. We are all really excited to “get back to our roots” so to speak.

    If you’re coming over from Laura’s blog, The Turquoise Home, welcome! She is giving a great tutorial today on how to patch holes in drywall, so if you haven’t been there yet, be sure to after you leave here. There are also links at the end of this post to all the other bloggers getting back to the basics today as well.

    My project today is actually the brainchild of the Circus…

    DIY Bathtub Tray with Book Holder

    A DIY Bathtub Tray

    Right around the first of the year, she proclaimed that she needed a tray in the tub so that she could sip on her drink and read a book while bathing. And while she was a touch dramatic about it, I did think it was a pretty damn good idea. Since she insists on using my bathtub, I might as well make something that’s going to benefit not only her, but me too in the process.

    We wanted a bathtub tray that had a book rest, as well as a rim to help keep things from getting bumped and easily falling overboard. We were able to make this one for about $20, a little wood glue and some (very easy and simple) cuts.

    This post contains affiliate links for your shopping convenience. Click here to read my full disclosure policy.

    DIY Bathtub Tray with Book Holder

    Obviously, bathtub sizes differ. Our tray was made to fit a bathtub that is 31 1/2″ wide, outside edge to outside edge. You can easily adjust the measurements with this tray to fit any size bathtub. 🙂

    Supplies and Tools Needed:

    • 1 – 12″ x 3′ Pine Board or another similar board of your choice. I went with this one because it was the cheapest good piece of wood I could find in the length I needed. This bad boy was only $7 y’all. It’s my new go-to wood for projects.
    • 1 – 1″ x 2″ x 8′
    • 1 – 1″ x 2″ x 4′
    • Wood Glue
    • Long Bar Clamps or Hammer and Finish Nails or Nail Gun (I used just clamps, but if you don’t have those, you can use one of the other options to keep the boards in place as the glue dries.)
    • Circular Saw or Chop Saw or Miter Saw (you are only having to make straight cuts, so any one of those will do)
    • Handles – I used these screen door handles because they were the cheapest and still looked good.
    • Spray Paint in Color of Your Choice – mine is Krylon Peacock Blue
    • Drill

    Step 1

    Cut your big board, the 12″ x 3′ pine board, down to 33 1/4″. If your bathtub is not as wide as mine, then I suggest cutting the board down to where you have about a 1 1/2″ overhang on each side.

    Step 2

    Cut two pieces of the 1″ x 2″ x 8′ down to the length of the long sides of your tray base, the board you just cut. If you’re following my same dimensions, this should be 33 1/4″ as well.

    DIY Bath Tray with Book Holder

    Step 3

    Run wood glue along each long side of the tray base.

    DIY Bathtub Tray

    Place each of the 1″ x 2″s you cut along the edges of the tray base where you applied the glue and clamp together.

    DIY Bath Tray

    Be sure that the bottom of the 1″ x 2″ pieces are flush with the bottom edges of the tray base as shown below.

    Simple Bathtub Tray

    Let the pieces stay clamped together for a few hours or so.

    Step 4

    Cut two more pieces of 1″ x 2″ from the same 8′ long strip you already cut down to the width of the tray. If you’re following my exact measurements, this should be 13 9/16″.

    Simple DIY Bathtub Tray

    Apply wood glue to the short edges of the tray base, just as you did on the long edges. Put the 1″ x 2″ pieces you just cut along the edges and clamp together.

    Easy DIY Bath Tray

    Let the pieces stay clamped together for a few hours.

    Step 5

    *Note: This step creates wood blocks to go on the underside of the try to prevent it from getting knocked over the edge of the tub. If you aren’t concerned with this, you can skip this step. I however have a crazy six year old – we need them. 😉

    Take the uncut 1″ x 2″ x 4′ and cut two 6″ long pieces from it.

    Simple DIY Bath Tray with Book Holder
    I used scrap wood here, so disregard how it looks different than regular 1″ x 2″.

    Flip the tray over and using wood glue, attach each of these pieces 3 1/2″ inside from the short outside edge of the tray.

    Easy DIY Bathtub Tray with Book Holder

    Carefully flip the tray back over on a level surface and then place heavy objects on the tray and let it sit for a few hours.

    How to Make a Bathtub Tray

    Step 6

    Sand the tray smooth as needed.

    How to Make a Bathtub Tray with a Book Holder

    Caulk around the inside edges of the tray.

    Bathtub Tray with a Book Holder

    Step 7

    With the remaining 1″ x 2″ x 4′, cut two pieces that are each 10 1/2″ long.

    Apply wood glue to the “skinny side” of one of these pieces and place it in the center of one of the long edges of the tray, atop the edge as shown below.

    DIY Bath Tray

    Use clamps to hold it in place for a few hours.

    Step 8

    Take the remaining cut 10 1/2″ long 1″ x 2 piece, apply wood glue to the skinny side and place it in front of of the 1″ x 2″ you just attached to the tray edge. I placed mine 3 1/2″ out from the tray back so it could accommodate thicker books. You can play around with it before gluing it to decide where your piece would best fit.

    Place something heavy on top of this piece after gluing it to keep it set in place as it drys.

    DIY Bathtub Tray

    I didn’t have clamps that would fit around the back of the tray and over to this piece, so we got creative.

    Step 9

    Spray paint your tray – I did about three coats.

    Step 10

    Attach your handles to the short sides of the tray. I do suggest drilling a pilot hole first so you don’t crack the wood with the hardware screws.

    DIY Bathtub Tray with Book Holder

    Bathtub / Tub Faucet / Art Above Tub

    DIY Bath Tray with Book Holder

    We love how our tray turned out and have already put it to use! The only complaint from the Circus was that she didn’t get her bright turquoise paint on it.

    DIY Bathtub Tray

    I told her if she was going to always hijack my tub, then she was going to have to compromise on the paint color. 😉

    DIY Bath Tray

    Here’s to simple DIY projects that also prove themselves to be quite functional. Be sure to head over to Making Home Base and see how simple it is to frame a canvas! Don’t miss the other Back to the Basics DIY Projects below as well:

    Back to the Basics DIY Projects

    DIY Framed Canvas at Making Home Base | Settee Makeover at So Much Better with Age | How to Patch Drywall at The Turquoise Home

    Pin This Post
    DIY Bathtub Tray with Book Holder

    Join the Freak Show on: 

    Facebook | Instagram | Pinterest | Twitter

  • DIY Silhouette: How to Make a Silhouette The Easy Way

    DIY Silhouette: How to Make a Silhouette The Easy Way

    I have always loved a classic piece of silhouette art – especially when it’s my kid! When I wanted to make a silhouette art wall in our home, I figured out how to make a silhouette myself. And you know what? It’s easy! Find out how to make your own DIY silhouette below! 

    Remember last week, when I showed you my DIY tassel garland?

    You, do? Good.

    And remember in that same post, I said that if all went according to plan, I would show you how I did my silhouettes?

    You, do? Good.

    Well, you are about to see how to make a silhouette. But, over the course of the week, all has not went according to plan with the silhouettes. You see, the other day, I was just sitting at my dining room table minding my own business, trying to be a good blogger, when out of nowhere one of those silhouettes fell right off the wall. And the glass shattered into a million little pieces.

    No lie.

    And what’s weirder? There was no apparent cause for this fall. Nope, the nail was still in the wall when I went over there and the hook was just fine on the back of the frame.

    Strange.

    Do you believe in ghosts?

    I believe in ghosts.

    I think my Pap was just bored and trying to entertain himself at my expense.

    Just wait until the end of this post to call the asylum on me, you’ll want to see this first.

    DIY Silhouette Wall Art - an easy way to make your own silhouette art.

    So, here is the story of my silhouette wall and and the easy way to make silhouette art.

    How to Do a Silhouette

    This post contains affiliate links for your shopping convenience. Click here to read my full disclosure policy.

    First off, I only made one of those silhouettes on the wall.

    How to Make a Silhouette Easily

    Mine and Grunt Labor’s silhouettes were both made when we were kids. I smuggled mine away a long time ago and when Mama (Grunt Labor’s mom), found out I wanted a silhouette wall, she went and dug out his from long ago. Both of ours may be considered antiques by now.

    Heaven, help. If anyone asks, I’m 25.

    That’s my story and I’m sticking to it.

    I digress. So, all I needed was a silhouette of the kid.

    Materials Needed:

    • Side Profile Photo of the Person You Are Making a Silhouette Of
    • Printer
    • Black Paper
    • Scissors
    • Contrasting Paper for Mounting the Silhouette On
    • Mounting Squares

    Steps

    Step 1

    The first thing you’ll need is a side profile photo of the person you are making a silhouette of. You’ll want to have the person turn to their side, stand in front of their side straight on and snap a picture.

    In a rare moment of stillness, I snapped this side profile of my kiddo.

    How to Do a Silhouette - Snap a picture of the person.

    Step 2

    After I had my image, I loaded it onto my computer and cropped it around just her face using Picmonkey.

    Easy Way to Make Silhouette - side profile shot of person.

    I also turned it black and white, because all I have is a black and white printer. That’s not necessary of course.

    After you’ve cropped your image, save it to your computer.

    Step 3

    Next, open up a blank word document. Insert the picture you just cropped and saved into the document and make it just about as big as the whole page, then print it out.

    Step 4

    Using scissors, cut out the profile from the image you printed out. Also, cut a kind of curve into the chest of the person’s profile.

    How to Do Silhouette Art - cutout of person's profile.

    No, she doesn’t have a golden dinosaur growing out of her head. When I was done with the silhouette, I just popped it on my craft room wall with one of those push pins from my sassy message board.

    Step 5

    Lay the cut-out silhouette on black cardstock, trace the outline onto it and then cut it out.

    Of course, you could also use white paper or colored paper to do your silhouette. Black is just the traditional color.

    Step 6

    Mount your silhouette onto a contrasting piece of cardstock or paper.

    Silhouette Easy Art

    I spray painted frames gold I already had and mounted the silhouettes to scrapbook paper to serve as a mat. I like the unexpected pattern it adds to the art.

    And that my friends, is the easy way to make a silhouette.

    Do you have any tips for how to do silhouette art?

    Share them in the comments!

    Need more easy DIY art ideas?

    Monogram Photo Art – super easy wall art using your own photos!

    Free Printable Find Her Jesus Keep Her Well Art – perfect for those little girls in your life!

    DIY Wall Decor from a Gift Bag – there are some gorgeous gift bags out there these days!

    And here’s my trick for hanging heavy frames, mirrors and more!

    Want to come back for the instructions later? Just pin the image below! 

    How to Make Silhouette Art the Easy Way

    You know you don’t wanna miss any of this crazy.

    Stalk Me Here:

    Pinterest / Facebook / Twitter / Instagram