After a month hiatus, I’m back with another round of Power Tools 101.
This month is an easy one – How to Use a Sander.

This post contains affiliate links for your shopping convenience. Click here to read my full disclosure policy.
There are lots of different types of power sanders, but my go-to pick is a sheet sander. Its very versatile and unless you have a huge job, it can take care of just about anything.

I personally own and use a DeWalt Sheet Sander. I bought mine after having borrowed a friends. I loved it and knew I wanted my own.
How to use a Sander
To use a sander, you really just need to know how to attach the sandpaper to the sander.
First, locate the metal (usually, metal) locks on the sides of the sander. Pull down and out on each lock.

When you pull down and out on each lock, you will release the end clasps which will hold the sandpaper in place.
Take a sheet of sandpaper and tear it into fourths.

Take one of the fourths and place it onto the bottom pad of the sander.

Tuck the sandpaper under each end clasp and lock down.
My sander’s power button is on the top.
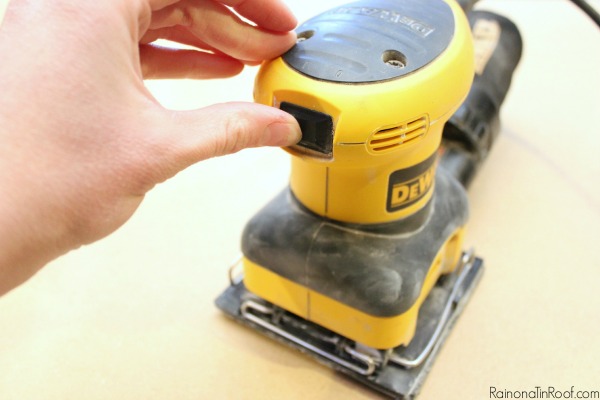
Plug it in, flip the switch and you are ready to go.
Sometimes the biggest struggle in using a sander is determining which grit of sandpaper to use. Here’s a breakdown:
Fine Grit (180 – 320 Grit)
• Use between topcoats to get a very smooth finish
Medium Grit (100 – 150 Grit)
• Surface Leveling & Smoothing
• Sanding door edges that don’t close properly
• Distressing furniture
• Preparing furniture for paint
• Rounding wood edges
Rough Grit (60 – 80 Grit)
• Paint Stripping
• Remove rust
Do you have any tips or tricks for how to use a sander or other uses for it?
Need more Power Tools 101 posts?
How to Use a Heat Gun and 15 Things It Can Do
The Best Tools for DIYers at Any Level
You know you don’t wanna miss any of this crazy.
Sign up to get my posts delivered to your inbox here.
Stalk Me Here:
Pinterest / Facebook / Twitter / Instagram


Tiffany says
Hi, Jenna ~ How did you know that just this weekend I told my husband that I needed a “real” sander, because I have a lot of DIY projects coming up? I especially love the part about which sandpaper to use when! Thanks for the well-timed tips! :0)
Jenna @ Rain on a Tin Roof says
Awesome, Tiffany!! A good, “real” sander is SO worth the investment! You won’t be disappointed!
Lisa says
The first lesson I learned using a sander was to be sure you are holding it when you turn it on so it doesn’t go flying away! LOL
Jenna @ Rain on a Tin Roof says
hahaha! Amen, sister! I’ve been there!
angela@spinachtiger says
Here’s what I’ve always wanted to know. What’s the difference between a power sander and an orbital sander? Or is there.
Jenna @ Rain on a Tin Roof says
They are both power, Angela. In fact, the sander I have, I think is technically classified as an orbital sander. There is another sander called a random orbit sander, which is round and moves around differently than the one I have.
chris aka monkey says
having a power sander is so worth it even a small palm sander beats using a sanding block or sand paper and sanding your fingerprints off great post xx
Jenna @ Rain on a Tin Roof says
Amen, sister!
Kitsy Keel Smith says
Hi Jenna, it’s Kitsy here. I got a DeWalt sander for Christmas and have been having so much fun with it. Mine is the round type and the sandpaper disks just adhere to the wheel. So easy. Love the little bag for catching dust too. I wash mine every time I use it so it’s ready for the next project. Thanks for the tips on which type of paper to use. Really helpful. Have asked for a soldering iron for Mother’s day. To be used mostly in repairing parts of my sewing machine collection.
Jenna @ Rain on a Tin Roof says
Girl, if you get a soldering iron, you will be a step above me! That’s one tool I don’t have!
Vera says
Hi, Jenna. I have not done any projects before, but i am trying to give it a start. Right now i am only doing a research on how-to’s, materials and tools, etc.
The question is, what sander to use: square or orbit? What is the difference in use and results between the one you use and orbit one?
Thank you in advance !!!
Jenna @ Rain on a Tin Roof says
I use a square one, Vera. I know of lots of other people who prefer orbits though. I think it’s just a personal preference thing.
Robert says
I’ve been woodworking for years and the best trick I found is to get a “sandpaper cleaner.” It is a block of rubber that you can use to clean your sandpaper. It doubles or triples the life of the sandpaper. When you think it’s time to change sheets, just sand that rubber block and it makes it almost new. I got mine from sears for like $6. You can also use an old rubber shoe sole although it doesn’t work as good.
Jenna says
Thanks for that tip, Robert! Had no idea you could do that!
Rhonda says
Thanks for sharing this information. I’ve just started to purchase and refinish furniture, so this post is perfect. Hope you will linkup on my Sunday’s Best linkup again. Love your posts.
Jenna says
Awesome, Rhonda! Glad it was helpful!
Rita Jadwisiak says
Love this.. so helpful. But I do have a question.. I have several orbital (round) electric sanders and they all end up the same. …the sand papers quits adhering..there are times I literally goes flying off.. HELP!!I.m at wits end and just don’t know what I’m doing wrong. Rita