A drill is one of the most versatile power tools a person can own. The best thing about it? Learning how to use a drill isn’t hard at all. Besides it being versatile, using a drill is pretty easy.
About a month and a half back, I was chatting with Gina from The Shabby Creek Cottage and attempting to bribe my child to be quiet with a popsicle so I could actually hear what Gina was telling me. I finally figured out we were troubleshooting what she should hang on a blank wall in her living room.
One thing led to another and before we knew it, we were planning a Power Tools 101 series.
Why?
Because we’re bad asses like that.
And we are ADHD.
Ok, that’s not really the reason.
The real reason is because we think that every woman (and all 3 men who read my blog, but don’t need this post – Hi Dad, Dad, and Grunt Labor) should know the basics of power tools.
Why should you know the basics?
Because you are a bad ass.
And every bad ass knows their way around power tools.
Once a month, Gina and I are each going to cover a different power tool. We are going to show you the basics of how the tool works and what it can do.
This month, I am giving you the basics on cordless drills and Gina is sharing the how-to for a jigsaw.

This post contains affiliate links for your shopping convenience. Click here to read my full disclosure policy.
Please use all appropriate and proper safety precautions when using tools and attempting projects. All projects and tool usage are attempted at the reader’s own risk.
First off, the photo above is of the actual drill that we have – a Ryobi One Plus 18V. So far, it has worked really well for us.
Using a Drill
Parts of a Drill
I’m sure I don’t have to tell you where the trigger is or that it makes the drill “go,” but just in case, here ya go…

There is a button on each side with an arrow. You push it back and forth and it controls which direction the drill drives – reverse (counter clockwise) or forward (clockwise). You can also think of it as going inward (clockwise) when drilling into wood or attaching screws or outward (counter clockwise) when pulling a drill bit back out of wood or removing a screw.
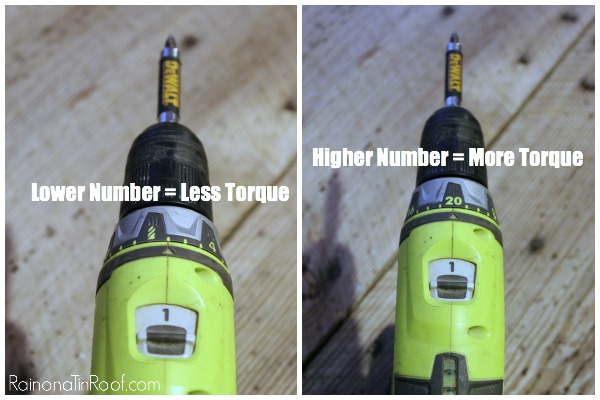
Our drill has a dial on top that controls the torque (power / force) that the drill drives with. The lower the number, the less torque and vice versa. Typically, I keep the drill on the lowest number, unless I am drilling into something pretty hard that I need more power with.
What a Drill Can Do
Driving Screws with a Drill
When you are driving a screw, you will want to use a screwdriver bit in the end of your drill that matches the type of screw you are driving. Most likely, you will need to use a straight or a phillips head drill bit.

And here are what some screwdriver bits look like:
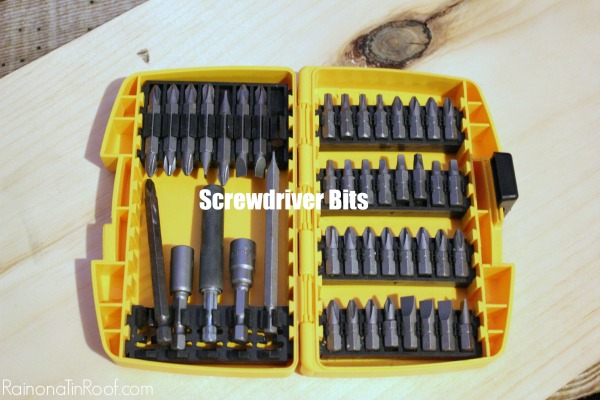
This is one set of screwdriver bits we have – a 45 piece set from DeWalt – it has just about any shape or size you could need.
To insert a bit into your drill. Hold your hand firmly around the front part of your drill keeping it still while running the drill in reverse (#1 below). The opening will get larger as you continue to go in reverse (#2) and smaller as you go forward (#3).

When the opening is big enough for your bit to fit in, but small enough for it not to fall too far in the hole, place your bit in the opening, hold your drill firmly as you did before and run the drill in the forward (inward) motion until the bit is securely in the drill (#4).
You can also twist the front part of your drill to release and tighten bits into the drill.
As a side note, Grunt Labor and I have a screw guide that we keep on our drill just about all the time. You put it in and remove it the same way you do a regular drill bit.

Once you place a screw on the bit, you pull the sleeve over the screw and it helps to keep it stable while you are drilling the screw. The cover moves itself back as the screw goes into your surface. A screw guide isn’t necessary, but is super helpful with getting your screws in straight and not having the screw fall off the bit a million times – especially with long screws.
Ok, now that we have a screwdriver bit in the drill, let’s put the screw into the wood. Hold the drill straight (the picture below is not a good example of this because I was taking photos with one hand and using the drill with the other), firmly push down on the drill and pull the trigger at a slow and steady pace.

To remove screws, simply place the screwdriver bit into the screw you are removing, push the button on the side of the drill to make the drill go in the counterclockwise direction and pull the trigger.
How to Use a Drill Bit
Drilling Pilot Holes
Sometimes, you may want to drill a pilot hole before placing your screw directly into the wood. Pilot holes keep your wood from splitting. You will do this with regular drill bits that make holes.
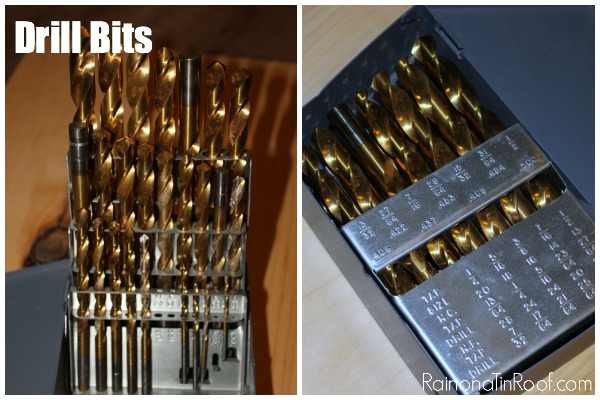
The above set is one that belonged to Grunt Labor’s grandpa and it is great. This set would also be a good option that has just about any size you would ever need.
To drill a pilot hole, select a drill bit that is a little smaller than the tip of your screw. Place the bit in your drill using the same method you used for putting the screwdriver drill bit in place. One more, firmly press down straight onto your drill, while pulling the trigger with a firm and steady motion to start drilling and create your pilot hole (#1 below).

After your pilot hole is drilled, reattach your screwdriver bit and drill the screw in. If you want to really look like a pro, before putting the screw back in, you can take a larger drill bit, the size of the screw’s head (#2 above) and drill out just a tad bit more where your pilot hole is (#3 above). You just want to drill out enough to where the screw’s head will sink into the wood (called counter-sinking). Once you have done this, drill your screw in and place wood putty on top of the screw – you won’t even be able to tell the screw is there (#4 above).
More Useful Drill Bits
There are other fun and useful bits you can use with a drill, like a spade drill bit.

Drilling a hole with a spade drill bit cuts out circles in wood. You can also get hole saw bits which cut out much larger circles – you can use them for things like cutting out drink holders in a swing.
And if you need to mix up something large, you can use a mixing bit.
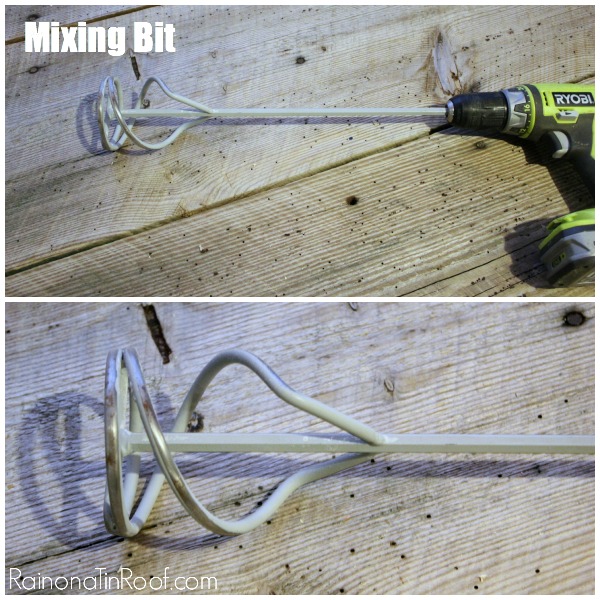
Mixing drill bits are super handy for mixing grout, paint, and huge batches of cookies.
Well, I haven’t tried the cookie thing, but I’m pretty sure it would work.
Not too hard, huh?
Seriously, anyone can use a drill. Anyone.
Just don’t let your two year old play with it…. you may end up with a few holes in the wall….not like that’s ever happened to me or anything…
Head over to The Shabby Creek Cottage for a crash course in using a jigsaw – now you get to cut stuff!
Got any tips on how to use a power drill?
Share them in the comments!
Looking for more power tool 101 how-to’s?
How to Use a Circular Saw – a must have tool for any DIYer.
How to Use a Miter Saw – probably my favorite power tool.
How to Use a Heat Gun and 15 Things to Do With It – you won’t believe just what all a heat gun can really do!
How to Use a Sander – a must for furniture makeovers!
Need tool suggestions? Here are the best tools for DIYers at any level.
Want to come back here later? Just pin the image below.

You know you don’t wanna miss any of this crazy.
Sign up to get my posts delivered to your inbox here.
Stalk Me Here:
Pinterest / Facebook / Twitter / Instagram

Brianne Anderson says
This is fantastic! Now…can you teach me how to drill into cement? My entire condo is made up of concrete and just trying to hang a piece of art on the walls is nearly impossible (not to mention I was born without any type of upper body strength). Is their a particular bit or drill that I should have that would be better to make that type of hole? Or do I just need someone with more muscle?
Jenna @ Rain on a Tin Roof says
I’m glad it was helpful, Brianne! For concrete, you can buy concrete / masonry drill bits – that may help. Do a pilot hole first, then use screws that are for concrete as well. Hope that helps!
joyce says
This is really good, I thought I knew it all and you showed me! Its fascinating how you put the bits
on and the torque has always had me wondering what the heck does it do. (read directions?) thanks, Joyce
Jenna @ Rain on a Tin Roof says
I’m so glad it helped you, Joyce – and if it makes you feel better, I didn’t know what that dial (the torque) was for until a couple weeks ago when Grunt Labor told me! haha!
chris aka monkey says
wow jenna i love you… i didn’t know i was a badass until this post i do know how to use a drill but i didn’t know about the slide thingy, i will have to get one of those i hurt the hell out of my fingers holding the screw xx
Jenna @ Rain on a Tin Roof says
Chris, you have always been a badass in my book! And yes- get a slider – they are like $5 and SO worth the money!
chris aka monkey says
wait i am also a freak so does that make me a freking badass ha ha xx
Jenna @ Rain on a Tin Roof says
Abso-freakin-lutley!
Hope Williams says
Great post ! All bad ass women need to know how to use power tools.
I have my own drill. We pretty much share the rest. And cookie dough is a must try! Being a chef, when the Hobart goes on vacation permanently, a girl does what a girl has to do! I just recommend a heavy duty plastic stirrer!
Kudos to both you Jenna and Gina for helping all women become empowered literally!
To Brianne, when you purchase a masonary bit, buy a couple extras. If you get them too hot, they will break, or they just wear out depending on what type of concrete your drilling into. You can always return them when your done!
Have a great day ladies and three gentlemen!
Jenna @ Rain on a Tin Roof says
Have you seriously used your drill to mix food with!? That is fantastic, Hope!! I like you even more now! haha!! T
Hope Williams says
Yes I have. When you have to “mash” 75+ pounds of potatoes, cabbage casserole, what ever went in the hobo, yep! It got mixed!
Jenna @ Rain on a Tin Roof says
You are so freakin’ cool, Hope!!
Hope Williams says
No, but thank you for saying that. Necessity can be the MOTHER of all kinds of inventions! 500 guests, a wedding, you can adapt quickly or lose a ton of money.
Dad says
Honey, EXCELLENT Article. Look forward to many more of these in the future. I thought I might mention one thing for your readers. There are older drills that don’t often have a reverse such as an old electric Black & Decker I’ve had since 1981 that I received for Christmas that year. It’s my favourite drill even though there is no reverse & is still very dependable. Have a great day. Love you. Dad.
Jenna @ Rain on a Tin Roof says
Great to know, Dad! Thanks!
Julia Pearl says
this is so cute
Selene Galindo says
This was super helpful!!! I’m so glad you two are doing this series! I’ve been wanting my hubby to show me how to use power tools but he’s so darn busy!
Jenna @ Rain on a Tin Roof says
I am so glad that is was helpful, Selene!! That’s exactly what we are trying to do!
Jennifer @ Decorated Chaos says
Great tutorial! A lot of people are afraid of power tools so its nice to see it all broken down so it doesn’t seem so scary.
Jenna @ Rain on a Tin Roof says
Yes, Jennifer – they totally aren’t scary!! Just gotta jump in!
Kira says
GREAT idea! I so could have used this yesterday. It’s frustrating to not be able to drill a hole or saw a piece of wood when my husband isn’t home. Super excited to follow along with y’all!
Jenna @ Rain on a Tin Roof says
That’s exactly what we are talking about, Kira – every gal doesn’t need to depend on her hubby for things like this!! You can totally do it yourself! (Just ask them for help every once in a while – it makes them feel special!) haha!
Jamie says
This is amazing!! I’m totally mixing up a batch up cookies with it now 😉
J. xo
Jenna @ Rain on a Tin Roof says
haha! get it girl!
Emily says
Haha, I’ve been teaching my daughters this for years. When they were younger I was a single parent. I had to depend on my uncles to come fix things then it hit me. I could be doing this myself. Now I’m married and sometimes have to wait for my husband. I don’t wait I just grab the tools and do it myself. I even purchased my own little tool pouch lol
Jenna @ Rain on a Tin Roof says
That is awesome, Emily!! Start ’em young!
Nancy Ippolito says
What about the numbers? Which is for drilling and which for screws?
Jenna @ Rain on a Tin Roof says
What numbers are you talking about, Nancy?
Victoria @DazzleWhileFrazzled says
Funny! A drill is the only power tool I know how to use. It’s all the other “things” on my husband’s work bench that are giant mysteries to me. Great series idea. Visiting from Saturday Sharefest.
Jenna says
haha! Well, there’s a whole series on Power Tools, so hopefully it will help you!
Cristina at Ava's Alphabet says
I am so in love with your whole Power Tool 101 series! Every girl needs to know how to use her tools, right? Awesome! Pinned and sharing. Thank you for linking up at Family Joy Blog Party. We hope to see you at our next party starting on Sunday at noon EST!
Jenna says
Totally agree, Cristina! Thanks!
Kim~madeinaday says
Nice tutorial! Pinned! Thank you for sharing on Merry Monday! Hope to see ya next week!
Kim
Jenna says
Thank you, Kim!
laura {not a trophy wife} says
Jenna
I just spent a half hour in the garage last night figuring out the drill bits. I know the basics but i needed pilot holes and just needed to practice. I love this tutorial and pinned it!
Jenna says
Awesome, Laura!! So glad it was helpful! Get your drill on!
Sally says
Ryobi One Plus 18V is a fantastic drill, it has a fantastic amount of power and can even drill through steel on its high gear setting in no time. The battery is great too, I’ve used it with my curricular saw and drill for hours and only run it halfway dead. And it gives this drill just a bit more UMPH! to get the job done.
Linda says
I need a drill. This is a post I have needed to see for a long time.. I know how to use a drill, but the last one I had was my late husband’s and I burned it up drilling holes in terra cotta pots and books. This one was electric. (That’s how old it was!) The Book Mark didn’t want to sell me any more books when I told them I was using them to make lamp bases. I was looking for attractive covers. Anyway now I am going to be able to talk to the guy at the Home Depot about what I want.
Thanks for sharing at What’d You Do This Weekend? You will be featured next week. And all DIY’ers need to read this.
Linda
Chas says
Love this! Thanks for sharing on To Grandma’s House We Go!
Jann Olson says
Great post! You should have seen me the first time I tried to use my hubbies. It took me a while to figure out how to revers it. 🙂 Thanks for sharing with SYC.
hugs,
Jann
Jenna says
Thanks, Jann! It takes a little while to learn anything new!
Cari says
When drilling a pilot hole, like when trying to screw 2 pieces of wood together, how to know how far to drill? I’m nervous of drilling too long of a pilot hole, and ruining the wood.