These DIY wall shelves are one of my easiest DIY projects that I’ve also built over and over again! You can’t beat the great storage and decorative style they add to a space. Learn how to build wall shelves easily and super affordably below!
Sweet Lord, it is unbelievable to me how much a person who has been on this earth for less than five years can amass. The sheer number of stuffed animals that the Circus owns is unfathomable to me. She has little plastic horses in every shape, size, breed, and color. Let’s also not discount the other varieties of plastic animals we have on hand: a bald eagle, a grizzly bear, a mountain lion, a silver back gorilla, a water buffalo – and she can specifically identify each of them.
All of the paraphernalia that comes with four year olds is just cra-cra.
If you’ve followed along with the 70’s Landing Pad renovation, you know that we took what was the master bedroom walk-in closet and turned it into the Circus’ playroom. It worked out perfectly, as the closet backed right up to her bedroom.
However, walking into that playroom was essentially like walking into a black hole of toys. Consider yourself blessed if you only stepped on one plastic horse that made you mutter a cuss word or two under your breath. When we moved in, we just kind of threw all her toys in there, threw up a cheap prefab wall shelf or two and called it a day.
That was a mistake.
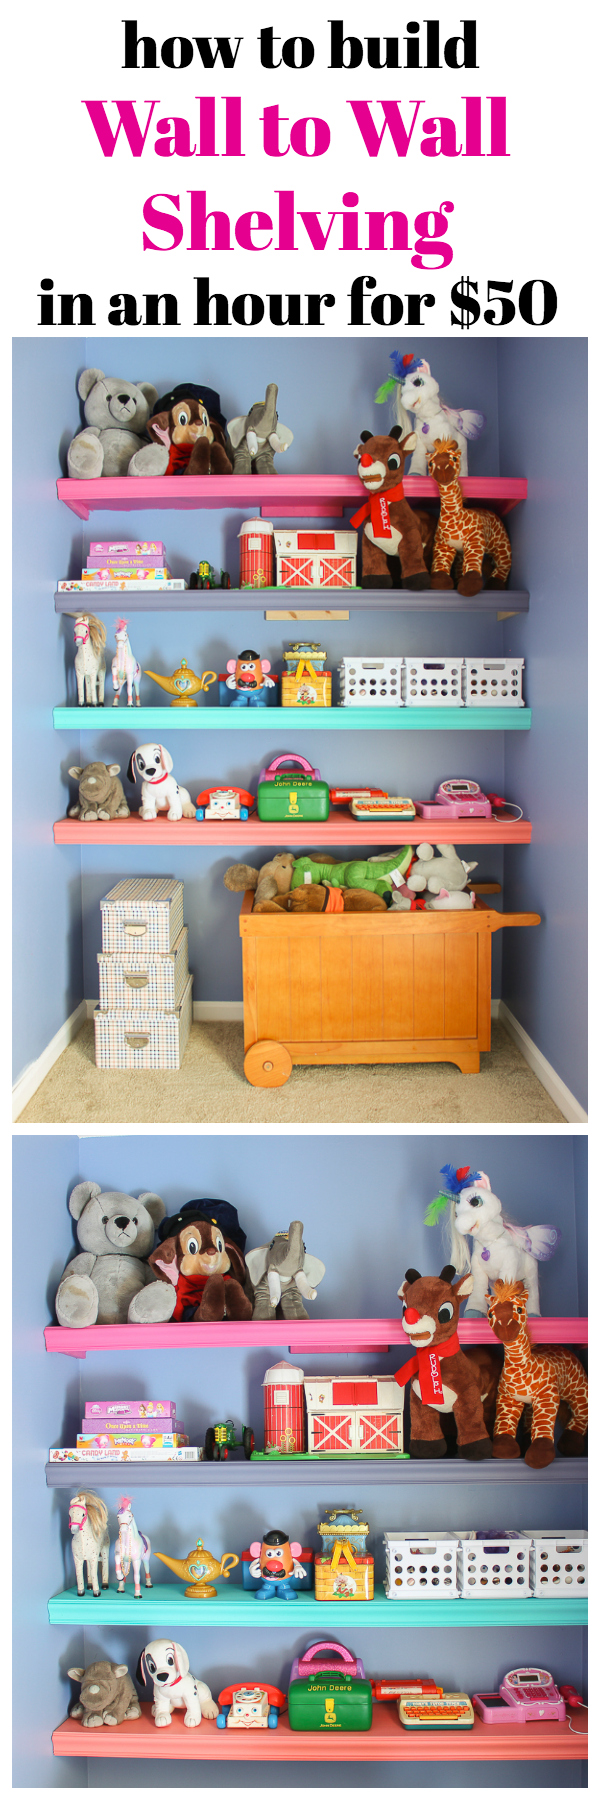
This space desperately needed shelves that didn’t bow in the middle and lots of them. Doing a “spinoff” of the bathroom shelving at our previous house in the Circus’ playroom didn’t occur to me until last week. So this past weekend, I built these shelves into a wall in the playroom and life there is a touch more organized – and cute if I do say so myself. 😉

This wall to wall shelving was a lifesaver in here!
And let’s just be real, we all know those shelves aren’t going to stay that organized after a couple of days, hell, a couple of hours. I gave it a shot though.
These shelves are so easy to make, y’all. If you can nail a piece of wood to a wall, then you can build these. I built all four of those shelves in about an hour for about $50. Of course if your walls are longer or shorter, your cost would be different. Here’s how to make them.
How to Build Wall Shelves
Disclosure: This post is sponsored by Velvet Finishes, however all opinions and multi-colored shelves are 100% mine. This post contains affiliate links for your shopping convenience. Click here to read my full disclosure policy.
Tools & Supplies Needed:
As a reference point, my shelves are 58″ wide. These are the supplies I needed for the four shelves.
- 2 – 1″ x 2″ x 8ft Furring Strips (supports for shelves)
- 2 – 1″ x 12″ x 10ft Common Boards (actual shelves)
- 20 feet of Decorative Molding – I used this basic chair rail.
- Stud Finder
- Nail Gun & Nails or Hammer and Finish Nails
- Saw (either a miter saw, circular saw or handsaw. I used our miter saw. You could also pre-measure and have the pieces cut at your local home improvement store.)
- Level – a small one and a large one are ideal for this project, but a small one will do the job if necessary.
- Measuring Tape
- Pencil
- Paint: I used Velvet Finishes Paint in Exotic, Boheme, Stately and Glamorous.
Steps
Step 1.
For each shelf you are building, cut at least two 11″ pieces of the 1″ x 2″ furring strip. If your shelves are close to the same width as mine or longer, you will need to cut at least one more 11″ piece of the 1″ x 2″ furring strip for additional supports in the middle of the shelf.
Grab your measuring tape, stud finder and pencil. Using the measuring tape, mark on each side of the wall how high up you want your first shelf to be. My lowest shelf was 27″ off the ground to accommodate for storage underneath. The rest of the shelves are 12″ apart from one another.

After making the marks on the walls where you want the shelves to be, use one of the 1″ x 2″ strips you cut and place it on the mark, then draw a line under the piece. Use your stud finder to locate wall studs where the line is and mark those on the wall.

Step 2.
Place the 1″ x 2″ piece along the mark you made. Use a small level to ensure the strip is level, then nail it in where the studs are located behind the wall.

Repeat this process on the opposite wall at the same height.

Step 3.
Cut a 1″ x 12″ board down to the width between the two walls. (Mine was 58.”) Place it on top of the two strips you just attached to the wall.

Place a level on top of the shelf (a larger level if you have one) to check to make sure its level and then nail the 1″ x 12″ board from the top down into the strips of wood you attached on the side walls.
Step 4.
For these shelves, I needed an additional middle support. To do that, use the stud finder to locate where the studs are under the shelf, then place one of the 1″ x 2″ strips just under the shelf where a stud is located. Nail the strip in place, then nail the shelf into the strip from the top down as you did with the sides.

If you don’t have a stud in the center or close to the center of the wall, then you can do two supports split between the middle of the shelf where studs are.
Step 5.
Cut a piece of molding, I used chair rail, down to the width of your shelves. Mine was 58.” Attach to the front of the shelf even with the top of the shelf.

Repeat this entire process for as many shelves as you want to build.
Step 6.
Paint those bad boys!

I decided to have fun with these shelves and paint each one a different color. This added a little more color to the playroom. I used Velvet Finishes Paint in Stately, Boheme, Exotic, and Glamorous.
With Velvet Finishes Paint, there is usually no prep required and it has a primer already built-in.

I just brushed the color right on. Each shelf got two coats of paint. Velvet Finishes also has a built-in topcoat, so I didn’t worry with a topcoat for these either. If I had been painting something like a tabletop or end table that would see a lot of drinking glasses and other action, I would have used an additional topcoat.
Are those just not the most fun shelves you’ve ever seen?

Honestly, these DIY shelves are a great way to add storage to just about any space in your home.

The Circus was using the lower shelf where the typewriter, phone and cash register are as her “office” the other night. Apparently, the shelves are cute, colorful, functional and also moonlight as a work space for her. 😉
Will you be building wall shelves anywhere in your home?
You can see how I made these shelves for extra storage in our bathroom here.
Need more great ideas for your kiddos?
IKEA Bookcase turned Dress-Up Closet – a super easy hack that your kids will love and you’ll love it too for keeping all those dress-up clothes organized!
DIY Kid’s Stage with Hidden Dress-Up Storage – for all those theatrical and singing kiddos in your life.
Easy DIY Lemonade Stand – great for little entrepreneurs, but also makes a fun pretend play center too!
How to Create an Object and Text Feature Wall for Your Little One – the perfect way to add a punch of their own little personality into their rooms!
Want to come back to this project later? Just pin the image below!


Marty Oravetz says
i love them and I love that you painted them different colors too.
Jenna @ Rain on a Tin Roof says
Thanks, Marty! I love the different colors too. The Circus picked them out on her own!
Brigitte Baker says
So cuuuuuuuute. I love the colors! Thanks for this, we need some extra storage in our hall bath, these will be perfect!
Jenna @ Rain on a Tin Roof says
Thanks, Brigitte! Yes, this is perfect for bathrooms!
Patty says
Jenna, those shelves are just too cute and the different colors set them off perfectly. Great job and the circus did a great job picking out the colors.
Jenna @ Rain on a Tin Roof says
Thanks, Patty! I love the colors she chose as well!
Pam S says
These really are the most fun shelves! It’s (almost:-) enough to make me wish I had a little person to use them ~ LOL! But in just one lovely color they would suit any adult (OK….old person) use. I like that Circus has her office all set up…mark of a true entrepreneur!!
Jenna @ Rain on a Tin Roof says
haha! All the colors are really fun! Like you said though, they would just as good in a single color! I know – I might really have a little entrepreneur on my hands! haha!
Susan the Farm Quilter says
Totally adorable!!! Circus really has an eye for color! What a lucky little girl to have inherited her momma’s design sense and to have a momma who is skilled enough to make it happen!!!
Jenna @ Rain on a Tin Roof says
Thanks, Susan! She did do a great job with the colors!
Nicole | The Professional Mom Project says
These shelves look awesome and I really like the different paint colours that you chose. Very cute for a playroom. My 5 year old has also amassed a huge number of toys, cars, lego playlets and sports equipment. I really need something like this in my son’s play area. Found your post at Share The Wealth Sunday.
Jenna @ Rain on a Tin Roof says
Thanks, Nicole! I love all the different colors together too! These are really easy to build and great for a playroom!
Lisa J O'Driscoll says
These turned out so cute! Thanks so much for sharing with us at Share The Wealth Sunday!
Jenna @ Rain on a Tin Roof says
Thanks, Lisa!
Sharon@bluewillowhouse says
I is amazing what kids accumulate. Love the shelves and the great tutorial. Thank you for sharing at the Snickerdoodle Create~Bake~Make link party!
Jenna @ Rain on a Tin Roof says
You aren’t lying, girl!! She has too much stuff!
frugal hausfrau says
That’s such a nice solution! Toys can multiply, can’t they – it’s just about insane! Thanks for sharing with us at Throwback Thursday and have a wonderful Thanksgiving!
Mollie
Jenna @ Rain on a Tin Roof says
Thanks! I think it’s going to work out pretty well – at least until Christmas, then we’ll probably have to do another toy purge! haha!
Jean | DelightfulRepast.com says
Jenna, this is fabulous! And your directions are so well-written, I am confident I can actually do this! #SYC
Jann Olson says
Staying organized or not, I love the fun colors! Thanks for sharing with SYC.
hugs,
Jann
Kristin @ Peppermints and Cherries says
Super cute! I love the multi-colors you chose! Pinned and visiting from Pretty Pintastic Party.
Jane says
I am freaking out because the Circus has the ORIGINAL Fisher Price Barn! That thing is the coolest. Never get rid of it!!
Jenna says
And girl, it was just $0.25 at a yard sale. Can you believe it?!
Jane Stein says
$0.25?!? You are KILLING me! Check this out –
https://www.ebay.com/itm/Vintage-Fisher-Price-Little-People-Play-Family-Farm-Barn-915-complete/302630521783?hash=item46762f4bb7:g:S1YAAOSwZvRaeoxH
Jenna says
Right?! Crazy!!
Myrna says
Jenna, I love the colorful shelves. Circus is one lucky girl. When we build a house once, I had them change the wall so each bedroom would have built in shelves on either side like yours (L shaped) Love shelves..and all the goodies to put on them.
Jenna says
Thanks, Myrna! I’m like you – I love built-in shelves!! So much good storage and you can also make it decorative too!
Sylvia|Grace for a Gypsy says
Great idea! I am going to make some of these!
Sarah @ The DIY Mommy says
Simple DIY’s are my favourite! Love the colors you chose 🙂
Amrita Basu (Misra) says
Such a lovely DIY shelf with minimal headache.The molding and fun colours make it even better.Found you at the Bloggers Pit stop.
Linda says
Thank you for sharing on the Classy Flamings. We did the same thing except yours is more colorful than my shelves. I really like the colors.
Antano says
Hi Jenna,
Great idea! These shelves look awesome. I love the different colors you choose. Thank you for this.