By far, one of the best things I did when I completed my office makeover was installing built in cabinets. They gave me loads more of hidden storage. I can just close the cabinet doors on all that clutter! These DIY built in cabinets were made using unfinished wall cabinets as base cabinets.
When I first showed you my office makeover back in March, I said that I was so mad at myself for not doing it sooner because I felt like having an office that was organized and beautiful made me much more productive. The more I thought about it though, the more I am kind of glad I waited a while to whip this space into shape. Granted, I shouldn’t have waited two years, but waiting did help me to pinpoint a few things that I knew I needed to add or change in my office to make it more functional – these built-in wall cabinets being one of those things.

I have a pretty good size closet in here, but it holds all my craft supplies. I desperately needed something that would both store and hide away all the paperwork, files, etc. that go along with running your business from your house. The solution to that were these DIY built-in cabinets using stock cabinets. Since I was short on floor space in this room, I ended up buying stock wall cabinets and used them as base cabinets for these built-ins. With a little bit of work, these stock cabinets look custom built for this space.
Using Prefab Cabinets for Built-Ins
This post contains affiliate links for your shopping convenience. Click here to read my full disclosure policy.
Obviously, since these built in wall cabinets were made for a certain space in my house, my measurements won’t match up exactly to yours. I’m going to list out everything I used and how I installed the cabinets and trimmed them out, but keep in mind, this is a project that will vary by size depending on where you are actually installing your built-in cabinets.
Supplies & Tools Needed for the Built-In Cabinets
- In-Stock Unfinished Wall Cabinets – You’ll want to measure your wall/space and determine what combination of sizes of cabinets would best fit in your space. It won’t be exact, but ideally, you don’t want more than 3-6 inches of open space on each side of the end cabinets.
- 2″ x 4″s – Enough to span the length of the area you are installing your cabinets in to build a frame for your cabinets to sit on.
- 3/4″ Sheet of Plywood – possibly more depending on size of area, you could also piece together scraps as it won’t show in the end.
- 1″ x 4″ as long as the run of your cabinets
- Lattice Strip as long as the run of your cabinets
- Wood Shims
- Filler Pieces – size will depend on any empty space you have at each end of your cabinet run. Typically, you might need a 1″ x 3″, 1″ x 4″, 1 x 6″ or other similar size.
- Wood Screws
- Stud Finder
- Drill – if you’ve got two, get them both out – it’s great to have one loaded with a drill bit for pilot holes and the other one loaded with a bit for driving the screws so you aren’t constantly having to switch out bits.
- Drill Bit for Pilot Holes
- Miter Saw
- Circular Saw
- Finishing Nailer & Air Compressor or Hammer & Finish Nails
- Oscillating Saw
- Small Pry Bar
- Hammer
- Spackling or Wood Filler
- Caulk
- Primer – I used Kilz 2
- Paint – I used a color I had custom-matched at Home Depot and mixed into Behr’s Semi-Gloss Premium Plus Ultra Paint.
Steps
Step 1: Remove Existing Baseboard
Before building or installing anything, you’ll want to remove the existing baseboard that is in the space where you’ll cabinets will go.

To do this, you should be able to use a small pry bar and hammer along the back wall the cabinets will sit against. For the sides, come out about 12″ from the corner of the wall, mark it and then use an oscillating saw going in at that mark to cut out that portion of the baseboard instead of having to remove the whole thing. Be sure to check the depth of your stock cabinets first though – they might be different than mine!

The photo above was taken after the cabinets were installed, but I wanted you to have an idea of what I was talking about with the oscillating saw. They are really a great little tool to have.
Step 2: Build a Frame for the Cabinets to Sit On
Since these are wall cabinets, they are shorter than typical base cabinets. If you just install them without putting them on a base, they are going to feel really small in a room and you’re going to be bending over more than you should. To bring the height of the cabinets up, build a base for them consisting of 2″ x 4″s and plywood.
You will want your frame to be as long as the space you are installing your cabinets in and as deep as your cabinet bottoms, about 12″. Again though, be sure to double check the depth of your cabinets.
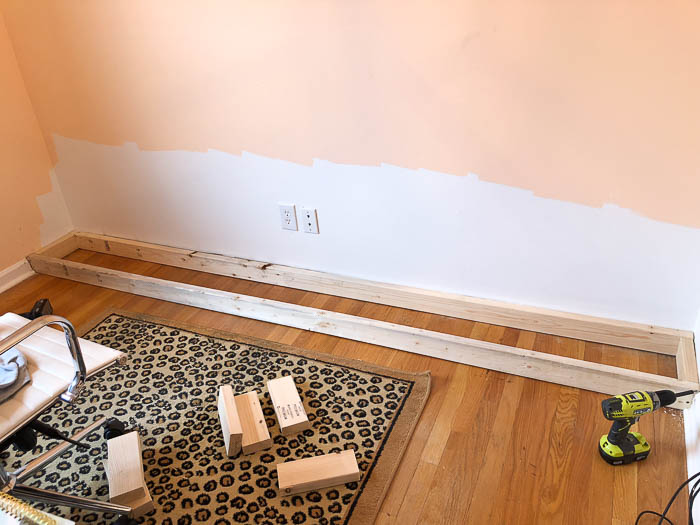
I found it easiest to first assemble a basic 2″ x 4″ rectangle frame, put it in the space, then add in more 2″ x 4″ supports.
Add 2″ x 4″ supports every 16″ inches. You’ll want to drill a pilot hole first, then attach the pieces with your screws to keep from splitting the wood.

I screwed the supports along one side of the frame first, flipped it, then put the screws in on the other side. Being able to push the frame against the wall while attaching the screws made it easier to get the screws in.

To finish off the base for the cabinets, you’ll want to cut out either one full piece of 3/4″ plywood or multiple pieces to fit and cover the top of the 2″ x 4″ base. Attach the plywood with screws to the 2″ x 4″ base.

It’s perfectly fine to piece together scraps of plywood you have on hand here, as long as they are all 3/4″. You won’t be able to see this part once the cabinets are installed.
Step 3: Set the Cabinets in Place
Bring your cabinets in and set them up however you wish on the base. Most likely, you’ll want to space them out so that you have a relatively even amount of empty space at each end of the cabinets.

Once you have everything how you want it, remove the end cabinets. You’ll need to add small wood blocks along the front side edge of each end cabinet that is closest to the wall.

The blocks don’t have to be a certain size. I just pulled out a piece of scrap wood I had. Attach it just behind that edge lip. Put a little glue on it and then nail it to the side of the cabinet. You’ll attach your filler pieces of wood to these little wood pieces once your cabinets are installed.
Step 4: Install the Cabinets
Put your end cabinets back in place. Check to make sure the cabinets are where you want them. Use a stud finder and mark where the studs are on the wall just above the tops of your cabinets.
I had a spot/hump on my wall that stuck out more than the rest of the wall. Knowing that I couldn’t push the cabinet back any farther into that area, but that I would be able to use wood shims to pull the other cabinets out more if needed, I started by installing the cabinet that butted up to that hump in the wall.
You can see in the photo below what I’m talking about.

Attach the cabinets to the wall with screws. The key to installing the cabinets is to make sure that each cabinet bottom is even with the cabinet base you built and that each individual cabinet meets up nicely to the cabinets beside it. This may mean that some cabinets aren’t flush with the wall. Use wood shims as shown above to make the cabinets meet the wall and allow a screw to hold it all together.
Step 5: Install the Filler Pieces
If you had gaps on the ends of the cabinets, now is the time to cut those filler pieces to the length of the cabinets and nail them to the small wood blocks you attached to the cabinet ends.

I used a finishing nail gun, but you could also use a hammer and finish nails. I was able to use a 1″ x 4″ on each end of my cabinets as filler pieces. Of course, yours may be different depending on how much empty space you had at the end.
Step 6: Trim Out the Base
You don’t want the exposed 2″ x 4″ frame to be what you see at the bottom of the cabinets. You want that to look more built-in and finished.
Cut your piece of 1″ x 4″ to the length of your cabinet run and attach it to the base just where the cabinet bottom ends and the plywood base begins. You can use a finish nailer or a hammer and finish nails for this.

You’ll still have a small gap at the bottom. To cover this, cut a piece of lattice strip wood to the length of your cabinet run and nail it on top of the 1″ x 4″ near the bottom to where it meets the floor.
Step 7: Painting the Built-Ins
Fill all your nails holes with spackling or wood filler. Caulk any gaps along the edges, between cabinets and the trim, then prime and paint.
Because these were unfinished oak cabinets and I wanted the grain of the wood to show as little as possible, I did two coats of primer and three coats of paint.

If you don’t care too much about the grain showing, you can easily get by with one coat of primer and two coats of paint.
For the paint, I do suggest opting for a semi-gloss or gloss finish, so that you can easily wipe it clean as needed.

I found these cute marble like knobs to top off my built-in office cabinets with – they were a steal!
And then there’s the countertop. Because this is already such a long post, I put the how-to for the countertop into another post. You can read about countertop ideas for the built-ins here and how I upholstered my countertop as well.
Do you have any plans for adding built in office cabinets to your home?
Need more home office inspiration?
The Full Office Makeover– see the full before and after of my office space including all the budget DIY projects that went into it.
DIY Chippendale Desk– can you believe I actually built my desk? It’s a really simple build and won’t cost more than around $100.
DIY Wall Mounted Drop Down Desk with Storage– short on space? This wall mounted desk is a great solution!
12 Stylish and Comfortable Office Chairs – it’s hard to find a chair that fits both criteria, right? Well, I’ve found 12 that do!
Want to save this project for later? Pin the image below!


Vicki says
Very nicely done. Love the pic of BR. Isn’t the cigar missing? (Wink)
Jenna says
hahahaha!!! Yep – Unfortunately, mine doesn’t have him with the cigar. 🙁
Marti Wagner says
Excellent post. Can you give me a ballpark idea what this project cost you?
Jenna says
Thanks, Marti! Hmmm.. So I did get my cabinets were they were on sale. I have a total of four cabinets – two double door cabinets and two single door cabinets. If I remember correctly, when I purchased the cabinets and the 2×4 for the base, I think I spent about $175. That didn’t include the top or paint or the trim and filler pieces though because I wasn’t for sure how much I would need for that at the time. If you factor all that stuff in, I would say I have about $250 or so in the project – definitely no more than $300. I hope that helps!
Marti Wagner says
Thank you, Jenna. We have just about finished our hurricane home repairs here on East coast of Fl. Now I would like to upgrade my craft room and your project is the right price? Thanks again.
Jenna says
You are welcome! I hope all the repairs have went smoothly – so sorry you had to go through that!
Pam S says
Another awesome tutorial ~ and those are really perfect for any office! Tell Circus Happy Birthday for me 🙂 We, like about half the people on the planet, share May as our birthday month~ it’s a great time for a birthday! I’m only doing mine every 5 years now – LOL
Jenna says
You are too funny, Pam!!! Celebrate that birthday every year girl – you deserve it!
Melissa @ Welsh Design Studio says
Looks great! Love that you chose a fun, bold color for your cabinets.
Jenna says
Thanks, Melissa!
Stephanie S. says
Jenna thanks for the tutorial on the great cabinets. I am going to look into this now to put in my office. Love it. I got my horse print back to frame. I got a great deal for a canvas and now ready to fine a frame. Heading to Hobby Lobby.
Jenna says
I love having these built-ins in my office, Stephanie – creates such great storage! I bet your horse print will be beautiful!
Theresa @DearCreatives says
Love the color you picked. The cabinets look great. Thanks for sharing at the Inspiration Spotlight party. Pinned & sharing.
Jenna says
Thanks, Theresa!
Pam says
Thank you for sharing, great job. I am exploring doing this project in my dining room. I have 108 inches. At first I was thinking I would buy 3 , 36 inch cabinets but I see that there should be room for filler boards.
I am trying to figure out the combo I should buy. Would it look weird if I had 2 36 inch cabinets and 1 30 inch which would leave me 3 inches on each side?
Thanks again for the great instructions.
Sam says
Can you provide Meterial list
4littlepilgrims says
Hi, great job! Could you please share the name of the paint color? Thank you!
Chelsea says
Hi there! What did you do about the outlet behind? We are going to attempt these in our living room and both sides have outlets.
Valeria says
Great tutorial! How did you secure the countertop to the cabinets?
Erin says
Love that Playgirl centerfold of Burt Reynolds!
Brenda says
I’ve looked at a ton of sites since deciding we want to plan this project. This is the most easy to understand, down to earth, and relatable post I’ve seen! I now feel confident we can do this!