I almost gave up on this idea no less than 10 times.
I mulled over tons of different options and ideas for how to build this chippendale desk for weeks.
Nearly every idea I came up with seemed to eventually hold up a bright red STOP sign.
I would go back to the drawing board. Sometimes, I would even go straight to my computer and start searching for a desk I could buy because I just didn’t think this idea was going to work out.
But I kept coming back to it. I just couldn’t leave the vision I had in my head of this chippendale beauty behind.
And then magically, it was like it all came together. It was more than a light-bulb moment.
Actually, it was just a hell of a lot of back and forth in my head, troubleshooting, mulling over all the different ways it could possibly be done and then making Grunt be my sounding board for all the above.
But I did it.
Yes, I.
I built this little baby all by myself.
At first glance, that might seem like a big deal, but I assure you if I can do this, anyone can.
And don’t fret – you don’t have to make those chippendale panels yourself…
DIY Chippendale Desk
This post contains affiliate links for your shopping convenience. Click here to read my full disclosure policy.
Supplies & Tools Needed
- 2 Readymade Chippendale Panel Inserts – mine are these, these also appear to be the same ones on Amazon.
- 1 sheet of 1/2″ Sanded Plywood
- 1 – 1″ x 4″ x 6′
- 1 – 1″ x 2″ x 6′
- 12 – 3/4″ Corner Braces
- 4 – 1 1/2″ Corner Braces
- Wood Glue
- Circular Saw
- Drill
- Finish Nailer or Finish Nails and Hammer
- Caulk / Caulk Gun
- Primer – I used Kilz 2
- Paint of Your Choice – I opted for oil-based paint because it is the toughest paint out there and my desk gets some hard use. The color is Bit of Sugar by Behr in Semi-Gloss.
- Good Paint Brush and Roller
Cut List
• Using your circular saw, cut the sheet of plywood into two pieces:
- 1 piece should be 29″ x 48″ – this is going to be the front panel of your desk.
- 1 piece should be 29 7/8″ x 48″ – this is going to be the top of your desk.
• Using either your circular saw or a miter saw, cut the 1″ x 4″ x 6′ into two pieces that each measure 28 3/4″ long.
• Using either your circular saw or a miter saw, cut the 1″ x 2″ x 6′ down to 46 5/8″ long.
If you don’t want to do the cutting yourself, then usually your local hardware store will cut them for you.
Steps
Step 1
First, you’re going to need to reinforce your chippendale panels. When I first pulled my panels out of the wrapping, I quickly noticed that some of the fretwork wasn’t super secure. To keep all the fretwork in place, you want to put wood glue between all the joints.

Just squeeze a little bit of glue where every joint is, as noted above, then rub your finger over the joint to push the glue into the joint. Once that side of the chippendale panel is dry, flip it over and do the same thing to the other side. It might not seem like this is going to make a huge difference, but it really does. Wood glue is serious stuff.
Do this with both chippendale panels, front and back. Let the glue fully dry before proceeding to the next step.
Step 2
Now, you’re going to be attaching feet to the chippendale panels.
Lay both chippendale pieces down with the inside facing up. You’ll also need both of your cut 1″ x 4″ pieces (the 28 3/4″ long pieces) now too.

Run wood glue along the inside edge of the chippendale panel that is 28 3/4″ long. Be sure you are gluing on the right edge – the chippendale panels are not perfect squares!.

Place your cut 1″ x 4″ pieces along where you just ran your glue and secure it with a finish nailer or with finish nails using a hammer.

Stand your panels up.

Let this dry completely before moving on to the next step.
Step 3
Now, you’re going to attach the front solid panel of the desk.
Stand both chippendale panels up on their feet. Attach corner braces along the sides and foot of each panel as shown below.

You’ll use single hole corner braces, the 3/4″ inch ones along the chippendale panel and one double hole corner brace, the 1 1/2″ ones, where the foot is.
Place the 29″ x 48″ piece of 3/4″ plywood in front of the brackets, then attach the brackets to the plywood panel.
An important thing to note – before attaching the brackets to the plywood panel, make sure the screws aren’t too long and won’t go through the front of the plywood. Some brackets come with longer or shorter screws than others. If your screws are going to be too long for the plywood panel, then just go to the hardware store and buy shorter screws that have about the same size screw head as the ones that came with your brackets.

Step 4
Now, you’re going to put on the desk top.
Start by attaching four single hole braces (3/4″ braces) along the top edge (shown below) of the front panel of plywood you just attached.

Attach two more single hole braces (3/4″ braces) to each chippendale side panel along the top, as shown below.

Lay your 29 7/8″ x 48″ piece of plywood on top of the front panel of plywood and the side chippendale panels making sure everything is even and squared up how you want it, then just like you did with the front plywood panel, attach the top plywood panel to the corner braces you just installed.

Step 5
Now, for a little added support in the back of the desk, you are going to attach your cut 1″ x 2″ wood piece that you cut down to 46 5/8″ long just along the inside top at the back of your desk.

Place it so that it meets up with that inside frame of the chippendale panel.

Attach the 1″ x 2″ to the desk using the 1 1/2″ double hole corner braces on each side as shown in the image above.
Step 6
Caulk any gaps in the desk to give it a nice clean finished look. I caulked all along the places where the plywood met the chippendale panels.
Step 7
Prime and paint the desk.
I opted to prime my desk before painting it so the raw wood wouldn’t soak up too much of the paint. I was very glad I did because it allowed me to only need one coat of the oil-based paint, which we all know isn’t great fun to work with.

That was after the primer coat.
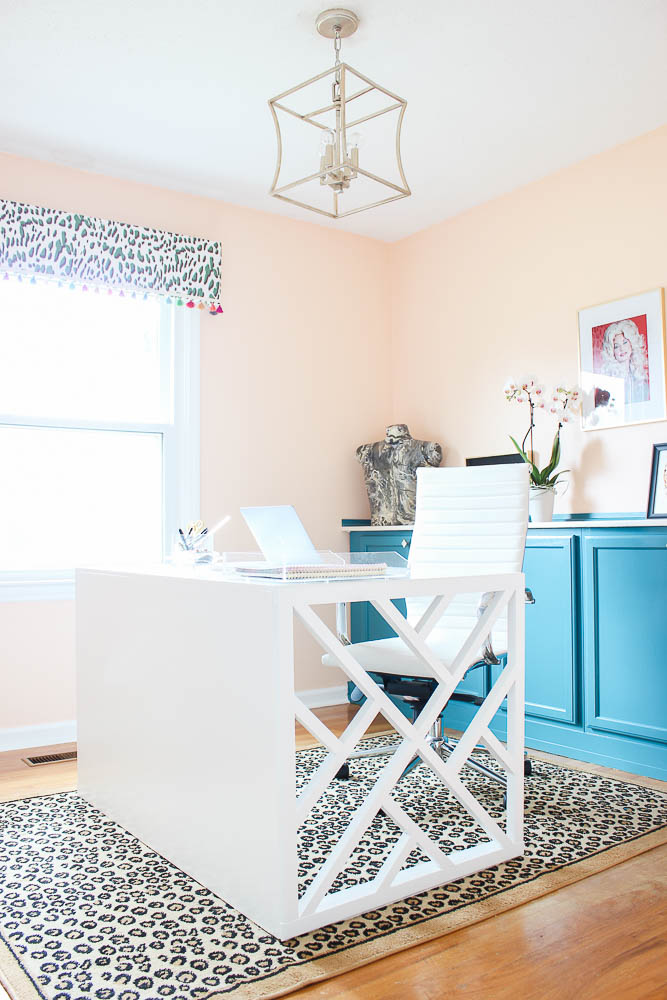
And the finished DIY Chippendale Desk….

Desk Chair / Leopard Print Rug (similar)
Isn’t she a beaut? It is the perfect size for my smaller office with the perfect touch of interest.

So – do you think you’ll give this easy desk plan a whirl?
You might also want to see…
How I DIYed those Built In Cabinets:

The Full Office Makeover:

Budget-Friendly DIY Office Makeover

12 Stylish and Comfortable Office Chairs
If you want to come back to this project later, just pin the image below!


Meaghan says
This looks so nice! Way to go!!
Jenna says
Thank you, Meaghan!
Shirley says
Your desk looks great! What a lovely bright room to work in.
I love the Dolly candle. St. Dolly of Parton -hilarious!?
Jenna says
Thanks, Shirley! Isn’t that candle just everything?! I want to buy all my friends one!
Heidi says
Well done! I wouldn’t have guessed this was a DIY desk, good job! Now you have my wheels spinning…
Jenna says
Thanks so much, Heidi!
Pam says
It, for sure, is a beaut!! But no, I probably won’t be attempting this. I just live vicariously through YOU!! LOL
Jenna says
Oh, Pam!! I know you could do it though!!
Marty Oravetz says
I love this, so petty and your tutorial is amazing.
Jenna says
Thank you so much, Marty!
Stephanie S. says
Jenna awesome tutorial. I use our old dining room table. About the same size. One dog likes to change out under neath when I am not banging around. Nice top and thought about redoing by painting it.
Have a good hump day. LOL Interview today.
Jenna says
Thanks, Stephanie! I hope your interview went well!
Susan the Farm Quilter says
And here I was thinking you made those sides from 2x2s!!! Either way, love the desk. Makes me wish I needed a desk, but I would need one with lots of drawers that I could fill up with the crap I need RIGHT NOW but didn’t want to clutter up the top of the desk…cuz ya know just 1 pen or pencils just won’t work! I need more room for other crap to make the desk top invisible!! My dad wants to build/buy a “thing” to go on the top-back of his desk so he can fill it with crap that is on his desk so he can put more crap on his desk!
Jenna says
Girl, you have too much faith in me! I don’t have enough patience to make those side panels myself!! And I totally know what you mean about storing crap – that’s why I put in the built-ins in my office!! Gotta hide the clutter somewhere!
Michelle says
When I read the subject, I honestly thought you made a desk with pictures of Chippendale dancers on it!!
Jenna says
hahahahaha!!! Well, you never really know with me!
Kari Wagner Hoban says
I am learning so much from your blog, the first of which is that style is called Chippendale.
Not anything like a nude male dancer.
I love what you did and I love that you made me think I can do this too (I can’t).
But what is funny is that we bought a coffee table off of Facebook Marketplace this week with that same design on the sides and now I can use my new big word!!
Jenna says
hahahaha!!! Happy to be of service! Don’t you just love Facebook marketplace?! I’m addicted!
Maria says
Wow! Great job on your desk…
Jenna says
Thanks so much, Maria!
Audra @ Renewed Projects says
Wow! That is incredible! You have mad skills!
Jenna says
Thank you, Audra!
Roseann Hampton says
That’s quite impressive – even with the premade panels! Thanks for sharing at Merry Monday! Can’t wait to see what you link up next week! Roseann from This Autoimmune Life
Jenna says
Thanks so much, Roseann!
Leanna says
Your desk is gorgeous!! I want one. I also like the storage cabinet behind your desk. Pinning and thank you for the inspiration.
Jenna says
Thank you so much, Leanna!
Monica Benavidez says
Ummmm, this is freakin’ fabulous! I may DIY something like this for my living room as a TV stand. My brain wheels are turning…
Jenna says
Thanks, Monica! You totally could – I still have a slew of ideas for using these panels in other places- they are just too good!
Brenda Young @ Unique Junktique says
What a wonderful piece!Even better that the sides came pre cut…..love what you created with the panels I never knew you or could get to these from the hardware store! Beautiful job pinning for later
Jenna says
Thanks, Brenda!
Rhonda says
Wow, I love, love, love the desk. The Chippendale panels are perfect. Oh, the blue cabinets behind it really make it stand out. Great job, and thanks for sharing on Sunday’s Best.
Jenna says
Thanks, Rhonda!
Vanessa says
I love your new desk, it’s gorgeous! Thank you for sharing at Dishing it and Digging it link party. You are one of the features at this Sunday’s party. Thank you again for sharing.
Jenna says
Thank you, Vanessa! I’m honored to be featured!
Tiffany says
This desk is amazing, Jenna! I agree with Audra…you have mad skills! 🙂 Enjoy your home office..
Jenna says
Thank you so much, Tiffany!!
BonBon says
Hey, thanks for sharing at Inspire Me Monday. I wanted to let you know that you are one of my featured picks this week.
Jenna says
Awesome!! Thank you so much, BonBon!
Michellejames says
I wanted to let you know I am featuring this great project at #merrymonday this week. I hope you will check it out when you have a chance! Hope you will link up with us again!
Jenna says
Oh wow! Thank you so much, Michelle!
Jann Olson says
I really love how this desk turned out! Thanks for sharing with SYC.
hugs,
Jann
Mother of 3 says
A beautiful desk and a great tutorial. I’ve been looking to build a hutch for my dining room and could see a modification of this working in there. Pinned.
Jenna says
Definitely! This could make a gorgeous hutch!
Rebekah Purnel says
How sweet! I have fallen in love with it!!! I’m an avid DIYer and always try to be busy with some new projects! Was searching for a unique idea. Yours made me stop and crazy to do it asap! In a hurry to start. Wish me a good luck Jenna! 🙂
Jenna says
Oh awesome, Rebekah! Good luck! It’s a pretty easy build though!
Barbara Warner says
Jenna,
Your desk looks great. I love the crispness of the white paint. My son used the Chippendale pattern to build his deck railing. He did it by hand. I don’t need a desk, but if I did, this one is beautiful and I love white furniture!
Jenna says
Thanks, Barbara! Oh wow!!! My hat is off to him – that pattern would be so difficult for me to do by hand. I bet his deck railing looks amazing!
Paula says
You are the best! I love this desk and how your brain works! Don’t ever give up. ❤️
Thanks for always sharing and Congratulations on BH&G!!
Jenna says
Thank you so much, Paula! And thanks for sticking around here for so long – you’re a gem!