If you work from home, then take my advice.
Get your home office in tip-top shape.
Paint it. Decorate it. Organize it. Make it you.
I’m not sure quite how, but somehow, magically, once you do that, you become so much more productive. So much more saner.
So much more feeling like maybe you can just make it through this day.
Hand to God, ever since I have gotten this office done, I feel like I have been so much more less stressed than before.
Why in the hell did I wait nearly two years after moving into the 70’s Landing Pad to make my office me?
Screw making the kitchens, bathrooms and living rooms beautiful, I’m starting to become a cheerleader for making your workspace beautiful and functional before the rest of all that.
And you know what the best thing about this office makeover is?
It was all done on a budget. I DIY’ed a lot of things in this space and did a lot of reusing what I already had as well.
Ok, here is what the office looked like when we first bought the house:

The previous tenants had left behind the desk as well as the hardwood floors that were loosing their finish.
When we moved in, I put my old desk in here, hung some curtains, threw in some other things and called it a day. You can see photos of that here. There was too much going on though. Too much stuff in the room, too much stark white wall, too much brightly colored patterns against stark white walls. It just didn’t work.
Now though, it works…
Home Office Makeover Full of Budget-Friendly DIY Projects
This post contains affiliate links for your shopping convenience. Click here to read my full disclosure policy.

Wall Color / Light Fixture / Cabinetry / Desk Chair / Leopard Print Rug (similar) / DIY Chippendale Desk
It feels more open. There are fewer things, but more storage. It’s light and airy, without being stark. It’s…exactly what I needed to stay sane.
Ok, and wanted too. And honestly, it turned out better than I ever imagined it would!
Let’s talk details.
First, the walls got a fresh coat of paint.

This room is small, so I didn’t want anything too dark, but didn’t want white walls. I went with Citrus Delight by Behr. It’s a peach color, which actually looks even lighter in this space than what the sample card showed because that window faces the sun nearly all day.
The leopard print rug has been in my office since we moved in. I’ve had it for a few years now and it has to be one of the best yard sale purchases I’ve ever made – it was only $2. The rug is also covering up where the finish was wearing off the hardwoods – no money in the budget to fix all that yet.
I had also switched the ceiling fan out for that light fixture a few years back and it stayed.
I added built-ins along the back wall.

I needed some serious storage in here. I have a closet, but it holds all my my craft supplies and extra home decor accessories. I needed something for paperwork and office supplies and all that ho-hum stuff. I bought unfinished wall cabinets, built a base for them and then attached them to the wall. Once I got in the middle of the project, I discovered I had a very bowed wall of drywall and that made the install much tougher, but still worth it. Read the tutorial here on how I added the built-ins.

Dolly Print / Leopard Print / Burt Print
The countertop of the built-ins is actually upholstered in a durable faux leather pearl vinyl. I had to get creative there because of the bowed drywall. The tutorial for upholstering a countertop is here.

Dolly Print / Leopard Print / Burt Print
Dolly is front and center in the office. Grunt says it’s funny to walk in and see me working with Dolly watching over me. I’m hoping she’ll shower some of her greatness on me. I found the Dolly print here and used this gold frame from Target to showcase her.

Leopard Print / Burt Print / Upholstery on Counter / Cabinetry Knobs
And you can’t have Dolly without Bert. 😉 I actually decided several months back that Bert was going in my office. That’s the picture from his 1972 Cosmo spread. I found it here. The seller offered it in an 8×10 size, but I wanted one bigger, so I messaged them and they were able to set me up with a 12 x 18 size. Because of the size of the actual photo, there is a good bit of white space around it when you get it in any size. Because of that, I decided to get it semi-custom framed. Since it’s such an odd size, I had a custom mat cut for it, but then just bought a frame that was already premade. I used Michael’s for framing it and they did a wonderful job. In fact, I think the framing girl was just as excited about framing Burt as I was! I got the leopard from Society6 a few months ago. I didn’t know the full plan for the office yet, but I knew he would be great alongside Bert – and I was right.

Over on the other side of the cabinetry is a bust I’ve had for years and finally found the perfect place for. I asked on my Instagram stories what I should paint him and Optometrist Jackie suggested a marbled finish. I gave it a whirl and I think it turned out pretty well.

I also whipped up a little custom art as well. Me and Reba were tight when I was a kid. And Fancy, well it was most definitely my favorite song, even in elementary school. I figured this line would serve as some good motivation.
And did you notice my new desk?
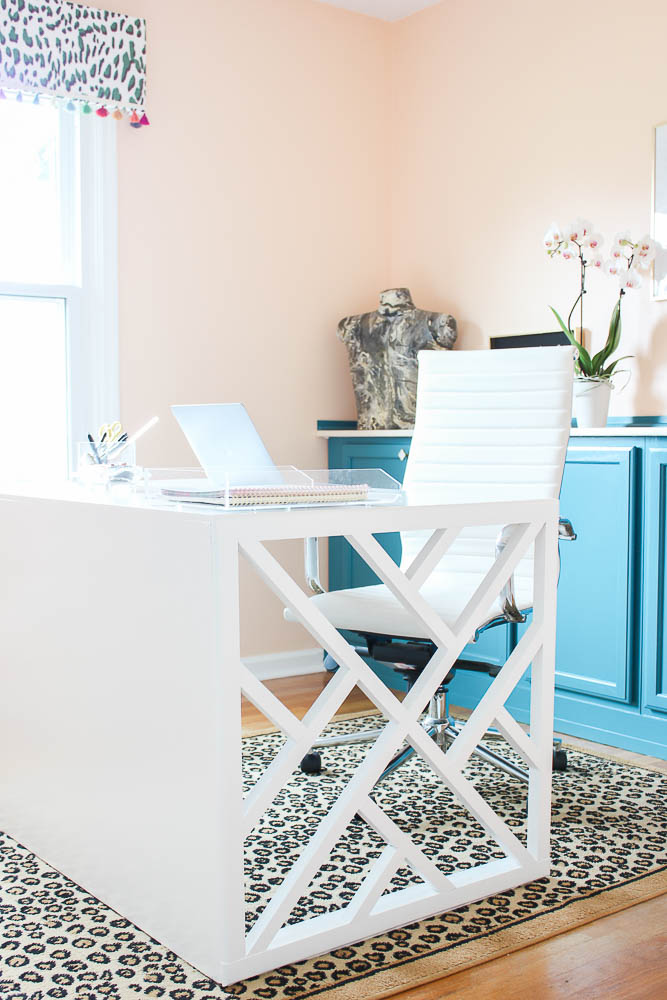
Desk Chair / Leopard Print Rug (similar)
I built it, ya’ll! Me! All by myself! It might look complicated, but I assure you, it was a pretty simple build. The how-to for the desk build is right here. That’s my same office chair I’ve had for a few years, it still worked perfectly in the space and is comfortable as well.
I did have a bit of a hard time parting with my old desk, which was actually my Pap and Grannie’s kitchen table at one time. However, it just wasn’t as functional as I really needed my desk to be. I have plans for it at the farmhouse and I know Pap would have been proud that I built the new desk myself.

That’s the DIY faux crystal vase I made last year that I’m using as a pen/pencil holder. The little glass dish tray was my great-grandmother’s. She used it to feed her chickens with. Not kidding! One of my great aunts started cleaning out family stuff years ago and brought me a few different things – this being one of them. She said she always remembered her feeding the chickens out of that dish and when she died, she just had to get it for the memories.
On the other side of the desk, I created an inspiration board of sorts.

That just means I wrapped pretty fabric around a bulletin board and added nailhead trim. I love how that green fabric works with the peach walls and blue cabinetry though – the perfect pop of color.

Green Upholstery Fabric / Nailhead Trim
Instead of individual nailheads, I used the rolled nailhead trim which helped me keep straight lines. It was a huge timesaver as well.

One of the biggest, yet easiest and super cheap things I suggest anyone do in their home office is to hang a pretty towel hook.

Not for towels of course, but for your computer bag or camera bag or whatever kind of bag you need to hang on it. It’s so much better than throwing it on the floor and tripping over it. Not that that’s happened to me or anything.
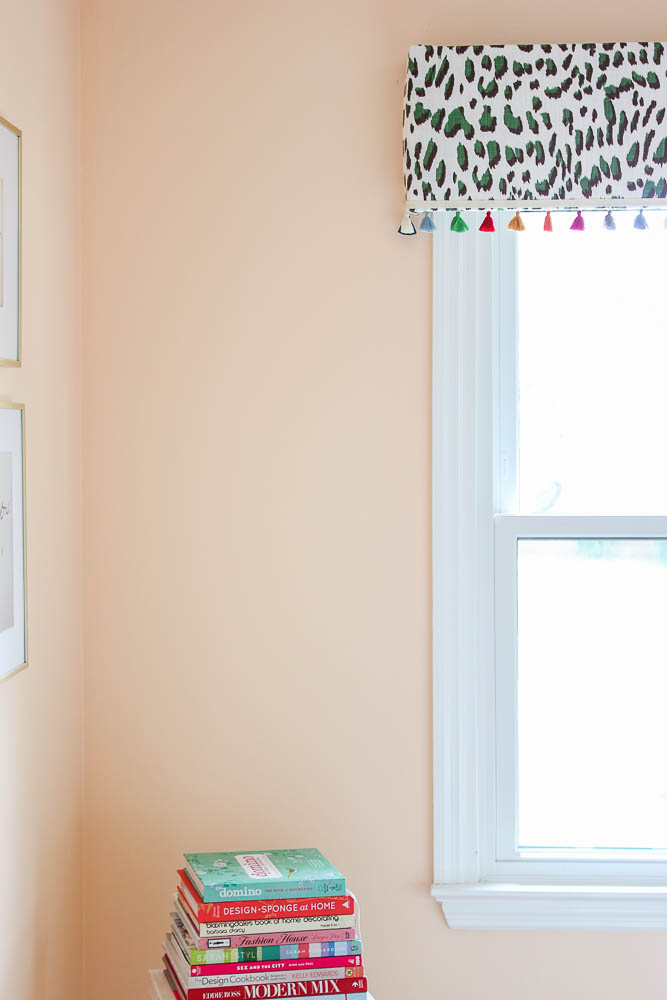
I also brought more of that glorious green upholstery fabric onto the other side of the room on a window cornice. Such a simple and cheap DIY project with so much bang for your buck. A yard and a half of this fabric (only $15 a yard!) gave me more than enough for the cornice and the bulletin board.

Green Upholstery Material / Tassel Trim
I found the tassel trim at Hobby Lobby and it added some more color and fun to the space.

DIY Painted and Patterned Closet Doors
I had actually painted these closet doors (full tutorial here) before we moved into the house and I still love them. They worked great with the space and the peach paint color, so I happily kept them as they were.

My little $5 elephant stool finally found a home!

Elephant Stool (similar)
He’s another one of my best yard sale purchases ever! I loaded him up with a few of my favorite colorful coffee table books. There is a similar elephant stools I found here.
And finally, one of my favorite touches in the room…

I scanned a couple of old cards and envelopes where my Pap had written my name and signed his and turned them into wall art. They are right across from my desk, so all I have to do is look up and it makes me smile.
So all in all, I have roughly right around $600 in the office makeover. The biggest chunk of that is the built-in cabinetry, which was around $300, but so worth it. The desk was less than $100 to make and then there’s around another $200 in paint, fabric, art, frames and various other supplies.
I for one though think that for just having spent $600, the whole space looks more like a million bucks. 😉
What do you think about the office makeover?
You might also want to see…

DIY Built-In Office Cabinets from Stock Cabinets

12 Stylish and Comfortable Office Chairs


Leave a Reply