Tag: cabinets

  • Mudroom Cabinets Makeover: From Yuck to Showstoppers

    Mudroom Cabinets Makeover: From Yuck to Showstoppers

    Ready to add some serious wow factor to your mudroom cabinets? This cabinet makeover will leave their jaws hanging!

    You know those chances you take sometimes where halfway through you realize there’s no going back?

    It’s not that you didn’t realize there would be no going back when you started but it just didn’t occur to you what you might do if it failed.

    Man, this is turning into some deep thoughts about plain old cabinets. 😆

    Anyway, that’s how I felt about my mudroom cabinets. I had hated the look of them since we moved into the 70’s Landing Pad four years ago. However, getting the mudroom space into shape was at the very bottom of the list; it’s pretty closed off from the rest of the house and for the most part, we’re the only ones who walk through it.

    While halfway through this project, the “oh shit, I’m in it now” feeling hit me, I’m happy to report that this project was a success…

    Green and White Mudroom cabinets with fabric inserts.

    Here’s what the mudroom storage looked like before…

    Mudroom Storage Cabinets Makeover - the blue cabinets before.

    Someone actually commented on this space saying it resembled what they think some prisons may look like. I was not offended at all. 😆

    I most definitely did not want to lose this great storage space in here. Here’s how I pulled the epic cabinet makeover off.

    Mudroom Storage Cabinets Makeover

    This post contains affiliate links for your shopping convenience. Click here to read my full disclosure policy.

    Supplies and Tools:

    Step 1

    As you can tell from the before picture, my mudroom cabinet doors had holes drilled in them. While these may have been purely for decoration, I think they had more to do with ventilation since this space is in a partially below ground basement in the south. And while previous owners may have liked the “decorative holes,” this current owner did not.

    The first thing I did was have the centers of the cabinet doors cut out to get rid of those holes.

    Mudroom Cabinets with Doors Cut Out

    While this was something I could have DIYed myself, I opted to hand it over to my cabinet guy. I knew he would do a better job of getting nice straight cuts and the same edge measurements for each door. I also knew he’d be able to knock it out in half the time of what it’d take me. I was right on all accounts and it was probably some of the best spent money on this space.

    Step 2

    Paint the cabinet doors and frames.

    After the centers of the doors were removed, I painted all the doors and cabinet frames with Bit of Sugar by Behr. I did two coats total.

    Step 3

    Once everything was good and dry, I put the doors back on the cabinet bases.

    Mudroom Cabinet Ideas - cut outs made in doors.

    I know it might seem weird to put them back up with them not being fully completed, but I felt it might make attaching the fabric easier if the doors were in place.

    I installed the doors using new hinges as the old ones were gross and had been painted over multiple times. I also went on and put the new knobs on at this time too.

    Step 4

    Finally, I attached the upholstery fabric to the backs of the cabinet doors.

    Roll out the upholstery fabric. Measure the openings in the doors and add about an inch or two to each side, then cut that measurement out from the fabric.

    Using a stapler, attach the fabric to the backside of the door with the pattern showing through the opening.

    Cabinet Makeover - attaching upholstery fabric to the backs of cabinet doors.

    I used my power stapler for attaching the fabric. It shoots all the way into the wood the first time, so no hammering staples down. It also goes much faster than using a regular stapler and it’s easier on your hands!

    The biggest thing to remember when attaching the fabric is to pay attention to the pattern on the front. Make sure you’re keeping the pattern straight. Of course if you have a more abstract patten or a solid color, you won’t have to worry about this.

    Mudroom storage cabinets with green and white lattice fabric and acrylic knobs.

    The acrylic knobs went perfectly with the green and white bamboo fabric – they complimented it nicely without distracting from the print.

    Don’t forget to accessorize a little too! I’ve never met a tassel I didn’t like! These from SmithHonig are some of my favorites.

    Colorful mudroom cabinets with decorative fabric panels.

    Window Shade / Pink Color on Door

    I had enough fabric left over to create a window seat on top of a couple of the cabinets. The Circus loves to climb up here and chill.

    The cool thing about this cabinet makeover idea is that if you ever want to change up the look of your space, you could switch out the fabric for a new print and create a whole new feel – and you’d never have to paint a thing!

    Share any creative mudroom cabinet ideas you have in the comments!

    Looking for more DIY cabinet ideas?

    DIY Built In Office Cabinets – all you need are basic stock cabinets from your local home improvement store!

    Best Paint for Cabinets – the lowdown on different types of paint for cabinetry.

    How to Make Cabinets Taller – if you ever need to raise your cabinets for home improvement projects…

    Want to remember this mudroom cabinet idea for later? Just pin the image below!

    Mudroom cabinets with doors that have fabric accent panels on the front.

    Hang out with me on social for more:

    Facebook | Instagram | Pinterest | Twitter

  • DIY Built-In Cabinets using Stock Wall Cabinets

    DIY Built-In Cabinets using Stock Wall Cabinets

    By far, one of the best things I did when I completed my office makeover was installing built in cabinets. They gave me loads more of hidden storage. I can just close the cabinet doors on all that clutter! These DIY built in cabinets were made using unfinished wall cabinets as base cabinets.

    When I first showed you my office makeover back in March, I said that I was so mad at myself for not doing it sooner because I felt like having an office that was organized and beautiful made me much more productive. The more I thought about it though, the more I am kind of glad I waited a while to whip this space into shape. Granted, I shouldn’t have waited two years, but waiting did help me to pinpoint a few things that I knew I needed to add or change in my office to make it more functional – these built-in wall cabinets being one of those things.

    Built In Cabinets using Stock Cabinets - Blue cabinets against wall - Rain on a Tin Roof

    I have a pretty good size closet in here, but it holds all my craft supplies. I desperately needed something that would both store and hide away all the paperwork, files, etc. that go along with running your business from your house. The solution to that were these DIY built-in cabinets using stock cabinets. Since I was short on floor space in this room, I ended up buying stock wall cabinets and used them as base cabinets for these built-ins. With a little bit of work, these stock cabinets look custom built for this space. 

    Using Prefab Cabinets for Built-Ins

    This post contains affiliate links for your shopping convenience. Click here to read my full disclosure policy.

    Obviously, since these built in wall cabinets were made for a certain space in my house, my measurements won’t match up exactly to yours. I’m going to list out everything I used and how I installed the cabinets and trimmed them out, but keep in mind, this is a project that will vary by size depending on where you are actually installing your built-in cabinets.

    Supplies & Tools Needed for the Built-In Cabinets

    Steps

    Step 1: Remove Existing Baseboard

    Before building or installing anything, you’ll want to remove the existing baseboard that is in the space where you’ll cabinets will go.

    DIY Built In Cabinets - preparing the space - Rain on a Tin Roof

    To do this, you should be able to use a small pry bar and hammer along the back wall the cabinets will sit against. For the sides, come out about 12″ from the corner of the wall, mark it and then use an oscillating saw going in at that mark to cut out that portion of the baseboard instead of having to remove the whole thing. Be sure to check the depth of your stock cabinets first though – they might be different than mine!

    Using Prefab Cabinets for Built Ins - Removing the baseboard - Rain on a Tin Roof

    The photo above was taken after the cabinets were installed, but I wanted you to have an idea of what I was talking about with the oscillating saw. They are really a great little tool to have.

    Step 2: Build a Frame for the Cabinets to Sit On

    Since these are wall cabinets, they are shorter than typical base cabinets. If you just install them without putting them on a base, they are going to feel really small in a room and you’re going to be bending over more than you should. To bring the height of the cabinets up, build a base for them consisting of 2″ x 4″s and plywood.

    You will want your frame to be as long as the space you are installing your cabinets in and as deep as your cabinet bottoms, about 12″. Again though, be sure to double check the depth of your cabinets.

    Built In Wall Cabinets - making a base - Rain on a Tin Roof

    I found it easiest to first assemble a basic 2″ x 4″ rectangle frame, put it in the space, then add in more 2″ x 4″ supports.

    Add 2″ x 4″ supports every 16″ inches. You’ll want to drill a pilot hole first, then attach the pieces with your screws to keep from splitting the wood.

    DIY Built In Office Cabinets - building a base and supports for the cabinets - Rain on a Tin Roof

    I screwed the supports along one side of the frame first, flipped it, then put the screws in on the other side. Being able to push the frame against the wall while attaching the screws made it easier to get the screws in.

    DIY Built Ins with Stock Cabinets - attaching the cabinet base to the wall - Rain on a Tin Roof

    To finish off the base for the cabinets, you’ll want to cut out either one full piece of 3/4″ plywood or multiple pieces to fit and cover the top of the 2″ x 4″ base. Attach the plywood with screws to the 2″ x 4″ base.

    Installing DIY Office Wall Cabinets - Rain on a Tin Roof

    It’s perfectly fine to piece together scraps of plywood you have on hand here, as long as they are all 3/4″. You won’t be able to see this part once the cabinets are installed.

    Step 3: Set the Cabinets in Place

    Bring your cabinets in and set them up however you wish on the base. Most likely, you’ll want to space them out so that you have a relatively even amount of empty space at each end of the cabinets.

    Built In Office Cabinets using Unfinished Wall Cabinets - putting on the base - Rain on a Tin Roof

    Once you have everything how you want it, remove the end cabinets. You’ll need to add small wood blocks along the front side edge of each end cabinet that is closest to the wall.

    Home Office Cabinets - filling the end gaps - Rain on a Tin Roof

    The blocks don’t have to be a certain size. I just pulled out a piece of scrap wood I had. Attach it just behind that edge lip. Put a little glue on it and then nail it to the side of the cabinet. You’ll attach your filler pieces of wood to these little wood pieces once your cabinets are installed.

    Step 4: Install the Cabinets

    Put your end cabinets back in place. Check to make sure the cabinets are where you want them. Use a stud finder and mark where the studs are on the wall just above the tops of your cabinets.

    I had a spot/hump on my wall that stuck out more than the rest of the wall. Knowing that I couldn’t push the cabinet back any farther into that area, but that I would be able to use wood shims to pull the other cabinets out more if needed, I started by installing the cabinet that butted up to that hump in the wall.

    You can see in the photo below what I’m talking about.

    Built In Cabinets - installing on the wall and shimming - Rain on a Tin Roof

    Attach the cabinets to the wall with screws. The key to installing the cabinets is to make sure that each cabinet bottom is even with the cabinet base you built and that each individual cabinet meets up nicely to the cabinets beside it. This may mean that some cabinets aren’t flush with the wall. Use wood shims as shown above to make the cabinets meet the wall and allow a screw to hold it all together.

    Step 5: Install the Filler Pieces

    If you had gaps on the ends of the cabinets, now is the time to cut those filler pieces to the length of the cabinets and nail them to the small wood blocks you attached to the cabinet ends.

    DIY Built in Wall Cabinets using Unfinished Stock Cabinets - Rain on a Tin Roof

    I used a finishing nail gun, but you could also use a hammer and finish nails. I was able to use a 1″ x 4″ on each end of my cabinets as filler pieces. Of course, yours may be different depending on how much empty space you had at the end.

    Step 6: Trim Out the Base

    You don’t want the exposed 2″ x 4″ frame to be what you see at the bottom of the cabinets. You want that to look more built-in and finished.

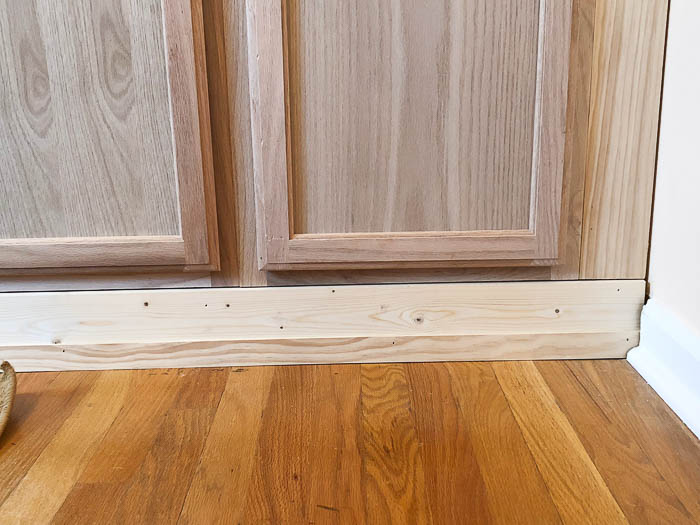
    Cut your piece of 1″ x 4″ to the length of your cabinet run and attach it to the base just where the cabinet bottom ends and the plywood base begins. You can use a finish nailer or a hammer and finish nails for this.

    DIY Built In Cabinet Plans using Prefab Cabinets - Rain on a Tin Roof

    You’ll still have a small gap at the bottom. To cover this, cut a piece of lattice strip wood to the length of your cabinet run and nail it on top of the 1″ x 4″ near the bottom to where it meets the floor.

    Step 7: Painting the Built-Ins

    Fill all your nails holes with spackling or wood filler. Caulk any gaps along the edges, between cabinets and the trim, then prime and paint.

    Because these were unfinished oak cabinets and I wanted the grain of the wood to show as little as possible, I did two coats of primer and three coats of paint.

    DIY Built In Office Cabinets - Blue Cabinets against Peach Wall - Rain on a Tin Roof

    If you don’t care too much about the grain showing, you can easily get by with one coat of primer and two coats of paint.

    For the paint, I do suggest opting for a semi-gloss or gloss finish, so that you can easily wipe it clean as needed.

    DIY Built Ins Using Stock Cabinets - Blue cabinets with upholstered countertop - Rain on a Tin Roof

    I found these cute marble like knobs to top off my built-in office cabinets with – they were a steal!

    And then there’s the countertop. Because this is already such a long post, I put the how-to for the countertop into another post. You can read about countertop ideas for the built-ins here and how I upholstered my countertop as well.

    Do you have any plans for adding built in office cabinets to your home? 

    Need more home office inspiration?

    The Full Office Makeover– see the full before and after of my office space including all the budget DIY projects that went into it. 

    DIY Chippendale Desk– can you believe I actually built my desk? It’s a really simple build and won’t cost more than around $100. 

    DIY Wall Mounted Drop Down Desk with Storage– short on space? This wall mounted desk is a great solution!

    12 Stylish and Comfortable Office Chairs – it’s hard to find a chair that fits both criteria, right? Well, I’ve found 12 that do!

    Want to save this project for later? Pin the image below!

    DIY Built In Office Cabinets using Unfinished Stock Wall Cabinets - Rain on a Tin Roof
  • Best Paint for Cabinets

    Best Paint for Cabinets

    Ready to give your kitchen cabinets a coat of paint? That’s great! It can be stressful determining what kind of paint to use on cabinets though, right? This guide lays out the best paint for cabinets and the pros and cons of each, as well as my personal experience with each.

    I get multiple painting questions every week. I thought I had covered most all painting topics with my Complete Guide to Painting Anything, but getting those questions tells me that I haven’t. And that’s totally ok! That’s what I’m here for – to answer as many of your DIY questions as I can or be helpful in other ways.

    I’ve had quite a few questions about painting cabinetry – both kitchen cabinets and bathroom vanity cabinets, so I thought I would go over the different types of paint you can use for painting cabinets.

    As I always say with posts like this, I am not a professional painter. While I have painted more things than I could ever possibly count, I don’t have a piece of paper that certifies I have a degree in painting. 😉 I have painted around 10 sets of kitchen cabinets, bathroom vanities, etc. though with multiple different types of paints so I have learned a little bit.

    This post contains affiliate links for your shopping convenience. Click here to read my full disclosure policy.

    What Kind of Paint to Use on Kitchen Cabinets

    There are various types of paint that can be used on kitchen cabinets, bathroom cabinets, etc. The main ones being:

    Oil-Based Paint

    Latex Paint

    Alkyd Paint

    Cabinet Painting Kits

    I’ve used each of these, as well as others, when painting cabinets in the past. Here’s my experience with each.

    Best Paint for Kitchen Cabinets

    Let’s start with the first time I painted cabinets…

    Rust-Oleum Cabinet Transformations Kit

    Best Paint for Cabinets - White Rustic Kitchen - Rain on a Tin Roof

    When we bought the Beloved Foreclosure, I didn’t really have much knowledge about painting cabinetry at all. However, our kitchen cabinets there were in great need of a makeover. Since I was such a novice and since this was before the days of Pinterest and I had no idea people actually wrote blogs about painting cabinets, I felt better about having a kit that would guide me step-by-step along the way. I used a Rust-Oleum Cabinet Transformations Kit to paint all the cabinets in the kitchen. The kit walked me through everything and it was easy to do, yet time consuming. The kit even came with a deglosser to use for priming the cabinets to paint.

    Pros:

    Walks you through everything step-by-step, usually no sanding required, everything you need sans the paintbrush is in the box. Easy cleanup.

    Cons: 

    There were brush strokes in the finish. More expensive than just buying each product in the kit individually.

    Durability:

    Pretty good. If I remember correctly, this finish stayed on the cabinets for about 2 years before I decided that I wanted a different look. I don’t remember lots of scratches or the paint peeling off.

    Would I use the kit again? 

    Yes, if I still didn’t have much knowledge about painting cabinetry, but since I know everything about painting that I do now, I wouldn’t spend my money on the kit, instead I would just buy the paint, deglosser, and whatever else I needed separately as it would be cheaper and just the same.

    You can read more about this kitchen remodel here.

    Velvet Finishes Paint

    What Kind of Paint to Use on Kitchen Cabinets - Navy and White Kitchen - Rain on a Tin Roof

    When I decided I wanted a different look for our kitchen cabinets at the Beloved Foreclosure, I used Velvet Finishes paint on them. At that point, I had used Velvet Finishes on lots of furniture pieces and wanted to give it a whirl on my cabinets. Before painting the cabinets, we removed the shiny finish with Ready (a spray on primer/deglosser), then painted the cabinets and finally finished them off with a topcoat of Protect.

    Pros: 

    Definitely one of the easiest paints to use, good variety of colors to choose from. Easy cleanup of brushes / paint supplies.

    Cons: 

    This paint is more expensive than regular paint you get from a local hardware store. There were some brushstrokes in the finish, but that could have been due to the fact that the previous finish had brushstrokes.

    Durability:

    Good. Before we moved out of that house, there were a few scratches in the paint here and there on our cabinets. I will say that we are tough on our house, so some of that could be due to us.

    Would I use it again?

    Yes, but I think I am more partial to it for furniture rather than larger projects like cabinets.

    You can read more about my kitchen cabinet painting experience with Velvet Finishes here.

    Latex Paint (Satin, Semi-Gloss, Gloss Finishes)

    What Kind of Paint to Use on Cabinets - Purple Bathroom Vanity - Rain on a Tin Roof

    I have used regular latex paint on bathroom vanities multiple times. I tend to lean toward semi-gloss and gloss finishes for the paint as it holds up better to wear and tear and you don’t always have to use a topcoat with it. If you use a satin finish latex paint, then I suggest giving it a topcoat of polycrylic as well for added protection. When priming your surface before using this kind of paint, you’ll want a shine-free surface. You can sand to get this or use a deglosser. I also like to give cabinets a coat of primer, such as KILZ or Zinnser after sanding/deglossing and before painting when using latex paints. I think it helps to give the paint a better grip on the cabinets.

    Pros: 

    Definitely the cheapest route, but do choose a good quality latex paint. My go-to is usually Behr. Can use Floetrol with the paint to prevent brush strokes. Easy clean-up. Can usually wipe any spills right off the cabinet with a wet cloth.

    Cons: 

    Latex paints are more prone to scratching and peeling off more so than other paints. There are more steps involved with priming and top coating as well.

    Durability:

    Ok, if you aren’t going to be giving the cabinetry super hard use. The durability is even better if you top it with a polycrylic topcoat.

    Would I use it again?

    Yes. I actually opted to use Behr Premium Plus Semi-Gloss Latex paint on the cabinets I installed in my office.

    You can read more about the bathroom makeover that includes the vanity pictured above here.

    Alkyd Paint

    What Type of Paint for Kitchen Cabinets - Black Cabinets in Kitchen - Rain on a Tin Roof

    When we bought the 70’s Landing Pad, it was obvious the kitchen cabinets needed a new paint job. Honestly, they really need to be replaced, but that wasn’t in the budget then and still isn’t quite yet. A paint job had to work for now. I did a lot of research and had heard about an Alkyd paint called Benjamin Moore Advance that was supposed to be great for cabinets. I decided to give it a whirl. It’s durability is supposed to be like that of an oil-based paint, but it goes on like a latex paint. Before painting the cabinets, I still had to degloss them all before painting. No topcoat is needed with this paint though.

    Pros:

    Easy cleanup. No topcoat needed. No brush strokes.

    Cons:

    More expensive than regular latex paint. Smelly, but not as much as oil-based paint.

    Durability:

    I do think this paint is more durable than regular latex paints, but I don’t think it is as durable as oil-based paint. We don’t have any big scratches in the finish or anything like that on our cabinets that are painted with it, but there are some spots around the cabinet knobs where the paint is wearing off.

    Would I use it again?

    Yes. Behr has actually came out with an Alkyd paint now as well and I used it on my daughter’s playroom stage here.

    You can read about our kitchen remodel where I used this paint here.

    Oil-Based Paint

    Best Paint for Kitchen Cabinet - Oil Based Paint on Cabinets - Rain on a Tin Roof

    I used oil-based paint on the bathroom vanity cabinet in our guest bathroom. This was the first time I ever used oil-based paint on cabinetry and I have to say – I was impressed.

    No, oil-based paint is not the easiest paint to work with, it’s smelly and the clean-up afterward isn’t super fun either, but it’s hard to beat the durability of oil-based paint. This paint dries to a hard finish that’s hard to scratch off. If you need to wipe up any dirt or marks, just use a damp cloth. On top of that, oil-based paint leaves virtually no brush strokes.

    I have also used oil-based paint on my office desk and it has held up wonderfully. My desk works hard and I’m not always nice to it, but the paint has stood strong.

    Pros: 

    Most durable. No brush marks. Usually takes fewer coats than other paints.

    Cons: 

    Smelly, clean-up.

    Durability:

    Very.

    Would I use it again?

    Absolutely.

    You can see more of this bathroom makeover where I used oil-based paint on the vanity cabinet here.

    Stain + Polyurethane

    Types of Paint for Cabinets - Stain on Bathroom Vanity Cabinet - Rain on a Tin Roof

    If you’re looking to go with the wood grain look instead of the painted look, then you’re probably going to be using stain. I have stained cabinets before and have been very happy with the results. I stained the vanity in our master bathroom and it has held up extremely well. Of course, if you want to stain your cabinets, they will either need to be already unfinished cabinets or be stripped. You can read more about stripping pieces here. If you stain something, you will want to topcoat it with a polyurethane to keep it from fading and protect the piece. Stains themselves don’t have much protection in them.

    Pros:

    Probably a little cheaper than using some of the more expensive paints. No brush stokes.

    Cons: 

    If you have to strip your pieces, it’s going to take some time and might be more difficult depending on how much you have to strip off.

    Durability:

    Pretty durable.

    Would I use it again?

    Yep.

    One thing to keep in mind when painting cabinets is that any paint is going to chip over time. That is just the nature of the beast. The key is choosing the best paint for your project and yourself that will keep that from happening as long as possible.

    If you’ve got any other cabinet painting questions or anything you can add from personal experience, please drop it in the comments below!

    What type of paint for kitchen cabinets have you used before?

    Looking for more painting help or DIY kitchen ideas?

    Painting 101: The Complete Guide to Painting Anything – all your questions answered.

    DIY Kitchen Island – we made this out of old barn wood and salvaged porch posts.

    If you’d like to refer to this post in the future, pin it below!

    Kinds of Paint to Use on Cabinets - paint for kitchen and bathroom cabinets - Rain on a Tin Roof

    Gift Ideas Signature


    SaveSave

  • How to Raise Cabinets

    How to Raise Cabinets

    So sometimes during a big project or after I finish a project, I start looking at all the little projects that made up that big project and I decide that some of those little projects probably wouldn’t be that interesting to you.

    So I don’t bother too much with pictures and I don’t post about it.

    But then months later, someone will ask me something specific about that small project that helped to make the bigger project possible and I will realize that I probably should have posted about that.

    Does any of this make sense? Its late and I’ve been drinking. And apparently that makes me use the word projects too much.

    So there’s that. 

    Anyway, if you remember way back in January, Grunt Labor and I finally finished his man cave.

    How to Raise Cabinets - Learn how we raised our base cabinets to accommodate for a refrigerator that was taller than the base cabinets.

    In order to deem the man cave livable, he had to have a beverage center (a.k.a. a fancy name for a mini refrigerator). But when the beverage center arrived, it was a bit taller than the opening we had for it, thus we needed to raise the cabinets or get a new refrigerator.

    Raising the cabinets was cheaper and faster than getting a new beverage center.

    So you can guess which option won.

    How to Raise Cabinets

    Affiliate links may be contained in this post.

    First, let me say that these cabinets were not in our kitchen or around any sort of plumbing. I definitely think that you can do this with your kitchen cabinets, however you would have to remove the countertops and possibly create a few new holes in the back of the cabinets for plumbing. It would be a bigger job than what we had to do.

    You will need: 

    • 4 x 4 Post
    • Saw (We used our miter saw and a table saw, you could also easily substitute the miter saw for a circular saw.)
    • Drill and Screws or Hammer and Nails or Nail Gun (We used our nail gun.)
    • Trim for the bottom of the cabinets (most likely a 1 x 6 piece)

    Step 1: 

    Determine how much you need to raise your cabinets before moving them.

    Step 2:

    Remove your cabinets from the wall and flip them upside down. Before cutting the 4 x4 post to the height you need to raise your cabinets, look at the bottom of your cabinets.

    How to Raise Cabinets - Learn how we raised our base cabinets to accommodate for a refrigerator that was taller than the base cabinets.

    Most all cabinets have that “base” or “frame around the bottom. Your 4 x 4 pieces are going to need to fit in that frame, but extend out of it the height you need to raise your cabinets. Does that make sense? So, you should cut your 4 x 4 pieces the height you need to raise the cabinets plus the height of that frame. Cut the 4 x 4 post to the appropriate length you need – we did 5 of these for each cabinet – one in each corner and one in the middle.

    How to Raise Cabinets - Learn how we raised our base cabinets to accommodate for a refrigerator that was taller than the base cabinets.

    Step 3:

    Secure the 4 x 4 pieces to the cabinet with nails or screws. For each of the corner pieces, just go through the frame. On the middle piece, just use wood glue to secure it, otherwise a screw or nail would probably go through the bottom.

    Step 4:

    Put your cabinets back into place.

    How to Raise Cabinets - Learn how we raised our base cabinets to accommodate for a refrigerator that was taller than the base cabinets.It will now look like you have “feet” on your cabinets – although not pretty ones. To fix this, you need to trim it out. Measure the space that you have to cover and cut trim to fit, then secure. We had about 5 inches to cover (height wise), so we bought a 1 x 6 x 12, cut it down to the appropriate length, then ran it through a table saw to get the six inches down to five inches. We secured it with finish nails. Paint it whatever color matches your cabinets.

    How to Raise Cabinets - Learn how we raised our base cabinets to accommodate for a refrigerator that was taller than the base cabinets.

    Beverage center catastrophe averted.

    You can see more of the man cave here.

    Have you raised cabinets before? Did you use a different method? 

    How to Raise Cabinets - Learn how we raised our base cabinets to accommodate for a refrigerator that was taller than the base cabinets.

    You know you don’t wanna miss any of this crazy.

    Sign up to get my posts delivered to your inbox here.

    Stalk Me Here:

    Bloglovin / Pinterest / Facebook / Twitter / Google+ / Instagram

    blog-signature-summer-15

    SaveSave