Looking for a simple and super affordable way to cover damaged bathroom walls left behind by old wall tile? We’ve been there too. We had little budget and lots of damaged wall in one of our bathrooms. Our solution cost us less than $100 – and it looks great!
It seems I’m becoming quite productive since my crew has returned to school. Case in point: this blog post. This was a project we completed over two years ago, alas I never actually got around to sitting down and writing the post.
Back in June, I taught a local workshop on remodeling your bathroom on a budget. I included this project in it and as I was writing up the presentation, it was then I realized I had never actually posted about it. Go me!
So, if you’re looking for a super affordable, easy to accomplish solution for bathroom walls (or potentially any walls) damaged from tile or that may have huge gaping holes in them for other reasons, here ya go.

When we got the farmhouse, the bathroom looked like this:

I knew that before even laying eyes on it, the bathroom was going to need to be updated. It hadn’t been in that great of condition when my grandfather passed nearly 20 years ago. As you can see, the tiles were coming off the wall – and in multiple places, not just in that one place you see there.
While I would have loved to retile the walls, that simply wasn’t in the budget. However, something still had to be done about those damaged walls left from the full removal of the tiles.
This post contains affiliate links for your shopping convenience. Click here to read my full disclosure policy.
Budget Friendly DIY Fix for Damaged Walls
Materials & Tools Needed
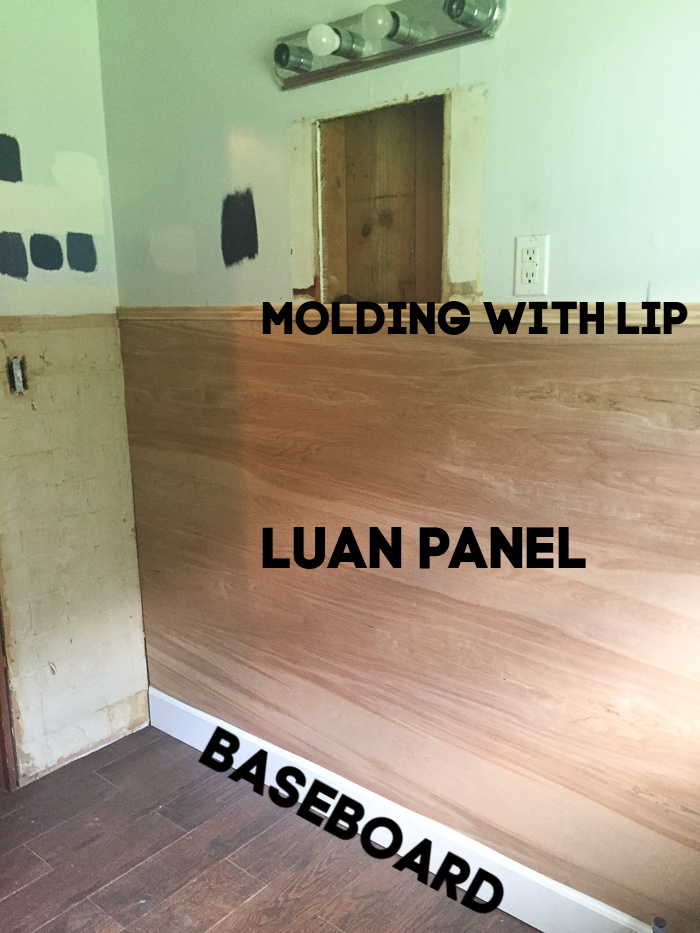
- Luan Panels
- Baseboard
- Molding for top of luan panels – I suggest using a top molding that has a lip like this one.
- Stud Finder
- Construction Adhesive
- Finish Nails and Hammer or Nail Gun loaded with Finish Nails
- Circular Saw
- Miter Saw
- Caulk
- Wood Filler or Spackling
- Primer and Paint in Your Choice of Color
Project Notes
- You’ll need enough luan, baseboard and lip molding to cover your damaged walls.
- For us, the luan panels had to sit on top of the baseboard in order to reach far enough up the wall to cover all the damaged areas. This meant we had to buy a little wider baseboard as well. This can vary from space to space. Measure your space before buying and cutting. You may even be able to install your luan panels first, then your baseboard in front of the panel if you have a shorter area of damaged walls.
- If you are installing new flooring in the space, you’ll want to install the flooring first, then do this project.
Steps
Step 1
If you haven’t done so already, remove all the old tile and any trim or baseboard from your walls.

I don’t have a photo of the space after I removed all the tile, but you can get an idea from above just how rough everything was once I started digging in.
Step 2
Using a stud finder, locate and mark all the studs along the walls.
Step 3
Using a miter saw, cut your baseboard to size and install it around your space.
Step 4
Using a circular saw, cut the luan panels down to the length of your walls.
Apply construction adhesive to the back of the panels.
Attach the panels to the walls where studs are located using finish nails and a hammer or a nail gun.
Push firmly along areas where there are no studs and just the construction adhesive.
Step 5
Cut your top molding down to size and install it over the top of the luan panels so that it lips over the panels a bit.
Step 6
If you have an area where two pieces of luan had to be used on one span of wall, use a small piece of wall trim to cover the seam. You could use a simple piece of lattice molding for this. This wasn’t the case for us as it was a small bathroom and we didn’t have any walls longer than 8 ft.
Step 7
Caulk all the corner seams where the panels meet. Caulk along where the baseboard and luan panels meet. Caulk along where the top piece of trim meets the wall.
Fill any nail holes and sand smooth.
Step 8
Prime everything and then paint!

Light Fixture / Mirror / Vanity / Faucet / Towel Hook / White Towels with Blue Stripes
We painted the top half of the walls a creamy white and then the luan panel portion of the walls in Shipyard.

Light Fixture / Mirror / Vanity / Faucet / Towel Set
We spent a little less than $100 for all the materials to cover the damaged portion of the bathroom walls – waaaaayyyy cheaper than replacing the tile!
For all of you wondering how it’s held up: Since I’m just now getting around to writing this post two years after we did it, I can say it’s held up really well. Everything is still in place just as it was. To clean the luan paneled portion of the walls, I just wipe it down with a wet washcloth – my kid is notorious for banging her toothbrush multiple times against the sink edge after brushing her teeth resulting in little white dots everywhere.
What do you think of this solution for covering damaged walls?
You can also see where we did a similar version of this project, but stained the panels here!
Looking for more budget friendly fixes for your home?
Here are more bathroom remodeling ideas on a budget.
Here are nine DIY countertop makeovers.
Here’s an easy $25 solution for covering those ugly dated louvers on doors.
And here’s another budget bathroom remodel you might get some ideas from!
Want to come back to this project later? Just pin the image below!
Are you following on social media?

Suzanne Melton says
Excellent tutorial.
Tip for your “Step 2 Using a stud finder, locate and mark all the studs along the walls”
Using short pieces of blue painter’s tape, place the tape on the floor or ceiling (or both).
Once everything was painted, we had no idea where the studs were located for mounting shelving, etc. The blue tape is easily removed and we didn’t need to use a stud finder AGAIN.
Jenna says
Girl, you are one smart cookie! Thanks for that tip!
mireille says
It looks very pretty! I am glad you found a way to do it on a budget!
Roseann Hampton says
Great tutorial! And wow what a difference! Thanks for sharing with us at The Blogger’s Pit Stop!
Kim @Serving Up Southern says
Hi Jenna!
Love what you did with the bathroom walls. I wanted to let you know you’re one of this week’s features at Homestyle Gathering link party. Thanks so much for sharing! I hope your week is off to a good start.
>>> Kim
Jenna says
Thanks so much, Kim!
Sarah says
I was wondered how you removed the glue that was left from the tile or did you not have to? I’m in the process of looking for ideas and tips on how to do my boyfriends outdated and falling apart bathroom.
Jenna says
The remaining glue was covered up by the wood panels. 🙂
Tina says
Is this recommended for around a tub/shower area as well? Only concerned about it being water proof? I know that there is water proof paint. Would that be sufficient if you covered it well to prevent mold?