Category: DIY Projects

Budget DIY projects to give your home a high-end custom look, but on a budget.

  • 10 Ralph Lauren Inspired Projects

    10 Ralph Lauren Inspired Projects

    The Ralph Lauren Soiree was another success for the Summer Style Series!

    Here are 10 Ralph Lauren inspired projects that stole the show!

    Get ready for navy overload!

    Love these classic style ideas! 10 Ralph Lauren Inspired Projects

    10 Ralph Lauren Inspired Projects

    10 Ralph Lauren Inspired Projects {rainonatinroof.com} #ralphlauren

    Ralph Lauren Monogrammed Shirt from Lucky Scarf

    10 Ralph Lauren Inspired Projects {rainonatinroof.com} #ralphlauren

    Ralph Lauren Aqua & White Striped Tray from May Richer Fuller Be

    10 Ralph Lauren Inspired Projects {rainonatinroof.com} #ralphlauren

    Ralph Lauren Inspired Barstools from Rain on a Tin Roof

    10 Ralph Lauren Inspired Projects {rainonatinroof.com} #ralphlauren

    Ralph Lauren Bedding from Southern State of Mind

    10 Ralph Lauren Inspired Projects {rainonatinroof.com} #ralphlauren

    Ralph Lauren Chest Makeover from Our Fifth House

    10 Ralph Lauren Inspired Projects {rainonatinroof.com} #ralphlauren

    How to get the Ralph Lauren Look from Craftivity Designs

    10 Ralph Lauren Inspired Projects {rainonatinroof.com} #ralphlauren

    Ralph Lauren Brickmaster Table from Effortless Style

    10 Ralph Lauren Inspired Projects {rainonatinroof.com} #ralphlauren

    DIY Nautical Inspired Ralph Lauren Drapes from Amy Krist Interiors

    10 Ralph Lauren Inspired Projects {rainonatinroof.com} #ralphlauren

    Ralph Lauren Denim from Pinterest Told Me To

    10 Ralph Lauren Inspired Projects {rainonatinroof.com} #ralphlaurenRalph Lauren Inspired Living Room from The Coconut Head

    Want more designer inspired projects?

    13+ Kate Spade Inspired Projects – if Kate is your thing, don’t miss these!

    8 Jonathan Adler Projects – modern and colorful!

    Love Lilly Pulitzer? Here are 10+ projects inspired by her! 

    You know you don’t wanna miss any of this crazy.

    Sign up to get my posts delivered to your inbox here.

    Stalk Me Here:

    Pinterest / Facebook / Twitter / Instagram

  • DIY Monogram Tray (A Great Gift Idea)

    DIY Monogram Tray (A Great Gift Idea)

    I loved how the first monogrammed tray I did turned out. Lindsay loved getting it for her birthday, and it is beautiful in her home. In fact, I loved it so much that I made another one for a friend who is getting married in October and I have one for myself in the works.
    DIY Monogram Tray
  • 40+ Gold Home Decor Projects

    40+ Gold Home Decor Projects

    Sign up here to get more posts like this one delivered to your email for free!  

    Gold is back, baby! And I am loving it!

    Here are 40+ gold home decor projects!

    This is a huge round-up, but there is some amazing inspiration to be had here!

    40+ gold home decor DIY Projects and Crafts | Easy Home Projects | Easy Crafts | Home Decor Ideas

    This post contains affiliate links. 

    How to Glitter Mason Jars via RainonaTinRoof.com #glitter #crafts #masonjar #modpodge

    Gold and Pink Glittered Mason Jars

    Those mason jars are only $3 each!

    Made from a $1 rubber snake! DIY Snake Bud Vase

    DIY Snake Bud Vase

    Yea, its a little weird, but you have to admit this snake bud vase using a heat gun is super creative.

    Sequined Coat Hangers via RainonaTinRoof.com #lifequotes #sequins #coathanger

    Gold Sequined Coat Hangers + Free Printable Quote Art

    Just when you thought a coat hanger couldn’t get any better…

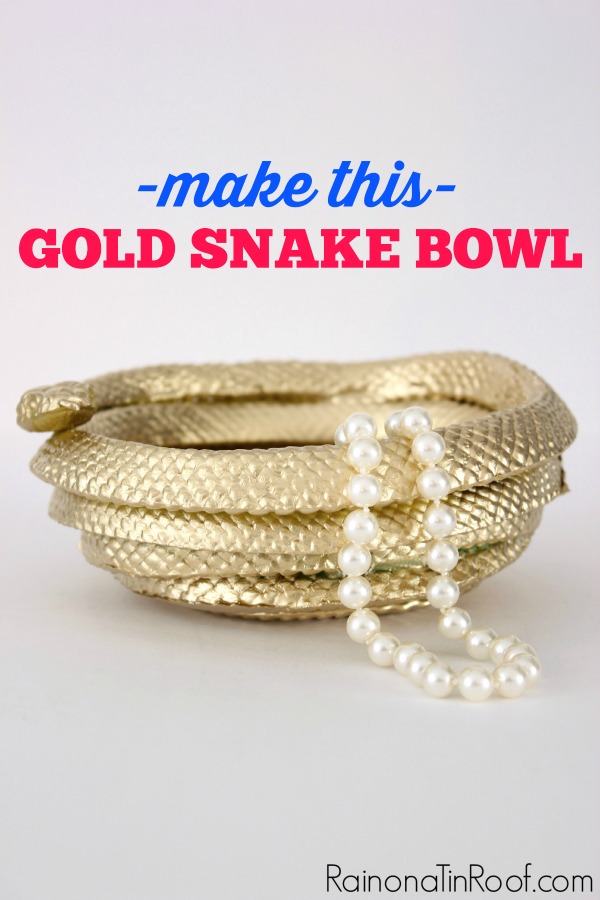
    Had no clue you could do something like this with a heat gun! So many possibilities! DIY Gold Snake Bowl via RainonaTinRoof.com

    DIY Golden Snake Bowl

    Another slightly weird, but creative project.

    40+ Gold Projects {rainonatinroof.com} #gold #DIY #craft

     Rub ‘N Buff Gold Corners

    Use Rub ‘N Buff to add a touch of gold detail to the corners of frames.

    40+ Gold Projects {rainonatinroof.com} #gold #DIY #craft

    DIY Decorative Horse Accessories

    Toy horses + Gold Spray Paint = Love.

    40+ Gold Projects {rainonatinroof.com} #gold #DIY #craft

    Blue & Gold Dipped Barstool

    40+ Gold Projects {rainonatinroof.com} #gold #DIY #craft

    Kate Spade Inspired Lamp Makeover

    40+ Gold Projects {rainonatinroof.com} #gold #DIY #craft

    Two Twenty One: Glitter State Art

    40+ Gold Projects {rainonatinroof.com} #gold #DIY #craft

    The Glitter Guide: DIY Gold Leaf Pots

    40+ Gold Projects {rainonatinroof.com} #gold #DIY #craft

    View Along the Way: Rub ‘N Buff Lamp Makeover

    40+ Gold Projects {rainonatinroof.com} #gold #DIY #craft

    Cosy Carolina: Gold Shade

    40+ Gold Projects {rainonatinroof.com} #gold #DIY #craft

    AKA Design: Gold Sharpie Animal Print Bowls

    40+ Gold Projects {rainonatinroof.com} #gold #DIY #craft

    An Extraordinary Day: Gold Clam

    40+ Gold Projects {rainonatinroof.com} #gold #DIY #craft

    Dimples & Tangles: Green & Gold Lamp Makeover

    40+ Gold Projects {rainonatinroof.com} #gold #DIY #craft

    Our Fifth House: Gold Chair

    40+ Gold Projects {rainonatinroof.com} #gold #DIY #craft

    Live Life Beautifully: Gold & White Bowls

    40+ Gold Projects {rainonatinroof.com} #gold #DIY #craft

    Worthing Court: Pops of Gold in the Dining Room

    40+ Gold Projects {rainonatinroof.com} #gold #DIY #craft

    A Pumpkin and a Princes: Gold Glitter Candles

    40+ Gold Projects {rainonatinroof.com} #gold #DIY #craft

    Suburble: Gold Jewelry Organizer

    40+ Gold Projects {rainonatinroof.com} #gold #DIY #craft

    Creative Soul Spectrum: DIY Elephant Key Hooks

    40+ Gold Projects {rainonatinroof.com} #gold #DIY #craft

    Burlap & Lace: Gold Dipped TV Console

    40+ Gold Projects {rainonatinroof.com} #gold #DIY #craft

    Jenna Beth: Gold Dinosaurs

    40+ Gold Projects {rainonatinroof.com} #gold #DIY #craft

    Honey Bear Lane: Gold Dipped Barstools

    40+ Gold Projects {rainonatinroof.com} #gold #DIY #craft

    Carissa Miss: Free Gold Glitter Animal Printables

    40+ Gold Projects {rainonatinroof.com} #gold #DIY #craft

    hi sugarplum: Gold Dot Vase

    40+ Gold Projects {rainonatinroof.com} #gold #DIY #craft

    Fabulous K: Gold and White Office

    40+ Gold Projects {rainonatinroof.com} #gold #DIY #craft

    Design + Fluff: Rub ‘N Buff Wall Treatment

    40+ Gold Projects {rainonatinroof.com} #gold #DIY #craft

    Cottage at the Crossroads: Gold Plaster Leaves

    40+ Gold Projects {rainonatinroof.com} #gold #DIY #craft

    Marty’s Musings: Gold Framed Map Print

    40+ Gold Projects {rainonatinroof.com} #gold #DIY #craft

    Girl in the Garage: Gold Dipped Feet

    40+ Gold Projects {rainonatinroof.com} #gold #DIY #craft

    Girl in the Garage: Black and Gold Mirror

    40+ Gold Projects {rainonatinroof.com} #gold #DIY #craft

    A Little Claireification: DIY Gold Home Decor

    40+ Gold Projects {rainonatinroof.com} #gold #DIY #craft

    Renew Redo: Rub ‘N Buff Chest of Drawers

    40+ Gold Projects {rainonatinroof.com} #gold #DIY #craft

    Making Lemonade: Gold Faux Bois Tray

    40+ Gold Projects {rainonatinroof.com} #gold #DIY #craft

    Just Paint It: Antique Gold Faux Finish

    40+ Gold Projects {rainonatinroof.com} #gold #DIY #craft

    AKA Design: Gold Glittered Ampersand Art

    40+ Gold Projects {rainonatinroof.com} #gold #DIY #craft

    Dimples and Tangles: Gold Accent Wall

    40+ Gold Projects {rainonatinroof.com} #gold #DIY #craft

    Fresh Idea Studio: Upcycle Ugly Art with Gold

    40+ Gold Projects {rainonatinroof.com} #gold #DIY #craft

    Our Fifth House: Rub ‘N Buff Greek Key Tray

    40+ Gold Projects {rainonatinroof.com} #gold #DIY #craft

    Atta Girl Says: Gilded Seashells

    40+ Gold Projects {rainonatinroof.com} #gold #DIY #craft

    Cuckoo 4 Design: Gold Monogrammed Greek Key Bookend

    40+ Gold Projects {rainonatinroof.com} #gold #DIY #craft

    Two Twenty One: DIY Gold Striped Vase

    Hope you are full of gold inspiration now!! I’m headed to break out my gold spray paint and Rub ‘N Buff!
    pin-this-post
     
    GOLD is back, baby!! Awesome ideas here - mostly easy DIYs that anyone can do! 40+ DIY Gold Projects via RainonaTinRoof.com

    Sign up to get my posts delivered to your inbox here. 

    You know you don’t wanna miss any of this crazy.

    Stalk Me Here:

    Bloglovin / Pinterest / Facebook / Twitter / Google+ / Instagram


    SaveSave

  • DIY Monogram Photo Art with All You Magazine

    DIY Monogram Photo Art with All You Magazine

    Heard of all you before? All you is a magazine dedicated to its title. Its all about you and how you can live a better life.

    Disclosure: This post is part of a social shopper marketing insight campaign with Pollinate Media Group® and All You, but all my opinions are my own. #lifeforless #pmedia

    All you shows you ways to save money while still living life to the fullest.  Saving money doesn’t have to mean that you go without or that you can’t have fun! All you shows you how to save money (and gives you lots of coupons to help) while still enjoying life! Each and every all you magazine includes numerous coupons, money saving ideas, frugal family activities, recipes, fun craft and decor ideas.

    A couple weeks back, I headed over to my local Dollar General store.

    all you magazine at Dollar General

    And what was staring back at me at the checkout line?

    all you magazine at Dollar General

    all you! That’s right, all you is now available at the Dollar General! July’s issue was loaded with affordable summer fashion, new recipe ideas, money-saving apps, and ways to erase your debt among other awesome things. As I was perusing the magazine, I stumbled upon an article about re-vamping thrifted frames and creating your own wall art, which made me think about a frame I had picked up on clearance  a couple months back. No, it wasn’t a thrifted frame, but it was a large frame on clearance for $5 because it had some dents and dings. The frame had just been sitting down in my craft room collecting dust. With the help from all you, I knew I could turn that frame into some great wall art. I gathered my supplies:

    Monogram Photo Art {rainonatinroof.com} #monogram #photo #art #diy

    I didn’t have one large photo that I wanted to frame, but the all you article was about thinking outside the box for wall art, so I decided to take  four – 4×6 black and white photos and form some monogram photo art with them against some wrapping paper.

    There was some paint that had been scraped off on one side of the frame, so I touched it up with some white acrylic paint. I wanted to add a little bling to the frame with gold Rub ‘N Buff, so I taped off the corners to keep clean edges and rubbed some Rub ‘N Buff on.

    Monogram Photo Art {rainonatinroof.com} #monogram #photo #art #diy

    I cut the wrapping paper to size by simply placing the glass on top of the paper and tracing the size onto the paper then cutting it out. I used photo mounts to attach the photos to the wrapping paper.

    Monogram Photo Art {rainonatinroof.com} #monogram #photo #art #diy

    And the end result:

    monogram photo art 2

    monogram photo art

    So, what do ya think?! Thanks all you for the inspiration!

    Looking for more easy wall decor? Check these out:

    How to Make a Silhouette the Easy Way – easy peasy!

    Sassy Fabric Covered Message Board – up the wow factor on those boring bulletin boards!

    Vintage Nursery Rhyme Art – so sweet and easy!

    Song Lyrics as Wall Art – turn your favorite song into art!

    DIY Wall Art with Picmonkey – learn how to make your own art!

    You know you don’t wanna miss any of this crazy.

    Sign up to get my posts delivered to your inbox here. 

    Stalk Me Here:

    Pinterest / Facebook / Twitter / Instagram

  • 10+ Lilly Pulitzer Inspired Crafts and Projects

    10+ Lilly Pulitzer Inspired Crafts and Projects

    No one does colorful and summer better than the colorful summer queen herself, Lilly Pulitzer.

     Here are over 10 colorful DIY and craft projects that are Lilly worthy!

    So much color!! Perfect for summer! 10+ Lilly Pulitzer Inspired Projects

    Lilly Pulitzer Inspired Projects

    lilly pulitzer wreath 6

    Lilly Pulitzer Inspired Wreath

    Lilly Pulitzer Inspired Decorating

    Lilly Pulitzer Prep School from Commona-My House

    Lilly Pulitzer Inspired Tote
    DIY Summer Tote from Country Peony
    Lilly Pulitzer Hair Accessory Organizer from Our Fifth House
    Lilly Pulitzer Inspired Home Projects
    Lilly Pulitzer Inspired Decor

    Lilly Pulitzer No-Sew Monogram from Effortless Style

    Lilly Pulitzer Inspired Bar Cart Decor
    Lilly Pulitzer Inspired Cocktail Cart from Southern State of Mind
    Lilly Pulitzer Printable Quote
    Lilly Pulitzer Typographic Quote Art from May Richer Fuller Be
    Lilly Pulitzer Inspired Decor
    Lilly Pulitzer Inspired Dresser Makeover
    Looking for more great designer inspired projects? Here ya go!

    You like Ralph Lauren style? See these projects then!

    More of a Jonathan Adler person? Right here are projects inspired by him!

    Kate Spade girl? This way then!

    You know you don’t wanna miss any of this crazy.

    Sign up to get my posts delivered to your inbox here.

    Stalk Me Here:

    Pinterest / Facebook / Twitter / Instagram

  • Lilly Pulitzer Inspired Wreath

    Lilly Pulitzer Inspired Wreath

    Our second style icon for the summer soiree…Lilly Pulitzer.

    Begin channeling bright floral prints, the sunshine, and all things fun.

    My Lilly project:

    DIY Lilly Pulitzer Inspired Wreath

    A Lily Pulitzer Inspired Wreath.

    And it may or may not be considered somewhat of a semi-fail…..I’ll explain in a bit…..

    The minute I saw that bright floral fabric – I immediately thought Lily and thanked God because I had no clue what I was going to do for my Lily project until I saw it. Just to be sure, I wasn’t delusional, I sent a picture of the fabric to my friend, Lindsay, with “Lily, right???” below the picture. She concurred that the fabric was most definitely Lily.

    Here’s what I used to make this wreath:

    DIY Lilly Pulitzer Inspired Wreath
    – Wreath Form

    – 1/4 – 1/2 yard of fabric (Mine came from Hobby Lobby)

    – Grosgrain Ribbon

    – Hot Glue Gun

    – Scissors

    – Bling (I used vintage brooches, old cheap rings and earrings.)

    Disregard the felt and pearls in the above photo. That was part of the fail. I told you, I’ll get there in a minute – I know you are dying to know.

    First, lay your wreath out on the fabric. I bought WAY too much fabric. I bought 1 yard and probably only used 1/4 – 1/2 a yard.

    Cut a small hole in the middle of fabric that is inside the wreath form and then triangle slits in the fabric that is inside the wreath form. That may not make sense, but check out the below pictures to see what I’m talking about.

    DIY Lilly Pulitzer Inspired Wreath
    DIY Lilly Pulitzer Inspired Wreath
    Begin wrapping the wreath with the triangles and securing them with hot glue.
    DIY Lilly Pulitzer Inspired Wreath
    DIY Lilly Pulitzer Inspired Wreath
    DIY Lilly Pulitzer Inspired Wreath
    Trim the excess fabric as needed.

    At this point, I tried making brightly colored felt flowers. FAIL. They looked horrendous.

    Plan B: Vintage brooches, old earrings and rings.

    DIY Lilly Pulitzer Inspired Wreath
    I just stuck the brooches right through the wreath form. I really love some of them, so I wanted to be able to easily pull them out and wear them if I wanted to one day. I used hot glue on the old earrings.

    At this point, I thought I was done. Wrong. When I put it up, there was styrofoam showing where I had cut the fabric.

    Plan C: Cover showing styrofoam with ribbon.

    DIY Lilly Pulitzer Inspired Wreath
    New problem: when the wreath is hanging the aqua ribbon just squishes up behind the wreath and looks horrible. Fantastic.

    Plan D: Cut strips from gift box to re-inforce the ribbon and make it stand up, rather than be squished.

    DIY Lilly Pulitzer Inspired Wreath
    DIY Lilly Pulitzer Inspired Wreath
    I cut two strips and hot-glued it behind the aqua ribbon.

    Another new problem: cardboard strip now shows on one side.

    Plan E: Glue aqua ribbon on other side of cardboard strip.

    DIY Lilly Pulitzer Inspired Wreath

    Finally, all systems are a go. Except for the fact that the ribbon still looks a little funny. But, at this point, I was done solving wreath problems. I was ready to move on to world peace.

    Lilly Pulitzer Wreath
    Lilly Pulitzer Inspired Wreath
    Lilly Pulitzer Wreath
    Lilly Pulitzer Wreath
    Lilly Pulitzer Wreath

    Complete fail?

    Semi-Fail?

    1/4 Fail?

    Would Lilly approve?

    Want more Lilly Inspired projects – here are 10+ of them! 

    You like Ralph Lauren style? See these projects then!

    More of a Jonathan Adler person? Right here are projects inspired by him!

    Kate Spade girl? This way then!

     You know you don’t wanna miss any of this crazy.

    Sign up to get my posts delivered to your inbox here.

    Stalk Me Here:

    Pinterest / Facebook / Twitter / Instagram

  • 13 {Inspired by} Kate Spade DIY Projects

    13 {Inspired by} Kate Spade DIY Projects

    This post contains affiliate links for your shopping convenience. Click here to read my full disclosure policy.
    These Kate Spade DIY Projects are sure to have you running for your gold and kelly green spray paint!
    DIY Kate Spade Decor | DIY Kate Spade Office | DIY Kate Spade Party | Kate Spade Decor | Kate Spade Crafts | Easy Crafts
    Here are 13 amazing {inspired by} Kate Spade projects to make your mouth water!

    13 Kate Spade Inspired Projects

    Kate Spade Knock-Off Photo Frame #katespade #knockoff #photo #diy #craft
    Kate Spade Inspired Shoe Makeover
    My Life on the Divide {DIY Kate Spade Terry Flats}
    Kate Spade Inspired Chair Makeover
    Kate Spade Inspired Pitcher
    Kate Spade Inspired DIY Bow Necklace
    Kate Spade Inspired Shoe Makeover
    Kate Spade Inspired Home Decor
    Kate Spade Inspired Outfit
    Pinterest Told Me To {Kate Spade Color & Pattern}
    Kate Spade Inspired No Sew Tote Bag
    Our Fifth House {Kate Spade Inspired DIY No-Sew Tote Bag}
    Kate Spade Inspired Home Decorating
    Kate Spade Inspired Knockoff Bracelet
    Inspiration & Realisation {DIY Leather Bow Cuff Bracelet}
    Kate Spade Inspired Table Decor
    Have you ever made a Kate Spade DIY project before?

    Need more designer knock-offs? Here you go!

    You know you don’t wanna miss any of this crazy.

    Sign up to get my posts delivered to your inbox here.

    Stalk Me Here:

    Pinterest / Facebook / Twitter / Instagram

    SaveSave

  • Simple and Cheap Kate Spade Inspired Lamp Makeover

    Simple and Cheap Kate Spade Inspired Lamp Makeover

    I am so flippin’ excited to show you this lamp. I. Love. It. Even Grunt Labor loves it. First, I must thank Heather from Southern State of Mind for inviting me to co-host the Summer Soiree Style Series which made me start thinking Kate Spade, which made me think Kelly Green, which led to “Hmmm……a kelly green lamp……hmmmmm……” and it all resulted in this beauty.

    Kate Spade Inspired Lamp Makeover

    Kate Spade Lamp Makeover
    This post contains affiliate links for your shopping convenience. Click here to read my full disclosure policy.
    Honestly, I shocked myself, y’all. I would have never dreamed I could pull this off. I originally got this lamp from my aunt and it looked like this then.
    Kate Spade Lamp Makeover: The lamp before
    Kate Spade Lamp Makeover: The lamp before
    Initially, I wanted to put polka dots on the lamp base, but I didn’t feel like I could do that very well with all the curves and shapes on the lamp. I did tape off a strip along the base to keep some of the gold before painting it.
    Kate Spade Lamp Makeover: The lamp before
    I used Rustoleum’s Meadow Green for the base and finished it off with a gloss top-coat.
    Before I had even started on the lamp, Jamie from Better With Age and I had been emailing each other and talking about the soiree. I told her I was stressing out about what projects to do and she had said, “Oh, Kate Spade is easy. Do something with polka dots, like a lampshade.” And so when the polka dots on the lamp base didn’t work out, I turned to Jamie’s idea of a polka dotted lamp shade. Thank. You. Jamie.

    Kate Spade Lamp Makeover

    I picked up an $8 lampshade from Target, FolkArt Metallic Gold Acrylic Paint, and a round-sponge-thing-a-ma-bob. I said a little prayer (because I hate paying retail for something and then not being able to take it back when it doesn’t work) and went to polka-dotting.
    Kate Spade Inspired Lamp Makeover
    And it worked. And I thanked God and had a beer, because I was a nervous wreck putting those polka dots on that shade.
    Kate Spade Inspired Lamp
    I took it upstairs to show Grunt Labor my handy-work. His response: “Wow. Go put it somewhere where we can’t mess it up. And by we, I mean me. That lamp is great.”
    Kate Spade Lamp Makeover
    Its a keeper. I guess he is too, if he likes the Kate Spade lamp.
    Love a great lamp makeover, a DIY lamp or just general lamp ideas? Don’t miss these 16 lamp ideas and makeovers then!

    You know you don’t wanna miss any of this crazy.

    Sign up to get my posts delivered to your inbox here. 

    Stalk Me Here:

    Pinterest / Facebook / Twitter / Instagram

    SaveSave

  • Tutorial: Frugal DIY Wall Art

    Tutorial: Frugal DIY Wall Art

    After posting my DIY wall art for my master bedroom makeover, there were a few people who asked for a tutorial of how to make them. So here ya go, y’all.

    DIY Wall Art with Picmonkey Tutorial

    This post contains affiliate links for your shopping convenience. Click here to read my full disclosure policy.

    I did this all in Picmonkey.

    Supplies: 
    –Graphics / Images in .png format (.png gives the images a transparent background)
    –Backgrounds of your choice

    I bought images on Etsy from GraphicDreamz and from Graphique. When you order, just specify in the message that you would like the .png file.

    I bought backgrounds from Maishop Digital Art and Gidget Designs, both on Etsy.
    Okay, now down to business.
    What I did first, was size my backgrounds. I wanted all of these to be 11×14 prints (including backgrounds) in the end. I wanted to use two backgrounds, the coral and the linen to make the prints pop. See how the image below is on a linen background, the linen is on the coral pattern, and the coral is on the same linen background again.
    Tutorial for DIY wall art using Picmonkey.
    I also noted above what size crops to use for each background. The linen background that the elephant is on is 5×7, the coral is 8×10, and the back linen is 11×14. Just because I made these an 11×14 doesn’t mean I have to print them out that size. I just wanted standard dimensions to work with.
    To size your backgrounds:
    1. Go to Picmonkey.
    2. Select edit a photo near the top.
    3. Select whatever background you are using. I’m going to use my linen background first.
    4. Once the background appears, select the 1st button on the left under editor, which is the basic edits button.
    5. Select crop.
    6. In the drop down menu that says “no fixed proportions”, select the size you want to use. I’m doing my first linen background first, so I am selecting 5×7.
    Use Picmonkey to make cheap wall art.
    7. Look at the crop screen to the right on your background. If what is in the crop regions works for you, hit apply. If the crop regions do not include part of the pattern you want, then move around the box, but don’t make the box bigger or smaller.
    8. Save the background. Do not save it as the original file. I saved mine as “5×7 linen background”.
    9. If you are using multiple backgrounds, as I did, you will need to repeat these steps for each background, cropping them to your desired size. Example: I cropped the coral one to an 8×10 and the back linen one to an 11×14 and saved them accordingly.
    Now, you are going to add your image to your background. I put my image on my 5×7 linen background.
    To put your image on your background:
    1. Go to Picmonkey.
    2. Select edit a photo near the top.
    3. Select the background you want your image to go on, NOT the image. I selected my 5×7 linen background. ****At this point: if you are using a horizontal image and your background is vertical, you will need to rotate your background under the basic edits button and rotate. I did this with mine.***
    4. Click on the overlay button on the left (the fifth button down).
    5. Select Your Own at the top.
    6. Find the image on your computer you are wanting to use, highlight it, and click open. I’m using my elephant. Your screen should look something like this, once you choose your image.
    DIY Wall Art with Picmonkey
    7. Use the circles on the corners of the image to make it bigger and then position it in the center of the background.
    8. When you are satisfied, save the entire image. I saved mine as “elephant on linen.”
    At this point, if you are just doing one background, you’re done! However, if you are doing multiple backgrounds, continue on!
    To add a second background:
    1. Go to Picmonkey.
    2. Select edit a photo near the top.
    3. Select the background you want to put under the image you just made. (This should be one of the backgrounds you have already sized. Mine is the 8×10 coral background.) Rotate if needed.
    4. Click on the overlay button on the left (the fifth button down).
    5. Select Your Own at the top.
    6. Find the first background with your image on your computer that you just did (mine is the elephant on the linen background), highlight it, and click open.Your screen should look something like this, once you choose your image.
    DIY Wall Art with Picmonkey Tutorial
    7. Just like you did with your last one, size the image to where it is center on the new background.
    8. Save it when you are satisfied. I saved mine as “elephant both backs.”
    If you want to add a third background:
    1. Go to Picmonkey.
    2. Select edit a photo near the top.
    3. Select the background you want to put under (in the very back) the image you just made. (This should be one of the backgrounds you have already sized. Mine is the 11×14 linen background.) Rotate if needed.
    4. Click on the overlay button on the left (the fifth button down).
    5. Select Your Own at the top.
    6. Find the last background you just made that has your image and two backgrounds (mine is the “elephant both backs” file. highlight it, and click open. Your screen should look something like this, once you choose your image.
    Make your own wall art with Picmonkey.
    7. Just like you did with your last one, size the image to where it is center on the new background.
    8. Save it. So I would know this was the final one, I saved it as “elephant final”.
    And now you are done. It seems like it takes a long time, but it really doesn’t. You only size your backgrounds once and when you get the hang of it, you’ve done an entire print in no time. I think it took me about 30 – 45 minutes to make 10 complete prints.
    And this was the longest blog post. Ever. Good Grief.
    Now, some of you that are familiar with PicMonkey are thinking “Why in the world didn’t she just do an overlay on top of an overlay on top of an overlay???!!” “Is she crazy?”
    Duh. We all already knew that. I tried the overlay on top of an overlay, yada-yada-yada method. But it just would not work for me. It wouldn’t let me re-size the backgrounds and image like I wanted it. Maybe some of you can get it to work for you.
    Now, go buy cute graphics and backgrounds (I think I paid around $15 for backgrounds and 9 or 10 images) from Etsy and make your own wall art.
    I have to go get a beer. Because this was the longest blog post ever. I know I already said that, I just wanted to re-inforce it. Love y’all!

    You know you don’t wanna miss any of this crazy.

    Sign up to get my posts delivered to your inbox here. 

    Stalk Me Here:

    Pinterest / Facebook / Twitter /  Instagram

  • DIY Decorative Horse Accessories

    DIY Decorative Horse Accessories

    Have you guys noticed all these decorative animal home accessories that are out lately? Like this…

    Silver Horse Home Accessory
    Or this one from Target that I have been eyeing for the past month…..
    White Horse Home Accessory

    Well, I couldn’t spend $30+ on one of these when I knew I would probably get tired of it soon. So, I decided to make my own decorative horse accessories.

    When I bought these little guys at the 127 yard sale months ago, my friend, Lindsay looked at me like I had gone bat-shit crazy.

    DIY Horse Accessories
    I had a plan, though. They would become something magical. That was in August. So, it only took 6 months for them to become something magical. Whoops.
    First, I spray painted them metallic gold. Gold makes everything magical.
    DIY Horse Figures
    I cut some old 2x4s we had into small rectangles. Then, I took that fabulous wrapping paper from Target that I put in the back of my liquor cabinet, and wrapped the 2x4s in it.
    Making your own home accessories.
    I used hot glue to seal the wrapping paper around the wood. I wanted it to stay put. Then, I just glued the horses on top. Just a dot on each horse’s foot.
    Make your own DIY horse home accessories.
    I thought about using them as bookends, but when I tried that, they were just too small against the books, so they just sit on top of the books now.
    DIY Horse Home Accessories
    By the way, these babies cost a quarter each, the wood was just lying around our house, I already had the spray paint, and the wrapping paper was $0.50 a roll and I barely used any of it for this. So less than $1 for both of these studs!
    DIY Horse Accessories
    Magical, right?
    Looking for more great DIY home accessories? Don’t miss these then:
    How to Make Faux Crystals – then turn them into finials, knobs, magnets and more!
    How to Make Lamp Tassels – adorn your lamps with these colorful little tassels that you can make in five minutes!
    DIY Agate Slice Lamp Finials – so easy to make and so pretty!
    DIY Selenite Knobs – turn beautiful selenite stones into pretty knobs for your furniture!

    Like what you see?

    Follow along:
  • Song Lyrics as Wall Art

    Song Lyrics as Wall Art

    I love music. In fact, I don’t just love music, I live music. If you have ever read my About Me page, you know that my musical tastes are incredibly varied. I’m talking Patsy Cline one minute and KISS the next. Yep, I’m that girl. I even made my daughter a playlist before she was born to make sure she was raised up on the classics. The child has yet to listen to an actual lullaby or kids song. We have dance parties to Jason Aldean, Scissor Sisters, and Poison among others. The wheels on the bus what? Not here. So, obviously, music is very important to me.

    When I chose the graphics to use for my DIY bedroom wall art, for the most part, I chose images that were special or had a connection to my husband and I in some way. Besides those prints, I wanted to put something else that had a significant meaning up. What better than song lyrics? So, I took lyrics from our favorite song and put together a print on Picmonkey to use song lyrics as wall art.

    This post contains affiliate links for your shopping convenience. Click here to read my full disclosure policy.

    Song Lyrics as Wall Art
    Yes, people, our favorite song is “Your Love” by The Outfield. I’m not older than Grunt Labor, and we don’t know a Josie, but on our second date this song came on, I turned it up, he looked at me and asked, “Do you like this song?” I responded with, “Its my favorite.” He smiled devilishly and drove on. Music has the amazing power to take you back to a place in time and this one takes me back to that exact moment.
    Enough mushiness.
    To make this in Picmonkey, all I did was upload a linen background that I used from the master bedroom wall art, then I wrote in the first few lines of the song, using different fonts for each line. I added the wreath type image (I’m not quite sure what that’s called) as an overlay. It was a graphic I already had, and then just added text in the middle of it to put our initial. The banner on the bottom right was an overlay available through Picmonkey.
    Now, I just need a frame for this along with the other new wall art.
    Frugal frame ideas, anyone?

    Looking for more easy wall decor? Check these out:

    How to Make a Silhouette the Easy Way – seriously, super EASY!

    Sassy Fabric Covered Message Board – super fun bulletin board!

    Monogram Photo Art – monogram art using family photos!

    Vintage Nursery Rhyme Art – don’t toss those old nursery rhyme books!

    DIY Wall Art with Picmonkey – when you can’t find the art you want, you make your own!

    You know you don’t wanna miss any of this crazy.

    Sign up to get my posts delivered to your inbox here. 

    Stalk Me Here:

    Pinterest / Facebook / Twitter / Instagram

  • DIY Corbel Shelving

    DIY Corbel Shelving

    I love corbels. I love old corbels, new corbels, white corbels, red corbels, big corbels, small corbels. Get the point? I really love old corbels with some history, but they have been super expensive when I have found them anywhere. So, alas, I must settle for Home Depot corbels. For our master bedroom makeover, I really wanted a corbel shelf. So, I got one. Grunt Labor and I just had to make it. We all know I’m too cheap to buy a pre-made $50 one.
    DIY Corbel Shelving:
    Easy DIY Corbel Shelf
    This was so simple y’all. We started out with an old floating shelf we had laying around.

    We bought two corbels at Home Depot like this.

    Corbel for DIY Shelving
    Source

    We added trim, like the kind we used on our built in bathroom shelving, to the edges of the floating shelf and attached the corbels to the bottom. I spray painted the whole thing with basic white spray paint. I WAS NOT going to try and coat every nook and cranny of those corbels with a paint brush. Here’s a closeup of the underside of the shelf so you can see how it all went together.

    DIY Shelf with Corbel Bracket

    Please accept my apologies for no pictures of us actually making this thing. There was a baby to contend with and we just wanted to get it done. But, this is so simple y’all, you really don’t need step by step photos.

    Grunt Labor finally hung it on the wall:

    DIY Corbel Shelving

    Whadda ya think? By the way, that julep cup and lamp are both Goodwill finds! Score!

    Need more shelving ideas? Be sure to see these then: 

    Simple Built-In Bathroom Shelving – easy and costs around $25!

    DIY Modern Rustic Bookshelf – a great bookshelf for storage that looks good and is easy to build!

    How to Build Wall-to-Wall Shelving – I did these in my daughter’s playroom and they’ve been a lifesaver!

  • DIY Metal Basket Shelving (With Old Locker Baskets)

    DIY Metal Basket Shelving (With Old Locker Baskets)

    As most of you know, I have an un-ending love for galvanized metal. This is particularly true of galvanized metal baskets. I especially love those old gym locker baskets. By love, I mean, if I see one for sale, my soul cries out, “You can’t leave it behind. (As long as its a reasonable price.)” I had a few that were sitting on the bottom of my entry table, basically un-used except for decoration. So I took them, turned them on their sides, bolted them to the wall, and they became cookbook holders.
    Metal Basket Shelving from Vintage Locker Baskets
    I heart them. And they were soooo easy to do. All we (ok, Grunt Labor) did was buy really big washers and put them on each side of the basket. (See below.) Make sure the washers are as big or bigger than the holes in the basket. One washer goes on the back of the basket and one on the corresponding front side. A smaller washer goes on top of the larger one in the front and a screw goes through it all. Easy peasy. We also used drywall anchors to make sure the baskets could hold plenty of weight.
    Mounting vintage locker baskets to make shelves.
    Mounting vintage locker baskets to make shelves.
    DIY Metal Basket Shelving
    DIY Metal Basket Shelving
    Metal Basket Shelving
    How to Make Metal Basket Shelving from Vintage Locker Baskets
    Simple, galvanized storage. Ahhh……
    What do you think about my basket shelving?
    Need more organizing & storage ideas? 
    Color Coded Organization  – simple, but effective at keeping the whole family’s clutter contained!
    12 Ideas for Organizing Your Home – great ideas that are doable!
    15 Days to a Clutter-Free Home – banish the clutter in just over two weeks!
    Coke Crate Tie Holder – creative storage for ties!
    You know you don’t wanna miss any of this crazy.

    Sign up to get my posts delivered to your inbox here.

    Stalk Me Here:

    Pinterest / Facebook / Twitter / Instagram

  • DIY Bathroom Shelves: Built In Bathroom Shelves for $25

    DIY Bathroom Shelves: Built In Bathroom Shelves for $25

    Everyone can always use a little more storage space, right? These DIY bathroom shelves are a great storage solution for your bathroom! Take advantage of that empty wall behind your toilet and build these bathroom shelves over the toilet for only $25. 

    Who else has one of those wasted spaces above the toilet?

    Ya know, the space where you hang a pretty picture trying to fill the void?

    Who else needs more bathroom storage?

    Who doesn’t?

    Well, I used to have one of those spaces above the toilet….

    and I used to need more bathroom storage……

    But then, Grunt Labor (being the powerful force he is) made these great bathroom shelves above the toilet to fit between the walls.

    DIY Bathroom Shelves Above Toilet

    Built-In Bathroom Shelves

    This post contains affiliate links for your shopping convenience. Click here to read my full disclosure policy.

    Materials and Supplies Needed:

    *Obviously, these shelves will vary in size depending on your space. Therefore, I have made notes as to how much to get in terms of how big your shelves are.1″ x 2″ x 8ft Furring Strips (supports for shelves – get 22 inches of this per shelf )

    • 1″ x 12″ x 10ft Common Boards (actual shelf surface – get pieces as wide as your shelves will be.)
    • Decorative Molding – I used basic chair rail. You’ll need as much of this as each shelf is wide.
    • Stud Finder
    • Nail Gun & Nails or Hammer and Finish Nails
    • Saw (either a miter saw, circular saw or handsaw. I used our miter saw. You could also pre-measure and have the pieces cut at your local home improvement store.)
    • Level
    • Measuring Tape
    • Pencil
    • Paint Color Of Your Choice

    Steps

    Step 1

    Cut two pieces of the furring strips at 11 inches long each.

    Mark your studs on the side walls.

    Using a nail gun or hammer and nails, attach one strip to each side wall where you want a shelf, making sure the strip is level.

    Built In Bathroom Shelves Over Toilet
    Step 2
    Cut your shelf tops, the 1″ x 12″, down to the opening size you have between the two walls or the measurement from edge to edge of the furring strip.
    Place the 1″ x 12″ on top of the furring strips and secure them down with nails.
    Bathroom Shelves Over Toilet

    Step 3

    Cut your molding to the same length as your shelves. Attach it to the front of the shelves using a nail gun or finish nails and a hammer.

    Step 4

    Repeat for as many shelves as you want, then finish with paint.

    Bathroom Shelf Storage Ideas

    It only cost about $25 to make both of these shelves. We did have some scrap wood laying around, but it shouldn’t cost you much more than that. Check the scrap lumber bins at Home Depot and Lowe’s for great deals.

    This open shelving makes great extra storage for toilet paper, decorative items and other bathroom necessities. On top of that, this a great space saver for bathrooms and helps to get things up off the floors!

    See how I built these same shelves, but bigger for storage in my daughter’s playroom HERE!

    Need more bathroom inspiration? You’ll want to see these then…

    Remodeling a Bathroom on a Budget – without compromising on style!

    Classic Blue and White Bathroom Remodel – on a budget!

    1st DIY Bathroom Renovation – on a budget too! This one was even featured in This Old House Magazine!
    2nd Bathroom Makeover – a little preppy, a little old school Hollywood glam!
    Want to come back to this tutorial later? Just pin the image below!
    Bathroom Shelves Above Toilet

    Sign up to get my posts delivered to your inbox here. 

    You know you don’t wanna miss any of this crazy.

    Stalk Me Here:

    Pinterest / Facebook / Twitter / Instagram

    DIY Built In Bathroom Shelves Above Toilet
  • DIY Tissue Paper Pom Poms (Easy and Fun)

    DIY Tissue Paper Pom Poms (Easy and Fun)

    Aren’t these tissue paper pom poms so fun?

    How to Make Tissue Paper Pom Poms
    Instead of a mobile in the vintage style nursery, I thought these would be much more pretty and stylish! And, we all know, my kid has gotta have style!
    DIY Tissue Paper Pom Poms
    I used this simple tutorial from Martha Stewart, that you can find here. All you need is tissue paper, floral wire and fishing line.
    Way easy and CHEAP!!!
    Tissue Paper Pom Poms Tutorial
    I also made some of these for my daughter’s blue and pink birthday party. And notice those little tissue paper flowers in the mason jar, there? I used the same tutorial for those as I did the poms, I just made them on a smaller scale.
    Looking for more great nursery ideas on a budget? Be sure to see these nine nursery ideas that won’t break the bank!

    Sign up to get my posts delivered to your inbox here. 

    You know you don’t wanna miss any of this crazy.

    Stalk Me Here:

    Pinterest / Facebook / Twitter / Instagram

  • How to Make a Lamp Out of a Bottle (Easier than you think!)

    How to Make a Lamp Out of a Bottle (Easier than you think!)

    Seen a few bottle lamps around that you love, but not the price tag? Learn how to make a lamp out of a bottle yourself! It’s actually pretty easy! 
    I’m sure you’ve seen many bottle lamps around. Aren’t they gorgeous? I just love them. However, they tend to have a high price tag. Luckily though, I’m going to show you how to make a bottle lamp yourself.
    DIY Bottle Lamp

    Making a lamp from a bottle is actually pretty easy!

    DIY Bottle Lamp

    Affiliate links included in this post.

    Materials Needed: 

    Steps

    Step 1

    Get your stuff together. Remember that awesome old wine bottle I bought at the Insyde Outsyde shop back in September?

    DIY Bottle Lamp
    Pottery Barn sells these bottles for a ridiculous amount of $$$, but luckily I found a great deal on one. I decided to turn it into a lamp!
    Step 2
    Follow the instructions on the bottle lamp kit.
    Turn a bottle into a lamp.
    The lamp kit is way easy to do. You’ll select the best size plug to go into your bottle top. An Xacto knife may be helpful to trim the plug if it’s a little too big. You’d rather it be too big than too small though.
    Once you find the correct size plug, you’ll attach the socket and wire as the directions say.
    How to Make a Lamp Out of a Bottle
    I also ran a bead of super glue around where the plug goes into the bottle to keep it nice and securely in there.
    Step 3
    Top it with a shade!
    I had a lampshade I’d found at a thrift store that I covered with burlap to work nicely with my lamp. I also added a ribbon detail along the edge.
    Make a bottle lamp.
    Finally, I had my very own DIY bottle lamp.
    How to Make a Lamp Out of a Bottle

    Did you know making a lamp from a bottle was so easy?

    Love a great DIY lamp or lamp hack? You’ll want to see these too then! 

    16 Lamp Ideas and Makeovers – you won’t believe some of these easy, but gorgeous lamp ideas!

    How to Make Your Own Lampshade and Finial – turn any fabric into a lampshade!

    DIY Agate Slice Lamp Finial – these are SO gorgeous, yet so simple to make!