Category: DIY Projects

Budget DIY projects to give your home a high-end custom look, but on a budget.

  • Make Fabric Stain Resistant and Waterproof for Less than $10

    Make Fabric Stain Resistant and Waterproof for Less than $10

    Don’t chance your upholstery to kids or another red wine spill again! Learn how to make fabric stain resistant and waterproof it at the same time for only about $20.

    Maybe you’ve figured out one of my dirty little secrets…

    Ya know how when you see my dining room, you’ve never really seen the cushions on the chairs?

    You may have seen a shot of the side of the chair seat, but not the whole thing.

    Well, ummm…..

    They were gross. Way gross and way past their makeover due date.

    But I have a two year old, so I didn’t really want to re-upholster them and have her destroy them again in 2.0 seconds.

    I looked longingly at fabric swatches, impatiently waiting for the day when my dining room chairs could shine once more.

    One day, I happened upon the tool that would make them shine – without worrying about stains. I discovered how to waterproof and repel stains on fabric.

    how to waterproof fabric with a waterproofing spray

    Disclosure: This post is sponsored by Thompson’s Waterseal. However, all gross seat cushions and opinions are 100% mine. This post contains affiliate links for your shopping convenience. Click here to read my full disclosure policy.

    How to Waterproof Fabric and Repel Stains

    This could quite possibly be one of the easiest, yet most valuable DIY projects of all time.

    For me and my circus of a two year old anyway.

    Here is a shot of one of my seat cushions before:

    The old stained upholstery before new DIY waterproofed fabric.

    Ugh. I purposefully did not zoom in – because well, its just gross. You could probably discern between spaghetti sauce, mustard, and / or ketchup and who knows what else.

    It was bad. Oh, and don’t worry about that brightly colored striped towel below the chair – its nothing new – just the catchall that sits under the kid’s chair when she loses her food.

    Innovative, I am.

    Materials and Supplies Needed:

    Step 1

    First off, you want to pick out pretty new fabric for your seats. I chose the gorgeous Williamsburg Portobello Vase Ladybug fabric from Online Fabric Store.

    I fell for it the moment I saw it. Its a reproduction of fabric from the real Williamsburg, so if you have a nerdy of love of history like me, that’s kinda cool. It also has so many colors that it can work with just about anything.

    Step 2

    Measure and cut out the fabric you will need. I took the seats off my chairs, then laid it on the fabric and cut around it leaving extra to go over the edges.

    Step 3

    Lay all your fabric pieces out on a clean surface. I used a tarp. Give each piece a coat of Thompson’s WaterSeal FabricSeal. You may want to do a test spray on a small piece of fabric first to make sure it doesn’t change the color. (Mine was fine – no color change.) You are spraying this on the RIGHT side up of the fabric – not on the back.

    Waterproof upholstery fabric using this fabric seal.

    You don’t want to saturate the pieces – just give them a nice even coat. Let them air dry for four hours, then give each piece another coat. Let them dry for four more hours, but wait 24 hours before exposing to moisture.

    Step 4

    Before you put them back on your seat cushions or make it into a pillow or whatever, you can test the seal by flipping water on the fabric to see if it will repel water now.

    DIY stain resistant fabric showing water repelled.

    See those little bubbles of water? That mean’s the fabric is sealed. If it wasn’t sealed, the water would have seeped into the fabric. If the water doesn’t “bubble,” give the fabric another coat.

    It took almost two cans for me to seal 6 pieces of large sized square cut pieces of fabric.

    DIY method for how to waterproof fabric on dining room chair upholstery.

    I am so happy to finally have pretty dining room chairs again.

    How to Make Interior Upholstery Fabric Stain Resistant - dining room chair upholstery that has been sealed.

    After I re-upholstered my cushions, I tested out the stain and spill repellent-ness of the fabric seal a little more.

    I took Coke and poured a little on one of the cushions.

    DIY stain resistant fabric showing coke not soaking in.

    I zoomed in so you could see the bubbling – it repelled the Coke!

    I used a paper towel to soak up the Coke and this is what it looked like afterward:

    Waterproofing spray used to waterproof upholstery fabric.

    Not a stain in sight!

    Take note: According to the can, Thompson’s does recommend that you reapply the seal after any cleanings and annually.

    Waterproofing sprays are also great to waterproof outdoor pillows and cushions that are always exposed to the elements.

    You can find Thompson’s WaterSeal FabricSeal here.

    Will you be stainproofing and waterproofing your upholstery now?

    You might also want to see these other cleaning hacks and decor tips…

    How to Clean Really Gross Vinyl Upholstery – the grime just melts off!

    How to Get Pet Stains and Odors Out of Your Carpet Naturally – no harsh chemicals!

    50+ Home Decor Fabrics under $15 a yard – gorgeous fabrics at low prices!

    If you want to remember this upholstery waterproofing tip for later, just pin the image below!
    How to Make Fabric Waterproof and Stain Resistant for Upholstery
    How to Waterproof Fabric and Make Fabric Stain Resistant done on dining room chair upholstery.
    Williamsburg Portobello Vase Ladybug
  • 20+ Duck Tape Crafts and Projects You’re Gonna Love

    20+ Duck Tape Crafts and Projects You’re Gonna Love

    You guys know I love me some quick and easy crafts and projects with Duct Tape – particularly gold duck tape. I have used it to embellish curtains, make DIY art, and to dress up a bookcase.

    Ya’ll, that’s just the tip of the iceberg, though. You aren’t going to believe some of these awesome Duct Tape Crafts and Projects that I’ve found. Get ready to be inspired!

    This post contains affiliate links for your shopping convenience. Click here to read my full disclosure policy.

    Duct Tape Crafts and Projects for the Home

    Get your fringe on!

    Seriously?! DUCK TAPE FRINGE! And its easy to make! Duck Tape Fringe Pillow: Dress Up Boring Pillows on the Cheap via RainonaTinRoof.com

    Embellish pillows, curtains, lampshades and more with fringe made from duck tape! Find out how easy it is to do here!

    Head for the bathroom.

    DIY Shower Cornice with Black & White Shower Curtains via RainonaTinRoof.com #diy

    Make a custom, but super simple, cornice for your shower and then embellish it with duck tape!

    Trim out your curtains.

    Duck Tape Trim Curtains via RainonaTinRoof.com #ducktape #ikeacurtain #hack

    Got boring curtains? Spice them up by trimming them out along the edges with duck tape!

    Make your own art.

    I made this DIY art with a gift bag, then spiced it up with a little gold duck tape!

    Get floral with it.

    Duct Tape Crafts and Projects via RainonaTinRoof.com #ducttape #ducktape #crafts #projects

    Seriously, who knew that duck tape flowers could be so stinkin’ cute? Four Generations One Roof knew. That’s who.

    Faux Gold-Leaf It Up.

    Duct Tape Crafts and Projects via RainonaTinRoof.com #ducttape #ducktape #crafts #projects

    Let me be honest. I have never attempted gold leaf. I think I could do this faux gold leaf from Shwin & Shwin though.

    Grace your mantel with garland.

    Duct Tape Crafts and Projects via RainonaTinRoof.com #ducttape #ducktape #crafts #projects

    Ok, as soon as I saw this easy breezy duct tape craft, I wanted one. Charming Zebra is full of great ideas and this garland is no exception.

    Give your refrigerator the Midas touch.

    Duct Tape Crafts and Projects via RainonaTinRoof.com #ducttape #ducktape #crafts #projects

    The Hunted Interior is also full of great ideas that are simple, but make a big impact – like this refrigerator.

    Go for stripes and polka dots.

    Duct Tape Crafts and Projects via RainonaTinRoof.com #ducttape #ducktape #crafts #projects

    One of my favorite blogs on the planet is Dimples and Tangles. She is just full of wonderful, beautiful ideas. She gave a wall and her ceiling the duck tape treatment.

    Make diamonds with it.

    Duct Tape Crafts and Projects

    Ok, we all know The Nester is brilliant and amazing. So brilliant and amazing that she made this accent wall out of duct tape.

    Add a houndstooth touch in seconds.

    Duct Tape Crafts and Projects via RainonaTinRoof.com #ducttape #ducktape #crafts #projects

    I am a huge houndstooth fan. Yes, I am an Alabama fan, but it is also a classic pattern that never dates. In My Own Style had the genius idea to cover a step stool with houndstooth duct tape.

    Make a wreath.

    Duct Tape Crafts and Projects via RainonaTinRoof.com #ducttape #ducktape #crafts #projects

    I am just dying over how adorable this duct tape flowers wreath is from The Country Chic Cottage.

    Adorn your candles with it.

    Duct Tape Crafts and Projects via RainonaTinRoof.com #ducttape #ducktape #crafts #projects

    How great are these metallic candles from Something Turquoise? I’m usually not a big candle fan,  but I love these.

    Add stripes to boring vases.

    Duct Tape Crafts and Projects via RainonaTinRoof.com #ducttape #ducktape #crafts #projects

    Hi Sugarplum is another absolute favorite blog of mine. See that fab vase? She made it with duct tape.

    Create art.

    Duct Tape Crafts and Projects via RainonaTinRoof.com #ducttape #ducktape #crafts #projects

    I love how simple, yet stunning this Duck Tape art is from Less Than Perfect Life of Bliss.

    Accessorize your outfit.

    Duct Tape Crafts and Projects via RainonaTinRoof.com #ducttape #ducktape #crafts #projects

    Typically, I would never consider Duck Tape for clutch. However, Ginger Snap Craftsmakes this one look cool.

    Make jewelry.

    Duct Tape Crafts and Projects via RainonaTinRoof.com #ducttape #ducktape #crafts #projects

    52 Mantels made this really cool color block jewelry using duck tape. I love those colors.

    Go for an easy IKEA hack.

    Duct Tape Crafts and Projects via RainonaTinRoof.com #ducttape #ducktape #crafts #projects

    I love this quick duct tape project from Amy Krist. Such an easy IKEA hack.

    Create a fun homework spot.

    Duct Tape Crafts and Projects via RainonaTinRoof.com #ducttape #ducktape #crafts #projects

    Artchoo! had the idea to cover a desk with duck tape – how fun would this be for a kid?

    A buck head for the win.

    Duct Tape Crafts and Projects via RainonaTinRoof.com #ducttape #ducktape #crafts #projects

    I love buck heads. Love ’em to pieces. This duck tape deer head from DIY Candy is amazeballs.

    Make a pouch.

    Duct Tape Crafts and Projects via RainonaTinRoof.com #ducttape #ducktape #crafts #projects

    Less Than Perfect Life of Bliss knows her duck tape, y’all. She also made this cool zippered pouch with it!

     And if you are looking for more cheap craft ideas using tape, don’t miss these 7 Super Simple, Super Cute Electrical Tape Crafts!

    pin-this-post
    Duct Tape Crafts | Duct Tape Crafts for Kids and Teens | DIY Duct Tape Crafts | DIY Duct Tape Projects | Duct Tape Ideas

    What home decor crafts with Duct Tape will you come up with?

    You know you don’t wanna miss any of this crazy.

    Sign up to get my posts delivered to your inbox here. 

    Stalk Me Here:

    Pinterest / Facebook / Twitter / Instagram

    SaveSaveSaveSave

    SaveSaveSaveSaveSaveSaveSaveSaveSaveSaveSaveSaveSaveSaveSaveSaveSaveSaveSaveSaveSaveSaveSaveSaveSaveSaveSaveSaveSaveSaveSaveSaveSaveSaveSaveSaveSaveSave

  • Stenciled Leopard Skin Accent Wall

    Stenciled Leopard Skin Accent Wall

    I hope you just started singing Guns ‘N Roses Welcome to the Jungle after reading that title.

    You’re welcome.

    As I told you when I revealed the guest bedroom and office makeover on Monday, this space is a 100% selfish act.

    When I started plotting this makeover, yes, I wanted guests to enjoy the room, but it was going to contain my workspace as well. And I would be the one spending the most time in here. So, come Hades or high water, this space would be whatever my little heart desired.

    And it is.

    When I showed you the guest bedding a few weeks back, I hinted that the back wall would be getting a serious treatment, so the bedding didn’t need to be too patterned.

    That back wall did get a serious treatment – a serious leopard skin accent wall treatment.

    Disclosure: Cutting Edge Stencils provided me with the materials for this project. However, all opinions and love for animal prints are solely my own.

    Leopard Skin Accent Wall via RainonaTinRoof.com #leopard #animalprint #accentwall #stencil #cuttingedgestencil (more…)

  • DIY Wall Decor with a Gift Bag

    DIY Wall Decor with a Gift Bag

    Guys, this may be one of my favorite Fifteen on Friday projects ever.

    Ok well, its right up there with the electrical tape lampshade, duck tape curtains, and lucite trays anyway.

    As you know, I am a huge fan of making my own DIY wall decor. I made my own prints with PicMonkey for my master bedroom, used the sassy printables on the sequined coat hangers, and  made my own silhouette art.

    This DIY modern art was by far one of the easiest home decor items I have ever created and I think it looks fab.

    And did I mention I made it with a gift bag?

    DIY Wall Decor with a Gift Bag via RainonaTinRoof.com #diy #walldecor #wallart #art #modernart (more…)

  • Super Easy No-Sew Upholstered Box Spring

    Super Easy No-Sew Upholstered Box Spring

    When I showed you the guest bedroom’s new bedding a couple weeks back, some of you guys asked about the upholstered box spring. I hadn’t really planned on posting about it because I’ve seen a few other tutorials out there on how to do it.

    But, since you asked, here is how I made my upholstered box spring. And of course, it’s no-sew. If I don’t have to sew – I don’t!

    DIY Upholstered Box Spring | Upholstered Bed | Upholstered Box Spring DIY | Fabric Covered Box Spring | How to Upholster a Box Spring

    (more…)

  • Duck Tape Trim Curtains

    Duck Tape Trim Curtains

    I hope you are ready for some great projects and inspiration! Today, I’m very excited to show you how I salvaged the curtains in my guest room / office instead of having to buy new ones.

    Duck Tape Trim Curtains via RainonaTinRoof.com #ducktape #ikeacurtain #hack
    Duck Tape Trim Curtains

    This post contains affiliate links for your shopping convenience. Click here to read my full disclosure policy.

    That’s right, people, I used Duck Tape on my curtains.

    When I was plotting out the guest bedroom and office, I knew something had to happen with the curtains. They were just basic IKEA white panels and they were boring. We had them left over from our old house and there they had been against dark blue walls and worked perfectly.

    I wanted to switch out the curtains completely and had them pulled down and ready to go in the yard sale pile.

    But………..

    I really didn’t want to spend money on new curtains. Surprise, surprise.

    So, I held onto them for a little while longer. And then one day, while meandering through Michael’s attempting to keep the kid from jumping out the cart and escaping my rule, I happened upon Gold Duck Tape. Gold Duck Tape. 

    My heart stopped.

    I had to catch my breath.

    And it was on sale.

    I snatched up two of those bad boys, the kid, and headed for the cash register.

    Because I didn’t have much time, and wanted to make this as easy as possible, I just put the Duck Tape along the edges of the curtains and called it done.

    Duck Tape Trim Curtains via RainonaTinRoof.com #ducktape #ikeacurtain #hack

    Check out the askew pull on that chest. Obviously, I’m a perfectionist.

    Duck Tape Trim Curtains via RainonaTinRoof.com #ducktape #ikeacurtain #hack

    The Duck Tape has been on the curtains for over a month and hasn’t budged.

    Duck Tape Trim Curtains via RainonaTinRoof.com #ducktape #ikeacurtain #hackWhat do you think? Can you embellish some curtains with Duck Tape?

    Want more great tape crafts, hacks and DIY projects? I love ’em too! Be sure to see these…

    There are 20+ Duct Tape craft and project ideas here! 

    Find out how to make gorgeous fringe out of duck tape to add to pillows, lampshades and more here!

    Got some electrical tape on hand – easily dress up a lampshade with it using this tutorial!

    And don’t miss these seven super simple, super cute electrical tape crafts either!

    You know you don’t wanna miss any of this crazy.

    Sign up to get my posts delivered to your inbox here. 

    Stalk Me Here:

    Pinterest / Facebook / Twitter / Instagram

    SaveSave

  • Sequined Coat Hangers

    Sequined Coat Hangers

    Last week when I showed you the faux wall moldings, many of you mentioned the sequined coat hangers.

    Who knew a coat hanger could be so fabulous?

    When I was trying to figure out how I could make frugal wall decor for the guest bedroom, I knew I wanted to have lots of inspiring and fun life quotes. I also wanted them to be fabulously displayed. And what better to display them with than sequined coat hangers.

    Sequined Coat Hangers via RainonaTinRoof.com #lifequotes #sequins #coathanger
    Sequined Coat Hangers

    This post contains affiliate links. 

    I bought an 8 pack of the Bumerang Curved Coat Hangers from IKEA for $5.

    Sequined Coat Hangers + Free Printable Life Quotes via RainonaTinRoof.com #lifequotes #sequins #coathangerI bought four small rolls of stretch sequin ribbon in gold from Michael’s. It took two rolls per coat hanger. I think each roll was about $4 regular. Use your coupons or wait till its on sale to get it cheaper! That’s what I did!

    Sequined Coat Hangers + Free Printable Life Quotes via RainonaTinRoof.com #lifequotes #sequins #coathangerAfter the sequin ribbon fabulous-ness was attained, I just wrapped it around the coat hanger, putting a dot of hot glue on the coat hanger every now and then to keep the ribbon in place.

    Sequined Coat Hangers + Free Printable Life Quotes via RainonaTinRoof.com #lifequotes #sequins #coathangerI used Rub ‘N Buff to make the bottom bar gold.

    I taped gold and white twine to the back from the Target Dollar Spot, then tied them on the coat hangers.

    Sequined Coat Hangers via RainonaTinRoof.com #lifequotes #sequins #coathanger

    And aren’t those prints so fun?

    Sequined Coat Hangers via RainonaTinRoof.com #lifequotes #sequins #coathanger

    I like to think of them as life quotes. Words to live by.

    Words to live by in my crazy life anyway.

    Get those life quotes as well as some other ones for free here! 

    Read about the faux wall moldings shown in this post here.

    If you liked this easy little craft, you’ll want to see these too…

    Learn how to make faux crystals and then turn them into gorgeous knobs HERE!

    Find out how to make a huge wall frame for super cheap HERE!

    You know you don’t wanna miss any of this crazy.

    Sign up to get my posts delivered to your inbox here. 

    Stalk Me Here:

    Pinterest / Facebook / Twitter / Instagram

    SaveSave

  • Faux Cowhide Rug DIY using Faux Cowhide Fabric for only $15

    Faux Cowhide Rug DIY using Faux Cowhide Fabric for only $15

    I love a great cowhide rug, but not the price tag that comes with them. I found a solution though with this faux cowhide rug I made for only $15. All you’ll need is some faux cowhide fabric and a few other things to make your own!

    I have been lusting after a cowhide rug for quite some time. The cowhide lampshade I made just wasn’t enough. I needed more.

    Honestly, I don’t know why I don’t already have one. As a girl who has spent the better part of her life around cows, how in the world I don’t already have my very own cowhide is beyond me.

    I have talked with my uncle about this problem, who is a cattle farmer. He has promised me that the next time a cow goes to the slaughterhouse, he will have them save the hide and we will tan it for a rug.

    Now that the whole world knows of his promise, I feel he must carry through on it. Don’t you think so?

    Talk about a great DIY post – tanning your own cow hide – that should be interesting.

    So, dear uncle, if you are reading this post, you are not off the hook just because I made a DIY version.

    For now though, this faux cow rug will have to suffice.

    Faux Cowhide Rug DIY

    This post contains affiliate links for your shopping convenience. Click here to read my full disclosure policy.

    Fake Cowhide Rug Tutorial

    The tutorials I have seen for DIY any-type-of-hide rugs have required painting on the pattern of the hide.

    People, I can paint a wall, a piece of furniture, or faux moldings like nobody’s business.

    Freehand the pattern on a hide? Houston, we have a problem.

    So, when I had fabric left over from my cowhide lampshade, I saw the sign….. and it opened up my eyes.

    Did you catch that Ace of Base reference?

    I didn’t have a large piece of fabric left over, so I opted for a small version of a cowhide rug. However, you can make your rug any size you wish – just buy enough cow print fabric to do so.

    Supplies & Materials Needed:

    Steps

    Step 1

    Lay out your fabric, animal printed side facing down.

    Faux Cowhide Fabric - lay on ground.

    For reference, my fabric was 62 inches x 59.5 inches. Again though, you can go as big as the fabric will let you.

    Step 2

    Pull up a real cowhide rug that you like online (I just did a Google search for one). Use the photo from online to sketch out the shape on your fabric – be sure to do this on the back! I would suggest doing this with a pencil, a real pencil, not a mechanical pencil. I didn’t have a real pencil on hand, only a mechanical pencil and that didn’t work, so I used a black marker.

    Fake Cowhide Rug - trace shape on fabric.

    It’s really not rocket science, folks. This isn’t hard at all and since you’re sketching on the back of the faux cow hide, there’s room for error.

    Step 3

    Once you’ve got it all sketched out, cut it out with sharp scissors.

    Cowhide Fabric for Faux Cowhide Rug - Cut Out

    Step 4

    If you plan on putting this in a low traffic area, you could flip it over and stop right here.

    But, if you plan on putting it in a higher traffic area, you want to protect the top of the rug from dirt and easily tearing. To protect mine, I flipped it cow print side up, stuck cardboard gift boxes under it, and rolled on a couple coats of Polycrylic.

    I let it dry for a couple of days, then put it in my vintage-modern-rustic living room where it fits in perfectly.

    Faux Cow Rug Tutorial

    I really like the two different rug patterns working with each other.

    Faux Cow Hide Rug DIY

    Is there a faux cow rug in your future?

    I think ours should work until the uncle comes through.

    Love a great rug hack?

    Be sure to check out these 14 painted rug hacks then!

    Here’s a cool way to upgrade an astroturf rug too!

    And don’t miss my trick for keeping rugs from sliding here!

    Want to come back for the instructions later? Just pin the image below then!

    DIY Cow Print Rug Tutorial

    Stalk Me Here:

    Pinterest / Facebook / Twitter / Instagram

    DIY Cow Hide Rug Tutorial

    SaveSave

  • Electrical Tape Lampshade

    Electrical Tape Lampshade

    Sometimes…

    Rarely…

    But it happens every once in a while…

    Totally out of the blue…

    I have a stroke of genius…

    Or genius for me anyway… I’m sure most of you guys are way above my level.

    As I was working on my guest bedroom / office makeover, I decided I needed a lamp for one of the nightstands.

    And if you’re gonna have a lamp, you’re gonna need a lampshade.

    So, I made over a lamp and picked up a basic white lampshade at Target for $8 on clearance.

    We all knew that basic white lampshade wasn’t going to stay basic and white.

    It needed something.

    So, I asked myself: “Self, what can we do that won’t cost a dime to this lampshade?’

    Self responded: “Self, grab the electrical tape, quick!”

    And the electrical tape was attained and a black and white striped electrical tape lampshade was born.

    Electrical Tape Lampshade via RainonaTinRoof.com #electricaltape #lampshade #fifteenonFriday

    This post contains affiliate links for your shopping convenience. Click here to read my full disclosure policy.

    This little black and white striped gem took about a whole five minutes to whip up.

    Materials and Supplies: 

    • Lampshade
    • Electrical Tape
    • Scissors

    Steps

    Step 1

    Cut strips of tape.

    Step 2

    Apply to lampshade.

    Obviously, you really didn’t need those steps, but I’m trying to be a good DIY blogger.

    DIY Electrical Tape Lampshade | DIY Lampshade | DIY Lampshade Ideas | DIY Lampshade Makeover | Lampshade Makeover

    Fun Fact: This lampshade didn’t work quite right on its intended lamp. Instead, it is sitting atop the Kate Spade lamp and the Kate Spade lampshade is on the recently made over lamp that you haven’t seen yet.

    DIY Electrical Tape Lampshade | DIY Lampshade | DIY Lampshade Ideas | DIY Lampshade Makeover | Lampshade Makeover

    Ok – now what will you use electrical tape on??

    Love a good lamp, lampshade or all things lamp related? And on a budget? Oh good –  you’ll love these then: 

    16+ Lamp Makeovers and Ideas

    Easy DIY Agate Slice Lamp Finials

    How to Make Custom Lampshades and Finials

    Looking for more cheap craft ideas using tape, then don’t miss these:

     7 Super Simple, Super Cute Electrical Tape Crafts

    20+ Duck Tape Crafts and Projects

    Duck Tape Trimmed Curtains

    Sign up to get my posts delivered to your inbox here. 

    You know you don’t wanna miss any of this crazy.

    Stalk Me Here:

    Pinterest / Facebook / Twitter / Instagram

    SaveSave

  • Faux Wall Moldings

    Faux Wall Moldings

    Today, you get to see another little piece of the guest bedroom and office.

    I’m still not quite done with the rest of the room as I told you on Tuesday, but I’m hoping I get to show you a full reveal next week.

    When I began plotting out this room makeover, I found some great inspiration photos on Pinterest. If you follow me there, you may have noticed I pinned a lot of black and white rooms that had some great black wall moldings.

    Disclosure: This post is sponsored by FrogTape, but you know how I roll, all opinions are 100% mine. This post contains affiliate links for your shopping convenience. Click here to read my full disclosure policy.

    Here’s the problem with wall moldings -they can be expensive.

    My solution?

    Faux wall moldings made with FrogTape and glossy black paint.

    Faux Wall Moldings via RainonaTinRoof.com #frogtape #faux #wallmoldings

    Faux Wall Moldings

    After I nailed down my measurements, these were pretty easy to do. From outside edge to outside edge, my moldings are 24 1/2 inches wide x 74 inches long. The bottom edge comes up 11 1/2 inches from the floor and the top edge comes down 10 inches from the ceiling. There is more room between the ceiling and top edge than the baseboard and the bottom edge. I did that on purpose – I may want to add faux crown molding one day!

    I determined the size by sketching lines on my wall to get an idea of how large I wanted the moldings. Be sure to write down your measurements before completing the next step.

    When I had the lines where I wanted them, I painted a rough rectangle right over the lines.

    Faux Wall Moldings via RainonaTinRoof.com #frogtape #faux #wallmoldingsNow, you need to put FrogTape over the black where your rectangle will go.

    To do this, you first need to measure back out your dimensions. You don’t have to draw the entire line again, just measure to where you want your tape edge to start and put a mark.

    After you have your marks, enlist help.

    Seriously, this step is done much easier with another person.

    I enlisted Bill, whose name isn’t really Bill, but he said he liked the name Bill. He told me he wanted to be on the blog. I said I needed help on a project that was going on the blog. He’s on the blog, I get help. Its a win-win for myself and for Bill.

    Now, have your helper, in my case, Bill, hold a level on the mark and make sure its level.

    Faux Wall Moldings via RainonaTinRoof.com #frogtape #faux #wallmoldingsOnce its level, run your FrogTape along the edge. Because I had just painted the black the day before, I used the FrogTape Delicate Surface for newly painted surfaces.

    Faux Wall Moldings via RainonaTinRoof.com #frogtape #faux #wallmoldingsDo your vertical and horizontal edges the same way. You’ll end up with this:

    Faux Wall Moldings via RainonaTinRoof.com #frogtape #faux #wallmoldingsNow, I didn’t just want a plain jane rectangle. We all know I’m not a plain jane kinda gal. So, I took some FrogTape Scalloped Shape Tape and put it in the corners.

    Faux Wall Moldings via RainonaTinRoof.com #frogtape #faux #wallmoldingsBe sure to trim up your corners evenly as well.

    After all your tape is up, paint over it with your existing wall color. In my case, white.

    Which took about five coats to cover the black.

    But, the end result was worth the five coats.

    Faux Wall Moldings via RainonaTinRoof.com #frogtape #faux #wallmoldings

    Faux Wall Moldings via RainonaTinRoof.com #frogtape #faux #wallmoldings

    Faux Wall Moldings via RainonaTinRoof.com #frogtape #faux #wallmoldings

    More projects in this post that may have caught your eye: 

    DIY Sequined Coat Hangers– so fun to use for display!

    How to Build a Desk Using Furniture You Already Have– I made this desk using an old kitchen table and a discarded hutch top!

    Free Sassy Printables – everyone needs a little sass in their lives, right?

    Where would you like to add faux molding?

    Sign up to get my posts delivered to your inbox here. 

    You know you don’t wanna miss any of this crazy.

    Stalk Me Here:

    Pinterest / Facebook / Twitter / Instagram

    SaveSave

  • DIY Acrylic / Lucite Trays for $5 or less in 5 minutes!

    DIY Acrylic / Lucite Trays for $5 or less in 5 minutes!

    I absolutely love having lots of pretty trays around my home. Lucite or acrylic trays (whichever you want to call them!) are perfect for corralling items in a stylish way. They can easily make your home look chic and organized at the same time. But, those clear acrylic trays can also be really expensive! Keep reading though to see how I created my own lucite trays for less than $5 and in five minutes! 

    I was ecstatic with all your comments last Friday when I introduced this new series, 15 on Friday! Thanks so much, y’all!

    This week’s 15 on Friday, I think, is FAB.

    This post contains affiliate links for your shopping convenience. Click here to read my full disclosure policy.

    See, I have this thing for lucite / acrylic. When Grunt Labor asked me what lucite was, my response was, “It’s the stuff dreams are made of.”

    Obsessed much? Probably too much.

    For Christmas, I asked for a plethora of lucite items from Anthropologie. One being this tape dispenser (that I got!) and another one, this lucite tray. Friends, that tray is $44. You can get this one cheaper – its $25.

    Or, you could make your own DIY lucite tray for $5 and in less than 5 minutes.

    And you can make the bottom prettier than those other ones.

    We have a winner! {Insert Price is Right theme song here}
    DIY Acrylic Tray

    DIY Lucite Tray

    Here’s what ya do.

    Step 1

    Go to Michael’s (mine came from Michael’s) or another craft store or maybe even Target and buy an acrylic frame and pretty paper (12 x 12).

    DIY Lucite Tray

    I got two frames – a larger one and smaller one – and by using a 40% coupon at Michael’s each was under $5. I think the paper was like $0.50 a sheet on sale.

    Step 2

    Now, unwrap the frames and flip them over.

    How to Make a Clear Acrylic Tray

    Step 3

    Pull out the cardboard backing.

    DIY Lucite Trays {Under $5 in 15 minutes} via RainonaTinRoof.com

    Instant clear acrylic tray.

    Now, this next step isn’t necessary, but if you want to add a bit more to your tray, you can easily add a little bling.

    Trace the tray’s shape on the back of the paper and cut it out. Pop it in the tray.

    Acrylic Tray

    Bling added.

    Were you expecting it to be more complicated? You should know by now that I love quick and easy projects with some bling.

    DIY Lucite Trays {Under $5 in 15 minutes} via RainonaTinRoof.com

    I sent my paper to work with Grunt Labor one day and had him laminate it. You don’t have to do this, but it just adds a little extra protection. You can also get that done pretty cheap at just about any office supply store. Or, you could even Mod-Podge it in there.

    DIY Lucite Trays {Under $5 in 15 minutes} via RainonaTinRoof.com

    Both trays are on my new office desk / hutch.

    The small one is holding my business cards (that need an update), extra gold animal push-pins, and my grandmother’s retro glasses that she wore while driving her beloved Cadillac.

    DIY Lucite Trays {Under $5 in 15 minutes} via RainonaTinRoof.com

    The larger one holds….

    DIY Lucite Trays {Under $5 in 15 minutes} via RainonaTinRoof.com

    An old Avon perfume bottle that is a cross between a giraffe and the Eiffel Tower?? Strange, but pretty when spray painted gold….

    Lucite Tray

    A fun (and inappropriate) coaster my friend Lindsay got me from Z-Gallerie.

    DIY Lucite Trays {Under $5 in 15 minutes} via RainonaTinRoof.com

    And the beloved lucite tape dispenser….

    DIY Lucite Trays {Under $5 in 15 minutes} via RainonaTinRoof.com

    What do you think of these DIY lucite trays? Better than a $40 one?

    Love a good tray hack or knock-off DIY? Then you’ll want to see these…

    This Faux Malachite Tray costs less than $10 to make.

    This DIY Monogrammed Tray makes a perfect gift.

    Learn how to make your own lucite frame – and get a free Gone with the Wind printable.

    You know you don’t wanna miss any of this crazy.

    Stalk Me Here:

    Pinterest / Facebook / Twitter / Instagram

    SaveSave

    SaveSave

  • DIY Kitchen Island with salvaged wood

    DIY Kitchen Island with salvaged wood

    Don’t miss another post like this one! Sign up to get my posts delivered to your inbox here. 

    Every time I post about my kitchen, it seems that you guys love the DIY kitchen island the most.

    And I love that you love it the most.

    That piece is pretty special to me.

    So special that I regularly threaten to be laid out on it when I die.

    {Insert Grunt Labor rolling his eyes here.}

    If you have read about the full kitchen makeover renovation, you know it has come a really long way. We knocked down walls, moved appliances, painted cabinets, took out cabinets, dealt with rude plumbers and much more.

    And it was all worth it.

    So, here is how we built our DIY kitchen island.

    This post contains affiliate links for your shopping convenience. Click here to read my full disclosure policy.

    Kitchen Tour {rainonatinroof.com} #kitchen

    DIY Kitchen Island

    First off, I apologize for the lack of photos of us actually building it. I was pregnant during the process (which was an adventure) and honestly, after it taking a couple hours to figure out how to build it, I wasn’t sure if it would even turn out well. 

    Luckily, I was wrong.

    The good news for you is that since it did take us a few hours and a few curse words and few cross looks to figure it out, we figured out it was actually pretty easy in the end. So, really if you have basic DIY skills, you can build this island. 

    First off, let me give you the dimensions:

    NO WAY! They built this and it cost less than $100! DIY Kitchen Island via RainonaTinRoof.com

    It’s five feet long, two feet (and a smidge over) wide and right at about three feet in height. For us, its the perfect size. It functions as a great workspace, we can eat breakfast at it, but it doesn’t take over the entire kitchen. 

    Here’s the materials we used:

    NO WAY! They built this and it cost less than $100! DIY Kitchen Island via RainonaTinRoof.com

    The legs are old porch columns we purchased from a local architectural salvage store. If you can’t find salvaged porch columns, you can always find them at Home Depot or another local hardware store. We made a frame of 2x4s to go around the columns at the top and at the base. We used wood screws to attach all the 2 x 4s to the columns.

    The bottom shelf is barn wood that came from my great grandfather’s farm. After the frame was completed, we just used a finish nailer to nail the barn wood into both sides of the 2 x 4s.

    NO WAY! They built this and it cost less than $100! DIY Kitchen Island via RainonaTinRoof.com

    The top is the same countertop material that is in the rest of the kitchen. We did add some 1 x 4s between the 2×4 frame on top (underneath the counter) to give the countertops a little more support.

    The screws weren’t too noticeable at the bottom, but were at the top. So, after the countertop was installed, we added decorative trim around the top to hide the screws. Its the same trim we used on our built-in bathroom shelving.

    NO WAY! They built this and it cost less than $100! DIY Kitchen Island via RainonaTinRoof.com

    DIY Kitchen Island via RainonaTinRoof.com #kitchenisland #diy

    A coat of white paint and my barstools make it complete.

    After we finally got our dimensions figured out, it took about an hour (without the countertop – we had pros put that in) to construct.

    NO WAY! They built this and it cost less than $100! DIY Kitchen Island via RainonaTinRoof.com

    All in all, excluding the countertop, we have less than $100 in it. If you didn’t want a regular countertop, like ours, you could always just opt for wood.

    Vintage Modern Rustic Kitchen via RainonaTinRoof.com #vintage #modern #rustic #kitchen #whatsyourstyle

    You can see more of the kitchen details here or tour our entire renovated rancher here.

    What do you think of our DIY Kitchen Island?

    You’ll also love these ideas for your kitchen…

    See how I made my laminate countertops look like stone here – you won’t believe how easy it was! 

    You can also get more DIY countertop makeover ideas here!

    7 Kitchen Island Ideas you haven’t thought Of– out-of-the-box ideas for your own DIY kitchen island!

    10+ Kitchen Ideas for Decorating, Organizing, and Storage– functional, but still pretty ideas!

    7 (To-Die-For) White Kitchens – love white kitchens? Don’t miss these then!

    Sign up to get my posts delivered to your inbox here. 

    You know you don’t wanna miss any of this crazy.

    Stalk Me Here:

    Pinterest / Facebook / Twitter / Instagram

    pin-this-post-2

    DIY Kitchen Island Idea | How to Build a Kitchen Island | Rustic Kitchen Island | Farmhouse Kitchen Island | Affordable Kitchen Island

  • DIY Animal Candleholders

    DIY Animal Candleholders

    Have you ever seen something, told yourself you could totally make that and then you found out, ummmm, no, I can’t do this.

    Happens to me all the time. Truth.

    I have had many crafting and DIY fails. And that’s ok.

    Sometimes, I can salvage them. Sometimes, I don’t know whether to call it a fail or a win.

    Here’s how I took my latest potential fail and still came out with something pretty.

    DIY Animal Candleholders via RainonaTinRoof.com (more…)

  • Easy to Make DIY Cowhide Lamp Shade for $15

    Easy to Make DIY Cowhide Lamp Shade for $15

    If there was one thing that ever defined my Pap’s schedule the most, it was the cows.

    Cattle farmer’s lives run on when cows have to be fed.

    I vividly remember leaving my great uncle’s funeral in a hurry to go feed the cows with my Pap.

    We both rode on the tractor, him in his suit, me in a dress, and hurriedly fed the cows before going back to gather with the rest of the family after the funeral.

    I also vividly remember a calf I grew up with, named Blackjack.

    I also remember when I asked my dad where Blackjack was one day and he responded with, “On our plates.”

    And I didn’t bat an eye.

    The cows fed us and paid our bills.

    I still miss feeding the cattle and I miss my Pap.

    Disclosure: This post is sponsored by Online Fabric Store. Y’all know how I roll though, all opinions are 100% mine. This post contains affiliate links for your shopping convenience. Click here to read my full disclosure policy.

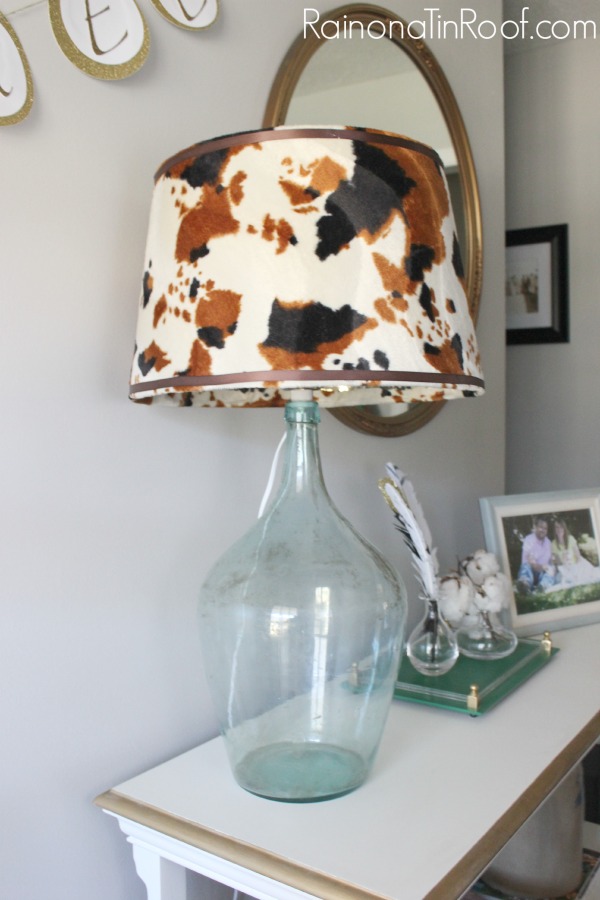
    A few weeks back I saw this cowhide lamp shade and fell in love with it. The only problem was, of course, its price tag of $109.

    I knew I wanted a cowhide lamp shade though. Not only would it fit perfectly with my decor, but it would be a nod to my Pap.

    Even though he is somewhere shaking his head and laughing because he probably doesn’t understand why in the world someone would want a DIY cowhide lampshade.

    DIY Cowhide Lampshade | How to Make a Cowhide Lamp Shade | DIY Lampshade | DIY Lampshade Ideas | DIY Lampshade Makeover | Lampshade Makeover

    DIY Cowhide Lamp Shade

    Here is how I made my own DIY cowhide lamp shade and you can make one too for less than $15.

    Get excited!

    Here’s what ya need:

    – 1 1/2 yards of Tan Cow Velboa Faux Fur Fabric

    – Brown Satin Ribbon

    -Lampshade (I used one I already had. You can find a basic one here* for $10.)

    – Hot Glue

    *Depending on the size of your lampshade, you may need more or less fabric. I got three yards to begin with because I thought my lampshade was pretty big and still overestimated.

    I started by taking the lampshade from my DIY bottle lamp and ripping off the old covering. If your lampshade wasn’t re-covered to begin with, you don’t have to do this. I’m just a frugal gal and re-use things as often as possible.

    Then, I spread my fabric on the floor and laid the lampshade on top of it.

    DIY Cowhide Lampshade via RainonaTinRoof.com #OnlineFabricStore #cowhide #knockoff #diyI rolled the lampshade over the fabric to get a good idea of how much fabric I would need, then did a rough cut of the excess fabric.

    Once I had the excess cut, I took my hot glue gun and glued one end of the fabric down along my lampshade.

    DIY Cowhide Lampshade via RainonaTinRoof.com #OnlineFabricStore #cowhide #knockoff #diy

    Next, I rolled the fabric back onto the lampshade and applied hot glue along the inside bottom edge, then pushed the fabric into the glue.

    DIY Cowhide Lampshade via RainonaTinRoof.com #OnlineFabricStore #cowhide #knockoff #diy

    Keep going! You’re almost about to have your very own DIY cowhide lamp shade!

    When my two ends met, I hot glued the edge that would be on top into a neat fold and then glued it down on top of the other end.

    DIY Cowhide Lampshade via RainonaTinRoof.com #OnlineFabricStore #cowhide #knockoff #diyI sat the lampshade upright and snipped the fabric where the metal frame was, then hot glued those edges down and trimmed the fabric.

    DIY Cowhide Lampshade via RainonaTinRoof.com #OnlineFabricStore #cowhide #knockoff #diy

    I added the brown ribbon along both the top and bottom edges of the lampshade. I just put a dot of hot glue every little bit and pushed it onto the shade.

    DIY Cowhide Lampshade via RainonaTinRoof.com #OnlineFabricStore #cowhide #knockoff #diyAnd that’s it.

    DIY Cowhide Lampshade via RainonaTinRoof.com #OnlineFabricStore #cowhide #knockoff #diy

    DIY Cowhide Lampshade via RainonaTinRoof.com #OnlineFabricStore #cowhide #knockoff #diy

    DIY Cowhide Lampshade | How to Make a Cowhide Lamp Shade | DIY Lampshade | DIY Lampshade Ideas | DIY Lampshade Makeover | Lampshade Makeover

    $100 lampshade or $15 DIY cowhide lamp shade?

    Ding! Ding! Ding!

    I’ll take the $15 one!

    You can get the info on the DIY bottle lamp here – it’s easy to make! And see how I used this same fabric to make a faux cowhide rug here!

    You might also want to see…

    How to Make a Lampshade from Scratch and Your Own Lamp Finials – turn any fabric into a lampshade!

    16+ DIY Lamp Makeovers and Ideas – SO many great ideas here!

    Sign up to get my posts delivered to your inbox here. 

    You know you don’t wanna miss any of this crazy.

    Stalk Me Here:

    Pinterest / Facebook / Twitter / Instagram

    SaveSave

  • Repose Gray Walls + The Easiest Way to Paint a Room

    Repose Gray Walls + The Easiest Way to Paint a Room

    Gray is the hot new choice for wall color these days and after just giving my kitchen, living room and dining room walls a fresh coat of Repose Gray, I can see why! This color is a true gray color and was the perfect choice for us! And the icing on the cake? I used a cool, new tool for painting my walls and it made the job so much easier! 

    That’s right.

    I went gray.

    Not with my hair yet, though.

    Thank the Lord.

    Because when the kid tries my patience, its like I can just feel the color fading from my hair, as well as my sanity quickly disappearing.

    But right now, just my walls are gray, repose gray to be exact.

    Things do change quickly around here though, so here’s hoping there are no gray hairs in my near future.

    Repose Gray Walls
    Repose Gray Walls + The Easiest Way to Paint a Room

    Disclosure: This post is sponsored by HomeRight. Y’all know how I roll though, all opinions are 100% mine. This post contains affiliate links for your shopping convenience. Click here to read my full disclosure policy.

    Tools & Supplies Used:

    • Sherwin Williams Repose Gray Paint – while this is a Sherwin Williams color, we actually had it mixed in Behr paint at Home Depot. They can mix colors of just about any paint brand, just tell ’em the name and brand!
    • HomeRight PaintStick EZ-Twist – makes painting a breeze!
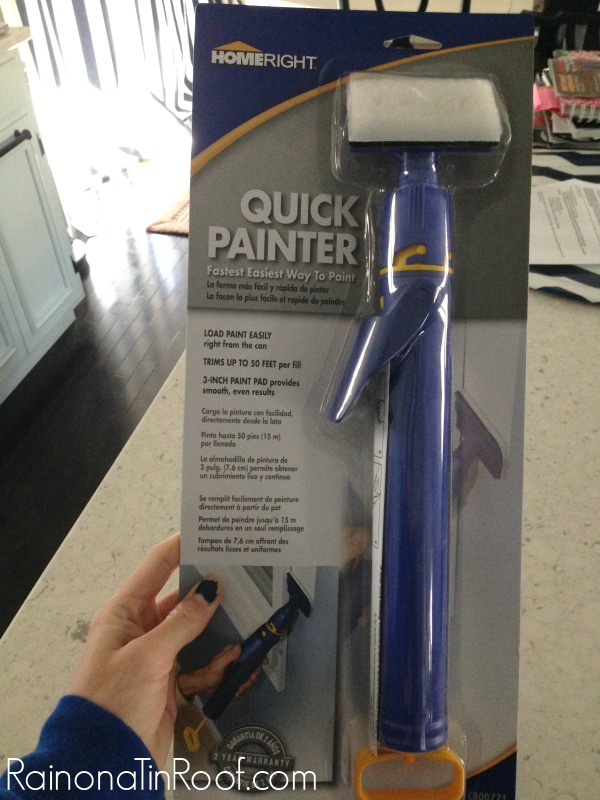
    • QuickPainter for edging around trim and the ceiling.

    Ever since we moved into our rancher and made a mad rush to finish the renovation in two months, I was never really 100% happy with our previous wall color. No doubt, it was my fault – the mad rush took over and I lost all sight of actually taking my time on selecting colors. The same happened in my bathroom, the nursery, the guest room, and our bedroom.

    And that’s pretty much every room in our house.

    And that’s a lot of re-painting.

    Its no big surprise that it took me two years to even begin thinking about re-painting our main living space.

    Enter the HomeRight PaintStick EZ-Twist.

    Repose Gray Walls + The Easiest Way to Paint a Room via RainonaTinRoof.com #homeright #paintstickeztwist #reposegrayY’all I painted our entire main living area (that includes the kitchen, living room, dining room, entryway, and hallway) in about four hours with this bad boy.

    How to Use the EZ-Twist for Painting Walls

    It comes with a big paint stick (as if its name didn’t already allude to that), a roller, a roller cover, and a suction tube and cover for your paint can.

    Step 1

    Attach the roller to the stick.

    Repose Gray Walls + The Easiest Way to Paint a Room via RainonaTinRoof.com #homeright #paintstickeztwist #reposegray

    Step 2

    Attach the roller cover to the roller.

    Repose Gray Walls + The Easiest Way to Paint a Room via RainonaTinRoof.com #homeright #paintstickeztwist #reposegray

    Step 3

    Place the suction tube and cover over your gallon of paint.

    Repose Gray Walls + The Easiest Way to Paint a Room via RainonaTinRoof.com #homeright #paintstickeztwist #reposegray

    Step 4

    Put your PaintStick EZ-Twist onto the suction tube and pull the paint into the handle of the tube by pulling back on the inner tube.

    Repose Gray Walls + The Easiest Way to Paint a Room via RainonaTinRoof.com #homeright #paintstickeztwist #reposegray

    Step 5

    Take the EZ Twist to your walls, twist on the end of it to make the paint come up into the roller cover and start rolling your paint on the walls!

    There is no running back and forth to your paint tray hundreds of times.

    There is no messy tray to trip over and track paint all over your floors.

    Yes. That has happened to me before.

    When your roller needs more paint, you simply twist the handle and keep rolling.

    Repose Gray Walls + The Easiest Way to Paint a Room via RainonaTinRoof.com #homeright #paintstickeztwist #reposegrayWhen you have finally ran out of paint in the handle, just go fill it back up.

    To edge around all the trim in the areas we painted, I used the HomeRight Quick Painter.

    Repose Gray Walls + The Easiest Way to Paint a Room via RainonaTinRoof.com #homeright #paintstickeztwist #reposegray

    How to Use the Quick Painter

    Step 1

    Suction the paint right into the handle of the Quick Painter.

    Repose Gray Walls + The Easiest Way to Paint a Room via RainonaTinRoof.com #homeright #paintstickeztwist #reposegray

    Step 2

    Place the paint pad on the handle, squeeze the trigger and paint the town, I mean edges.Repose Gray Walls + The Easiest Way to Paint a Room via RainonaTinRoof.com #homeright #paintstickeztwist #reposegray

    Want to see the final product?

    The Repose Gray in all its glory?

    The Entryway

    Sherwin Williams Repose Gray Paint

    Repose Gray Walls + The Easiest Way to Paint a Room via RainonaTinRoof.com #homeright #paintstickeztwist #reposegray

    Repose Gray Walls + The Easiest Way to Paint a Room via RainonaTinRoof.com #homeright #paintstickeztwist #reposegray

    Repose Gray Walls + The Easiest Way to Paint a Room via RainonaTinRoof.com #homeright #paintstickeztwist #reposegray

    The Kitchen

    Repose Gray Walls + The Easiest Way to Paint a Room via RainonaTinRoof.com #homeright #paintstickeztwist #reposegray

    I especially love how the gray made the subway tile pop a bit more in the kitchen.

    Repose Gray Walls + The Easiest Way to Paint a Room via RainonaTinRoof.com #homeright #paintstickeztwist #reposegray

    Gray Walls in The Dining Room

    Gray Walls in the Dining Room

    Repose Gray Walls + The Easiest Way to Paint a Room via RainonaTinRoof.com #homeright #paintstickeztwist #reposegray

    Repose Gray Walls + The Easiest Way to Paint a Room via RainonaTinRoof.com #homeright #paintstickeztwist #reposegray

    Gray Living Room

    Repose Gray Walls + The Easiest Way to Paint a Room via RainonaTinRoof.com #homeright #paintstickeztwist #reposegray

    Gray Living Room

    Repose Gray Walls + The Easiest Way to Paint a Room via RainonaTinRoof.com #homeright #paintstickeztwist #reposegray

    Repose Gray Walls + The Easiest Way to Paint a Room via RainonaTinRoof.com #homeright #paintstickeztwist #reposegray

    Repose Grey WallsYou can see the boring beige walls of yesterday here. They weren’t terrible, they just weren’t that pretty.

    And we all know I like pretty things.

    And functional things.

    That make my life so much easier.

    Sign up to get my posts delivered to your inbox here. 

    You know you don’t wanna miss any of this crazy.

    Sherwin Williams Repose Gray Walls + The Easiest Way to Paint a Room

    SaveSave

  • DIY Horse Silhouette Pillow and How to Cut Felt on a Silhouette

    I’m still learning the ropes of my Silhouette, so no judging how simple or elementary this project is.

    But, aren’t fabulous simple projects what you love?

    I do.

    And I think that my horse silhouette pillow is pretty fabulous. And simple.

    This post contains affiliate links for your shopping convenience. Click here to read my full disclosure policy.

    And if you don’t have a Silhouette, I’m pretty sure you could easily make this project without one.

    DIY Horse Silhouette Pillow via rainonatinroof.com #silhouette #horsepillow
    So, first, you are gonna need a pillow. I made my pillow out of leftover fabric I had from the new navy and white striped curtains you may have noticed in my kitchen tour. The fabric came from Ikea and it was a whopping $2 a yard. Needless to say, I came back with more  navy and white striped fabric than I can ever use. They will probably cover my coffin in it. You could always use an existing pillow you have or grab a pillow cover from Hobby Lobby. Whatever floats your boat.

    I just did a simple small rectangle pillow that was 17 inches x 10 inches before sewing it together.

    I purchased the horse shape from the online Silhouette store. Did you really think I could draw that horse myself with my elementary skills? I know there is some trace feature, but I haven’t conquered that one either.

    I played with the size of the horses and cut them out on printer paper unil I had the right size.

    DIY Horse Silhouette Pillow via rainonatinroof.com #silhouette #horsepillow

    The right size for the horse turned out to be about 6 x 7.5.

    I cut out my horse on felt. Learn from my mistakes, DO NOT buy the felt that already has a sticky back. It will not work. Just buy the plain old $0.50 a piece felt at Hobby Lobby. Once I did have the right felt, I made my settings as follows, which seemed to work ok for me.

    DIY Horse Silhouette Pillow via rainonatinroof.com #silhouette #horsepillow

    This is what the felt looked like when it came out of the Silhouette.

    DIY Horse Silhouette Pillow via rainonatinroof.com #silhouette #horsepillow

    There were places where it didn’t go all the way through. I’m sure if I had a separate fabric blade, it would have cut more, but it was easily fixed with a pair of scissors.

    DIY Horse Silhouette Pillow via rainonatinroof.com #silhouette #horsepillow

    After I cut out the horse, I adhered it to the pillow with hot glue.

    DIY Horse Silhouette Pillow via rainonatinroof.com #silhouette #horsepillow

    It is definitely improving the look of my ugly brown couch.

    DIY Horse Silhouette Pillow via rainonatinroof.com #silhouette #horsepillow

    What do you think? Too simple for you? haha!

    Looking for more things to make with your Silhouette?

    Check out these vintage-esque holiday gift tags.

    These pumpkin place card holders also used my Silhouette.

    And I made this fun and colorful party banner with it too!

     Like what you see?

    Follow along:

    SaveSave

  • 4 Home Decor Projects You Don’t Want to Miss

    It’s time for the features from last weeks GMTG party!

    My picks this week are four fabulous home decor projects that you must see!

    4 Home Decor Projects You Don't Want to Miss {rainonatinroof.com} #homedecor

    4 Home Decor Projects You Don't Want to Miss {rainonatinroof.com} #homedecor

    Pink and White Dresser Makeover from 24 Cottonwood Lane

    4 Home Decor Projects You Don't Want to Miss {rainonatinroof.com} #homedecor

    DIY Easy Pleated Curtains from The Turquoise Home

    4 Home Decor Projects You Don't Want to Miss {rainonatinroof.com} #homedecor

    DIY Wood Bead Chandelier from Life On Virginia Street

    4 Home Decor Projects You Don't Want to Miss {rainonatinroof.com} #homedecor

    West Elm Inspired Herringbone Floor Mirror from Home Coming

    Most Viewed Link:

    4 Home Decor Projects You Don't Want to Miss {rainonatinroof.com} #homedecor

    Cozy and Bright Living Room from Grace Lee Cottage

  • DIY Bamboo Mirror {Trash to Treasure}

    I have a confession to make.

    A couple months ago, I had this huge DIY fail.

    But don’t we all? You see, I had seen this bamboo table and I just thought for sure I could make it myself.

    I was wrong.

    So wrong.

    I made it, but stable, it was not.

    Ok, not only was it not stable, but it doesn’t even really stand on its own unless you position it just correctly.

    Just correctly to where it is supported by the wall.

    Heaven help.

    I can do a furniture makeover like nobody’s business. Build furniture, I cannot.

    Even though the bamboo table was an utter and complete failure, I kept the bamboo from the legs. I love bamboo and thought maybe I could salvage something out of my failure.

    And I did with this DIY bamboo mirror.

    DIY Bamboo Mirror {rainonatinroof.com} #trashtotreasure #bamboo #mirror

    This post contains affiliate links for your shopping convenience. Click here to read my full disclosure policy.

    Here’s how I did it:

    First, I picked up this square beveled mirror at Michael’s. It is $4.99 at regular price, but I used a 40% off coupon, so you can figure out how much it was, because math is not my thing.

    DIY Bamboo Mirror {rainonatinroof.com} #trashtotreasure #bamboo #mirrorI have to entertain myself in some way, people.

    Next, I got out my leftover bamboo sticks.

    DIY Bamboo Mirror {rainonatinroof.com} #trashtotreasure #bamboo #mirrorOf course, this bamboo came from the failed table, but originally I bought the bamboo at Pier One on clearance for $5. Not bad for three big sticks of bamboo. I cut two pieces to go across the top and bottom of the mirror, a little longer than the mirror.

    DIY Bamboo Mirror {rainonatinroof.com} #trashtotreasure #bamboo #mirrorNext, I measured the sides of the mirror and cut bamboo pieces to fit on the sides between the top and bottom pieces.

    DIY Bamboo Mirror {rainonatinroof.com} #trashtotreasure #bamboo #mirrorI also cut four small pieces to extend on each corner, then spray painted all the pieces green.

    Because I love kelly green.

    DIY Bamboo Mirror {rainonatinroof.com} #trashtotreasure #bamboo #mirrorOnce the pieces were dry, I used Gorilla Glue brand epoxy (affiliate link) to adhere the bamboo pieces to the mirror.

    DIY Bamboo Mirror {rainonatinroof.com} #trashtotreasure #bamboo #mirrorI started with the top and bottom pieces.

    DIY Bamboo Mirror {rainonatinroof.com} #trashtotreasure #bamboo #mirrorAfter mixing the epoxy, I used that small sliver of a wood shim to smear the epoxy on the top and bottom bevels, and then on the sides. I used hot glue to adhere the small corner pieces.

    DIY Bamboo Mirror {rainonatinroof.com} #trashtotreasure #bamboo #mirrorKelly green and bamboo are two of my favorite things.

    DIY Bamboo Mirror {rainonatinroof.com} #trashtotreasure #bamboo #mirror

    I am so in love with this mirror’s goodness.

    DIY Bamboo Mirror {rainonatinroof.com} #trashtotreasure #bamboo #mirrorAnd no, I’m not leaving it just propped against pillows on my entry bench.

    The kid would have this bad boy broken and skinning a squirrel with the pieces in five minutes flat.

    I adhered a hanging bracket to the back of the mirror with the epoxy and popped it on a nail in my entry way. DIY Bamboo Mirror {rainonatinroof.com} #trashtotreasure #bamboo #mirrorHowever, I was lazy and just popped it on a nail that was already in the wall, so I have to move it and even it up some.

    It may even end up on my gallery wall at some point. I’m just glad the failed table brought forth some good. haha.

    DIY Bamboo Mirror {rainonatinroof.com} #trashtotreasure #bamboo #mirror

    Like what you see?

    Follow along:
    Trash to Treasure Series with Thistlewood Farms, Rain on a Tin Roof, So Much Better with Age and AKA DesignDon’t miss the rest of the Trash to Treasure goodness!
    French Finish Mirror from AKA Design
    be-thankful-wreath-project
    Be Thankful Wreath from Thistlewood Farms
    crate-thumbnail
    Kitchen Crate from So Much Better With Age

    SaveSave

  • How to Paint a Refrigerator (It’s actually easy!)

    How to Paint a Refrigerator (It’s actually easy!)

    So, can you paint a refrigerator? The answer is a big YES! When you don’t have the budget to upgrade that dated fridge, just give a good ol’ DIY paint job. Find out how to paint a refrigerator below – it’s actually not that hard at all!
     
    Hi! My name is Madalyn and I nest over at Home Hearted where I share my latest crafting, homemaking and diy projects. My husband and I just bought our first house and since it took most of our resources to get it I have been trying to do what I can to restore and utilize what we already have. First on my list was to take our rusty old refrigerator that we inherited from our rental house and make it into something a little more pretty.
     
    I had grand ideas, but my dad who is a painter talked me out of them and into restoring my fridge to its former glory, a simple white. And to compromise on the chalkboard he suggested I paint a large magnet in chalkboard paint and put it on the fridge.
     
    How to Paint a Refrigerator Easily

    DIY Refrigerator Paint Job

    This post contains affiliate links for your shopping convenience. Click here to read my full disclosure policy.
     
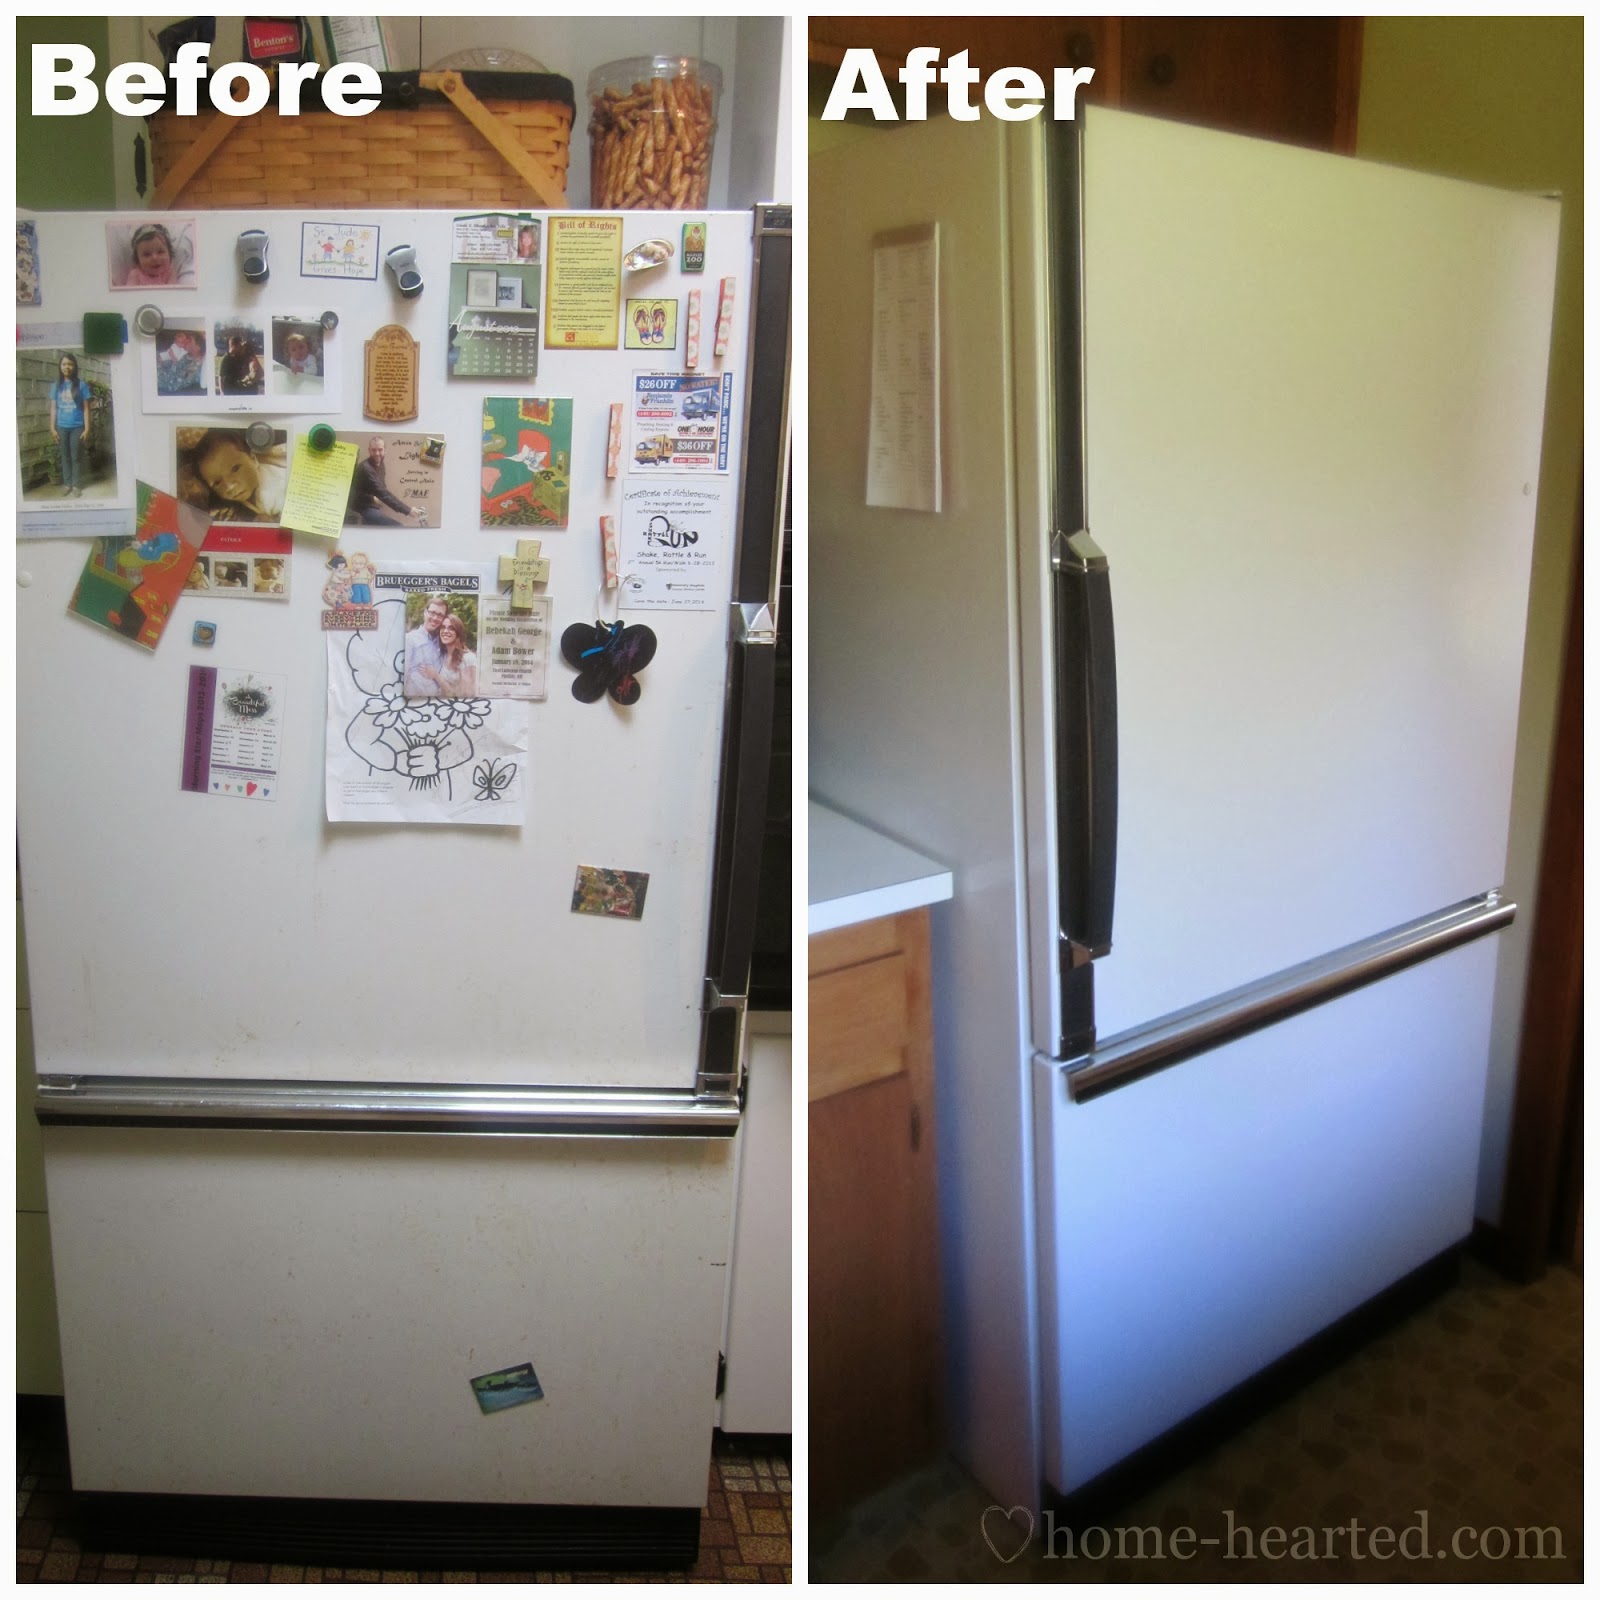
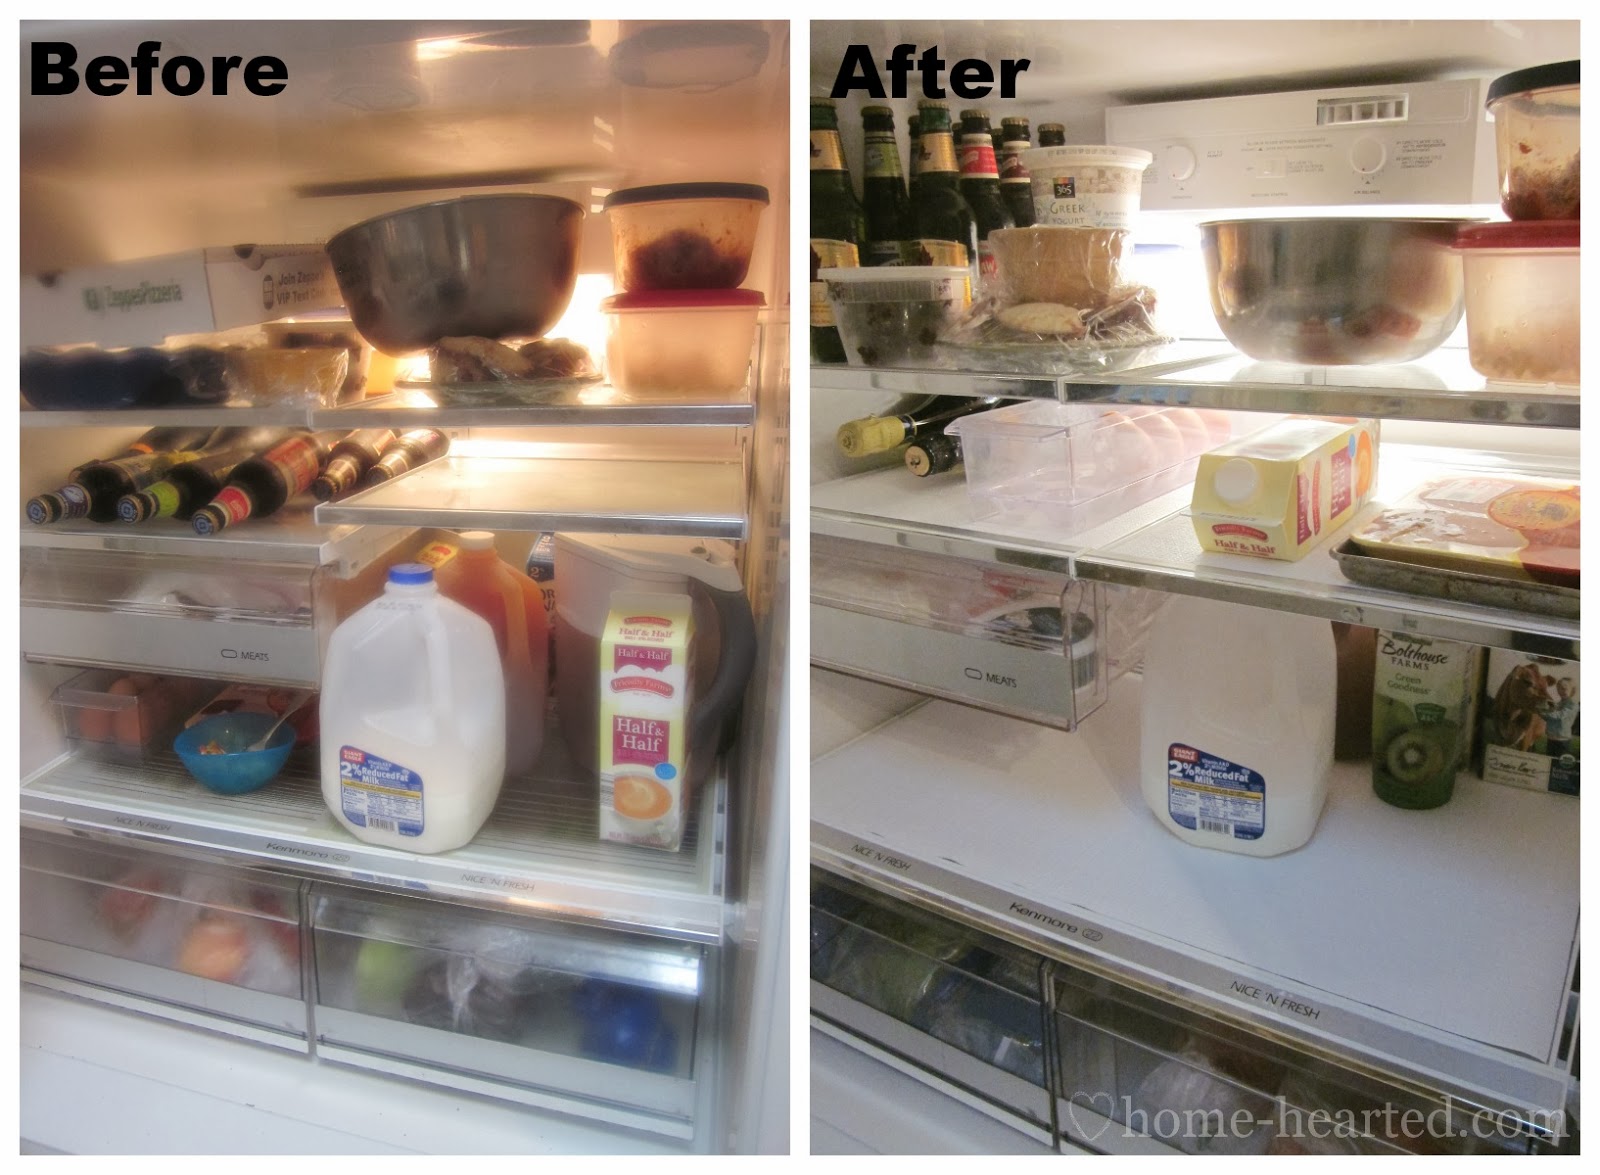
    Let’s start out with a good before and after shot, shall we?
     
    Can You Paint a Refrigerator
     
    As you can see, we also switched the door handle to function better in our new kitchen. The above picture doesn’t do the before any justice. It was so rusted and gross as you can clearly see in these pictures below.
     
    Refrigerator Paint DIY
     
    This refrigerator was obviously in need of some major loving!
     
    Materials and Supplies Needed:
    Steps
     
    Step 1
     
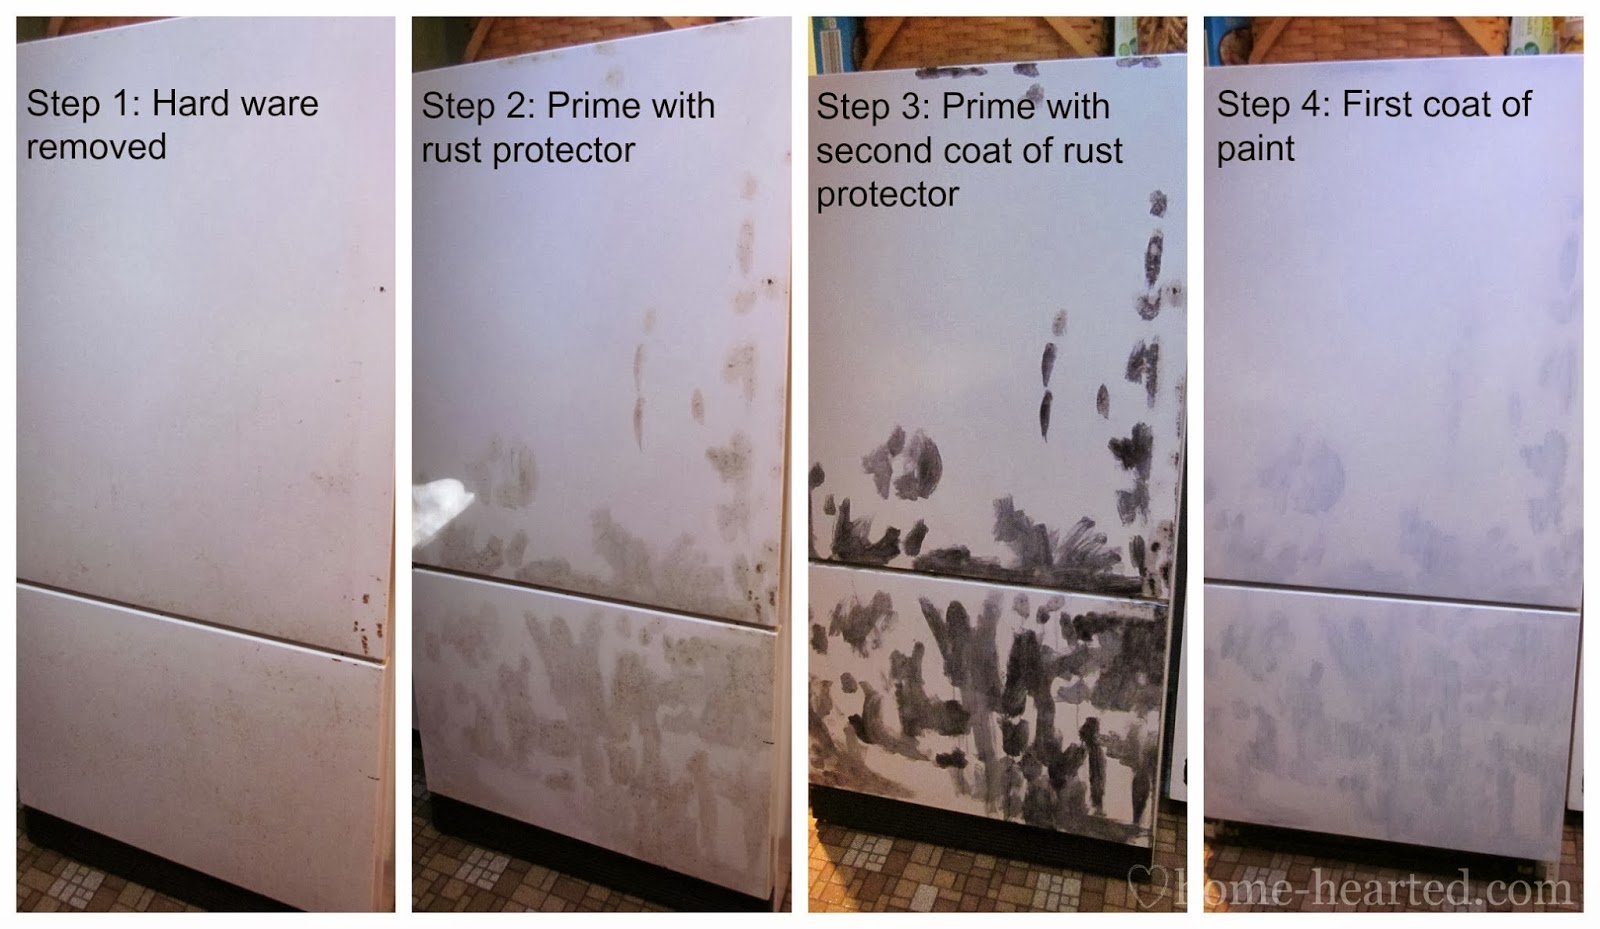
    If you have rusted areas on your refrigerator, you’ll want to take care of those first.
     
    Start by lightly sanding the rusted areas, wiping them clean with a tack cloth and then applying two coats of Loctite Extend Rust Neutralizer. See image below for step-by-step shots.
     
    Step 2
     
    After the rust neutralizer is completely dry, apply Rust-Oleum’s Protective Enamel in Gloss White or another appliance paint color of your choice.
     
    Because the rust was so bad on the front of my fridge and thus where I applied the rust treatment, I had to apply two coats of the paint here. The rest of the fridge was fine with a light sanding and one coat of paint. Remember to always wipe the entire surface clean with a tack cloth after sanding to get a smooth finish in the end.
     
    I used a small roller for most all of the painting. I used a small artists paint brush for one tiny area that I couldn’t get to with the roller. 
     
    How to Paint a Fridge
     
    Step 3
     
    To top off this little home improvement project, I also spray painted the bottom vent on the refrigerator a nice black. That really cleaned things up and adds to the “brand new” look.
     
    Can You Paint a Fridge
     
    While I was at it I also took the time to clean up the inside of the refrigerator as the etched glass had received a stain at some point. I love the liner, it keeps things very simple as you can just pull it out and wash it, keeps things cleaner and easier!
    DIY Painting a Refrigerator
    DIY Refrigerator Painting
     
    When all was said and done I spent a total of $36.83 which includes the magnet, fabric rollers, paint and spray paint.
     
    I hope you enjoyed this post and if you have any questions about painting a refrigerator, please leave a comment!
     
    Need more DIY kitchen project ideas?
     
    See how I made my laminate countertops look like stone here!
     
    Need DIY kitchen island ideas? See these!
     
    Want more countertop makeover ideas? There are nine here!
     
    And finally, get 10+ ideas for decorating, organizing and storage in your kitchen here!
     
    Want to come back to this post later? Just pin the picture below! 
    DIY Refrigerator Paint Job

    Sign up to get my posts delivered to your inbox here. 

    Stalk Me Here:

    Pinterest / Facebook / Twitter / Instagram

     
  • 10 Navy Projects and Ideas

    10 Navy Projects and Ideas

    Maybe you have figured it out by now.

    Maybe it was the barstools, or the chevron tray, or the new buffet.

    You have most likely figured out, that I love navy.

    Its classic and can work with most any color. My favorite navy combination being navy and kelly green.

    Here are some of my favorite navy projects and ideas.

    10 Navy Projects and Ideas {rainonatinroof.com}  #navy #diy

    (more…)

  • 8 Jonathan Adler Knock-Off Projects

    8 Jonathan Adler Knock-Off Projects

    I am so sad to see the Summer Soiree come to an end.

    But, I am so happy and grateful for all the amazing inspiration I have found through it!

    Here are 8 of my favorite Jonathan Adler Inspired Projects from our last soiree:

    Jonathan Adler Inspired Projects {rainonatinroof.com} #jonathanadler

    8 Jonathan Adler Inspired Projects

    The Jonathan Adler version will cost you $98. This version will cost you $10. Mohawk Lollipop Holder - A Jonathan Adler Knock-Off

    Jonathan Adler Mohawk Lollipop Holder Knock-Off

    Jonathan Adler Inspired Projects {rainonatinroof.com} #jonathanadler

    Jonathan Adler Silhouette Pillow from Effortless Style

    Jonathan Adler Inspired Projects {rainonatinroof.com} #jonathanadler

    Jonathan Adler Inspired Makeup Brushes from Our Fifth House

    Jonathan Adler Inspired Projects {rainonatinroof.com} #jonathanadler

    Ikea Lack Table Hack Jonathan Adler Style from Amy Krist Interiors

    Jonathan Adler Inspired Projects {rainonatinroof.com} #jonathanadler

    Jonathan Adler Stool Makeover from Fresh Idea Studio

    Jonathan Adler Inspired Projects {rainonatinroof.com} #jonathanadler

    Jonathan Adler Inspired Chair Makeover from Rain on a Tin Roof

    Jonathan Adler Inspired Projects {rainonatinroof.com} #jonathanadler

    Jonathan Adler Recovered Chair from Lucky Scarf

    Jonathan Adler Inspired Projects {rainonatinroof.com} #jonathanadler

    Jonathan Adler No Sew Curtains from Pies and Puggles

    Jonathan Adler Inspired Projects {rainonatinroof.com} #jonathanadler

    Jonathan Adler Knock-Off Monogram Pillow from Southern State of Mind

    Need a few more great designer inspired projects? Here ya go!

    You like Ralph Lauren style? See these projects then!

    Kate Spade girl? This way then!

    Love some bright Lilly Pulitzer style? Right this way!

    You know you don’t wanna miss any of this crazy.

    Sign up to get my posts delivered to your inbox here.

    Stalk Me Here:

    Pinterest / Facebook / Twitter / Instagram

  • 16 DIY Lamp Makeovers and Ideas You Can Do Yourself!

    16 DIY Lamp Makeovers and Ideas You Can Do Yourself!

    In my opinion, one can never have enough great lamps. These DIY lamp ideas for lamp makeovers, building your own lamps, creating your own lampshades and more are sure to give you a “lightbulb” moment. 

    I have a serious obsession with lamps. In fact, many would say I’m a lamp hoarder.

    And they’re right. I totally am a lamp hoarder. I never leave a good one behind.

    One of my favorite things about lamps though, is that they can easily be made over or made from objects you might already have on hand. And just to prove my point, I thought I’d showcase some of my favorite lamp ideas.

    DIY Lamps

    Make a lamp out of a bottle.

    DIY Lamp

    Learn how easy it is to make a lamp out of an old bottle here!

    Make a lamp out of books! 

    DIY Lamp made from books

    Learn how to make a lamp out of books from The Shabby Creek Cottage!

    Give a tripod a second life.

    How to make a lamp from a tripod

    Breathe new life into an old music tripod with this tutorial from The Painted Hive on how to turn one into a lamp.

    Reach for some scrap wood. 

    DIY Lamp made from scrap wood

    If you have some salvaged or scrap wood lying around, you can turn it into a lamp with these instructions from Burlap & Denim.

    Lamp Painting and Lamp Makeover Ideas

    Reach for light and bright colors.

    Lamp painting

    How about a little lamp painting? This lamp got a breath of new life with pink, yellow and white. See how I did it here.

    Get your Kate Spade on.

    DIY Lamp Ideas

    Give an old lamp new life with a Kate Spade inspired twist!

    Go aqua!

    Lamp Makeover Ideas

    Add some bright blue to your life with this aqua spray painted lamp makeover idea!

    Grab your wrapping paper! 

    Thrift Store Lamp Makeover

    Update a basic lamp with a roll of cheap wrapping paper with this tutorial form At Home with the Barkers!

    DIY Lampshade Ideas

    Make your own lampshade!

    Lampshade Ideas - Make your own!

    How to Make Your Own Lamp Shade out of Any Fabric + DIY Lamp Finial

    Get creative with electrical tape! 

    Electrical Tape Lampshade Idea

    DIY Electrical Tape Lampshade

    Give cowhide a spin! 

    DIY Cowhide Lampshade Idea

    Learn how to recover an existing lampshade with faux cowhide here!

    Reach for some balsa wood.

    Lampshade Ideas - lampshade made from balsa wood.

    Give a lamp shade a modern twist with this DIY balsa wood lamp shade from Pomp and Circumstance.

    Got any trim lying around? 

    Lampshade Idea - add trim to bottom of shades.

    Give your lampshade a touch of class by trimming them out with greek key trim like Honey We’re Home Did.

    Give your lamps a vintage twist.

    Lamp Ideas - give a lamp a vintage look.

    Love the vintage shabby chic look? Then see how My Blessed Life made over this lamp.

    DIY Lamp Finial Ideas

    Give it a glam touch!

    DIY Lamp Finial

    Hands down, one of my favorite lamp ideas for dressing up your lamps is to top it off with a lamp finial. Give your lamps a touch of glam with this tutorial for how to make a crystal lamp finial!

    Agates are always a good idea.

    DIY Agate Lamp Final - pretty lamp idea

    If crystals aren’t your thing, then maybe agates are. How about topping off your lamps with one of these DIY Agate Slice Lamp Finials?

    Other Ideas for Dressing Up Your Lamps

    Everything is better with tassels.

    Lamp Ideas - add tassels to lamps.

    Make these lamp tassels in under five minutes to add a little somethin-somethin to your lamps!

    Add an unexpected pop of color.

    Lamp Ideas - Paint the cord for a pop of color.

    Give your lamp an unexpected twist by making the cord pop with this idea from Vintage Revivals.

    Have you done any of your own DIY lamp makeovers?

    Looking for more great DIY decorating ideas?

    7 Super Simple, Super Cute Electrical Tape Ideas – you’ll kick yourself if you don’t take a peek at these!

    14 Painted Rug Hacks – gorgeous rugs on a budget!

    17 Easy Crafts and DIY Projects under $10 – budget projects!

    20+ Duck Tape Crafts & Projects – duck tape, a crafter & DIYer’s best friend!

    pin-this-post

    DIY Lamp Ideas and Lampshade Ideas

    Sign up to get my posts delivered to your inbox here. 

    You know you don’t wanna miss any of this crazy.

    Stalk Me Here:

    Pinterest / Facebook / Twitter /Instagram

    SaveSave

    SaveSaveSaveSaveSaveSaveSaveSaveSaveSave

  • Top 20 Coral Projects and Ideas for any Home

    Top 20 Coral Projects and Ideas for any Home

    I know what you’re thinking.

    Why am I doing a post on the top 20 coral projects when coral is such a spring and summer color and summer is almost over.


    Coral Decor | Coral Decorating Ideas | Coral Bedroom | Coral Bathroom | Coral Living Room | Coral DIY Decor

    Because I think that coral is a versatile color that can be used year round. It works great with other light and pastel colors, but pair it with navy or emerald, and it still works. And may just knock your socks off.

    That’s just my two cents. Take it or leave it.

    But do check out these awesome projects and ideas for coral inspiration. (more…)

  • Spray Painted Lamp Makeover

    Remember that fabulous coral and green striped table I showed you the other day?

    This lamp was its mate.

    It was on top of the table at the yard sale.

    Spray Painted Lamp Makeover {rainonatinroof.com} #spraypaint #lamp #makeover

    The lamp was actually overhauled before the table. I think when the table saw how fabulous the lamp was, it decided it should be just as fabulous, if not more.

    Have any of you called the asylum yet to come pick up the crazy lady who says her furniture has thoughts and feelings?

    One of you should probably get on that. I’ll start packing. (more…)