Looking for an easy DIY countertop makeover? If you’ve got $20, then you can take your laminate countertops from dated to modern beauties by using this tutorial for creating faux stone countertops!
Remember when I answered all your burning questions and you asked if I ever messed up on anything. And I was like, All. The. Time.
Ok, this project was one of those trial by error projects.
Luckily, its result was stellar – stellarly good looking and stellarly cheap as well.
And I’m aware stellarly may not actually be a word.
It is now though.
Dear friends, let me show you the cheapest and easiest way you can turn those ugly laminate countertops from yesteryear into beautiful “stone” counters.

At first glance, what kind of material would you think that countertop was made of? Stone, right?! But it’s totally not – that countertop was once a regular old laminate countertop!
Let’s back up for a second. First off, these countertops are in the man cave. I showed you the whole built-in makeover last week. Before all that though, the built-ins looked like this:

Complete with shiny brownish-burgundy countertops circa 1970.
Initially when Grunt Labor and I did a “lazy job” of redoing this space, I painted the countertop. I knew good and well it would end up scratching off, but I didn’t really care because I was pregnant and just wanted to lounge around in my fold-out lawn chair and eat chocolate while I still had a good excuse to do so.
So I did, and if you’ve been pregnant before, then don’t tell me you would have done any differently. 🙂
And what did the countertop do after it was painted?

It got lots of little scratches here and there. Just like I knew it would.
A few months back when I really committed to overhauling this space, I knew I couldn’t leave the countertop as it was. I had lots of ideas – I would clad it all in pallet wood, or 1 x 4s, or pleather with nailhead trim….. Then, I had a better idea, I wanted to make it look like soap stone. I would paint it black, then come back with a tiny paintbrush and maybe add some grayish-whiteish veining.
Pssssshhhhhh…..As if I actually have the patience for all that.
After I realized that idea was a bust, I had a thought.
I wonder what this countertop looks like underneath the laminate.
So I started tearing it off….
Painting Countertops to Look Like Stone
This post contains affiliate links for your shopping convenience. Click here to read my full disclosure policy.
Tools & Supplies Needed:
- Hammer
- Drywall Knife, Metal Scrapers, Pry Bar or something similar
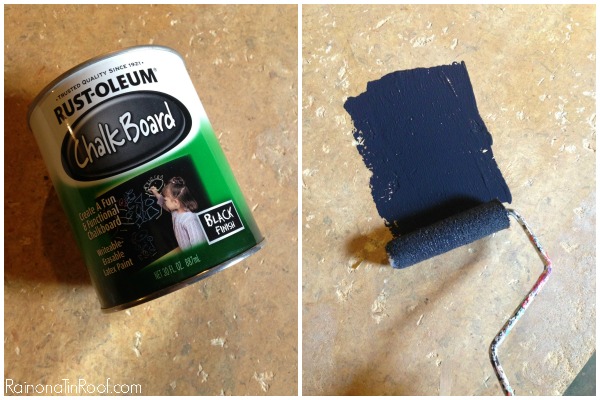
- Chalkboard Paint
- Topcoat – I used wax, but if your countertop is going in a kitchen or where water is often being used, go for a polycrylic topcoat.
Steps
Step 1
Starting at a corner of the countertop or a side, gently hammer your pry bar, drywall knife or scraper under the laminate of your countertop, then pop it up.

Continue doing this until your countertop is sans laminate and all you are left with is a piece of wood. It is totally ok if you make a few nicks, scratches and such on the wood as you tear the laminate off.
Step 2
Take a look at the wood you are left with and decide if the texture is “stone-y” enough for you. If you want more texture to it, you the scrapers to scrape into it some, beat it a few times with the hammer, hit it with a chain, whatever. This is also a great stress release exercise. 😉

If the wood is too rough for you, give it a light sanding with a palm sander. I did do this, as there were a few splinters sticking up that I wanted to take care of. A very light sanding is key here though.
Step 3
Once you are satisfied with the texture of your wood, give it a minimum of two coats (but I did three) of chalkboard paint.
Step 4
After the paint is fully dry, you need to seal the countertop. I used Minwax Finishing Paste Wax. I am not a fan of using waxes usually, but I knew the wax would keep that muted look of the paint so it looked more like stone, but still protect it, so that’s what I went for.
To apply the wax, I used my AutoRight Detailing Polisher.

I put some wax on the foam applicator, applied it to the counter, let it sit for 20 minutes or so, then came back with the microfiber bonnet and buffed it. The polisher makes it sooooo easier to apply wax to pieces.
If you are doing this countertop technique on a kitchen countertop or bathroom countertop that is going to be getting a lot of use, I would highly recommend you using a more heavy duty sealant like a polyurethane or polycrylic, which would hold up to water much better.
Here’s our end result:

And another shot:

Helpful Tips and Q&A About the DIY Faux Stone Counters:
How are they holding up?
Since this project was completed, we have actually moved out of the house where this countertop is. We were there for about two years though with the countertop and it was holding up just fine! My in-laws actually live in that house now and the countertop is doing well for them too!
Could I put food directly on the countertop?
Since you’re using a wax or polycrylic topcoat, I would suggest that you not put food directly on top of the counters.
Can I use a different kind of paint?
So I used the chalkboard paint because I had it on hand and because it had that flat, black color, but a little grayed out like soapstone looks. I think that you could use a different paint, however I would definitely suggest using a flat finish paint to get that stone look.
Want more DIY countertop makeover ideas?
Here are 9 DIY Countertop Makeovers!
Want to remember this countertop makeover for later? Just pin the image below!
You know you don’t wanna miss any of this crazy.
Sign up to get my posts delivered to your inbox here.
Stalk Me Here:
Pinterest / Facebook / Twitter / Instagram


angie says
Ok, you may have just discovered the best faux soapstone technique E.V.E.R! Seriously, that looks so real. Now I wish I had an old countertop to redo!
Jenna @ Rain on a Tin Roof says
Totally trial and error, Angie! Honestly, I was shocked it all worked out!! haha!
India says
I sooooo fell in LOURVE with this and less than an hour later, I held chisel and mallet in hand, ready to de-laminate our REALLY ugly green countertop. Sorry to say, but another hour later and I had barely made a dent — even with very sharp chisels! Only a patch of about 6″x15″ is gone now and I’ve had to give up.
Our UK-made laminate has been apparently made to last well into the next century. UGH! Now, we have decided to simply sand it down and tile over it… 🙁 Oh well… it was nice to imagine for a bit!
Jab says
I love it ????. I’m going to redo r kitchen boring white very soon using yr idea. Great job, great adventurer. Congrats ????
Jenna @ Rain on a Tin Roof says
Awesome, Jab!
wendy says
did you ever do your kitchen countertop white?
Meagan c says
If you did this in a kitchen and don’t use wax would it still have that same look? Or would it end up shiny?
Jenise @ DIYFunIdeas.com says
My favorite thing is experimenting and then having it come out awesome. Doesn’t always happen, but it did this time! Pinning!
Jenna @ Rain on a Tin Roof says
I know right, Jenise!? I’ve had so many failures, glad this one was a win!
Angela says
How did you get the little bits of gray?
Jenna says
It’s not really gray, it’s just the indentions in the countertop that make it look gray.
Linda Johnston says
I rarely ever sit in front of a computer and laugh out loud all by myself. Today I did! You just cracked me up. My daughter came by about that time and asked what was so funny. I just pointed to the screen and she read your post. After reading it she grinned and said, “Mom you laughed so hard because it sounds just like you!” What a compliment! No kidding, not only informative and inspiring, but very funny. Thanks!
Jenna @ Rain on a Tin Roof says
hahahaha! That is fantastic, Linda!!
Minky says
I just discovered your blog, and loved this post. Not only did does the faux soapstone look amazing, you cracked me up too! Like, real, burst out loud laughter! Thanks for this awesome post! Pinning and going to read more :).
Jenna @ Rain on a Tin Roof says
Hi Minky! Laughter is always my number one goal. 😉 I’m so glad you found me!
chris aka monkey says
omg where in the hell is my pry bar…. love this jenna xx
Jenna @ Rain on a Tin Roof says
haha, Chris! Removing the laminate with the pry bar is also great therapy! Take out some frustration!
Dana says
That looks amazing! If I have laminate countertops I’m going to do that. I love how you didn’t give. I know a lot of people (ahem…my husband) that would give up and throw it away before thinking outside the box. They are stellarly gorgeous.
Jenna @ Rain on a Tin Roof says
Thanks, Dana! In the end, I was like, wow, that was super easy. 🙂
Tanya says
FABULOUS!
Carol says
These look fabulous!! How are they holding up to daily wear and tear?
Jenna @ Rain on a Tin Roof says
Hey Carol! Its only been like this for a little more than a month, but so far, so good!
Alison says
Now that ot has been several years, do you have a picture of it? How did it grow old?
Thanj you
Jenna says
Hi Alison! Unfortunately, we don’t live in the house anymore where we did this, but my in-laws now do and so far, it’s held up just fine!
shelley says
WOW!! Thanks for taking a chance on what could have been a mess but came out awesome! This is a great look for all of us with older houses!!
Jenna @ Rain on a Tin Roof says
Yay, Shelley! I’m thrilled you like it – and super glad it worked out, otherwise it would have been a hot mess for me! haha!
Trina @ Let's Just Build a House says
looks REALLY good. My husband would have killed me if i started ripping off the laminate too..glad yours trusted your crazy ways to see your end idea!!
Jenna @ Rain on a Tin Roof says
hahaha!! Me too, Trina!
Liz Anthony says
My husband has learned not to ask questions. I love the use what u got on hand method. Sometimes it works sometimes it turns out so fabulous u have to write a blog about it…… Love the counter tops.
Jenna @ Rain on a Tin Roof says
Thanks, Liz! Mine is finally getting there!! I approached him about painting cabinets last night and there was no opposition at ALL! Shocking!
Amanda @ Dwelling in Happiness says
Ok, this is genius! AND amazing. I hate our countertops in our kitchen. Heck, I hate them in our bathrooms, too. This is a great idea to update them! Is this wood under every laminate counter? I’d be scared to rip it all off only to find something totally different! Love the idea either way, totes pinned for future reference!
Jenna @ Rain on a Tin Roof says
Hey Amanda! I cannot attest to this wood being under every laminate countertop. If I were you, I’d try peeling back the laminate in an inconspicuous spot like a corner or something! Hope that helps!
Kim Prichard says
Did anyone do this in their kitchen with the proper sealant? I’d LOVE to see how it looked and if it held up.
Laurie says
I’m pretty sure our laminate is sitting on top of particle board – I wonder if we could do this? Our painter painted the laminate nearly two years ago, but it’s rubbing off in places – I would really like to re-do in a less busy pattern than she did – too difficult to see where you need to wipe up, as the busy pattern is camouflage for EVERYTHING!! Great job!
Jenna @ Rain on a Tin Roof says
Hi Laurie! I’m not 100% sure if it would work on particle board or not. If there is a small spot you could peel up and test out, I would try that first!
Christie says
I know that this post was made several years ago, but no, you cannot do over particleboard. If it gets wet, it will swell. And then, you will have replacing them. This is why you will rarely ever see an undermount kitchen sink in laminate counters. You might want to seal the counters before you start.
Tiffany says
Jenna ~ This is really impressive! Simple and stunning! I’m hoping to redo our kitchen counters this summer. Although I’m wanting a butcher block look, I’m so glad to have this option in my back pocket (because I’ll likely seriously mess up my kitchen counters). Thanks!
Jenna @ Rain on a Tin Roof says
I couldn’t believe how easy it was, Tiffany!
Kim Prichard says
Jenna, how are the kitchen countertops holding up?
Jenna @ Rain on a Tin Roof says
These are doing great for us, Kim! However, like I mentioned in the post, we did this on a counter that is in the man cave – so it doesn’t see a lot of food and liquid action like the kitchen would.
Bethany says
I there! I’m wondering how they are holding up now!? They are beautiful!
Jenna @ Rain on a Tin Roof says
Hi Bethany! So far, so good! I do have to say though – where these countertops are – they don’t get a lot of hard use, which could be a factor.
Dharma says
You are my kinda crazy! Freaking awesome. Pinned for when I can’t find my stressball.
linda says
Honey, I have a question…first I love what you did to the countertop. I have a 80’s faux marbled countertop with sink all one piece. How can I refinish that. The countertop is glued down so much I will hurt the cabinet under it for sure…HELP please…thank you
Jenna @ Rain on a Tin Roof says
Hey Linda! Ok, I just found out about a new product. Its called Tainted to Repainted Countertops: http://taintedtorepainted.com/videos/countertops.html. It doesn’t look like they have any videos up yet, but I just saw it demonstrated at a conference. Its a kit that includes everything you need. If I remember correctly, first you prime the counters, then you apply paper that looks like marble, granite, etc. (you pick which one), then you seal it. I actually tried it myself and it is pretty easy to do and it looks great! I hope that helps!
Maggie says
Do you think I could do this over my concrete countertops that my contractor screwed up?
Jenna @ Rain on a Tin Roof says
I don’t know about that Maggie. I think you could probably paint them, but I don’t know that you could chip them off like I did the laminate without it causing a huge mess.
Laurie says
You can paint and seal concrete if you use a breathable paint made specifically for that purpose – I don’t know about using it on a food prep surface, though….
Jessi says
What would you suggest for a lighter version?
Jenna @ Rain on a Tin Roof says
For a lighter color, Jessi? I think if you went to your local home improvement store and looked at paint chips for a dark gray and got it in a flat finish that would work.
Donna says
I have hideous matching laminate cabinets and counter tops… I wonder if I can do this to the cabinets as well?
Jenna @ Rain on a Tin Roof says
I don’t know, Donna. Is there a cabinet where you could test it out and it wouldn’t really be seen if it didn’t work?
MLee says
Oh yes! Good timing! I am having a mini makeover in my kitchen and want to add worktops to create more working space. Problem is I want it to match my current worktops. Which is no longer made, and rather ugly to be honest. So, I am faced with not only adding new worktops but replacing old ones to match too.
Now I Quite fancy having a go at this! Makeover on the current ones and when I get the new ones, make them over to match! No full replacements!
Jenna @ Rain on a Tin Roof says
Awesome! Glad it was helpful!
Lorene @Remodelaholic says
Hi Jenna! I just emailed you about being featured on Remodelaholic, but my emails sometimes get caught in spam filters so I wanted to leave you a comment as well, just in case. Drop me a line at [email protected] please!
sydni says
OMG!!! Love this. Going to try on a small section when I get home! I have ugly green laminate counter tops… hope this works on mine!!! Thanks so much for sharing!!!!
Jenna @ Rain on a Tin Roof says
You are welcome, Sydni! Hope it works out for you!
Sydni says
Just peeled some of my laminate back….. it looks like compressed wood (kinda looks like corkboard)… is that was your is? I can’t tell by the pics
Jenna @ Rain on a Tin Roof says
Mine didn’t really look like cork board, but it did look like compressed wood pieces, all glued together. Does it look anything like the picture of mine in the post where the counter was stripped before painting? Does it have some texture to it? Can you paint a small patch and see?
Jennifer says
I don’t have any laminate countertops to try this on so I am going to buy a laminate countertop to replace a solid surface counter/integrated sink that I hate. For around $50 it’s worth a shot! My question is, would the finish still turn out like it looks with the wax if poly was used on it? It looks like the wax is the part that really makes it special and gives it some depth.
Jenna @ Rain on a Tin Roof says
I think it would turn out the same – maybe slightly different – if you use as matte of a polycrylic as you can find. Also, if you wanted to try it out first, look for old countertops at a Habitat for Humanity Restore. You may be able to get a small piece for cheap and see what it looks like.
Anna says
Really enjoyed this! I burned the kitchen laminate countertop with a hot cast iron pot a few years back. Oops. The problem is, I have a sink that is set on top of that laminate countertop. I guess I can’t apply this technique to my kitchen laminate countertop 🙁 Or can I? How?
Jenna @ Rain on a Tin Roof says
You could, Anna. but you would have to disconnect the plumbing, take the sink out and put it back in. Another possibility is that you could take the laminate off right up to the sink’s edge and then do a good line of caulk around the sink. Then do the paint and everything else.
Brad W. says
Starting a kitchen remodel and saw this idea on pinterest. We were looking at new countertops, as we have worn the color right off the old laminate, and now have a viable, less expensive alternative to try. My wife removed the laminate on the peninsula this morning and I am painting it after work. We will clear coat it and let you know how it goes.
Jenna @ Rain on a Tin Roof says
Awesome, Brad! I hope it works out!
leslie says
How well is your countertop holding up? Could you do a post-post?
Jenna @ Rain on a Tin Roof says
It’s done great, Leslie! Nothing bad to report at all. Now, keep in mind though that this is in our “man cave” so it doesn’t see as much action as a kitchen counter would.
Ashley says
I did this and failed miserably :/ There are 2 types of people in the world: those who can DIY and those who cannot.
Jenna @ Rain on a Tin Roof says
Oh no! I’m so sorry, Ashley! What went wrong?
Brooke says
So, I’ve had this pinned since before we even had our own house! Now that we do, I’m SO ready to do it to our kitchen. But…my countertops have a stupid rounded/bull nosed edge. They’re laminate, though. Any idea if that edge piece is like a piece of trim I can remove after I peel off the laminate? My big fear is, I’ll be stuck with rounded edge “stone”.
Brooke
Jenna @ Rain on a Tin Roof says
Hmmm… Brooke. I don’t know. I’ve never had countertops with that rounded edges. I do wonder though if after you removed the laminate if you could take something a little jagged – like a pry bar and “rough up” the edges.
Thomas says
The countertop looks great and seems like a good alternative to replacing my kitchen counters (plus, much cheaper!). Was your use of the chalkboard paint a result of what you had available to give you the look you wanted? Do you see any reason I can’t use some other type of paint, given that I will likely cover in some polycrylic?
Jenna @ Rain on a Tin Roof says
Hi Thomas! I used the chalkboard paint for two reasons – I had it on hand and it gave the black look I was going for – not too black, but more of a stone colored black. I definitely think you could use another kind of paint if you are putting polycrylic over it!
Lisa says
I did something so similar to my kitchen counter! But I tore off the laminate while hubby was away. I used my iron to heat areas of the laminate as I tore it away from counter beneath. Came off in smooth, big chunks that way. Then did a sanding, then some stain then epoxied it! Totally water proof around my kitchen sink! I do have to be careful about putting hot things directly on the counters, but otherwise it’s great! Goodbye purple (yes, purple!) laminate, hello wood looking countertops!
Jenna @ Rain on a Tin Roof says
Awesome, Lisa! That’s a great idea!
Sara says
Can’t wait to show this to my daughter-in-law!!! She’ll love it!! And she has countertops that she hates!!!! Thanks!!!
Jenna @ Rain on a Tin Roof says
Awesome, Sara!
Annie says
OMG! I’ve been looking for ideas like this for soooo long!!!! I’ll never thank you enough for it!!
Watch out the face my husband will do when he’ll get back from his 28 days work trip!! 😀
Jenna @ Rain on a Tin Roof says
hahaha!! Glad I could help, Annie!
Meghan says
I am in the process of taking the laminate off… what did you do with the left over glue on the counter top? did you have to sand it all or did you just paint over it? Thanks! Meghan
Jenna @ Rain on a Tin Roof says
Hmmm, Meghan, I didn’t really have any glue on the top of mine, it had been nailed down. Yes, though, I think I would try to sand it off if you can.
Alison says
So we bought a house and this pin is on my list to do in the kitchen. 🙂 I will us the polycrylic or this product I found that has a flat finish but creates thst water barrier (can’t remember the name) as suggested since it is a high use area. My fear is tearing off the laminate and it not having that stone texture. So my question is, should it not have the texture I am looking for or doesn’t hold up, do you think it would be ok to do the feather concrete technique over the particle or over the polycrylic? Any help is appreciated!
Jenna @ Rain on a Tin Roof says
Hi Alison! I would think you could do a feather concrete technique over the wood underneath, BUT I have never worked with concrete before, so I can’t be sure. Sorry I’m not much help!
Suzanne renshaw says
HiAlison ..I know this is 4 years later but wanted to know if you ever did the feathered concrete? I tore off all my laminate but couldn’t get it to look like stone..ugh so trying to figure out what to do next! Ty
Aria Archer says
So fabulous! I might have to do this in my kitchen. I have to ask, does it have a stone counter feel to it? Not necessarily in texture, but just solidness, temperature, etc.
Jenna @ Rain on a Tin Roof says
Hmmm….well, it doesn’t feel as heavy as a stone counter of course. These are old countertops though and so it’s more solid than newer laminate ones I believe. Hope that helps!
Lisa | Shine Your Light says
Oh my gosh I couldn’t love this project more. I don’t even have laminate countertops anywhere and now I wish I did 🙂 They look just like honed granite, it’s crazy!
Jenna @ Rain on a Tin Roof says
Thanks, Lisa!! It was a total crapshoot, but I’m so glad it turned out well!
Linda L. K says
As if I don’t get enough “Aha moments” I find a new one. LOL! My husband and I are renovating our whole house now that we only have one child home and he’s off to college in the fall. We had priced granite counter tops and I nearly had a coronary, $3,500! I love to squeeze a penny until it screams and this will be the perfect project. The last time I ripped out laminate we put ceramic tiles over the wood, the grout is a pain to keep clean and it chips, this will be perfect. I can’t wait to see the look on my hubby’s face when I say….”Look what I found on Pinterest.” LOL! I can’t wait to try this, thank you.
Jenna @ Rain on a Tin Roof says
Awesome, Linda! I know – countertops can be SO expensive!! This is a really easy project instead!
Kerry says
It looks great! So is that like a particle board wood material underneath the formica?
Jenna @ Rain on a Tin Roof says
I’m not 100% sure, Kerry. I think so, but I think it’s a pretty touch particle board – not like flimsy ones we would get in stores.
Christine says
I happened to stumble onto your blog and saw this countertop project. WOW!!! This is amazing! I’ve been searching for alternative countertops because I really don’t like the look of granite. What you did here is incredible and I can’t wait to look through your entire blog!
My question for you (since I’m inexperienced with finishes): Would it work to seal the countertop with polyurethane after applying the wax? I understand why you chose to finish it off with wax because it does give it a natural stone look, but I definitely need something more durable for the kitchen.
Thank you for sharing your ideas and for taking the time to respond to everyone, even though you originally posted this over a year ago! The fact that you do this is making me subscribe!!!
Jenna @ Rain on a Tin Roof says
Hi Christine! Sorry it took me a while to respond, I got busier than expected this week. So, yes, it sounds like you’ll need more protection than just a wax. If you are going to do a polyurethane or polycrylic topcoat, then I think you could skip the wax coat all together. As whatever it made the counters look like would be negated by the polyurethane or polycrylic. Hope that helps!
Christine says
Yes, that helps. Thank you!!
Chessie says
I love it!!! I showed the pic to my hubby (while covering the “How to Make Laminate Countertops look like Stone” caption! I asked him “Honey…do you like this countertop?” and he said “Yeah, what is that slate?” 😀
The fact that he said slate is good on you, because through the years he has often stopped many of my inexpensive fixer upper projects in their tracks because they looked too “craft-ish” rather than home improvement-ish! 🙂
Jenna says
Oh wow, Chessie, what a compliment! Thanks to both of you! And I totally get what he means by a project looking too “craft-ish.” I’ve done a few of those myself and they never last long around here because I just don’t like that look!
Chris says
Hi Jenna
WoW! I have been thinking about something like that for a couple of years. Either that or I was going to smear concrete on the countertop and then paint.
Your counter top looks great. How are they holding up and would you do anything different?
Jenna says
Hi Chris! We moved out of the house where this countertop is, but my in-laws live in that house now and it seems to still be holding up fine. I don’t think I would do anything differently, but if you did put this in a kitchen, I would recommend using a tougher topcoat such a polycrylic or something similar.
Scott says
So how well is it holding up. I am tempted to try this in a kitchen. But it would get more wear.
Jenna says
Hi Scott! We moved out of the house where this countertop is, but my in-laws live in that house now and it seems to still be holding up fine. If you did put this in a kitchen, I would recommend using a tougher topcoat such a polycrylic or something similar
Cassidy says
Hi, I am wondering, in your picture it looks like there is littler a darker spots on the counter that really gives it that stone look. But you only painted with the one color… Did it just naturally varying in shades with the “markings” on he counter or did you have to do something?
Jenna says
It just naturally did that, Cassidy. All I did was use that one paint. Hope that helps!
Carmen says
Would the top coat be food safe is using in a kitchen. What about the polycrylic? Would it leech into food?
Jenna says
I wouldn’t suggest sitting food directly on top of the counter and then eating it.
Sam says
You can find food safe sealers/top coats to use instead of the wax or traditional polycrylics/
Olivia- Reinvented Collection says
Your countertop turned out beautifully! If you re-apply wax they will continue to hold up nicely. Usually, every six months is needed for high traffic areas but once each year should keep your finish in good shape. I really do like the look! Much better than laminate. I’m lucky to be graced with those too.
Jenna says
That is awesome to know, Olivia – thanks so much for the tip!
Anna says
I’m remodeling my camper and I came across your blog. If I wanted a lighter concrete look without the weight, could I use this same idea but with a gray paint? Or does it have to be chalkboard paint?
Jenna says
I think you could probably do that, Anna. I would use a flat or satin sheen of the gray paint to get that concrete look.
Annie L says
This is DIY at it’s brilliant best. You are awesome!
Jenna says
Thanks so much, Annie!
Sherry McMullin says
I have tile squares on my bathroom countertops that are attached to one sink. Do u think I could chop up the tile and do that?
Jenna says
Honestly, Sherry, I’m not sure. I haven’t ever tried anything like that before.
Audrey says
We are purchasing a house from the 60s with original builder-basic white laminate countertops and I’m wondering if underneath ours will be the same. Do you know if most plain white, basic grade laminate countertops are like this? Such a good accident-idea! Lol. Black soapstone would just look so good in our house too. Thank you for putting this up!
Jenna says
Hi Audrey! I can’t say with 100% certainty that it would be like this or not. I would think so, but am not for sure. Maybe you could try peeling off a little piece somewhere that is kind of out of sight?
Lisa @ NatureImmerse says
Pro tip: Lock the cats in the other room when you do this! Trust me you’ll be glad you did 🙂
Sarah says
What did you do for the backsplash/back edge between counter and wall?
Jenna says
I just did it like I did the rest of the countertop. I didn’t have an edge on this countertop that came up the wall – it was just flat against it.
Jaime says
I’m in the process of trying this. I loved the finish with the chalkboard paint, but because this is in my kitchen I did one coat of a satin poly and it totally changed the look. It is more black than the charcoal/black it was before and too shiny. I’ve lighted sanded the top and am trying to figure out what to do next. I ordered a Matte Poly but didn’t know if I could paint another coat over my sanded poly coat that I have now.. Any advice? I was so bummed with how the poly changed the look. I didn’t know if I should try just the matte poly when it comes in, or paint another coat and then poly?
Jenna says
As long as you sanded the topcoat, you could definitely do another coat of paint over it.
Meg says
Jaime, how did your countertop turn out after using the Matte poly? I’m really considering doing this.
Elena says
This is pure genius! The finished look is outstanding and if by chance our next home has laminate countertops I will do this, because I know whatever we would buy will be a fixer upper. Our current townhouse has honed leathered black granite that actually resembles your finished project.
Samantha says
Can i use a different sealant so i can put food directly on the countertop? It’s for a kitchen so there will be a major amount of wear and tear! Thanks ?
Jenna says
I’m not sure, Samantha. You could ask a paint clerk at your local home improvement store if that is a food safe sealer.
Diane says
Hmmmm……my brother runs a convenience store-gas station in FL. The huge island counter has cracked, stained and gross faded red laminate. It’s already popping up off the wood. I’m seriously thinking about flying down and performing a DIY intervention on this nasty counter beast!
Jenna says
I’m sure he would be appreciated! 🙂
Grady Harmon says
This is brilliant. I will do this, because I know whatever we would buy will be a fixer upper. I loved the finish with the chalkboard paint, but because this is in my kitchen I did one coat of a satin poly and it totally changed the look. Black soapstone would just look so good in our house too. Thank you for putting this up.
Holly says
Do you think it would work and look just as good using white chalk board paint?
Jenna says
I think it would work fine. I don’t know about the look – I think that would be a matter of preference.
Kathy says
We just removed the laminate on our utility room counters and we are left with a sticky residue from whatever held the laminate onto the wood. What did you use to remove it? The palm sander didn’t budge it.
Jenna says
Hmmm. I didn’t have any sticky residue left on mine. You could try TSP to remove it.
Lorrie says
Does it hold up to water and heat, bumps, cuts etc? We’re really rough on cabinets and cook all the time.
Jenna says
Hi Lorrie! I would suggest always using a potholder under hot things when you put them on the countertop. I wouldn’t let water sit on it either.
Loretta Spears says
Love this idea! Redoing our kitchen countertops and I will be doing this, but I’m looking into polyurea as the sealant. I’ve read reviews and its super shiny and glossy but seen that you can add an additive that tones that down. Also read that by adding the additive makes more texture. Thinking this is a win-win for the soapstone look and safe kitchen use! What do you think?
Laurie G says
Love what you did!! I have my laminate removed and have 3 coats of balk chalk paint down. This is in the kitchen so I have satin gloss polyurethane to cover. But I’m now nervous that it’s going to be shiny and not muted soapstone-y. Any advice?
Jenna says
Satin usually isn’t too shiny – I think you should be fine!
Jennifer Wise says
This is amazing! I am going to be moving an old countertop and trying to repurpose it in the laundry room, and this will be just the thing! Thank you! Pinning. 🙂
#madebyyoumonday
Marie says
Wow, you’d never know it wasn’t the real thing! Visiting from the Wow Me Wednesday party. Pinned
Sylvia | Grace for a Gypsy says
I love this faux stone project! It looks like real stone!
Roseann Hampton says
Looks like your hard work paid off – looks amazing! Thanks for sharing with us at The Blogger’s Pit Stop!
Sandy Irving says
Wow. That’s definitely good old particle board, made from wood chips and glue. But that’s what gives it that textured, stone look. Cool. I’m going to flip over a loose piece of my kitchen countertop and test the technique on the reverse. With a sealant, because it’s the kitchen. If that works, and it’s reasonably waterproof, I’ll attack the old laminate. (And if I gouge it up, that just makes it better. My kind of project.)
Casey says
Would it work to use like a pour on epoxy resin once painted to top coat it, if being done in a kitchen…or would that make it too glossy and ruin the faux stone effect you think?
Jahnson alberto says
I love this faux stone project! It looks like real stone!
Kelley Loveless says
I LOVE this and have started working on my countertop that currently has a horrible camo leaf print. It’s coming off pretty easily, but the glue that was used is leaving behind a pink, almost red, residue. Any suggestions on how to tackle this issue without sanding away the imperfections that give it so much character? Thank you!
Susan says
I love your style of writing and your ideas, but wow! Way too many ads. I know that’s how u get paid, but I can’t make it through this article.
Cathy says
It looks great!! I do have a question. Laminate is usually affixed with contact cement. Was contact cement left behind??
I also liked the idea of using an iron to get it to release better!
I want to try this!!