So sometimes during a big project or after I finish a project, I start looking at all the little projects that made up that big project and I decide that some of those little projects probably wouldn’t be that interesting to you.
So I don’t bother too much with pictures and I don’t post about it.
But then months later, someone will ask me something specific about that small project that helped to make the bigger project possible and I will realize that I probably should have posted about that.
Does any of this make sense? Its late and I’ve been drinking. And apparently that makes me use the word projects too much.
So there’s that.
Anyway, if you remember way back in January, Grunt Labor and I finally finished his man cave.

In order to deem the man cave livable, he had to have a beverage center (a.k.a. a fancy name for a mini refrigerator). But when the beverage center arrived, it was a bit taller than the opening we had for it, thus we needed to raise the cabinets or get a new refrigerator.
Raising the cabinets was cheaper and faster than getting a new beverage center.
So you can guess which option won.
How to Raise Cabinets
Affiliate links may be contained in this post.
First, let me say that these cabinets were not in our kitchen or around any sort of plumbing. I definitely think that you can do this with your kitchen cabinets, however you would have to remove the countertops and possibly create a few new holes in the back of the cabinets for plumbing. It would be a bigger job than what we had to do.
You will need:
- 4 x 4 Post
- Saw (We used our miter saw and a table saw, you could also easily substitute the miter saw for a circular saw.)
- Drill and Screws or Hammer and Nails or Nail Gun (We used our nail gun.)
- Trim for the bottom of the cabinets (most likely a 1 x 6 piece)
Step 1:
Determine how much you need to raise your cabinets before moving them.
Step 2:
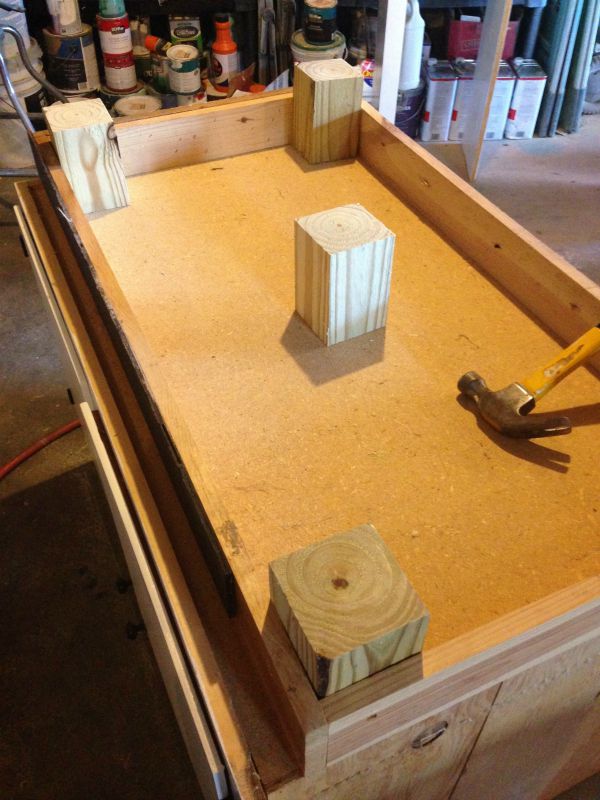
Remove your cabinets from the wall and flip them upside down. Before cutting the 4 x4 post to the height you need to raise your cabinets, look at the bottom of your cabinets.

Most all cabinets have that “base” or “frame around the bottom. Your 4 x 4 pieces are going to need to fit in that frame, but extend out of it the height you need to raise your cabinets. Does that make sense? So, you should cut your 4 x 4 pieces the height you need to raise the cabinets plus the height of that frame. Cut the 4 x 4 post to the appropriate length you need – we did 5 of these for each cabinet – one in each corner and one in the middle.
Step 3:
Secure the 4 x 4 pieces to the cabinet with nails or screws. For each of the corner pieces, just go through the frame. On the middle piece, just use wood glue to secure it, otherwise a screw or nail would probably go through the bottom.
Step 4:
Put your cabinets back into place.
 It will now look like you have “feet” on your cabinets – although not pretty ones. To fix this, you need to trim it out. Measure the space that you have to cover and cut trim to fit, then secure. We had about 5 inches to cover (height wise), so we bought a 1 x 6 x 12, cut it down to the appropriate length, then ran it through a table saw to get the six inches down to five inches. We secured it with finish nails. Paint it whatever color matches your cabinets.

Beverage center catastrophe averted.
You can see more of the man cave here.
Have you raised cabinets before? Did you use a different method?

You know you don’t wanna miss any of this crazy.
Sign up to get my posts delivered to your inbox here.
Stalk Me Here:
Bloglovin / Pinterest / Facebook / Twitter / Google+ / Instagram





