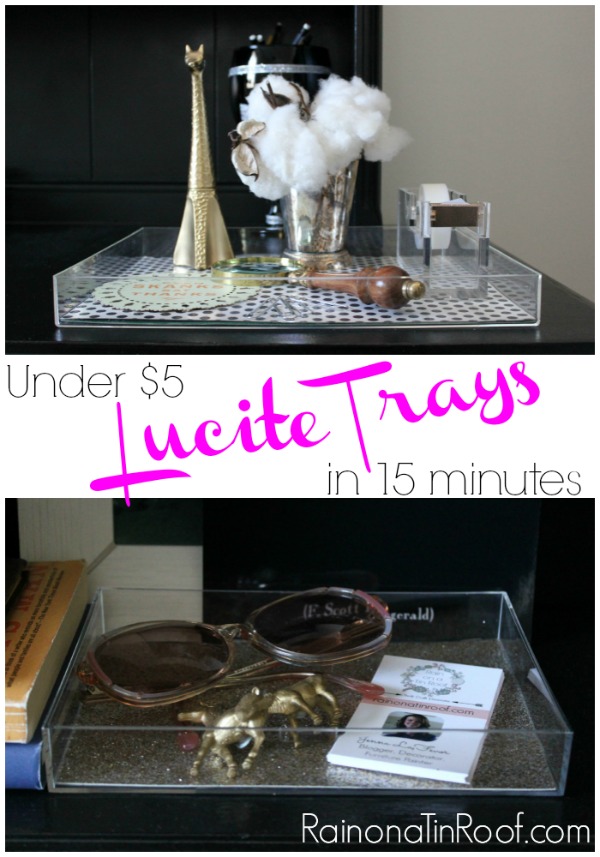
I absolutely love having lots of pretty trays around my home. Lucite or acrylic trays (whichever you want to call them!) are perfect for corralling items in a stylish way. They can easily make your home look chic and organized at the same time. But, those clear acrylic trays can also be really expensive! Keep reading though to see how I created my own lucite trays for less than $5 and in five minutes!
I was ecstatic with all your comments last Friday when I introduced this new series, 15 on Friday! Thanks so much, y’all!
This week’s 15 on Friday, I think, is FAB.
This post contains affiliate links for your shopping convenience. Click here to read my full disclosure policy.
See, I have this thing for lucite / acrylic. When Grunt Labor asked me what lucite was, my response was, “It’s the stuff dreams are made of.”
Obsessed much? Probably too much.
For Christmas, I asked for a plethora of lucite items from Anthropologie. One being this tape dispenser (that I got!) and another one, this lucite tray. Friends, that tray is $44. You can get this one cheaper – its $25.
Or, you could make your own DIY lucite tray for $5 and in less than 5 minutes.
And you can make the bottom prettier than those other ones.
We have a winner! {Insert Price is Right theme song here}
DIY Lucite Tray
Here’s what ya do.
Step 1
Go to Michael’s (mine came from Michael’s) or another craft store or maybe even Target and buy an acrylic frame and pretty paper (12 x 12).
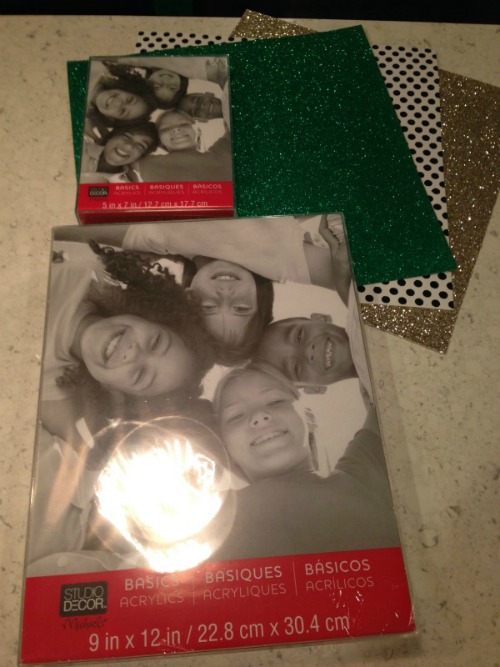
I got two frames – a larger one and smaller one – and by using a 40% coupon at Michael’s each was under $5. I think the paper was like $0.50 a sheet on sale.
Step 2
Now, unwrap the frames and flip them over.

Step 3
Pull out the cardboard backing.
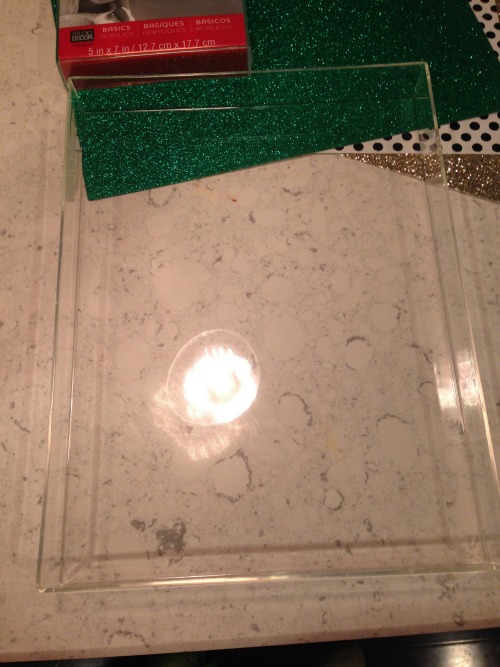
Instant clear acrylic tray.
Now, this next step isn’t necessary, but if you want to add a bit more to your tray, you can easily add a little bling.
Trace the tray’s shape on the back of the paper and cut it out. Pop it in the tray.

Bling added.
Were you expecting it to be more complicated? You should know by now that I love quick and easy projects with some bling.

I sent my paper to work with Grunt Labor one day and had him laminate it. You don’t have to do this, but it just adds a little extra protection. You can also get that done pretty cheap at just about any office supply store. Or, you could even Mod-Podge it in there.

Both trays are on my new office desk / hutch.
The small one is holding my business cards (that need an update), extra gold animal push-pins, and my grandmother’s retro glasses that she wore while driving her beloved Cadillac.

The larger one holds….

An old Avon perfume bottle that is a cross between a giraffe and the Eiffel Tower?? Strange, but pretty when spray painted gold….

A fun (and inappropriate) coaster my friend Lindsay got me from Z-Gallerie.

And the beloved lucite tape dispenser….
What do you think of these DIY lucite trays? Better than a $40 one?
Love a good tray hack or knock-off DIY? Then you’ll want to see these…
This Faux Malachite Tray costs less than $10 to make.
This DIY Monogrammed Tray makes a perfect gift.
Learn how to make your own lucite frame – and get a free Gone with the Wind printable.
You know you don’t wanna miss any of this crazy.
Stalk Me Here:
Pinterest / Facebook / Twitter / Instagram

Lisa says
I just found my solution for storing small items on our old, weathered wood bathroom closet shelves!! The doors are reclaimed French door (glass panels) and so a few trays and a little *bling* will go a long way. Awesome sauce!
Jenna @ Rain on a Tin Roof says
Awesome, Lisa!!! These will be perfect against those doors!!
angela says
You did not just do that with a frame from Michaels! Are you serious!?! I have been coveting Lucite trays, but couldn’t justify spending the money right now. This I can totally do. Like probably today…
Angela @ Number Fifty-Three
Jenna @ Rain on a Tin Roof says
I. Am. Serious. I shocked myself, Angela! Go. Do it. Today!!!!
Jerri says
You could also use clear contac paper to add protection to your pretty scrap book paper liner.
Jenna @ Rain on a Tin Roof says
That is a great alternative to laminating it, Jerri! Thanks for sharing!
Trina @ Let's Just Build a House says
i love lucite, although i’m not sure it would go in my home…but it looks so fab!
also those coasters, LOL love them!
Jenna @ Rain on a Tin Roof says
Thanks, Trina! I know what you mean about lucite – there are definitely some spaces in my home that it wouldn’t work in, but I am loving it in my office! And those coasters are too funny!!
Jennifer @ Decorated Chaos says
What a clever idea! I never thought about using plastic frames! Thanks for sharing.
Jenna @ Rain on a Tin Roof says
Thanks, Jennifer!
Kristin @ bliss-athome.com says
One of my all-time fave DIY hacks. So easy and cheap. I love seeing how different bloggers use it. Fun! Happy Weekend! xo K
Jenna @ Rain on a Tin Roof says
Thanks so much, Kristin!
Laura @ The Turquoise Home says
Oh. My. Word. You’re a genius, Jenna. I have always wanted a lucite tray, but never in all my years thought of using a picture frame. AND I have several of them in my house! Seriously, genius!!
Laura
PS – love the new e-mail look!
Jenna @ Rain on a Tin Roof says
I’m not sure I’m a genius, Laura. Just really cheap! haha! Thanks, gal!
Selene Galindo says
Fabulous!! And you had me laughingng at the “Even skanks say thanks” coaster! I had to double look to make sure I read right!! Haha!!
Jenna @ Rain on a Tin Roof says
Isn’t that coaster so funny??! The whole set of them is just fabulous!
Amy Barber says
That is my cake topper! The picture is my exact cake topper, although mine got broke in one of our moves, sad face. We bought it on ebay cause I had a vintage style wedding. that is so cool!
Jenna @ Rain on a Tin Roof says
That is so cool, Amy! That is the cake topper that my grandparents had on their 30th anniversary cake!
Stephanie says
First, what a great idea turning a frame into a tray, I will be using that one for sure. Second, I totally love that coaster! It made me laugh as soon as I spotted it, fits my sense of humor perfectly (what can I say, inappropriate things make me giggle). Thanks for sharing!
Jenna @ Rain on a Tin Roof says
Girl, you and me both! I laugh at inappropriateness all the time!! Thanks!
Janae says
I ADORE the coaster!! And your fab trays make it classy!!
Jenna @ Rain on a Tin Roof says
Is that coaster just not the best thing ever?? haha! Thanks!
Andi says
After reading this I feel so silly for buying one for 30 bucks! I’m pretty sure a trip to Michael’s is in store this weekend. BTW, I included a link to this post in my weekly round-up. Thanks for sharing!
Jenna @ Rain on a Tin Roof says
Don’t feel silly, Andi – I was totally about to buy one for $40 myself. Now, you can have more for cheap! Thanks for giving me a shout-out!
Melanie LaDue says
You’ve just inspired me to make this for my bedroom dresser! LOVE the quote too! Made me smile!
I’d love for you to come link up at Skip The Housework Saturday, live now!
Jenna @ Rain on a Tin Roof says
Thanks, Melanie! I LOVE that quote as well!
Erin @ DIY on the Cheap says
Love this idea! And love that it only cost $5!
Jenna @ Rain on a Tin Roof says
Thanks, Erin! And how in the world you have time to comment on blogs while in the midst of a move is beyond me! You. Are. A. Rockstar.
Alaya Sheardon says
How adorable! I will have to try this myself… perfect to add to a nightstand for all your small items.
Jenna @ Rain on a Tin Roof says
Thanks, Alaya! And yep – perfect for those nightstands and they have a variety of sizes!
Emily says
This is just brilliant. I would have never even thought you could use those frames for lucite trays. I’m not really a fan of them as frames, so this seems like a perfect alternative. I so want to do this now. Pinned!
Jenna @ Rain on a Tin Roof says
Yea, I’m usually not a fan of them as frames either, but I do love using them for this! Thanks for the pin love!
Pat says
Love this! You are so clever ~ I love having bling everywhere too. 🙂
xo
Pat
Jenna @ Rain on a Tin Roof says
Bling makes everything better!! haha! Thanks, gal!
Lusine says
I have been dying for a lucite tray but couldn’t justify spending the money. You are a genius. I am heading to Michael’s tomorrow, thank you for the idea 🙂
Jenna @ Rain on a Tin Roof says
I don’t know that I’m a genius, Lusine – just really cheap! haha! Glad you like it and that I could save you some $$!!
Jane says
Thanks for linking up to our new linky party Design {it} Friday! Love your chic lucite tray! Hope you’ll stop by again!
Laura / Pet Scribbles says
Jenna, this is such a cool project! I’m pinning it to my “Tray Makeovers” board! Thanks for sharing such a great idea!
Jenna @ Rain on a Tin Roof says
Thanks, Laura! And thanks as well for the pin love!
Emily says
Wow! So easy and chic! Definitely going to do this 🙂 Thanks for sharing!
Jenna @ Rain on a Tin Roof says
It is so easy, Emily!! Thanks!
Tasha @ Designer Trapped in a Lawyer's Body says
Okay, this is officially a genius idea! I can’t wait to go to Michael’s again so I can make some of these beauties! Pinning!
Jenna @ Rain on a Tin Roof says
Maybe not genius….just the fruit of a really cheap person! haha! Thanks!
Jamie says
This is amazing! You are genius girl! Even Skanks say Thanks? bahaha
J.
Jenna @ Rain on a Tin Roof says
hahahahahaha – I know right, love those skanks! haha!
Rachel says
Oh, how pretty! I have to admit, I’ve not been a big fan of lucite, but you *might* have converted me . . . or at the very least given me pause! Those trays are awesome, and so easy! I love big bang for your buck home decor projects.
Jenna @ Rain on a Tin Roof says
Rachel, if I converted you to a lucite fan, then my life’s mission is complete! hahaha! I LOVE lucite!
Jane says
Hi Jenna, I featured your Awesome lucite tray on my Design {it} Friday – Favorites post today! Thanks so much for linking up…it was our first day!! I really appreciate it.
Jenna @ Rain on a Tin Roof says
Awesome, Jane! Thank you so much!
Jessi @ Practically Functional says
Oh I love it! What a fun and simple idea! I’m pinning this, and thanks for linking it up to Creativity Unleashed!
Marty@A Stroll Thru Life says
I love these, they are fabulous and so fun. Thanks tons for linking to Inspire Me. Hugs, marty
Jenna @ Rain on a Tin Roof says
Thanks, Marty!
IvandaVGV says
Love this!! It also occurred to me that one could use fabric in the tray by using coating it with iron-on, clear vinyl. You know, if one wanted to. 🙂
Now, how many trays are TOO many? 😉
Thanks!
Jenna @ Rain on a Tin Roof says
That is a great idea!! And there are so many other color and pattern options with fabric too – thanks for sharing that!
And you can NEVER have too many trays. At least in my opinion!
Marie@The Interior Frugalista says
Jenna, thats just too simple to be so cute! I want your lucite or glass tape dispenser – do you remember where you got it?
Jenna @ Rain on a Tin Roof says
The tape dispenser came from Anthro – there is a link in the post! Thanks!
Adrienne says
What a great idea! I love adding things like lucite to my shabby chic decor. It helps keep things from looking too precious and gives it that modern edge. I am totally making one of these for my desk. Found you via From my Front Porch to Yours. Pinning!
Jenna @ Rain on a Tin Roof says
Thanks, Adrienne! These are so simple to make and yep, they would look great with your shabby chic decor!
Courtney says
Love this and always feel so inspired when I come to your blog!
Jenna @ Rain on a Tin Roof says
Oh, Courtney – I live for these comments! Thanks, gal!
Linda @ A La Carte says
What a fun idea!
Jenna @ Rain on a Tin Roof says
Thanks, Linda!
Sara says
Fantastic!! I have to make a lucite tray now that I read this!
Thanks for linking up at Tell Me About It Tuesday. We hope you hop over and share with us again this week. (Sorry for the late comment!)
Jenna @ Rain on a Tin Roof says
Thanks, Sara! They are so easy!
angela says
Just linked back to you this morning. You can see the tray on my nightstand. Thanks again for the inspiration! 🙂
Angela @ Number Fifty-Three
Jenna @ Rain on a Tin Roof says
LOVE the tray, Angela!! Always happy to inspire!
Brandi says
Such a clever idea. I love how it came together. You could have a lot of fun with all the fun paper patterns they sell.
Jenna @ Rain on a Tin Roof says
Thanks, Brandi! Oh, I know – there are so many paper choices that its dangerous! haha!
Lindsay says
So I came back to this post this morning because I want to make one of these fabulous trays to go in the new bathroom. Whenever that project happens. You know Jerry.
But! How did I never notice that the skanks coaster had the little cutout of someone giving the middle finger?
I’m such a classy friend. Aren’t you glad you trust me with the kid?
Jenna @ Rain on a Tin Roof says
Girl. It took me about a month to realize it and when I did, I stared at it for a few minutes to make sure I was right! haha!
Michelle says
Talk about re-purposing something! You go gurl! brilliant! ~That Chic~
Kristy says
OMG, I’m in love! Thank you, genius!
Emily says
This is NEXT LEVEL genius! Seriously. Thanks for posting!! Xo
Jenna @ Rain on a Tin Roof says
hahaha!! Thanks, Emily!
Cari says
I’m late to the party, but I love this. I think I need one and so does my sister-in-law! Love it!
Tori says
Ohmygosh! I totally thought when I saw this on Pinterest that “Hey! I could totally just use a plastic frame thingie!” Hahahahaha! And that’s exactlt what you did! Great minds think alike! I’ve used these frames for years in my kids rooms. I’ve used them for trays to hold puzzle pieces, toy cars, legos…and all manner of boys junk! The only problem is that they do scratch easily =(
Jenna @ Rain on a Tin Roof says
Great minds, Tori!! Yes – they can scratch easily. That’s one reason I did the laminated lining on the bottom.
Jessica says
I don’t know you but this is amazing and we’re pretty much best friends now because of this post. I never would have thought to do this. I didn’t even know this type of frame existed!
If you are as obsessed with gold lately as I am, you can use a gold paint marker to line the top edges of your tray. I did that with a clear magazine organizer and it looks really pretty.
Jenna @ Rain on a Tin Roof says
Oooooo, girl we are TOTALLY best friends – gold + anything clear/lucite/acrylic = AWESOME!
Jessica says
Lo and behold, after seeing this blog post I found a tiny acrylic box frame at Goodwill for $0.50
I decided to give it a try as a mini tray and it ended up fitting perfectly in my nightstand! I cut up the front of an old notebook cover I saved (I knew hoarding it would come in handy one day)
Here are some pictures (hopefully the links work):
https://scontent-atl3-1.xx.fbcdn.net/hphotos-xpa1/v/t1.0-9/13010694_10209505104453709_8808368347034097870_n.jpg?oh=ab3a05c369c4024bd0edbfb9c7aac5e4&oe=57B04F72
https://scontent-atl3-1.xx.fbcdn.net/hphotos-xaf1/v/t1.0-9/13015153_10209505104733716_6320312964317368792_n.jpg?oh=c95d089ac9789f6c5fec71b64b5facf1&oe=577668C5
Jenna @ Rain on a Tin Roof says
LOVE it!! The gold and white stripes are perfect!! Aren’t these just the handiest little things ever?
Karla says
The scrapbooking paper is 12 x 12 but the tray is bigger how did you cover up the seam?
Karla says
Hi! I’m so excited to try this out the very same day I went to pick up supplies! However, my question is how did you mend the scrapbooking paper as most scrapbooking paper is 12X12?? How did you do it for the the trays?
Liz V. says
Brilliant! Thank you!
Jenna @ Rain on a Tin Roof says
You are so welcome!