Tag: tray

  • DIY Ouija Board Halloween Tray

    DIY Ouija Board Halloween Tray

    If you love the spooky feeling a ouija board can add to your Halloween decor, then this is the project for you! This DIY ouija board Halloween tray adds a creepy touch and is also great to use as a serving tray at your Halloween party!

    So I got a comment on the blog post about my witch costume the other day from a lady quoting scripture about how the Lord will put an end to witchcraft, fortune tellers, pagan cities and the such.

    Folks, it’s the Halloween season. I’m not out here dancing around nude in the dark offering up my soul to the devil. I just love a damn good witch costume and Halloween.

    I mean, we all know I need prayer for a whole lot of things but my witch costume and halloween decorations aren’t one of them.

    All that being said, this ouija board tray will not be used to summon spirits. And even if I wanted to, I’m not sure the thick coat of Mod Podge I put on the bad boy would even let any spirits through.

    This tray however can be seen throughout this glorious Halloween season adorning my coffee table, serving drinks, and just generally satisfying all my Halloween decorating dreams. 😆

    Halloween Tray

    This post contains affiliate links for your shopping convenience. Click here to read my full disclosure policy.

    Isn’t it spooky? It looks old and creepy and I love it for all that and more.

    This tray is easily made using a pre-fab tray, a printable I’ve got for you and a couple other things.

    DIY Ouija Board Halloween Serving Tray

    Materials and Supples Needed:

    Ouija Board Decor

    Steps

    Step 1

    Print out the Ouija Board Printable.

    You can get the printable from my Printable Library. To access the printable library, you’ll need to be an email subscriber to Rain on a Tin Roof.

    If you’re already an email subscriber, go to the Printable Library here and enter the password which you can find at the bottom of the latest email from me, which would most likely be about this tray. Scroll down until you see the ouija board printable, download and print it using the links.

    If you’re not already an email subscriber to Rain on a Tin Roof, simply click here and sign up. After signing up, you’ll receive an email to confirm your subscription. After doing this, you’ll be directed to the Printable Library where you can download the ouija board and then print.

    Printing Notes

    I used this public domain ouija board image and created two different sizes from it to use for the tray. If you go with the same tray size I used, I would recommend using the 8.5″ x 14″ size that I made. If you go with a smaller tray, you can use the 8.5″ x 11″ size. Both are available for download in my printable library.

    Step 2

    Paint the tray. I did two coats of spray paint.

    Step 3

    Cut out the printable.

    Halloween Serving Tray

    If you go with the same size tray and printable I used, the printable is going to be longer than the tray. To cut it out, I just placed the printable in the tray, then creased where I should cut.

    Now, I am not recommending that you do the next part exactly how I did it. I don’t want none of you coming back and blaming me for burning yourself.

    Ouija Board Printable

    After I cut the printable down some, I burned some of the paper along the edges to give it an authentic spooky Halloween look. Again, I don’t recommend you do this. If you do it, you are doing so at your own risk.

    Step 4

    Apply a good coat of Mod Podge onto the bottom of the tray, then immediately place the ouija board on top of it.
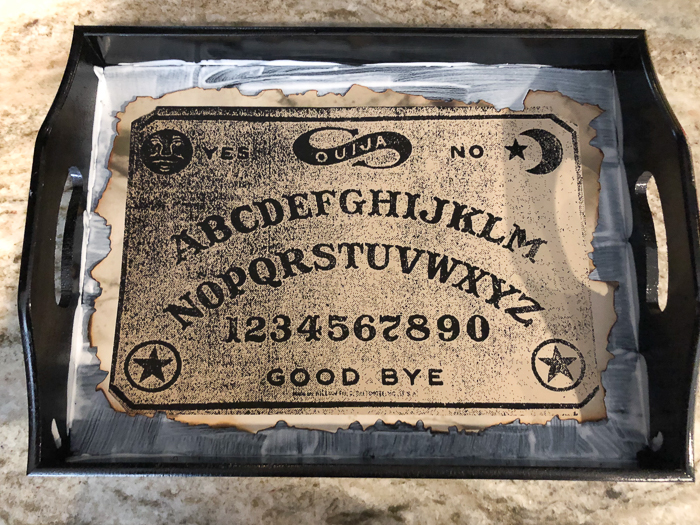
    DIY Ouija Board Halloween Tray

    Apply a coat of Mod Podge over the ouija board.

    DIY Halloween Serving Tray

    Let dry, then add 1-2 more coats of Mod Podge. I did three coats total.

    As you can see, I had a couple of wrinkles in my paper. I tried to get them out, but failed. However, in the end, I think it just added more to the overall “old” look of the project.

    Ouija Board Halloween Serving Tray

    Oooo, I just love it!

    Ouija Board Decor DIY

    Isn’t it so fun for Halloween?

    I’m off to give this thing a whirl and see who all I can conjure up!

    Just kidding!

    Will you be adding this touch of ouija board decor to your Halloween home?

    Want more Halloween projects to get your house creepy-fied?

    How to Make a Glowing Crystal Ball – it will take you all of five minutes!

    DIY Skull Sconce – using items from the Dollar Tree!

    Printable Spell Book Cover and Potion Labels – turn any book into a “spell book!”

    Want to come back to the instructions for this tray later? Just pin the image below!

    DIY Halloween Tray

    Follow on social media for more Halloween decorating ideas!

    Facebook | Instagram | Pinterest | Twitter

  • DIY Bathtub Tray with Book Holder

    DIY Bathtub Tray with Book Holder

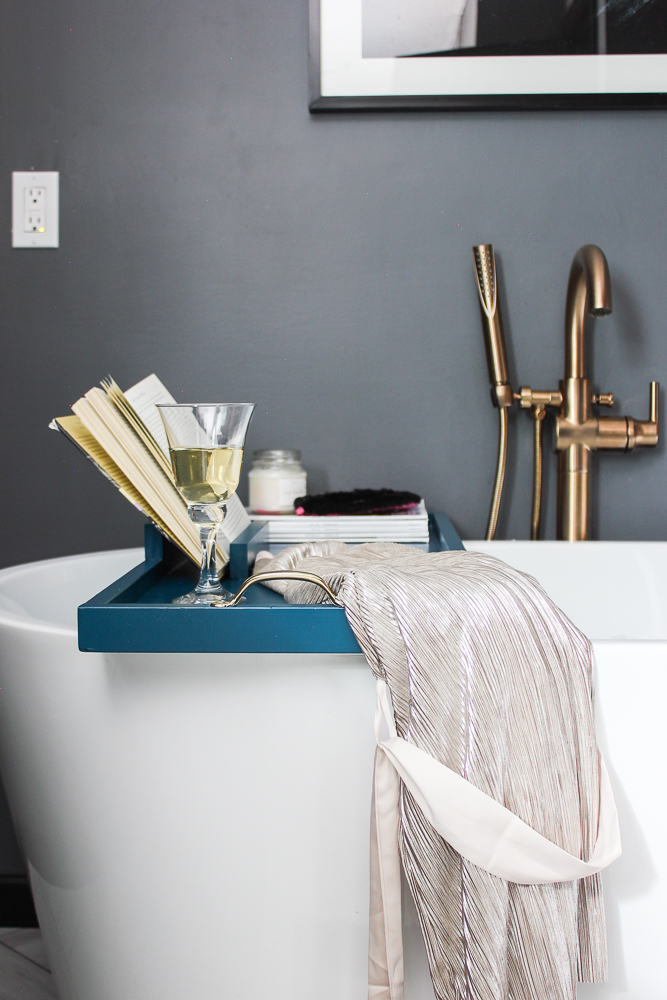
    Need a place to rest your book and your wine glass during bath time? This DIY bathtub tray is the perfect perch for just that! You can make this bath tray with a book holder using basic DIY skills and for about $20.

    If you read my Caftans and Cocktails post, then you may remember I talked about how I wanted to share more simple DIY projects this year – doable, non-expensive projects that require simple materials, basic DIY skills and maybe power tools occasionally – but no fancy ones.

    Good, simple DIY.

    As promised, I’ve rounded up a few of my favorite blogger friends and we are going to share with you a simple DIY project every other month throughout the year. We are all really excited to “get back to our roots” so to speak.

    If you’re coming over from Laura’s blog, The Turquoise Home, welcome! She is giving a great tutorial today on how to patch holes in drywall, so if you haven’t been there yet, be sure to after you leave here. There are also links at the end of this post to all the other bloggers getting back to the basics today as well.

    My project today is actually the brainchild of the Circus…

    DIY Bathtub Tray with Book Holder

    A DIY Bathtub Tray

    Right around the first of the year, she proclaimed that she needed a tray in the tub so that she could sip on her drink and read a book while bathing. And while she was a touch dramatic about it, I did think it was a pretty damn good idea. Since she insists on using my bathtub, I might as well make something that’s going to benefit not only her, but me too in the process.

    We wanted a bathtub tray that had a book rest, as well as a rim to help keep things from getting bumped and easily falling overboard. We were able to make this one for about $20, a little wood glue and some (very easy and simple) cuts.

    This post contains affiliate links for your shopping convenience. Click here to read my full disclosure policy.

    DIY Bathtub Tray with Book Holder

    Obviously, bathtub sizes differ. Our tray was made to fit a bathtub that is 31 1/2″ wide, outside edge to outside edge. You can easily adjust the measurements with this tray to fit any size bathtub. 🙂

    Supplies and Tools Needed:

    • 1 – 12″ x 3′ Pine Board or another similar board of your choice. I went with this one because it was the cheapest good piece of wood I could find in the length I needed. This bad boy was only $7 y’all. It’s my new go-to wood for projects.
    • 1 – 1″ x 2″ x 8′
    • 1 – 1″ x 2″ x 4′
    • Wood Glue
    • Long Bar Clamps or Hammer and Finish Nails or Nail Gun (I used just clamps, but if you don’t have those, you can use one of the other options to keep the boards in place as the glue dries.)
    • Circular Saw or Chop Saw or Miter Saw (you are only having to make straight cuts, so any one of those will do)
    • Handles – I used these screen door handles because they were the cheapest and still looked good.
    • Spray Paint in Color of Your Choice – mine is Krylon Peacock Blue
    • Drill

    Step 1

    Cut your big board, the 12″ x 3′ pine board, down to 33 1/4″. If your bathtub is not as wide as mine, then I suggest cutting the board down to where you have about a 1 1/2″ overhang on each side.

    Step 2

    Cut two pieces of the 1″ x 2″ x 8′ down to the length of the long sides of your tray base, the board you just cut. If you’re following my same dimensions, this should be 33 1/4″ as well.

    DIY Bath Tray with Book Holder

    Step 3

    Run wood glue along each long side of the tray base.

    DIY Bathtub Tray

    Place each of the 1″ x 2″s you cut along the edges of the tray base where you applied the glue and clamp together.

    DIY Bath Tray

    Be sure that the bottom of the 1″ x 2″ pieces are flush with the bottom edges of the tray base as shown below.

    Simple Bathtub Tray

    Let the pieces stay clamped together for a few hours or so.

    Step 4

    Cut two more pieces of 1″ x 2″ from the same 8′ long strip you already cut down to the width of the tray. If you’re following my exact measurements, this should be 13 9/16″.

    Simple DIY Bathtub Tray

    Apply wood glue to the short edges of the tray base, just as you did on the long edges. Put the 1″ x 2″ pieces you just cut along the edges and clamp together.

    Easy DIY Bath Tray

    Let the pieces stay clamped together for a few hours.

    Step 5

    *Note: This step creates wood blocks to go on the underside of the try to prevent it from getting knocked over the edge of the tub. If you aren’t concerned with this, you can skip this step. I however have a crazy six year old – we need them. 😉

    Take the uncut 1″ x 2″ x 4′ and cut two 6″ long pieces from it.

    Simple DIY Bath Tray with Book Holder
    I used scrap wood here, so disregard how it looks different than regular 1″ x 2″.

    Flip the tray over and using wood glue, attach each of these pieces 3 1/2″ inside from the short outside edge of the tray.

    Easy DIY Bathtub Tray with Book Holder

    Carefully flip the tray back over on a level surface and then place heavy objects on the tray and let it sit for a few hours.

    How to Make a Bathtub Tray

    Step 6

    Sand the tray smooth as needed.

    How to Make a Bathtub Tray with a Book Holder

    Caulk around the inside edges of the tray.

    Bathtub Tray with a Book Holder

    Step 7

    With the remaining 1″ x 2″ x 4′, cut two pieces that are each 10 1/2″ long.

    Apply wood glue to the “skinny side” of one of these pieces and place it in the center of one of the long edges of the tray, atop the edge as shown below.

    DIY Bath Tray

    Use clamps to hold it in place for a few hours.

    Step 8

    Take the remaining cut 10 1/2″ long 1″ x 2 piece, apply wood glue to the skinny side and place it in front of of the 1″ x 2″ you just attached to the tray edge. I placed mine 3 1/2″ out from the tray back so it could accommodate thicker books. You can play around with it before gluing it to decide where your piece would best fit.

    Place something heavy on top of this piece after gluing it to keep it set in place as it drys.

    DIY Bathtub Tray

    I didn’t have clamps that would fit around the back of the tray and over to this piece, so we got creative.

    Step 9

    Spray paint your tray – I did about three coats.

    Step 10

    Attach your handles to the short sides of the tray. I do suggest drilling a pilot hole first so you don’t crack the wood with the hardware screws.

    DIY Bathtub Tray with Book Holder

    Bathtub / Tub Faucet / Art Above Tub

    DIY Bath Tray with Book Holder

    We love how our tray turned out and have already put it to use! The only complaint from the Circus was that she didn’t get her bright turquoise paint on it.

    DIY Bathtub Tray

    I told her if she was going to always hijack my tub, then she was going to have to compromise on the paint color. 😉

    DIY Bath Tray

    Here’s to simple DIY projects that also prove themselves to be quite functional. Be sure to head over to Making Home Base and see how simple it is to frame a canvas! Don’t miss the other Back to the Basics DIY Projects below as well:

    Back to the Basics DIY Projects

    DIY Framed Canvas at Making Home Base | Settee Makeover at So Much Better with Age | How to Patch Drywall at The Turquoise Home

    Pin This Post
    DIY Bathtub Tray with Book Holder

    Join the Freak Show on: 

    Facebook | Instagram | Pinterest | Twitter

  • DIY Faux Malachite Tray (For Less than $10)

    DIY Faux Malachite Tray (For Less than $10)

    Lately, I’ve been lusting.

    Lusting after this malachite fabric.

    I’ve kind of been dreaming and scheming to make that fabric into curtains for the living room.

    But I just can’t bite the bullet yet.

    But I do love malachite. 

    And as I was walking through the craft store the other day, plotting to make a pink and white marbled tray, I changed my mind.

    Which happens often. 

    I would make a faux malachite tray. 

    And I did.

    ANYONE can do this - its hard to mess up! And its cheap! DIY Faux Malachite Tray (For Less than $10) via RainonaTinRoof.com

    This post contains affiliate links for your shopping convenience. Click here to read my full disclosure policy.

    The best part?

    It will cost you $10 or less.

    If you are like me and tend to have some gold spray paint lying around, its only going to set you back about $6.

    Boom.

    How to Make a Faux Malachite Tray

    Materials & Supplies Needed:

    ANYONE can do this - its hard to mess up! And its cheap! DIY Faux Malachite Tray (For Less than $10) via RainonaTinRoof.com

    Steps

    Step 1: 

    Spray paint your picture frame gold.

    Step 2:

    Starting with the darkest color of green, squeeze out a line into the bottom of the tray. On both sides of the darkest green, squeeze out lines of the next darkest, and finally on both sides of those lines, squeeze out lines of the lightest green. It will eventually look like this:

    ANYONE can do this - its hard to mess up! And its cheap! DIY Faux Malachite Tray (For Less than $10) via RainonaTinRoof.com

    You will see that you kind of start to curve your lines as you work your way out. Don’t worry about that.

    Stop every once in a while and tap your tray against a level solid surface to kind of spread the paint out, but still maintain the pattern. Once you’ve got most of the tray covered with paint, you can move the tray around to get in any corners.

    Step 3:

    Run a toothpick back and forth and all around throughout the paint while it is still wet.

    ANYONE can do this - its hard to mess up! And its cheap! DIY Faux Malachite Tray (For Less than $10) via RainonaTinRoof.com

    Just go crazy with it until you have a pattern you like. You really can’t mess this up.

    Step 4: 

    Let the paint fully cure. This is a lot of paint, so its going to take a while. I let mine sit untouched for three days to let it fully dry.

    After its dry, you may have some green paint where you don’t want it on your gold, or maybe I’m the only hot mess crafter around. To cover those spots, I laid a few sheets of plain white printer paper in the tray and pressed it down with my hand while spray painting over the spots.

    ANYONE can do this - its hard to mess up! And its cheap! DIY Faux Malachite Tray (For Less than $10) via RainonaTinRoof.com

    Yes, your hands will get spray paint on them. Wear gloves if you aren’t down with that.

    Step 5: 

    After the spray paint dries, give your faux malachite a coat of satin Mod Podge and allow it to dry.

    ANYONE can do this - its hard to mess up! And its cheap! DIY Faux Malachite Tray (For Less than $10) via RainonaTinRoof.com

    This is totally one of my new favorite trays. I know – I’m kind of a tray whore.

    I love the way the gold snake bowl looks against the faux malachite.

    Are you a tray whore too? 

    Here are more tray makeovers you might like then…

    DIY Bathtub Tray – a simple build and functional!

    DIY Monogrammed Tray – makes a great gift!

     DIY Lucite Trays for less than $5 – so easy to make.

    You know you don’t wanna miss any of this crazy.

    Sign up to get my posts delivered to your inbox here.

    Stalk Me Here:

    Pinterest / Facebook / Twitter /Instagram

    pin-this-post

    ANYONE can do this - its hard to mess up! And its cheap! DIY Faux Malachite Tray (For Less than $10) via RainonaTinRoof.com

    SaveSaveSaveSaveSaveSave

  • DIY Acrylic / Lucite Trays for $5 or less in 5 minutes!

    DIY Acrylic / Lucite Trays for $5 or less in 5 minutes!

    I absolutely love having lots of pretty trays around my home. Lucite or acrylic trays (whichever you want to call them!) are perfect for corralling items in a stylish way. They can easily make your home look chic and organized at the same time. But, those clear acrylic trays can also be really expensive! Keep reading though to see how I created my own lucite trays for less than $5 and in five minutes! 

    I was ecstatic with all your comments last Friday when I introduced this new series, 15 on Friday! Thanks so much, y’all!

    This week’s 15 on Friday, I think, is FAB.

    This post contains affiliate links for your shopping convenience. Click here to read my full disclosure policy.

    See, I have this thing for lucite / acrylic. When Grunt Labor asked me what lucite was, my response was, “It’s the stuff dreams are made of.”

    Obsessed much? Probably too much.

    For Christmas, I asked for a plethora of lucite items from Anthropologie. One being this tape dispenser (that I got!) and another one, this lucite tray. Friends, that tray is $44. You can get this one cheaper – its $25.

    Or, you could make your own DIY lucite tray for $5 and in less than 5 minutes.

    And you can make the bottom prettier than those other ones.

    We have a winner! {Insert Price is Right theme song here}
    DIY Acrylic Tray

    DIY Lucite Tray

    Here’s what ya do.

    Step 1

    Go to Michael’s (mine came from Michael’s) or another craft store or maybe even Target and buy an acrylic frame and pretty paper (12 x 12).

    DIY Lucite Tray

    I got two frames – a larger one and smaller one – and by using a 40% coupon at Michael’s each was under $5. I think the paper was like $0.50 a sheet on sale.

    Step 2

    Now, unwrap the frames and flip them over.

    How to Make a Clear Acrylic Tray

    Step 3

    Pull out the cardboard backing.

    DIY Lucite Trays {Under $5 in 15 minutes} via RainonaTinRoof.com

    Instant clear acrylic tray.

    Now, this next step isn’t necessary, but if you want to add a bit more to your tray, you can easily add a little bling.

    Trace the tray’s shape on the back of the paper and cut it out. Pop it in the tray.

    Acrylic Tray

    Bling added.

    Were you expecting it to be more complicated? You should know by now that I love quick and easy projects with some bling.

    DIY Lucite Trays {Under $5 in 15 minutes} via RainonaTinRoof.com

    I sent my paper to work with Grunt Labor one day and had him laminate it. You don’t have to do this, but it just adds a little extra protection. You can also get that done pretty cheap at just about any office supply store. Or, you could even Mod-Podge it in there.

    DIY Lucite Trays {Under $5 in 15 minutes} via RainonaTinRoof.com

    Both trays are on my new office desk / hutch.

    The small one is holding my business cards (that need an update), extra gold animal push-pins, and my grandmother’s retro glasses that she wore while driving her beloved Cadillac.

    DIY Lucite Trays {Under $5 in 15 minutes} via RainonaTinRoof.com

    The larger one holds….

    DIY Lucite Trays {Under $5 in 15 minutes} via RainonaTinRoof.com

    An old Avon perfume bottle that is a cross between a giraffe and the Eiffel Tower?? Strange, but pretty when spray painted gold….

    Lucite Tray

    A fun (and inappropriate) coaster my friend Lindsay got me from Z-Gallerie.

    DIY Lucite Trays {Under $5 in 15 minutes} via RainonaTinRoof.com

    And the beloved lucite tape dispenser….

    DIY Lucite Trays {Under $5 in 15 minutes} via RainonaTinRoof.com

    What do you think of these DIY lucite trays? Better than a $40 one?

    Love a good tray hack or knock-off DIY? Then you’ll want to see these…

    This Faux Malachite Tray costs less than $10 to make.

    This DIY Monogrammed Tray makes a perfect gift.

    Learn how to make your own lucite frame – and get a free Gone with the Wind printable.

    You know you don’t wanna miss any of this crazy.

    Stalk Me Here:

    Pinterest / Facebook / Twitter / Instagram

    SaveSave

    SaveSave

  • Target Dollar Spot Trays Hack {A Fabulous Fifteen Minute Hack}

    I’m not quite sure if this is considered a hack or an upcycle.

    I’m a pathetic excuse for a DIY blogger, aren’t I?

    I was definitely up-cycling these trays into something better, but I guess I’m also hacking them too?

    I settled on a hack.

    Because it sounds more scandalous.

    And I’m nothing if I’m not scandalous.

    If you only knew the half of it…..

    Target Hack Dollar Spot Trays via rainonatinroof.com #targethack #diytray

    This post contains affiliate links for your shopping convenience. Click here to read my full disclosure policy.

    Aren’t they so pretty?

    Don’t they look expensive?

    Don’t shatter my dreams if you don’t like them.

    I am in love with them and just know they will look fabulous on my coming-soon bar cart.

    So, seriously, these took less than 15 minutes to hack. They already came in those super cute green and blue colors.

    Target Hack Dollar Spot Trays via rainonatinroof.com #targethack #diytrayGeez, the lighting is terrible in my craft room. But you can see where they were just $1, right?

    And they also come in pink and yellow colors as well.

    To do these, I took a gold Sharpie paint pen, and just ran it along the lines, edges, and corners of the tray.

    Target Hack Dollar Spot Trays via rainonatinroof.com #targethack #diytray

    Yup, real hardcore DIY stuff, y’all.

    Each tray has little dots, so with the green one, I just pressed my marker over the dots to make the polka dot pattern.

    Target Hack Dollar Spot Trays via rainonatinroof.com #targethack #diytray

    Wouldn’t these be fabulous little gifts too?

    Target Hack Dollar Spot Trays via rainonatinroof.com #targethack #diytray
    Give it with a fab necklace or some smell good lotion.

    Target Hack Dollar Spot Trays via rainonatinroof.com #targethack #diytray

    I picked these up just last week and they had tons of them, so I’m sure you can still get some.

    If you hurry.

    Target Hack Dollar Spot Trays via rainonatinroof.com #targethack #diytrayLove trays?

    Me too. Some, myself included, would even call me a tray whore. You can see the evidence for yourself:

    Looking for more tray ideas? Check these out:

    DIY Bathtub Tray with Book Holder – one of my favorite projects to date and it’s an easy build!

    DIY Lucite Trays– so easy to make and great for desk storage!

    This DIY Monogram Tray makes a fab Christmas gift as well.

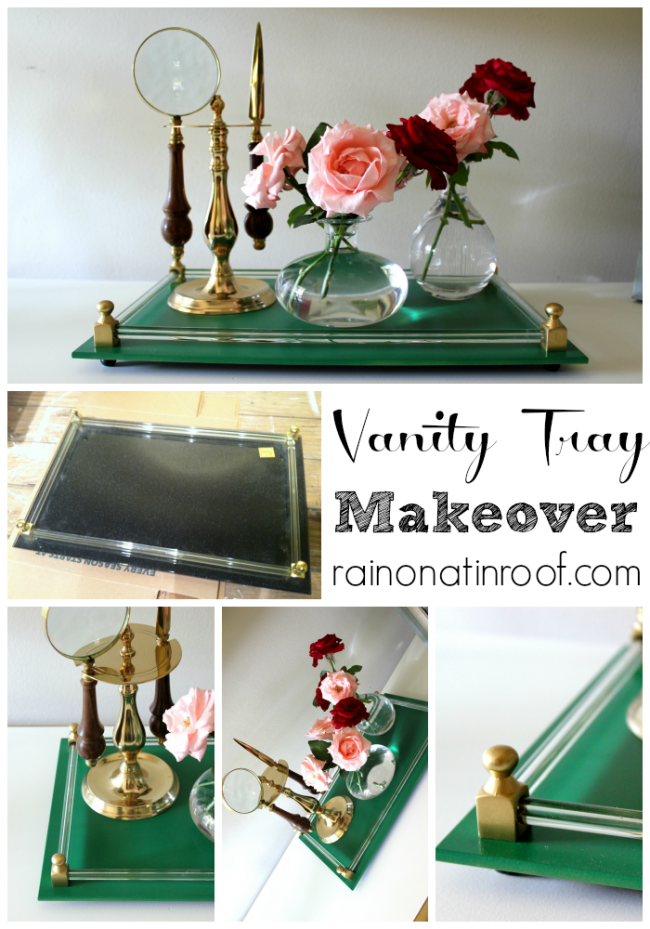
    This vanity tray was once stuck in 1988 and barely made it out alive or through the half-off Goodwill day.

    You know you don’t wanna miss any of this crazy.

    Sign up to get my posts delivered to your inbox here. 

    Stalk Me Here:

    Pinterest / Facebook / Twitter / Instagram


    SaveSave

  • Glass Vanity Tray Makeover and Rules of Goodwill 1/2 off Day

    This tray is a living miracle.

    Really.

    Vanity Tray Makeover {rainonatinroof.com} #tray #makeover

    Ok. Maybe not living.

    But a miracle none the less.  (more…)

  • DIY Monogram Tray (A Great Gift Idea)

    DIY Monogram Tray (A Great Gift Idea)

    I loved how the first monogrammed tray I did turned out. Lindsay loved getting it for her birthday, and it is beautiful in her home. In fact, I loved it so much that I made another one for a friend who is getting married in October and I have one for myself in the works.
    DIY Monogram Tray