As the Preppy meets Hollywood Regency Bathroom Makeover (that wasn’t supposed to happen) progressed, I had a brilliant idea.
I would make a shower cornice. I had always wanted one, so now was the perfect time.
This would not be just any cornice though.
No, no, no.
It would be a Greek Key Carved Shower Cornice.
I spent hours actually using a ruler and level (instead of eyeballing it) drawing the perfect greek key pattern on my new cornice.
And then I went to carve it out.
Who the hell was I kidding?
After about 15 minutes of trying to follow those lines, I realized it was going to look already looked like sh*t.
Instead of tossing it into the trash though, I flipped the board over and whipped up a little Trash to Treasure Shower Cornice.

The great thing about this project is that you don’t have to screw up and waste countless hours like I did.
Or maybe you are a master carver and could totally carve a greek key into a piece of wood like nobody’s business. If so, please help a sister out.
DIY Shower Cornice & Curtains
This post contains affiliate links for your shopping convenience. Click here to read my full disclosure policy.
Materials and Tools Needed for Cornice:
- 1″ x 10″ x 6′ Pine Board
- Saw (or have the folks at the hardware store cut your board for you)
- Paint color of your choice, preferably a Semi-Gloss or Gloss
- Paint Brush / Roller
- Gold Duck Tape
- 4 Corner Braces & Screws
- Ruler
- Pencil
- Scissors
- Drill
- X-Acto Knife
Steps
Step 1
Cut the board down to the width of your shower. Mine was about 59″. Test it out to make sure it fits above your shower. Cut more as needed. I cut it with our miter saw, but a circular saw will do fine. You can even have the fellas at the hardware store cut it for you! Paint both sides of the board a color of your choice. I suggest a semi-gloss or gloss. It holds up better in a bathroom and will help to keep moisture out of the board better.
Step 2
After the paint is dry, take your ruler and make small tick marks 1/2″ all around the board.

Step 3
Run the outside edge of your duck tape horizontally and then vertically along your tick marks.

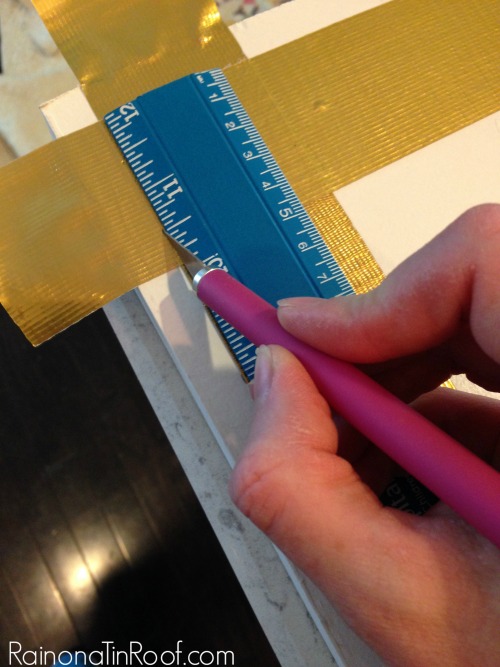
Step 4
Take an X-Acto knife and ruler and trim up where the edges of the duck tape meet.
Step 5
How freakin’ easy was that? Your cornice is done and now you just need to hang it. You guys know I’m the queen of easy projects, thus once more, why the heck did I think I could carve a cornice? Seriously?
Ok, sorry for digressing….take your four corner braces and attach one in each corner of your board. After attaching them to your board, recruit help.
No seriously, I mean it. This part is much easier with someone holding the board and someone else drilling.
Place your cornice where you want it to be above your shower and screw it into the wall through the other side of the brackets.

Most likely, you are going to have a stud in the area where you attach the braces to the wall. However, if you don’t, I would recommend using an anchor when screwing them to the wall. The photo above also shows how I hid the shower curtain rods behind the cornice. I used a cheap tension rod and curtain rod rings to hang the black and white shower curtains. I kept my old shower curtain rod and shower curtain and just slid it to one side of the shower and hid it behind the black and white curtains.
If you want to make the shower curtains as well, they are super easy. You just need four yards of fabric (or more if you want to make them longer). I used this fabric. And a side note on the fabric: You may want to go with an outdoor fabric for this. It will hold up better in a bathroom. However, I went with a regular upholstery fabric and then waterproofed it and stain repelled it myself. You can totally do that too and find out how to here.
Lay out your fabric, cut it to the length you want it. I made mine 78″ long.

Fold your fabric in half and cut it down the middle.

When my curtains are closed, there is about an inch on each side where you can still see through to the shower. That doesn’t bother me, because they aren’t meant to be closed. My old shower curtain still functions as the actual shower curtain we use when showering. If you do want to close these, you will need to buy more fabric.
After cutting your panels out, pin all your edges down and then sew.
That’s my easy, breezy, (and ok, a little lazy) curtain hack. I’ve done it for every single curtain I’ve ever sewed. I just hang them with clip-on curtain rings.

Nothing more classic that a good black and white stripe.
And a salvaged DIY distaster.
Have you made your own cornice before?
I’m sure you did and I’m sure yours was amazing from the beginning….unlike mine.
See more of the Preppy meets Hollywood Regency Bathroom Makeover here!
Want another great duck tape window treatment hack? Then see these duck tape trimmed curtains and don’t miss this post with 20+ Duck Tape Crafts and Projects!
There’s more Trash to Treasure goodness to see!

AKA Design: Grapevine & Berry Wreath

So Much Better With Age: Update Old Artwork

Thistlewood Farms: Make a Pillow from a Reusable Shopping Bag
You know you don’t wanna miss any of this crazy.
Sign up to get my posts delivered to your inbox here.
Stalk Me Here:
Pinterest / Facebook / Twitter / Instagram

Mari Holihan says
Love the cornice for the shower. Would you be able to tell me where you gotmthe bacl and white material for the outside pillows with the eleohants?
Jenna @ Rain on a Tin Roof says
Thank you, Mari! Do you mean the black and white fabric that I used on the shower curtain?
Mari Holihan says
Yes so sorry about all of the typos! Not sure what happened there. On that same post there was fabric with eleohants on it. I was womdering where you purchased that.
Jenna @ Rain on a Tin Roof says
No worries, Mari! That fabric was in the photo from the Trash to Treasure project from Thistlewood Farms. The info should be in this post: http://www.thistlewoodfarms.com/make-a-pillow-from-a-reusable-shopping-bag If its not, just leave a comment for her. I’m betting it came from Online Fabric Store.
colette says
I love this idea. And I love how easy it is. I especially love the glass of wine next to the bathtub… amen to that!!!
Jenna @ Rain on a Tin Roof says
Yes, sister – Amen!!! Thank you!
Debrah says
I am very disappointed in the use of profanity in your post. The need to use words that convey a small mind is puzzling! You look like a lovely young lady and you also seem to be intelligent so please, if you would, refrain from using common base words and be aware of how that makes you sound! There are many alternatives that will make you sound and appear as an young women who is aware of she sounds!!! Thank you for the consideration of this suggestion.
timea says
Debra,
Your post is more offending than Jenna’s so called profanity. If you have an issue with the word hell, freakin’, heck or sh*t (those are the only words I was able to find in her blog), you need to get a life! I thought her blog was clever and funny.
Timea
Jenna @ Rain on a Tin Roof says
Thanks, Timea. 😉
Leslie @ House on the Way says
You are such a clever girl! Love the black and white curtains.
Jenna @ Rain on a Tin Roof says
Thank you, Leslie! I love me some classic black and white!
pam clark says
How am I just discovering your blog today?!?! Love it! I should have known KariAnne would steer me to great blogs!
Jenna @ Rain on a Tin Roof says
Oh Pam, I LOVE comments like these!! Thank you!! And Karianne – I just love her! She is such a sweetie and a tad bit crazy which makes her even better!!! I’m glad to have you along for the ride!
Carissa Rasmussen says
once again fabulous creation Jenna! I looove the bold black and white. I’d love you to share it at Outside {the Box} link party Tuesday 5pm EST
Jenna @ Rain on a Tin Roof says
Thanks, Carissa!! Love me some black and white!
Ania says
Love how the black&white stripes go with green rug. So classy!
Jenna @ Rain on a Tin Roof says
Thank you, Ania!! That’s one of my favorite combos!
Angelique says
It’s amazing what can be done with the new colors of duct tape! I never would have known that it was duct tape unless I had read the blog. Very creative and welld done!
Jenna @ Rain on a Tin Roof says
Thanks, Angelique! I know – I just LOVE Duck Tape!
Wendy Ewing says
Hi Jenna,
I love the cornice but do you have instructions on how to do that fabulous hot pink ceiling as well? What color paint did you use? Thank you in advance.
Wendy 🙂
Jenna says
Hi Wendy! All the details on that ceiling are right here: https://rainonatinroof.com/pink-ceiling-faux-moldings-homeright-giveaway/
Jamie Antonelli says
By chance do you have a DIY video on how you made the shower curtain cornice?
Jenna says
Sorry, but I do not.