Tag: curtains

  • DIY Shower Cornice with Black & White Shower Curtains A.K.A. That Time I thought I Could Carve Something

    DIY Shower Cornice with Black & White Shower Curtains A.K.A. That Time I thought I Could Carve Something

    As the Preppy meets Hollywood Regency Bathroom Makeover (that wasn’t supposed to happen) progressed, I had a brilliant idea.

    I would make a shower cornice. I had always wanted one, so now was the perfect time.

    This would not be just any cornice though.

    No, no, no.

    It would be a Greek Key Carved Shower Cornice.

    I spent hours actually using a ruler and level (instead of eyeballing it) drawing the perfect greek key pattern on my new cornice.

    And then I went to carve it out.

    Who the hell was I kidding?

    After about 15 minutes of trying to follow those lines, I realized it was going to look already looked like sh*t.

    Instead of tossing it into the trash though, I flipped the board over and whipped up a little Trash to Treasure Shower Cornice.

    DIY Shower Cornice with Black & White Shower Curtains via RainonaTinRoof.com #diy

    The great thing about this project is that you don’t have to screw up and waste countless hours like I did.

    Or maybe you are a master carver and could totally carve a greek key into a piece of wood like nobody’s business. If so, please help a sister out.

    DIY Shower Cornice & Curtains

    This post contains affiliate links for your shopping convenience. Click here to read my full disclosure policy.

    Materials and Tools Needed for Cornice:

    • 1″ x 10″ x 6′ Pine Board
    • Saw (or have the folks at the hardware store cut your board for you)
    • Paint color of your choice, preferably a Semi-Gloss or Gloss
    • Paint Brush / Roller
    • Gold Duck Tape
    • 4  Corner Braces & Screws
    • Ruler
    • Pencil
    • Scissors
    • Drill
    • X-Acto Knife

    Steps

    Step 1

    Cut the board down to the width of your shower. Mine was about 59″. Test it out to make sure it fits above your shower. Cut more as needed. I cut it with our miter saw, but a circular saw will do fine. You can even have the fellas at the hardware store cut it for you! Paint both sides of the board a color of your choice. I suggest a semi-gloss or gloss. It holds up better in a bathroom and will help to keep moisture out of the board better.

    Step 2

    After the paint is dry, take your ruler and make small tick marks 1/2″ all around the board.

    DIY Shower Cornice with Black & White Shower Curtains via RainonaTinRoof.com #diy

    Step 3

    Run the outside edge of your duck tape horizontally and then vertically along your tick marks.

    DIY Shower Cornice with Black & White Shower Curtains via RainonaTinRoof.com #diy

    Step 4

    Take an X-Acto knife and ruler and trim up where the edges of the duck tape meet.

    DIY Shower Cornice with Black & White Shower Curtains via RainonaTinRoof.com #diy

    Step 5

    How freakin’ easy was that? Your cornice is done and now you just need to hang it. You guys know I’m the queen of easy projects, thus once more, why the heck did I think I could carve a cornice? Seriously?

    Ok, sorry for digressing….take your four corner braces and attach one in each corner of your board. After attaching them to your board, recruit help.

    No seriously, I mean it. This part is much easier with someone holding the board and someone else drilling.

    Place your cornice where you want it to be above your shower and screw it into the wall through the other side of the brackets.

    DIY Shower Cornice with Black & White Shower Curtains via RainonaTinRoof.com #diy

    Most likely, you are going to have a stud in the area where you attach the braces to the wall. However, if you don’t, I would recommend using an anchor when screwing them to the wall. The photo above also shows how I hid the shower curtain rods behind the cornice. I used a cheap tension rod and curtain rod rings to hang the black and white shower curtains. I kept my old shower curtain rod and shower curtain and just slid it to one side of the shower and hid it behind the black and white curtains.

    If you want to make the shower curtains as well, they are super easy. You just need four yards of fabric (or more if you want to make them longer). I used this fabric. And a side note on the fabric: You may want to go with an outdoor fabric for this. It will hold up better in a bathroom. However, I went with a regular upholstery fabric and then waterproofed it and stain repelled it myself. You can totally do that too and find out how to here.

    Lay out your fabric, cut it to the length you want it. I made mine 78″ long.

    DIY Shower Cornice with Black & White Shower Curtains via RainonaTinRoof.com #diy

    Fold your fabric in half and cut it down the middle.

    DIY Shower Cornice with Black & White Shower Curtains via RainonaTinRoof.com #diy

    When my curtains are closed, there is about an inch on each side where you can still see through to the shower. That doesn’t bother me, because they aren’t meant to be closed. My old shower curtain still functions as the actual shower curtain we use when showering. If you do want to close these, you will need to buy more fabric.

    After cutting your panels out, pin all your edges down and then sew.

    That’s my easy, breezy, (and ok, a little lazy) curtain hack. I’ve done it for every single curtain I’ve ever sewed. I just hang them with clip-on curtain rings.

    DIY Shower Cornice with Black & White Shower Curtains via RainonaTinRoof.com #diy

    Nothing more classic that a good black and white stripe.

    And a salvaged DIY distaster.

    DIY Shower Cornice with Black & White Shower Curtains via RainonaTinRoof.com #diy

    Have you made your own cornice before?

    I’m sure you did and I’m sure yours was amazing from the beginning….unlike mine.

    See more of the Preppy meets Hollywood Regency Bathroom Makeover here!

    Want another great duck tape window treatment hack? Then see these duck tape trimmed curtains and don’t miss this post with 20+ Duck Tape Crafts and Projects!

    There’s more Trash to Treasure goodness to see!

    aka design trash to treasure sept 2014

    AKA Design: Grapevine & Berry Wreath

    Update Old Artwork

    So Much Better With Age: Update Old Artwork

    Make a Pillow from a Reusable Shopping Bag

    Thistlewood Farms: Make a Pillow from a Reusable Shopping Bag

    You know you don’t wanna miss any of this crazy.

    Sign up to get my posts delivered to your inbox here. 

    Stalk Me Here:

    Pinterest / Facebook / Twitter / Instagram

    SaveSave

  • DIY Floating Curtain Panels

    DIY Floating Curtain Panels

    As you guys well know, I will stretch a dollar as far as I possibly can.

    And then some.

    The same is true with fabric.

    When I started the colorful porch makeover, Grunt Labor had one request:

    Curtains.

    Well he had other requests too, like a fireplace and a television, but at the current moment, those aren’t attainable.

    He was adamant on the curtains though. He thought it would make the space feel more homey.

    Yes, that coming from a male who even refers to himself as Grunt Labor is a little odd, but he was right. And really, the man rarely asks for anything around here – there was no way I could say no.

    My problem was that I only had three yards of fabric for the curtains. Typically, I would be lucky to get two curtain panels out of three yards – and they would be skinnier panels at that.

    My other problem here was that even though the porch is screened-in, the curtains were still going to get dirty at the bottom pretty quickly.

    Luckily at Home Depot one day, the lightbulb went off.

    Does anyone else have moments of genius at Home Depot? I swear sometimes that’s the only place I get them. I will have ran in for one can of spray paint and by the time I get to the checkout line, I’m struggling to hold onto everything that I’ve picked up and apologizing for knocking over a display with the 10 foot piece of pipe I’m barely holding under my arm.

    Yep, I’m that girl.

    But it was that stroke of genius that solved both problems – I would make Floating Curtain Panels.

    DIY Floating Curtain Panels | DIY Outdoor Curtains | How to Make Outdoor Curtains | Outdoor Curtains for Porch or Patio | DIY Outdoor DecorThis post contains affiliate links for your shopping convenience. Click here to read my full disclosure policy.

    DIY Floating Curtain Panels

    If you can sew a straight semi-straight line (my lines are never totally straight) and make a couple of simple cuts with a hand saw or electrical saw, you can totally do these. Seriously, they aren’t hard at all.

    Materials Needed:

    -3 yards of fabric of your choice (I used this outdoor fabric and it made three panels for me that were 19 in wide x 89 in long before being hemmed. I did have a little leftover. If these are going outdoors and you don’t find an outdoor fabric you like, you can always waterproof, color protect, and stain repel the fabric yourself by using this tutorial.

    -10′ piece of 1/2″ PVC pipe

    –Gold Spray Paint

    -Regular Hand Saw or Circular Saw or Miter Saw (I used our Miter Saw)

    -12 Screw Eyes 

    –Neon Pink Cord (or other color of your choice – you guys know I love my bright flashy colors)

    -Scissors

    -Sewing Machine & Thread or Stitch Witchery

    -Straight pins

    -Measuring Tape

    Steps

    Step 1

    Cut your pipe down to whatever your desired length is. I was fitting my pipe between the 2×4 supports on my porch. Of course, no measurement between the 2x4s were the same. That’s just what you get with older houses and foreclosures, people. I thought it would look funny to have different size panels, so I opted to make all my pipes the same size, which was 19 inches. I marked my pipe and cut it with a miter saw.

    DIY Floating Curtain Panels via RainonaTinRoof.com #curtains #drapery #diy #fabric #ad #onlinefabricstore #porchMost of the pipe will be covered by the panels, however, the ends do still show. I didn’t want them to be white, so I spray painted the ends gold.

    Step 2

    Lay out your fabric and cut it into panels. Each of my panels were 19 inches wide x 89 inches long.

    DIY Floating Curtain Panels via RainonaTinRoof.com #curtains #drapery #diy #fabric #ad #onlinefabricstore #porch

    After you have cut your panels, pin down the long side edges only (not the top or bottom edges) and hem them. If you want to go the no-sew route, use the stitch witchery here.

    And by the way, if I can sew a decently straight line on this….

    DIY Floating Curtain Panels via RainonaTinRoof.com #curtains #drapery #diy #fabric #ad #onlinefabricstore #porch

    Anyone can sew a decently straight line. That sewing machine was my great grandmother’s, my grandmother’s, and now mine. I’ve cursed it, hit it (that hurt), ran my finger through it on more than one occasion (that hurt more), but I wouldn’t think of sewing with anything else.

    We have a history.

    Step 3

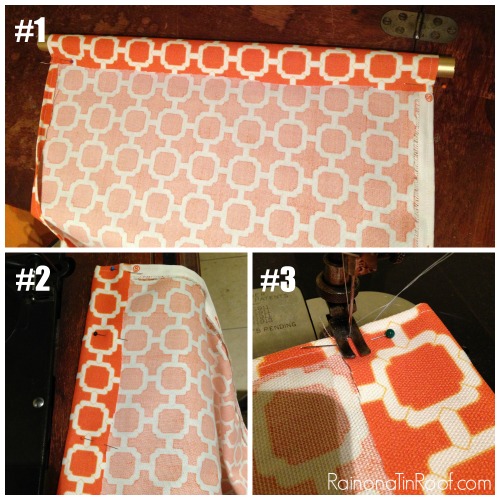
    Now you need to hem your top edges, but leave an opening for the pipe to fit through.

    DIY Floating Curtain Panels via RainonaTinRoof.com #curtains #drapery #diy #fabric #ad #onlinefabricstore #porch

    Do this by placing the pipe long the top edge, then pulling the fabric over the pipe and pinning the edges in place (#1 in the photo above). Remove the pipe and pin down the rest of the edge (#2 above). Finally, sew the edge down (#3). Repeat this with the top and bottom edges for all the panels.

    Step 4

    Take your screw eyes and screw one into each corner where your panels will hang from (top and bottom). Since my pipes were 19 inches long, I put my screw eyes about 19 inches apart.

    DIY Floating Curtain Panels via RainonaTinRoof.com #curtains #drapery #diy #fabric #ad #onlinefabricstore #porch

    Next, thread the nylon cord through your pipe and tie each end onto the screw eyes.

    Stand back and observe your amazingness.

    DIY Floating Curtain Panels via RainonaTinRoof.com #curtains #drapery #diy #fabric #ad #onlinefabricstore #porch

    Go grab a cheap beer or a cocktail.

    DIY Floating Curtain Panels via RainonaTinRoof.com #curtains #drapery #diy #fabric #ad #onlinefabricstore #porch

    And relax in the shade of your new floating curtain panels that you made all by yourself.

    Because you are a superstar.

    DIY Floating Curtain Panels | DIY Outdoor Curtains | How to Make Outdoor Curtains | Outdoor Curtains for Porch or Patio | DIY Outdoor Decor

    Do you have any DIY curtain hacks?

    See the full porch makeover here and this little DIY flamingo wreath that embellishes these curtain panels now!

    Love a good curtain hack? Be sure to see these duck tape trimmed curtains too!

    You know you don’t wanna miss any of this crazy.

    Sign up to get my posts delivered to your inbox here. 

    Stalk Me Here:

    Pinterest / Facebook / Twitter / Instagram

    SaveSave

  • Duck Tape Trim Curtains

    Duck Tape Trim Curtains

    I hope you are ready for some great projects and inspiration! Today, I’m very excited to show you how I salvaged the curtains in my guest room / office instead of having to buy new ones.

    Duck Tape Trim Curtains via RainonaTinRoof.com #ducktape #ikeacurtain #hack
    Duck Tape Trim Curtains

    This post contains affiliate links for your shopping convenience. Click here to read my full disclosure policy.

    That’s right, people, I used Duck Tape on my curtains.

    When I was plotting out the guest bedroom and office, I knew something had to happen with the curtains. They were just basic IKEA white panels and they were boring. We had them left over from our old house and there they had been against dark blue walls and worked perfectly.

    I wanted to switch out the curtains completely and had them pulled down and ready to go in the yard sale pile.

    But………..

    I really didn’t want to spend money on new curtains. Surprise, surprise.

    So, I held onto them for a little while longer. And then one day, while meandering through Michael’s attempting to keep the kid from jumping out the cart and escaping my rule, I happened upon Gold Duck Tape. Gold Duck Tape. 

    My heart stopped.

    I had to catch my breath.

    And it was on sale.

    I snatched up two of those bad boys, the kid, and headed for the cash register.

    Because I didn’t have much time, and wanted to make this as easy as possible, I just put the Duck Tape along the edges of the curtains and called it done.

    Duck Tape Trim Curtains via RainonaTinRoof.com #ducktape #ikeacurtain #hack

    Check out the askew pull on that chest. Obviously, I’m a perfectionist.

    Duck Tape Trim Curtains via RainonaTinRoof.com #ducktape #ikeacurtain #hack

    The Duck Tape has been on the curtains for over a month and hasn’t budged.

    Duck Tape Trim Curtains via RainonaTinRoof.com #ducktape #ikeacurtain #hackWhat do you think? Can you embellish some curtains with Duck Tape?

    Want more great tape crafts, hacks and DIY projects? I love ’em too! Be sure to see these…

    There are 20+ Duct Tape craft and project ideas here! 

    Find out how to make gorgeous fringe out of duck tape to add to pillows, lampshades and more here!

    Got some electrical tape on hand – easily dress up a lampshade with it using this tutorial!

    And don’t miss these seven super simple, super cute electrical tape crafts either!

    You know you don’t wanna miss any of this crazy.

    Sign up to get my posts delivered to your inbox here. 

    Stalk Me Here:

    Pinterest / Facebook / Twitter / Instagram

    SaveSave