Want to save money and install your own luxury vinyl flooring? That’s exactly what we did. This Nucore flooring installation guide will walk you through the process step-by-step.
YOU GUYS.
The 70’s Landing Pad is actually starting to not look like a construction zone.
Well, it’s starting to not look like a construction zone in the living room, dining room and hallway anyway.
After getting paint on the walls week before last, we’ve been putting down the new flooring in the hallway, living and dining rooms. This flooring will also go in the kitchen, stair landing and in the downstairs foyer as well, we just haven’t gotten that far yet. I’m finally moving past the point of “Oh my word, what have we gotten ourselves into?” to “Oh my word, it actually looks like a house and it’s pretty!” We still have quite a ways to go in the overall renovation, but there is a light at the end of the tunnel, y’all.
This post is sponsored by Floor & Decor, however all opinions are 100% mine. Affiliate links may be contained in this post.
The flooring we are using for the kitchen, dining room, living room, hallway and all those other places where there’s going to be a lot of foot traffic is NuCore from Floor & Decor.

NuCore is an engineered floor that has a tough top layer of luxury vinyl adhered to a stable, rigid, and waterproof core. I’ll be the first to say there isn’t a thing about this flooring that looks cheap or even like vinyl – I’ll also admit I had my doubts in the beginning. I partnered with Floor & Decor on the flooring and after a slew of emails full of questions about NuCore between myself and Sarah from Floor & Decor, we finally opted to go with the NuCore Cocoa Oak Handscraped Planks.
One of my doubts was how easy installation was supposed to be. Word on the street was that it snapped together (tongue and groove), no glue or nailing required and it could go over most any existing floor, with the exception of carpet.
Word on the street was accurate.
How to Install NuCore Flooring
You’ll need:

- NuCore Flooring
- Speed Square
- Rubber Mallet
- Utility Knife (use new, sharp blades)
- Measuring Tape
- Jigsaw & Drill (Needed only for cutting around door frames and other odd edges.)
Step 1
Unlike hardwood, NuCore does not have to acclimate to your home’s temperature before being installed. You can start as soon as you get it.
You can install NuCore over most existing flooring. Carpet is an exception. If you want to put it where carpet currently is, you will need to remove the carpet first, which is what we had to do. Pull up any staples that are left from the carpet pad and remove any carpet tack strips.
For your first row, you will simply snap the short edges of the flooring together, which easily lock into one another. After finishing the first row, place a few pieces of the flooring vertically along the baseboard of the room. Put your first row flush against these pieces. This will keep your first few rows of flooring from sliding in the beginning.

Step 2
For the second row of flooring, you will snap the tongue and groove into each other.
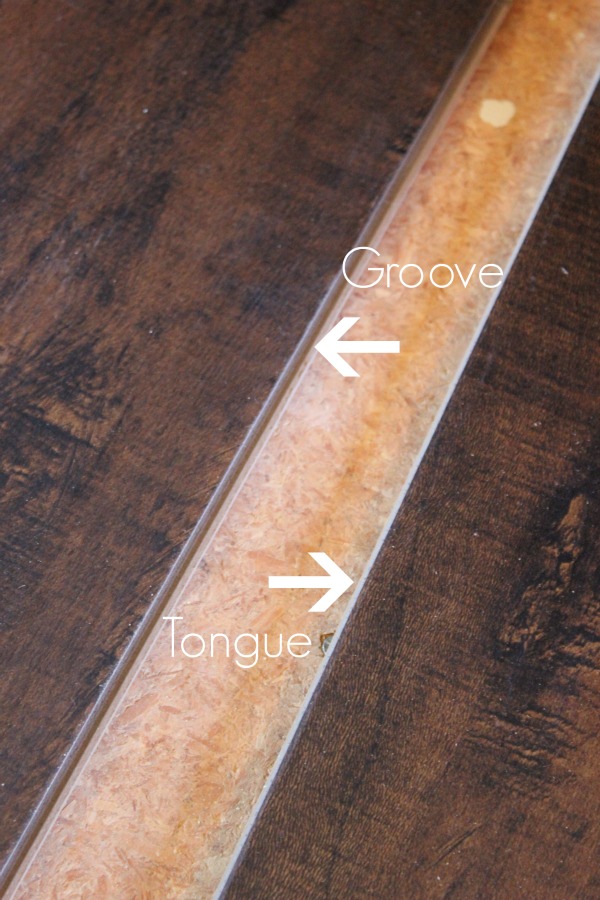
Simply hold a piece of NuCore at a 45° angle and snap it into the piece in front of it.

Step 3
Use a rubber mallet to secure the joints.

You do want to make sure you stagger your joints as shown below.

You will have to cut pieces in order to do this sometimes and obviously you will have to cut pieces as you get to the end of rows. To cut NuCore, measure to determine what length you need, mark it on the plank, score it with a utility knife and snap it at the cut.

Super simple.
After installing all the flooring, you will want to trim out around the edges with quarter round molding to cover the small gap. If you have to go around door trim or jambs, you can cut the wood with a jigsaw. Mark where you need to cut, drill a small hole to get you started, then use the jigsaw to cut the flooring.
Grunt Labor and I made a quick video to show you how to install NuCore.
[adthrive-in-post-video-player video-id=”EmAIvJzB” upload-date=”Wed Jun 29 2016 14:23:39 GMT+0000 (Coordinated Universal Time)” name=”Rain on a Tin Roof – How to Install NuCore Flooring” description=”How to Install NuCore Flooring by Rain on a Tin Roof”]It is really as simple as it looks. And when it’s installed, it looks just like hardwood. It’s gorgeous. I’m also pretty pumped about the fact that it’s waterproof, so that when the Circus doesn’t tell me she spilled her juice hours later, it won’t be that big of a deal. 🙂
UPDATE: I DID A REVIEW OF OUR NUCORE FLOORING ONE YEAR LATER. YOU CAN READ ABOUT IT HERE.
Want to easily come back to this flooring installation guide later? Just pin the image below!


You know you don’t wanna miss any of this crazy.
Stalk Me Here:
Pinterest / Facebook / Twitter / Instagram


 It will now look like you have “feet” on your cabinets – although not pretty ones. To fix this, you need to trim it out. Measure the space that you have to cover and cut trim to fit, then secure. We had about 5 inches to cover (height wise), so we bought a








 After it dried, I popped it into the bud vase with a little water and put my rose in it.
