I have visions.
Not like psychic visions – but that would be really cool.
Room visions, project visions, idea visions.
And in my head – they are fan-freakin-tastic.
In real life, they don’t always turn out so fan-freakin-tastic though.
In my head, this black and white gallery wall was fan-freakin-tastic.
In real life, its better than fan-freakin-tastic.
In fact, I can’t even come up with a word for how awesome it is and how much I love it.
This wall totally took my living room to a whole new level.

To get the full effect of how far this wall has come, here’s what it looked like before:

It wasn’t terrible, but let’s be honest, it doesn’t hold a candle to the new accent wall.
The best thing about this project is that its so easy. All you need is a little paint, FrogTape®, frames and art.
This post contains affiliate links for your shopping convenience. Click here to read my full disclosure policy.

DIY Black and White Gallery Wall
I used:
- FrogTape® Multi-Surface in 0.94″ width
- FrogTape® Multi-Surface in 1.88″ width
- Black & White Paint (or other colors of your choice)
- Paint Roller & Tray
- Paintbrush
- Ruler
- Craft Knife
Steps
Step 1:
Use the FrogTape® 1.88″ width to tape off baseboards, any crown molding, or other trim around the area that you don’t want to get paint on.
Step 2:
Paint all four edges of the wall white (or other color of your choice). I edged with the paint brush and then rolled about 2-3 roller widths wide along the edges.
Step 3:
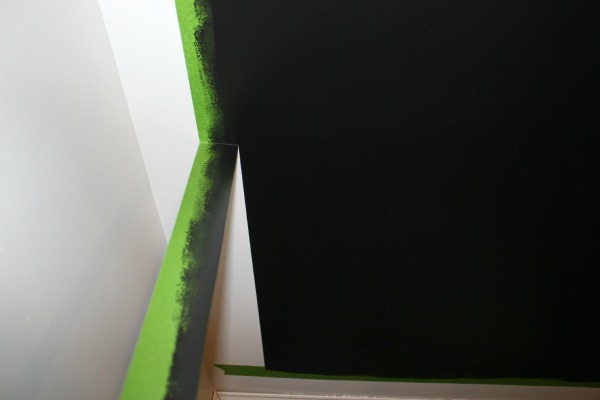
After the paint is dry, tape off the “frame” for your gallery wall. I waited a week or so before taping off my frame, so I used the FrogTape® Multi-Surface, however if you don’t want to wait long, you can use FrogTape® Delicate Surface.

I came in five inches all around the wall and taped off a rectangle using the wider width FrogTape®. After that, I came in 7 1/2″ all around the wall and taped off the second rectangle within the larger one using the smaller width FrogTape®. Of course, your wall will most likely be a different size than mine, so you can adjust the measurements as needed.
Step 4:
Trim up the edges of the FrogTape®.

I use a ruler and craft knife to do this. After you have trimmed up all the edges, take your fingernail or a credit card and run it firmly along the edges of the FrogTape® to fully adhere it to the wall.
Step 5:
Paint the rest of the wall black (or other color of your choice).

Two coats was all I needed.
Step 6:
Remove the FrogTape® immediately after painting your last coat.
After the wall is good and dry, you can decorate it however you want.

I opted to go with simple white frames that popped off the wall, but showcased the art, along with gold sconces.

I used these 16×20 white frames with artwork in 8×10 sizes. I added these sconces (spray-painted gold) to either side of the television to bring in a touch of metallic and another element besides the frames.
See more of the new living room in my latest home tour and find out how I stripped and re-stained the buffet here.
Need more gallery and accent wall ideas?
Indoor Lattice Walls– it’s not crazy, it’s gorgeous!
9 Accent Walls for $30 or Less – Big Bang for your buck.
Easy Confetti Accent Wall – fun. on a wall. seriously.
Criss-Cross Accent Wall – a classic design that will work with any decor style.
7 Wall Treatments that Aren’t Shiplap – let’s give shiplap a break, y’all.
You know you don’t wanna miss any of this crazy.
Sign up to get my posts delivered to your inbox here.
Stalk Me Here:
Pinterest / Facebook / Twitter / Instagram


Naomi @ Plaster & Disaster says
This is extraordinary! It came out so well. It seriously looks so polished. Thanks for sharing your how-to!
Jenna @ Rain on a Tin Roof says
Thanks so much, Naomi!
Michelle Vincent says
You did an awesome job and such a great idea! I think the brown dresser looks good with the black.
Jenna @ Rain on a Tin Roof says
Thanks, Michelle! I love the stained wood against the black wall too – I’m glad I changed it!
Salome says
Is this a different piece of furniture, or is this the same red dresser/media cabinet? Is there a way to strip it down to its original wood finish?
Jenna @ Rain on a Tin Roof says
Hi Salome! It is the same piece of furniture – the red dresser / media cabinet. Yes, I did strip it down. I have the full tutorial on it here: https://rainonatinroof.com/2015/04/how-to-strip-furniture-and-restain-it/ Hope that helps!
Kellie says
LOVE THIS!!!!!!!!!!!
Jenna @ Rain on a Tin Roof says
Thanks, Kellie!
Alison says
Love the new bold living room!! And I thought those sconces were Wyatt more expensive than what you picked them up for! I have been wanting similar ones for my office and was psyching myself up to shell out some serious coin. What brand/Color paint did you spray them with?
Jenna @ Rain on a Tin Roof says
Girl, I was dreaming of some greek key sconces I found, but they were like $200 EACH- no way could I bring myself to shell out that kind of dough!! I used Design Masters Gold Medal spray paint from Michael’s. I think its $8 a can, but it makes ALL the difference!
Jenna @ Wife in Progress says
Jenna – I never in a million years would have thought a black accent wall would look so amazing! That wall looks like it popped right out of an interior design magazine! Well done!! It’s fabulous!! 🙂
Jenna @ Rain on a Tin Roof says
Wow, Jenna! What a compliment! Thank you!
Debra@shoppeno5 says
I really like how the TV disappears and you only see the artwork. It looks very nice.
Jenna @ Rain on a Tin Roof says
Thanks, Debra!
pamela says
I LOVE this! Bought the black paint today. I had the same idea to meld the tv into the wall and surround it with my framed Audubon Birds. My husband would not get onboard until I showed him your Gorgeous Gallery wall. Perfection! Not to much not too little. Thank you!
Jenna @ Rain on a Tin Roof says
Awesome, Pamela!!! I bet your wall will be gorgeous!!
ashley says
This looks amazing!! First time visitor at your blog and am loving it 🙂
Jenna @ Rain on a Tin Roof says
Thanks so much, Ashley! So glad you stopped by for a visit!:)
Lisa @ Fun Money Mom says
Wow…you did a fantastic job! It looks beautiful!
Jenna @ Rain on a Tin Roof says
Thanks so much, Lisa!
Bobi says
Wow, this is the closest I’ve had to the courage to paint with black. Well except my chalkboard wall but that doesn’t count :).
I have a link party going on this weekend, I’d love to have you join:
http://www.bobijensen.com/2015/05/come-join-party.html
Thanks, Bobi
Desiree @The36thAvenue says
Super cute! Thank you so much for linking up with us… Featuring you tomorrow!
Jenna @ Rain on a Tin Roof says
Awesome! Thanks so much, Desiree!
Sandra P says
I’ve had a ting for black walls for a while now…. your wall might be the final confirmation I needed to go for it. I LOVE it!
Jenna @ Rain on a Tin Roof says
Thanks, Sandra! Just go for it! I am digging on black walls too – its taking everything I have not to paint an entire room black!
Cathy Lawdanski says
WOW! That turned out great!
Jenna says
Thanks, Cathy!
Carol ("Mimi") says
The black wall is really dramatic and sophisticated! I like the white frame around it, too. The gallery looks so nice against the black wall. Looks great!
Carol (“Mimi”) from Home with Mimi
Jenna says
Thanks, Carol!
Jenny says
I can’t even….. That is fan-freakin’-tastic! It turned out so good. I am pinning (to save the idea for later) & sharing – because – it’s awesome! Congrats!
Jenna says
Thanks so much, Jenny! It’s definitely one of my favorite projects!
Karen Bowen Pooler says
I absolutely love the black wall….could even add black & white photographs and it would be stunning! First time here and I am loving what I see!
Jenna says
Thanks so much, Karen!
Chelsea says
Hi! Any tips or tricks on how you ensured your tape/lines were so straight? We are talking about nailing a piece of scrap trim baseboard to the wall to use as a guide, but want to ensure I am not overthinking this and overlooking a much easier way, :).
Love your style!
Jenna says
Hi Chelsea! Thanks! It’s been a few years since I did this project, but if I remember correctly, I just measured out from the corners, ceiling and bottom of the wall and made little tick marks all the way up and around the wall where I wanted the tape/line to go. Hope that helps!
dede mays says
I knew I wanted to camouflage my 65″flat screen by painting the wall black. But you took it to a whole nother level!!! I am so stealing this look. You’re brilliant! Thank you.
Jenna says
Happy to help, Dede!
sharon says
OMG..I saw this and fell in love. Your the answer to my decorating fears. My husband and I ran out to get the black paint and in a few hrs we hide the tv Thank you so much for this inspiration!
Jenna says
You’re welcome! I’m so happy to have helped! This was one of my favorite projects I’ve ever done!