Tag: accent wall

  • DIY Colorful Confetti Wall

    You could go with the wallpaper version….or you could go full-on DIY and save yourself some money AND time!

    I may be full of quick and easy projects, but Lord help me, I’m having a hard time getting them posted in a timely manner! The Air BnB project (The Loft at Local Depot) has been taking up lots of my time – it’s so close to being finished y’all! The kid and I have managed to squeeze in some time here and there to just about finish up her room makeover though. It’s about 90% done, like the BnB, but you know that last little bit always takes the most amount of time to complete, right?!

    Anywho, here’s our latest shenanigan.

    DIY Colorful Confetti Wall

    When we first started chatting about her room makeover, she found a confetti wallpaper that she fell in love with. It was adorable, it was also going to take a good chunk of her room makeover budget. The more I looked at it, the more I thought we could replicate the look ourselves without spending as much or having to put up wallpaper.

    And I was right.

    When I posted this wall on social media after we did it, there were so many people who commented and said, “This must have taken you days to do.” Nope, it sure didn’t. All that “confetti” was on the wall in about 30 minutes. The longest part of this project was painting the wall white for the base color and that wasn’t bad at all! https://www.ovodewa-zeus.com/

    This post contains affiliate links for your shopping convenience. Click here to read my full disclosure policy.

    How to Paint a Confetti Wall

    Supplies and Materials Needed:

    Steps

    Step 1


    Paint the wall with your base coat of white paint.

    Step 2

    Using one of your confetti colors, dip just the tip of a foam brush into the paint.

    How to paint a confetti wall easily with sample pots of paint.

    Tap the foam brush on the wall. Repeat this in a random pattern on the wall. https://ongoing.ibero.mx/

    Reload the foam brush with paint as needed.

    Step 3

    Repeat Step 2 with the rest of your confetti colors.

    After you’ve covered the wall with all your confetti colors, step back and fill in any empty spots as needed with confetti.

    Easy and Cheap Colorful Confetti Accent Wall

    That’s it! Told you it was super easy! If you wanted to add a fun pop of glam you could throw in a metallic as one of the confetti colors.

  • DIY Indoor Lattice Wall Tutorial

    DIY Indoor Lattice Wall Tutorial

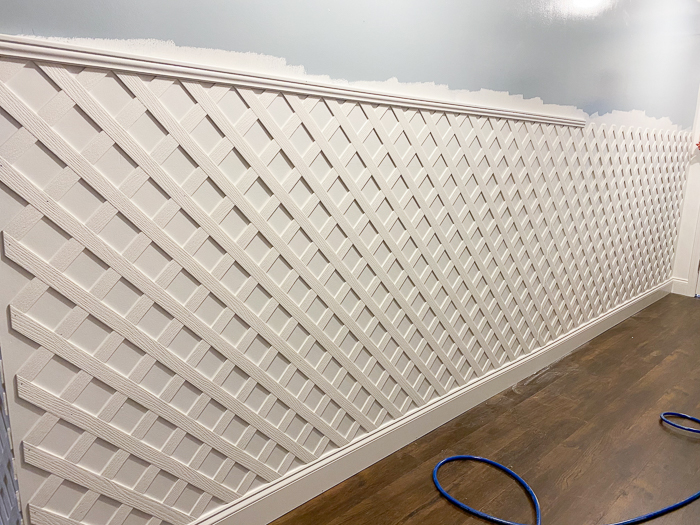
    If you want to make a statement with your next accent wall, then look no further than this DIY indoor lattice wall. Your friends may think you’re crazy at first, but in the end their jaws are gonna drop.

    I had no idea that lattice walls would be such a hot topic, y’all.

    Many of you thought I was crazy. Hell, I kind of thought I was crazy.

    Many folks are seriously worried about how I’m going to clean them. To be honest, I don’t do a lot of cleaning, so there’s that. 😆 Really though, since everyone was so concerned, I put my thoughts on cleaning these at the bottom of this post.

    For me though, I’d been thinking about doing a lattice wall somewhere for quite a while and when the mudroom’s design led that way, I knew it was now or never. Well, probably not really never, we all know I’m a determined soul when it comes to an out-of-the-box decorating idea. I did put green astroturf carpet on a wall after all.

    While lattice walls will never be for everyone, they are most definitely a winner in my heart…

    Indoor Lattice Wall with Bird Wallpaper

    Thinking about working them into your own home? It’s actually a relatively easy feature wall to create….

    This post contains affiliate links for your shopping convenience. Click here to read my full disclosure policy.

    Lattice Accent Wall Tutorial

    Tools and Materials Needed:

    Steps

    Step 1


    Prep Work

    Before installing any lattice, you’ll need to determine what paint color you’ll be doing behind the lattice and paint the wall that color.

    Lattice Accent Wall Tutorial - painting the wall first.

    I had a lot of other colors and prints going on in this space, so I stayed with white-on-white for the walls and lattice. I have seen lattice accent walls that have one color on the wall and another on the lattice and it’s gorgeous. It just wasn’t the right move for this space.

    For reference, I painted my walls Bit of Sugar by Behr and left the white vinyl lattice as-is and both whites worked well together.

    If you’re planning to go with a color other than white for your lattice or if you’re using traditional wood lattice, you’ll also want to paint it first as well.

    Paint any other trim you’ll be installing on the lattice walls now as well – i.e. the single lattice trim pieces, the cap molding, etc.

    Baseboard also needs to be installed along your wall before installing the lattice.

    Finally, go ahead and mark your studs along the wall using a stud finder.

    Step 2

    Now it’s time to put the lattice on the walls! This is actually really easy.

    The lattice panels come in 4′ x 8′ sheets. So, if you’re looking at the sheets horizontally, they are 4′ tall and 8′ long. I did not cut any of the height off my panels. I only cut down the length if need be.

    If you have a wall you are installing the lattice on that is longer than 8′, you should first determine where you want the seam to be where your panels will meet. I had one wall that was longer than 8′. I decided I would make the seam in the middle. I marked the middle and then used my level to draw a line.

    Note: If you will have to use two or more panels on a wall, I highly suggest placing the seams along where a stud is.

    Cut the lattice to length as needed. We used a circular saw for this.

    After drawing your level line, line up one end of the lattice on the line, then attach the lattice to the wall using a nail gun or finish nails and a hammer where you’ve marked your studs.

    Lattice Wall Decor - using vinyl lattice as interior wall molding.

    This is the seam on my long wall where two panels had to meet up. As you can see, there is a gap. Both the walls and floors here are not level, so that was working against me. No big deal though – that gap is easily going to be covered with a single lattice wood strip.

    The lattice should sit right on top of your baseboard, or be pretty close to it as shown below.

    Indoor Lattice Ideas - using it as wall molding.

    Continue installing the lattice panels around the rest of the room.

    Step 3

    Once all the lattice panels are installed, it’s time to make it look finished with your moldings.

    DIY Indoor Lattice Wall - installing a molding cap on top of the lattice.

    You’ll want to install the molding cap above the lattice before installing the single lattice pieces to cover seams and corners.

    We used this molding which has a lip on it so it smoothly sits right over the top of the lattice.

    Step 4

    Cut the single pieces of lattice molding to size and install those in corners, edges and panels seams.

    Lattice Accent Wall Tutorial - using single lattice moldings to cover the edges.

    This helps to give the lattice a framed-in and finished look.

    Step 5

    Fill any nail holes in the lattice and trim with spackling putty and touch up with paint as needed.

    Lattice Wall Decor Ideas - used as wall moldings in a colorful mudroom.

    Console Table / Similar Red Mirror

    I think this lattice wall decor brings gorgeous dimension and interest to a space.

    Lattice Ideas - using lattice as wainscoting.

    Wallpaper / Pink Door Color / Light Fixture / Similar Brass Chinese Symbols

    Keeping it white-on-white also complemented the other colors, patterns and designs in this space without having the walls take away from the overall feel of the room.

    DIY Lattice Accent Wall in a mudroom

    Green Tassel / Similar Brass Ginger Jars / Similar Blue and White Jars

    And I adore how it’s the perfect backdrop for decorative accents like these and that red mirror.

    And for those of you super worried about cleaning: since it was such a concern on this Facebook post, I tested out my Swiffer duster on them and that thing easily gets in all the nooks and crannies. The fact that I used the vinyl lattice panels which are thinner than traditional wood panels was key there too, I think.

    So….would you do it? Could you handle lattice on your walls? 😬

    Take the full tour of the mudroom featuring this lattice wall here!

    Want more great accent wall ideas?

    Washed Out Stripes Accent Wall – all you need is a sample pot of paint!

    7 Wall Treatments that Aren’t Shiplap – for all of us who haven’t jumped on that train….

    Black and White Gallery Wall Around the TV – makes your television disappear!

    DIY Wood Panel Wainscoting – super cheap way to bring wood tones and architectural interest into your home!

    Want to come back to this lattice idea later? Just pin the image below!

    Indoor Lattice Wall Tutorial with bird wallpaper.

    Stay up to date on social media:

    Facebook | Instagram | Pinterest | Twitter

  • Washed Out Stripes Bathroom Accent Wall

    Washed Out Stripes Bathroom Accent Wall

    This isn’t your typical striped accent wall. Instead of bold, solid stripes, these are toned down, washed out stripes to create a gorgeous blue accent wall. You can easily recreate this look with any colors of your choosing and have your own gorgeous bathroom accent wall in a day’s time. 

    As you guys well know, if I see a pattern/design/look, etc. that I fall in love, I’m usually going to try my best to mimic that design with paint and Frogtape. There have been countless times where I’ve scared Grunt Labor to death jumping out of bed to pause the television so I could snap a picture of it because I saw a design I knew I could pull off with Frogtape.

    There have also been times when I come to an abrupt halt on the sidewalk to snap a photo of the same kind of thing.

    I’ve also slammed on my breaks for the same thing.

    I think one reason why I’m so drawn to pulling off these patterns and designs with paint and Frogtape is because it’s such a huge bang for your buck. Huge. Often times, those designs I see are completely made out of wood mouldings. Don’t get me wrong, I love a room full of beautiful mouldings (and have some plans for that in my own dining room), but that gets pricey quick, plus there’s a lot of work that goes into installing moulding. A great striped accent wall, or any kind of painted and patterned accent wall for that matter, though might set you back $50 at most. Bang for your buck.

    When I was looking around for inspiration and ideas for the guest bathroom, I stumbled upon this image. I fell in love with the shiny finishes and the blue stripes on the walls. I loved how they weren’t completely solid. From what you just read above, I’m sure that you can figure out what my first thought was – “I can do that with Frogtape.”

    And so I did.

    bathroom accent wall

    I did opt to do two smaller stripes per section, rather than larger ones as I wanted these stripes to mesh really well with the rest of the space and not take over the show. I also opted for a lighter shade of blue as well. This bathroom accent wall turned out to be perfect for this space because it brought just the right amount of color and pattern into the room.

    The actual painting of the stripes takes no time at all, it’s the measuring and taping that does take some time, but it’s worth it. All in all, these were started and finished in the same day.

    DIY Washed Out Striped Walls

    This post is sponsored by Frogtape, however all opinions are 100% my own. Affiliate links included in this post.

    Materials and Supplies Needed: 

    • Frogtape – 1″ and 1.5″ sizes
    • Measuring Tape
    • Level (the longer the better)
    • Pencil
    • Plastic Putty Knife, Credit Card or something to smooth down edges of tape
    • Paint Color of Your Choice – My striped walls have Sleek White as the base color in a satin finish and the stripes are Peaceful Blue in satin. I only needed a sample size pot of the blue for this.
    • Paint Brush
    • Scrap Piece of Cardboard

    Step 1

    The first thing you’ll need to consider is the base color for your striped walls. I had already painted this bathroom in a slightly off-white color called Sleek White.

    Striped Accent Wall

    If you’ve already got a paint color on your walls that will work well with your stripe color, then proceed to step 2. If you want to switch out that base color though, do so first. Wait at least three days after painting before taping off the walls for the stripes, so that the paint on the walls have enough time to cure.

    Step 2

    Time to start measuring and taping off the walls! For reference, my walls from floor to ceiling in this space were 82.” Even if your walls are a little taller or shorter than mine, I think you should still be ok using the measurements I’ll give you, as I measured down some before even starting the pattern.

    Measure down 5″ from the ceiling and mark it. Do this several times along the length of your wall.

    Place your level on the wall along the marks you made. Make sure you’re level, adjust if needed, then draw a line along the level over the entire wall.

    Striped Walls

    If you look closely, you can see my line in the photo above. The line doesn’t have to be dark or heavy, just enough for you to see it.

    Run 1.5″ Frogtape along this line. The bottom of the tape should be on this line – therefore the tape is in part of that 5″ down measurement and not below it. Make sense?

    Painting Stripes on Walls

    Step 3

    Measure 2″ down from the bottom of the tape you just applied to the wall and mark it. Do this several times along the length of the wall.

    Place the level along your marks. Make sure it’s level, adjust as needed, then draw a line along the level just as you did before.

    Apply the 1″ Frogtape along this line over the entire length of the wall. The top of this tape should be at the 2″ mark.

    Blue Accent Wall

    If you placed your tape correctly, you should have about 2″ between both strips of tape.

    Step 4

    Measure 2″ down from the bottom of the piece of tape you just applied to the wall and mark it with your pencil. Do this several times along the entire length of the wall.

    Place the level along the marks, get it level, then draw a line with your pencil along the level.

    Bathroom Accent Wall

    Apply 1.5″ Frogtape along this line. The top of this tape should be along the line you just drew.

    Again, the measurement between the pieces of tape here should be about 2″.

    Step 5

    Measure 6″ down from the top of the piece of tape you just applied and mark it. Do this several times along the length of the wall.

    Place your level along the marks, level it, and draw a line along the level.

    Apply 1.5″ Frogtape along this line. The bottom of the tape should be along this line.

    Striped Accent Wall

    Step 6

    Repeat steps 3-5 working your way down the wall.

    Striped Walls

    I know it sounds a little tedious and complicated, but it’s really not all that bad. Once you get those first couple of rows completed, then you should have the hang of it pretty well.

    Painting Stripes on Walls

    Step 7

    Once you have all the tape applied to the wall, place a piece of tape on each of the thicker stripes. You will not paint these areas.

    Blue Accent Wall

    Also, remember to run some of the 1.5″ Frogtape along the corners of the walls to keep the blue from getting on the connecting walls.

    Step 8

    Use a plastic putty knife or credit card and firmly press along all edges of the tape to completely seal it.

    Bathroom Accent Wall with Washed Out Stripes

    Painting Stripes on Walls

    Step 9

    Grab the paint for the stripes, a paintbrush and a piece of cardboard you can use to wipe paint on.

    To paint the stripes on the wall, you are going to use a dry brush technique.

    Striped Accent Wall using Dry Brush Technique

    Dip the paintbrush into the paint. Wipe the brush on both sides along the edges of the paint jar/can as you bring it back out, then brush the excess paint off on the piece of cardboard. Just do a few swipes on the cardboard until you see that the color isn’t as “solid” as it was when you first swiped it on the cardboard.

    Brush your paint onto the outlined stripes on the wall.

    Striped Walls in the Bathroom

    The beautiful thing about this way of painting stripes on walls is that you don’t do multiple coats and you don’t have to worry about brush strokes. It’s perfectly fine if the paint is heavier in some places and lighter in others – that’s how it’s supposed to look! On top of that, if you didn’t get your stripes perfectly level, you really don’t notice because the paint isn’t super bold.

    If you decide you want it darker in some places, add more paint. If you put the brush on the wall and it’s too much paint for your liking, then have a wet cloth on standby and just wipe it right off.

    Step 10

    Immediately, after painting the stripes, remove the Frogtape from the wall.

    Painting Stripes on Bathroom Walls

    You will probably have some pencil marks along the wall. Lightly take a Magic Eraser to those and they will come right off. Just don’t rub too hard, because those things will take off paint. If it takes off a little paint, that will be fine as you won’t even notice since these are washed out stripes anyway.

    Blue Accent Wall in the Bathroom

    Chrome Ring Pulls / Oval Knobs / Faucet / Mirror, Similar Here and Here

    The blue accent wall is the perfect compliment to the white cabinetry, shiny fixtures and hardware.

    Bathroom Accent Wall with Washed Out Blue Stripes

    I especially love how it worked so well as the backdrop for the mirror.

    Striped Accent Wall with Washed Out Blue Stripes

    Faucet / Mirror, Similar Here and Here

    The blue really helped to bring out the color and pattern in the mirror frame.

    Striped Walls with Washed Out Blue Stripes

    Ginger Jar + Fern Art Print / Frame

    I didn’t want to get too much going on in here against the wall, so I opted for a small art print in a frame that compliments the mirror frame nicely. And every room needs some touch of green too, right?

    Do you see a bathroom accent wall with washed out stripes in your future?

    You might also want to see…

    Blue and White Bathroom with Washed Out Stripes

    The Complete Blue and White Bathroom Remodel

    Accent Wall Ideas

    Wall Painting Ideas and Paint Designs Anyone Can Do

    Pin This Post

    Painting Stripes on Walls with a Washed Out Effect


  • How to Create an Object and Text Feature Wall

    How to Create an Object and Text Feature Wall

    Man, this wall has been nearly a year in the making. When I found out we were moving and started plotting out the Circus’ room, I knew this wall was a must. I really wanted a way to convey the Circus’ unique personality and I think this object and text feature wall was the perfect way to do it.

    How to Create an Object and Text Feature Wall | Perfect for a kid's room and totally customizable! Great way to add a kid's unique personality to their room!

    You may have seen a wall similar to this in a Kate Spade store. I’m not sure if every store has them, but I know the one that I have been in does have one and it’s what inspired this wall. Of course, the Kate Spade version doesn’t mention yard sales or tutus, but that’s their loss. 😉

    How to Create an Object and Text Feature Wall

    Tools & Supplies

    • Custom Wall Decal (I got mine from Wall Quotes – I’m going to show you how I made it. Disclosure: They gave me my decal to use in this post, but I had planned on buying one anyway.)
    • Objects (to add into the wall and take the place of some words)
    • Paint and FrogTape (if you want to change the color of your wall where the decal will go)
    • Command Strips and Command Hooks to hang the objects

    Steps

    Step 1. 

    The first thing you’ll want to do is come up with your text. If you’re doing it for a person, make a list of things they really love or that describe them and then work those into sentences. After you’ve done this, go back through and make note of words that you could actually replace with objects. We did this with the words horse, tutu, cowboy boots, money, yard sale and umbrella.

    Step 2. 

    Now you’re ready to make your decal. I made my decal through the Design Your Own feature at Wall Quotes. The design center walks you through all the steps, but I also made a video to show you specifically how I made mine.
    [adthrive-in-post-video-player video-id=”rejB6yTP” upload-date=”Fri Sep 16 2016 18:40:58 GMT+0000 (Coordinated Universal Time)” name=”Rain on a Tin Roof – How to Create a Text Feature Wall” description=”Create a text feature wall that perfectly describes your child with a touch of whimsy!”]

    When you make your decal in the design center, I think the biggest thing is making sure you have the dimensions of the wall area set correctly. The spaces in the sentences didn’t really matter that much while making the decal because I had to cut some sentences into two pieces to make room for the objects anyway. Also, make sure to take into account your wall color. I knew I was painting this section of the wall white, thus why I set it to white when making the decal.

    Next, try to wait patiently for your decal to arrive! 😉

    Step 3. 

    If you’re planning to paint the area of the wall where the decal is going, go ahead and do so. I didn’t realize that the wall needed to be painted at least three weeks prior to the decal going on until I got my decal, so that slowed my project up a bit. I just rolled some bright white paint (Bit of Sugar), onto the wall.

    Step 4. 

    When your decal arrives, pull it out of the box and unroll it.

    How to Create an Object and Text Feature Wall | Get a custom made wall decal.

    When I unrolled mine, I realized I was definitely going to have to cut the sentences into strips for it to feel the space I wanted it to on the wall.

    How to Create an Object and Text Feature Wall | Get a custom made wall decal.

    That wasn’t a big deal at all – it didn’t affect the text in any way.

    Tape your strips onto the wall and move them around until you get them where you want them.

    How to Create an Object and Text Feature Wall | Place decals on wall.

    Once I got the strips where I wanted them, I tested out the objects in their spaces and ended up cutting most of the sentences where the objects would go so I would have room for the actual object.

    Step 5. 

    Once you have all the strips in place where you want them, it’s time to start actually applying the decal to the wall. Instructions and an application tool are included with Wall Quotes decals. It’s really simple though.

    How to Create an Object and Text Feature Wall | Place decals on wall.

    Just apply tape to the top portion of the strips (as shown in that top sentence of mine), carefully pull the backing from the strip, then smooth the top portion onto the wall. Use the application tool to fully smooth and apply the decal onto the wall, then pull  back the top portion.

    How to Create an Object and Text Feature Wall | Place decals on wall and add in objects as you go.

    Add in your objects as you go so that you can move strips if you need to.

    Step 6. 

    If you painted the area where you put the decal and objects, then use FrogTape to straighten up the edges and go back over the outside with your wall color.

    How to Create an Object and Text Feature Wall | Perfect for a kid's room and totally customizable! Great way to add a kid's unique personality to their room!

    I used Command Strips to keep the horse and boots on the wall. The tutu is held up by clothespins that are hot-glued to the wall. The dollar bills are just taped and the coins are hot-glued. The yard sale sign is taped and the umbrella is hung on Command Hooks.

    How to Create an Object and Text Feature Wall | Perfect for a kid's room and totally customizable! Great way to add a kid's unique personality to their room!

    I really love this little sneak preview you get of the wall when looking into her room.

    How to Create an Object and Text Feature Wall | Perfect for a kid's room and totally customizable! Great way to add a kid's unique personality to their room!

    The Circus can still easily get the umbrella and tutu down to play with. The cowboy boots are actually too small for her, so she’s ok with them being on the wall. She was a little upset when I went to put one of her horses on the wall, but when I pulled out the 50 other ones she had, she forgot about that one real quick.

    Only a couple more projects to go in her room!

    What do you think about the new wall?!

    You can make your own custom decal at Wall Quotes.

    You might also want to see these…

    IKEA Bookcase turned Dress-Up Closet

    Easy DIY Lemonade Stand - use this tutorial to make a simple lemonade stand for kids!

    Easy DIY Lemonade Stand

    This is such an easy build! Any beginning DIYer could complete these! Great for kid's rooms and home offices! How to Build Wall to Wall Shelves in an hour for $50

    How to Build Wall to Wall Shelving Easily

    blog-signature-summer-15

    pin-this-post-2

    Learn how to create an object and text feature wall - perfect for a kid's room and totally customizable! Great way to add unique personality to a space!

    SaveSave

  • 7 Wall Treatments That Aren’t Shiplap

    7 Wall Treatments That Aren’t Shiplap

    Honesty is the best policy. And in all honesty, I don’t think I could ever lie to you guys anyway even if I wanted to.

    I’m not a shiplap fan.

    That’s not a secret around here.

    It’s not so much that I dislike shiplap itself, I think I dislike more that it’s freakin’ everywhere. Everywhere, y’all. 

    Stop the shiplap insanity!

    I now fully understand why Woody disliked Buzz so damn much.

    I mean, come on. Fly your own freak flag! Don’t be swayed by the trends!

    Ok, I’ll stop. If you do love shiplap, that’s great. Go for it. Own it. I’m just owning not liking it. At all.

    These wall treatments are ones that I’ve done in the past and ya know what? You guessed it – they don’t include a single inch of shiplap. Hopefully, they will inspire you to whip a wall into shape with your own spin on it. And if they don’t, then there are four more gals sharing their wall treatments sans shiplap today and then 15 more bloggers sharing theirs throughout the week.

    That’s right. It is anti-shiplap week up in here, ya’ll! Get excited.

    If you’re coming over from Suburban Bitches, welcome! Here’s hoping I can live up to Erin and Tricia’s wall treatments!

    7 Wall Treatments That Aren’t Shiplap

    DIY Indoor Lattice Feature Wall

    While many people thought I was crazy for putting lattice on my walls, I went for it anyway! I’m so glad I did – I love how this wall treatment turned out! Read the full tutorial for the DIY Lattice walls here.

    My Master Bedroom Accent Wall

    Seven Wall Treatments That Aren't Shiplap: Black and White Accent Wall | Feature Wall

    This wall is probably my most favorite one ever. I love the design, I love the black and white, I love how the mid-century dresser looks in front of it. I love it all. You can see how I made it here and see more of the final product here.

    The Carpet Covered Wall

    Seven Wall Treatments That Aren't Shiplap: Carpet Covered Feature Wall | Accent Wall

    Yes. I did cover a wall with carpet. Green carpet. And I love it. It added just the right amount of color and texture to this wall. See how I did it here.

    Cane Inspired Accent Wall

    Seven Wall Treatments That Aren't Shiplap: Cane Inspired Feature Wall | Accent Wall

    This wall added some much needed interest and color to an otherwise all white bathroom. It has a cane inspired feel, but was pretty easy to accomplish. Read how I did it here.

    Criss-Cross Wall Treatment

    Seven Wall Treatments That Aren't Shiplap: Criss-Cross Accent Wall | Feature Wall

    This wall was one of my first bigger DIY wall treatments and I was so happy with how it turned out. It’s a simple criss-cross pattern, but also classy at the same time. Find out how to make this wall here.

    Black and White Gallery Wall

    Seven Wall Treatments That Aren't Shiplap: Black and White Gallery Wall | Accent Wall | Feature Wall

    Some people like gallery walls that are more “random” in terms of what they have on it. I often prefer clean lines though. This black and white gallery wall also helped to make the television disappear. See how I did it here.

    The Confetti Wall
    Seven Wall Treatments That Aren't Shiplap: Easy Confetti Accent Wall | Feature Wall

    Ahh, the confetti wall. It was such a fun project and super simple too. This wall was in the entryway at our Beloved Foreclosure so guests knew what to expect when they entered. 🙂 Find out how to do it here.

    Half and Half Walls

    Seven Wall Treatments That Aren't Shiplap: Half-Black Half-White Wall Treatment

    In the guest room at our old house, we painted one wall completely black, one wall completely white and the two other walls half-black and half-white. It gave it a really cool modern effect, while still keeping the room from not feeling too dark from all the black. See more of the space here.

    That’s all I got right now – I have a few more wall treatments brewing up in my head though. Of course, none include shiplap. 😉 Up next today is Cassie Bustamante – you’ll love her earthy, vintage, eclectic style!

    To get your full dose of wall treatment sans shiplap inspiration, be sure to visit everyone this week:

    Monday, September 19th

     
    Tuesday, September 20th
     
    Wednesday, September 21st
     
    Thursday, September 22nd
     
    blog-signature-summer-15
    pin-this-post-2
    Looking to create an accent wall or feature wall that doesn't include shiplap? This post about 7 wall treatments that aren't shiplap is for you then!
  • A Simple Blue Accent Wall for the Circus

    A Simple Blue Accent Wall for the Circus

    As you know, my in-laws moved into our Beloved Foreclosure after we moved into the 70’s Landing Pad. The Circus of course got a new room here, but she also got to keep her old room at our old house. So now, the child has two rooms of her own literally within walking distance. As if she wasn’t already planning for the global shutdown of Toys ‘R Us, she now has two rooms that she can fill with stacks and stacks of toys.

    While the Circus’ wanted to paint her entire old room blue, her Gaia (Grandma) and I weren’t too sure about that. So instead, we picked out three blue colors that worked well with the gray we were painting in the rest of the room and let her choose which blue color from those.

    Tutorial for a Simple Blue Accent Wall using Behr's Boat House - great idea for adding a little color to a room!

    And I have to say, she did a pretty good job choosing a blue.

    This is a really simple project and a great way to add a little dose of color to a room – especially when you have a kid that would paint her entire room an electric blue if you’d let her. 😉

    Disclosure: This post is sponsored by FrogTape, however all opinions are 100% mine. Affiliate links may be contained in this post.

    Tools & Supplies

    Tutorial for a Simple Blue Accent Wall using Behr's Boat House - great idea for adding a little color to a room!

    • FrogTape – I used both the green Multi-Surface and Delicate Surface because I had to tape some walls that were freshly painted.
    • Good Paintbrush
    • Paint Tray & Roller
    • Accent Wall Color (She chose Boat House.)
    • Main Wall Color (only necessary if you want to give the rest of the room a fresh coat of paint, which this room desperately needed. We used Dolphin Fin.)

    Steps

    Step 1.

    Prep all your walls by filling any nail holes with spackling. If you’ve got some areas with dust on the walls, wipe them down with a wet cloth or Swiffer cloth.

    Tutorial for a Simple Blue Accent Wall using Behr's Boat House - great idea for adding a little color to a room!

    You can see where we spackled holes in the photo above. Before painting the walls, we also gave the baseboards a fresh coat of paint as well as the newly added crown moulding. If you need to touch up that trim, now is a good time to do it. We didn’t tape it off since we knew we were painting the walls.

    Step 2.

    Use FrogTape Multi-Surface to tape off the trim anywhere you will be painting.

    Tutorial for a Simple Blue Accent Wall using Behr's Boat House - great idea for adding a little color to a room!

    We started by painting the main wall color, the gray Dolphin Fin color, onto all the walls with the exception of the wall that would get the blue.

    When I tape trim, I like to use the widest FrogTape and leave the outer part of the tape (the tape not closet to the wall) not taped down. So, I just firmly apply it right along the top of the baseboard and edges of the trim, but leave the outer half kind of standing up. Does that make sense? You should be able to see what I’m talking about in the picture above. I’ve found that this gives a little extra paint splatter protection.

    Step 3.

    Start painting. Do your edging first.

    Tutorial for a Simple Blue Accent Wall using Behr's Boat House - great idea for adding a little color to a room!

    Come back and roll on your paint.

    Tutorial for a Simple Blue Accent Wall using Behr's Boat House - great idea for adding a little color to a room!

    Step 4.

    As soon as you’ve painted your last coat on, remove the FrogTape.

    Remove the FrogTape. Tutorial for a Simple Blue Accent Wall using Behr's Boat House - great idea for adding a little color to a room!

    Let the walls dry for at least 24 hours before doing your accent wall.

    Step 5.

    For the accent wall, once more tape off the trim first. Use FrogTape Delicate Surface along the edges, right in the corner, where the accent wall will meet the other walls.

    Tutorial for a Simple Blue Accent Wall using Behr's Boat House - great idea for adding a little color to a room!

    You want to use the Delicate Surface FrogTape because of how fresh the paint on the other walls are.

    Firmly press the FrogTape down along the edges with your fingers.

    Tutorial for a Simple Blue Accent Wall using Behr's Boat House - great idea for adding a little color to a room!

    This helps to ensure that there isn’t any paint bleed.

    Step 6.

    Paint your accent color on the wall.

    Tutorial for a Simple Blue Accent Wall using Behr's Boat House - great idea for adding a little color to a room!

    Once again, edge first and then come back with the roller.

    And again, after painting your final coat of paint, remove the FrogTape.

    Remove the FrogTape. Tutorial for a Simple Blue Accent Wall using Behr's Boat House - great idea for adding a little color to a room!

    Stand back and give yourself a high five. 🙂

    Tutorial for a Simple Blue Accent Wall using Behr's Boat House - great idea for adding a little color to a room!

    Seriously, how cute it that room?!

    Tutorial for a Simple Blue Accent Wall using Behr's Boat House - great idea for adding a little color to a room!

    The Circus came to me after she saw it for the first time and said, “Thank you for painting my wall blue, Mama. It’s the perfect blue ever.” #notkidding

    Tutorial for a Simple Blue Accent Wall using Behr's Boat House - great idea for adding a little color to a room!

    It’s also just enough blue for all of us not to have our hearts shocked back into rhythm when we walk in the room.

    Looking for more accent wall ideas? Well that just so happens to be my specialty….

    Wall Painting Ideas and Paint Designs ANYONE Can Do! This article is FULL of DIY painting ideas including wall painting techniques, wall painting designs and other painting ideas!

    Wall Painting Ideas and Paint Designs Anyone Can Do

    Criss-Cross Accent Wall for $30 or Less via RainonaTinRoof.com #diy

    Criss-Cross Accent Wall

    STUNNING Black and White Gallery Wall! Simple to do - such a great accent wall!

    Black and White Gallery Wall

    blog-signature-summer-15


    pin-this-post-2

    Tutorial for a Simple Blue Accent Wall using Behr's Boat House - great idea for adding a little color to a room! Perfect for kid's rooms!


    SaveSaveSaveSaveSaveSaveSaveSave

  • Cane Inspired Accent Wall for $25

    Cane Inspired Accent Wall for $25

    This post is sponsored by FrogTape, however all opinions are 100% mine. This post contains affiliate links. 

    Sometimes I try to make things more complicated than they really are.

    Not on purpose of course.

    I just don’t think sometimes. Its like my mind sometimes turns off its “common sense” mode.

    That’s also when I end up saying things I shouldn’t to people. 

    Whoops. 

    That common sense mode of my brain shut down when I started to do this accent wall.

    You see I love caned pieces. Caned chairs, caned tables, caned light fixtures. I’m crazy over the pattern.

    And I have a pillow with a caned pattern on it.

    And I was determined to get that pattern on my wall. I knew I could. It was just straight lines strategically placed.

    But I was overthinking it.

    And it took Grunt Labor coming up to me, turning the pillow diagonally and saying, “Its just squares, Jenna,” for me to figure it out.

    He was right.

    But I didn’t say that because I’m not too keen on how saying he’s right tastes.

    Like vinegar, I tell ya.

    And once this revelation was made, I figured out how to make my own cane inspired accent wall.

    DIY Cane Inspired Accent Wall

    DIY Cane Inspired Accent Wall done for around $25. Gorgeous kelly green wall treatment in this bathroom.

    It might look complex, but it really wasn’t.

    After I used common sense and all.

    Here’s what you’ll need:

    Step 1:

    My wall was already painted white which was what I wanted to use for one of my colors. However, if you want to use a different color than what your wall is already painted, you will need to paint the entire wall first. Keep in mind this will be the color that will be the pattern (lines) on your wall in the end.

    Step 2: 

    Find the center of your wall at the very top and mark it. Place one corner of your 12 x 12 piece of cardboard or cardstock (I used cardstock) on the mark. Trace the piece of cardstock on all four edges. Next, move the cardstock to either side of the diamond you just traced, match up the edges and trace again. Continue doing this until you have worked your way all the way across and down the wall.

    How to make a cane inspired accent wall.

    Step 3:

    Using the smaller width FrogTape, run the tape all along the inside edges of each square you traced. Your wall should look like this when you are finished:

    How to make a cane inspired accent wall with paint and FrogTape.

    Step 4:

    At this point, I was going to do two horizontal lines across the top and bottom of each square, just like a caned pattern. However, as I started to run the tape across the wall, I realized that I had some very uneven and shoddy drywall work at the top of the wall and it was throwing off the pattern. So, I opted to forgo those lines.

    I still wanted a little extra pop though, so I “framed” in the pattern along the edges. Do this by coming 2 1/2″ in from the wall edges on all sides.

    How to make a cane inspired accent wall.

    Run tick marks along the edges at the correct measurement and then run more of the smaller width FrogTape along the tick marks. This is what it should look like when you are finished:

    How to make a cane inspired accent wall with paint and FrogTape.

    Step 5:

    Use the larger width FrogTape along the edges of any walls that butt up to your accent wall, ceiling, and any other fixtures.

    How to make a cane inspired accent wall with paint and FrogTape.

    Step 6:

    To ensure crisp, clean paint lines, run your fingernail or a credit card along the edges of all the tape that you have applied to the wall.

    Step 7:

    Roll and brush on a paint color of your choice. It took about three coats of this bold green hue for me.

    Step 8: 

    Remove the FrogTape as soon as you have applied the final coat of paint while it is still wet.

    DIY Cane Inspired Accent Wall done for around $25. Gorgeous kelly green wall treatment in this bathroom.

    And commence the swooning.

    DIY Cane Inspired Accent Wall done for around $25. Gorgeous kelly green wall treatment in this bathroom.

    If you only need a quart of paint, you’ll end up having about $25 or less in the wall. Not too shabby, eh?

    Are you an accent wall fiend?

    You might also like these then...

    Super easy to make and fun! Easy Confetti Accent Wall

    9 Accent Walls for $30 or Less via RainonaTinRoof.com #homedecor

    pin-this-post-2

    DIY Cane Pattern Accent Wall | Patterned Accent Wall DIY | Accent Wall Ideas | Accent Wall Bathroom | Feature Wall Ideas

    I did end up painting the pink ceiling in the bathroom white. It was just clashing way too much with the green.

    You know you don't wanna miss any of this crazy.

    Sign up to get my posts delivered to your inbox here.

    Stalk Me Here:

    Bloglovin / Pinterest / Facebook / Twitter / Google+ / Instagram

    blog-signature-summer-15

    frogtape-disclosure

    SaveSave

  • Black & White Gallery Wall

    Black & White Gallery Wall

    I have visions.

    Not like psychic visions – but that would be really cool.

    Room visions, project visions, idea visions.

    And in my head – they are fan-freakin-tastic.

    In real life, they don’t always turn out so fan-freakin-tastic though.

    In my head, this black and white gallery wall was fan-freakin-tastic.

    In real life, its better than fan-freakin-tastic.

    In fact, I can’t even come up with a word for how awesome it is and how much I love it.

    This wall totally took my living room to a whole new level.

    STUNNING Black and White Gallery Wall! Simple to do - such a great accent wall!

    To get the full effect of how far this wall has come, here’s what it looked like before:

    The wall before

    It wasn’t terrible, but let’s be honest, it doesn’t hold a candle to the new accent wall.

    The best thing about this project is that its so easy. All you need is a little paint, FrogTape®, frames and art.

    This post contains affiliate links for your shopping convenience. Click here to read my full disclosure policy.

    frogtape-disclosure

    DIY Black and White Gallery Wall

    I used:

    Steps

    Step 1:

    Use the FrogTape® 1.88″ width to tape off baseboards, any crown molding, or other trim around the area that you don’t want to get paint on.

    Step 2: 

    Paint all four edges of the wall white (or other color of your choice). I edged with the paint brush and then rolled about 2-3 roller widths wide along the edges.

    Step 3:

    After the paint is dry, tape off the “frame” for your gallery wall. I waited a week or so before taping off my frame, so I used the FrogTape® Multi-Surface, however if you don’t want to wait long, you can use FrogTape® Delicate Surface.

    Create your "frame" with the FrogTape.

    I came in five inches all around the wall and taped off a rectangle using the wider width FrogTape®. After that, I came in 7 1/2″ all around the wall and taped off the second rectangle within the larger one using the smaller width FrogTape®. Of course, your wall will most likely be a different size than mine, so you can adjust the measurements as needed.

    Step 4: 

    Trim up the edges of the FrogTape®.

    Cut edges of FrogTape

    I use a ruler and craft knife to do this. After you have trimmed up all the edges, take your fingernail or a credit card and run it firmly along the edges of the FrogTape® to fully adhere it to the wall.

    Step 5: 

    Paint the rest of the wall black (or other color of your choice).

    Paint two coats of black.

    Two coats was all I needed.

    Step 6: 

    Remove the FrogTape® immediately after painting your last coat.

    Remove tape immediately after your last coat of paint.

    After the wall is good and dry, you can decorate it however you want.

    STUNNING Black and White Gallery Wall! Simple to do - such a great accent wall!

    I opted to go with simple white frames that popped off the wall, but showcased the art, along with gold sconces.

    STUNNING Black and White Gallery Wall! Simple to do - such a great accent wall!

    I used these 16×20 white frames with artwork in 8×10 sizes. I added these sconces (spray-painted gold) to either side of the television to bring in a touch of metallic and another element besides the frames.

    See more of the new living room in my latest home tour and find out how I stripped and re-stained the buffet here.

    Need more gallery and accent wall ideas?

    Indoor Lattice Walls– it’s not crazy, it’s gorgeous!

    9 Accent Walls for $30 or Less – Big Bang for your buck.

    Easy Confetti Accent Wall – fun. on a wall. seriously.

    Criss-Cross Accent Wall – a classic design that will work with any decor style.

    7 Wall Treatments that Aren’t Shiplap – let’s give shiplap a break, y’all.

    You know you don’t wanna miss any of this crazy.

    Sign up to get my posts delivered to your inbox here.

    Stalk Me Here:

    Pinterest / Facebook / Twitter / Instagram

    pin-this-post

    STUNNING Black and White Gallery Wall! Simple to do - such a great accent wall!

    SaveSaveSaveSaveSaveSaveSaveSaveSaveSave

  • Easy Confetti Accent Wall

    Easy Confetti Accent Wall

    Have you been introduced to my new favorite wall?

    Its shiny, its gold, its fun, and it was so easy to make.

    My favorite thing about it? There’s no way you can screw it up.

    Meet my Confetti Accent Wall.

    Super easy to make and fun! Easy Confetti Accent Wall

    This post contains affiliate links for your shopping convenience. Click here to read my full disclosure policy.

    frogtape-disclosure

    This baby made its debut in my recent entryway makeover – ya know – the makeover that was totally unplanned and random?

    I have done quite a few accent walls in my time and I have to say that this one was by far the easiest I’ve ever done. There’s no measuring needed and bonus – it only cost me about $25 to do this wall.

    Easy Confetti Accent Wall

    Materials Needed: 

    Steps

    Step 1:

    Before the confetti wall, this wall was a very dark navy. Since I was going with a much lighter color on the wall, I first needed to prime the entire wall. Using the wider width of FrogTape® Multi-Surface, tape off your edges and trim, then prime.

    Step 2:

    Using a small foam roller, roll on random strips of your “confetti” color. I opted to do gold.

    Step 3: 

    After the confetti color has dried, place strips of the smaller width of FrogTape® Multi-Surface onto the confetti color.

    Easy Confetti Accent Wall

    Use a credit card or something similar to burnish the edges of the tape.

    Step 4: 

    Paint your desired wall color over the entire wall.

    Step 5: 

    After your final coat of paint, remove the FrogTape® Multi-Surface, while the paint is still wet.

    Remove tape carefully - Easy Confetti Accent Wall

    Let the wall completely dry before you put anything on it or near it.

    Super easy to make and fun! Easy Confetti Accent Wall

     I love having this wall in our entryway – it lets guests know that we are fun and easygoing – or at least I hope that’s what they think about us…..

    Do you have a fun accent wall in your house?

    Looking for more great accent wall ideas? That’s kind of my thing…

    Cane Inspired Accent Wall for $25 or Less – gorgeous, not too hard and a classic design.

    Black & White Gallery Wall – a simple accent wall that disguises your television!

    Criss-Cross Accent Wall – another classic design, but on a larger scale.

    9 Accent Walls for $30 or Less – high on style, but low on budget.

    7 Wall Treatments that Aren’t Shiplap – please, simmer down on the shiplap, ya’ll.

    You know you don’t wanna miss any of this crazy.

    Sign up to get my posts delivered to your inbox here.

    Stalk Me Here:

    Pinterest / Facebook / Twitter / Instagram

    pin-this-postSuper easy to make and fun! Easy Confetti Accent Wall

    SaveSave

  • The funnest entryway you ever did see, even if it is mine

    The funnest entryway you ever did see, even if it is mine

    I’m not sure that funnest is actually a word. I googled it after saying it over and over in my head a hundred times and still couldn’t get a clear answer as to whether or not it is a word.

    I finally just went with my redneck instincts and left it in the title.

    Keep in mind, I used to teach middle school Language Arts.

    Those poor children.

    So I know I didn’t tell you I was doing an entryway makeover.

    Here’s the thing.

    I hadn’t really planned on doing an entryway makeover.

    And then it all just kind of happened.

    Story of my life. 

    The Fun and Easy Entryway Makeover

    Disclosure: This post was a collaboration with Kirkland’s. All opinions and sporadic makeovers are 100% mine.

    Before we start this makeover process, let’s take a moment to look at the before so that we can really appreciate the after:

    Entryway Before

    I didn’t hate the entryway before. I loved that navy wall, but that navy wall was really making the space dark.

    Furthermore, the circus would barely miss hitting her head on the corner of that table as she tornadoed down the hall.

     Really, I could just say that I did this whole makeover for her safety. Right?

    Quit shaking your head at me.  

    So, as my former students would say, what had happened is…

    The Fun and Easy Entryway Makeover

    These prints. 

    That’s how it all started.

    I went into Kirkland’s a few weeks ago and lo and behold they were on sale for $13 a piece.

    And did you see how big they are?

    It would have been a sin to leave them behind at that price, so I bought all four designs:

    The Elephant One

    The Leopard One

    The Zebra One 

    The Giraffe One

    And then I got home and realized that I had grossly misjudged how much all four of them together on the wall would overpower the bench (I’ll get to the new bench in a minute).

    I was forced to pick favorites.

    The elephant and leopard won.

    Actually, my pick was the leopard and giraffe, but the circus screamed when I attempted to take the elephant off the wall, so that decided that.

    Sidenote: they are all still only $13 as of the writing of this post.

    And then there was the bench.

    The Fun and Easy Entryway Makeover

    You see, while I was in Kirkland’s I also happened upon this bench.

    And I’d been thinking I wanted a bench to put in place of the table.

    And this bench was a nice neutral, which meant it would work with my ever-changing decor.

    And it had nailhead trim.

    And nailhead trim kind of makes me all warm and fuzzy inside.

    So it came home with me too.

    And then I got it all home and I said to myself, “Self, this wall color has to go.”

    The Fun and Easy Entryway Makeover

    And Self concurred.

    Self deems it the “confetti wall” and you can read how Self and I did it here.

    And after the wall was finished, the bench placed in front of it, the art above it, I shopped my own house for the pillows, fur throw, and painted plant basket.

    Because I’m good like that.

    But then I realized the old light fixture no longer worked there.

    Yep, even I can make this one! $25 Easy DIY Light Fixture

    So I made a new super easy DIY light fixture for only $25.

    And that is how this entryway makeover came to be.

    Looking for more fun room design inspiration? 

    Mudroom – Laundry Room Makeover – complete with a wall of swimmers. Seriously.

    Home Office Makeover – where color and Burt Reynolds collide. 🙂

    DIY Master Closet Makeover – colorful tassels and black and white stripes – oh my!

    You know you don’t wanna miss any of this crazy.

    Sign up to get my posts delivered to your inbox here.

    Stalk Me Here:

    Pinterest / Facebook / Twitter / Instagram

    pin-this-post

    The Fun and Easy Entryway Makeover

  • 10+ Gorgeous DIY Accent Wall Ideas for Just $30 or Less

    10+ Gorgeous DIY Accent Wall Ideas for Just $30 or Less

    Want to create a gorgeous focal point in your home? Have you thought about an accent wall? These DIY accent wall ideas bring the beauty but don’t require a lot of cash!

    Feature walls can be a total game changer for a room. Not only do they add character and beauty, but they can define a space and bring it to a whole other level – not that this happened in my dining room or anything lately. 😉

    Below you’ll find a few of my favorite easy and cheap accent wall ideas for multiple different areas in your home! The best part? Each one costs just $30 or less to complete!

    Easy Accent Wall Ideas

    Washed Out Stripes Wall

    DIY accent wall ideas- washed out blue stripes in a bathroom

    Bathroom Accent Wall

    A sample pot of paint. Yep. Just that, a ruler and some tape and you can create this washed out stripe look in your home!

    Object and Text Wall

    cheap accent wall ideas - combining objects and vinyl text on a wall

    Kids Room Wall

    This is one of the sweetest walls I’ve ever done. I mixed in objects and vinyl text lettering to create a feature wall especially for my daughter.

    Carpeted Wall

    easy accent wall - putting green astroturf carpet on a wall with pink accents.

    Putting Carpet on Walls

    Yes m’am, I did! Carpeted feature walls got a bad vibe back in the day, but I’m on a mission to change that! I put a $30 astroturf rug on a wall in my bedroom and it added the perfect amount of color and texture to the space.e

    Cane Inspired Feature Wall

    accent wall ideas -  green and white lattice bathroom wall

    Cane Inspired Accent Wall for $25 or Less

    This one might look a little complicated, but it’s actually quite easy! All you need is a little painter’s tape and paint, of course! This bathroom accent wall could be recreated in any space in your home.

    Painting One Wall

    create an accent wall by painting one wall only - blue feature wall against gray walls

    Blue Accent Wall

    You don’t always have to paint every wall or create a pattern on the walls – sometimes just painting one will do the trick!

    Gallery Wall that Hides the TV

    Accent Wall Ideas for Living Room - black and white gallery wall that hides the tv

    Black & White Gallery Wall

    This is still one of my favorite walls to date! I love this black and white gallery wall for two reasons. 1. It takes your wall art to a whole other level. 2. The television practically disappears into the wall.

    Wood Accent Wall

    Wood accent wall in a masculine bathroom

    DIY Wood Wainscoting Panels

    This is a cheap way to bring gorgeous stained wood walls into a room!

    Fun and Carefree Wall

    diy accent wall ideas - white wall with gold confetti on the wall.

    Confetti Accent Wall

    This easy confetti accent wall isn’t only easy and cheap to make, but its also fun. It adds a touch of whimsy to any space and is ridiculously easy to complete! This one is super budget friendly too – you can just use a bottle of craft paint for it!

    Classic Style Accent Wall

    cheap accent wall ideas - traditional black and white criss cross wall.

    Criss-Cross Accent Wall

    This criss-cross wall was a huge game-changer for my dining room! It helps to anchor the dining room with it’s traditional feel and pattern, but can easily work with color and modern decor as well.

    An Accent Ceiling

    accent wall on the ceiling - pink and white ceiling

    Pink Ceiling

    How about an accent ceiling? I painted my bathroom ceiling pink with faux white moldings. It adds a lot of interest to an otherwise all white bathroom. You can always opt for a different paint color to not make it seem as girly.

    Accent Squares

    easy accent wall - gray squares on a white wall

    Painted Wall Treatment on a Budget from Thistlewood Farms

    I love this simple graphic wall treatment from Karianne. And guess what? She did it with just a sample pot of paint!

    No Paint Accent Wall

    black and white accent wall using tape

    Striped Accent Wall without Paint from Homey Oh My

    This accent wall doesn’t even require paint! And isn’t that black and white classic?

    Stencil Wall

    white circles stenciled on a beige wall

    Circle Patterned Wall from Lilikoi Joy

    I love the circles on this one – adds a good dose of fun! You just switch it up with any kind of colors you prefer!

    Square on Squares Accent Wall

    squares on squares accent wall

    Graphic Statement Wall from AKA Design

    Squares are always a favorite of mine – and these make a bold statement, but are a simple pattern. This would be great in a modern home.

    Triangle Wall

    peel and stick triangles no paint accent wall

    Triangle Accent Wall from Upcycled Treasures

    Another one that doesn’t require paint! If modern is your style, this one might be perfect for your home too. Simply use peel and stick triangles to achieve the look!

    + Accent Wall

    Modern Accent Wall Idea

    Plus Signs Accent Wall from Knack Studios

    These plus signs or crosses are a fun and unexpected twist for another modern statement wall! You could easily create them with paint pens or electrical tape!

    Now go create an accent wall and come back and tell us all about it!

    Want more great ideas for your walls?

    Wall Paint Design Ideas with Tape – if you can tape it off, you can make it happen! You won’t believe some of these walls!

    DIY Indoor Lattice Wall – yes, lattice inside makes for a gorgeous wall treatment!

    Want to come back to these wall ideas later? Just pin the image below!

    Looking for BIG bang for your buck? Here are 9 Accent Walls for $30 or Less - includes lots of wall painting ideas, techniques and designs - and they are all DIY projects! Great painting ideas!

  • Criss-Cross Accent Wall for $30 or Less

    Criss-Cross Accent Wall for $30 or Less

     First off, the title of this post totally has me singing the Kriss Kross Jump song – you’ll think me later for sharing that link.

    Other than Criss-Cross, I couldn’t think of a better description for this wall though – besides of course amazingly-awesome-and-total-game-changer-for-my-dining-room.

    But that would have been a really long title.

    Now, in true “Jenna” fashion, I discovered how and how not to do this type of accent wall.

    I started out doing it one way and then ended up doing it another way.

    Either way, this criss-cross accent wall was truly a huge game changer for my dining room and does make me wanna jump-jump.

    Criss-Cross Accent Wall for $30 or Less via RainonaTinRoof.com #diy

    Disclosure: This post is sponsored by FrogTape. However, all opinions, game-changing black and white accent walls, and references to Kriss Kross are 100% mine.  This post contains affiliate links for your shopping convenience. Click here to read my full disclosure policy.

    Depending on what colors you want to use and how big your wall is, you can totally get by with $30 for creating this wall.

    Yes, $30 for one huge impact.

    Jump jump!

    Ok, I’ll quit referencing Kriss Kross songs now. Maybe.

    Materials & Supplies Needed:

    Steps

    Step 1

    If you are cool with the current paint color on your wall and just want to add in the criss-cross, leave your wall color as is and just choose a color for the criss-cross. If not, go ahead and paint your wall. I wanted the crisp black and white combo, so I painted the wall first with my paintstick and Snowfall by Behr.

    Step 2

    To make the criss-cross pattern, you are essentially creating squares that you will paint around. To start it off, take a piece of 12 x 12 cardboard or 12 x 12 scrapbook paper and place it in the top center of your wall turned sideways. Trace around the cardboard / paper.

    Criss-Cross Accent Wall for $30 or Less via RainonaTinRoof.com #diy

    After you have traced it, place your FrogTape along your lines. You want the outside edge of your FrogTape to go right along the traced lines, therefore keeping your overall square 12 x 12, but making the white space within the tape smaller than that. Make sense?

    Step 3

    From here, you can go about making the rest of the pattern two ways. The first way is to place two pieces of tape along the edges of your square you just made and then trace another square, and repeat steps two and three until your wall is covered. Like this:

    Criss-Cross Accent Wall for $30 or Less via RainonaTinRoof.com #diy

    I did this method for a little while and then saw that my pattern was becoming quite uneven. I removed some of my uneven spots and started using a good old ruler and pencil to measure out the rest of my pattern. Either way you do it, I suggest using the 12 x 12 piece of cardboard or scrapbook paper to make your first square. The measurements below are what you should be using to get your squares right:

    Criss-Cross Accent Wall for $30 or Less via RainonaTinRoof.com #diy

    Just take your ruler and make tick marks, then put your tape along those marks and repeat.

    Criss-Cross Accent Wall for $30 or Less via RainonaTinRoof.com #diy

    Step 4

    Once you have all your pattern taped out, you need to go back and even up your tape edges, so that you have perfect squares and can paint around them. I did this with an X-Acto knife and ruler.

    Criss-Cross Accent Wall for $30 or Less via RainonaTinRoof.com #diy

    Step 7

    After your tape is squared up, take a credit card and use it to press firmly along the edges to seal the tape.

    Criss-Cross Accent Wall for $30 or Less via RainonaTinRoof.com #diy

    Step 6

    Paint around your squares.

    Criss-Cross Accent Wall for $30 or Less via RainonaTinRoof.com #diy

    Step 7

    After your final coat of paint, remove the tape.

    And just so we remember how this space started, here’s the before:

    Criss-Cross Accent Wall for $30 or Less via RainonaTinRoof.com #diy

    And now:

    Criss-Cross Accent Wall for $30 or Less via RainonaTinRoof.com #diy

    Criss-Cross Accent Wall for $30 or Less via RainonaTinRoof.com #diy

    Criss-Cross Accent Wall for $30 or Less via RainonaTinRoof.com #diy

    Ya know it makes ya wanna jump jump!

    Yea, I lied about the whole “I’ll stop referencing Kriss-Kross” thing.

    I’m sure it seems like this took forever to do. It actually really didn’t. Once you get in the hang of marking your measurements, it goes really fast.

    If you want to see the whole new dining room, you can tour it here.

    Need more accent wall ideas? I’m your girl!

    Cane Inspired Accent Wall for $25 or Less – a gorgeous wall that packs a big punch for not a lot of money!

    Black & White Gallery Wall – one of my favorite accent walls of all time, and an easy one to do!

    Easy Confetti Accent Wall – super easy and super fun accent wall!

    9 Accent Walls for $30 or Less – on a tight budget? Check these out!

    You know you don’t wanna miss any of this crazy.

    Sign up to get my posts delivered to your inbox here.

    Stalk Me Here:

    Pinterest / Facebook / Twitter / Instagram

    SaveSave

  • 14 Real Life Bedroom Ideas Anyone Can Do

    14 Real Life Bedroom Ideas Anyone Can Do

    Ok, ya know how sometimes when you are reading a magazine or browsing on Pinterest, and you see those perfectly gorgeous bedrooms? There is high end wall art, beautiful mirrors, comfy bedding, and perfect antique furniture.

    And you know that the bedding alone probably cost $1000?

    If you have $1000 to spend on bedding or on a mirror or wall art, by all means, go for it.

    I don’t.

    Hell, I can’t remember when the last time was that I had $1000 to spend on a whole room.

    Oh, wait, yea, I haven’t ever had that.

    So, for the rest of us that want beautiful bedrooms without breaking the bank, here are 14 real life bedroom ideas that anyone can do.

    Real Life Bedroom Decorating Ideas

    #1 – Create An Accent Wall

    14 Real Life Bedroom Ideas Anyone Can Do - create an accent wall

    Creating an accent wall is one of the easiest things you can do that gives huge impact. For the easiest route, go with one single color. I love this bold pink accent wall that SAS Interiors did. I’m also very into bright pinks now. Obviously, a bright pink wall isn’t going to work as an accent wall in many of our bedrooms. However, think bold for your accent wall. You want it to make a statement. The accent wall in my entryway is Rich Navy and it works perfectly for the space. If you want to really step up your accent wall game, you could stencil a design onto your wall. That is exactly what I did in our guest bedroom with this leopard accent wall. The walls were all white with black moldings – it was very stark. With the accent wall, it tied everything together perfectly and added some much needed interest to the walls.

    #2: Do a Mini-Makeover

    14 Real Life Bedroom Ideas Anyone Can Do - a mini-makeover

    Sometimes, we just need a little freshening up. I did a makeover in my master bedroom last year, but a couple months ago, I felt it needed a little something. Instead of doing a full-fledged makeover, I gave it a mini-makeover. I kept most of the main elements of the room, but changed the look with paint and a few other little ideas.

    #3: Get yourself a vanity. 

    Option 1: Build a floating vanity table.

    I did this in my walk-in-closet, but you could do it in your bedroom if you wanted to. I desperately needed a place to sit down and put on my makeup, so I build a simple floating vanity table that even has storage. The tutorial for it is HERE!

    Option 2: Turn an old armoire into a vanity.

    14 Real Life Bedroom Ideas Anyone Can Do - Turn an armoire into a vanity

    If you have enough room in your bedroom, this is a great idea for creating a vanity space. How cool is this old media cabinet turned vanity? I could totally sit there and primp for an hour. Until the kid gets in the way…

    #4: Paint a Headboard on Your Wall

    14 Real Life Bedroom Ideas Anyone Can Do - Paint a headboard on your wall.

    Beds and headboards can be expensive. Hopefully, you can luck up on a good used one that you can makeover or you can DIY your own. You could also just paint a headboard on the wall and call it done. Seriously ya’ll, this headboard is like two lines of paint and one stenciled design. So easy and gorgeous! If you aren’t into painting on a headboard, you can purchase a headboard wall decal. Yes friends, I said a headboard decal – and they look great!

    #5: Decorate your room around your favorite icon

    14 Real Life Bedroom Ideas Anyone Can Do - decorate your bedroom around your favorite icon.

    Most of us all have a favorite icon or celebrity. Hopefully its someone classic like Princess Diana and not Eminem, but hey if Eminem is your idol, who am I to judge? This Audrey Hepburn inspired bedroom is just too adorable. Really, how easy would it be to take your icon and use them as inspiration in your bedroom? Just think about their favorite colors, what movies they’ve been in and pull from that!

    #6: Create a Reading Nook

    14 Real Life Bedroom Ideas Anyone Can Do - create a reading nook!

    I love a good reading nook just about anywhere, but especially in a bedroom. I am one of those people that believe bedrooms should always have at least one chair – and that chair should be perfect for reading in.The reading nook in my bedroom is simply a single chair and side table. You’ll never believe where that chair came from! I am dying over that adorable reading nook for a kiddo from These Moments of Mine. Really, how cute are those curtains? A kid would love hanging out in a place like that, heck I would!

    #7: Make Storage Decorative

    14 Real Life Bedroom Ideas Anyone Can Do - make storage decorative!

    I don’t know about you guys, but there is never enough storage in our bedroom. Half of my clothes are in the guest closet and we are busting out of our dresser and chest of drawers. To save a little closet space, Grunt Labor’s ties are stored outside of the closet. We took an old coke crate and turned it into decorative storage for his ties.I also kinda sorta maybe have a good bit of jewelry. Fake jewelry of course, but there’s a good bit of it. Grunt Labor gave me this bust of David for Christmas (from this Etsy store) that I use to store my necklaces that I wear most often. Its pretty, quirky, and useful.

    #8 – Upholster Your Box Spring

    When it was time for the guest bedroom to get a makeover, I knew I wanted to keep the bed we had in there. The problem was that a bed skirt didn’t hang right on it.

    14 Real Life Bedroom Ideas Anyone Can Do via RainonaTinRoof.com #bedroom #DIY

    I fixed the problem by upholstering the box spring. It was easy to do – no sewing required – and it added some extra color and pattern to the room.

    #9 – Create an Office Space with Skinny Furniture Pieces

    While also plotting out the guest bedroom makeover, I knew I needed to somehow incorporate an office space in there for me. However, the room isn’t large, I needed the office area to take up as little space as possible.

    14 Real Life Bedroom Ideas Anyone Can Do via RainonaTinRoof.com #bedroom #DIYI created the office space by taking an old kitchen table and putting a hutch from a yard sale on top of it to create a desk. There is still ample storage, but it doesn’t take up much space at all.

    #10 – Save Money on Bedding by Buying the Basics

    As we all know, I am cheap. As I said at the beginning of this post, I do not have $1000 to drop on a room, much less on bedding.

    14 Real Life Bedroom Ideas Anyone Can Do via RainonaTinRoof.com #bedroom #DIYOne idea to save on bedding is to buy “basics” and liven them up with pillows and other elements.

    #11 – Create Your Own Art

    In both the guest bedroom and master bedroom, I created my own art.

    14 Real Life Bedroom Ideas Anyone Can Do via RainonaTinRoof.com #bedroom #DIY

    In my master, I made all the animal print wall art using Picmonkey and then found inexpensive frames that I spray painted.

    14 Real Life Bedroom Ideas Anyone Can Do via RainonaTinRoof.com #bedroom #DIY

    In the guest bedroom, I took an old framed print and replaced the prints with this hello darlin’ wall art.

    #12 – Add Drama with Moldings (Real or Fake)

    Moldings add interest to any room, a bedroom is no different.

    14 Real Life Bedroom Ideas Anyone Can Do via RainonaTinRoof.com #bedroom #DIY

    If you are good with wood and have basic DIY skills, you can easily do moldings similar to what Evolution of Style did in her bedroom.

    14 Real Life Bedroom Ideas Anyone Can Do via RainonaTinRoof.com #bedroom #DIY

    If you want to go the cheaper route, you can create faux wall moldings, as I did in my guest bedroom and office space.

    #13 – Keep Bedding Mostly Neutral

    When it comes to bedding, its always smart to keep it mostly neutral.

    14 Real Life Bedroom Ideas Anyone Can Do via RainonaTinRoof.com #bedroom #DIY

    I can easily tire of patterns. That’s why I went with simple white bedding with a pop of coral around the edges on my bed. I can easily change the room color, pillows, throws, etc without having to worry about clashing with lots of other colors or patterns.

    #14 – Keep Existing Furniture and Give It a Simple Makeover

    You don’t have to do extensive paint jobs to give your furniture new life.

    14 Real Life Bedroom Ideas Anyone Can Do via RainonaTinRoof.com #bedroom #DIY

    I am crazy about my dresser and chest of drawers in my bedroom. However, the pulls were definitely lacking some luster. I easily brought them back to life with Rub ‘N Buff.

    What are your go-to bedroom ideas or decorating tips?

    Find more bedroom ideas on my Pinterest board!

    Want more real life decorating ideas? Don’t miss these then…

    10+ Kitchen Ideas for Decorating, Organizing, and Storage – functional ideas for your kitchen that are pretty too!

    20+ Living Room Ideas – real life living room decorating ideas that are actually doable!

    14 Stunning Home Ideas – stunning home ideas that you might not have thought of before!

    You know you don’t wanna miss any of this crazy.

    Sign up to get my posts delivered to your inbox here. 

    Stalk Me Here:

    Pinterest / Facebook / Twitter / Instagram

    Real Life Bedroom Ideas | Bedroom Decor | Bedroom Decorating Ideas | DIY Bedroom Decor | DIY Bedroom Ideas | Bedroom Decor DIY

  • Stenciled Leopard Skin Accent Wall

    Stenciled Leopard Skin Accent Wall

    I hope you just started singing Guns ‘N Roses Welcome to the Jungle after reading that title.

    You’re welcome.

    As I told you when I revealed the guest bedroom and office makeover on Monday, this space is a 100% selfish act.

    When I started plotting this makeover, yes, I wanted guests to enjoy the room, but it was going to contain my workspace as well. And I would be the one spending the most time in here. So, come Hades or high water, this space would be whatever my little heart desired.

    And it is.

    When I showed you the guest bedding a few weeks back, I hinted that the back wall would be getting a serious treatment, so the bedding didn’t need to be too patterned.

    That back wall did get a serious treatment – a serious leopard skin accent wall treatment.

    Disclosure: Cutting Edge Stencils provided me with the materials for this project. However, all opinions and love for animal prints are solely my own.

    Leopard Skin Accent Wall via RainonaTinRoof.com #leopard #animalprint #accentwall #stencil #cuttingedgestencil (more…)

  • Accent Wall: Rich Navy Entryway

    Hi, my name is Jenna and I’m an over-analyzer.

    The last time I over-analyzed something was just yesterday this morning.

    I am easy going on many things. Most of the time, I’m just a “It is what it is” kind of girl.

    But then, I start thinking about fabric and paint swatches and should I place this brass golf ball here or maybe here or maybe it needs to be on top of a vintage book…

    Sheesh…. it never ends.

    Case in point: The new rich navy accent wall in my entryway.

    Rich Navy Accent Wall via RainonaTinRoof.com #homeright #richnavy #accentwall

    Rich Navy Accent Wall

    Disclosure: This post is sponsored by HomeRight. Y’all know how I roll though, all opinions and over analyzations are 100% mine. This post contains affiliate links for your shopping convenience. Click here to read my full disclosure policy.

    This was one of the quickest and most simple projects I have ever done, yet it took me around two months to decide what I wanted to do with the wall.

    It went something like this in my head:

    Maybe I should stencil that tiger stripe on the wall from my bar cart makeover.

    No, maybe I should do wide stripes.

    No, stripes are everywhere.

    Maybe I should do more faux moldings.

    Maybe I should do a different stencil.

    Maybe I should do vertical stripes.

    Maybe, maybe, maybe……

    Then one day, while in a stare down with said wall, telling it that it would not beat me on this, it dawned on me.

    Why not just do one single, simple, solitary color for the accent wall?

    And then as if it were meant to be, my brain responded with navy.

    Seriously? It took two months to figure that out. Geez.

    Once the decision was made, I tested out a few navy shades and went with Rich Navy by Behr. I used my and it took no time at all to do this wall.

    Rich Navy Accent Wall via RainonaTinRoof.com #homeright #richnavy #accentwall

    That’s the same PaintStick I used on my Repose Gray walls, except its a smaller version and doesn’t twist, you just push it.

    Push it real good.

    Sorry, I couldn’t resist a little Salt ‘N Pepa action there.

    The PaintStick Mini is great for small jobs and tight spaces (and its only $15!) – exactly what that accent wall was.

    Rich Navy Accent Wall via RainonaTinRoof.com #homeright #richnavy #accentwall

    Everything just seems to pop beautifully off the navy.

    Rich Navy Accent Wall via RainonaTinRoof.com #homeright #richnavy #accentwallThe Rich Navy is also a perfect contrast to the Repose Gray in the rest of the main living area.

    Rich Navy Accent Wall via RainonaTinRoof.com #homeright #richnavy #accentwallThe moral of this story is don’t over-analyze. Seriously, y’all. Save yourself time. Sometimes the easiest and most dramatic look can be achieved with one color and one fabulous tool. My accent wall is the perfect example.

    If you liked this accent wall, you may like my Leopard Print Accent Wall as well.

    Need more accent wall ideas? I’m your girl – here are a slew of different ideas for painting your walls in all sorts of gorgeous colors and patterns!

    You know you don’t wanna miss any of this crazy.

    Sign up to get my posts delivered to your inbox here. 

    Stalk Me Here:

    Pinterest / Facebook / Twitter / Instagram

    SaveSave