When we set out to makeover Bill’s Room / The Guest Room / My Office, we really needed to relocate my desk so it wasn’t a focus in the room. Our best option was to move the desk to the small wall opposite the bed. However, it was relatively tight there. We needed to get that footboard out of the way to open up the space. In order to do that, we needed to figure out how to add feet to the box spring so we could eliminate the bed rails, and thus the footboard.
We figured out how to do it – and y’all I’m so mad I didn’t do it sooner because it was so easy and made a huge difference in the space.
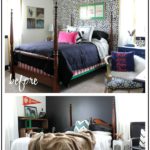
Here’s the room before:

You can see how the desk is to the right of the room – it was the first thing you saw when you went in the room.
And here’s the space now:

Huge difference and on top of freeing up space, it lowered the overall height of the bed which allows you to see more of the gorgeous wood headboard against the black wall – not that black and woodgrain is a favorite combination of mine or anything. 😉
How to Add Feet to a Box Spring
Affiliate links may be contained in this post.
Materials & Tools Needed:
- Six Table Legs – we used these, but you can use any style or height (although I wouldn’t go for those 12″ long legs because it would be too high and probably unstable because it’s so high).
- Six Furniture Leg Attachment Plates
- 4″ x 4″ Wood Pieces (This is for added support under the box spring.)
- Drill
- Saw (to cut the 4″ x 4″ – you can use a circular saw or miter saw.)
Step 1:
If you want to stain or paint your table legs, do so now and let them dry. We stained ours.
Flip the box spring on its side against a wall. Attach a furniture leg attachment plate with your drill in each corner of the box spring and one in the center of each long side of the box spring.

You can see from the photo above that I was only able to get three screws in each plate as there was nothing for the 4th screw to grab onto. That’s fine – it hasn’t effected the strength of our bed legs at all.
Step 2:
Screw a table leg into each attachment plate.

Step 3:
Flip your box spring back over and place it wherever it will be in your room. You need to add a little extra support to your box spring / bed by cutting some 4″ x 4″ pieces that will go in the middle of the box spring under it. To do this, measure the distance from your floor to the wood frame of the box spring underneath. Its probably going to be close to whatever size legs you used. Cut six pieces of 4″ x 4″ to this length. If you have a king or queen sized bed, you would need to cut more. A twin size bed may require less.
While your box spring is in place where you want it in the room, have someone slightly hold it up as you place the 4″ x 4″ pieces under the box spring in the locations shown below. It’s next to impossible to get a picture of this in action, so I hope you can understand what I’m saying to do with the picture below. The X’s mark where your 4″ x 4″ pieces should go under your box spring. Just reach under the box spring and place them there while someone is holding the box spring up. You don’t need to attach them to the frame or anything, as long as they are placed under the wood supports in the box spring.
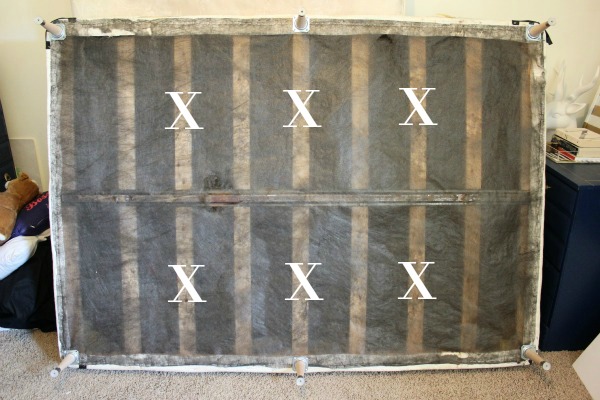
Make sense? If not, let me know and I’ll try to explain it more. Basically, those X’s are where your 4″ x 4″ pieces should be under the box spring.
After your 4″ x 4″ pieces are in place, place your mattress on top of the box spring and dress the bed.

You can see a bit of the leg in the photo above – the furry rug likes to be the center of attention instead of letting the bed legs be seen. 😉
If you wanted to, you could even nix the headboard as well. This is a great solution if you don’t want to buy one of those metal bed frames – especially if you don’t want to do a bed skirt that would cover the ugly metal frame.


You might wanna see this too…

Masculine Bedroom Makeover

How to Use a Drill

How to Use a Miter Saw

You know you don’t wanna miss any of this crazy.
Sign up to get my posts delivered to your inbox here.
Stalk Me Here:
Bloglovin / Pinterest / Facebook / Twitter / Google+ / Instagram
Kellie Smith says
Smart! It looks more up to date now. I love it!
Jenna @ Rain on a Tin Roof says
Thanks, Kellie! it was an easy fix!
Ann C says
I love the bed without the footboard. I’m not a fan of footboards. (Stub toes too often, plus scratch hands when tucking bedding in end.) if this is a queen size bed you could have just fastened another leg in the middle of the box springs, that is how the ugly metal frames are made. Just thought I’d share that fact. Did you attach the headboard to the box springs or just push the bed up against it, or attach it to the wall?
Jenna @ Rain on a Tin Roof says
Great idea for queen beds, Ann! Thanks! Right now, the headboard is just pushed up against the wall by the mattress. We were going to attach it to the wall, but since we are moving at some point, we figured we would just wait and attach it at the new house.
Pam S says
This is nothing short of genius! Nothing uglier than those metal (Hollywood) frames…this would cure that 🙂 Again….good job!!
Jenna @ Rain on a Tin Roof says
Those are so ugly, Pam – totally agree!! Thanks!
Susan the Farm Quilter says
Super smart idea!! I love the way the room looks so much bigger now!
Jenna @ Rain on a Tin Roof says
Thanks, Susan! Me too – I love the little bit of added space!
Joyce De Vere says
Jenna I just have got to complain!!!!!!!!! I am VERY UPSET!!!! You told about the HomeRight finish max sprayer, in one of your posts a while back. I have been on Wal-Mart .com and they are “not in stock” Do you know why??? Because some people are buying them up and putting them on e-bay and Amazon and asking $20 to $30 dollars more than Wal-Mart does!!!!! Just what is a woman to do about such a thing???? I’m sorry to complain to you but you do answer me back because you are my kind of people and YOU care!!! Any suggestions??? Thanks for reading my complaint !!!
Joyce De Vere
Jenna @ Rain on a Tin Roof says
Wow, Joyce. This is CRAZY! I had no idea this was happening. Are they significantly cheaper on Walmart.com? They are available on the HomeRight site and Amazon as well.
Julie says
So glad to see this. I’ve been wondering whst to do with my guest room bed. Head/footboard were too big for the room
Jenna @ Rain on a Tin Roof says
Glad it was helpful, Julie!
mary ballerin says
Hi Jenna – I love the furniture legs and hate metal bed frames. I want to change my decor, sell my dark brown leather sleigh bed and go with a neutral upholstered or white metal headboard that I already own. Have you seen these on Amazon, and would you please share your opinion on using these vs. buying the legs and attachments? I know you’re busy with the LP, sorry to bug you. http://www.amazon.com/Zinus-Adjustable-Legs-Wooden-Springs/dp/B016E8POXO/ref=sr_1_26?s=furniture&ie=UTF8&qid=1461895549&sr=1-26-spons&keywords=queen+size+bed+frame&psc=1
Jenna @ Rain on a Tin Roof says
Hey Mary! I hadn’t seen those before, but I think they would work fine!
Amelia says
Great! How did u attach the headboard!?
Jenna says
So this headboard just stood up on it’s own, so I didn’t worry with attaching it. However, you could use corner braces to attach the box spring and headboard together.
Amelia says
Awesome, Im going to give this a try! 🙂 Thanks for the tips!
Michele says
Hey. I know has being a long time since your post, but I just found it because I’m trying do add legs in my box springs, and I didn’t understand the support of the box spring (the X part). Can you explain? Thank you 🙏🏻
Jennifer says
I don’t understand the X part either for under the box spring. Did you get a response. I too just found this and loving this site.
Nancy says
You connect the legs on the corners of the box spring. Cut pieces of 4×4 to match the height of the legs. Then you will place the 4×4 pieces under the box spring WITHOUT ATTACHING THEM. They are simply standing on the floor under the box spring where the Xs are.
Kaththee1 says
It certainly freed up space but I liked the room better in the before. The colors were better balanced for one thing. Even though the bed was bigger before it actually appeared to be smaller because one could see under I and the large expanses were broken up with different colors and patterns. Still I imagine it serves your needs more now and that is more important.
Nancy says
You connect the legs on the corners of the box spring. Cut pieces of 4×4 to match the height of the legs. Then you will place the 4×4 pieces under the box spring WITHOUT ATTACHING THEM. They are simply standing on the floor under the box spring where the Xs are.