Tag: bedroom

  • The Circus’ Bed Refresh

    The Circus’ Bed Refresh

    The kid has good taste.

    Last year, when I gave our master bedroom a refresh, the Circus fell in love with our new bedding. She absolutely loved how soft and cozy it was. Anytime she could, she curled up in our bed to watch T.V.

    Needless to say, when we started chatting about her room makeover, she asked for bedding like mine.

    And while she didn’t get the same design and color as my bedding, it did come from the same place and she loves it just as much as mine – and probably more since it’s all hers!

    Disclosure: Crane and Canopy provided the bedding for this space. However, all opinions are 100% mine. https://spas.gau.ac.ke/

    We wanted something that wouldn’t compete with her new confetti wall, but would also make a statement itself – the Berry Damask Patterned Bedding from Crane and Canopy fit the bill perfectly!

    The berry color coordinated well with the purple color in her confetti wall as well as other splashes of purple throughout her room. It also worked with the pink color on her other three bedroom walls too.

    The duvet cover is perfect for kiddos because it comes right off the comforter for easy washes. It has interior corner ties as well though to keep the comforter in place while it’s in use – no more comforter going to the bottom of the duvet cover! ht tps://ovodewa13.com/slots

    I think the tiger approves as well, but I’m not sure if he’s cool with the party hat yet. Isn’t that little confetti pillow the sweetest? One of the vendors at my store made it for the Circus when she found out she was doing a confetti wall in her room. It’s the perfect way for bringing the confetti wall and bedding together!

    This print also comes in other beautiful colors – a gorgeous yellow and a beautiful cobalt blue. https://ovodewa6.org/

    There are more bloggers who I’ve teamed up with to do a bedroom refresh today as well….

    Camila from Effortless Style

    Kate from Kate Decorates

    Ashley from At Home with Ashley

    Chelsea from Two Twenty One

    Carmel from Our Fifth House

    Tiffany from My Eclectic Nest

    Tasha from Kaleidoscope Living

    Yuni from Love Your Abode

    Katrina from Katrina Blair

    Be sure to visit everyone for more bedroom decorating ideas!

  • National Sleep Day Bedroom Refresh Blog Hop

    National Sleep Day Bedroom Refresh Blog Hop

    Did you know today is National Sleep Day? I didn’t know there was such a thing until my friend Camila said, “Hey, wanna do a sleep day blog hop?” Yes, girl! And so here we are. Fourteen of us are sharing our bedrooms all refreshed for spring and ready for national sleep day – in hopes we’ll actually get some extra sleep today. 😉

    I knew the pink couldn’t stay forever.

    Let’s be honest, there aren’t a whole lot of guys out there who would prefer a bedroom with pink painted walls. Heck, there aren’t many guys out there who would let their wives even think about painting their bedroom walls pink.

    I however, have that husband. The husband that just goes with whatever you say. You say you’re painting the bedroom walls pink? He says ok. You’re putting carpet on walls? He says alrighty then. Creating an indoor lattice wall? Go for it.

    I’m pretty damn lucky folks. I really hope you’re that damn lucky too.

    All that being said, I did know the pink walls in my master bedroom wouldn’t stay forever. I knew Grunt wasn’t crazy about it, but it was just something I guess I needed to do to prove to myself I could paint a wall pink and make it work. When the opportunity to join this bedroom blog hop for National Sleep Day presented itself, I knew it was a good time to freshen up the bedroom and paint over the pink.

    Thanks to Crane and Canopy for providing product for this bedroom refresh. All opinions are 100% mine.

    This post contains affiliate links for your shopping convenience. Click here to read my full disclosure policy.

    Blue Bedroom with Orange Bedding, Green and Black and White Accents

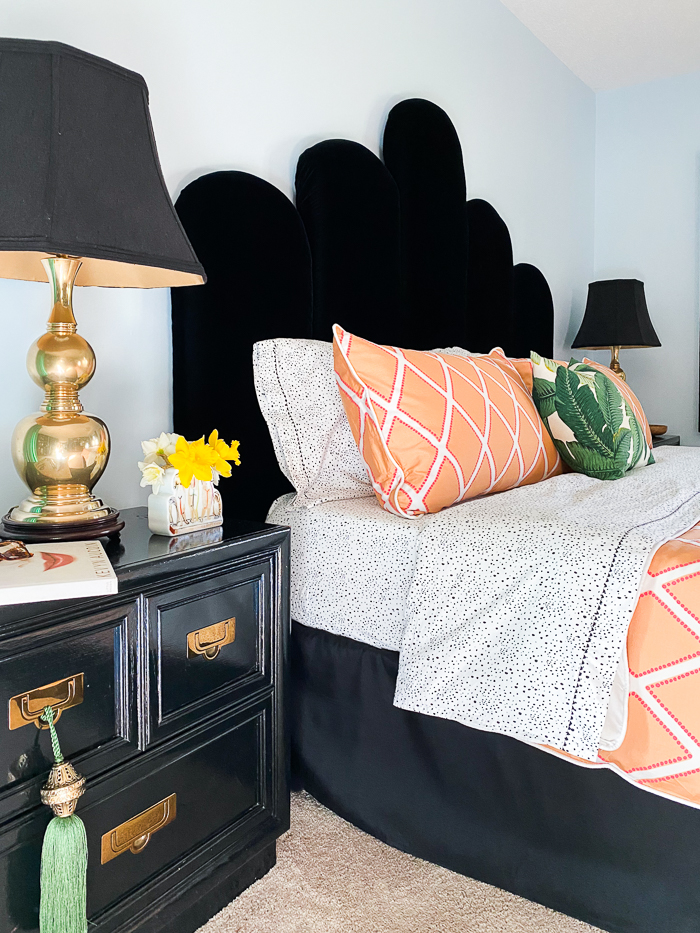
    Citrus Diamond Bedding / Black and White Dot Sheets / Black Bedskirt / DIY Black Velvet Headboard / Palm Pillow Cover / Green Curtains / Chandelier

    And so now we have blue walls and citrus bedding!

    Ok, the citrus may not be all that masculine, but it’s balanced out by the blue walls, green curtains and black accents, no? Just say yes, folks. Just. Say. Yes.

    The only things I changed in here were the paint, bedding and lampshades.

    Orange bedding with black and white sheets.

    Citrus Diamond Bedding / Black and White Dot Sheets / Palm Pillow Cover

    I chose the bedding first; it’s The Avery Citrus from Crane and Canopy. To be honest, I’m not usually much of an orange person. But I was looking for bedding that would still work well with my black velvet headboard and when I came across this set, I was like, ‘hmmm…what if…’ and then I showed it to Grunt and much to my surprise, he was like ‘ok, I can do this.’

    It’s a duvet cover, so it can easily be taken right off and tossed in the wash. I love the bright pop of color it brings to the room and the classic diamond pattern will quickly date.

    I got in on a little more pattern play with the black and white dotted sheets. Grunt did doubt me on these at first, but once we tried them against the other two solid options, he was sold on the dots.

    Citrus diamond bedding with black and white accents.

    I switched out the bedskirt as well. I opted for a black one to go better with the headboard and to also contrast and keep the bedding popping over the whole bed. For less than $9, the bedskirt packed some bang for my buck.

    Same nightstands as before – I love these and have no plans of quitting them anytime soon. I just embellished one the drawers with a green tassel that pulls a bit of that green from the drapes over into this space.

    Bedroom with blue walls, orange bedding, black, white and green accents.

    Citrus Diamond Bedding / Black and White Dot Sheets / Black Bedskirt / DIY Black Velvet Headboard / Palm Pillow Cover / Green Curtains

    We’ve had the lamps for a couple of years now. They were Grunt’s grandparents and I absolutely adore these lamps. They polish up beautifully. As luck would have it, I happened upon those great black shades at a thrift store last week and snagged them. I wasn’t sure if they would work better in here than the previous beige ones, but I think they do and Grunt said he likes them better as well.

    I actually had no idea what color I would paint the room until the bedding got here. I was holding paint chips against it, the curtains and the headboard. All I knew was that I didn’t want to go gray or white on the walls. I had a wild thought to try blue and it worked! The exact color is Permafrost with 220 drops of white added to make it a touch lighter.

    The oversized palm art print still worked perfectly for this space. We made that huge diy frame for it for about $20.

    Bedroom with crystal chandelier, blue walls, black velvet headboard, orange bedding and green curtains.

    I think I actually fell in love with this light fixture all over again after painting the walls. Maybe it’s the fixture paired with the blue, but I think I love it even more than before.

    Blue bedroom with green curtains, black and white accents.

    On the wall opposite the bed, I was a bit worried as to how well the blue would butt up against the black and white diamond accent wall. However, I think it turned out great and I now have a new love for a baby blue, black and white combination. In fact, it might be a new favorite triple threat.

    Of course, it’s always best to celebrate National Sleep Day with a new pair of cozy pajamas, no?

    Orange bedding with DIY black velvet headboard.

    This Layla Pajama Sleep Set from Crane and Canopy might be the comfiest pair of pajamas I’ve ever owned. And Grunt will tell you, I own a lot of pjs. These are the absolute softest pajamas ever. You can even get them monogrammed if you want. I had a great aunt I never knew, Treva, who I’m told lived in fancy pjs by day and furs by night. They say I’m a lot like her. I think Aunt Treva would approve of these pjs. 😉

    There are more bedroom refreshes to see!

    Patricia’s Palace • Mimosa Lane • Effortless Style • The Pink Clutch • Dimples and Tangles • Designer Trapped • Oh So Lovingly • Jeweled Interiors • Our Fifth House • Kate Smith Interiors • PMQ for Two • Diana Rose Spier • Crafting Culture

    Follow me on social media for more decorating ideas!

    Facebook | Instagram | Pinterest | Twitter

  • DIY Master Closet Makeover

    DIY Master Closet Makeover

    It’s been a very busy two weeks, y’all! When I was trying to decide what space to do for the Choose Your Own Adventure Room Refresh hosted by Jeweled Interiors, one of the reasons I opted to go with my closet (besides the fact that it desperately needed a makeover) was because I thought it might be a little easier time-wise and project wise than taking on a larger room. This space still ended up being demanding on both fronts. Of course, part of that was due to me critiquing every little thing.

    This post contains affiliate links for your shopping convenience. Click here to read my full disclosure policy.

    Thanks to Hudson Valley Lighting, Minted and SEI for providing products for this makeover!

    I’m so glad we gave this closet a makeover though, y’all. It has given us a load more of functional space and it’s a true testament to how readymade plain Jane store bought products and DIY projects can come together to create a beautiful, organized and super functional space.

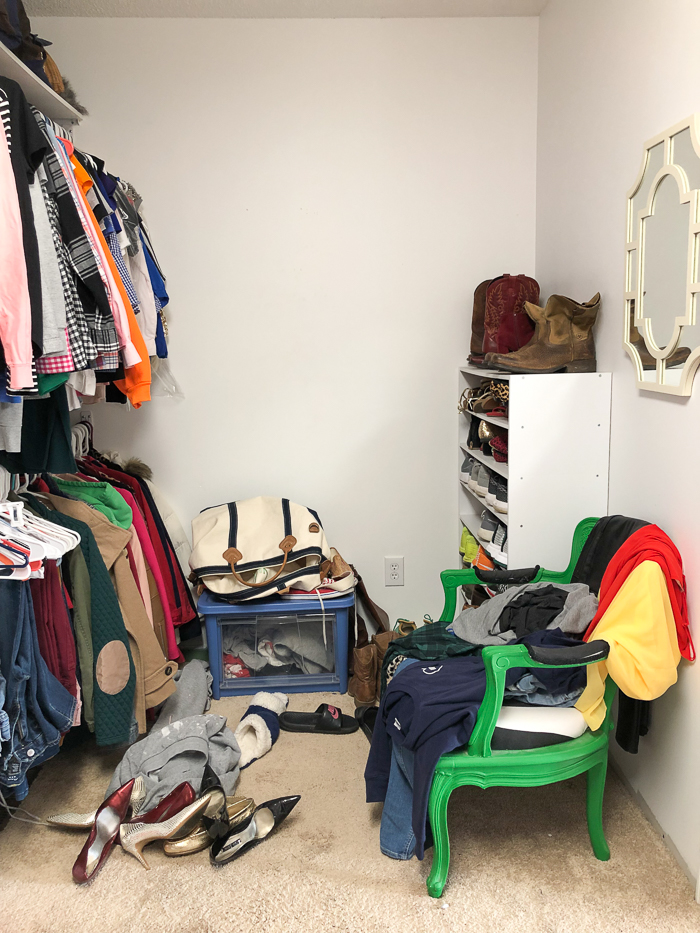
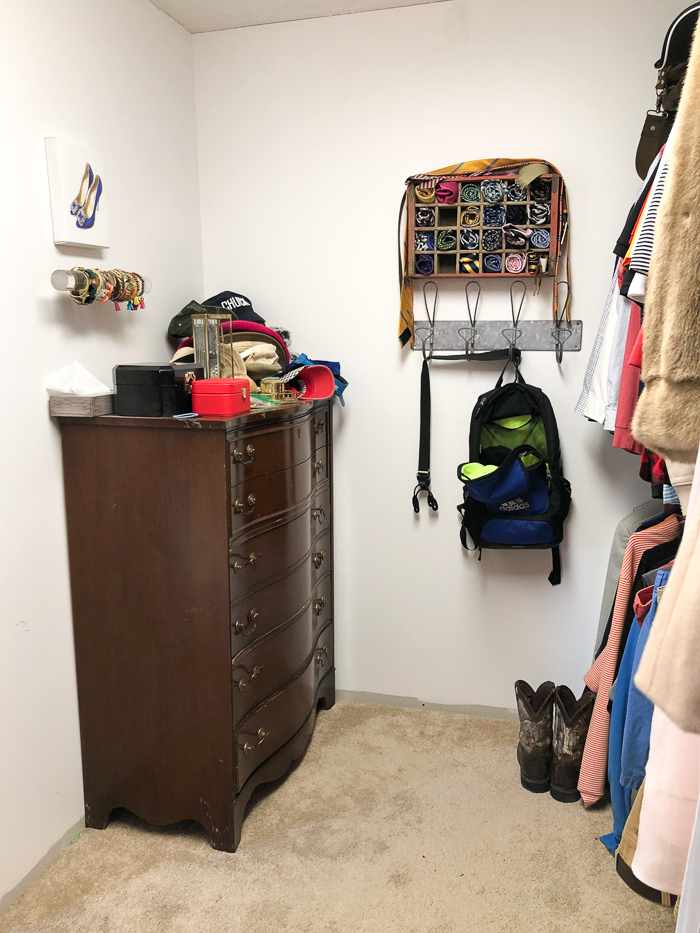
    The Master Closet Before

    DIY Master Closet Makeover
    Master Closet Before
    Master Closet Before
    Master Closet Before

    After: DIY Walk-In Master Closet Makeover

    The Closet Exterior

    DIY Master Closet Makeover

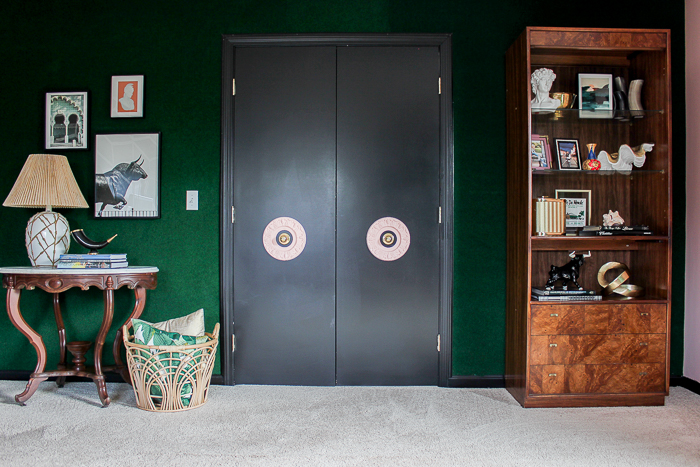
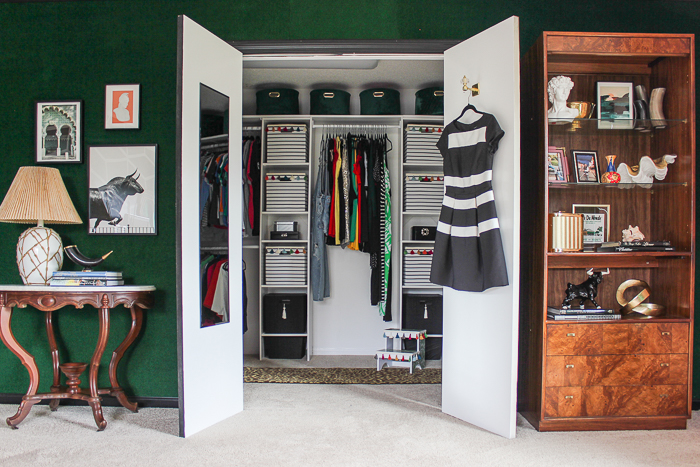
    DIY Green Carpet Wall / Closet Door Medallions

    I was already pretty pleased with the closet exterior, so I didn’t do too much here. I did a bit of sprucing up though by editing, adding art and styling.

    DIY Walk in Closet on a Budget

    I’m still a big fan of the color and texture the carpet wall adds to the space and how this table and details like the closet door medallions, the lamp, rattan basket and other items give it a “traveled and collected” feel.

    Master Closet Makeover

    Toro Art / Rome or Bust Art / Fonte Mourisca Art

    I wanted to add in more of that traveled feel and color with some art though. I went with Toro, Fonte Mourisca and Rome or Bust from Minted. Minted offers custom framing with all their art prints and you can choose from a wide variety of frame styles and sizes. I wanted the art to stand out and needed to keep the frames neutral since they were going on a very bold wall, so I opted for thin black metal frames. This way, they will also work with just about any other decor style if we ever change it up.

    Walk In Closet on a Budget

    Toro Art

    I got Toro in a larger size since he was a good neutral and he also adds some masculinity to the rest of our bedroom, which sports pink walls. He was also approved by Grunt, so brownie points there.

    Budget Master Closet Makeover

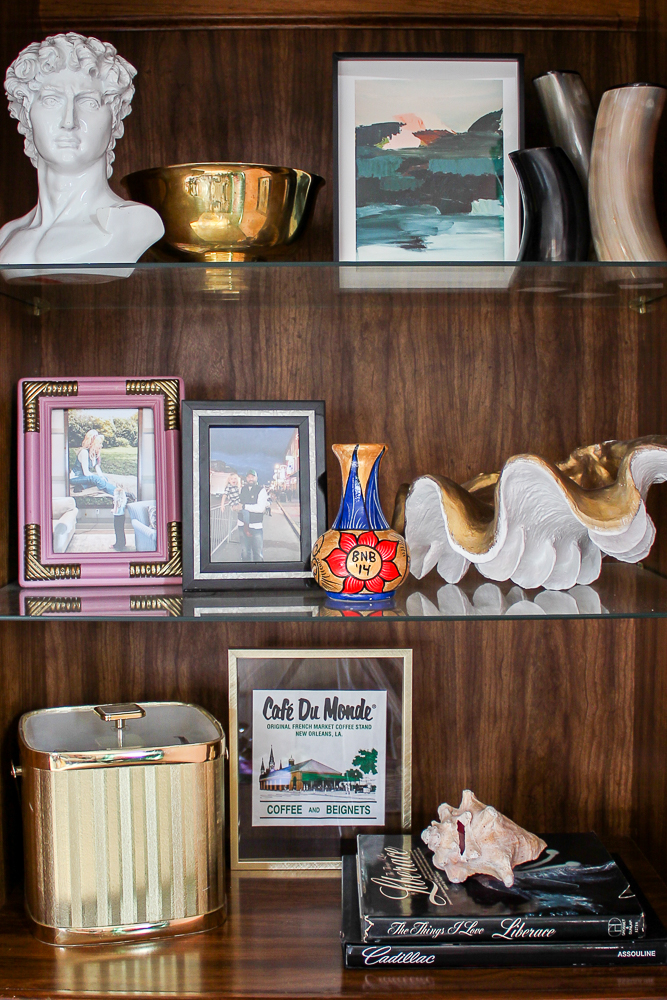
    The bookshelf on the other side of the closet doors desperately needed some styling help. I had scored the bookshelf for $10 at a thrift store a while back, but had never really worked to make it “pretty”. I kept the travel vibe going here as well.

    Master Closet Makeover

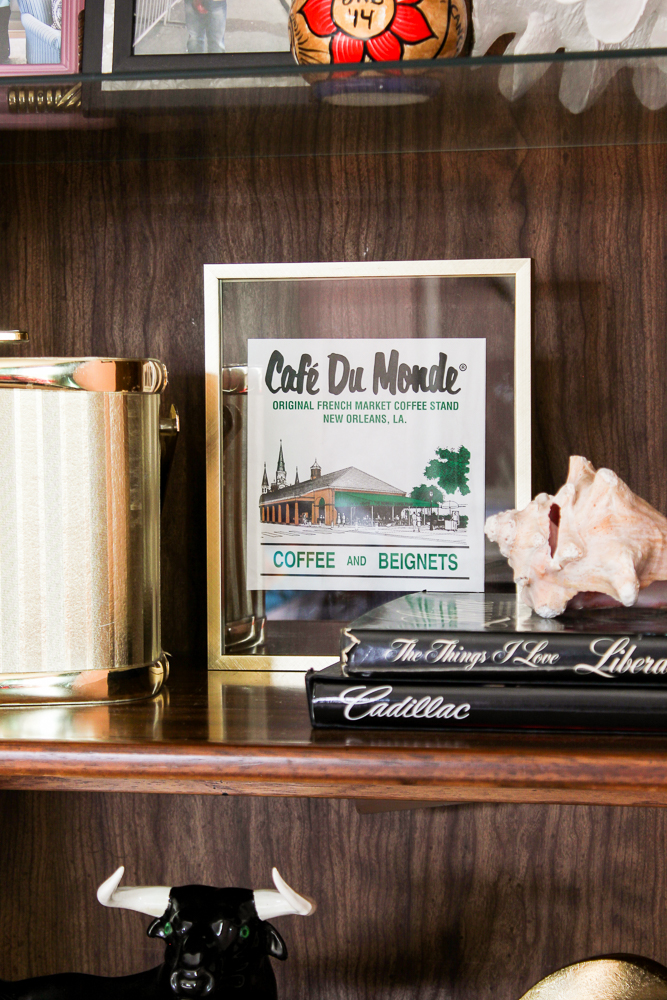
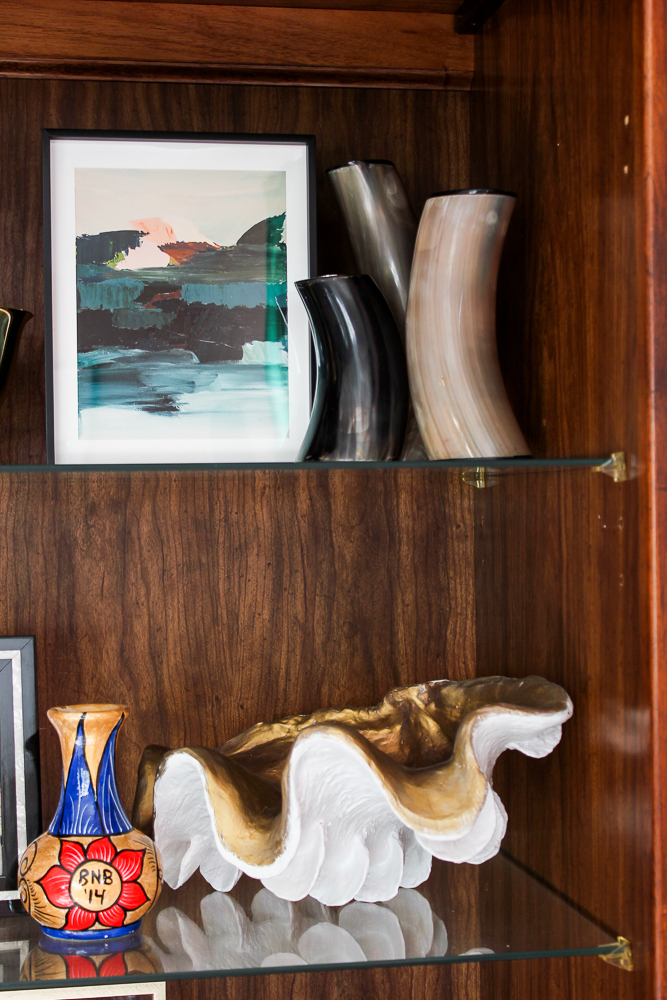
    These shelves hold lots of mementos from our trips – a seashell Grunt found on the beach the day we got married, a nod to my favorite city, pictures from our trips, a vase we made during our Booze No Baby trip 😉 and more.

    DIY Master Closet Makeover

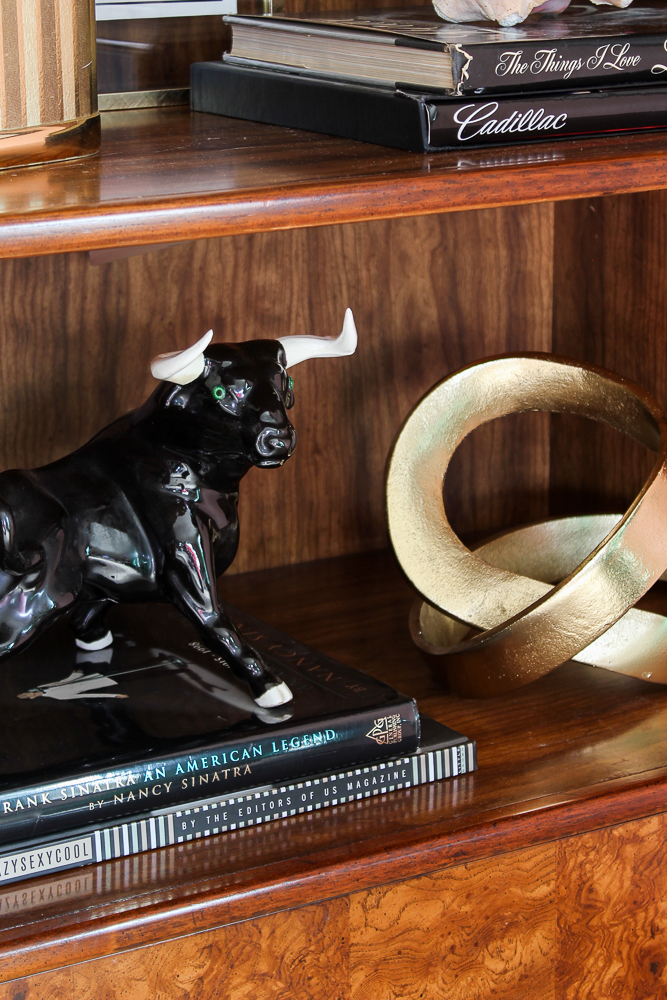
    I found this guy at a thrift store and he fit perfectly in here too – guess we also have a bull theme going. ?

    Master Closet Ideas

    I added in another art piece from Minted here as well called Curaco. It pulls in a lot of colors from the space and of course continues the traveled feel.

    The Closet Interior

    Here’s where we really put in some work…

    DIY Master Closet Makeover

    And yes, one closet door edge is black and one is white. Of course, it’s by design. 😉

    DIY Walk In Closet on a Budget

    Leopard Print Rug / Closet System / Black and White Bins / Black Bins / Velvet Coat Hangers

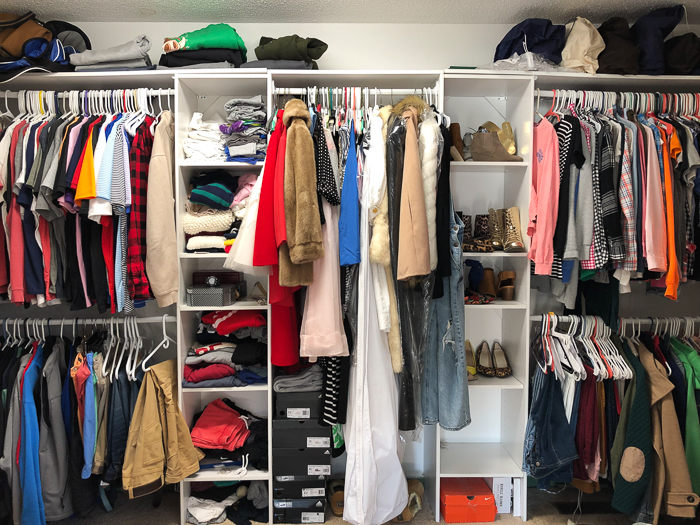
    This is just your basic closet system we bought at Home Depot when we moved in about three years ago. It’s nothing fancy, but I feel like we were able to make it fancy (and functional at the same time!) by partnering it with pretty storage bins.

    That leopard print rug helps out a little too, doesn’t it? Can you believe that bad boy was only $15?!

    Master Walk In Closet Budget Ideas

    The top of our closet system wasn’t really all that functional before. You couldn’t tell, but the shelves didn’t go all the way to the back of the wall. There was a pretty good sized gap between the back wall and the shelf’s back edge. And they also bowed in the middle. We were just so tired of renovating when we finally moved in, we just used a lot of what we had and called it a day. Grunt switched all those out this time around though and they are much more functional now. The green bins hold handbags, seasonal items, work clothes, etc. – things that you don’t need on an everyday basis. That cute little step stool makes it easy for us folks with short girl problems to get to the top shelf. 😉

    Master Closet Ideas

    Isn’t it darling? It was a super fun and really easy little makeover I did with a stool I found on clearance at Home Goods – tutorial for it is here!

    Walk In Closet Ideas

    Black and White Bins / Tassel Trim on Bins / Black Bins / Black Velvet Coathangers

    I did do the one thing I had said I wouldn’t do – switch out my coat hangers. I am so glad I did though, y’all. These take up less space and they truly do keep those slippy sliding tops on the hangers. Switching out the coat hangers also made me realize how many pieces of clothing I had! I did some serious editing!

    Putting the bins in were a game changer for this space. Doing this allowed us to move all the things that were in the chest of drawers in the closet and move that big piece of furniture out that was taking up one corner of the closet.

    Walk In Closet Budget Ideas

    I dressed up the black and white striped bins with this colorful tassel trim. I just used fabric tape to apply it – easy peasy. The black bins got a simple white tassel. Tassels for everything up in here!

    The right side of the closet is my most favorite part about this whole space…

    DIY Walk In Closet Makeover

    Sconces / Zebra Art / Mirror / Stool

    This is one of the times when what I envisioned in my head actually turned out better in reality.

    Walk In Closet Makeover on a Budget

    Sconces / Mirror / Stool

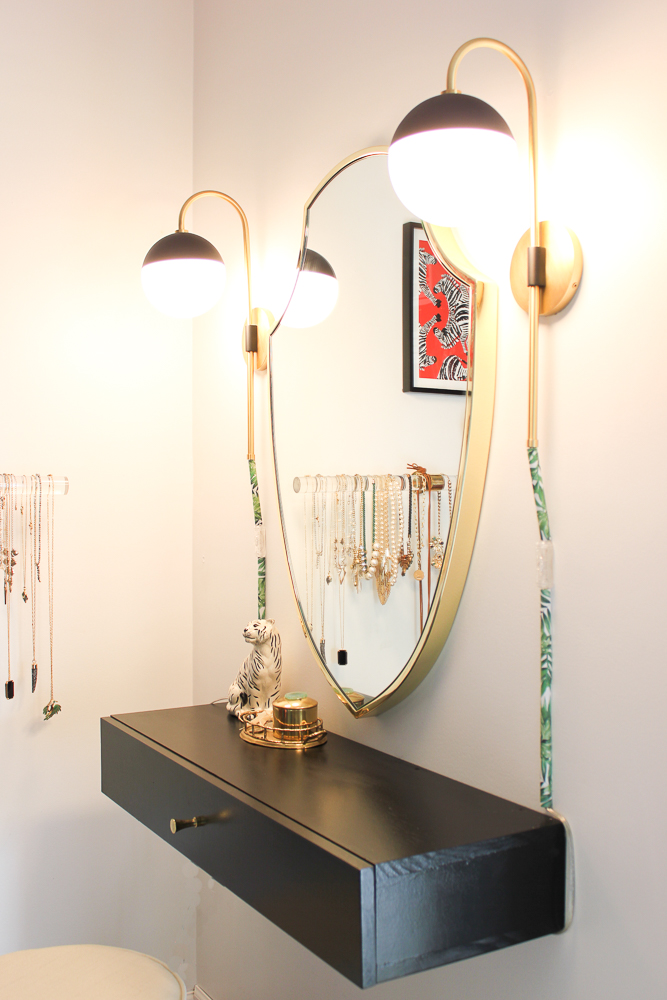
    If you read my first post about the plans for this space, I told you that I actually do my makeup in here because surprisingly it has the best lighting in our house for that. Previously though, I would be sitting in the floor in front of the mirror on the back of the closet door putting my makeup on. Not anymore though! Now I’m sitting getting pretty at this dressing table.

    This wall mounted table was a really easy build (tutorial for it is HERE!) and the front even drops down to reveal storage inside. The Circus had a ball organizing all my makeup into the containers, although she was upset I wasn’t ready to let go of more and give it to her.

    Both the gorgeous stool and mirror are from Southern Enterprises. You can find the stool at Home Depot and the mirror at Overstock.

    Walk in Closet Makeover Ideas

    Sconce / Mirror

    I was going for a bit of a Studio 54 vibe in this area of the closet. Y’all know I’m enthralled with all that. The stool, mirror and sconces all help to create that and when I’m getting gussied up now, I can easily channel my inner Jerry Hall or Divine – depending on what the day calls for of course.

    DIY Master Closet Makeover

    When the sconces are lit up, I can really feel the disco vibe coming on. 🙂 They are from the Mitzi collection at Hudson Valley lighting and I love everything about them. They are plug-in, so no hard wiring required. I didn’t want the cords just flopping along the wall though so I customized some cord channels to keep them in place while adding a little color at the same time.

    Walk In Closet Ideas

    Zebra Art / Brass Brackets / Single Clip Hangers / Stool

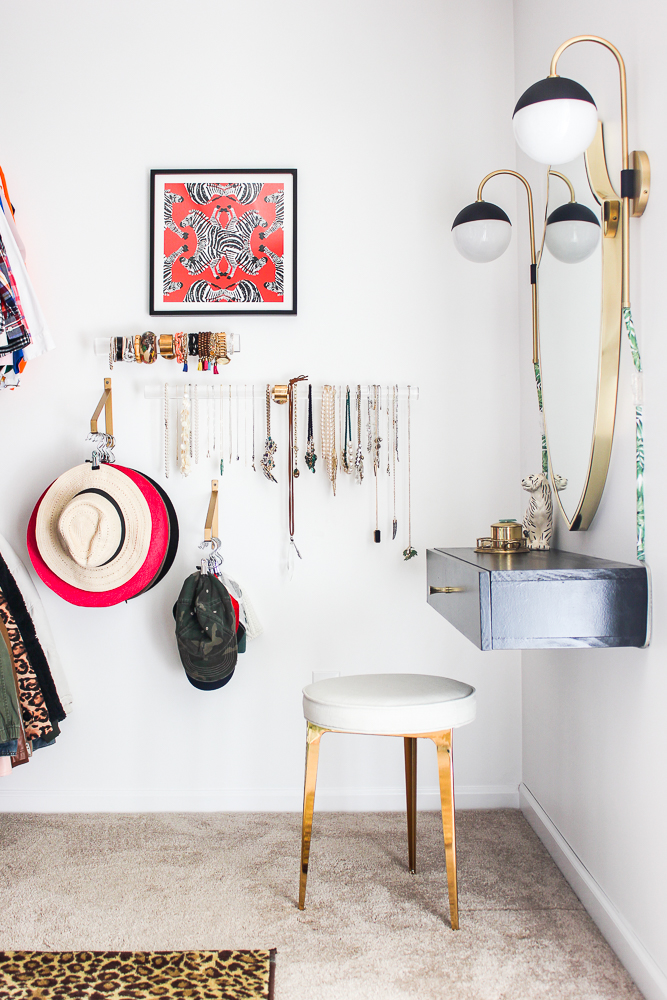
    My jewelry and hats had previously been on top of the chest of drawers. Since we moved that out, I had to come up with new storage solutions for both.

    For the bracelet and necklace storage, I used acrylic rods anchored on brass posts that were leftovers from my curtain rods and stair rail.

    For my hats, I took these brass brackets, installed them upside down, then hung the hats from these single clip hangers onto the brackets.

    I love both the jewelry and hat storage solutions because now I can see everything that I have right in front of me – no digging for what I’m looking for! To top it off, I added in this Zebra art above it all. I’ve been eyeing that art for years and finally decided this was the space to put it.

    DIY Walk in Closet Ideas

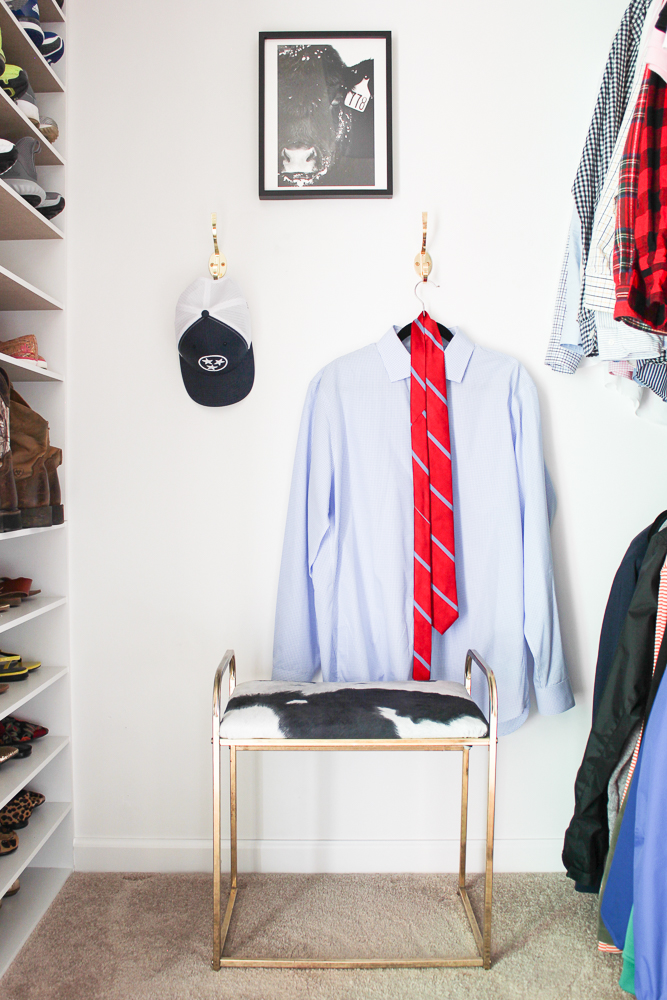
    Stackable Shoe Shelves / Brass Hooks

    Opposite “my” side of the closet is our area for shoe storage and Grunt’s nook. He gets a nook, I get a side. Seems fair, right?

    As I told you in the progress post, I had a grand idea for elaborate shoe shelves in this area and as it turns out, DIY wasn’t the way to go there. We ended up buying readymade shoe shelves and stacking them on top of one another. They actually ended up giving us more shoe storage than we would have had with my not so brilliant idea and it was much easier as well. Sometimes, it is just easier and more effective to not DIY!

    Walk In Closet Ideas

    Not Just a Number Art / Brass Wall Hooks

    Halfway through this makeover Grunt asked for a bench or stool of his own to sit down and put on his shoes. I told him sure, but don’t count on it before this whole thing is done. Mama had a list a mile long to get through! On Sunday, he mentioned the stool again. I went and got this one I had bought at a thrift store a couple years back and handed it to him. I told him I thought I had some leftover cowhide print fabric in my closet. He took it upon himself to find the fabric and reupholster the seat himself. I don’t know if I’ve ever been more proud of him in my life. haha! He had already picked out the Not Just a Number art from Minted, so it fit perfectly over the stool. I bought quite a few of the brass wall hooks to add in throughout the closet as needed. These work perfectly in his space to hang his clothes for the next day and other odds and ends.

    That’s it for me! What do you think of the new space?

    A big thank you to Hudson Valley who supplied the lighting for the Choose Your Own Adventure Refresh and Minted who supplied the art.

    A special thanks also to SEI who provided me with the mirror and stool for this space.

    Be sure to see what everyone else did during the Choose Your Own Adventure Refresh…


    Jeweled Interiors | Haneen’s Haven | Dimples and Tangles | PMQ for Two | House Homemade | Pencil Shavings | Our Fifth House | Kaleidoscope Living | The Pink Clutch | At Charlotte’s House | Effortless Style Blog

    Join the Freak Show on Social Media:

    Facebook | Instagram | Pinterest | Twitter

  • Seeing Red. The Circus’ Farmhouse Bedroom Plans

    Seeing Red. The Circus’ Farmhouse Bedroom Plans

    I didn’t want to be that mom.

    That mom who never let her kid have the kind of room they wanted.

    That mom who didn’t give her kid any creative freedom when it came to decorating their room.

    I really really didn’t want to be that mom.

    This is where not being that mom got me…

    The Bedroom Now

    A bright red room I’m not quite sure what in the hell to do with.

    The Circus insisted on having a red room at the farm. Absolutely could not be swayed any other way, folks.

    So I will say that the 1st photo above was taken in very bad lighting, so that picture might be making it seem a little worse than it actually is. And nothing is really on the walls yet. And everything else is just thrown into the room haphazardly.

    But still.

    It’s a whole lot of red. And I love red. It’s one of my favorite colors. But this red, y’all. I just don’t know.

    I’m trying though. I’m putting forth an effort to make this red work because this little girl loves this red. So here’s what I’ve come up with…

    Disclosure: Affiliate links may be included in this post. Minted provided me with the art for this room. All opinions are 100% mine.

    Colorful Boho Cowgirl Girls Bedroom Design

    Chandelier / Horse Art / Lucky Girl Art / Bedding / Curtains / Blue Paint / Purple Paint / Coral Paint

    I’m calling it a Colorful Boho Cowgirl Bedroom. I need something that sounds halfway legit to keep me going here, folks. 

    My general thought is that I need to make that red paint the backdrop, instead of the focal point, much like I do with the black walls in the living room and dining room at The 70’s Landing Pad. In this case, I figure the way to do that is to add in other colors that work with the red, some white and eye catching patterns.

    Colorful Boho Cowgirl Girls Bedroom Design: Colors and Textiles

    Light Blue Color / Purple Color / Coral Color / Bedding

    I found this colorful floral bedding from Target and the red that’s on the walls seems to go well with the red in the bedding. Since the bedding also has so many other colors, I figure I can pull multiple other colors from it as accents throughout the room that will also work well with the red. I matched up Velvet Finishes colors to some of the colors in the bedding, so I think I’m going for using the Boheme (light blue), Stately (purple) and Exotic (coral) as those accent colors. I’ve got to paint her toy chest and bookshelf in this space, plus a few other odds and ends, so hopefully those colors will work with some of those things. I’m actually thinking that what I might do is create a plaid sort of pattern with those three colors plus white on her toy chest. We’ll see….

    Colorful Boho Cowgirl Girls Bedroom Design: Textiles

    Bedding / Tassel Trim Curtains

    I had already let her pick out curtains for her windows and she chose these tassel trimmed ones from Target and they go perfectly with the bedding so there’s one win at least.

    Colorful Boho Cowgirl Girls Bedroom Design: Art

    Lucky Girl / Desolate

    We’ve already got our art for the space too – she chose Desolate and I chose Lucky Girl for her room. Both came from Minted, so we were able to customize the size and frames. We got both frames in the rustic-y indigo color you see around the horse print above. The horse print is large, so it will definitely help with taking some of the attention away from the red too.

    Colorful Boho Cowgirl Girls Bedroom Design: DIY Tassel Fringe Lighting

    Tasseled Chandelier

    This isn’t the actual light fixture I’m going with, but….wait for it….I’m going to attempt to DIY a similar version of this one. Yes, I’m crazy, and no, don’t hold your breath on this one. It may not work at all, but I’ve got a plan, so I’m going to give it a whirl. This one is beautiful, but out of our budget, and I’d prefer it be a little more playful for the Circus’ room anyway.

    So what do you think? Have you ever pulled off a red room before? Any ideas or tips you want to share? I am all ears!

  • How to Create an Object and Text Feature Wall

    How to Create an Object and Text Feature Wall

    Man, this wall has been nearly a year in the making. When I found out we were moving and started plotting out the Circus’ room, I knew this wall was a must. I really wanted a way to convey the Circus’ unique personality and I think this object and text feature wall was the perfect way to do it.

    How to Create an Object and Text Feature Wall | Perfect for a kid's room and totally customizable! Great way to add a kid's unique personality to their room!

    You may have seen a wall similar to this in a Kate Spade store. I’m not sure if every store has them, but I know the one that I have been in does have one and it’s what inspired this wall. Of course, the Kate Spade version doesn’t mention yard sales or tutus, but that’s their loss. 😉

    How to Create an Object and Text Feature Wall

    Tools & Supplies

    • Custom Wall Decal (I got mine from Wall Quotes – I’m going to show you how I made it. Disclosure: They gave me my decal to use in this post, but I had planned on buying one anyway.)
    • Objects (to add into the wall and take the place of some words)
    • Paint and FrogTape (if you want to change the color of your wall where the decal will go)
    • Command Strips and Command Hooks to hang the objects

    Steps

    Step 1. 

    The first thing you’ll want to do is come up with your text. If you’re doing it for a person, make a list of things they really love or that describe them and then work those into sentences. After you’ve done this, go back through and make note of words that you could actually replace with objects. We did this with the words horse, tutu, cowboy boots, money, yard sale and umbrella.

    Step 2. 

    Now you’re ready to make your decal. I made my decal through the Design Your Own feature at Wall Quotes. The design center walks you through all the steps, but I also made a video to show you specifically how I made mine.
    [adthrive-in-post-video-player video-id=”rejB6yTP” upload-date=”Fri Sep 16 2016 18:40:58 GMT+0000 (Coordinated Universal Time)” name=”Rain on a Tin Roof – How to Create a Text Feature Wall” description=”Create a text feature wall that perfectly describes your child with a touch of whimsy!”]

    When you make your decal in the design center, I think the biggest thing is making sure you have the dimensions of the wall area set correctly. The spaces in the sentences didn’t really matter that much while making the decal because I had to cut some sentences into two pieces to make room for the objects anyway. Also, make sure to take into account your wall color. I knew I was painting this section of the wall white, thus why I set it to white when making the decal.

    Next, try to wait patiently for your decal to arrive! 😉

    Step 3. 

    If you’re planning to paint the area of the wall where the decal is going, go ahead and do so. I didn’t realize that the wall needed to be painted at least three weeks prior to the decal going on until I got my decal, so that slowed my project up a bit. I just rolled some bright white paint (Bit of Sugar), onto the wall.

    Step 4. 

    When your decal arrives, pull it out of the box and unroll it.

    How to Create an Object and Text Feature Wall | Get a custom made wall decal.

    When I unrolled mine, I realized I was definitely going to have to cut the sentences into strips for it to feel the space I wanted it to on the wall.

    How to Create an Object and Text Feature Wall | Get a custom made wall decal.

    That wasn’t a big deal at all – it didn’t affect the text in any way.

    Tape your strips onto the wall and move them around until you get them where you want them.

    How to Create an Object and Text Feature Wall | Place decals on wall.

    Once I got the strips where I wanted them, I tested out the objects in their spaces and ended up cutting most of the sentences where the objects would go so I would have room for the actual object.

    Step 5. 

    Once you have all the strips in place where you want them, it’s time to start actually applying the decal to the wall. Instructions and an application tool are included with Wall Quotes decals. It’s really simple though.

    How to Create an Object and Text Feature Wall | Place decals on wall.

    Just apply tape to the top portion of the strips (as shown in that top sentence of mine), carefully pull the backing from the strip, then smooth the top portion onto the wall. Use the application tool to fully smooth and apply the decal onto the wall, then pull  back the top portion.

    How to Create an Object and Text Feature Wall | Place decals on wall and add in objects as you go.

    Add in your objects as you go so that you can move strips if you need to.

    Step 6. 

    If you painted the area where you put the decal and objects, then use FrogTape to straighten up the edges and go back over the outside with your wall color.

    How to Create an Object and Text Feature Wall | Perfect for a kid's room and totally customizable! Great way to add a kid's unique personality to their room!

    I used Command Strips to keep the horse and boots on the wall. The tutu is held up by clothespins that are hot-glued to the wall. The dollar bills are just taped and the coins are hot-glued. The yard sale sign is taped and the umbrella is hung on Command Hooks.

    How to Create an Object and Text Feature Wall | Perfect for a kid's room and totally customizable! Great way to add a kid's unique personality to their room!

    I really love this little sneak preview you get of the wall when looking into her room.

    How to Create an Object and Text Feature Wall | Perfect for a kid's room and totally customizable! Great way to add a kid's unique personality to their room!

    The Circus can still easily get the umbrella and tutu down to play with. The cowboy boots are actually too small for her, so she’s ok with them being on the wall. She was a little upset when I went to put one of her horses on the wall, but when I pulled out the 50 other ones she had, she forgot about that one real quick.

    Only a couple more projects to go in her room!

    What do you think about the new wall?!

    You can make your own custom decal at Wall Quotes.

    You might also want to see these…

    IKEA Bookcase turned Dress-Up Closet

    Easy DIY Lemonade Stand - use this tutorial to make a simple lemonade stand for kids!

    Easy DIY Lemonade Stand

    This is such an easy build! Any beginning DIYer could complete these! Great for kid's rooms and home offices! How to Build Wall to Wall Shelves in an hour for $50

    How to Build Wall to Wall Shelving Easily

    blog-signature-summer-15

    pin-this-post-2

    Learn how to create an object and text feature wall - perfect for a kid's room and totally customizable! Great way to add unique personality to a space!

    SaveSave

  • Our DIY Hollywood Regency Headboard and New Mattress

    Our DIY Hollywood Regency Headboard and New Mattress

    So you’re ready to make your own headboard? Not just any old headboard, but one with serious style – like a Hollywood Regency headboard? You’re in the right place! This black velvet headboard will make you swoon and it’s totally DIYable.

    I have never been so stressed about a project before. Never, y’all. I swore I was not making a new headboard for the master bedroom at the 70’s Landing Pad myself. I even found some great options that were less than $300, but as I kept coming back and looking at them, they just didn’t have that “wow” factor – they didn’t make a statement.

    And we all know I prefer to make a statement in both decorating and life in general.

    So I ate my words (not for the first time) and made the king sized headboard for our bedroom.

    Black Velvet Hollywood Regency Headboard

    Our headboard wasn’t necessarily cheap, but it was significantly cheaper than if we would have purchased what I really wanted brand new. We have about $250 in the headboard, but would have easily spent $600, probably more, if I would have bought one similar to our DIY version new. This headboard is made of panels that all get screwed together in the end. The build is really pretty easy. The hardest part for me and where I stressed the most was the upholstery and that was probably because I’m such a perfectionist and wanted super smooth edges which just won’t happen when it’s not a professional upholstery job. In the end, you can’t even see the imperfections that much unless you look closely. Of course, I eyeball them constantly though because I know exactly where they are. #storyofmylife

    DIY Hollywood Regency Headboard

    This post contains affiliate links for your shopping convenience. Click here to read my full disclosure policy.

    Tools and Supplies Needed:

    *Please note that all the measurements and amounts are for a king size headboard that is approximately 85″ wide when assembled. 

    Steps

    Step 1. 

    Cut a panel of wood that is 16 3/8″ wide x 4 1/2′ long from the 4′ x 8′ sheet of plywood using a circular saw.

    DIY Retro Style Headboard
    This is an EASY DIY headboard that even beginning DIYers can make! Switch up the upholstery to your style! DIY Hollywood Regency Headboard | DIY Velvet Headboard | Black Velvet Headboard | Scalloped Headboard | Retro Headboard | Vintage Style Headboard | Palm Beach Inspired Bedroom and Headboard

    Step 2. 

    This is an EASY DIY headboard that even beginning DIYers can make! Switch up the upholstery to your style! DIY Hollywood Regency Headboard | DIY Velvet Headboard | Black Velvet Headboard | Scalloped Headboard | Retro Headboard | Vintage Style Headboard | Palm Beach Inspired Bedroom and Headboard

    Find something round that will nicely fit into the width of the plywood panel and will allow you to create a semi-circle. 

    We ended up using a footstool. You could also use a lampshade, a large bowl, basically anything round that will give you a curve. Once you find something, place it on one end of the wood panel and trace it as shown above.

    Step 3. 

    Using a jigsaw, cut along the traced line.

    This is an EASY DIY headboard that even beginning DIYers can make! Switch up the upholstery to your style! DIY Hollywood Regency Headboard | DIY Velvet Headboard | Black Velvet Headboard | Scalloped Headboard | Retro Headboard | Vintage Style Headboard | Palm Beach Inspired Bedroom and Headboard

    Step 4.

    You now have one of your headboard panels. Trace the shape of this panel onto the rest of your wood and cut out the remaining four panels.

    This is an EASY DIY headboard that even beginning DIYers can make! Switch up the upholstery to your style! DIY Hollywood Regency Headboard | DIY Velvet Headboard | Black Velvet Headboard | Scalloped Headboard | Retro Headboard | Vintage Style Headboard | Palm Beach Inspired Bedroom and Headboard

    The curve of all your panels will be the same, however, only the end panels need to be 4 1/2′ long. The remaining three panels in the middle of the headboard need to be 4′ long so that you have enough plywood.

    Step 5. 

    Roll out the Poly Foam and place your wood panels on top of it.

    This is an EASY DIY headboard that even beginning DIYers can make! Switch up the upholstery to your style! DIY Hollywood Regency Headboard | DIY Velvet Headboard | Black Velvet Headboard | Scalloped Headboard | Retro Headboard | Vintage Style Headboard | Palm Beach Inspired Bedroom and Headboard

    Trace the shape of the wood panels onto the foam with a black marker. All but two of the panels will fully fit on the foam strips. For the remaining two panels, lay them out as shown below.

    This is an EASY DIY headboard that even beginning DIYers can make! Switch up the upholstery to your style! DIY Hollywood Regency Headboard | DIY Velvet Headboard | Black Velvet Headboard | Scalloped Headboard | Retro Headboard | Vintage Style Headboard | Palm Beach Inspired Bedroom and Headboard

    Trace them and use the scrap from the remaining foam to fill in on the bottom of the panel.

    Use an electric knife to cut out the foam shapes.

    P.S. This was the first project using foam where I finally bought an electric knife to cut the foam. Every other time I used a box cutter which was the biggest pain in the you know what. Trust me, the  $14 investment for the electric knife is so worth it. I am mad at myself for not buying one sooner.

    Step 6. 

    Lay out all your wood panels with the foam on top of them, then cover each panel with two layers of batting.

    This is an EASY DIY headboard that even beginning DIYers can make! Switch up the upholstery to your style! DIY Hollywood Regency Headboard | DIY Velvet Headboard | Black Velvet Headboard | Scalloped Headboard | Retro Headboard | Vintage Style Headboard | Palm Beach Inspired Bedroom and Headboard

    Loosely staple the batting around the back edges of the panel.

    Step 7. 

    Upholster each panel with your upholstery material. I used black velvet from Hobby Lobby. For me, the toughest part was covering the panels with velvet. I found that if I first stapled the velvet to the back somewhat loose, then came back and tightened it up with a staple while smoothing it from the front, it worked best. Also, this was another case when it was so worth it to have the electric stapler. Those staples went in fast and flush.

    Step 8.

    After all the panels are upholstered, lay them face down on the floor. Move them around in the shape you want the panels to be. I opted for our panels to work it’s way up in the middle.

    This is an EASY DIY headboard that even beginning DIYers can make! Switch up the upholstery to your style! DIY Hollywood Regency Headboard | DIY Velvet Headboard | Black Velvet Headboard | Scalloped Headboard | Retro Headboard | Vintage Style Headboard | Palm Beach Inspired Bedroom and Headboard

    The two end panels are at the same height, the next two are at the same height, but higher than the two end ones and the middle panel is higher than them all. You can keep them all at the same height too if you prefer. The only thing you want to make sure of is that the bottom of the middle panel doesn’t go higher than your mattress.

    After you have the panels in position, attach the two 1″ x 2″ x 8′ furring strips across the back as shown below. You will have to cut them down some. This part is best done with two people. While one is attaching the furring strips, the other should be pushing the panels together tightly.

    Step 9.

    Once you’re done attaching the furring strips, you’re pretty much finished with the headboard. The only thing left to do is attach it to your bed frame – which we decided was optional and I’ll tell you about in just a minute.

    The mattress that comes in a box: Tuft & Needle King Size Mattress Review

    Mattress Details

    Disclosure: Tuft & Needle provided me with a new mattress, however all opinions are 100% mine.

    The mattress for our new bed came from Tuft & Needle. We didn’t have room for a king size bed at our Beloved Foreclosure, but did at the 70’s Landing Pad, so we jumped on that because both Grunt Labor and I have always wanted one. Also, it helps to have all that extra space when the Circus comes and gets in bed with us at 7 a.m. in the morning and we aren’t ready to get up just yet. 

    The mattress that comes in a box: Tuft & Needle King Size Mattress Review

    Tuft & Needle mattresses come straight to your doorstep – in a box. #mindblown Yes, that is a king size mattress in that box.

    Also, my Vanna White is hotter than your Vanna White. 😉

    The mattress that comes in a box: Tuft & Needle King Size Mattress Review

    All you do is just take the mattress out of the box and remove the plastic from it.

    The mattress that comes in a box: Tuft & Needle King Size Mattress Review

    You will immediately see it begin to expand as you do this.

    The mattress that comes in a box: Tuft & Needle King Size Mattress Review

    Lay it out on your bed frame or box springs and it will continue to fully expand.

    Tuft & Needle mattresses are made of adaptive foam in the top layer and a support layer on the bottom which is the foundation so to speak of the mattress. The adaptive foam basically conforms to anyone’s weight or size to give you the ideal amount of support. In non-fancy words, it’s really comfortable.

    The mattress that comes in a box: Tuft & Needle King Size Mattress Review

    To me, the mattress doesn’t “give” as much as our old pillow top one did, but instead it just kind of contours to your body. We’ve been sleeping on it for a little over a month now and really love it. It did take a few nights to get used to the difference from our old mattress, but now we’re out like lights every night.

    Since we were starting from scratch with this bed and headboard, we bought a SmartBase mattress foundation to put our Tuft & Needle mattress on top of.

    Mattress Foundation

    The foundation puts the mattress at standard height, but it has much more storage space under the bed. You can also use a regular box springs, slatted bed frame, etc. with Tuft & Needle mattresses.

    Back to the headboard, you can use nuts and bolts to attach it the bed frame, however after we got it in place and pushed the bed frame and mattress up against it, it stayed in place and has ever since. For now, we are leaving it like that, but may attach it to the bed frame at some point.

    This is an EASY DIY headboard that even beginning DIYers can make! Switch up the upholstery to your style! DIY Hollywood Regency Headboard | DIY Velvet Headboard | Black Velvet Headboard | Scalloped Headboard | Retro Headboard | Vintage Style Headboard | Palm Beach Inspired Bedroom and Headboard

    Apparently, the new bed is so good that Bill set up camp in our bedroom while we were away on vacation.

    This is an EASY DIY headboard that even beginning DIYers can make! Switch up the upholstery to your style! DIY Hollywood Regency Headboard | DIY Velvet Headboard | Black Velvet Headboard | Scalloped Headboard | Retro Headboard | Vintage Style Headboard | Palm Beach Inspired Bedroom and Headboard

    According to him, he went to lay down for just a minute before he was going to clean the house up on the day we got home, but fell asleep. I’ll let you guess how clean the house was when we got back… #notsomuch

    You can see more of our master bedroom here.

    This master bedroom makeover is a MUST-SEE! Who knew pink could look so good?! It's an eclectic vibe of old Hollywood glamour meets Palm Beach decorating styles! The 70's Landing Pad Home Tour, Part 2: The Master Bedroom | Palm Tree Art | DIY Scalloped Headboard

    Looking for more DIY home projects?

    How to Make a Huge Frame for Cheap – like the one you see in the picture above!

    How to Turn a Side Table into a Bench – easy and the possibilities are endless!

    Want to remember this DIY headboard for later? Just pin the image below!


    DIY Upholstered Headboard | DIY Headboard Ideas | Headboard DIY | Easy DIY Headboard | Hollywood Regency Headboard | DIY Velvet Headboard
    blog-signature-summer-15

    SaveSave

  • The Well Traveled Master Bedroom Makeover Reveal

    The Well Traveled Master Bedroom Makeover Reveal

    Not even gonna lie, this room design took me out of my comfort zone more than any other. As I’ve said before, I was stressed during most of the whole process about the pink walls not working out as well as they were in my head. But on top of that, I also doubted my headboard project, the window treatments and multiple other things. On multiple occasions, Grunt Labor had to bring me back from the dark side with “It’s just paint, Jenna,” or “We can easily switch the curtains if we need to.” In all honesty, I think he had more faith in this design than I did and that is just baffling considering a huge part of it included pink. Go figure.

    Today is the day though for you to be the judge.

    This post is sponsored by FrogTape, however all opinions are 100% mine. Affiliate links may be contained in this post.

    Right after I applied the final coats of paint, I removed the FrogTape®…

    Well Traveled Master Bedroom Makeover Reveal - removing the tape

    Don’t wait for your paint to dry – remove the tape while it’s still wet! I had painted three walls pink and all the trim was black. After I removed the tape from the trim, I was feeling pretty confident about the pink and black color scheme.

    I moved on to the accent wall which would be pink and black as well, but of course with lots more pattern.

    Well Traveled Master Bedroom Makeover Reveal - removing the tape

    I removed the tape.

    Well Traveled Master Bedroom Makeover Reveal - removing the tape

    I was feeling pretty confident about the pink and black color scheme here too since it looked so good on the other walls. But….after I got all the tape off the feature wall, I wasn’t loving the pink and black together there.

    Well Traveled Master Bedroom Makeover Reveal - changing the color scheme

    While the black trim and plain pink walls worked well on the other two walls, it just seemed too much on the feature wall. So as I like to say – I had to back up and punt. I opted to change the pink on the feature wall to white. Instead of mapping out my entire design again, I just used FrogTape® Delicate Surface and taped off around the black parts of the wall and painted the white in-between. And after two coats of white paint and removing more tape…

    Well Traveled Master Bedroom Makeover Reveal - DO NOT miss this master bedroom! It combines bold black and white, a touch of green, pink and a dash of Palm Beach! STUNNING! Lots of great DIY project ideas for bedrooms in this article! DIY Accent Wall / DIY Painted Patterned Accent Wall / DIY Feature Wall / Black and White Interior Decorating / Black and White Design

    I made quite the home run if I do say so myself….

    Well Traveled Master Bedroom Makeover Reveal - DO NOT miss this master bedroom! It combines bold black and white, a touch of green, pink and a dash of Palm Beach! STUNNING! Lots of great DIY project ideas for bedrooms in this article! DIY Accent Wall / DIY Painted Patterned Accent Wall / DIY Feature Wall / Black and White Interior Decorating / Black and White Design

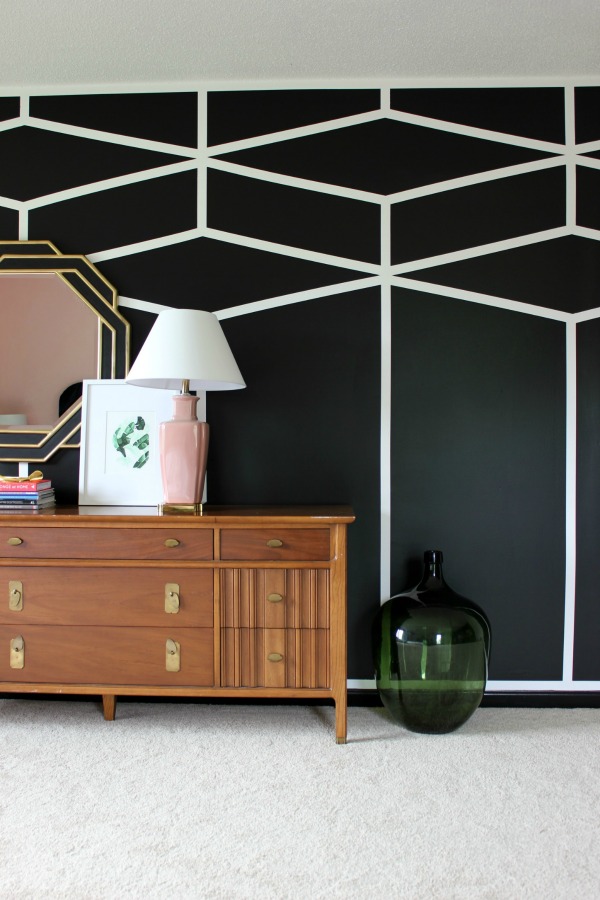
    Since I had nixed the pink on this wall, I knew I needed to pull some of it back over to connect the whole room, so I did that with the pink lamp – which was a $5 Goodwill find I’ve had for about six months waiting for it’s perfect spot.

    Well Traveled Master Bedroom Makeover Reveal - DO NOT miss this master bedroom! It combines bold black and white, a touch of green, pink and a dash of Palm Beach! STUNNING! Lots of great DIY project ideas for bedrooms in this article! DIY Accent Wall / DIY Painted Patterned Accent Wall / DIY Feature Wall / Black and White Interior Decorating / Black and White Design

    Mirror (similar) / Banana Leaves Print / Lamp (similar)

    There’s a lot of musical furniture going on at the new house. I had purchased this dresser for the Circus’ room before I knew we were moving. As it turns out, it works better in our new master bedroom than hers, so she got our old dresser and we got this one. I think it has that great “Well Traveled” vibe we were going for in here. The mirror in our old dining room is making it’s new home in our bedroom as well and I jacked the banana leaves print from our old gallery wall.

    Well Traveled Master Bedroom Makeover Reveal - DO NOT miss this master bedroom! It combines bold black and white, a touch of green, pink and a dash of Palm Beach! STUNNING! Lots of great DIY project ideas for bedrooms in this article! DIY Accent Wall / DIY Painted Patterned Accent Wall / DIY Feature Wall / Black and White Interior Decorating / Black and White Design

    My dad gave me the big green bottle thing quite a while back as well. It was a great aunt’s and he didn’t want it anymore, but as we all know, I am the taker of all family junk no one else wants, so it came to me and finally found a new perfect home.

    And remember how we were building a headboard?

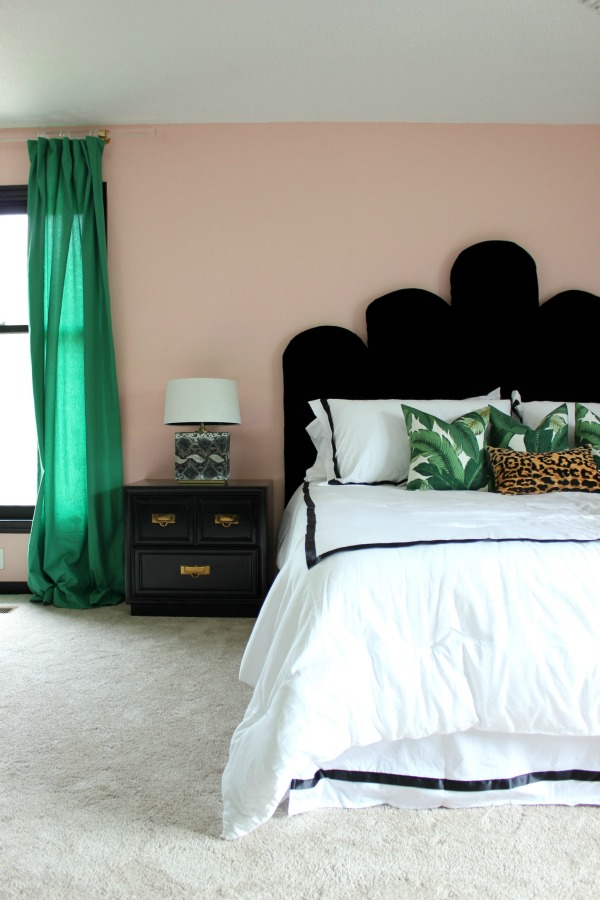
    Well Traveled Master Bedroom Makeover Reveal - DO NOT miss this master bedroom! It combines bold black and white, a touch of green, pink and a dash of Palm Beach! STUNNING! Lots of great DIY project ideas for bedrooms in this article! DIY Headboard / DIY Huge Ass Picture Frame / Palm Beach Design / Kelly Green Curtains / Palm Leaves Decor / Banana Leaves Decor / Velvet Upholstered Headboard
    Pink Wall Color
    / Black Trim Color / Bedding / Green Drapes / Palm Print / DIY Headboard

    It’s velvet. And luscious. And pretty. And actually not too hard at all to make – the tutorial for it is right here.

    Well Traveled Master Bedroom Makeover Reveal - DO NOT miss this master bedroom! It combines bold black and white, a touch of green, pink and a dash of Palm Beach! STUNNING! Lots of great DIY project ideas for bedrooms in this article! DIY Headboard / DIY Huge Ass Picture Frame / Palm Beach Design / Kelly Green Curtains / Palm Leaves Decor / Banana Leaves Decor / Velvet Upholstered Headboard

    Kelly Green Drapes / Bedding / Banana Leaf Pillows / Leopard Print Pillow / Headboard

    You may have also spied those lucite curtain rods – another DIY project. I tried to save as much money as possible on this makeover by reusing items we already had either in our old master bedroom or in other places at our old house. The green curtains used to be in our living room and wouldn’t work for our new living room, but were perfect for our Well Traveled Bedroom. The snakeskin lamps also used to reside in our dining room. Bringing in the snakeskin prints, leopard prints and banana leaf prints was another way I kept the “Well Traveled” theme going. I felt like all those types of prints and patterns combined with the detailed feature wall worked perfectly into the theme. The nightstands are new to us, however they didn’t cost a dime. A friend gave them to us and I just painted them.

    Well Traveled Master Bedroom Makeover Reveal - DO NOT miss this master bedroom! It combines bold black and white, a touch of green, pink and a dash of Palm Beach! STUNNING! Lots of great DIY project ideas for bedrooms in this article! DIY Headboard / DIY Huge Ass Picture Frame / Palm Beach Design / Kelly Green Curtains / Palm Leaves Decor / Banana Leaves Decor / Velvet Upholstered Headboard

    Green Drapes

    The light fixture added a touch of glam and also helped to pull the lucite curtain rods together.

    Well Traveled Master Bedroom Makeover Reveal - DO NOT miss this master bedroom! It combines bold black and white, a touch of green, pink and a dash of Palm Beach! STUNNING! Lots of great DIY project ideas for bedrooms in this article! DIY Huge Ass Picture Frame / Palm Beach Design / Palm Leaves Decor / Banana Leaves Decor / Huge Palm Tree Art

    Palm Print / Leopard Print Pillow / Banana Leaf Pillow / DIY Huge Picture Frame

    As I told you in my design plan post for this room, we already had the palm tree print on hand, however it didn’t have a frame. Let me just tell you – frames that are almost as big as you are ain’t cheap. Grunt Labor and I made our own for about $25. Purchasing one already made would have been about $150. The tutorial for the frame can be found here.

    Well Traveled Master Bedroom Makeover Reveal - DO NOT miss this master bedroom! It combines bold black and white, a touch of green, pink and a dash of Palm Beach! STUNNING! Lots of great DIY project ideas for bedrooms in this article! Features DIY Lucite / Acrylic curtain rods and lots of other great DIY project ideas for bedrooms!

    Moving across from the bed is a small sitting area.

    Well Traveled Master Bedroom Makeover Reveal - DO NOT miss this master bedroom! It combines bold black and white, a touch of green, pink and a dash of Palm Beach! STUNNING! Lots of great DIY project ideas for bedrooms in this article!

    Accent Chair / Elephant Table (similar ones) / Leopard Print Pillow / Date Art

    Once more with the exception of the leopard print pillow, I already had all of this on hand. The chair had been in our old master bedroom. I bought the elephant table awhile back having no idea where it would go, but who can pass up an elephant table for $20? Exactly. No one. The date art is our wedding anniversary. Considering that both myself and Grunt Labor have forgotten our anniversary before, I figure it’s a good way to remind us. The gold mirror is literally like gold to me – it was my great aunt’s, then it hung in my grandparent’s living room and then I took it when they died. It had to stay in storage for quite some time until I had the perfect place for it.

    Well Traveled Master Bedroom Makeover Reveal - DO NOT miss this master bedroom! It combines bold black and white, a touch of green, pink and a dash of Palm Beach! STUNNING! This wall is CARPETED! It looks gorgeous! Lots of great DIY project ideas for bedrooms in this article!

    And did I mention I covered a wall with carpet? For about the last year, I’ve been dying to cover a wall with AstroTurf. The wall that leads into our master bedroom closet seemed to be the perfect candidate. However, after looking at the Astroturf more, it was just too shiny and bright. Instead, I used darker green outdoor rugs to cover the wall. I love the added dimension it gives.

    Well Traveled Master Bedroom Makeover Reveal - DO NOT miss this master bedroom! It combines bold black and white, a touch of green, pink and a dash of Palm Beach! STUNNING! This wall is CARPETED! It looks gorgeous! Lots of great DIY project ideas for bedrooms in this article!

    DIY Carpet Covered Wall / Closet Door Medallions / Gold Door Knobs

    The marble top table used to be a nightstand in our old master bedroom. Mama graciously loaned me her bamboo lamp for the space, because really, how can you have a Well Traveled Master Bedroom without a bamboo lamp? The Easy Like Sunday Morning print was another print that used to hang on the gallery wall in our old living room. I also jazzed up the closet doors with medallions.

    Remember, this makeover was part of FrogTape’s® Paintover Challenge. They gave myself and five other bloggers a box of painting supplies and $1,000 to makeover our rooms.

    Here’s the budget breakdown for my room:

    Paint – $100

    Light Fixture – $124

    Headboard (velvet upholstery, foam, batting, wood, etc.) – $243

    Bedding – $240

    Accent Pillows & Inserts (I had some inserts on hand already) – $98

    DIY Art Frame – $20

    Lucite Curtain Rods – $206

    Closet Door Medallions & Knobs – $27

    Rugs for Closet Wall & Moldings – $30 (I had store credit for part of this.)

    Grand Total: $1,088

    I did go over budget by $88. The main reason for that was that it ended up taking three coats of pink paint and therefore I had to buy another $50 gallon of the paint. The headboard also took more foam than I expected which was about another $30 cost.

    There were also parts of this room that were factored into our whole house renovation. That included the carpet, construction of the new closet, and closing up the openings to the old closet, which became the Circus’ playroom. Those were things that were planned out long before this room design was dreamed up, so I didn’t factor those into the actual makeover budget.

    What do you think? Is it “Well Traveled” to you?

    pin-this-post-2

    Well Traveled Master Bedroom Makeover Reveal - DO NOT miss this master bedroom! It combines bold black and white, a touch of green, pink and a dash of Palm Beach! STUNNING! Lots of great DIY project ideas for bedrooms in this article!

    blog-signature-summer-15

    SaveSave

  • Masculine Bedroom + Office Makeover Full Source List

    Masculine Bedroom + Office Makeover Full Source List

    Affiliate links may be contained in this post.

    I realize it’s been well over a month since I first showed you the masculine guest bedroom and office makeover – A.K.A. Bill’s room.

    Essentially, Christmas threw up everywhere and this post kept getting pushed to the back burner.

    This room is by far one of my favorites and really, I just pulled it together, Bill came up with the plan and he knocked it outta the park. We used a mix of new items with ones we already had, we DIYed a thing or two and of course, we mixed in a few yard sale and thrift store finds. Here’s the full source list for everything in the space – if something is no longer being made, I tried to find a similar version for ya.

    Masculine Bedroom + Office Makeover Full Source List / Black and White Bedroom / Black and White Interior Design / Vintage Inspired Interior Design

    Faux Sheepskin Area Rug (Chocolate Color, We went with an 8′ x 11′)

    We also removed the footboard and added feet to the box spring to eliminate the need for bed rails.

    Masculine Bedroom + Office Makeover Full Source List / Black and White Bedroom / Black and White Interior Design / Vintage Inspired Interior Design / Fur Blanket / Black Wall

    Faux Fur Blanket / White Quilt  / Green & White Pillow (similar one, mine originally came from Target about a year ago.)

    Paint Colors: Limousine Leather & Bit of Sugar

    I’ll be honest – I didn’t think that white quilt would work at all. Bill was very specific about not getting a comforter because it made him too hot, but he didn’t want something too thin either. He found the white quilt and when we got it home, I was so surprised at how well it worked in the space. I do think though that without the fur throw it would have been too stark.

    Masculine Bedroom + Office Makeover Full Source List / Black and White Bedroom / Black and White Interior Design / Vintage Inspired Interior Design

     White Side Table  / White and Black Faux Fur Pillow (Similar) / Jack Accent  / White Deer Head (similar and similar)

    The black and chrome chair is vintage and was a yard sale find that was once covered in rust. This chair is actually the exact same one – minus the rust mine had. Wassily chairs are also very similar and honestly, prettier, but more expensive. The drapes are just your basic white ones from IKEA.

    Masculine Bedroom + Office Makeover Full Source List / Black and White Bedroom / Black and White Interior Design / Vintage Inspired Interior Design / Green Glass Lamp

    Green Glass Lamp

    Masculine Bedroom + Office Makeover Full Source List / Black and White Bedroom / Black and White Interior Design / Vintage Inspired Interior Design / Vintage Dresser / Dog Statue

    Framed Art

    The dresser is vintage. For local Chattanooga folks, it came from the Insyde Outsyde Shop. I wasn’t using the mirror that goes with our master bedroom furniture, so I propped it on top of Bill’s dresser.

    Masculine Bedroom + Office Makeover Full Source List / Black and White Bedroom / Black and White Interior Design / Vintage Inspired Interior Design / DIY Bookshelf

    DIY Bookshelf / Vintage Record Holder (Similar) 

    We made the bookshelf ourselves after we saw a similar one for $1000 that I just couldn’t bring myself to spend that much money on. I found the record holder at a yard sale. Urban Outfitters has a similar new option and Etsy is full of vintage ones.

    The horse print was a yard sale find and unfortunately, I can’t find any similar ones online. The vintage pennant was a gift from a friend, but you can find lots of those on Etsy.

    And finally, my office portion of the room…
    Masculine Bedroom + Office Makeover Full Source List / Black and White Bedroom / Black and White Interior Design / Vintage Inspired Interior Design / Office Space / Comfortable but Stylish Office Chair

    Desk Chair / DIY Desk

    I’ve also got a post about stylish and comfortable desk chairs here if ya need that.

    If I left anything out, let me know y’all!

    And can I just say  – I’m really glad the Christmas decorating hoopla is winding down… #thisgirlneedsatimeout

    And if you didn’t see the full before and after of Bill’s room, you probably should. He kinda killed it.

    Masculine Bedroom Makeover - This room functions as a Guest Room, Teenage Boy's Room, and an Office. Lots of great ideas for making a room function for multiple uses.

    Masculine Bedroom Makeover

    blog-signature-summer-15

    You know you don’t wanna miss any of this crazy.

    Sign up to get my posts delivered to your inbox here.

    Stalk Me Here:

    Pinterest / Facebook / Twitter / Instagram

    SaveSave

  • How to Add Feet to a Box Spring and Get Rid of the Footboard

    How to Add Feet to a Box Spring and Get Rid of the Footboard

    When we set out to makeover Bill’s Room / The Guest Room / My Office, we really needed to relocate my desk so it wasn’t a focus in the room. Our best option was to move the desk to the small wall opposite the bed. However, it was relatively tight there. We needed to get that footboard out of the way to open up the space. In order to do that, we needed to figure out how to add feet to the box spring so we could eliminate the bed rails, and thus the footboard.

    We figured out how to do it – and y’all I’m so mad I didn’t do it sooner because it was so easy and made a huge difference in the space.

    Here’s the room before:

    How to Add Feet to a Box Spring and Get Rid of the Footboard - great and easy idea for small bedrooms. You could also remove the headboard with this idea if you wanted to. / Bedroom Ideas / DIY Bed Ideas / DIY Bed Frame

    You can see how the desk is to the right of the room – it was the first thing you saw when you went in the room.

    And here’s the space now:

    How to Add Feet to a Box Spring and Get Rid of the Footboard - great and easy idea for small bedrooms. You could also remove the headboard with this idea if you wanted to. / Bedroom Ideas / DIY Bed Ideas / DIY Bed Frame

    Huge difference and on top of freeing up space, it lowered the overall height of the bed which allows you to see more of the gorgeous wood headboard against the black wall – not that black and woodgrain is a favorite combination of mine or anything. 😉

    How to Add Feet to a Box Spring

    Affiliate links may be contained in this post.

    Materials & Tools Needed:

    Step 1:

    If you want to stain or paint your table legs, do so now and let them dry. We stained ours.

    Flip the box spring on its side against a wall. Attach a furniture leg attachment plate with your drill in each corner of the box spring and one in the center of each long side of the box spring.

    How to Add Feet to a Box Spring and Get Rid of the Footboard - great and easy idea for small bedrooms. You could also remove the headboard with this idea if you wanted to. / Bedroom Ideas / DIY Bed Ideas / DIY Bed Frame

    You can see from the photo above that I was only able to get three screws in each plate as there was nothing for the 4th screw to grab onto. That’s fine – it hasn’t effected the strength of our bed legs at all.

    Step 2: 

    Screw a table leg into each attachment plate.

    How to Add Feet to a Box Spring and Get Rid of the Footboard - great and easy idea for small bedrooms. You could also remove the headboard with this idea if you wanted to. / Bedroom Ideas / DIY Bed Ideas / DIY Bed Frame

    Step 3:

    Flip your box spring back over and place it wherever it will be in your room. You need to add a little extra support to your box spring / bed by cutting some 4″ x 4″ pieces that will go in the middle of the box spring under it. To do this, measure the distance from your floor to the wood frame of the box spring underneath. Its probably going to be close to whatever size legs you used. Cut six pieces of 4″ x 4″ to this length. If you have a king or queen sized bed, you would need to cut more. A twin size bed may require less.

    While your box spring is in place where you want it in the room, have someone slightly hold it up as you place the 4″ x 4″ pieces under the box spring in the locations shown below. It’s next to impossible to get a picture of this in action, so I hope you can understand what I’m saying to do with the picture below. The X’s mark where your 4″ x 4″ pieces should go under your box spring. Just reach under the box spring and place them there while someone is holding the box spring up. You don’t need to attach them to the frame or anything, as long as they are placed under the wood supports in the box spring.

    How to Add Feet to a Box Spring and Get Rid of the Footboard - great and easy idea for small bedrooms. You could also remove the headboard with this idea if you wanted to. / Bedroom Ideas / DIY Bed Ideas / DIY Bed Frame

    Make sense? If not, let me know and I’ll try to explain it more. Basically, those X’s are where your 4″ x 4″ pieces should be under the box spring.

    After your 4″ x 4″ pieces are in place, place your mattress on top of the box spring and dress the bed.

    How to Add Feet to a Box Spring and Get Rid of the Footboard - great and easy idea for small bedrooms. You could also remove the headboard with this idea if you wanted to. / Bedroom Ideas / DIY Bed Ideas / DIY Bed Frame

    How to Add Feet to a Box Spring and Get Rid of the Footboard - great and easy idea for small bedrooms. You could also remove the headboard with this idea if you wanted to. / Bedroom Ideas / DIY Bed Ideas / DIY Bed Frame

    You can see a bit of the leg in the photo above – the furry rug likes to be the center of attention instead of letting the bed legs be seen. 😉

    If you wanted to, you could even nix the headboard as well. This is a great solution if you don’t want to buy one of those metal bed frames  – especially if you don’t want to do a bed skirt that would cover the ugly metal frame.


    pin-this-post-2

    How to Add Feet to a Box Spring | Box Spring Ideas | DIY Bed Ideas | DIY Bedroom Ideas

    You might wanna see this too…

    Masculine Bedroom Makeover - This room functions as a Guest Room, Teenage Boy's Room, and an Office. Lots of great ideas for making a room function for multiple uses.

    Masculine Bedroom Makeover

    Great guide for the basics of using a drill and seeing what all it can do! Power Tools 101: How to Use a Drill via RainonaTinRoof.com

    How to Use a Drill

    The basics - exactly what it can do and how to do it. Power Tools 101 - How to Use a Miter Saw

    How to Use a Miter Saw

    blog-signature-summer-15

    You know you don’t wanna miss any of this crazy.

    Sign up to get my posts delivered to your inbox here.

    Stalk Me Here:

    Bloglovin / Pinterest / Facebook / Twitter / Google+ / Instagram

    SaveSave

  • Masculine Bedroom and Office Makeover

    Masculine Bedroom and Office Makeover

    How many uses can you find for one average sized bedroom?

    Well around here, we can find three.

    Apparently, we like a challenge.

    I thought that as kids got older, they liked to spend more time with their friends – away from the adults in their lives.

    Apparently, I was wrong.

    Or either Bill is the exception.

    It seems the older he gets, the more he’s here.

    I’m not complaining – I’ll take all the quality time I can get; he’s off to college next year.

    In the meantime though, the room he was inhabiting was not very “Bill.”

    The Room Before

    While Elvis loved his jungle room, apparently Bill was not fond of a similar theme with the leopard print wall in his room.

    The Room Before

    I was also invading part of his space with my office area.

    So I told him he could decide what he wanted to do with the room.

    I know – I couldn’t believe I uttered those words myself.

    The only conditions were that it did still have to have the bed, as the room is also our only guest room, and my desk had to stay in the space. Anything else was up to him.

    I set him up on Pinterest one night – and held my breath.

    I prayed he wouldn’t pin some hideous basketball/baseball/football/soccer ball border circa 1992. I cringed as he looked at bright orange Tennessee Vols decor. I finally had to leave the room.

    About 30 minutes into his browsing, he called me back in and presented me with his pick – a masculine black and white room with fur accents and wood tones.

    I don’t know if I was ever more proud of him.

    I asked him if he was sure he liked that. He did. He was actually excited about it. And then he said the words I would have never dreamed he would say – “I think we should add in some pops of green too. That would keep it in line with the rest of the house.“

    Oh. My. Stars.

    This is what we ended up with…

    Masculine Bedroom Makeover - This room functions as a Guest Room, Teenage Boy's Room, and an Office. Lots of great ideas for making a room function for multiple uses. Black Walls (Behr's Limousine Leather), Black and White with green and wood toned accents. Brown Faux Fur Rug

    I really don’t know who was more excited about how well it turned out – me or him. It is perfect for him, it works just fine for guests and my office space is still in the room – just out of the way.

    *A big thanks to Home Decorators Collection for helping with this project so Bill can have a bedroom that doesn’t resemble the jungle room.

    Here’s the breakdown…

    Masculine Bedroom Makeover

    We definitely wanted black in the room, but didn’t want the entire room to be black. We opted to paint one wall completely black and then paint black halfway up on two of the walls.

    Masculine Bedroom Makeover - This room functions as a Guest Room, Teenage Boy's Room, and an Office. Lots of great ideas for making a room function for multiple uses. Black Walls (Behr's Limousine Leather), Faux Fur Throw / Green Accents

    The bed stayed, however I removed the rails and added feet to the box spring – it was ridiculously easy. It really helped to open up the room. I also think it makes the headboard really stand out against the black walls – I love that wood grain against the black wall. We opted for a white quilt on the bed, accented with a super soft and cozy faux fur throw and a green accent pillow.

    Masculine Bedroom Makeover - This room functions as a Guest Room, Teenage Boy's Room, and an Office. Lots of great ideas for making a room function for multiple uses. Faux Fur Throw on White Quilt.

    Most of the time, he totally ditches the quilt and sleeps with the fur throw. He. Loves. it.

    My desk used to be on the wall coming right into the room – it was way too overwhelming there though. We moved it to another wall and found a vintage mid-century modern dresser to place along the wall for some much needed storage.

    Masculine Bedroom Makeover - This room functions as a Guest Room, Teenage Boy's Room, and an Office. Lots of great ideas for making a room function for multiple uses. Vintage Mid-Century Modern Dresser / Faux Brown Fur Rug / Black and Leather Chrome Chair / Fur Accents / White Geometric Table / Oversized Jack Decor

    A chocolate faux fur rug from Home Decorators Collection covers most of the carpet in the room. The rug was a steal of a deal. I got an 8 x 11 for under $300. When Bill came home and saw it for the first time, he immediately laid down on it and hardly moved for the rest of the night. We did keep the chrome and black chair in there, but got smaller side tables for each side of the bed.

    Masculine Bedroom Makeover - This room functions as a Guest Room, Teenage Boy's Room, and an Office. Lots of great ideas for making a room function for multiple uses. White Geometric Side Table with Brass Horse Tray

    The tables have open geometric shapes on the sides, so they are very airy feeling, which is great for small spaces. There is still plenty of room though to hold knick-knacks on the top.

    He picked out the dresser himself (we found it at a local vintage shop). I pulled the mirror that actually goes with mine and Grunt Labor’s bedroom set out of storage to prop on his dresser.

    Masculine Bedroom Makeover - This room functions as a Guest Room, Teenage Boy's Room, and an Office. Lots of great ideas for making a room function for multiple uses. Vintage Mid-Century Modern Dresser / Dog Statue

    He fell in love with Finneman the dog as soon as he saw him.

    Masculine Bedroom Makeover - This room functions as a Guest Room, Teenage Boy's Room, and an Office. Lots of great ideas for making a room function for multiple uses. Dog Statue - love how its used as decor in a bedroom rather than in an entry.

    He didn’t really have to convince me – I thought putting the dog in a bedroom rather than as the typical entry decor was a genius idea. However, if you follow me on Instagram, you may have seen that the Circus has tried to make the dog her own. She’s drug him all around the house and adorned him in hair of tinsel, a ballerina costume and most recently a combination of items that make him look like he’s a cross between an Egyptian pharaoh and a Disney princess.

    The art and deer head on the dresser was in the room before, it still worked pretty well with the space, however we did add in a green glass lamp that I wouldn’t mind stealing for my own room.

    Masculine Bedroom Makeover - This room functions as a Guest Room, Teenage Boy's Room, and an Office. Lots of great ideas for making a room function for multiple uses. Green Glass Lamp with Faux Wood Shade / Black Walls (Behr's Limousine Leather) / Chrome and Leather Chair

    When he said we needed green accents, there was no way I wasn’t going along with that one. 😉

    Masculine Bedroom Makeover - This room functions as a Guest Room, Teenage Boy's Room, and an Office. Lots of great ideas for making a room function for multiple uses. Green Glass Lamp with Faux Woodgrain Shade / Black Walls (Behr's Limousine Leather)

    I also love the shade on this lamp – it’s a woodgrain look that goes great against the black and white wall.

    The other side of the bed may be my favorite part of the room though.

    Masculine Bedroom Makeover - This room functions as a Guest Room, Teenage Boy's Room, and an Office. Lots of great ideas for making a room function for multiple uses. DIY Bookshelf / Guitar as decor / White Geometric Side Table / Black Walls (Behr's Limousine Leather)

    Bill and I made, (yes we made!) a bookshelf for this wall.

    Masculine Bedroom Makeover - This room functions as a Guest Room, Teenage Boy's Room, and an Office. Lots of great ideas for making a room function for multiple uses. DIY Bookshelf / Guitar as decor

    The full tutorial for the bookshelf is here. We decorated with some vintage items around it – including my grandmother’s guitar which he thought was a pretty cool touch.

    Masculine Bedroom Makeover - This room functions as a Guest Room, Teenage Boy's Room, and an Office. Lots of great ideas for making a room function for multiple uses. DIY Bookshelf / Guitar as Decor / Vintage Records / Fur Rug

    The other occasional table is on this side as well.

    Masculine Bedroom Makeover - This room functions as a Guest Room, Teenage Boy's Room, and an Office. Lots of great ideas for making a room function for multiple uses. Old guitar as decor / White Geometric Side Table / Black Walls (BEHR's Limousine Leather) / Brown Fur Rug

    And finally, on the wall opposite from everything else is my workspace.

    Masculine Bedroom Makeover - This room functions as a Guest Room, Teenage Boy's Room, and an Office. Lots of great ideas for making a room function for multiple uses. Functional office space in a guest bedroom.

    It’s tucked away from everything else and I also kept this wall entirely white to visually separate the two spaces. I’m one smart cookie, right?

    No, I’m not at all. It was just a random idea that happened to work. 🙂

    So what do you think of the masculine bedroom makeover? Bill did a pretty good job, didn’t he? He only had a smidgen of help…

    pin-this-post-2

    Masculine Bedroom Makeover - This room functions as a Guest Room, Teenage Boy's Room, and an Office. Lots of great ideas for making a room function for multiple uses.

    You might wanna see this too…

    DIY Modern Rustic Bookshelf - simple build and costs about $40 in materials. Could do any color you wanted to!

    DIY Modern Rustic Bookshelf

    How to Add Feet to a Box Spring and Get Rid of the Footboard - great and easy idea for small bedrooms. You could also remove the headboard with this idea if you wanted to. / Bedroom Ideas / DIY Bed Ideas / DIY Bed Frame

    How to Add Feet to a Box Spring

    ***Giveaway Now Closed.***

    And…Home Decorators Collection is giving away a $50 gift card to one lucky guy or gal!

    Home Decorators Collection Gift Card Giveaway

    Use the Rafflecopter below to enter!

    a Rafflecopter giveaway

    Disclosure: This post was a collaboration with Home Decorators Collection. However, all opinions and pride in the teenager’s design skills are 100% mine.

  • King Headboards for $300 or Less

    King Headboards for $300 or Less

    I am not a snuggler.

    I can be a snuggler for about five minutes and then you need to get off of me.

    Grunt Labor isn’t a snuggler either. This is good.

    However, he does roll over in his sleep quite a bit and while doing so, his face sometimes becomes thisclose to mine and he breathes right on me.

    And I hate that.

    I do love him though, don’t get me wrong. He knows I can’t stand him breathing on me. Some nights I give him an elbow or kick to get him to roll back over. If I’m feeling nice and don’t, then I usually don’t sleep great or it takes me forever to get to sleep and then he feels terrible the next morning when he finds out I didn’t sleep because he was breathing on me.

    We need a king sized bed.

    The best sleep we get is when we stay in hotels with king sized beds. I love him, but I need him to be on his side of the bed. In his defense, he says there are some nights I get right up on him, although I don’t remember this, so I cannot attest to its validity. Maybe he needs me to be on my side of the bed as well though.

    So we’re on the hunt for a king size headboard and/or bed that won’t cost a year’s worth of preschool.

    Here’s what I’ve found so far…

    This post contains affiliate links for your shopping convenience. Click here to read my full disclosure policy.

    King Headboards for $300 or Less

    King Size Headboards for $300 or Less + Awesome Sources for all Sizes of Headboards - gorgeous selections and affordable! White Upholstered Headboard

    Sovereign King Headboard

    This headboard also comes in other colors as well. Its upholstered in vinyl, so not quite as cozy as another material, but would be very easy to wipe down when its dusty. It has a very chic shape to it.

    King Size Headboards for $300 or Less + Awesome Sources for all Sizes of Headboards - gorgeous selections and affordable! Beige Upholstered Headboard

    Curl King Nailhead Headboard

    This one is also available in ivory. Its upholstered in linen, so a bit more cozy and it’s neutral, so it would work with lots of styles.
    King Size Headboards for $300 or Less + Awesome Sources for all Sizes of Headboards - gorgeous selections and affordable! Grey Upholstered Headboard

    Clique King Headboard

    Also available in ivory, this one has some tufting and is also upholstered in linen.

    Confession: I may have lied a little about the next three headboards being $300 or less. They are all actually $320. I just couldn’t let a measley $20 not let me share them with you…King Size Headboards for $300 or Less + Awesome Sources for all Sizes of Headboards - gorgeous selections and affordable! Green Upholstered Headboard

    Seville Velvet Headboard

    I won’t lie – I love that green, however it is also available in five other colors.
    King Size Headboards for $300 or Less + Awesome Sources for all Sizes of Headboards - gorgeous selections and affordable! Floral Upholstered Headboard

    Floral Patterned Headboard

    I never thought I would be a floral patterned headboard person, but I love the rich hues on this one. Other patterns also available.

    King Size Headboards for $300 or Less + Awesome Sources for all Sizes of Headboards - gorgeous selections and affordable! Navy and White Patterned Upholstered Headboard

    Blue & White Patterned Headboard

    The blue dots on this one aren’t perfect, which is what I like about it. King Size Headboards for $300 or Less + Awesome Sources for all Sizes of Headboards - gorgeous selections and affordable! Black Upholstered Headboard

    Annabel Black Headboard

    This one is definitely more on the manly side, but I’m still digging it. Its upholstered in vinyl and I think it would look awesome against a dark green wall.


    King Size Headboards for $300 or Less + Awesome Sources for all Sizes of Headboards - gorgeous selections and affordable!

    Rectangle-y Modern Headboard

    Sadly, this was the only non-upholstered headboard I found that was under $300 and that I actually liked. To me, it has a vintage-y mid-century modern feel. I do think it would be really pretty painted a fun pop of color.

    Do you have any great headboard sources? Help a sister out. I need to sleep.

    pin-this-post-2

    Affordable King Size Headboards | Cheap King Headboards | King Headboard Ideas | Affordable King Size Beds

    blog-signature-summer-15

    You know you don't wanna miss any of this crazy.

    Sign up to get my posts delivered to your inbox here.

    Stalk Me Here:

    Bloglovin / Pinterest / Facebook / Twitter / Google+ / Instagram

    SaveSave

  • 9 Simple and Easy Bed Makeovers and Hacks

    9 Simple and Easy Bed Makeovers and Hacks

    I can’t tell you how many times I’ve ran across DIY headboards on Pinterest.

    I’m confident DIY headboards could run Pinterest all by themselves.

    Now, I’m not bashing on DIY headboards at all.

    If you have patience and an insane amount of upholstery and tufting skills, then by all means make your own headboard.

    However, I don’t.

    I’m in favor of using what I’ve got.

    This could also mean that I’m cheap. That’s cool too. I’ll own it.

    I can paint a headboard faster than I can build one and cheaper too.

    No, it might not look as chic as a velvet upholstered one would, but if it looks like any of these bed makeovers, I wouldn’t turn my nose up at it.

    This post is sponsored by HomeRight, however all opinions are 100% mine. This post contains affiliate links for your shopping convenience. Click here to read my full disclosure policy.

    Simple and Easy Bed Makeovers and Hacks

    Americana style, anyone?

    Headboard Makeovers - Patriotic Shades, Red and Blue. Painted with the HomeRight Finish Max paint sprayer - gives a flawless finish and easy to use.

    That red. Oh my. Makely Home killed it with this bold red headboard. Gail from My Repurposed Life went with a classic navy for this twin headboard makeover. Navy is always a good pick – it will never fail you. Both of them used their HomeRight Finish Max Sprayers to makeover the beds.

    Shades of Green

    Headboard Makeovers: Shades of Green - Awesome furniture makeovers!

    I love the lines of Refresh Restyle’s headboard makeover, but I am also totally digging the bolder green hue on Jesse Coulter’s makeover.

    I know. Jenna likes the green. Imagine that.

    Play It Safe White

    Bed Makeovers: Shades of White

    Play it safe with a classic white like Finding Silver Pennies and 11 Magnolia Lane did.

    When in doubt, go for polka dots.

    Bed Makeovers: Easy to do polka dot bed.

    I’ve never been able to resist a good (and really easy to paint!) polka dot. After I sprayed this bed with my Finish Max, I popped on a few polka dots.

    And if you just have to make your own headboard…

    You can use these ideas to repurpose your old bed.

    Bed Hacks: Turn old headboards and footboards into benches and coat racks!

    Domestically Speaking made a charming bench from an old bed and My Repurposed Life made simple coat racks. So clever! They both used their paint sprayers to get in the nooks and crannies with ease.

    So are you a bed makeover or a DIY bed kinda person?

    pin-this-post-2

    Bed Makeover Ideas | Bed Makeover Paint | How to Paint a Bed Frame | Bed Makeover DIY | Bed Makeover DIY Head Boards

    You know you don’t wanna miss any of this crazy.

    Sign up to get my posts delivered to your inbox here.

    Stalk Me Here:

    Pinterest / Facebook / Twitter / Instagram

    blog-signature-summer-15

  • 13 Stunning Home Ideas I Found in One Place

    13 Stunning Home Ideas I Found in One Place

    Last Wednesday they let me into the Nashville Symphony Show House.

    Nashville Symphony House

    Builder, Castle Homes; Architect, Wade Weissman

    I know. Its gorgeous. Go ahead and take a minute to close your gaping mouth.

    I’m quite certain the powers that be must have never read my blog before to know that this gal is borderline redneck and hadn’t set foot in such a fancy house before – otherwise they may have thought twice before sending my invitation.

    I walked out of that house scolding myself for using inappropriate language in front of people who never met me before, but brimming over with DIY and decorating ideas.

    I quickly got over the inappropriate language scolding. I feel overall they became better people for having met me.

    The ideas though – my head is still spinning. Here’s 14 stunning home ideas that I took away from the Nashville Symphony Show House – and really, there were waaaay more than 14, but I felt I should cut it off somewhere instead of keeping you stuck here reading all day.

    1. Create an entryway nook to your bedroom.

    Have an entryway to your bedroom.

    Design by Julie Couch Interiors

    Obviously, we won’t all have the space for this, but I fell in love with this little entry of sorts that was carved out of the master bedroom.

    2. Always, always, always go for lots of windows in the bathroom.

    Opt for lots of windows in the bathroom.

    Design by Julie Couch Interiors

    Now, if you live in a neighborhood where you can open a window and toss a muffin to your next door neighbor, you’ll also want to invest in some window shades, as your neighbor doesn’t want to see your rear end.

    3. And hang your mirrors from the ceiling.

    Hang your mirrors from the ceiling instead of the wall.

    Design by Julie Couch Interiors

    I had never ever ever seen this idea before, but I thought it was genius – hang your mirrors from the ceiling!

    4. Go for a window in the shower too.

    Add a window in the shower.

    Design by Julie Couch Interiors

    Its much easier to wake up with a pretty view as you shower.

    5. Add “drooping” greenery to your floral arrangements. 

    Leafy Greens and Pink Flowers

    Design by Julie Couch Interiors

    I don’t know about you, but it seems I’m always wanting the leaves on my flowers to stand up right alongside the actual flower. I was smitten with this arrangement though that has “drooping” greenery.

    6. Clad a bookshelf – front, back, and sides – in barn wood.

    Cover a bookshelf in barn wood or pallet wood.

    Design by Julie Couch Interiors

    These bookshelves were built-ins, but I think you could easily re-create the look with regular bookshelves by just gluing on barn wood or pallet wood.

    7. Turn a vintage dough bowl into a succulent garden. 

    Plant a succulent garden in a dough bowl.

    Design by Castle Homes

    I’m not 100% sure that is a vintage dough bowl, in fact I don’t think it is, but it very much looks like one. Just make sure your bowl is lined very well to prevent water damage.

    8. Feathers are always right. 

    Feather Pillow

    Design by Rozanne Jackson Interiors for The Iron Gate

    There’s a good chance I left drool on this pillow. I’m already plotting out my own DIY version.

    9. Opt for the really tall lamp.

    Opt for the really tall lamp.

    Design by Rozanne Jackson Interiors for The Iron Gate

    I love the sophisticated lamp paired with the rustic-industrial nightstand.

    10. Always have at least one old piece in every room.
    Have something old in every room, like an antique mirror.

    Design by Rozanne Jackson Interiors for The Iron Gate

    Like this mirror. Just gorgeous.

    11. Use a vintage showcase as bedroom storage. 

    Use a vintage showcase in a bedroom for storage.

    Design by Rozanne Jackson Interiors for The Iron Gate

    This could very well be my favorite idea from the house. In one bedroom, there was an old showcase from a store that held records and such. I am crazy over this idea. 

    12. Go for the chimney that touches the sky.

    Go for the chimney that touches the sky.

    Design by Mark Simmons Interiors

    One day, when I save enough money from buying cheap beer, I’ll have a chimney that touches the sky.

    13. Remember the 3 T’s when it comes to container gardens. 

    Carmen Johnston Container Gardening

    Container Gardens by Carmen Johnston Gardens

    Something tall, something thick, and something trailing – all planted in a triangle.

    See what I mean? Stellar home ideas.

    Looking for more great home decor ideas…

    20+ Living Room Ideas – gorgeous, livable spaces!

    How to Coordinate Paint Colors in Your House – one little tip that will save your sanity!

    14 Real Life Bedroom Ideas – ideas that are both functional and pretty.

    You know you don’t wanna miss any of this crazy.

    Sign up to get my posts delivered to your inbox here.

    Stalk Me Here:

    Pinterest / Facebook / Twitter / Instagram

    pin-this-post

    Drop. Dead. Gorgeous! Stunning Home Ideas!

  • Summer Home Tour: The Details Make The Space

    Summer Home Tour: The Details Make The Space

    It doesn’t matter how many times I paint a piece of furniture or upholster a chair – if the accessories around it don’t look good, the furniture or chair won’t shine and the space will fall short.

    The details make the space. 

    It took me a really long time to realize that.

    And a lot of backaches and wasted paint. 

    I get it now though – and even if we are just talking about decorating – the pain was worth the reward.

    As dramatic as that sounds. 

    So this summer home tour is about the details.

    The quirky little objects that I love.

    That some may find ugly.

    Or even tacky.

    But for me, they make my space a reflection of my family.

    And that’s all that matters.

    So if you love it or hate it, either way, I don’t care.

    Because we love it.

    And its how we fly our freak flag.

    Welcome to our freak show.

    This post contains affiliate links for your shopping convenience. Click here to read my full disclosure policy.

    A fun and easy to do confetti wall treatment. Summer Home Tour: The details make the space.

    Entryway / Confetti Accent Wall

    The entryway hasn’t changed since the last home tour.

    That’s good considering I just made it over in February. 

    Its still full of fun with the confetti accent wall. Guests feel like they are walking right into a party and turn around to go buy booze.

    Or at least that’s the effect I wish it had on them. 

    Eclectic but Modern Living Room. Summer Home Tour: The details make the space.

    Living Room

    You just saw the completed living room on Tuesday, so it definitley hasn’t changed since then.

    Ain’t nobody got time fo’ that.

    Here are my favorite details from the space though…

    A fun book atop a navy end table. Summer Home Tour: The details make the space.

    The Perfect Navy End Table

    The perfect navy end table paired with Kate Spade’s Places to Go, People to See Book and a faux snakeskin lamp I scored at Bargain Hunt for $5.

    P.S. I’d be lying if I said that book always sat open, perfectly placed like that. You and I both know the  circus would have it turned into a sticky apple juice mess in 2.0 seconds flat. 

    Coral paired with Kelly Green. Summer Home Tour: The details make the space.

    Kelly Green Curtains

    The coral lamp against the kelly green curtains and the pop of glam the pillow adds to the gray chair – I just can’t quit you. Oh and the tray, can’t forget the giraffe print tray.

    In my opinion, every room should have a little animal print.

    Roar.  

    A vintage bull planter. Summer Home Tour: The details make the space.

    My new favorite thing in the giraffe tray is the vintage bull planter.

    Right beside the metallic angel wing.

    Whoever told you that a bull, giraffe, and angel made a bad combination was lying.

    Add a simple pop of color to a boring console table. Summer Home Tour: The details make the space.

    I’m also quite smitten with the new pop of coral on the console table.

    And the $2 brass duck that was supposed to have went out of style in 1989.

    A dramatic, but easy to make black and white gallery wall. Summer Home Tour: The details make the space.

    Black & White Gallery Wall / Stripped & Re-Stained Buffet

    And then there’s the gallery wall. The gallery wall that is almost a sin because its so damn pretty.

    Almost. 

    Sconces on a gallery wall. Summer Home Tour: The details make the space.

    Let’s be honest though.

    Without the art and the sconces, its just a black wall with a white border.

    And that’s just boring. 

    Let’s not dismiss the bowl of cotton and lilies either.

    And then there’s the kitchen.

    Navy and White Kitchen. Stunning. Summer Home Tour: The details make the space.

    Kitchen Makeover / Barstools / Island

    The navy and white kitchen in all its glory.

    Its the stuff dreams are made of.

    Navy and White Kitchen. Summer Home Tour: The details make the space.

    Hardware

    But the hardware is so good, I refer to it as hardware porn.

    I’m nothing if not blunt.

    Navy and White Kitchen. Summer Home Tour: The details make the space.

    Faucet

    The faucet is right behind the hardware porn show.

    Navy and White Kitchen with Quirky Elements. Summer Home Tour: The details make the space.

    Mohawk Lollipop Holder

    And to top the kitchen off, we have open shelving that consists of a mohawk lollipop holder, antlers, the scales of justice and my grandmother’s red glasses among other things.

    I’m also nothing if not random.

    A bold accent wall in the dining room. Summer Home Tour: The details make the space.

    Criss-Cross Accent Wall / Blue and White Buffet / Entire Dining Room

    The dining room hasn’t changed one bit.

    Oh wait – I’m lying. 

    I did move the corner cabinet into the living room and painted it red, but didn’t have time for photos so you’ll have to stick around for that one. 😉

    Nothing else has changed. Seriously, I’m not lying this time.

    What do you think? Are you a details person?

    Either way, keep flying your freak flag.

    pin-this-post

    A gorgeous home tour, but also a breath of fresh air! Decorate with what you love! Summer Home Tour: The details make the space.

    SaveSave

  • Spring Home Tour: Design Ideas for Small Budgets

    Spring Home Tour: Design Ideas for Small Budgets

    You guys.

    You guys.

    No really, you guys.

    So much has changed since the last time I did a full home tour.

    Especially my living room. And my kitchen.

    I’m almost pee-my-pants excited to show you.

    And now that I think about the things that have changed in the past two months, I realize I have no clue how it all got done and that I must be insane.

    Oh wait, we already knew that.

    Even though, I know you’ve already seen the entryway, let’s start there since its still new-ish.

    Disclosure: Kirkland’s provided me with a gift card to do a little shopping for my home tour. However, all opinions are 100% mine.

    Confetti Style Entryway: Spring Home Tour

    Entryway Makeover / DIY Confetti Wall

    I still love the entryway so much. Its light, bright, and most importantly – fun.

    The living room….

    Wait for it…

    Wait for it…

    Vintage Modern Rustic Living Room: Spring Home Tour

    Boom.

    Such a big difference from last time, right?

    There’s a new rug, the red buffet has been stripped, and my most favorite new feature of the living room – the black and white framed gallery wall.

    Black and White Framed Accent Wall: Spring Home Tour

    Stripped & Restained Buffet / Black & White Gallery Wall

    Living Room: Spring Home Tour

    There is still a lot of gold, green, navy, and red in this space. Those are my favorites. 

    Vintage Modern Living Room: Spring Home Tour

    IKEA Tarva turned Drink Bar / DIY Cowhide Rug

    I love all the black and white that anchors it as well.

    Black and White Gallery Wall: Spring Home Tour

    The gallery wall turned out far better than I ever could have dreamed.

    Fo Realz. I never thought I could make anything that pretty. 

    The gray chair is sporting a new shimmery gold pillow, that’s a new white bust as well, and yes, those sconces are new on the wall. The pouf ottoman is new-to-the-space. I may or may not have stolen it from the man cave…..shhhhhh…..

    Black and White Gallery Wall: Spring Home Tour

    Same thing with the pink ottoman – except I stole it from my office. Moving pieces around is my favorite way to decorate. I was tickled pink to find the gold sphere for a whopping $13.

    Let’s move on to the kitchen…

    Navy and White Kitchen with a DIY Island: Spring Home Tour

    Kitchen Makeover / DIY Kitchen Island / Green & Navy Barstool Makeover

    Spot anything different??

    NAVY CABINETS!

    I die. 

    Navy and White Kitchen: Spring Home Tour

    And pretty new brass hardware…

    I die again.

    Me, overdramatic? Whatever…

    I loved my kitchen before.

    Now, I love my kitchen. Painting the base cabinets navy and adding that brass hardware made it 100% Jenna…and Grunt Labor too..he really likes it..

    Navy, White, and Brass Kitchen: Spring Home Tour

    Coffee Station & 10+ Kitchen Ideas

    The entire kitchen got a makeover in three days. It was a total whirlwind and there’s no way I could have done it alone. Kellie, who makes Velvet Finishes, actually came with her crew to pitch in and filmed it all! All that will be posted soon too.

    After the cabinets were done, I did some editing and redecorating on the open shelving.

    Open Shelving in the Kitchen: Spring Home Tour

    Knock-Off Jonathan Adler Mohawk Lollipop Holder

    The Knock-Off Jonathan Adler Mohawk Lollipop Holder graces the top of the shelving. I added a few more touches of brass with the eagle thing (no clue what its called, but it was $1 at a thrift store) and the brass bowl on the bottom. I also switched up the clear glasses for my Grannie’s red ones. I can’t believe I didn’t have those babies showcased before. I love ’em. The antlers didn’t make it into the new gallery wall in the living room, so I hung them in the kitchen. The touch of rustic they add is perfect for the space.

    And the dining room…

    Black and White Dining Room: Spring Home Tour

    Not much is different here. I am plotting to strip the table and stain it to connect the space with the living room more.

    Dining Room: Spring Home Tour

    That would be an ice bucket holding those roses, ’cause I’m a genius like that. You may have seen that tray when I instagrammed it. Its Jonathan Adler and was $4 at Burlington. Score.

    Dining Room: Spring Home Tour

    Navy, White, & Gold Buffet

    I’m still quite smitten with the buffet makeover. Its perfect for tying in the navy cabinets in the kitchen, since that whole space is open.

    Black and White Accent Wall / Buffet Makeover: Spring Home Tour

    Criss-Cross Accent Wall

    Everyone who has entered my house for the first time since the Criss-Cross Accent Wall was completed can’t get over the fact that it isn’t wall paper – its paint. And then they totally can’t believe it when I tell them it actually wasn’t that hard.

    More on the Dining Room…

    Last but not least, the master bedroom…

    Pop of Color with the bedding. Spring Home Tour

    Very little has changed in here since the master bedroom mini-makeover. I did switch out the white lamps for mid-century modern style lamps like you see above. The shape of those lamps pulled me in and had me buying them in five minutes flat.

    Stacks of books for decorating: Spring Home Tour

    I added another of the gold pillows to the reading nook and to make the books look less like clutter and more like decor, I topped them off with faux peonies. I’m usually not a faux flower person, but these were really cute and I adore the black and white striped pot.

    More on the Master Bedroom…

    I didn’t include the kid’s room, guest bedroom + office, and bathroom in the tour since nothing has really changed there at all. You can tour them here though if you https://ovo188exp.com/ haven’t seen them before.

    You know you don’t wanna miss any of this crazy.

    Sign up to get my posts delivered to your inbox here.

    Stalk Me Here:

    Pinterest / Facebook / Twitter / Instagram

    pin-this-post

    Great and Realistic Design Ideas for Small Budgets: Home Tour

  • 5 Easy Steps to Decorating a Bedroom

    5 Easy Steps to Decorating a Bedroom

    Redecorating a bedroom? The struggle is real, right? It gets overwhelming fast! Will the bedding and drapes coordinate? What paint color would be the best? Is my old furniture still going to work in the space? I’ve been there and after quite a few frustrations, I think I’ve finally came up with an easy method for how to decorate a bedroom. 

    Let’s talk about the boudoir today, shall we?

    What are your thoughts on decorating it? Easy? Hard? Somewhere in the middle?

    Our first bedroom makeover was definitely harder for me. Or I should say, it just didn’t come together as easily as other makeovers have. That could probably be why I changed it a little more than a year later.

    Since then, I’ve figured out an easier method for decorating a bedroom.

    Of course, this the “Jenna” way of decorating a bedroom – most definitely not the official way – but I fly my own freak flag.

    Proceed with caution.

    How to Decorate Your Bedroom

    How to Decorate a Bedroom in 5 Easy Steps

    This post contains affiliate links for your shopping convenience. Click here to read my full disclosure policy.

    Before you start anything, gather some inspiration photos. You can create a pin board of bedrooms you like or just save images to your computer. Also, make of list of any needs you have for the bedroom – what definitely needs to be changed or not changed? Keep those a priority as you work on your plan.

    Step #1: Start with Fabrics

    Decorating a Bedroom

    Top Left Fabric / Bedding / Leopard Pillows / Bottom Right Fabric

    The first thing you want to do is select your fabrics for your bedroom. This includes bedding, accent pillows, window treatments, rugs, and any upholstered pieces such as a headboard or chair.

    I know – you are wondering why aren’t we starting with paint.

    Never ever ever start with paint. 

    It is much easier to first find fabrics you love, and then a complimentary paint color. 

    Trust me on this one. 

    For me, I like to have solid colored bedding and then throw in patterns with pillows and / or curtains. I also like to keep my larger pieces in a solid color – even neutral. This just makes it easier to switch up your decor whenever you want! My current headboard is a creamy beige and anytime I have changed things up in the room, I haven’t had to worry about changing the headboard. It works with anything.

    I have found that buying fabrics online is much cheaper than in store…but I know its stressful picking out fabrics when you can’t see them in person. I have some tips here for how I buy fabric online without seeing it in person first.

    Step #2: Evaluate Your Furniture

    How to Decorate Your Bedroom

    Gray Nightstand / Mod Rocking Chair / Cowhide Chair (I’m dying!) / Dresser / Chest

    Take stock of your furniture. Do you need any new pieces? Would your current pieces look better if they were painted? Does your hardware need an update?

    As you know, I am a fan of updating my furniture. Simply put – they don’t make furniture like they used to. Yes, it may be cheaper now, but 9 times out of 10 the quality is going to be poor. When I did our bedroom makeover, I most definitely wanted to keep our dresser and chest. However, the hardware was lacking. I gave the hardware a quick and easy makeover with Rub ‘N Buff. That stuff works wonders on hardware – and really anything.

    What about chairs? If possible, I love to have at least one chair in a bedroom. Its just a nice little space for a reading nook or to put your shoes on. If its an upholstered piece, make sure the fabric will work with your other fabric selections you chose in Step 1.

    Step #3: Select Your Wall Paint

    Redecorating a Bedroom

    It is much easier to select a wall color when you already have your bigger items such as fabrics and furniture selected. Get paint chips you love from your local hardware store and bring them home.

    Do not try to select a paint at the hardware store. 

    Their lighting isn’t what the lighting in your bedroom will be. Trust me, it is totally different. I have made this mistake before.

    Bring the swatches home and lay them out with your fabric selections in your bedroom with your lights on. Get rid of any ones that automatically scream, “This doesn’t work!”

    Narrow your paint colors down to 2 or 3. Go get samples of those and paint small patches on your bedroom wall. Once dry, place your fabrics beside the colors and see which works best.

    Step #4: Put It All Together

    Steps for Decorating a Bedroom

    This is the easy step. You’ve made all the hard decisions – fabric, furniture, paint colors, etc. Now its just time to put it all together. Pull as much stuff out of the room as you can. Tape off your trim, cover up your flooring and any furniture and paint those walls! Go ahead and take the time to touch up trim if its needed.

    If you are re-doing any furniture, do it now.

    After you paint, bring it all back in. Start with your large pieces such as dressers, night stands and chairs. Work your way to your window treatments, bedding, and then accent pillows.

    Step #5: Bring in Accessories

    How to Decorate a Bedroom

    Gold Lion Head / Mirror / Lamp / Pocket Watch Clock / Lucite Box / Fitzgerald Quote Print

    I am one of those people who believes that sometimes when redecorating a bedroom or any space for that matter, you have to pull all of those trinkets and accessories out of the space and do some heavy editing of what you had. Pull out all those lamps, pretty storage boxes, clocks, frames, vases, knick-knacks, etc. After you put all your big stuff in the space – furniture, bedding, window treatments – come back in and slowly add in your lamps, mirrors, etc. Sometimes you may just find that less is more. This was exactly the case in my recent dining room makeover. There was simply way too much crap in that space.

    Do you have any great tips on decorating or redecorating a bedroom?

    Need more bedroom inspiration? These might help…

    14 Real Life Bedroom Ideas Anyone Can Do – real, doable ideas!

    Well Traveled Master Bedroom Makeover – a master bedroom makeover with a “well traveled” vibe.

    Masculine Bedroom Makeover – a masculine bedroom that’s still full of character.

    You know you don’t wanna miss any of this crazy.

    SaveSave

  • 14 Real Life Bedroom Ideas Anyone Can Do

    14 Real Life Bedroom Ideas Anyone Can Do

    Ok, ya know how sometimes when you are reading a magazine or browsing on Pinterest, and you see those perfectly gorgeous bedrooms? There is high end wall art, beautiful mirrors, comfy bedding, and perfect antique furniture.

    And you know that the bedding alone probably cost $1000?

    If you have $1000 to spend on bedding or on a mirror or wall art, by all means, go for it.

    I don’t.

    Hell, I can’t remember when the last time was that I had $1000 to spend on a whole room.

    Oh, wait, yea, I haven’t ever had that.

    So, for the rest of us that want beautiful bedrooms without breaking the bank, here are 14 real life bedroom ideas that anyone can do.

    Real Life Bedroom Decorating Ideas

    #1 – Create An Accent Wall

    14 Real Life Bedroom Ideas Anyone Can Do - create an accent wall

    Creating an accent wall is one of the easiest things you can do that gives huge impact. For the easiest route, go with one single color. I love this bold pink accent wall that SAS Interiors did. I’m also very into bright pinks now. Obviously, a bright pink wall isn’t going to work as an accent wall in many of our bedrooms. However, think bold for your accent wall. You want it to make a statement. The accent wall in my entryway is Rich Navy and it works perfectly for the space. If you want to really step up your accent wall game, you could stencil a design onto your wall. That is exactly what I did in our guest bedroom with this leopard accent wall. The walls were all white with black moldings – it was very stark. With the accent wall, it tied everything together perfectly and added some much needed interest to the walls.

    #2: Do a Mini-Makeover

    14 Real Life Bedroom Ideas Anyone Can Do - a mini-makeover

    Sometimes, we just need a little freshening up. I did a makeover in my master bedroom last year, but a couple months ago, I felt it needed a little something. Instead of doing a full-fledged makeover, I gave it a mini-makeover. I kept most of the main elements of the room, but changed the look with paint and a few other little ideas.

    #3: Get yourself a vanity. 

    Option 1: Build a floating vanity table.

    I did this in my walk-in-closet, but you could do it in your bedroom if you wanted to. I desperately needed a place to sit down and put on my makeup, so I build a simple floating vanity table that even has storage. The tutorial for it is HERE!

    Option 2: Turn an old armoire into a vanity.

    14 Real Life Bedroom Ideas Anyone Can Do - Turn an armoire into a vanity

    If you have enough room in your bedroom, this is a great idea for creating a vanity space. How cool is this old media cabinet turned vanity? I could totally sit there and primp for an hour. Until the kid gets in the way…

    #4: Paint a Headboard on Your Wall

    14 Real Life Bedroom Ideas Anyone Can Do - Paint a headboard on your wall.

    Beds and headboards can be expensive. Hopefully, you can luck up on a good used one that you can makeover or you can DIY your own. You could also just paint a headboard on the wall and call it done. Seriously ya’ll, this headboard is like two lines of paint and one stenciled design. So easy and gorgeous! If you aren’t into painting on a headboard, you can purchase a headboard wall decal. Yes friends, I said a headboard decal – and they look great!

    #5: Decorate your room around your favorite icon

    14 Real Life Bedroom Ideas Anyone Can Do - decorate your bedroom around your favorite icon.

    Most of us all have a favorite icon or celebrity. Hopefully its someone classic like Princess Diana and not Eminem, but hey if Eminem is your idol, who am I to judge? This Audrey Hepburn inspired bedroom is just too adorable. Really, how easy would it be to take your icon and use them as inspiration in your bedroom? Just think about their favorite colors, what movies they’ve been in and pull from that!

    #6: Create a Reading Nook

    14 Real Life Bedroom Ideas Anyone Can Do - create a reading nook!

    I love a good reading nook just about anywhere, but especially in a bedroom. I am one of those people that believe bedrooms should always have at least one chair – and that chair should be perfect for reading in.The reading nook in my bedroom is simply a single chair and side table. You’ll never believe where that chair came from! I am dying over that adorable reading nook for a kiddo from These Moments of Mine. Really, how cute are those curtains? A kid would love hanging out in a place like that, heck I would!

    #7: Make Storage Decorative

    14 Real Life Bedroom Ideas Anyone Can Do - make storage decorative!

    I don’t know about you guys, but there is never enough storage in our bedroom. Half of my clothes are in the guest closet and we are busting out of our dresser and chest of drawers. To save a little closet space, Grunt Labor’s ties are stored outside of the closet. We took an old coke crate and turned it into decorative storage for his ties.I also kinda sorta maybe have a good bit of jewelry. Fake jewelry of course, but there’s a good bit of it. Grunt Labor gave me this bust of David for Christmas (from this Etsy store) that I use to store my necklaces that I wear most often. Its pretty, quirky, and useful.

    #8 – Upholster Your Box Spring

    When it was time for the guest bedroom to get a makeover, I knew I wanted to keep the bed we had in there. The problem was that a bed skirt didn’t hang right on it.

    14 Real Life Bedroom Ideas Anyone Can Do via RainonaTinRoof.com #bedroom #DIY

    I fixed the problem by upholstering the box spring. It was easy to do – no sewing required – and it added some extra color and pattern to the room.

    #9 – Create an Office Space with Skinny Furniture Pieces

    While also plotting out the guest bedroom makeover, I knew I needed to somehow incorporate an office space in there for me. However, the room isn’t large, I needed the office area to take up as little space as possible.

    14 Real Life Bedroom Ideas Anyone Can Do via RainonaTinRoof.com #bedroom #DIYI created the office space by taking an old kitchen table and putting a hutch from a yard sale on top of it to create a desk. There is still ample storage, but it doesn’t take up much space at all.

    #10 – Save Money on Bedding by Buying the Basics

    As we all know, I am cheap. As I said at the beginning of this post, I do not have $1000 to drop on a room, much less on bedding.

    14 Real Life Bedroom Ideas Anyone Can Do via RainonaTinRoof.com #bedroom #DIYOne idea to save on bedding is to buy “basics” and liven them up with pillows and other elements.

    #11 – Create Your Own Art

    In both the guest bedroom and master bedroom, I created my own art.

    14 Real Life Bedroom Ideas Anyone Can Do via RainonaTinRoof.com #bedroom #DIY

    In my master, I made all the animal print wall art using Picmonkey and then found inexpensive frames that I spray painted.

    14 Real Life Bedroom Ideas Anyone Can Do via RainonaTinRoof.com #bedroom #DIY

    In the guest bedroom, I took an old framed print and replaced the prints with this hello darlin’ wall art.

    #12 – Add Drama with Moldings (Real or Fake)

    Moldings add interest to any room, a bedroom is no different.

    14 Real Life Bedroom Ideas Anyone Can Do via RainonaTinRoof.com #bedroom #DIY

    If you are good with wood and have basic DIY skills, you can easily do moldings similar to what Evolution of Style did in her bedroom.

    14 Real Life Bedroom Ideas Anyone Can Do via RainonaTinRoof.com #bedroom #DIY

    If you want to go the cheaper route, you can create faux wall moldings, as I did in my guest bedroom and office space.

    #13 – Keep Bedding Mostly Neutral

    When it comes to bedding, its always smart to keep it mostly neutral.

    14 Real Life Bedroom Ideas Anyone Can Do via RainonaTinRoof.com #bedroom #DIY

    I can easily tire of patterns. That’s why I went with simple white bedding with a pop of coral around the edges on my bed. I can easily change the room color, pillows, throws, etc without having to worry about clashing with lots of other colors or patterns.

    #14 – Keep Existing Furniture and Give It a Simple Makeover

    You don’t have to do extensive paint jobs to give your furniture new life.

    14 Real Life Bedroom Ideas Anyone Can Do via RainonaTinRoof.com #bedroom #DIY

    I am crazy about my dresser and chest of drawers in my bedroom. However, the pulls were definitely lacking some luster. I easily brought them back to life with Rub ‘N Buff.

    What are your go-to bedroom ideas or decorating tips?

    Find more bedroom ideas on my Pinterest board!

    Want more real life decorating ideas? Don’t miss these then…

    10+ Kitchen Ideas for Decorating, Organizing, and Storage – functional ideas for your kitchen that are pretty too!

    20+ Living Room Ideas – real life living room decorating ideas that are actually doable!

    14 Stunning Home Ideas – stunning home ideas that you might not have thought of before!

    You know you don’t wanna miss any of this crazy.

    Sign up to get my posts delivered to your inbox here. 

    Stalk Me Here:

    Pinterest / Facebook / Twitter / Instagram

    Real Life Bedroom Ideas | Bedroom Decor | Bedroom Decorating Ideas | DIY Bedroom Decor | DIY Bedroom Ideas | Bedroom Decor DIY

  • Master Bedroom Mini-Makeover

    Master Bedroom Mini-Makeover

    So, remember a few weeks back when I created this whole master bedroom inspiration board?

    Remember how we were looking at building on a new master suite?

    Exactly one day after that post published, we met with a contractor. We walked him around the house, showed him what we wanted to do, and then he gave us a heartfelt smile and said, “It won’t work. I’ve never seen a house more stuck than yours.”

    Seriously?

    Yes. I kid you not.

    Now, we really don’t need a new master suite. We really don’t need anymore space at all, though it would be nice. And honestly, we could live in less than we have and we are are truly blessed to have what we do have.

    And that was a lot of “haves” in the last sentence.

    But, I figured if I’m not going to get a new master suite, I’m at least going to give the current one a mini-makeover. And what better time to show you that master bedroom makeover and share with you my master bedroom ideas than on the last round of What’s Your Style.

    This post contains affiliate links for your shopping convenience. Click here to read my full disclosure policy.

    Master Bedroom Ideas {A Mini-Makeover} via RainonaTinRoof.com #masterbedroom #bedroom #makeover #homedecor #interiordesign

    (more…)

  • Duck Tape Trim Curtains

    Duck Tape Trim Curtains

    I hope you are ready for some great projects and inspiration! Today, I’m very excited to show you how I salvaged the curtains in my guest room / office instead of having to buy new ones.

    Duck Tape Trim Curtains via RainonaTinRoof.com #ducktape #ikeacurtain #hack
    Duck Tape Trim Curtains

    This post contains affiliate links for your shopping convenience. Click here to read my full disclosure policy.

    That’s right, people, I used Duck Tape on my curtains.

    When I was plotting out the guest bedroom and office, I knew something had to happen with the curtains. They were just basic IKEA white panels and they were boring. We had them left over from our old house and there they had been against dark blue walls and worked perfectly.

    I wanted to switch out the curtains completely and had them pulled down and ready to go in the yard sale pile.

    But………..

    I really didn’t want to spend money on new curtains. Surprise, surprise.

    So, I held onto them for a little while longer. And then one day, while meandering through Michael’s attempting to keep the kid from jumping out the cart and escaping my rule, I happened upon Gold Duck Tape. Gold Duck Tape. 

    My heart stopped.

    I had to catch my breath.

    And it was on sale.

    I snatched up two of those bad boys, the kid, and headed for the cash register.

    Because I didn’t have much time, and wanted to make this as easy as possible, I just put the Duck Tape along the edges of the curtains and called it done.

    Duck Tape Trim Curtains via RainonaTinRoof.com #ducktape #ikeacurtain #hack

    Check out the askew pull on that chest. Obviously, I’m a perfectionist.

    Duck Tape Trim Curtains via RainonaTinRoof.com #ducktape #ikeacurtain #hack

    The Duck Tape has been on the curtains for over a month and hasn’t budged.

    Duck Tape Trim Curtains via RainonaTinRoof.com #ducktape #ikeacurtain #hackWhat do you think? Can you embellish some curtains with Duck Tape?

    Want more great tape crafts, hacks and DIY projects? I love ’em too! Be sure to see these…

    There are 20+ Duct Tape craft and project ideas here! 

    Find out how to make gorgeous fringe out of duck tape to add to pillows, lampshades and more here!

    Got some electrical tape on hand – easily dress up a lampshade with it using this tutorial!

    And don’t miss these seven super simple, super cute electrical tape crafts either!

    You know you don’t wanna miss any of this crazy.

    Sign up to get my posts delivered to your inbox here. 

    Stalk Me Here:

    Pinterest / Facebook / Twitter / Instagram

    SaveSave

  • Sequined Coat Hangers

    Sequined Coat Hangers

    Last week when I showed you the faux wall moldings, many of you mentioned the sequined coat hangers.

    Who knew a coat hanger could be so fabulous?

    When I was trying to figure out how I could make frugal wall decor for the guest bedroom, I knew I wanted to have lots of inspiring and fun life quotes. I also wanted them to be fabulously displayed. And what better to display them with than sequined coat hangers.

    Sequined Coat Hangers via RainonaTinRoof.com #lifequotes #sequins #coathanger
    Sequined Coat Hangers

    This post contains affiliate links. 

    I bought an 8 pack of the Bumerang Curved Coat Hangers from IKEA for $5.

    Sequined Coat Hangers + Free Printable Life Quotes via RainonaTinRoof.com #lifequotes #sequins #coathangerI bought four small rolls of stretch sequin ribbon in gold from Michael’s. It took two rolls per coat hanger. I think each roll was about $4 regular. Use your coupons or wait till its on sale to get it cheaper! That’s what I did!

    Sequined Coat Hangers + Free Printable Life Quotes via RainonaTinRoof.com #lifequotes #sequins #coathangerAfter the sequin ribbon fabulous-ness was attained, I just wrapped it around the coat hanger, putting a dot of hot glue on the coat hanger every now and then to keep the ribbon in place.

    Sequined Coat Hangers + Free Printable Life Quotes via RainonaTinRoof.com #lifequotes #sequins #coathangerI used Rub ‘N Buff to make the bottom bar gold.

    I taped gold and white twine to the back from the Target Dollar Spot, then tied them on the coat hangers.

    Sequined Coat Hangers via RainonaTinRoof.com #lifequotes #sequins #coathanger

    And aren’t those prints so fun?

    Sequined Coat Hangers via RainonaTinRoof.com #lifequotes #sequins #coathanger

    I like to think of them as life quotes. Words to live by.

    Words to live by in my crazy life anyway.

    Get those life quotes as well as some other ones for free here! 

    Read about the faux wall moldings shown in this post here.

    If you liked this easy little craft, you’ll want to see these too…

    Learn how to make faux crystals and then turn them into gorgeous knobs HERE!

    Find out how to make a huge wall frame for super cheap HERE!

    You know you don’t wanna miss any of this crazy.

    Sign up to get my posts delivered to your inbox here. 

    Stalk Me Here:

    Pinterest / Facebook / Twitter / Instagram

    SaveSave

  • Faux Wall Moldings

    Faux Wall Moldings

    Today, you get to see another little piece of the guest bedroom and office.

    I’m still not quite done with the rest of the room as I told you on Tuesday, but I’m hoping I get to show you a full reveal next week.

    When I began plotting out this room makeover, I found some great inspiration photos on Pinterest. If you follow me there, you may have noticed I pinned a lot of black and white rooms that had some great black wall moldings.

    Disclosure: This post is sponsored by FrogTape, but you know how I roll, all opinions are 100% mine. This post contains affiliate links for your shopping convenience. Click here to read my full disclosure policy.

    Here’s the problem with wall moldings -they can be expensive.

    My solution?

    Faux wall moldings made with FrogTape and glossy black paint.

    Faux Wall Moldings via RainonaTinRoof.com #frogtape #faux #wallmoldings

    Faux Wall Moldings

    After I nailed down my measurements, these were pretty easy to do. From outside edge to outside edge, my moldings are 24 1/2 inches wide x 74 inches long. The bottom edge comes up 11 1/2 inches from the floor and the top edge comes down 10 inches from the ceiling. There is more room between the ceiling and top edge than the baseboard and the bottom edge. I did that on purpose – I may want to add faux crown molding one day!

    I determined the size by sketching lines on my wall to get an idea of how large I wanted the moldings. Be sure to write down your measurements before completing the next step.

    When I had the lines where I wanted them, I painted a rough rectangle right over the lines.

    Faux Wall Moldings via RainonaTinRoof.com #frogtape #faux #wallmoldingsNow, you need to put FrogTape over the black where your rectangle will go.

    To do this, you first need to measure back out your dimensions. You don’t have to draw the entire line again, just measure to where you want your tape edge to start and put a mark.

    After you have your marks, enlist help.

    Seriously, this step is done much easier with another person.

    I enlisted Bill, whose name isn’t really Bill, but he said he liked the name Bill. He told me he wanted to be on the blog. I said I needed help on a project that was going on the blog. He’s on the blog, I get help. Its a win-win for myself and for Bill.

    Now, have your helper, in my case, Bill, hold a level on the mark and make sure its level.

    Faux Wall Moldings via RainonaTinRoof.com #frogtape #faux #wallmoldingsOnce its level, run your FrogTape along the edge. Because I had just painted the black the day before, I used the FrogTape Delicate Surface for newly painted surfaces.

    Faux Wall Moldings via RainonaTinRoof.com #frogtape #faux #wallmoldingsDo your vertical and horizontal edges the same way. You’ll end up with this:

    Faux Wall Moldings via RainonaTinRoof.com #frogtape #faux #wallmoldingsNow, I didn’t just want a plain jane rectangle. We all know I’m not a plain jane kinda gal. So, I took some FrogTape Scalloped Shape Tape and put it in the corners.

    Faux Wall Moldings via RainonaTinRoof.com #frogtape #faux #wallmoldingsBe sure to trim up your corners evenly as well.

    After all your tape is up, paint over it with your existing wall color. In my case, white.

    Which took about five coats to cover the black.

    But, the end result was worth the five coats.

    Faux Wall Moldings via RainonaTinRoof.com #frogtape #faux #wallmoldings

    Faux Wall Moldings via RainonaTinRoof.com #frogtape #faux #wallmoldings

    Faux Wall Moldings via RainonaTinRoof.com #frogtape #faux #wallmoldings

    More projects in this post that may have caught your eye: 

    DIY Sequined Coat Hangers– so fun to use for display!

    How to Build a Desk Using Furniture You Already Have– I made this desk using an old kitchen table and a discarded hutch top!

    Free Sassy Printables – everyone needs a little sass in their lives, right?

    Where would you like to add faux molding?

    Sign up to get my posts delivered to your inbox here. 

    You know you don’t wanna miss any of this crazy.

    Stalk Me Here:

    Pinterest / Facebook / Twitter / Instagram

    SaveSave

  • Navy and Gold Chest Makeovers

    Navy and Gold Chest Makeovers

    Have I chatted with you about the guest bedroom before?

    Why am I asking? I know the answer to this. Its no.

    And why have you never heard of this guest bedroom before or seen photos of it?

    Because its ugly.

    Let’s be honest. What room is usually last on the list when it comes to decorating?

    The guest bedroom.

    Those poor guests. A.K.A my amazing in-laws.

    Bless them. They deserve better.

    And they will get it. It’s all starting with these navy and gold chest makeovers.

    Disclosure: This post is sponsored by HomeRight. Y’all know how I roll though, all opinions are 100% mine. This post contains affiliate links for your shopping convenience. Click here to read my full disclosure policy.

    Navy and Gold Chest Makeovers via RainonaTinRoof.com #furnituremakeover #homeright #finishmax

    Sometimes, all you need to make something pop is the simple combination of two colors.

    No frills. No intricate details. Just the simple combination.

    And for me, that simple combination in this case was navy and gold.

    Notice, I said makeovers in the title. Yep, there are two of these. A night stand and a chest of drawers. I think the night stand probably  qualifies as a chest because it certainly doesn’t seem like a “stand.”

    Both of these are pretty solid, but had some issues.

    Navy and Gold Chest Makeovers via RainonaTinRoof.com #furnituremakeover #homeright #finishmaxI think at some point, they may have been in some water. See the bottom of the big chest above?

    And the top needed some love as well.

    Navy and Gold Chest Makeovers via RainonaTinRoof.com #furnituremakeover #homeright #finishmaxSo, before any paint went on these, I sanded them well. And picked up all the sanding dust with a tack cloth.

    And then I pulled out my beloved, my coveted, my just-go-ahead-and-bury-me-with-it, HomeRight Finish Max paint sprayer.

    Navy and Gold Chest Makeovers via RainonaTinRoof.com #furnituremakeover #homeright #finishmax

    Heaven help. Why did I just show you that picture?

    That would be one of those days when the circus went to preschool and I tend to go a little loco.

    You don’t get to judge.

    After a coat of primer, I painted the chests the same navy color I used on the $10 dresser turned buffet.

    Navy and Gold Chest Makeovers via RainonaTinRoof.com #furnituremakeover #homeright #finishmax

    Navy and Gold Chest Makeovers via RainonaTinRoof.com #furnituremakeover #homeright #finishmax

    This is a really deep navy, so it took a few light coats to get the color uniform. The finish was still impeccable.

    Wow, I don’t know that I’ve used that word before on the blog. Yay, Jenna for using big words!

    But, that’s the beauty of the Finish Max, it has a fine finish that looks completely professional.

    Navy and Gold Chest Makeovers via RainonaTinRoof.com #furnituremakeover #homeright #finishmax

    I was not parting with the hardware that these chests came with – I loved their vintage vibe. They got a coat of gold spray paint.

    Navy and Gold Chest Makeovers via RainonaTinRoof.com #furnituremakeover #homeright #finishmax

    Navy and Gold Chest Makeovers via RainonaTinRoof.com #furnituremakeover #homeright #finishmax

    There was this inlay on the top of each chest. To highlight it, I went over it with a gold Sharpie paint pen.

    Navy and Gold Chest Makeovers via RainonaTinRoof.com #furnituremakeover #homeright #finishmax

    Navy and Gold Chest Makeovers via RainonaTinRoof.com #furnituremakeover #homeright #finishmax

    Want to learn more about how to use the Finish Max paint sprayer? See this post then! Oh, you are worried about clean-up of the Finish Max? Don’t be. It takes less than 10 minutes to clean it and in only six steps! Read all about it here!

    So, where is this guest bedroom headed?

    My friends, that is a fabulous question.

    Here’s what I know:

    The Jonathan Adler inspired chair is staying.

    The wall color is going.

    Somewhere in all of it, there needs to be an office space.

    And these chest makeovers were a fabulous start.

    That’s about it.

    Stayed tuned. It should be fun.

    Sign up to get my posts delivered to your inbox here. 

    You know you don’t wanna miss any of this crazy.

    Stalk Me Here:

    Pinterest / Facebook / Twitter / Instagram

  • Master Bedroom Makeover (Neutral, Yet Beautiful)

    Master Bedroom Makeover (Neutral, Yet Beautiful)

    This was the room that got put off for a very long time. When we purchased the foreclosure, the last thing on our minds was the bedroom. I am thrilled to announce that our Master Bedroom Makeover is finally complete. Master Bedroom Makeover {rainonatinroof.com} #masterbedroom #makeover

    This post contains affiliate links for your shopping convenience. Click here to read my full disclosure policy.

    Master Bedroom Makeover

    It is finally done. We’ve been in this house almost two years, and the master was always put off on the makeover list. I am so happy to have it done and I’m pretty sure Grunt Labor might be more excited than I am because he doesn’t have to listen to me whine about not finding the right curtains or pillows, or frames. Poor guy. Here is the master bedroom makeover reveal:

    Summer 2013 Showcase of Homes {rainonatinroof.com} #hometour

    Summer 2013 Showcase of Homes {rainonatinroof.com} #hometour Summer 2013 Showcase of Homes {rainonatinroof.com} #hometour

    Here is a before:
    Master Bedroom Before
    I cringe.
    I actually kept a lot of elements from the before, I just re-arranged some things and made them over. The wall color also stayed the same. I’m still not 100% happy with the wall color, but I did not want to paint this room.
    Here’s what I did:
    Reading Nook
    Summer 2013 Showcase of Homes {rainonatinroof.com} #hometour
    I took a little corner of the room and turned it into a reading nook. Grunt Labor found that chair at Costco and the table was a Craiglist find that I made over with DIY chalk paint.
    DIY Corbel Shelving
    DIY Corbel Shelving
    I added a DIY Corbel Shelf above the reading nook. This shelf was super simple to make. Read more about it here.
    Bedding 
    Summer 2013 Showcase of Homes {rainonatinroof.com} #hometour
    Summer 2013 Showcase of Homes {rainonatinroof.com} #hometour
    The bedding got a serious makeover. We kept our headboard – love it way too much to part ways. We chose a simple white comforter from Dillard’s and bought some frugal accent pillows.
    Frugal DIY Wall Art
    Summer 2013 Showcase of Homes {rainonatinroof.com} #hometour
    I created some frugal DIY wall art with images and backgrounds I bought from Etsy. I made it all using Picmonkey. Did you notice the frames in the reveal photo? I found those at Target for $5 each!!! They were white, but I sprayed them gold! Read about the art here.
    Rub ‘N Buff Hardware Makeover
    Summer 2013 Showcase of Homes {rainonatinroof.com} #hometour

    I used the amazing Rub ‘n Buff to transform the hardware on our dresser and chest of drawers. Read how easy it was here.

    Overall, I’m very pleased with the makeover! Grunt Labor was very hesitant about the gold in the curtains and me spray painting the wall frames gold. But after it was all done, he said: “I’m not a gold guy, but I really like it in here.” SCORE.
    Master Bedroom Makeover {rainonatinroof.com} #masterbedroom #makeover
    What do you guys think? Successful master bedroom makeover?
    Update: The master bedroom has underwent another mini-makeover! See it here! 
    Need more real-life bedroom ideas – be sure to see this post with great out-of-the-box bedroom ideas that are totally doable!
    Want to snoop in my house more? Right this way, please…

    You know you don’t wanna miss any of this crazy.

    Sign up to get my posts delivered to your inbox here. 

    Stalk Me Here:

    Pinterest / Facebook / Twitter / Instagram

  • Rub ‘n Buff Hardware Makeover

    Rub ‘n Buff Hardware Makeover

    This was my first adventure with Rub ‘n Buff.

    A Rub ‘n Buff hardware makeover.

    This post contains affiliate links for your shopping convenience. Click here to read my full disclosure policy.

    Rub N Buff Hardware Restore
    It won’t be my last! If you haven’t heard of Rub ‘N Buff, it is this little tube of amazingness that is like a paint / paste / cream. You can get it in various shades of gold, pewter, silver, etc.

    All you do is squeeze a small portion out, I mean SMALL, a little goes a LONG way, and rub it on whatever you want to make gold, silver, etc. Let it dry, then buff. That simple.

    My dresser and chest of drawers pulls in the master needed some help. I tried to polish the brass, but that did nothing. They needed a total overhaul.
    Hardware Before Rub N Buff
    Hardware Before Rub N Buff

    Some of them were even a little rusty, so I sanded those first. And the after:

    After I applied the Rub ‘n Buff, and rubbed and buffed, I did sand them a tad. The gold was a bit too “BAM” for me.
    Rub N Buff Hardware Makeover
    What da ya think?
    The Master Bedroom is finally complete. Wanna see the whole shebang? Right this way, please…Master Bedroom Reveal
    Need more ideas for restoring your furniture hardware or making new hardware? See these…
    How to Clean and Restore Your Hardware with One Product  – you won’t believe the difference!
    Three Easy Ways to Update Your Furniture Hardware – before you replace it, see if you can update it!
    DIY Faux Crystal Knobs – make your own crystals, then turn them into knobs! It’s easier than you think!
    DIY Selenite Knobs – easily turn beautiful selenite stones into furniture knobs!
    Like what you see?
    Follow along: