So you’re ready to make your own headboard? Not just any old headboard, but one with serious style – like a Hollywood Regency headboard? You’re in the right place! This black velvet headboard will make you swoon and it’s totally DIYable.
I have never been so stressed about a project before. Never, y’all. I swore I was not making a new headboard for the master bedroom at the 70’s Landing Pad myself. I even found some great options that were less than $300, but as I kept coming back and looking at them, they just didn’t have that “wow” factor – they didn’t make a statement.
And we all know I prefer to make a statement in both decorating and life in general.
So I ate my words (not for the first time) and made the king sized headboard for our bedroom.

Our headboard wasn’t necessarily cheap, but it was significantly cheaper than if we would have purchased what I really wanted brand new. We have about $250 in the headboard, but would have easily spent $600, probably more, if I would have bought one similar to our DIY version new. This headboard is made of panels that all get screwed together in the end. The build is really pretty easy. The hardest part for me and where I stressed the most was the upholstery and that was probably because I’m such a perfectionist and wanted super smooth edges which just won’t happen when it’s not a professional upholstery job. In the end, you can’t even see the imperfections that much unless you look closely. Of course, I eyeball them constantly though because I know exactly where they are. #storyofmylife
DIY Hollywood Regency Headboard
This post contains affiliate links for your shopping convenience. Click here to read my full disclosure policy.
Tools and Supplies Needed:
*Please note that all the measurements and amounts are for a king size headboard that is approximately 85″ wide when assembled.
- 1/4″ Plywood – Two sheets of 4′ x 8′ and one sheet of 2′ x 4′
- Two pieces of 1″ x 2″ x 8′ wood furring strips
- 8 yards of Upholstery Material (I used black velvet.)
- Four packages of Poly Foam size 2″ x 27″ x 76″
- Two packages of Extra Loft Polyester Batting size 81″ x 96″
- Something round that is about the size you want your top edges to be (you’ll see what I mean in a second)
- Circular Saw
- Jigsaw
- Staple Gun
- Electric Knife
Steps
Step 1.
Cut a panel of wood that is 16 3/8″ wide x 4 1/2′ long from the 4′ x 8′ sheet of plywood using a circular saw.


Step 2.

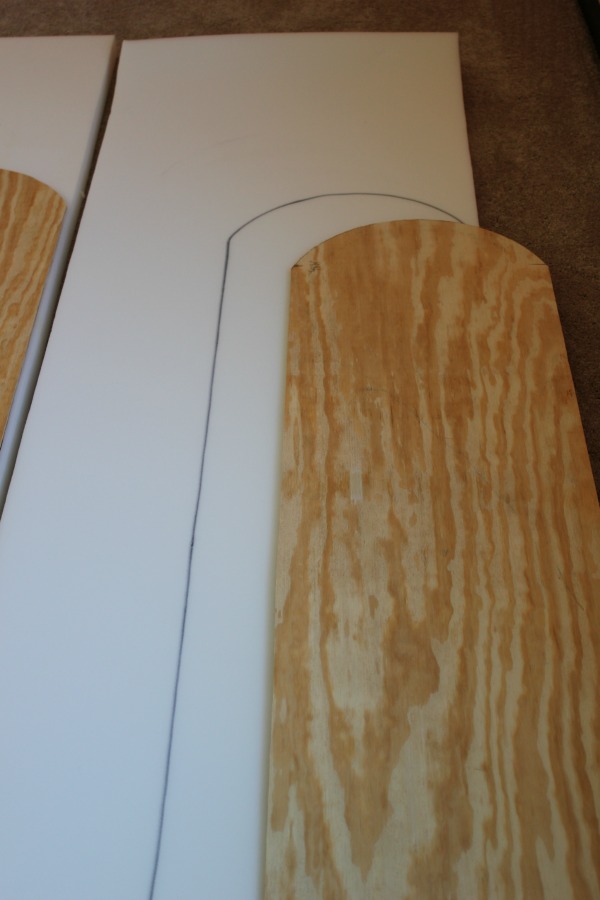
Find something round that will nicely fit into the width of the plywood panel and will allow you to create a semi-circle.
We ended up using a footstool. You could also use a lampshade, a large bowl, basically anything round that will give you a curve. Once you find something, place it on one end of the wood panel and trace it as shown above.
Step 3.
Using a jigsaw, cut along the traced line.

Step 4.
You now have one of your headboard panels. Trace the shape of this panel onto the rest of your wood and cut out the remaining four panels.

The curve of all your panels will be the same, however, only the end panels need to be 4 1/2′ long. The remaining three panels in the middle of the headboard need to be 4′ long so that you have enough plywood.
Step 5.
Roll out the Poly Foam and place your wood panels on top of it.
Trace the shape of the wood panels onto the foam with a black marker. All but two of the panels will fully fit on the foam strips. For the remaining two panels, lay them out as shown below.

Trace them and use the scrap from the remaining foam to fill in on the bottom of the panel.
Use an electric knife to cut out the foam shapes.
P.S. This was the first project using foam where I finally bought an electric knife to cut the foam. Every other time I used a box cutter which was the biggest pain in the you know what. Trust me, the $14 investment for the electric knife is so worth it. I am mad at myself for not buying one sooner.
Step 6.
Lay out all your wood panels with the foam on top of them, then cover each panel with two layers of batting.

Loosely staple the batting around the back edges of the panel.
Step 7.
Upholster each panel with your upholstery material. I used black velvet from Hobby Lobby. For me, the toughest part was covering the panels with velvet. I found that if I first stapled the velvet to the back somewhat loose, then came back and tightened it up with a staple while smoothing it from the front, it worked best. Also, this was another case when it was so worth it to have the electric stapler. Those staples went in fast and flush.
Step 8.
After all the panels are upholstered, lay them face down on the floor. Move them around in the shape you want the panels to be. I opted for our panels to work it’s way up in the middle.
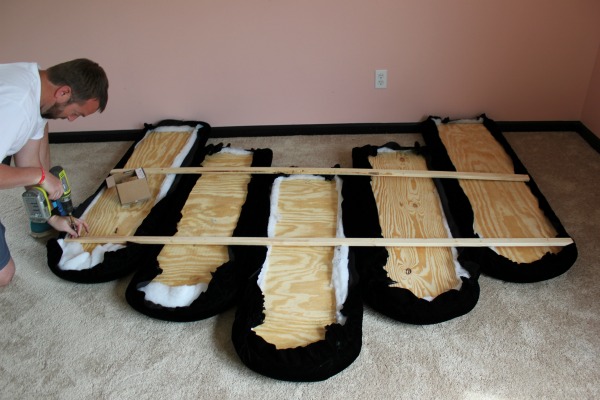
The two end panels are at the same height, the next two are at the same height, but higher than the two end ones and the middle panel is higher than them all. You can keep them all at the same height too if you prefer. The only thing you want to make sure of is that the bottom of the middle panel doesn’t go higher than your mattress.
After you have the panels in position, attach the two 1″ x 2″ x 8′ furring strips across the back as shown below. You will have to cut them down some. This part is best done with two people. While one is attaching the furring strips, the other should be pushing the panels together tightly.
Step 9.
Once you’re done attaching the furring strips, you’re pretty much finished with the headboard. The only thing left to do is attach it to your bed frame – which we decided was optional and I’ll tell you about in just a minute.

Mattress Details
Disclosure: Tuft & Needle provided me with a new mattress, however all opinions are 100% mine.
The mattress for our new bed came from Tuft & Needle. We didn’t have room for a king size bed at our Beloved Foreclosure, but did at the 70’s Landing Pad, so we jumped on that because both Grunt Labor and I have always wanted one. Also, it helps to have all that extra space when the Circus comes and gets in bed with us at 7 a.m. in the morning and we aren’t ready to get up just yet.

Tuft & Needle mattresses come straight to your doorstep – in a box. #mindblown Yes, that is a king size mattress in that box.
Also, my Vanna White is hotter than your Vanna White. 😉

All you do is just take the mattress out of the box and remove the plastic from it.

You will immediately see it begin to expand as you do this.

Lay it out on your bed frame or box springs and it will continue to fully expand.
Tuft & Needle mattresses are made of adaptive foam in the top layer and a support layer on the bottom which is the foundation so to speak of the mattress. The adaptive foam basically conforms to anyone’s weight or size to give you the ideal amount of support. In non-fancy words, it’s really comfortable.

To me, the mattress doesn’t “give” as much as our old pillow top one did, but instead it just kind of contours to your body. We’ve been sleeping on it for a little over a month now and really love it. It did take a few nights to get used to the difference from our old mattress, but now we’re out like lights every night.
Since we were starting from scratch with this bed and headboard, we bought a SmartBase mattress foundation to put our Tuft & Needle mattress on top of.

The foundation puts the mattress at standard height, but it has much more storage space under the bed. You can also use a regular box springs, slatted bed frame, etc. with Tuft & Needle mattresses.
Back to the headboard, you can use nuts and bolts to attach it the bed frame, however after we got it in place and pushed the bed frame and mattress up against it, it stayed in place and has ever since. For now, we are leaving it like that, but may attach it to the bed frame at some point.

Apparently, the new bed is so good that Bill set up camp in our bedroom while we were away on vacation.
According to him, he went to lay down for just a minute before he was going to clean the house up on the day we got home, but fell asleep. I’ll let you guess how clean the house was when we got back… #notsomuch
You can see more of our master bedroom here.

Looking for more DIY home projects?
How to Make a Huge Frame for Cheap – like the one you see in the picture above!
How to Turn a Side Table into a Bench – easy and the possibilities are endless!
Want to remember this DIY headboard for later? Just pin the image below!


Barbara Christianson says
Very cool.
Jenna @ Rain on a Tin Roof says
Thank you, Barbara!
Julie says
Like the uniqueness of the headboard and most of all because you can say “I” did it! Another great job you’ve done Jenna!!
Jenna @ Rain on a Tin Roof says
Thanks, Julie! There is definitely something to being able to say “I”!
Marty@A Stroll Thru Life says
Love that headboard and your room. Looking good.
Jenna @ Rain on a Tin Roof says
Thanks so much, Marty!
Pam S says
Oh Jenna….it’s really pretty! Kudos to Vanna 🙂 too! Hope you had lots of fun on the vacation. Missed you!
Jenna @ Rain on a Tin Roof says
Thanks, Pam! We had a great time!
Joanna says
Thank you so much for sharing the info. on your new mattress. I’m in the market and this sounds like a great deal – I immediately went to their website to read more and I’m definitely intrigued — I have a question…do you know if you can “flip” this mattress? I’ve never owned any foam mattresses.
Jenna @ Rain on a Tin Roof says
Hey Joanna, glad it was helpful! I’m not sure about that, but I’m going to ask and find out for you! Stay tuned!
Jenna @ Rain on a Tin Roof says
Hey Joanna – I checked on your question and here is their response: “You can flip it head to foot, but you shouldn’t need to. If there’s a reason they feel like they need to, it’s probably a warranty issue and we’d send them a new one under the 10 year warranty. You shouldn’t flip it top side to bottom side. There’s a softer top layer and the support layer on the bottom is much firmer and not meant to be the top!”
Hope that helps!
mary ballerin says
Jenna – Does the new mattress make you warm? I have a 100% memory foam mattress in my guest room and a pillow top mattress in the master. I think I prefer sleeping in the guest room. I keep trying to win a Casper. There are so many new mattresses out there, easy to try out and return if necessary – so much better than feeling stuck with something you don’t like.
Jenna @ Rain on a Tin Roof says
We have a comforter on our mattress and I still use it while sleeping. So, I guess my answer would be the mattress keeps me “warm enough.” I know that the foam in these mattress have a technology that is supposed to draw the heat out from your body and keep you cool.
mary ballerin says
I guess that’s what I was asking, Jenna … I’m too hot on my pillowtop mattress! I have heard that these newer foam mattresses are supposed to keep you cooler. I’m all for that! 🙂
Patty says
Love, love, love your headboard. I think you were really smart to make it yourself, from the picture I’m looking at I can’t see that buying a new one would look any better.
I’m really interested in the mattress, we have a king size bed and I really hate it because #1 it takes up to much room in our bedroom and #2 it is so heavy I can barely lift a corner to make my bed (changing the sheets is a killer job), so I was wondering if that mattress is any lighter. It seems like if it expands the way it does it might be less heavy.
The mattress we have now is the second one we have had for this bed and each one ends up with a hump down the center, so I’m hoping these mattresses won’t do that.
Can I get more info online.
Jenna @ Rain on a Tin Roof says
Thanks, Patty! So, I do know that this mattress is somewhat heavy, but I don’t have any other mattress to compare it to besides our old queen size one. That being said, I can easily lift the corners to make the bed and I’m small beans, so I’m guessing it’s lighter than yours there anyway. I know what you mean about the hump, although I think ours was more of a dip in the center in our old one – drives me crazy. I haven’t had this one long enough to see how it will do in that department, but I’ve got high hopes. Tuft & Needle has an FAQ page here that might help: https://www.tuftandneedle.com/faq/
Patty says
Thanks Jenna, I’m going to check it out right now. I just read what you said about it is designed to keep you cooler That sounds wonderful since I sleep so hot, and that is not a menopause thing, I have always slept hot, thank the good Lord for fans even in the winter.
This mattress might just be what I’m looking for.
Jenna @ Rain on a Tin Roof says
Yea, the keeping you cooler thing is pretty cool! I know Grunt Labor says I put off a ton of heat when I sleep and he hasn’t complained about that near as much since we’ve been on the new mattress.
Suzanne Melton says
Great job with the upholstery! Can’t wait to see your next upholstery project.
P.S. Can you BELIEVE how much foam costs? I had to buy some and, when I saw the price, my first thought was, “Geez, do I get a hooker with that?”
Jenna @ Rain on a Tin Roof says
Girl. Preach. Foam is ridiculous!!! If you have to buy a small piece, it’s not too bad, but huge pieces – OMG! I’m pretty sure like $100 of my headboard was just foam!
Marie says
Great post. I just love those little lamp tassles too.
Jenna @ Rain on a Tin Roof says
Thank you, Marie!
Tina W says
Headboard gets a solid A.
Grunt’s stripey socks: A+++++++++++++++++.
Jenna @ Rain on a Tin Roof says
hahahahaha!!! He’ll be thrilled to hear it! 🙂
Anita Holland says
Great project and the shape is awesome. Pinned
Sandy Hartzler says
Cutting the velvet on the bias (if you get 60 inch wide fabric) you can smoothly stretch the fabric over the curved top edge. Takes a bit more fabric but the smooth finish is worth it. (from a retired decorator/drapery maker) Sandy
Sue at Blu says
Jenna…these colors!!!! OMG! Love!!!
Ana says
What was the original headboard called?