Have a large picture to frame, but don’t want to spend a fortune on the frame? No problem! This oversized DIY frame will only set you back about $25. You won’t need extensive woodworking skills to make this DIY large picture frame either!
I tried to come up with some eloquent title for this project, but really all that just fit it perfectly was what you see above. So I went with it because that’s what it is – a huge a** frame that was way cheaper to make than buying one.
When I did our master bedroom makeover, I already had this large print poster palm art on hand which was what kinda became the jumping off point for the bedroom’s design. The print was huge – 40″ x 54″. What I didn’t have on hand was a frame for it. I searched around online for one big enough to hold it and was met by price tags starting at $150 – and that price tag was for plastic frames. Our version however, will cost about $25 to make.

DIY Large Picture Frame
This post contains affiliate links for your shopping convenience. Click here to read my full disclosure policy.
Tools and Supplies Needed:
- Piece of 1/4″ plywood or luan (I used luan because it’s lighter and cheaper) cut to the size of your art print. My print was 40″ x 54″. You can cut this with a circular saw at home or measure your print before going to the store and have them cut the wood for you there.
- 3 – 1″ x 2″ x 8′ furring strips (You may need more or less depending on the size of your print.)
- 20 feet of lattice molding (Once more, you many need more or less depending on the size of your print.)
- Nail Gun (We used this Hitachi one, but any brad nailer should do.)
- Miter Saw or Miter Box and Saw (We use this Dewalt one.)
- Circular Saw (If you don’t have the hardware store cut your plywood for you.)
- Spackling or Wood Putty
- Paint or Stain (whichever you prefer)
- Double Sided Tape
- Small Corner Braces
- Picture Hanging Wire & Eye Screws
Steps
Step 1.
If you haven’t already done so, cut your piece of plywood down to the size of your art print. We did this by laying the print on top of the plywood, tracing around it with a pencil and then cutting the piece of wood along the traced line with a circular saw.
Step 2.
Lay your plywood on the ground. Cut two pieces of 1″ x 2″ to the length of the plywood. You can cut these pieces with either the miter or circular saw – they just need to be straight edges. These will be two of your vertical pieces on the frame.

After you cut the long vertical pieces, lay them around the plywood. Measure the width from end to end of the long piece of 1″ x 2″ and cut two more pieces of 1″ x 2″ to that size. These newly cut pieces will be your horizontal pieces. After cutting, lay all the pieces out around the plywood and make sure they snugly fit around it.
Step 3.
While the 1″ x 2″ pieces are still around the plywood, nail them together at the corners of the wood with a nail gun.

Optional: You can also use wood glue on the edges along with the nails for a super solid joint.
Step 4.
Measure the long pieces of 1″ x 2″ from end to end and cut pieces of the lattice molding to that size on a 45 degree angle – you’ll have to use the miter saw for this.

Lay the pieces out along the top of the 1″ x 2″ frame with the long edge of the lattice molding flush against the outside of the 1″ x 2″. Measure the distance between each piece of vertical lattice molding you just cut from long end to long end. Cut two pieces of lattice molding to this measurement at a 45 degree angle. Lay all the pieces out along the 1″ x 2″ pieces and make sure all fit well – all the lattice molding should be flush against the outside of the 1″ x 2″ frame.
Step 5.
Using the nail gun, nail the lattice molding against the 1″ x 2″ frame making sure the molding is flush against the outside edges of the 1″ x 2″.
Optional: Again, you can use nail glue here as well if you wish.
Step 6.
Fill any nail holes with spackling or wood putty and paint or stain the frame. You don’t need to paint the plywood – only the actual frame. I used semi-gloss black spray paint on mine.
Step 7.
Mount your large art print or picture to the plywood with double sided tape, then lay it face down in the frame. The lattice molding you cut should be face-down on the floor.
Step 8.
Screw four corner braces along the edges of the frame. You will only need to screw the braces once to the 1″ x 2″ part of the frame as shown below.
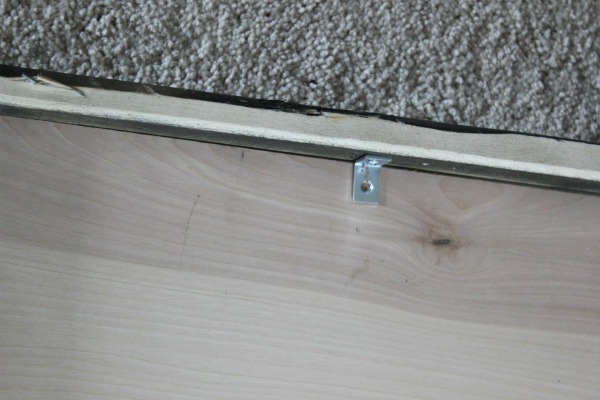
The braces should be installed to push the plywood up against the lattice molding.
Step 9.
Screw eye hooks into the back inside of the frame and run hanging wire through them.

Hang it on the wall!

Headboard / Bedding (similar) / Palm Print / Curtains / Light Fixture / Wall Color
If your wood frame is as big as mine, I would try to find a stud to hang it on or use a drywall anchor – these are my go-to wall anchors.
Banana Leaf Pillows / Leopard Print Pillow
Not too shabby for a $25 wood picture frame! I’ll take it over the $150 one any day!
Have you made your own DIY picture frame before?
Looking for more low-budget easy DIY projects and decorating ideas?
DIY Lucite Frame – Here’s an easy DIY frame to make for all you lucite lovers.
How to Hang Heavy Art – my go-to easy, but solid way to hang heavy pieces of home decor like art and mirrors.
Sources for Affordable Wall Art – some of my go-to places for great art at great prices.
And you can also see the entire bedroom makeover featured in this post.
Want to come back to this post later? Pin the image below!


Sara says
Was wondering how I was going to frame a set of mirrors, then…Tada!! There you were, with spep by step instructions!! I’m off to Home Depot for supplies!! Thanks! Happy 4th of July week end!!
Jenna @ Rain on a Tin Roof says
Awesome, Sara! Have fun!
Justin says
Jenna, approx how much does it weigh?
Looks great btw!
Jenna says
Hi Justin, thanks! I don’t think it weighs anymore than 10 pounds.
Jenny says
Great tutorial! I swear you can make anything with plywood and it looks awesome. Great DIY Tutorial! Pinning! Thanks for sharing at Merry Monday, see you next week.
Babychaser says
Thanks for the tips!! I’m pinning!
Here from Over the Moon!
Blessings,
Babychaser
mamasbrush.wordpress.com
Babychaser says
Oops, I meant Inspire me Modays! 🙂
Jean | Delightful Repast says
Jenna, when I think of all the money I could have saved with this–sheesh! Genius! Pinning for future reference.
Alice V says
the frame came out looking professional. thanks for sharing this DIY as frames are so expensive, especially the bigger ones.
Hanna Gardner says
The frame is good and the picture too, Suggesting you change the picture 😛
Regards
Hanna
Jamie says
Is this still a $25 project?