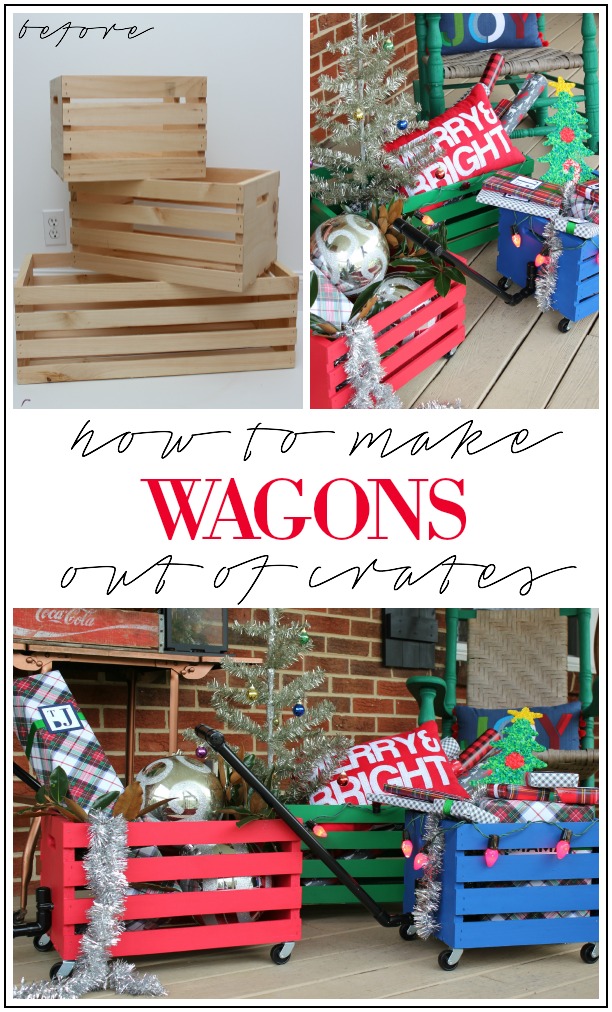
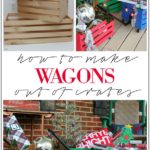
Create your own “custom” wagons from crates in just minutes using this tutorial. It’s so simple and perfect for kids, holiday decorating and more! Find out how to make a wagon that can be used for all sorts of things below!
The Circus loves to carry things on herself.
Have you ever seen a kid with a pink turtle zipped up in her jacket with its head popping out like it was a baby in one of those wrap things?
Well, you could have all day yesterday.
She also likes to load up a doll, perhaps a stuffed animal or two, her juice cup, probably a cash register as well and a few other random items in boxes, clothes baskets and other “carrying” devices and drag them across the house.
So if I told you that these wagons were still on the front porch and decorated just like this, I’d be lying.
However, I can say that these wagons – made out of crates – are quite easy to make and really do make pretty holiday decor when loaded up with various holiday items sans a princess cash register.

This post is sponsored by Crates and Pallets, however all opinions are 100% mine. Affiliate links may be contained in this post.
How to Make a Toy Wagon
This post contains affiliate links for your shopping convenience. Click here to read my full disclosure policy.
Materials & Tools Needed for the Wagon:
- Crates – I used an Extra Large Crate, a Large Crate, and a Medium Crate.
- Paint or Stain Colors of Your Choice – I used Vivid, Modern, and Baroque.
- Wheel Casters – Four per crate
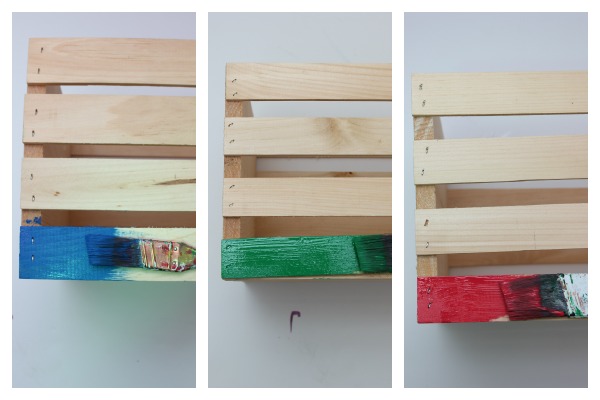
Step 1:
Paint the crates your desired colors and let them dry.
Step 2:
Attach the caster wheels to the base of the wagon with your drill. Use a small drill bit first to drill a hole to prevent the wood from cracking, then attach the wheels with the 3/4″ wood screws.
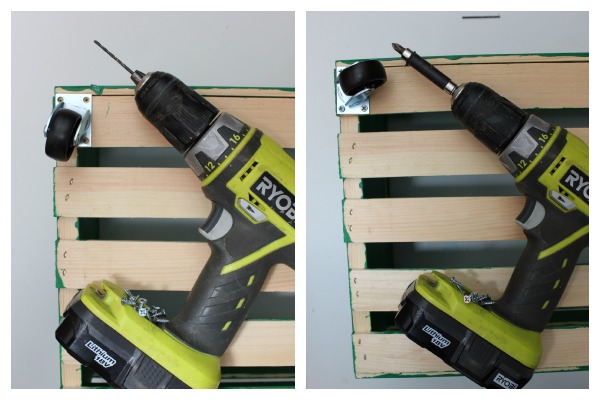
The screws may come through the bottom slats just a bit, so don’t put anything that you may not want snagged in these. You could also purchase shorter screws and use them rather than using the screws that come with the caster wheels.
Set aside the wagons and start making the handles.
Related: See how I made a DIY Lemonade Stand using these same crates too!
DIY Wagon Handle
Materials and Tools Needed for the Pull Handle:
- 1/2″ x 2′ PVC Pipe (It comes pre-cut in this size at Home Depot.) – I used four of these in total. It takes about one and 1/4 of another one per wagon.
- 1/2″ PVC Tee (One per wagon.)
- 1/2″ 45° PVC Elbow (One per wagon.)
- 1/2″ 90° PVC Elbox (One per wagon.)
- 1/2″ PVC Caps (Three per wagon.)
- 1/2″ PVC Straps (One per wagon.)
- PVC Cement
- Black Spray Paint
- Drill
- Saw (Circular or Miter Saw – I used my miter saw.)
- 3/4″ Wood Screws
Steps
Step 1:
Take one piece of the 1/2″ x 2′ PVC Pipe and cut four pieces that are approximately 1″ – 2″ in length. The length doesn’t have to be perfect on these. Lay out your pipe as shown in the image below.
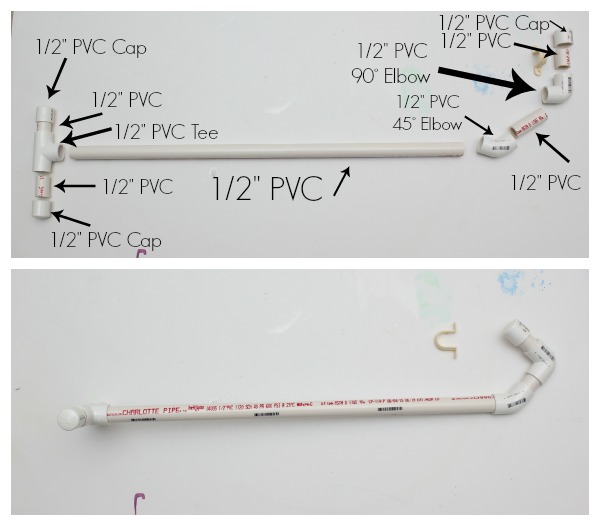
If you want to make the handle shorter, cut down the main piece of 1/2″ PVC pipe. I left it full length on one wagon and cut it down a bit on the other two.
The second photo above shows how everything will fit together. Before fitting everything together, apply PVC cement to the joints as shown below and then fit them together.

Don’t try to put the cement on all the joints all at once – do it one joint at a time and fit it together, then move onto another joint. Let the handle dry for a bit and then you can remove the excess cement with a baby wipe.
Step 2:
Spray paint the handles and PVC strap for each wagon black.
Step 3:
After the handles and straps have fully dried, attach a strap to the side of each wagon. I attached mine lower, however if you wanted your handles to be higher up, you can attach them higher.
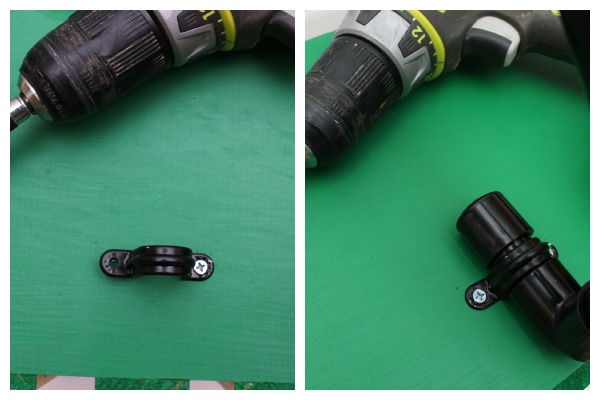
Attach the strap on one side only first, then gently lift the un-attached side and slide the handle under the strap where the small piece of PVC is between the cap and 90° PVC elbow and screw the other side of the strap into place.
Load ’em up with whatever your little heart desires…

Also, I am proclaiming that wrapping paper rolls be designated as holiday decor even if it isn’t on a present. I mean – those rolls are essentially out all season long (at my house anyway) so why not put them into multiple use?
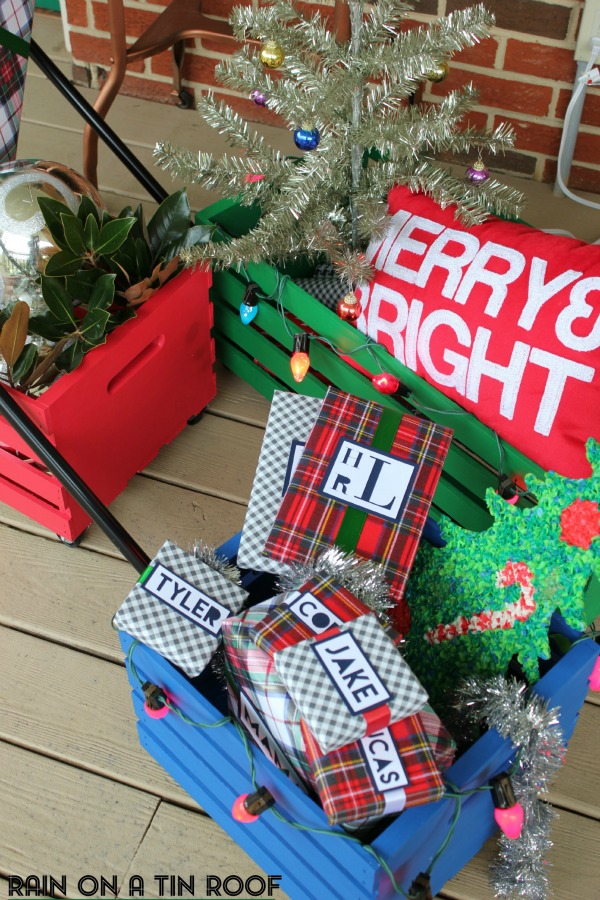
And yes, those are real, live wrapped presents. Like actual gifts – not just boxes I wrapped up. I’m on top of my gift-giving game. #winning Fantastic and unique gift ideas are HERE!
I think it would be really fun to fill these up with gifts for people who you gift more than one present or for couples. If it’s not for a kid, you could leave the handles off and then the person has a handy little crate to use as part of their gift too.
These could also make fantastic garden carts for gardeners! Load them up with a few gardening essentials and you’ll make their day!
Any other ideas you have to put these wagons to use?
Looking for more creative DIY upcycles?
DIY Faux Jadeite – looks just like the real thing, but uses thrift store finds.
DIY Kitchen Island – using reclaimed barn wood and old porch posts.
Locker Baskets turned Shelving – vintage metal locker baskets turned decorative and functional shelving.
How to Make a Lamp Out of a Bottle – did you know you can pretty easily turn just about any bottle into a lamp? Here’s how.
Want to remember these wagons for later? Just pin the image below!
Stalk Me Here:
Pinterest / Facebook / Twitter / Instagram

Susan the Farm Quilter says
What a great idea!! Love the way they have multiple uses!! One other thing, I really appreciate the fact that the title of your post is in the subject line of the email…I save your DIY/recipe emails and when I am looking for a specific project or recipe, it is really easy to find – thank you!!!
Jenna @ Rain on a Tin Roof says
Thanks, Susan! And thanks for letting me know that about the titles -sometimes I think I should try and be more witty with titles, but maybe not!
Lisa says
I’m thinking I need to make 3 of these to put presents in around the tree this year!!!
Jenna @ Rain on a Tin Roof says
Go for it, Lisa! They are super easy to make – and I think I’ll be bringing in one or two of mine to hold presents around the tree in as well – if I can keep them away from the Circus! 😉
Debra@shoppeno5 says
These are so darn cute. I don’t have any little kids but I may need to make a wagon for myself.
Jenna @ Rain on a Tin Roof says
Thank you, Debra! I think you should totally make a wagon for yourself. 😉
Amy says
I am obsessed!!!!! Such a cute and cheerful Holiday décor idea!
Jenna @ Rain on a Tin Roof says
Thanks, Amy – super easy DIY!
Terri Hughes says
Love the little wagons, they are so cute. This was a great idea!!!!
Jenna @ Rain on a Tin Roof says
Thanks, Terri! I think they are cute too and a really easy make!
Suzy @ Worthing Court says
What a cute idea, Jenna! I’ll be featuring your project at The Scoop this Monday night. Thank you for linking up!
Jenna @ Rain on a Tin Roof says
That’s awesome!! Thanks so much, Suzy!
Cindy Eikenberg says
Hi Jenna – these wagons are such a great idea and so adorable! Popping over from The 36th Avenue and of course, pinned! Hope you had a wonderful Thanksgiving and enjoy a happy weekend!
Jenna @ Rain on a Tin Roof says
Thanks so much, Cindy!! They were easy to make and are really fun!
Linda says
Love the bright and bold colors! It’s eye popping happy looking! Know all the Circus’s friends and moms love it too.
Jenna @ Rain on a Tin Roof says
Thanks, Linda! They’ve been really fun to have around!
Charlotte Burkholder says
This is a neat idea. The wagons could be decorated for any season. Thanks for sharing at Family Joy Blog Linkup.
Jenna @ Rain on a Tin Roof says
Yep, they totally could! Thanks, Charlotte!
Casserole Gal Rhonda says
Very Creative! Thank you for sharing!
Jenna @ Rain on a Tin Roof says
Thank you!
Lorelai @ Life With Lorelail says
Hey, Jenna! Just wanted to let you know that we loved your How To Make Wagons Out Of Crates so much when you shared it at the #HomeMattersParty last week, we’ve FEATURED it THIS WEEK! Hope you can check it out when you get a sec. Happy Friday!!!
http://lifewithlorelai.com/2016/11/10/home-matters-linky-party-112
Jenna @ Rain on a Tin Roof says
That’s awesome! Thanks so much!
anna says
Cute !
Anna
Jamie says
These are so adorable. Thanks for sharing on More the Merrier Monday link party!!
Nancy says
Such a cute idea! Great for decor or little ones to play with….thanks for the tutorial.
Nancy
wildoakdesigns.blogspot.com
Trisha says
Love this idea! I have crates that have been very unstylishly holding chip bags in my pantry. I need to pull them out and recycle them pronto!
Jenna says
Thanks, Trisha!
bonbon says
Thanks for sharing at Inspire Me Monday….I wanted to let you know that you are one of my featured picks this week.
Marjan says
Such a cleaver idea to use PVC pipe for the handle. The wagons look just great.
Rhonda-Gales says
I love this idea. I’m thinking it would be perfect in the garden or a great toy for seasonal decorating. Thanks for sharing on Sunday’s Best.
Kippi says
Great idea I want to make some of these too. Merry Christmas, Kippi
Judy says
What a super cute project! I will be featuring this tonight at my Winter Blues Wednesday party that opens at 8pm EST. Please stop by and pick up an I’ve Been Featured button. Thanks.