Our second style icon for the summer soiree…Lilly Pulitzer.
Begin channeling bright floral prints, the sunshine, and all things fun.
My Lilly project:

A Lily Pulitzer Inspired Wreath.
And it may or may not be considered somewhat of a semi-fail…..I’ll explain in a bit…..
The minute I saw that bright floral fabric – I immediately thought Lily and thanked God because I had no clue what I was going to do for my Lily project until I saw it. Just to be sure, I wasn’t delusional, I sent a picture of the fabric to my friend, Lindsay, with “Lily, right???” below the picture. She concurred that the fabric was most definitely Lily.
Here’s what I used to make this wreath:
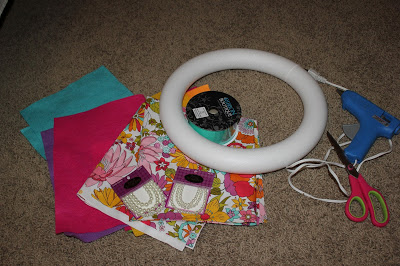
– 1/4 – 1/2 yard of fabric (Mine came from Hobby Lobby)
– Grosgrain Ribbon
– Hot Glue Gun
– Scissors
– Bling (I used vintage brooches, old cheap rings and earrings.)
Disregard the felt and pearls in the above photo. That was part of the fail. I told you, I’ll get there in a minute – I know you are dying to know.
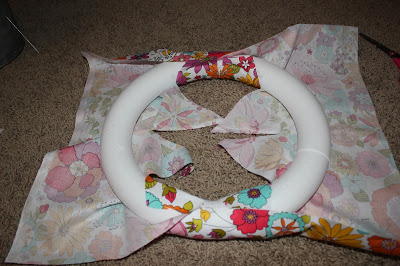
First, lay your wreath out on the fabric. I bought WAY too much fabric. I bought 1 yard and probably only used 1/4 – 1/2 a yard.
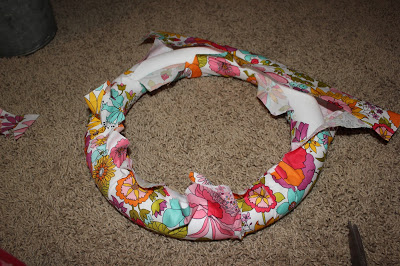
Cut a small hole in the middle of fabric that is inside the wreath form and then triangle slits in the fabric that is inside the wreath form. That may not make sense, but check out the below pictures to see what I’m talking about.


At this point, I tried making brightly colored felt flowers. FAIL. They looked horrendous.
Plan B: Vintage brooches, old earrings and rings.

At this point, I thought I was done. Wrong. When I put it up, there was styrofoam showing where I had cut the fabric.
Plan C: Cover showing styrofoam with ribbon.

Plan D: Cut strips from gift box to re-inforce the ribbon and make it stand up, rather than be squished.


Another new problem: cardboard strip now shows on one side.
Plan E: Glue aqua ribbon on other side of cardboard strip.

Finally, all systems are a go. Except for the fact that the ribbon still looks a little funny. But, at this point, I was done solving wreath problems. I was ready to move on to world peace.


Complete fail?
Semi-Fail?
1/4 Fail?
Would Lilly approve?
Want more Lilly Inspired projects – here are 10+ of them!
You like Ralph Lauren style? See these projects then!
More of a Jonathan Adler person? Right here are projects inspired by him!
Kate Spade girl? This way then!
You know you don’t wanna miss any of this crazy.

Megan Vaughn says
I don’t think it’s a fail at all. 🙂 I love it!
Tried and Twisted says
That’s a shame that it caused you so much frustration! The pattern and jewelry just make it look so classy and the turquoise is perfect for the season!
Heather @ Southern State of Mind says
So cute!! I can totally relate when a project has gone south, but you turned this around and it looks fantastic!
Tara @ Suburble says
It looks great, Jenna! And I’ve so been there (recently, actually) when it comes to crafts that just won’t cooperate!
Jamie {Better With Age} says
Great job! Love the fabric 😉
Jamie
Sherry at The Rusty Pearl says
love the pretty colors .. beautiful
Randi SowderingAbout says
I love the colors but I do hate when you get an image in your head and it just doesn’t work out. So frustrating!!!
Lauren says
Beautiful! Love the fabrics. Thanks so much for linking up at Off the Hook this week.
Carmel - Our Fifth House says
Love your plan b – the vintage brooches are so fun!
Paula@SweetPea says
This is so cute! I like your method of wrapping the wreath with fabric. I’m pinning and will share on FB!
Angela Ryder says
I thinks it’s very pretty! The colors are perfect and I absolutely love the use of vintage brooches!! Good job, Jenna!~~Angela
Navy Wifey Peters says
Cute! Lovely fabric and embellishments!
Jen @ Girl in the Garage says
Jenna this is super cute! I love all the colors and the vintage bling. It’s the perfect summer wreath! (Pinned!)
Aleks says
Even with all the troubles your wreath turned out great!! I love the way you covered it with fabric! Ive been looking for a way that isnt cutting strips and wrapping. Thanks for the inspiration! PINNING!!
Melissa Whitcher says
So cute! Love it. 🙂
Ornate Splendor says
It’s a very pretty wreath! Love all those bright happy colors – and of course, the bling! I have a similar tutorial on my St. Patrick’s Day post – I’ve made a few fabric covered wreaths lately. They are fun and unique! Great Job! Catherine (new follower)
Kim S. says
Love the fabric. Maybe you could have put some of the extra fabric over top of the spaces you had??? Not sure how much you needed to cover. Love the grouping of the brooches, earrings, etc.
Thanks so much for sharing this at Diana Rambles!!
-Kim
Co-host of Diana Rambles’ linky party
Bonnie and Trish @ Uncommon says
Oh LOVE!! Big Lily fan here and this is adorable! 😉 Bonnie @ Uncommon Designs!
suzanne kay says
What a neat idea!! You are so very clever!! Thanks for sharen with us at One Sharendipity Place this weekend!
Sue @ thet2women.com
Recreate and Decorate says
Nope no fail, it’s very cute and cheerful!
Jemma says
Totally darling! Love the colors, glitz and fun! Just pinned it too!
Happy Hugs-
Jemma
marty (A Stroll Thru Life) says
How fun and how cute is this. Love it. Thanks tons for joining Inspire Me. Hugs, Marty
Liz Fourez says
Beautiful and so colorful for Summer! Definitely a DIY win!
Sarah Lashbrook says
I am pinning this! I think I’ve found my summer wreath inspiration. It’s fabulous!!
My name is Rita says
What a gorgeous wreath! So fun and happy! Thank you so much for linking up! Hope to see more from you.
Recreate and Decorate says
I love that fun fabric! awesome!
Kelsey Poofy Cheeks says
I am in love with this wreath!! Next time I am in Hobby Lobby I am going to have to hunt down that beautiful floral fabric!
Jenna @ Rain on a Tin Roof says
Thanks, Kelsey! I love all the bright colors too!
Teri says
Probably a fail, an that sure looks like a Liberty of London print–did you ever find out for sure?
Michelle says
Beautiful! That is one happy wreath! I have a new Thursday linkup party called Creative Compulsions that is geared toward those of us who make things. I’d like to invite you to linkup!
Donna @ Modern on Monticello says
I have seen Lily Pulitzer inspired fabric used on many things but never for a wreath. I think it is beautiful. Thanks for sharing it with us at #HomeMattersParty
Jenna says
Thanks, Donna!!