Tag: wreath

  • Make This Simple Valentines Wreath DIY in Under 30 Minutes

    Make This Simple Valentines Wreath DIY in Under 30 Minutes

    Looking for a simple valentine door wreath to make? This valentines wreath DIY will take you only 30 minutes to less to make – and it’s beautiful!

    I never knew Grunt Labor’s grandfather, but after the many stories I’ve heard about him, I feel that we would have gotten along quite fabulously.

    Although, he would have never used the term fabulously. 

    Among other things, we both liked to hang onto things. Some might call it hoarding. I, and maybe Grandpa, though would perhaps call it collecting. You never know when you might need something for a rainy day.

    Also before I came along, a dumpster was rented and Mama and one of Grunt’s uncles, Vic, cleared out one of the rooms in the house from the “junk” Grandpa had accrued.

    Apparently, Grandpa was sitting in his chair in the den while all this was going on talking about all the great stuff they were throwing away.

    If I had been there, I’m sure I would have agreed with him.

    And then probably sneaked out around to the back of the dumpster and climbed in to rescue some of the treasures.

    So, this past fall when it was time to clean out Grunt’s grandparents’ entire house, there was another dumpster rented.

    This time I was there though, so as you can imagine not quite everything handed to me to go to the dumpster actually made it to the dumpster. 😉

    One of those things being a handful of little Valentine cards Grandpa had received in the 1930s.

    I just wouldn’t have been able to live with myself had I tossed them into that dumpster. You’d be the same way, right?

    And so, I brought them home and last week, the Circus and I made this simple little diy valentine wreath using a couple of the valentines.
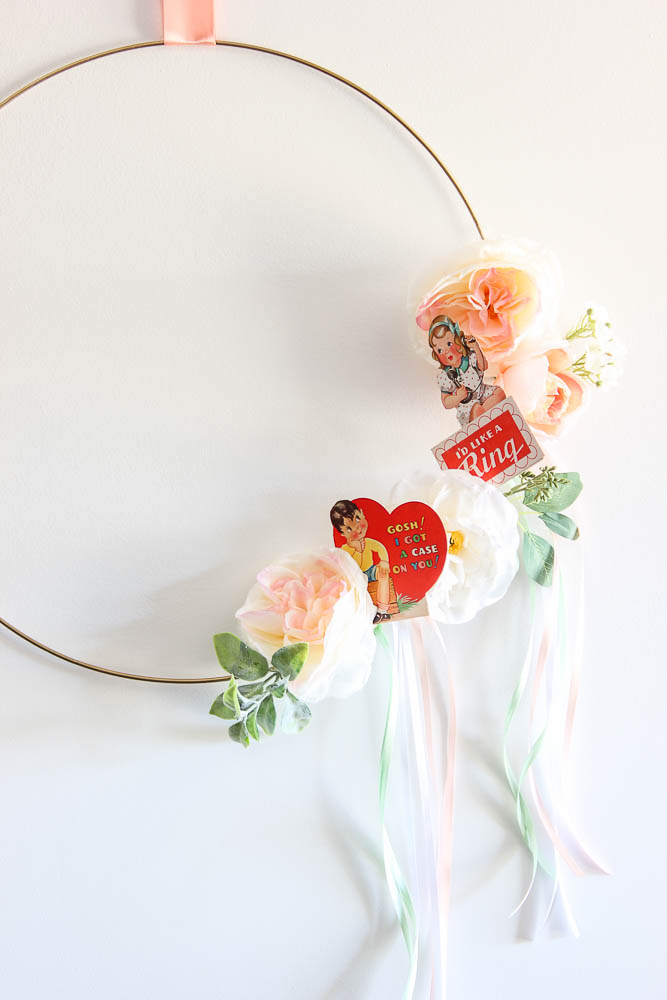
    Simple Valentines Wreath DIY with flowers and vintage valentines.

    This wreath took all of about 10 minutes – not including paint drying time of the ring, but that is totally optional.

    Don’t have your own vintage valentines to use? No problem! I’ve got you covered with a link below where you can print off vintage valentines to use!

    This post contains affiliate links for your shopping convenience. Click here to read my full disclosure policy.

    How to Make a Valentine Wreath

    Tools and Supplies Needed:

    Supplies for making a valentine door wreath.

    Steps

    Step 1

    I opted to spray paint my metal hoop gold. This is totally optional, but if you’re doing this, do it first.

    Note: You could also tweak this wreath and use a heart wreath form to give it more Valentine zing!

    Step 2

    Disassemble the bouquet. Start wrapping the greenery and florals on the ring.

    How to make a valentine wreath using faux flowers.

    If you go with the kind of bouquet or a similar one like we got, then the flowers already have wire in them, so they just wrap right around that ring, no extra wire needed.

    diy valentine wreath using a wire hoop

    They stay where you put them, but then you can also move them around the ring if needed as well. So much nicer than having to mess with that bare wire and poking yourself.

    Valentine Day Wreaths using a wire hoop and faux flowers.

    Leave some space between the flowers for where you think you want your valentines to go. Put as many or as few flowers on your ring. We covered about 1/4 of the ring or so.

    Using vintage valentines and faux flowers to make a front door valentine wreath.

    Step 3

    Now you can attach your vintage valentines. Now, being as how the valentines I was using were special to us, I didn’t want to permanently put them on this wreath or damage them by putting hot glue directly on them and then onto the wreath. So, I opted to use mini-clothespins to attach my valentines.

    Vintage Valentines you can print.

    I just stuck a clothespin on the valentine, then hot-glued the clothespin onto the metal ring or flower stem wherever I wanted it to go. Of course, if you aren’t attached to your valentines, you can just hot glue them right onto the wreath.

    Valentines wreath with printable vintage valentines.

    You can add in as many or as few valentines as you like. We opted for two of our favorites – a boy and girl and angled them to where they were kind of looking at one another.

    Step 4

    Take some of the skinny ribbons and wrap them around the metal ring and between the flowers and valentines, filling in as much or as little as you like. If you want to add a little more somethin-somethin to the wreath, then you could also embellish with a pom pom or two.

    Step 5

    Hang it up! We just used a wide peach colored ribbon to do this. You can drape the wreath over your front door and secure it on the other side or simply hang it from a nail or command hook on the wall somewhere.

    Vintage Valentine Decorations - a valentine wreath.

    I do love how the clothespins makes the valentines pop out from the flowers a little more than they might otherwise do.

    valentine day wreath ideas with ribbon, flowers and valentine cards.

    I just adore the sweetness of vintage valentine decorations, don’t you? They truly don’t make ’em like that anymore.

    easy valentines wreath diy with a simple look.

    Here’s to one handful of “junk” that didn’t get away, Grandpa!. 😉

    What kind of valentine day wreaths have you made before?

    Looking for more valentine decorating ideas?

    Here’s some fun valentine decor and cards the Circus and I made one year.

    And here are some great valentine ideas from a few blogging friends:

    Valentine Heart Printables (printed on clear address labels) via So Much Better with Age

    Valentine’s Day Dining Room via House by Hoff

    Love Print via Two Twenty One

    Adorable o”fish”ally Free Valentine Printables via The Happy Housie

    Want to come back to this valentine wreath tutorial later? Just pin the image below!

    how to make a valentine wreath with a vintage feel

    Follow on social media for more simple holiday crafts!

    Facebook | Instagram | Pinterest | Twitter

    Easy valentine wreath craft with flowers, valentines and ribbon.

    SaveSaveSaveSave

  • DIY Flamingo Wreath in under an hour

    DIY Flamingo Wreath in under an hour

    Want to dress up your front door for summer? What better way than with a DIY flamingo wreath! The best part? It’ll take just an hour to make!

    It’s the official symbol of summer.

    I don’t care if you think its tacky or not.

    The official symbol of summer: The Pink Flamingo

    All hail the pink flamingo. 

    I can’t get enough of this pink feathered friend of mine, therefore I am proclaiming it to be the official symbol of summer.

    I fully realize I may be the only one involved in this proclamation.

    That’s ok.

    I’ll own it. 

    It started with the DIY Flamingo Sprinkler.

    My fun friend has recently shown up once more.

    In the colorful screened-in porch.

    On a wreath.

    How to Make a Flamingo Wreath with a Plastic Flamingo

    This fun and colorful wreath fits in perfectly with the rest of the porch.

    It will also lend a fun touch to a summer party – it practically insists you have a drink complete with a mini-umbrella.

    Or at least that’s what it told me. 

    How to Make a Flamingo Wreath

    This post contains affiliate links for your shopping convenience. Click here to read my full disclosure policy.

    Here’s what you need to make your own pink flamingo wreath: 

    • Wreath Form (I used a 14 inch straw wreath)
    • Astroturf (You can go to your local home improvement store and buy the minimum that you can off the roll for about $5 or so and that should be plenty. I used scraps leftover from a project.)
    • Pink Flamingo
    • Drink Umbrellas – check your local Dollar Store or Dollar Tree for these during summer!
    • Hot Glue Gun
    • Scissors

    Step 1: 

    Cut the astroturf into long strips about three inches wide and three feet long. Wrap the strips around the wreath form securing with a dollop of hot glue between the astroturf and wreath as you wrap it. Continue until the wreath is covered with astroturf.

    Step 2: 

    Poke the mini drink umbrellas into the bottom of the wreath and a little up the sides.

    Step 3: 

    Hot glue the pink flamingo to the wreath. I did this by putting a good sized glob (love my terminology?) on the back of the neck and rear end of the flamingo, then immediately pressing and holding the flamingo onto the wreath. So far, its held up perfectly fine.

    Step 4: 
    Use another strip of astroturf to hang the wreath from or a ribbon.

    DIY Flamingo Wreath with Drink Umbrellas and a Plastic Flamingo

    Isn’t she just so fun? 

    Summer Wreath with a Pink Flamingo

    Are you in a summer lovin’ kind of mood yet?

    Want to come back to this flamingo wreath tutorial later? Then, just pin the image below!

    Flamingo Wreath for Summer

    Want more colorful summer project ideas?

    Creating a Cut Flower Garden for Beginners – ready to have fresh flowers every single day! It’s not as hard as you may think!

    12 Outdoor Furniture Makeovers – ideas to refresh your outdoor furniture rather than tossing it!

    DIY Outdoor Daybed – spend lazy summer afternoon right here!

    10+ Creative Flower Pot Ideas – things you never knew could be a flower pot!

    And get more inspiration for all your outdoor spaces HERE!

    Hang out with me on social media!

    Facebook | Instagram | Pinterest | Twitter

    DIY Flamingo Wreath for Summer with Drink Umbrellas

    SaveSave

  • 10+ DIY Holiday Wreaths

    10+ DIY Holiday Wreaths

    This week, we are talking DIY holiday wreaths, baby! Lots of them!

    10+ DIY Holiday Wreaths via rainonatinroof.com #wreath

    10+ DIY Holiday Wreath Ideas

    10+ DIY Holiday Wreaths via rainonatinroof.com #wreath

    Paint Stick Evergreen Wreaths from Me!

    10+ DIY Holiday Wreaths via rainonatinroof.com #wreath

    Vintage Santa Tinsel Wreath from Me

    10+ DIY Holiday Wreaths via rainonatinroof.com #wreath

    Vintage Elf Yarn Wrapped Wreath from Me 🙂

    10+ DIY Holiday Wreaths via rainonatinroof.com #wreath

    Cotton Ball Wreath from Learning Creating Living

    10+ DIY Holiday Wreaths via rainonatinroof.com #wreath

    Burlap, Boughs and Blades Winter Wreath from The Happy Housie

    10+ DIY Holiday Wreaths via rainonatinroof.com #wreath

    The Grinch Wreath from Style BluePrint

    10+ DIY Holiday Wreaths via rainonatinroof.com #wreath

    Anthropologie Inspired Wool Wreath from View From the Fridge

    10+ DIY Holiday Wreaths via rainonatinroof.com #wreath

    Colorful Vintage Style Wreath from Silly Old Suitcase

    10+ DIY Holiday Wreaths via rainonatinroof.com #wreath

    Jute and Glitter Wreaths from So Much Better With Age

    10+ DIY Holiday Wreaths via rainonatinroof.com #wreath

    Boxwood Christmas Wreath from Heather Bullard

    10+ DIY Holiday Wreaths via rainonatinroof.com #wreath

    Fresh Holiday Monogrammed Wreath from House in the Heights

    Looking for more holiday decorating inspiration? 

    Simple and Affordable Christmas Decoration Ideas – they’re gorgeous too! 

    Don’t get your tinsel in a tangle! – here are ideas for decorating with tinsel during the holidays!


  • Paint Stick Evergreen Wreaths

    Paint Stick Evergreen Wreaths

    Create gorgeous evergreen Christmas wreaths this holiday season using paint sticks! Yes, paint sticks! Read on to learn how to make an evergreen wreath in all shapes and sizes….

    Update: To everyone who is freaking out about me stealing these paint sticks and think that I’m a thief: I have talked to my paint guy at Home Depot. They give these things away for free all the time – without you purchasing paint. Just a little FYI.

    Please Home Depot, don’t hate me.

    You see, when I was buying paint at your store the other day, I may have picked up more paint sticks than I was allotted.

    I bought two gallons and one quart of paint. But, I took 15 paint sticks. Did I go over my quota?

    If it makes it any better, there have been multiple times when I’ve bought paint and not gotten the paint sticks….

    I’m really, really sorry.

    But you see, I just had to have those extra paint sticks to make these stellar evergreen wreaths.

    How to Make an Evergreen Wreath


    You understand, don’t you Home Depot?

    And all of you, my fabulous friends understand too, don’t you?

    I mean, really, how could I not make these spectacular paint stick evergreen wreaths? Especially when they cost me a total of $0.

    You want to make your own now too, don’t you?

    Let’s do it!

    This post contains affiliate links for your shopping convenience. Click here to read my full disclosure policy.

    DIY Evergreen Wreaths using Paint Sticks

    I made two square wreaths and one large star wreath. I’ll show you how to do both.

    For the Square Evergreen Wreaths

    Materials

    • 4 Paint Sticks per Wreath
    • Green Spray Paint
    • Evergreen Clippings
    • Hot Glue Gun
    • Wide Ribbon for Hanging

    Steps

    Step 1


    If you want to make the wreaths smaller than the size of the paint stick, cut the paint sticks down first. Next, spray paint the paint sticks.

    Step 2

    Using the hot glue gun, glue the paint sticks together to form a square.

    DIY Evergreen Wreath

    Step 3

    Gather your evergreen clippings. Cut them down to the size you’d like them to be on your wreath. Just hold a few up to the wreath frame and decide.

    Start hot gluing the clippings onto the paint sticks starting in a corner.

    Paint Stick Evergreen Wreaths

    Hang a ribbon from the top and enjoy!

    How to Make an Evergreen Wreath using Paint Sticks
    Wreaths made from Paint Sticks
    DIY Christmas Evergreen Wreaths

    For the Star Evergreen Wreath

    Materials

    Steps

    Step 1

    You will need ten paint sticks to make the size that I made. Now, mine is pretty big people. I didn’t cut any of the paint sticks down to size. It works for me because I will be sitting it on my front porch for decor and it would probably look great on a mantel if I had one, but if you want to hang it on a door, you will want to cut all your sticks down some. I would just play with the size until you have what you like.

    Gather your paint sticks.

    Using paint sticks for Christmas wreaths.

    Lay them out in the floor in the best star shape you can muster, if it looks like this at first, don’t worry:

    How to Make a Star Shaped Evergreen Wreath

    Yea, that big huge gap wouldn’t cut it. Just play with it until you have the correct shape. The best way I found was to take a square and put it into the angles and push the sticks together until they met up with the square.

    Paint Stick Star
    DIY Star Evergreen Wreath

    Step 2

    Once you have it laid out how you want it, hot glue all the sticks together. If its a little off, don’t worry because the greenery will cover up some of the unevenness.

    DIY Paint Stick Star

    Step 3

    Spray paint the frame green.

    Step 4

    Hot glue the greenery onto the star just like with the squares.

    How to Make an Evergreen Star Shaped Wreath

    Use a wide ribbon to hang the star wreath as well.

    DIY Star Shaped Evergreen Wreath

    Yes, it takes a little time to hot glue all the greenery on, but it is so worth it.

    Especially since its free.

    Thanks for the paint sticks, Home Depot. And no, Home Depot did not compensate me in any way for this post. In fact, they may be really pissed at me now.

    Uh-oh.

    Still in a wreath lovin’ mood?

    Then don’t miss the easy Santa Tinsel Wreath or these 10+ Holiday Wreath Ideas.

    There are also loads of simple and affordable Christmas decoration ideas here!

    Want to come back to this wreath tutorial later? Just pin the image below!

    How to Make Evergreen Wreaths from Paint Sticks

    Sign up to get my posts delivered to your inbox here. 

    You know you don’t wanna miss any of this crazy.

    Stalk Me Here:

    Pinterest / Facebook / Twitter / Instagram

  • DIY Fall Door Decor: My Take on the Fall Wreath

    DIY Fall Door Decor: My Take on the Fall Wreath

    I heart wreaths.

    I have a whole Pinterest board dedicated solely to wreaths.

    I still like my fall wreath from the last couple years. Although there was an unfortunate accident with it when the kid got a hold of it.

    But, this fall, I was feeling that a little something different was in order.

    Enter the Fall Rectangle Wreath.

    Fall Door Decor {rainonatinroof.com} #falldecor #wreath #fall

    (more…)

  • Lilly Pulitzer Inspired Wreath

    Lilly Pulitzer Inspired Wreath

    Our second style icon for the summer soiree…Lilly Pulitzer.

    Begin channeling bright floral prints, the sunshine, and all things fun.

    My Lilly project:

    DIY Lilly Pulitzer Inspired Wreath

    A Lily Pulitzer Inspired Wreath.

    And it may or may not be considered somewhat of a semi-fail…..I’ll explain in a bit…..

    The minute I saw that bright floral fabric – I immediately thought Lily and thanked God because I had no clue what I was going to do for my Lily project until I saw it. Just to be sure, I wasn’t delusional, I sent a picture of the fabric to my friend, Lindsay, with “Lily, right???” below the picture. She concurred that the fabric was most definitely Lily.

    Here’s what I used to make this wreath:

    DIY Lilly Pulitzer Inspired Wreath
    – Wreath Form

    – 1/4 – 1/2 yard of fabric (Mine came from Hobby Lobby)

    – Grosgrain Ribbon

    – Hot Glue Gun

    – Scissors

    – Bling (I used vintage brooches, old cheap rings and earrings.)

    Disregard the felt and pearls in the above photo. That was part of the fail. I told you, I’ll get there in a minute – I know you are dying to know.

    First, lay your wreath out on the fabric. I bought WAY too much fabric. I bought 1 yard and probably only used 1/4 – 1/2 a yard.

    Cut a small hole in the middle of fabric that is inside the wreath form and then triangle slits in the fabric that is inside the wreath form. That may not make sense, but check out the below pictures to see what I’m talking about.

    DIY Lilly Pulitzer Inspired Wreath
    DIY Lilly Pulitzer Inspired Wreath
    Begin wrapping the wreath with the triangles and securing them with hot glue.
    DIY Lilly Pulitzer Inspired Wreath
    DIY Lilly Pulitzer Inspired Wreath
    DIY Lilly Pulitzer Inspired Wreath
    Trim the excess fabric as needed.

    At this point, I tried making brightly colored felt flowers. FAIL. They looked horrendous.

    Plan B: Vintage brooches, old earrings and rings.

    DIY Lilly Pulitzer Inspired Wreath
    I just stuck the brooches right through the wreath form. I really love some of them, so I wanted to be able to easily pull them out and wear them if I wanted to one day. I used hot glue on the old earrings.

    At this point, I thought I was done. Wrong. When I put it up, there was styrofoam showing where I had cut the fabric.

    Plan C: Cover showing styrofoam with ribbon.

    DIY Lilly Pulitzer Inspired Wreath
    New problem: when the wreath is hanging the aqua ribbon just squishes up behind the wreath and looks horrible. Fantastic.

    Plan D: Cut strips from gift box to re-inforce the ribbon and make it stand up, rather than be squished.

    DIY Lilly Pulitzer Inspired Wreath
    DIY Lilly Pulitzer Inspired Wreath
    I cut two strips and hot-glued it behind the aqua ribbon.

    Another new problem: cardboard strip now shows on one side.

    Plan E: Glue aqua ribbon on other side of cardboard strip.

    DIY Lilly Pulitzer Inspired Wreath

    Finally, all systems are a go. Except for the fact that the ribbon still looks a little funny. But, at this point, I was done solving wreath problems. I was ready to move on to world peace.

    Lilly Pulitzer Wreath
    Lilly Pulitzer Inspired Wreath
    Lilly Pulitzer Wreath
    Lilly Pulitzer Wreath
    Lilly Pulitzer Wreath

    Complete fail?

    Semi-Fail?

    1/4 Fail?

    Would Lilly approve?

    Want more Lilly Inspired projects – here are 10+ of them! 

    You like Ralph Lauren style? See these projects then!

    More of a Jonathan Adler person? Right here are projects inspired by him!

    Kate Spade girl? This way then!

     You know you don’t wanna miss any of this crazy.

    Sign up to get my posts delivered to your inbox here.

    Stalk Me Here:

    Pinterest / Facebook / Twitter / Instagram

  • Super Easy Tinsel Wreath

    Super Easy Tinsel Wreath

    Tinsel will forever be a holiday classic – in my book anyway! You can easily whip up this tinsel wreath in 30 minutes or less. It adds some fun vintage Christmas charm to holiday decor!

    Anytime you want a cute, super easy holiday wreath to make, tinsel is the way to go.

    Tinsel Wreath

    I was recently inspired by one of my friends, Ashley, after she made the tinsel wreath you see below.

    Retro Christmas Wreath

    She purchased a wreath at Goodwill and re-worked it to make this beauty.

    Retro Christmas Wreath

    Luckily, Goodwill is overflowing with wreaths and tinsel at the moment! All I had to do was make a trip to my local Goodwill to find a very ugly, but still useful, wreath and a lot of tinsel.

    Old Wreath turned into a Tinsel Wreath

    It’s so circa 1990, right? But it was just $1. All I had to do was pull the rags out of the wreath. Some were held in with pins, others just shoved in there.

    Easy DIY Tinsel Wreath

    I was a little worried at first that some the straw might poke through. Luckily though, I was wrong.

    How to Make a Tinsel Wreath

    Enter lots and lots of and lots of tinsel. Ashley had already warned me it would take more than I thought it would. She was right. All I did was hot glue one edge of tinsel to the wreath and start wrapping it around.

    After I made it around the whole wreath, I filled in some not-so-fluffy spots with more tinsel, just hot-gluing it on.

    DIY Santa Tinsel Wreath

    So I’m going to admit I have this thing for vintage Santas. I love the small ones with velvet suits and round bellies. I have a few of these lying around that I’ve picked up at thrift stores, so I put one in the center of the wreath. I just dug out a little hole in the straw and hot glued that bad boy in.

    Retro Santa Christmas Wreath

    I love the contrast of the red Santa suit against the silver tinsel. I may add some ornaments or some red ribbon to hang it with, but I also just really love it like this.

    Want more easy Christmas crafts with a retro vibe?

    Don’t miss this easy to make vintage ornament tree topped with a super cute little elf!

    Here is an adorable Christmas tree garland made from vintage holiday storybooks – the kids will LOVE it!

    And don’t miss these simple and affordable Christmas decoration ideas!

    If you want to come back to this tinsel wreath later, just pin the image below!

    DIY Vintage Santa Christmas Wreath

    Keep up with our Christmas fun on social media:

    Facebook | Instagram | Pinterest | Twitter
