If you have a few spare ornaments on your hands this holiday season, you should add this DIY ornament tree to your project list! It’s simple to make and adds a fun touch to any holiday decor!
This little Christmas tree has been one of my favorite holiday decorations for years now. The best part about it though? It was so easy to make!
Did I mention that it also just cost me $6 to make as well? Thank you thrift stores!

Don’t you just love great little decorations like these that are easy to make and become your favorites? Me too.
Make your own using the tutorial below!
This post contains affiliate links for your shopping convenience. Click here to read my full disclosure policy.
Vintage Ornament Tree Tutorial
Supplies Needed:
- Ball Ornaments – vintage or store bought will work just fine!
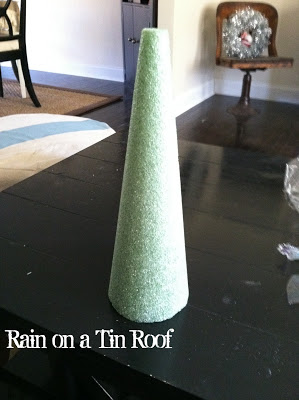
- Styrofoam Cone
- Hot Glue Gun
- Tinsel Garland
- Mini Tree Topper (optional)
Steps
Step 1
Remove the hooks from your ornaments. Like I said, vintage ornaments or store bought ornaments will work just fine. You could even spray paint plastic ornaments to colors of your liking! I prefer the colorful glass ornaments just because of the extra shine they have.
Unwrap the styrofoam cone.
Step 2
Starting at the base of the cone with your largest size ornaments, stick an ornament halfway into the cone. Put a healthy dose of hot glue around the top of the ornament and where it will meet the styrofoam, then push it into the styrofoam cone the rest of the way.

If you are using breakable ornaments, do be careful not to push too hard on the ornaments and break them.
Step 3
Repeat Step 2 working your way up the cone, fully covering the cone as you go. As you move up the cone, use smaller ornaments.
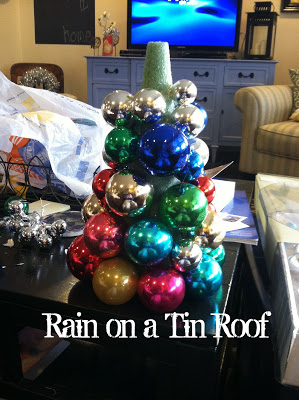
Step 4
Once your cone is covered with ornaments, you can weave tinsel garland into visible holes the ornaments didn’t cover.

Step 5
Embellish with a tree topper if you wish!

I opted for a cute little elf I had on hand.
Of course, if you’d like your tree to be more neutral, you can also just go with 2-3 colors of ornaments. Where would the fun in that be though? 😉
Want more easy holiday crafts and decorating ideas?
15+ Simple and Affordable Christmas Decoration Ideas – easy and cheap holiday decorations that are still gorgeous!
How to Make Ornament Clusters – easily create gorgeous clusters of ornaments to spread throughout your home and add instant holiday cheer! These are beautiful!
Raffle Ticket Christmas Card Holder – a fun spin on a Christmas card holder!
Elf Hat Tree Topper – need a tree topper in a pinch? This one takes no time and is a super fun holiday craft for kids too!
Vintage Storybook Garland – one of our family’s most beloved holiday decorations made from vintage Christmas storybooks – the kids will LOVE this one!
Want to come back to these instructions for making your own ornament tree later? Just pin the image below!
Follow on social media for more of our holiday decorations!

nelda says
You made this look so easy that I think I will try it really soon. I picked up some of those ornaments cheap at GW last week and already have some cones.
Sharon says
This is beautiful! Thanks so much for the tutorial.
Jenna @ Rain on a Tin Roof says
Thank you, Sharon!
Sharon says
I love this idea! I need one for our playroom!
Thank you for linking w us at Creative Muster! Pinned this! xoxo Sharon
April J Harris says
What a fun project, Jenna! This reminds me of some of the projects I used to make when I was a kid in the 1970’s (around the time when the vintage ornament you’ve used was just an ornament!) So I have a real soft spot for things like this. Thank you for sharing, and for being a part of the Hearth and Soul Link Party. I’m featuring this post at the party this week. Hope to ‘see’ you there!