If you’ve been longing for a space to sit and do your makeup that’s functional, pretty, and doesn’t take up too much space, then I’ve got an easy build for you – a DIY makeup vanity table! This vanity table is wall-mounted so it keeps the space light and airy. And did I mention it also has hidden storage?!
My favorite part of our recent closet makeover has nothing to do with clothes. However, the fact that we finally got all the clothing and shoes organized allowed for this little nook to happen…

My favorite part of the closet is my little makeup vanity area. It makes me happy and it’s something I needed in here. I’ve always done my makeup in the closet because it has better lighting than our bathroom. A month ago, you would have found me sitting criss-cross applesauce on the floor in front of the mirror attached to the back of the closet door.
Now you’ll find me getting pretty here. 🙂
This DIY vanity table is a pretty simple build. I had it fully built and the paint drying within a few hours time, then hung it on the wall the next day. All you’ll need to know to build a makeup vanity like this for yourself is how to make a few simple cuts and use a drill.
Oh, and did I mention it has storage?!
This post contains affiliate links for your shopping convenience. Click here to read my full disclosure policy.
Wall-Mount DIY Vanity Table with Storage
My DIY makeup vanity is 36″ long, just a tad over 12″ deep and 5 1/2″ thick. You can alter the length pretty easily if needed. If you want to alter the other dimensions, you’ll have to switch up your wood sizes below and reconfigure accordingly.
Supplies Needed:
- 2 – 1″ x 12″ x 4′ Pine Boards
- 1 – 1″ x 6″ Pine Board, 36″ long if you can find it, but you’re more than likely going to have to buy this in a 4′ or 6′ length.
- 1 – 2″ x 2″ furring strip, again 36″ long if you can find it, but if you can’t, a longer length is fine.
- Wood Glue
- 3 1/2″ Long Construction Screws – you’ll need 5-6 of them depending on how many studs you can hit.
- 1 5/8″ Long Construction Screws – you’ll need about six of these.
- Two – 2″ Corner Braces
- One pair of 90 Degree Surface Mount Hidden Spring Hinges
- Paint – I used a semi-gloss black.
- Cabinet Knob of Your Choice
Tools Needed:
- Saw (Circular, Miter or Chop Saw – I used my miter saw.)
- Brad Nailer or Hammer and Finish Nails (I used my brad nailer.)
- Clamps – I used these.
- Drill and Drill Bits
- Stud Finder
- Level
Step 1
Cut each of your 1″ x 12″ pieces down to 36″ long.

These pieces will be the top and bottom of your vanity table.
Step 2
Take one of the 1″ x 12″ scraps you just cut. Cut two 4″ pieces from the scrap.

These two 4″ pieces will be the sides of your vanity table.

Step 3
Put wood glue along one cut edge of each of the 4″ pieces you just cut.


Attach one 4″ piece to each end of one 36″ long piece using your brad nailer or finish nails and a hammer.

Step 4
Flip over everything you just put together.

Run glue along the remaining cut edges of the 4″ long pieces. Place the remaining 36″ long 1″ x 12″ on top and nail together.

Clamp the ends together while the glue dries.

Step 5
Cut the 1″ x 6″ down to 36″ long. Set aside.
Cut the 2″ x 2″ down to 34 1/2″ long. Set aside.
Step 6
After a few hours, paint both the vanity table and the 1″ x 6″ piece you cut. I used a semi-gloss black color and gave my pieces three coats. You don’t have to paint the 2″ x 2″ piece as it won’t be seen.
Mounting the DIY Vanity Table to the Wall
Step 7
Go to the wall where you are hanging your vanity table. From the floor, measure up 29 1/4″ and mark in several places. Use a stud finder to locate and mark your studs around that 29 1/4″ area.

Attach the 2″ x 2″ to the wall at 29 1/4″ high using your drill with the 3 1/2″ long screws where the studs are. Place a level on top of the 2″ x 2″ to make sure it’s level. Adjust as needed.
This will allow your makeup vanity to sit at 30″ high. If you want it higher or lower, adjust as you wish.
Step 8
Determine which side you want to be the back of your table. Attach the corner braces on the inside of the back of the table where the studs are located on the wall.

To do this, I held my table up on top of the 2″ x 2″ and made a few pencil marks on the table where the studs would meet up. As you can see, these corner braces may not be evenly space on your vanity table. That’s ok. Really, you might not even need these. I just wanted to add a little extra support for the bottom of the table.
Step 9
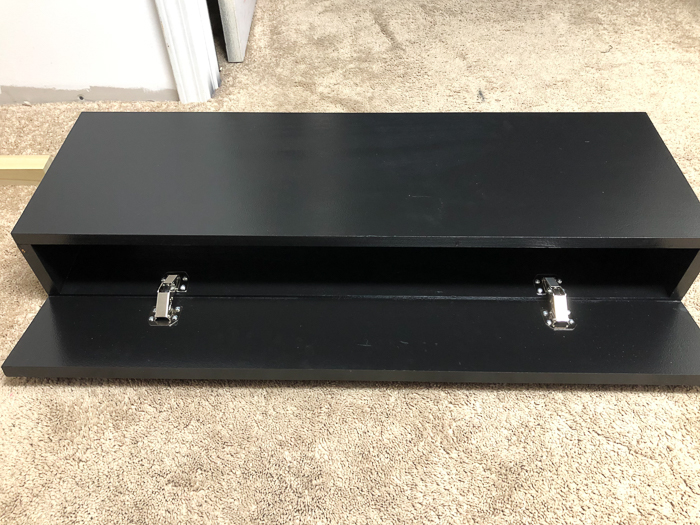
Lay the 1″ x 6″ face down in front of the vanity table. Attach the hinges as shown below.
Step 10
Place the makeup vanity on top of the 2″ x 2″. Secure the table to the 2″ x 2″ by first drilling pilot holes along the back of the table and then fastening the table to the 2″ x 2″ with the 1 5/8″ long construction screws.

Do this also on each side of the vanity table in the top back corner where the 2″ x 2″ would meet the table.
Step 11
Open up the front panel and fasten the corner brackets in the back to the wall using the 3 1/2″ long construction screws.
Attach your hardware knob to the front panel as well.
Fill any screw holes with putty and touch up paint as needed.

This DIY vanity table is just the right size for me. Its small profile that attaches to the wall keeps things open and airy in the closet.

Zebra Art Print / Leopard Print Rug / Brass Brackets for Hats / Single Clip Hangers for Hats
Plus the drop down front provides plenty of storage for all my makeup.

Brass Stool / Mirror / Plug-In Wall Sconces
The baskets easily slide in and out as needed.
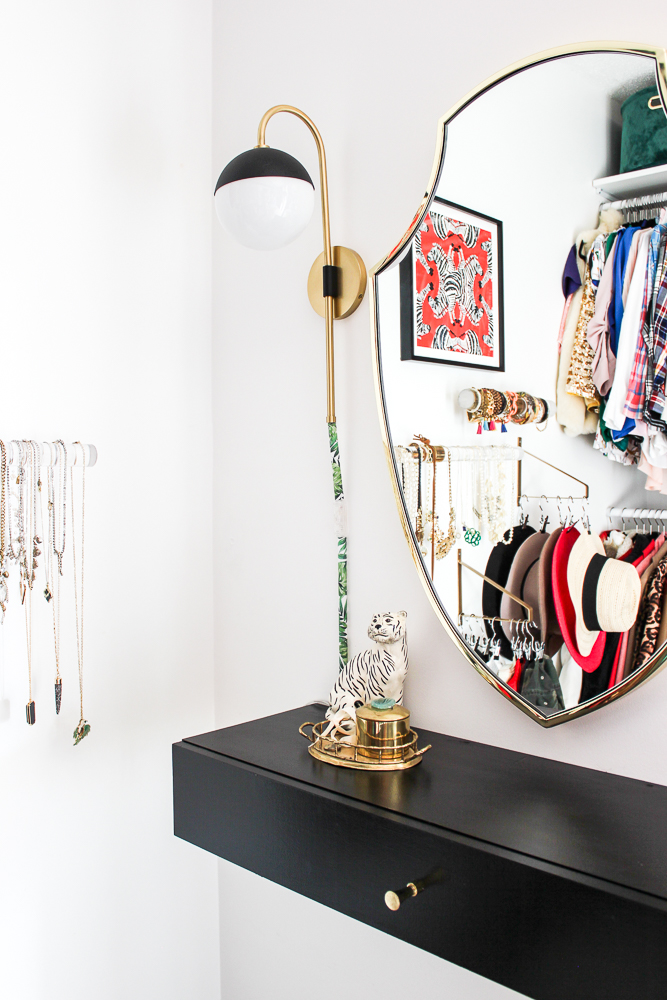
Of course, the mirror and sconces do their fair share of upping the “wow” factor in this space. 😉
See more of the closet makeover HERE!
Looking for more easy build projects?
DIY Bathtub Tray with Book Holder – minimal cuts and easy assembly!
DIY Chippendale Desk – one of my most favorite projects ever! A beautiful desk that doesn’t come with an expensive price tag!
DIY Modern Rustic Bookshelf – a great bookshelf with good storage and a simple build.


Join the Freak Show On….

Tracey A says
Absolutely love it! Thank you for sharing!!
Jenna says
Thanks, Tracey!
Tracey A says
I have a nook where my dresser is! I would hang the mirror there! Perfect!!
Mikki Gilmore says
I LOVE the sconces! Making the pocket for the cords is brilliant!!!
Jenna says
Me too, Mikki – aren’t those just gorgeous?! Thanks!
Stephanie S says
Oh how much fun she would be to win. Nice giveaway.
Meg Strauch says
I LOVE your space! Thanks for sharing.
Jenna says
Thanks, Meg!
Carol San Diego says
I’d love to hang this mirror in my bathroom to open up the space
Susan the Farm Quilter says
Jenna, I was wondering how you built in the drawer – this is so much easier without the drawer and you don’t need much makeup to be gorgeous!! I’d need a bank of drawers to hold all my “war paint”!!!
Jenna says
Oh yes, no way I’m going to try and build a drawer anytime soon! haha! These hinges are great for doing “faux drawers”! haha!
Kaycee says
Jenna, You did such a great job building this! It came out so good and looks great in your new closet/dressing area!
Jenna says
Thank you, Kaycee!
creativejewishmom/sara says
Love it so much I’ll be happy to feature it again, now with DIY instructions! thanks for sharing on craft schooling Sunday!
Jenna says
Thank you!
Pam S says
Jenna, this turned out really nice! You are going to enjoy this to no end!!
Jenna says
Thanks, Pam! You are so right – it’s only been a few weeks and I am absolutely loving it!
Alice V-DIYerfy says
I love how the floating vanity came out. Looks great! Thanks for linking this post with us at #OMHGWW!
Jenna says
Thanks so much, Alice!
Christine says
Such a great idea and can fit almost anywhere!
Jenna says
Thanks, Christine! Yep – not too hard to squeeze one of these in just about anywhere!
T'onna | Sew Crafty Crochet says
Your vanity table looks great! I everything looks great together. And I really love that mirror! Thanks for sharing at the Snickerdoodle Create Bake Make Party!
Jenna says
Thanks so much!
Michelle says
What a cool idea!
Jenna says
Thanks, Michelle!
Judy says
You did an incredible job. Love it. I will be featuring this tonight at my Swing into Spring party that opens at 8pm.
Jenna says
Thanks so much, Judy!
Tasha says
Thank you for sharing, I love it!