If you’ve got basic DIY skills, then you can easily make this kids play table in one weekend – and your kiddos will forever be grateful! On top of that, this activity table for kids with storage can easily be customized to fit the interests of your own individual child!
I first must start by saying that Grunt Labor gets all the building credit for this one. While I helped with the final touches, the table might not be done if it weren’t for him. We had told the Circus we would build her one when she got a play horse stable for her birthday and two months later, we still hadn’t done it. Things had just been crazy with the guest bathroom and bedroom remodel. So one day while I was working away on those two spaces, Grunt went out in the garage and built this kids farm play table in just a few hours.

It can actually be any kind of activity table for kids. We went with the farm theme because that’s the kind of stuff the Circus loves to play with. If your kid is more into Legos, the jungle or something else, it could totally be that instead. You’d just want to replace our “grass” with lego bases or jungle-esque stuff – whatever your kid likes.
DIY Kids’ Activity Table with Storage
This post contains affiliate links for your shopping convenience. Click here to read my full disclosure policy.
For reference, our kids’ play table is 41 1/2″ x 39 1/2″. You can alter the dimensions below to make your activity table bigger or smaller as desired.
Materials & Tools Needed for Table Construction:
- 4 – 2″ x 4″ x 96″
- Sheet of 1/2″ Plywood
- 2 – 1″ x 2″ x 8′
- 4 Casters
- Drill
- Circular Saw
- Wood Screws
- Nail Gun and Brad Nails or Hammer and Finish Nails
- Cup Hooks
- Storage Bins that have handles or holes that will hang from cup hooks – we found ours at The Dollar Tree.
Cut List
Using the circular saw, make the following cuts.
• Cut the 2″ x 4″s into the following lengths:
- 4 pieces – 20 1/2″ long (legs)
- 2 pieces – 26 7/8″ long (frame around table)
- 2 pieces – 48″ long (frame around table)
- 1 piece – 45″ long (support underneath table)
• Cut the 1″ x 2″s into the following lengths:
- 2 pieces – 48″ long (rim around table)
- 2 pieces – 31 1/2″ long (rim around table)
• Cut the plywood down to 30″ x 48″.
Steps
Step 1
Gather the 2″ x 4″ pieces that make up the frame of the table (2 – 26 7/8″ long pieces and 2 – 48″ long pieces) and the 2″ x 4″ piece that is the middle support (45″ long piece) underneath the table.
Arrange the 2″ x 4″ frame pieces in a rectangle and place the 45″ long support piece in the middle. Use wood screws to attach the 2″ x 4″s together where each 2″ x 4″ meets.

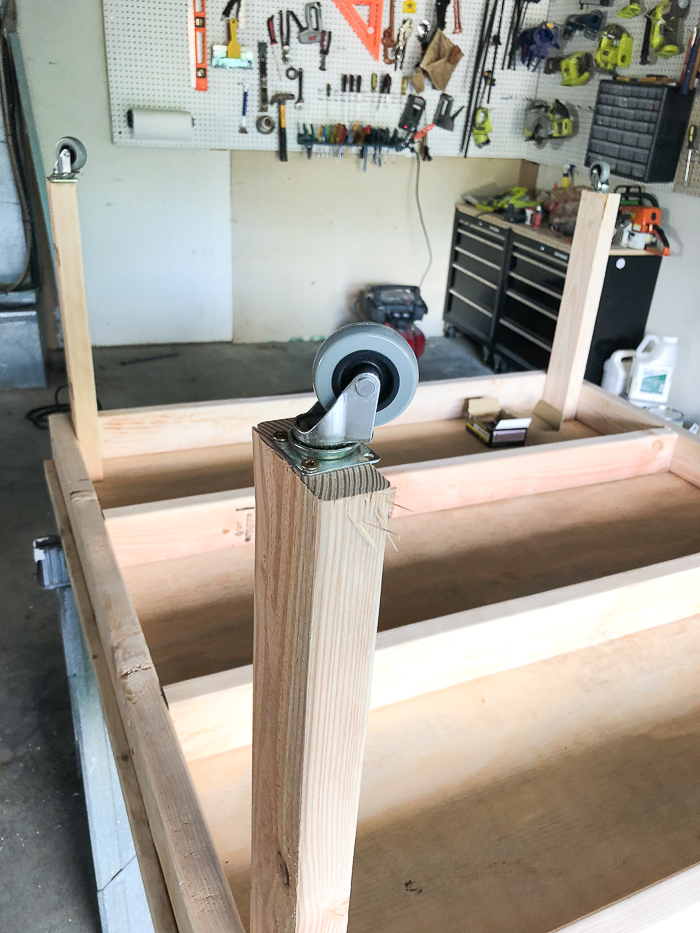
The photo above shows two support pieces. Ignore that. This was actually from the first round of Grunt making the table and it was way too big. He ended up disassembling it and making it to the dimensions noted in this post. The photo will help you get a visual though of how to construct the frame of the table.
Step 2
Attach the 2″ x 4″ leg pieces (the 20 1/2″ long pieces) to each corner of the frame using wood screws.

Be sure that the 2″ x 4″ leg is flush with the bottom of the 2″ x 4″ frame you are attaching it to and also pushed into the corner of the frame. You can use clamps to hold it in place while you are screwing it to the frame.
Go ahead and attach the casters at this time as well.
Step 3
Flip the table over and put it on the ground. Place the plywood on top of the 2″ x 4″ frame you’ve just constructed. Attach it to the frame with wood screws all around the edges and in the middle where that middle support is.
Step 4
Attach the 1″ x 2″ pieces around the edges of the plywood using finish nails and a hammer or a nail gun.

The bottom of the 1″ x 2″ should be flush with the plywood. This will create a rim around the activity table to keep things from falling off.
Step 5
Attach cup hooks to the sides of the 2″ x 4″ frame to hang bins from for storage.

Our storage containers came from The Dollar Tree.
How to Make It Into a Kids’ Farm Table
As I said, you can customize the top of the activity table to meet your own child’s interests and needs. Here’s how we made ours a farm play table…
Materials & Tools Needed
- Paint Colors of Your Choice – We used white for the legs and frame and stained the 1″ x 2″ rim to make it resemble a fence.
- Green Material that Resembles Grass – We used what we had leftover from this rug that I upholstered a wall with.
- Light Blue Craft Paint (if you’d like a pond on the table)
- Miniature Faux Trees
- X-Acto Knife
- Staple Gun
Step 1
Do the painting and staining first. We painted the legs and 2″ x 4″ frame white and stained the 1″ x 2″ rims so they looked like fencing. The only thing we didn’t paint first was the pond.
Step 2
Cut your green material down to the size of the plywood base and attach it to the table. We did this with a staple gun along the edges. You could also glue it if you wish.
Step 3
Determine where you want the pond to be on the kids’ farm table. Outline it using a pen or marker, then cut out that portion of the green material using an X-Acto knife. Once the green material is cut away, carefully paint that exposed portion of the plywood blue to resemble a pond.

Step 4
Place your faux trees wherever you desire. Ours wouldn’t stay standing very well, so we hot-glued them down.

And that’s it!

The Circus has loved playing with her farm table. She had all her Schleich paraphernalia up on it and set up before we could even put the finishing touches on it. I’m glad we finally got it done for her.
Having it on wheels is especially nice because it’s so movable.

Will you be adding an activity table for kids to your to-do list?
With Christmas just around the corner, this could be a great gift idea!
You might also want to see…

DIY Kids Wall Mounted Desk with Storage

How to Build Wall to Wall Shelves
How to Build a Children’s Stage with Hidden Dress-Up Storage


Joanna says
I have no kiddos, but have to say the table looks great and ten times better than anything you could buy in the store! You two are quite the team! Enjoy your blog.
Jenna says
Thanks so much, Joanna! That’s always my problem – I look for what I want to buy, but then decide I want to customize it too much or it needs to be bigger, etc. and then end up making my own. haha! Usually takes more time, but often not as much money and we’re happier in the end!
Pam says
This is SO stinkin’ cute!! Honest to Pete….I live vicariously through the Circus! Makes you wish you had six more just like her, huh!! LOL
Jenna says
hahahaha! Oh Pam, you always have a good joke!
Brigitte Baker says
Job well done to GL! 🙂 I know The Circus loves it!
Jenna says
Yes and Yes!!
Stephanie Sheridan says
How fun to have the table. I think the cows might fall into the water. LOL
Also the stage is great. Where is this sitting in the house.
Jenna says
hahaha!! The stage is in her playroom. The play table resides in the den, but I moved it to the guest room for photos because there were less things to work around that way! haha!
Victoria @DazzleWhileFrazzled says
Very fun! Love the green grass touch. I could see my kiddos playing farm for a long time at this table. Visiting from Sundays at Home party.
Jenna says
Thanks, Victoria!
Loni says
What a great play table! I’m sure it will get many hours of fun playtime! I love your use of the cup hooks and storage baskets, genius!
Jenna says
Thanks, Loni!! It’s already proving its worth!
Kim~madeinaday says
How adorable! My daughter would have loved this! I also love that stage! How cool is that! Pinned! Thank you for sharing on Merry Monday! Hope to see ya next week!
Kim
Jenna says
Thanks, Kim!
Jann Olson says
The table really is the perfect place for her farm and animals. Great job!! Thanks for sharing with SYC.
hugs,
Jann
Chloe says
What a handy mom you are! Great job on this table! I know my granddaughters would love it! Thanks for sharing at Celebrate Your Story!
Rhonda Gales says
How cute is this! This is perfect for any cowboy or cowgirl. I’ll be featuring your post on Sunday’ Best. Thanks for sharing.
Rebecca says
Jenna, Your DIY Play Table is so much nicer than the second hand train table I got for my daughter off Craig’s List! I love that it’s on casters, too. Thanks for sharing at Celebrate Your Story!
Rebecca
Katie says
I love everything about this!! Where ia that farm ans animals from?!
Jenna says
All the farm animals are Scleich. 🙂