Turn that dated flatware storage chest into a stunner with this easy flatware chest makeover. Don’t need silverware storage? No worries – these chests are great storage for all kinds of different things!
In February, a few friends and I decided to launch a “Back to the Basics” blog hop – good and simple DIY projects that aren’t expensive, require simple materials, basic DIY skills and maybe the occasional power tool, but nothing too convoluted. 😉 That was when I showed you how to make the DIY bathtub tray with a book holder.
I was thrilled with y’all’s response to the Back to the Basics projects! It seemed like these simple projects were things you were missing around “blog land” and guess what – we were missing them too!
We are all back this month and have a few extra folks joining in as well and I think you’re going to love this round of basic DIY projects too!
If you’re hopping over from Lauren at Bless’er House, welcome! Weren’t her scrap wood cutting boards awesome?
This time around, I did a simple makeover project, that resulted in a big “wow” factor…

Isn’t that the sexiest flatware chest you’ve ever seen? ? After this makeover, I’m starting to think there isn’t much a glossy red can of spray paint can’t fix.
This post contains affiliate links for your shopping convenience. Click here to read my full disclosure policy.
Easy Silverware Chest Makeover
Before we get started on how this silverware chest turned into a raging beauty, here’s a shot of it in its former state:

Sad, wasn’t it?
While I was a “Southern Belle” in one my preschool plays, there isn’t much that would classify me as one these days. However, my love for using great grandmother’s china on holidays, flanked by a good monogrammed napkin and my great aunt’s silverware might put me an inch or two closer to the title though. haha!
I had been looking for a good sized silverware chest to hold everything for a while, but none I’d seen in retail stores had impressed me. When I found this one at Goodwill though for $5, I knew it had potential.
Supplies and Tools Needed
- Fine Grit Sandpaper
- Tack Cloth
- Painter’s Tape
- Plastic Wrap
- New Hardware (if you want to switch out the hardware.)
- Wood Filler (if you need to fill old hardware holes.)
- Spray Paint in Color of Your Choice – I used this Apple Red.
Steps
Step 1
Remove all the hardware from the chest. Sand the chest with a fine grit sandpaper to rough up the surface a bit in order to give the paint a better grip.

If you are switching out the hardware, place your new hardware on the chest and make sure it will work with the old hardware holes. If it won’t, fill the holes with wood filler as needed, let dry, then sand those if needed.
After you’ve done all the sanding, use a tack cloth to remove any sanding dust and particles from the chest.
Step 2
If you want to preserve the interior of the chest , use painter’s tape and plastic wrap to cover it and keep paint from getting on it.

While the interior of my chest was not the prettiest of greens, I wasn’t up for relining it, so I taped the interior of my chest off.
Step 3
Apply spray paint to your flatware chest. I did about three coats of Apple Red.
Step 4
Attach the hardware. If you’re reusing the old hardware, just pop it back on. If you are doing new hardware, then drill new holes as needed.

The holes for the knobs on the front of the chest still worked fine for the new hardware there, but I did have to make new holes for the new handles I used on the side. Also, as you can see, I didn’t worry too terribly much about making those old holes completely flush – I knew the handles would hide them most of the time.
Remove the tape and plastic wrap at this time as well. You knew that already though, didn’t you?

I used a few of my easy to make DIY selenite knobs as the hardware for the front. I love the contrast between the white stones and the red on the chest.

I had a couple of these brass cobblestone pulls left over from the built-in cabinetry in our master bedroom sitting area that worked perfectly for the sides of the chest.

If you don’t have a need for a silverware chest, then these would make excellent storage for so much more as well. You could easily just pull the inside lining and dividers out and put whatever you want to in them. In fact, I love how this one turned out so much that I’m going to be on the lookout for more to makeover and use as decorative storage.
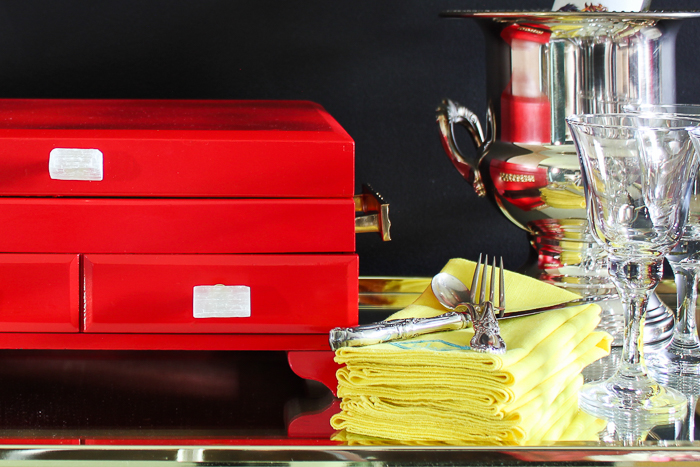
Did you notice those lovely yellow napkins beside the chest?

Those are actually the Circus’ first set of specially monogrammed napkins! One of her chores is to set the table for dinner and when she discovered we had monogrammed napkins she could use, she had a ball choosing different ones each night. When I found a set of plain yellow ones, I told her she could have them monogrammed with her initials. She selected the design, font and colors herself. As I’m sure you guessed – we currently use those more than any of the other napkin sets we have.
Up next on the Back to Basics Blog Hop is April from House by Hoff! You have to see the beautiful charcuterie boards she made!
Catch up on all the Back to Basics projects this month below:

Flatware Chest Makeover from Rain on a Tin Roof – You’re here!
DIY Charcuterie Board from House by Hoff
DIY Crock or Pottery from Thrift Store Canisters from So Much Better with Age
DIY Wood Planter from The Turquoise Home
Coffee Table to Bench Makeover from The Happy Housie
DIY Cutting Boards from Scrap Wood from Bless’er House
Follow on Social Media:
Facebook | Instagram | Pinterest | Twitter


Susan the Farm Quilter says
Your silverware chest looks great! Rather like Christmas when you open it up! If you want to change the color of the fabric, it isn’t hard to paint it https://www.diynetwork.com/how-to/make-and-decorate/upcycling/how-to-paint-fabric-chairs Just follow the same directions for the chair for your chest.
Jenna says
I thought it looked like Christmas too! haha! I considered painting it, but I’m pretty sure that fabric is the kind that helps keep the silver from tarnishing, so I figured painting it might take away that aspect.
Jamie says
You have such creative DIYs, Jenna. This is such a great upcycle!
Hugs, Jamie
Jenna says
Thanks, Jamie!! I thought your crock was awesome!
April says
Your silverware looks so fancy, Jenna! Love this project! xo
Jenna says
Thanks, April! So glad you joined in on this blog hop!
Stephanie S. says
It is so you. Love the color. Knobs are fun. I found an old jewelry box to redo. Will be fun.
Jenna says
Thanks, Stephanie! I’ve been on the hunt for a jewelry box to redo as well! I bet yours will be awesome!
Pam says
And THAT, my friend, is how you make a sexy silver chest! YES! Kind of funny….I’ve been wanting one for a while. But never thought about Goodwill ~ I mean I only drive by ours 2 times a day, five days a week. Bet I’ll be popping in really soon! But heck, even if I’d seen one, I wouldn’t have known what to do with it. Thank you for that!!!
Jenna says
hahahaha!!! Thanks, girl! Gotta love a little pop of sexy decor every now and then. haha!
Ann says
This is such a fun idea, luv it! I’d luv for you to share it with us at Wall to Wall DIY Wednesday! Have a great day!
Jenna says
Thanks, Ann!
Hamilton Billiards says
Lovely transformation Jenna, well done! Thanks for sharing. Carolina at Hamilton Billiards.