Author: Jenna

  • A month with Greta.

    A month with Greta.

    Thinking about buying a Roomba i7+ robot vacuum but wondering if it’s really worth all that money? I get it – those things aren’t cheap! Here’s my iRobot Roomba i7+ review. Read this then decide for yourself.

    It’s been a little over a month since we added a new addition to our family. She’s not cute and cuddly, but she is sleek and efficient. 

    She’s Greta.

    iRobot Roomba i7+ Review

    This post is brought to you by i​Robot​. While this was a sponsored opportunity, all content and opinions expressed here are my own.

    Greta is our iRobot® Roomba® i7+ if you missed the first post about her.

    We’ve spent the last month getting to know each other better and figuring out exactly how we can benefit each other.

    Who am I kidding? She benefits zilch from me. I’m 100% the user in this relationship.

    I know a robot vacuum is an investment and a lot of questions arise with spending that much money on a vacuum. I had quite a few questions myself when I got this bad girl. I’m going to answer both questions I had and questions I got from you guys, friends and family. I’ve also included tips for using your Roomba® and overall thoughts as well. 

    iRobot® Roomba® FAQ

    For reference, my Roomba® is the i7+ WiFi connected robot vacuum with automatic dirt disposal. Yes, friends – no emptying the canister. 

    Q: Does the vacuum work on tile? Carpet? Wood floors?

    Yes, yes, and yes. It even leaves carpet lines! 

    iRobot Roomba i7+ Wifi Connected

    I know – I was really surprised the suction was that powerful to leave carpet lines. 

    Tile and wood floors are no problem either. I didn’t know how well it might work on tile since grout lines are often recessed a bit lower than tile. However, I had a powder spill in the bathroom the other day and opted to let Greta clean it up to see how she did. 

    Robot Vacuum Review - going over tile

    She sucked up every bit of the powder and cleaned the rest of the floor as well.

    Q: Will a Roomba® go over rugs? 

    Yes, it easily transitions from my wood floors to rugs and from my carpeted areas to rugs. I do suggest removing scatter rugs, such as bath mats, from the areas you’ll be cleaning though. Since those are so lightweight, the Roomba tends to move those around.

    Q: What about rugs and/or carpets?
    This model does rugs and carpets well too. My daughter has the rug you see below in her room.

    Roomba Vacuum review - going over thick rugs

    It’s a heavy duty rug with lots of varying textures from the pattern on the rug. It gives it a good surface cleaning. Because she is a kid and this rug can hold a lot of dirt, I do still try to give this rug a go over with my old vacuum once a month or so for a deep cleaning. 

    Q: How well does it clean up dog hair? 

    Extremely well. It vacuumed up dog hair I didn’t even know was there. We have a lab and while it spends most of its time outside, she does come in occasionally and sit on her bed downstairs. She’s always downstairs and the Clean Base™ Automatic Dirt Disposal for the robot vacuum is upstairs. Because of this, when Greta is cleaning downstairs and her canister gets full, I often just dump it out myself instead of taking her back upstairs to let her empty herself. When I did this the first time, I was absolutely baffled to see how much dog hair she had picked up. I had no idea there was so much down there.

    Q: What about stairs? How do you keep it from falling off stairs?
    The Roomba® i7+ can actually sense drop offs such as stairs and therefore will avoid them.
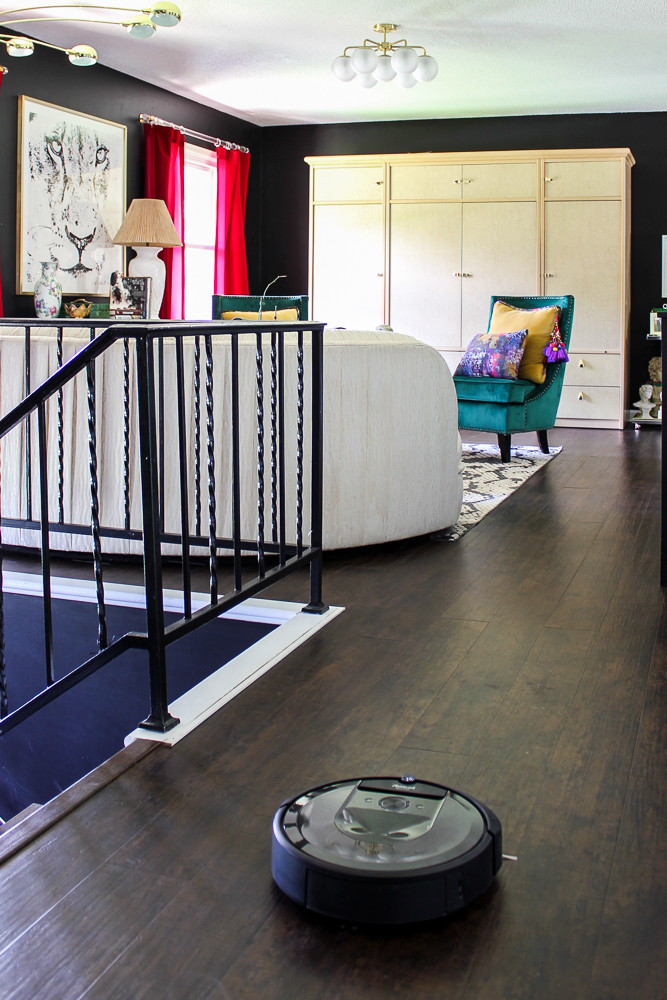
    Roomba i7+ - senses stairs and drop-offs

    If you’re still nervous about the Roomba® being so close to stairs, just place the Dual Mode Virtual Wall Barrier (comes with the Roomba) along the stairs and it will create a virtual wall that the Roomba® won’t go near. 

    Q: Is there any place you don’t use it? 

    I don’t let it go in my daughter’s playroom. It’s not a huge space anyway and there’s just a whole lotta stuff in there. You parents know what I’m talking about.

    Using the virtual wall barrier with a Roomba.

    There’s no door to close between her playroom and her bedroom though, so I just place the Virtual Wall Barrier here to create an invisible barrier that Greta won’t go past.

    Keeping a Roomba out of areas with the virtual wall barrier.

    There are two modes for the Virtual Wall Barrier – Virtual Wall and Halo Mode. I use Virtual Wall most often as it creates a straight line that Greta won’t cross. The halo mode creates a circular barrier that’s perfect for pet bowls. 

    Q: Can it go over threshold dividers?

    Yep. We have threshold floor moldings in multiple places in our house and the Roomba® i7+ easily goes right over them.

    iRobot Roomba - going over thresholds

    Q: How does it work with a smartphone?

    When you download the iRobot® app to your phone, you’ll be guided through the process of setting up your iRobot® Roomba® and floor plans. It’s super simple. 

    Using a Roomba with the iRobot app

    Once you get everything set up, you’ll be able to just open the app from anywhere, hit clean and your Roomba® will do their thing! 

    Q: Can you set up multiple levels or floor plans in the app? 

    Yes – it can map and store up to 10 floor plans.
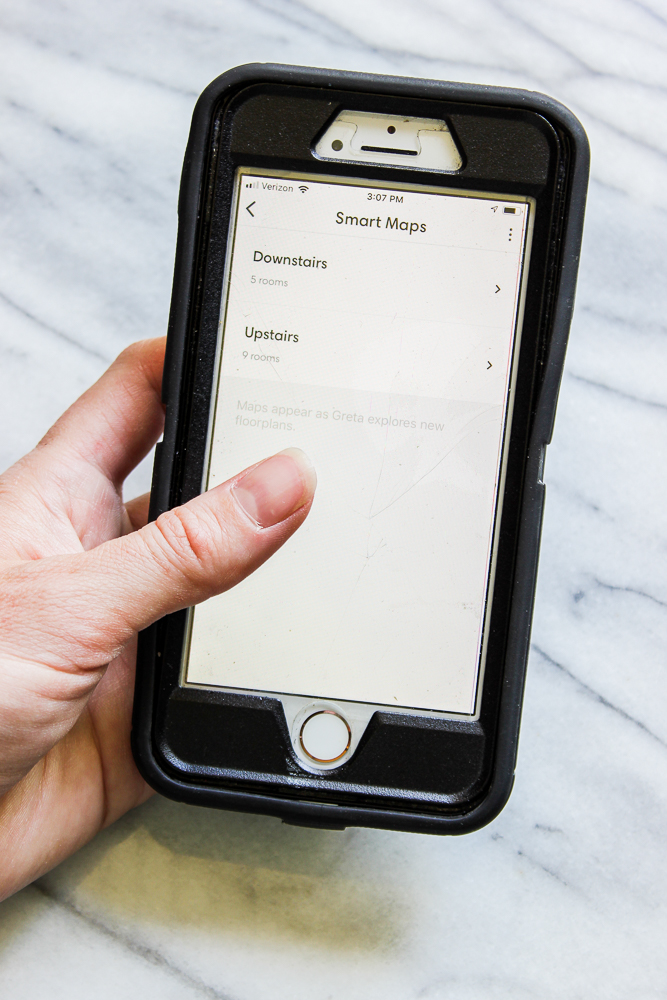
    Setting up smart maps on the iRobot app.

    I have both my upstairs and downstairs mapped in the app. After your floor plan is mapped out, you can choose to clean certain rooms instead of the whole house if you’d like. This is called Imprint™ Smart Mapping. 

    Cleaning certain rooms with the iRobot app.

    Q: Why did you name her Greta?

    The last housekeeper my Pap had was Greta. She came once a week and was a sweet soul. That one day a week she came would be the only day we didn’t eat out for lunch – Greta would cook for us. And if it wasn’t for her, those gallons and gallons of grapes my dad sent over would have went to waste instead of becoming the tasty jelly we made it into with Greta’s guidance. That’s another story though…

    Tips for Using the iRobot® Roomba® i7+

    A few things I’ve learned while setting up and using my iRobot® Roomba® i7+: 

    Do training runs to map out your home faster.

    When you first start creating your maps, use the “training run” feature to map it out faster. The Roomba® won’t clean during the training run, but instead just maps your floor plan.

    Do the first run when you are home. 

    When I did the training run and the first cleaning run, I made sure I was at home. Occasionally, I would peek in on Greta and see how she was doing. This way, I was able to pick up any smalls I missed and just keep an eye on her.

    Once you get your space mapped out and you’re fully comfortable with your iRobot® Roomba®, then you can create a cleaning schedule on the app for her to clean automatically where and when you want her to.

    Remove “smalls” from areas you are cleaning.

    Before sending Greta to do her thing, I go around the house and pick up any clutter that might be on the floors and also any small furniture items like ottomans, small side tables, etc. This just allows her to do a better job cleaning since she won’t have as much to work around. 

    Also, I will often set her up to just clean one room at a time, like the kitchen. Before I send her to clean, I’ll move the kitchen chairs into another room just so she can get a really good cleaning in, rather than having to clean around the chairs. After she’s done in the kitchen, I’ll move her into the dining room and the dining room chairs into the kitchen. She can go under chairs and does go under these if left out, but this just helps to get the whole area more clean.

    She’ll get smarter the more she works. 

    On the first few cleaning runs, you may notice your Roomba® missing some spots. I had this issue and it really bugged me at first. However, after a couple more runs, I noticed that she wasn’t missing those spots she had initially.

    Overall Thoughts

    The Roomba® has made cleaning so much easier for us. As I said when I first got this little gem, I rarely got my floors swept before and when I did have spare time to do it, I really didn’t want to be spending it sweeping. I don’t have to pick anymore because Greta does it for me.

    It is annoying taking her back and forth between the upstairs and downstairs, but it’s still a lot less time spent doing that than actually vacuuming myself. 

    I think one of my favorite aspects of having Greta is that after dinner each night, we just wipe all the counters off, letting any crumbs go into the floor, then I send Greta into vacuum and I go off to cuddle with the Circus – if she’ll let me. I wake up to clean floors the next morning. 

    Also, when I’m doing a whole house deep cleaning, Greta can be vacuuming while I’m scrubbing the bathtub or doing something else. It saves me so much time and energy. By the time, I’m done with the other cleaning tasks, she’s done vacuuming.

    Do you have a Roomba®? What do you love about it?

    Want to reference this post later? Just pin the image below!

    Roomba i7+ Review

    Keep up with me on social media!

    Facebook | Instagram | Pinterest | Twitter

  • Classy Crap

    This post is sponsored by W​oot​. While this was a sponsored opportunity, all content and opinions expressed here are my own. This post contains affiliate links for your shopping convenience. Click here to read my full disclosure policy.

    As you all well know by now, I am a deal seeker. I live for the hunt and thrill of finding something I absolutely never knew I needed – until I find it – and then getting it at a bargain. 

    Ok, let’s just go ahead and call it like it is. I’m cheap and I love being a collector of “uniques.” Ok, let’s just call that latter part like it is too – I collect a lot of crap.

    Classy Crap - Woot Birthday Deals
    I never pass up little pieces of elephant decor or these fantastic brass trays!

    I brake for yard sales, thrift stores and lord knows, a good church rummage sale – those precious old ladies put so many wonderful things in those! 

    I am forever on the hunt for classy crap at a bargain.

    Classy Crap - Woot Birthday Deals
    Remember my $10 coffee table and $30 brass floor lamp!?

    That being said – I do draw the line on buying some things secondhand. Bedding is a firm no. Cookware and many kitchen items are usually too worn out by the time it’s being sold secondhand and I’m always leery of secondhand electronics actually working correctly. 

    Obviously though, those things are often necessities in life. But again, I’m cheap. And those things aren’t always cheap. 

    Enter Woot.

    Woot Birthday Week

    Have you heard of Woot? I’m actually ashamed to say that I had no idea it existed, yet they are celebrating their 15th birthday this week. 

    Woot is the original daily deals site. They used to offer only one product at a steep discount per day, but now there are multiple daily deals and sales in several different categories.

    The icing on the cake, though? Woot is owned by Amazon, so if you’re an Amazon Prime member, you get free shipping at Woot! 

    This 15th birthday week though – it’s going to be epic when it comes to snagging classy crap at a bargain, folks.

    Woot Birthday Deals

    There are multiple different events going on all week, so listen up. 

    Monday and Tuesday, July 8th and 9th: The Deal-O-Meter

    Head to the Deal-O-Meter page on Monday to vote for lowering the price of an item on Tuesday. If enough people vote to lower the price, then the item will be released for sale at the lower price on Tuesday.

    Wednesday and Thursday, July 10th and 11th: WTF Pricing (Woot’s Totally Fun Pricing, not what you were thinking) 

    At 11am, 12pm, 1pm and 2pm (all in central time), a product will launch on Woot with a price of $1. There are just a few at this price though! If you miss it, stay on the page and refresh it in 10 minutes. At that point, there will be more available, but the price will go up a little more. So stay close to your phone or computer to snag these epic deals!

    Friday, July 12th: Woot-Off, Bags of Crap, Woot Locker

    This is like the grand finale at a fireworks show here, folks. 

    Woot-Off, 7am – 10pm CT

    Woot-Off is when a new product is launched immediately after the sellout of the previous deal. You never know what the item will be, how many will be available, etc. so you have to keep a close eye on the landing page and be ready to snag the deal before it goes away. You’ll find Woot-Offs on the Clearance page, the Shirt page, and the Gourmet page. I feel like there might be some great shirts to snag as gifts here and no telling what will be on that clearance page!

    15,000 Bags of Crap + Limited Edition Birthday Bags of Crap

    When I was a kid, there was a nearby store that sold all sorts of wonderful Hello Kitty Sanrio items and they would sometimes have grab bags for sale. You never knew what you would get in the bag – sometimes they were awesome and sometimes, not so much. Well, my inner kid is squealing over the thought of once more getting grab bags, just these are called Bags of Crap.

    Woot Boxes of Crap

    At Woot, BOCs are a random collection of stuff put in a box and shipped to you. They cost a whopping $10 and shipping is included. Here’s a video that shows what one guy got in his BOC – just watch it, crazy, right? The BOCs will appear at random times in the Woot-Off, on the Woot App, and during the 15-hour Woot Locker livestream (more info on that below).

    There will also be 150 limited edition birthday Bags of Crap released on Friday too. Each hour, from 7am – 10pm CT, Woot will release 10 of these special bags of crap. They have extra crap in them and retail for $50 and will contain exclusive birthday goodies. 

    Needless to say, I’ll be watching closely, ready to pounce on both the regular and limited edition Bags of Crap!

    15 Hour Woot Locker LivestreamFrom 7am to 10pm CT, the Woot staff will be hosting a live-stream on Woot’s Twitch channel. Every hour, they will make a new Woot Locker. What the heck is a Woot Locker, right? Essentially, it’s a larger version of the Bags of Crap. There’s this huge box and employees add items to it every 5-10 minutes live. The price starts at $10,000 (which of course no one will pay for an empty box), but each time an item is added, the price of the locker is reduced. It’s all on the livestream and when someone out there decides they will pay for the locker at the current reduced price, it’s sold. When that happens, the process starts all over again with a new Woot Locker every hour.

    Woot Lockers
    That is literally the box they fill!

    I know it’s a lot and can be overwhelming. I suggest getting the Woot app to easily check up on deals throughout the day. Also, take a look at their site now to get an idea of what products you want to be on the lookout for during this crazy deal week. 

    For me, I’ll be watching out for these things during the Woot! birthday week: 

    • Bedding – our bedding has seen better days. We need a new bedding set desperately. I’m also going to be on the lookout for a weighted blanket in hopes of getting some better sleep at night – I’ve heard a Degrees of Comfort weighted blanket might just be one of the deals next week. 😉 
    • Potential Gifts – y’all know I love gift giving, so as deals arise, I’ll be trying to think about people who would love that item. A little bird told me Yeti Flip Coolers and Silhouette Cameos might just go on sale – these make GREAT gifts!
    • Bath Towels – those also need a desperate upgrade around here.
    • Cookware – Grunt has been making breakfast for us this summer and just the other morning, he was complaining how bad some of our skillets are. He’s right! Time to upgrade! I’ll be looking for a T-fal cookware set to go on sale. 

    And if you’re in the market for a Roomba (we just got one and absolutely love it!) – keep a close eye on Woot – they might just have one at a great price. 

    Have you shopped at Woot before? What deals have you snagged?
    If you haven’t shopped at Woot before, sign up here and get ready to snag those deals! Be sure to also install the Woot app on your phone for easy shopping!

  • Less Stress, More Summer

    Less Stress, More Summer

    This post is brought to you by i​Robot​. While this was a sponsored opportunity, all content and opinions expressed here are my own.

    Friends, I had a meltdown the other day.

    A full-on lock myself in the bathroom, ugly crying, snotty tissues meltdown.

    It had been a day. My stress level was off the charts, thanks to a to-do list that just kept getting longer.

    After the umpteenth thing didn’t go according to plan that day, I lost it.

    Later that day after licking my wounds, Grunt and I pulled out our calendars to plan out the rest of the summer and see about squeezing in one more fun trip with our girl.

    It became quickly apparent that we didn’t have as much free time as we thought we did this summer.

    Add to that, the previously mentioned to-do list and it became abundantly clear to me – time is fleeting and especially the summer.

    It was then I also realized my never-ending to-do list means nothing. There’s not a thing on it that’s really all that important in the grand scheme of things.

    What is important is making sure I spend every possible second I can during these special summer days with my best girl. She’s growing – fast, and I want to be stress-free and present for her, not a slave to my to-do list.

    Cleaning the house is a constant on my to-do list. It’s always a hot mess and I just don’t have that much time to clean it. One thing I’m able to cross off my to-do list now though, without leaving my seat I might add, is vacuuming the floors.

    Roomba i7+

    Meet Greta. She’s an iRobot® Roomba® i7+. And she is a godsend.

    For the first time, in a loooong time, I’m actually ok not putting on my house shoes when I first get up in the morning – because my floors are no longer always covered with dirt, crumbs and other questionable debris.

    iRobot Roomba Vacuum

    Greta vacuums every flooring surface clean: wood, tile, carpet, rugs – everything. The Roomba i7+ has Dual Multi-Surface Rubber Brushes that are flexible so they hug every type of floor surface. They were also made to stand up to hair – it doesn’t get tangled in the Roomba. With a dog and two girls with long hair that both shed like a dog, that’s important stuff, folks.

    When I’m ready for Greta to clean, all I have to do open up the iRobot HOME App on my phone and hit clean.

    iRobot App for Roombas

    The Roomba i7+ has Imprint™ Smart Mapping Technology, so after running a few times, she mapped out my floor plan all on her own. All I had to do was go in and name the rooms. With the floor plan in place, I have the option to choose to have Greta clean certain areas, rather than the whole house. I don’t even have to be home for her to clean, I can open up the app anywhere and put her to work. You can also opt to set up a cleaning schedule to have your Roomba clean on certain days and times.

    iRobot 7+ on Carpet

    Greta also cleans up after herself. She automatically empties her bin into a disposable bag that holds 30 bins of dirt, dust and hair.

    iRobot 7+ Docking Station

    I don’t have to think about vacuuming for weeks at a time. That means more time for my best girl.

    If you need us, we’ll be by the pool this summer soaking in the sunshine and sweetness of being seven – and telling the to-do list exactly where it can go….

    From now until 6/29, you can save $150 off the same Roomba i7+ I have – find it here!

    You can also save on other select floor cleaning robots thru 6/29 as well – that robot mop is going at the top of my wish list!

    I’ll be reporting back in a month or so about how my Roomba is doing – leave any questions you’d like answered in the comments below!

  • Red Carpet Theme Party

    Red Carpet Theme Party

    Roll out the red carpet and create your own Hollywood using these red carpet theme party ideas! You’ll throw a VIP party that no one will ever forget!

    While the Circus’ birthday is in May, she started talking party themes in January.

    And promptly after her birthday party this year, she started talking themes for next year’s party.

    I told her she had to nail down a theme no later than one month before her party. She was all over the place with themes, y’all – Power Rangers, dolphins, cats, dance party, dadadadadada.

    A few days before the deadline, she said she wanted a “country music awards party.” Yes, you know my heart swelled in that moment, folks.

    The more we talked, the more it became obvious that she wanted lots of different types of music played at her party though – not just country and she also wanted people to dress up if they wished. So, we morphed her birthday party into a red carpet party that encompassed her country music awards party and a little touch of Hollywood…

    Red Carpet Party Ideas

    This post contains affiliate links for your shopping convenience. Click here to read my full disclosure policy.

    VIP Party Invitations

    For her invitations, I wanted to combine the music and red carpet themes together.

    Red Carpet Theme Party

    I made her invitations myself using Picmonkey. On the back, we taped on another piece of paper that had a URL for people to go to to RSVP and add some songs to the party playlist. I know – we’re super extra. And unapologetically so.

    VIP Passes

    VIP Party

    Upon entering the party, every kiddo got their very own All Access VIP pass. The kids loved them and thought they were so cool. Again, I made these myself using Picmonkey. I bought this pack of lanyards to put each pass in. Get the VIP pass printable file here! These also made a great party favor for the kids.

    Hollywood Party Swag Station

    Red Carpet Party Ideas

    Black Tablecloths / Gold Fringe Backdrop / 7 Balloon / Red Carpet Runner

    After receiving their VIP pass, the kids went downstairs to the VIP lounge (a.k.a. the cleaned out den). On the way in, they could stop by the swag station and adorn themselves with gear if they so wished.

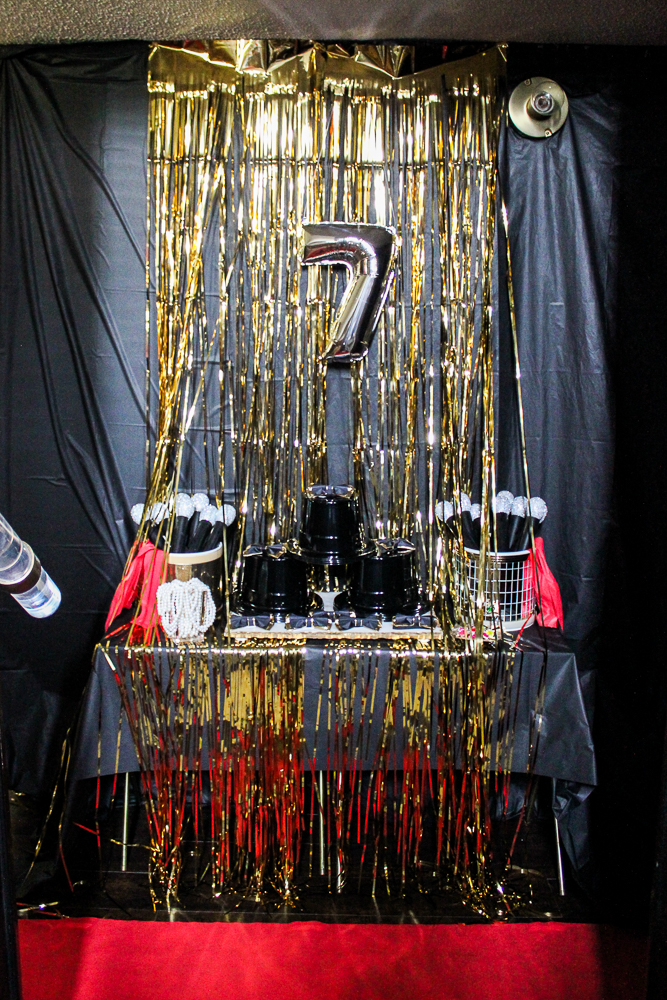
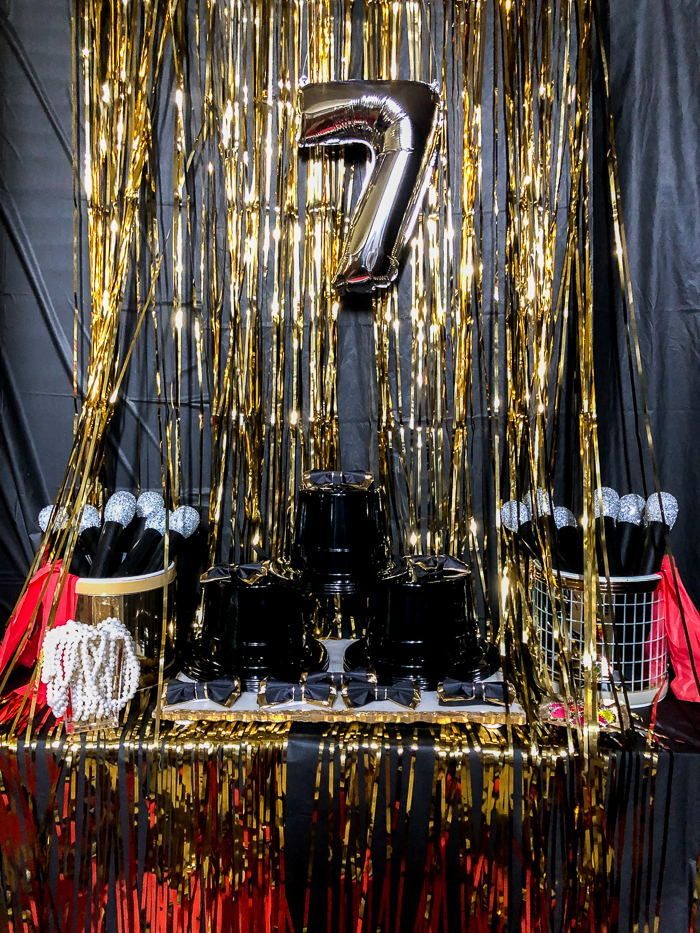
    To create the backdrop for the swag station, I hung up a couple of black plastic tablecloths from the ceiling and then layered on a gold fringe backdrop. On top of that, a simple “7” balloon.

    Red Carpet Party

    I put a table in front of the tablecloths, then covered that with another black tablecloth and pulled some of the gold fringe over the table. I used shiny things from around the house to hold all the swag.

    Red Carpet Birthday Party

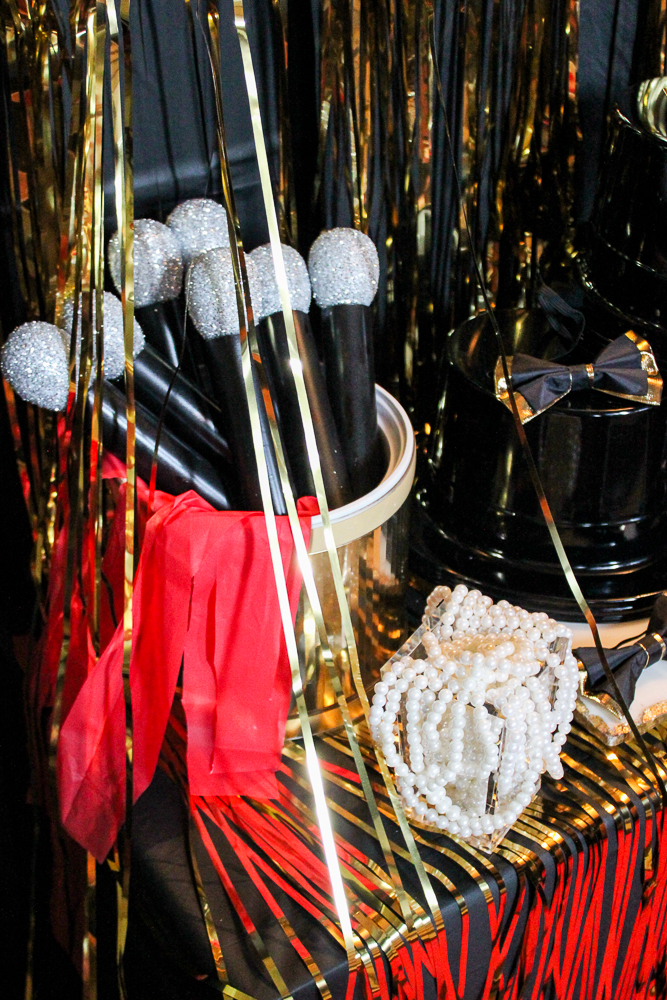
    My ice bucket collection came in pretty handy – two of those held the play microphones I made for the kids. Tutorial for the DIY kids microphone is here! I used a small acrylic vase to hold play pearl necklaces.

    Red Carpet Theme Party Ideas

    Top Hats / Bow Ties

    Even the marble cheese board got in on the action! It held top hats and bow ties. All the swag doubled as party favors for the kids as well.

    Red Carpet Party Decoration Ideas

    The red carpet runner in front of the swag table led on into the VIP lounge….

    Red Carpet Party Backdrop

    Red Carpet Party Backdrop

    I took one wall in the den and created a backdrop to pose against when walking the red carpet.

    DIY Red Carpet Backdrop

    Red Carpet

    Tutorial for making the backdrop is here! My bestie, Jason came through with all the albums. He already had some that were painted gold, so I didn’t have to paint any! Always have a friend who is extra like you, folks. They are often the only other one who gets you. 😉

    DIY Stanchions for Hollywood Party

    I just couldn’t bring myself to do a red carpet party without stanchions. These are really expensive to buy and I did find a place where I could rent them locally, but for less than the amount to rent them, I was able to make my own that we can keep for future parties or for the Circus to play with anytime. I’ll have the tutorial up for these soon!

    The Lounge Area

    Lounge Area for VIP Party

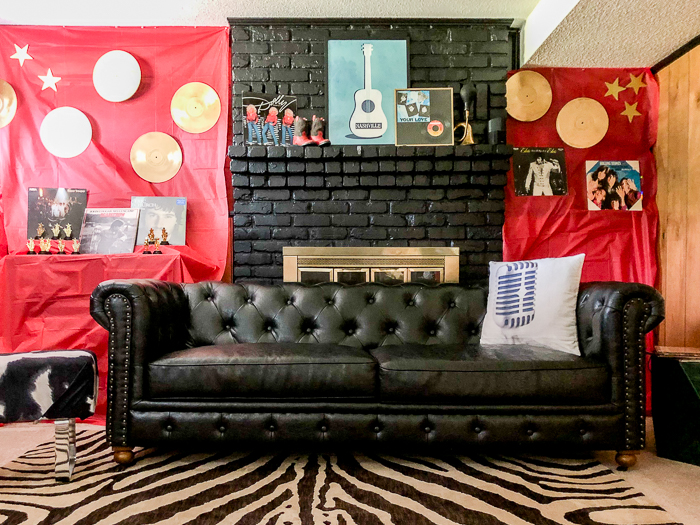
    The Circus wanted dancing at her party. In order to create a dance space, I moved a few things out of the den and rearranged the sofa to provide a big open space for dancing between the lounge area and the backdrop. I strategically placed the sofa in front of the fireplace so no drunk on Capri Sun kiddos would fall into it. 😉

    For decorating here, I hung plastic red tablecloths over the bookshelves, then hung more gold records on top of them and threw in some albums to add to the decor.

    Music Dance Party Decorations

    There were also trophies for the kids to take home as favors, since this was a red carpet music awards party. 😉

    And of course, cupcakes.

    Kids Red Carpet Birthday Party Cupcake Toppers

    The Circus requested cupcakes instead of a cake, so that was easy for me – Hello, Publix! I made simple cupcake stands by gluing old records to candlestick holders spray painted gold.

    Star Cupcake Toppers for Kids Birthday Party

    For toppers, I cut some stars out of gold card stock using my Silhouette and then hot glued two together per toothpick. Easy peasy.

    A good time was had by all.

    And don’t think for a second those stanchions and red carpet didn’t get toppled over and pulled up by the crazed dance party a time or two.

    That’s a wrap for our red carpet birthday party. We definitely do birthday parties big around here, I won’t deny that, but they’re only little once right? Before long, she’s just going to want me to drop her at the movies with her friends for her birthday. 😳

    Looking for more party ideas?

    DIY Party Background for $5 – use this video tutorial to make a super simple party background in whatever colors fit your party’s theme!

    Simple DIY Party Decorations on a Budget – lots of ideas for party decor that can be customizable to all sorts of different party themes.

    Picmonkey Invitation Tutorial – learn how to make your own party invitations using the online photo editor and creator, Picmonkey.

    Want to save these red carpet ideas for later? Just pin the image below!

    VIP Red Carpet Party Ideas

    Keep up with me on social media!

    Facebook | Instagram | Pinterest | Twitter

  • 6 DIY Kids Pretend Play Stations for Play Based Learning

    6 DIY Kids Pretend Play Stations for Play Based Learning

    Looking for great ways to get your kids away from the screen and instead up and using their imagination? These DIY pretend play stations for play based learning will help to do just that! On top of it all, you’ll probably score major brownie points with your kids for making these for them!

    Summer is just around the corner! Just a few weeks of school left here and then it’s quality time with the kid. I see lots of pool time, yard saleing and hammock time coming our way. 🙂

    That being said though, we all know that keeping them occupied all summer long can sometimes pose a challenge. It doesn’t take too long before we all start hearing the “I’m bored!” cries.

    Here are a few pretend play stations you can make your kids – these will keep them entertained for hours and hours! They’ll love you for making them. Your sanity will also thank you for making them. 😉

    What’s even better is that these play stations will foster learning and development through playtime! I know, right?! When I made these for my Circus, that wasn’t even necessarily the goal, but it happened anyway. 🙂

    DIY Imaginative Play Centers For Kids

    Kids Stage with Dress Up Area

    Pretend Play Stations for Kids

    Not only has this stage served as, of course, a stage, but it has also masqueraded around as a restaurant, doctor’s office, zoo and more. This DIY kids stage is a super simple build. The stage even has an area in the back that can be used for dress-up clothes.

    DIY Kids Activity Table

    DIY Kids Pretend Play Centers

    This play table is another project that can pull double duty. Here, it’s a barnyard, but it could easily be turned into a racetrack, building zone, Lego table and more. It’s also on wheels, so you can easily move it around. Attach some hooks and baskets to the sides for easy access storage and organization!

    Lemonade Stand

    Kids Pretend Play Stations for Learning Through Play

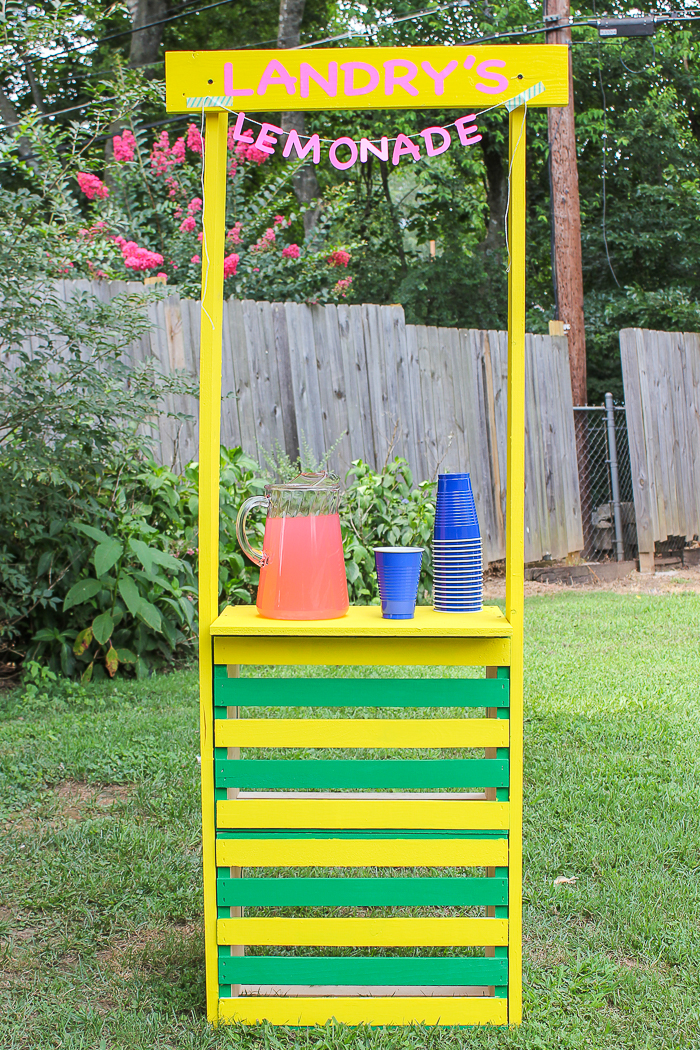
    There isn’t a hard thing at all about making this DIY lemonade stand! You’ll just need a couple of crates and a few pieces of wood. If you can drill a hole and make a straight cut, you’re good to go! This is perfect for those little entrepreneurs in your life. The Circus loves setting up her lemonade stand at yard sales and she doesn’t make chump change doing it either! She made $70 in one day doing it! When they aren’t creating their fortunes though, it also makes a great grocery play station.

    Space Saving Wall Mounted Desk

    Young Children Flip Down Wall Desk

    No doubt, this is one of the best things I’ve ever made my kid. This flip-down wall desk is great for small spaces. You can even hide away and organize all the art supplies inside!

    Dress-Up Closet from a Bookshelf

    Learning Through Play - DIY Kids Dress Up Station

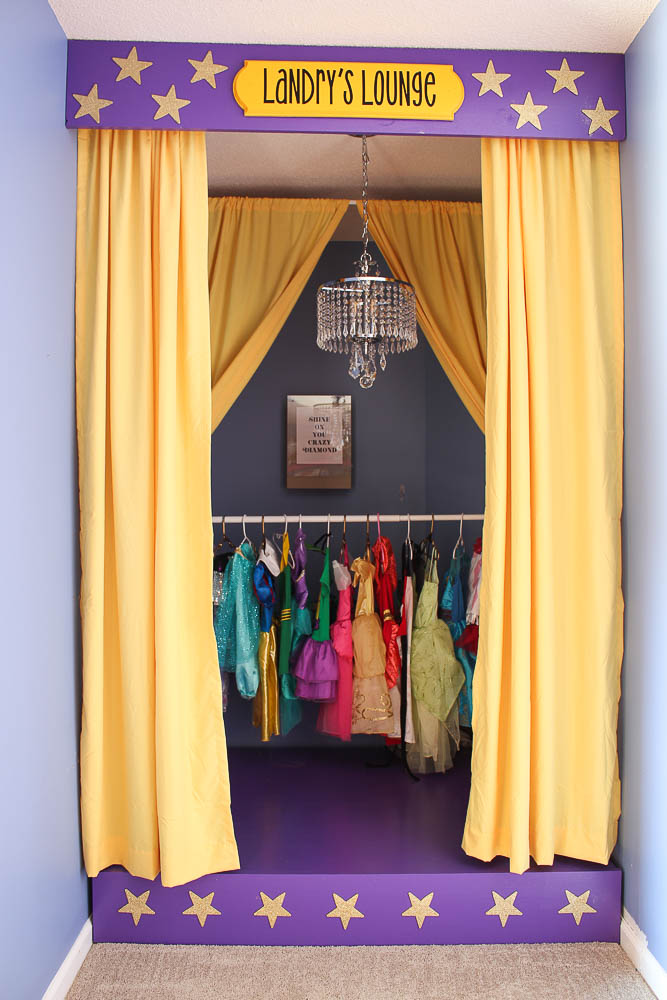
    Keep the dress-up clothes out and within easy reach with this dress-up closet! I made this from a bookshelf – an easy hack! If you’ve got the space, you can even work a mirror into it. If the clothes would cover the mirror on the back of the closet, then mount the mirror on the side.

    Crate Wagons

    Learning Experiences - Kids Wagon Crates

    Forgive the holiday-esque vibe going on with this image. When I made and photographed these wagons, it was right around Christmas. The fun thing about these wagons made out of crates is that the kids can really get in on the building process here – the handles are made from PVC pipe, so they can figure out how to put it all together!

    Have you created any DIY play centers for your child?

    Tell us about them in the comments!

    More great ideas for kids and their spaces:

    Kids Bedroom Feature Wall – this is a great and unique way to incorporate their own little personalities into their rooms!

    Playroom Wall to Wall Shelves – colorful, easy to build shelves that are UH-MAZING for toy storage!

    Super Easy to Make DIY Headband Holder – this headband holder is perfect for keeping all those adorable headbands organized and within reach!

    Want to hang onto this post for later? Pin the image below then!

    Play Based Learning Projects

    Find me on social media:

    Facebook | Instagram | Pinterest | Twitter

  • How to Hide Cords with a Custom Patterned Cord Cover

    How to Hide Cords with a Custom Patterned Cord Cover

    Ready to find out how to hide cords easily and stylishly? Make your own DIY cord covers in patterns or colors of your choice to fit with your home decor. It’s easy!

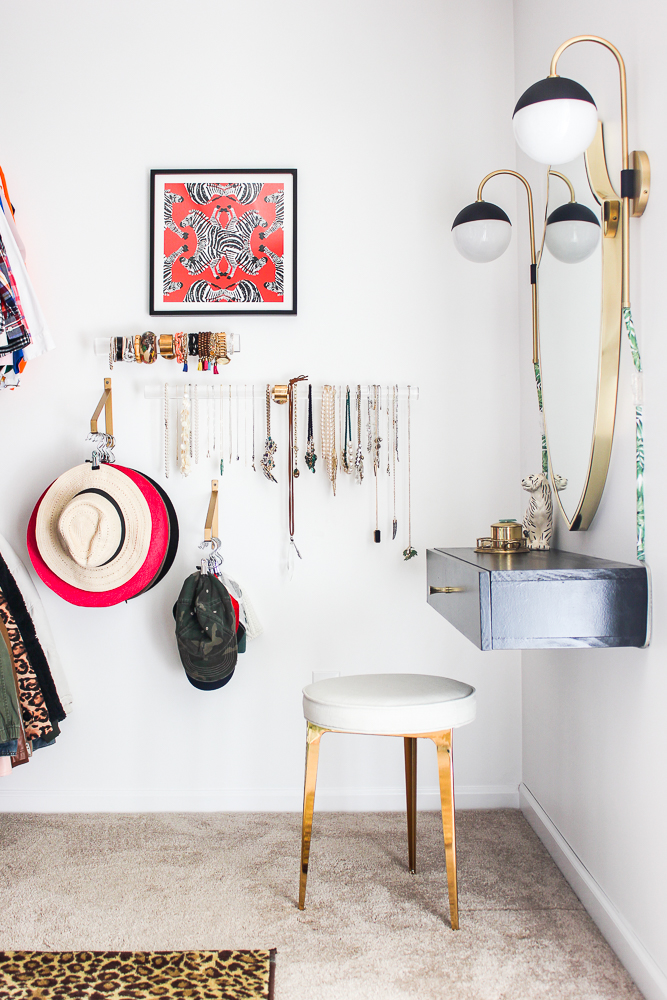
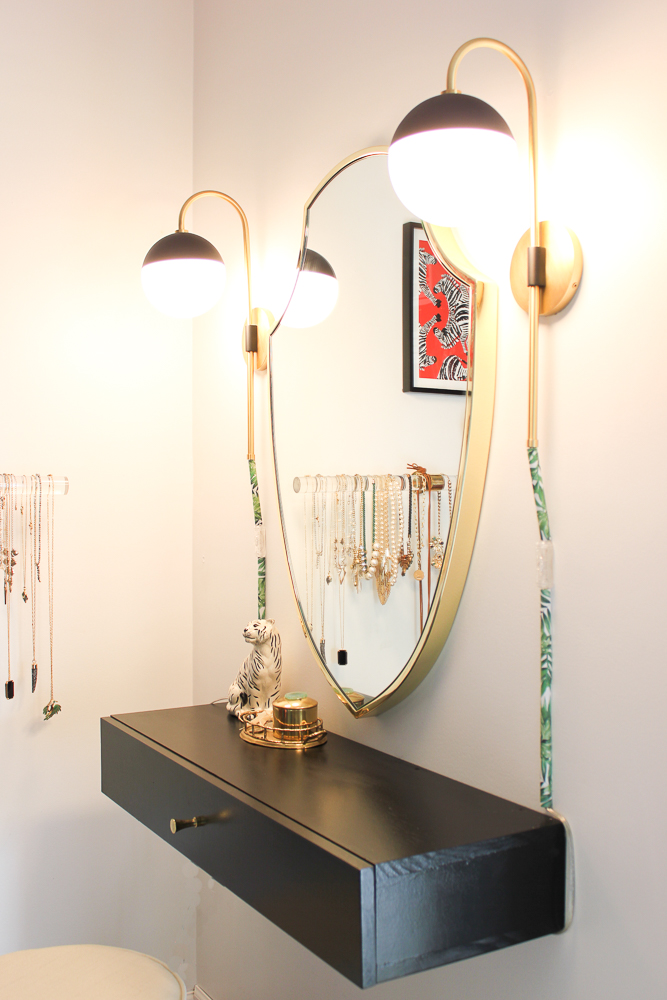
    I love that so many gorgeous sconces are now available with a plug-in option as opposed to just a hard-wired option. That being said, when going the plug-in route, you’re often left dealing with dangling cords on the wall.

    Thus was the case with the sconces I used in my recent closet makeover.

    The sconces were beautiful, but that dangling cord was a distraction.

    I didn’t want to use just plain Jane as-is cord covers you can find at your local hardware store. Even if you paint the cord cover to match your walls, it’s still obvious that it’s there. So, I opted to embrace the cord cover but give it a colorful spin.

    How to Hide Cords

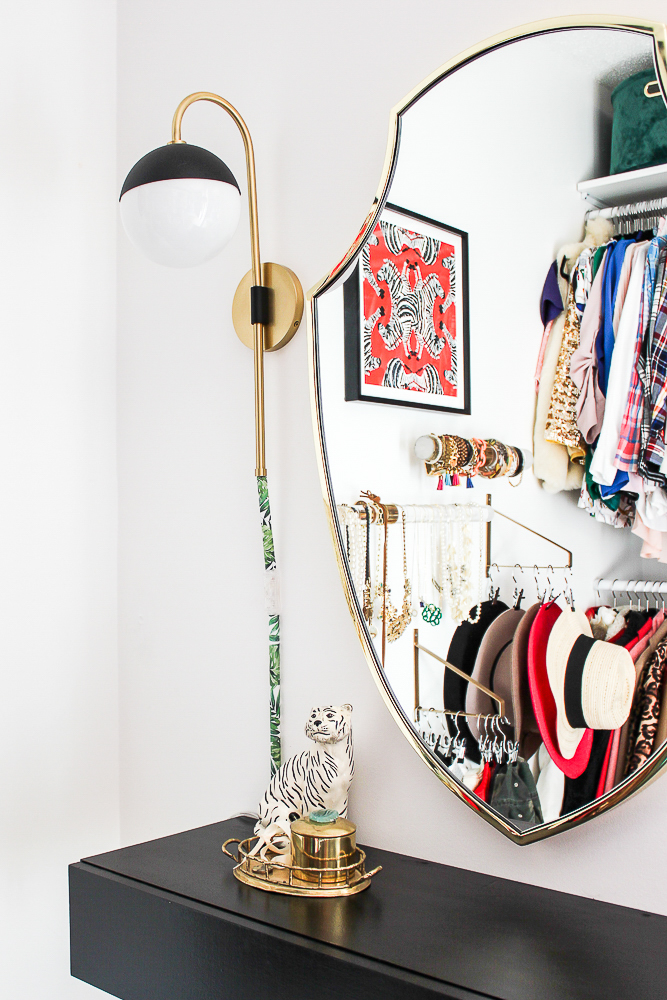
    Wall Mirror / Sconce

    Isn’t it a fun punch of color? I gave my cord covers a custom look to fit with my space perfectly – and it was so damn easy, y’all.

    This post contains affiliate links for your shopping convenience. Click here to read my full disclosure policy.

    DIY Cord Cover Tutorial

    Supplies and Tools Needed:

    DIY Cord Cover

    Steps

    Step 1

    Measure how long the cord is that you need to cover. Cut a piece of the cord channel to that same length.

    How to Hide Cords on Wall

    Cut a piece of the scrapbook paper to the same length of the cord cover you just cut and a little over 1 1/2″ wide. Note: If you have a wider cord cover than the one I used, you’ll want to cut your width wider. Measure as needed.

    Step 2

    Apply a thin coat of Mod Podge to the cut cord cover.

    How to Hide Lamp Cords

    After applying Mod Podge to the cord cover, immediately apply the cut paper to the cord cover, wrapping it around the cover. Leave the slit in the cord cover (where the cord will slide in) open. If your paper covers this slit, just trim the paper as needed.

    How to Hide Cords on Sconces

    Press the paper smoothly onto the cord cover. Give the now paper covered cord cover another thin coat of Mod Podge.

    Step 3

    After the Mod Podge has dried, trim off any excess paper from the cord cover.

    Custom DIY Cord Cover

    Apply 1-2 more thin coats of Mod Podge to the cord cover, letting it dry between coats.

    Step 4

    Once the cord cover is dry, push your cord into the cover through the slit on the side. Remove the paper from the self adhesive backing on the cord channel then firmly push the back of the cord cover against the wall to stick it in place.

    How to Hide Cords from Sconces on Walls

    Wall Mirror / Sconce

    These are so much better than having dangling cords or just a plain white cord cover!

    How to Hide Lamp Cords on Walls

    The extra little pop of color these DIY cord covers give is a fun touch for this space as well! If you’re wondering about that floating makeup vanity table, you can find out how to make it HERE! It even flips down for hidden storage. 😉

    Do you have any tricks to share for how to hide cords on walls?

    If you liked this project, you should take a look at these too…

    Wall Mounted DIY Makeup Vanity Table – a simple build!

    Complete Closet Makeover & Reveal – where these beauties you just read about reside!

    How to Cover Old Hardware Holes on Your Cabinetry and Furniture – you won’t have to worry about your new hardware holes matching up!

    16+ DIY Lamp Ideas and Makeovers – find out how to DIY your own lamp, lampshades, finials and more!

    Be sure to follow on social media:

    Facebook | Instagram | Pinterest | Twitter

    Pin This Post
    How to Hide Cords with DIY Cord Covers
  • Easy DIY Lemonade Stand with Video

    Easy DIY Lemonade Stand with Video

    Looking for kids lemonade stand ideas for your little one? I’m willing to bet this is THE most simple to build DIY lemonade stand you’ll find! It’s also pretty darn cute! See below for how to build a lemonade stand your kiddo will love and use for years to come!

    Sometimes life doesn’t hand you lemons.

    Sometimes it hands you an adorable little girl with blonde curls full of personality who also tends to lean on the “hustler” side.

    She comes by it honestly though, bless her heart.

    And even when life doesn’t hand her lemons, she still likes to make lemonade – pink lemonade.

    Exactly 12 hours before a yard sale we had in the spring, the little girl with blonde curls asked for a lemonade stand to sell lemonade at during the yard sale.

    There was simply zero time to throw all that together in under 12 hours though and there wasn’t a lick of anything to make lemonade with in the house.

    With a sad face, she settled for my promise to make her a lemonade stand for the next yard sale.

    I didn’t let her down.

    Easy DIY Lemonade Stand - use this tutorial to make a simple lemonade stand for kids!

    This was such a simple simple simple build, y’all. Honestly, it’s hardly a building project at all, you’re just putting a few pieces of wood together!

    This post is sponsored by Velvet Finishes, however all opinions are 100% my own. This post contains affiliate links for your shopping convenience. Click here to read my full disclosure policy.

    How to Make a Lemonade Stand

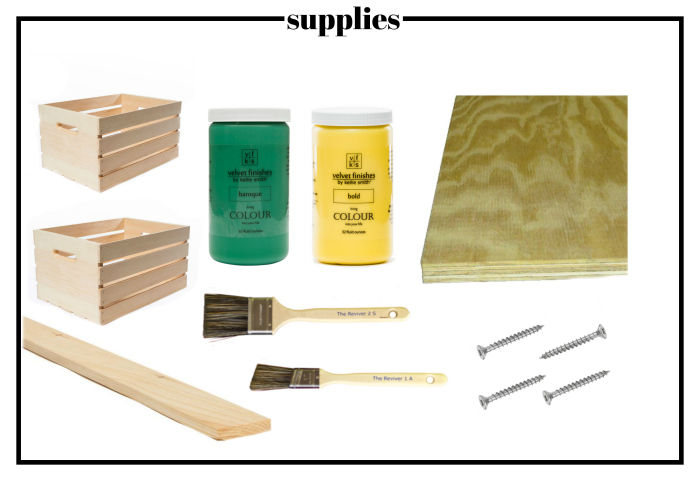
    Tools & Supplies Needed:

    how to make a lemonade stand - supplies - Rain on a Tin Roof

    Steps

    Step 1.

    Cut your wood to size.

    The 1″ x 4″ x 12′ should be cut into three different pieces in the following sizes:

    • 5 feet long
    • 5 feet long
    • 2 feet long

    After you cut both your five feet long pieces, you should have your 2 feet piece. You can cut these pieces using a circular saw, miter saw or a chop saw. You can also have your local hardware store cut these pieces to size for you before you leave the store.

    The plywood panel should be cut down to 11 5/8″ x 18″. You can cut this with a circular saw or table saw. You can also have your local hardware store cut it as noted above.

    The crates will stay as is. The video below provides a visual of the cuts as well.

    Step 2. 

    Time to paint!

    You’re going to paint all the 1″ x 4″ pieces and the plywood panel in Velvet Finishes Bold. You’ll paint the sides of the crates in Velvet Finishes Baroque and alternate between that color and Bold on the slats. We used Reviver paint brushes for the painting. They are really great quality that minimize brush strokes and don’t lose their bristles on your pieces.

    The video below will walk you through the cuts we noted above, the painting of the pieces and putting it all together. It also stars a pretty cute kid. 😉
    [adthrive-in-post-video-player video-id=”GbGcoL9N” upload-date=”Thu Aug 03 2017 18:39:34 GMT+0000 (Coordinated Universal Time)” name=”Easy Diy Lemonade Stand” description=”Use this tutorial for an easy DIY lemonade stand to keep your kids entertained and making their own money!”]

    Velvet Finishes paint doesn’t require a piece to be primed beforehand and it already has a topcoat built-in, so no need to worry with that. I had mentioned in the video that I might put on an additional topcoat on the counter, but in the end I didn’t worry with it and it weathered the first lemonade sale just fine.

    how to build a lemonade stand using crates - rain on a tin roof

    Helpful Tips & Hints: 

    • It took two coats of Velvet Finishes Baroque and about 3-4 coats of the Velvet Finishes Bold. Yellows tend to take more time to get the color even, especially on raw wood, so give yourself a little extra time there. This paint dries really fast though, so it doesn’t take too terribly long to get the paint on.
    • If you want to save on space after your kiddos have their lemonade sale, you can easily just unscrew everything and store it away. When you’re ready to use the stand again, just screw it back together using the holes you already made.
    • I made the “Landry’s Lemonade” with my Silhouette. After cutting it out, I mod-podged on the “Landry’s,” then hot-glued the “Lemonade” to string and taped it up.

    kids lemonade stand - easy to build - rain on a tin roof

    The lemonade stand was a big hit – the kid made $70!

    cute lemonade stand - diy project to make for your kids - Rain on a Tin Roof

    She would ask nearly every person that walked up if they would like lemonade or a treat. And really, who could tell her no?!

    Here’s to life not always handing you lemons so you can make your own pink lemonade and little hustlers in the making!

    Share your cute lemonade stand ideas in the comments!

    Want more great DIY ideas for your kiddos?

    DIY Children’s Stage with Hidden Dress-Up Storage – this one provides loads and loads of entertainment!

    DIY Dress-Up Closet from a Bookcase – great and easy way to store all those dress-up clothes!

    How to Create an Object and Feature Wall for Your Little One – the perfect accent wall for a kid’s bedroom!

    How to Build Wall to Wall Shelving Easily – we have these in my daughter’s playroom and they are a lifesaver when it comes to toy storage!

    Want to save this post to look at later? Just pin the image below! 

    Build a Lemonade Stand Using Crates - Easy - Rain on a Tin Roof

    How to Make a Lemonade Stand Using Wooden Crates - Rain on a Tin Roof

    SaveSave

    SaveSaveSaveSave

  • How to Make a Moodboard using Picmonkey

    How to Make a Moodboard using Picmonkey

    If you’re ready to get started on your next room makeover, then start with an inspiration board! Learn how to make a moodboard for your space below using Picmonkey – it’s so easy!

    When I first shared the design plans for our master closet makeover, I got asked multiple times about how I created the moodboards / design boards for the space…

    How to Make a Moodboard

    Like that one….

    How to Create a Mood Board

    …and this one.

    I had actually written a post a couple years back about making inspiration boards for room designs, but the online tool I used to use to create those boards is no more. Not a problem though – I had been using Picmonkey to make the boards before so I just went back to Picmonkey.

    It’s really pretty simple to make these boards.

    How to Create a Mood Board

    This post contains affiliate links for your shopping convenience. Click here to read my full disclosure policy.

    I find that tutorials like this are often easier to follow with a video. So, I made a video below that walks you through how to make a design board using Picmonkey. If you’re a still image tutorial kind of person though, I’ve also got step-by-step instructions with screenshots below the video.

    You will need a Picmonkey account to make the mood boards. Accounts start at $8 a month and that basic plan is all you need!

    [adthrive-in-post-video-player video-id=”ntKk7OAS” upload-date=”2019-04-24T10:00:00.000Z” name=”How to Make a Moodboard using Picmonkey” description=”Learn how easy it is to make a moodboard using Picmonkey. This is perfect when determining what direction to go in for your next room design. “]

    Step 1

    Before starting anything, pull all the product images you are considering for your space into a folder on your desktop.

    Step 2

    Go to Picmonkey. If you don’t already have a Picmonkey account, you will have to sign up for one. Unfortunately, it isn’t free, but it is only $8 a month. I have the $8 a month plan and it is plenty for me. I use Picmonkey all the time, not only for moodboards, but also for basic photo editing, creating collages, making the Circus’ birthday invitations and more.

    Click “Create New.”

    How to Make an Inspiration Board

    Select “Blank Canvas,” then select a size. I typically go with a large horizontal size, like the 7 x 5 inch.

    How to Make a Design Board

    When prompted, title your image as desired.

    Step 3

    Click “Add an Image” then “Computer”.

    How to Make a Concept Board Interior Design

    Select one of the products from your products folder.

    How to Make a Moodboard with Picmonkey

    Step 4

    Move and resize the image as needed by dragging the corners on the image.

    How to Create a Mood Board with Picmonkey

    Add the rest of your product images by repeating Step 3 and 4 as many times as needed.

    Step 5

    Arrange the products as you wish. Click “Export” near the top to save your moodboard.

    Helpful Tips

    To remove backgrounds from an image, click on the image you wish to remove the background from.

    How to Make an Inspiration Board with Picmonkey

    In the Graphics box that pops up, select “Erase.” Change the size as you wish. Drag the circle eraser over the image to erase the background as needed.

    How to Make a Design Board with Picmonkey

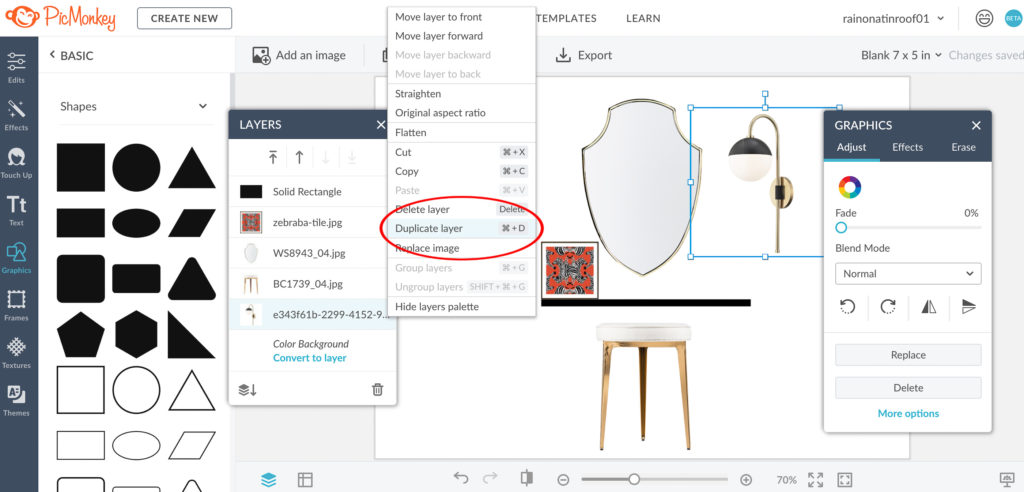
    To duplicate images, click on the image you wish to duplicate. On the “Layers” box, click on the three little dots to the right of the image you want to duplicate, then select “Duplicate Layer” from the menu.

    How to Make a Concept Board for Interior Design with Picmonkey

    To flip images, click on the image you wish to flip. On the “Graphics” box, click the little graphic with two triangles.

    Make a Moodboard using Picmonkey

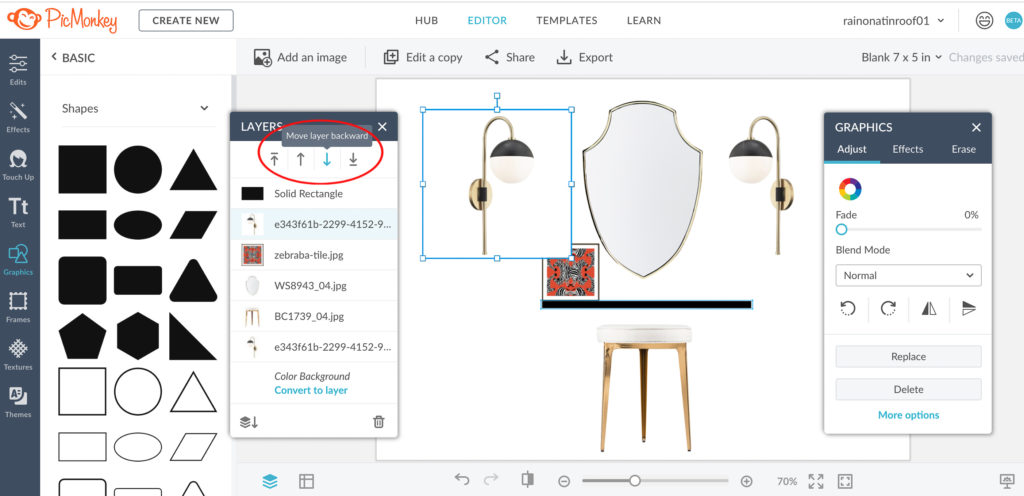
    To move images forward and backward, use the two right arrows on the “Layers” box to move images back and forth as you wish after clicking on the image you want to move in the layers box.

    Create a Mood Board using Picmonkey

    That’s it! It’s really simple to do and once you start making your own moodboard, you’ll easily catch on.

    Here are a few mood boards I’ve done if you need a little inspiration…

    Colorful Girls Bathroom Design Board

    Inspiration Board made with Picmonkey

    Tile / Wallpaper / Rug / Vanity / Faucet / Lighting

    The Circus’ bathroom is on the list for a makeover! So far, this is what we have come up with. She picked out the wallpaper and colors and I’ve been working to bring it all together.

    Traditional Modern Dining Room Mood Board

    Design Board made with Picmonkey

    Rug / Green Dining Chairs / Beige Host Chairs / Table / Chandelier / Bar Cart

    This is kind of what I have in mind for the dining room at the farm – traditional, but with a good pop of color.

    Traditional Casual Living Room Inspiration Board

    Concept Board for a Room Makeover made with Picmonkey

    Rug / Ottoman (similar) / Sofa / Wingback Chairs

    I made this inspiration board for our living room at the farm a couple years back. You can see how it turned out in real life HERE!

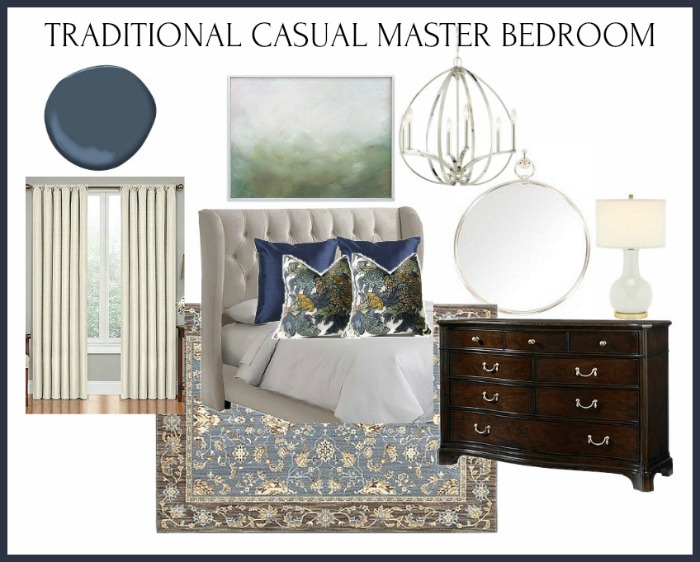
    Traditional Casual Master Bedroom Moodboard

    Moodboard for a Room Design made with Picmonkey

    Headboard / Solid Navy Pillows / Dragon Pillows / Chandelier / Rug / Morning Mist Wall Art / Ivory Curtain Panels / Mirror / Lamp / Dresser

    Another one from our farmhouse that’s still a work in progress – a look for our master bedroom.

    What space will you be making a moodboard for?

    If this post was helpful, you might want to see these too…

    Free Printable Project Planner for Room Makeovers – this will help keep you on track!

    How to Coordinate Paint Colors Throughout Your House – it’s actually really simple with this little trick!

    How to Find the Best Contractor for Your Renovation – learn what to look for and what to ask for and don’t let the same thing happen to you that happened to us!

    How I Buy Fabric Online Without Seeing It in Person First – buying fabrics online can often be much cheaper, but is a little less stressful since you can’t see them in person. Here’s my trick for buying fabric online without the stress!

    Join us on social media:

    Facebook | Instagram | Pinterest | Twitter

    Pin This Post

    Learn how to make a moodboard using Picmonkey
  • Creating a Cut Flower Garden for Beginners

    Creating a Cut Flower Garden for Beginners

    Learn how to create a cut flower garden and enjoy fresh flower arrangements all summer long from your very own garden. Here, you’ll learn how to get started, the best cut flowers to grow and more tips for your new cutting garden.

    Before motherhood, before the blog became my full-time job, and before life became so busy and hectic, I loved growing flowers – particularly flowers for cutting.

    In the first house that Grunt and I bought together, we planted all kinds of flowers – rose bushes, zinnias, and Grunt even planted me a whole row of hydrangeas along the fence, which is my favorite kind of flower.

    When we moved from that house, we dug up just about everything we had planted and transplanted it to our new home. And for a year or two, we still had beautiful cut flowers throughout the summer.

    But as the Circus grew, our schedule got busier and busier and then trying to get the blog off the ground took up a huge portion of any other time I had on my hands. There wasn’t any time for growing cut flowers.

    Early last year, I decided it was well past time to create a little more time for doing things for me. It was kind of like when Allie in The Notebook realized that she didn’t paint anymore. I didn’t grow flowers anymore.

    So Grunt Labor helped me to create a spot in our yard specifically for a cutting garden.

    Cut Flower Garden

    And create a cutting garden we did.

    It wasn’t elaborate and it was filled mostly with easy to grow flowers, but it made me so damn happy. Going outside planting the flowers, weeding, then cutting the flowers turned out to also be a wonderful stress reliever.

    Best Flowers for Cutting Garden

    We had buckets and buckets of flowers throughout the summer – more than enough flowers for us and enough to create small arrangements to surprise friends and family with a little unexpected color to brighten their day, which had been another goal of mine with the cut flower garden.

    Best Cut Flowers to Grow

    I didn’t write about the garden on the blog last year, but I did share a lot from it on Instagram. A lot of people who followed me wanted to know more about getting a cutting garden started so here it is. As I said, my cut flower garden is not elaborate – it’s mostly filled with easy to grow plants, so this is a good guide for people who are just beginning with growing cut flowers.

    Creating a Cutting Garden for Beginners

    This post contains affiliate links for your shopping convenience. Click here to read my full disclosure policy.

    Step 1: Find the best spot for your garden.

    Most cut flowers need lots of sunshine, so keep that in mind when determining where to place your garden.

    Growing Cut Flowers

    We placed my garden along a portion of the outside of our fence in a sunny location. My space is about 6 feet wide x 26 feet long. Your garden certainly doesn’t have to be this big or this small – go with any size your wish!

    Step 2: Get your ground ready for planting.

    Of course, it didn’t just start out looking like the photo above. To get the ground here ready for planting, Grunt used our tiller to break up the soil a few times, then I pulled out all the grass and weeds from the tilled-up dirt, used a rake to spread the soil around evenly, then planted. I also put landscape edging around the garden to create a barrier from the outside grass and hold in the mulch that I would later add.

    No tiller? No problem.

    If you don’t have a tiller or don’t want to till up the ground, then you could instead do a raised cut flower garden. You can buy a kit like this one to create a raised bed or use a tutorial like this one to create your own.

    Step 3: Select your flowers/seeds.

    There are lots of different kinds of flowers that make great cut flowers for arrangements – some easier to grow than others and of course some need specific types of climates to grow well in. As you select your flowers to plant, be sure to look at the growing information and determine if the flower will grow well in your area. Use this tool to determine which growing zone you are in.

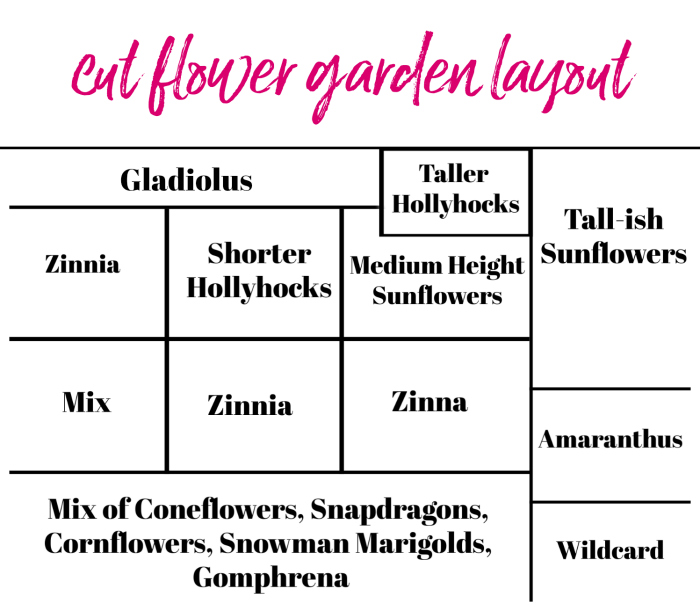
    This is the flower plan for my cut flower garden this year. For reference, I am in growing zone 7.

    Cut Flower Garden Layout

    Flowers for Cutting Garden:

    Most of the area in the front of my cut flower garden layout is kind of my “play” area this year. I’m trying out new flowers here that I haven’t planted before.

    • Gladiolus – Gladiolus are bulbs that can be planted in the spring and will bloom during the summer. These are taller plants, so I placed them in the back.
    • Hollyhocks – Hollyhocks are perennials, so they will come back every year. These aren’t necessarily great cut flowers, but I love their look so I wanted to add some here anyway. I just planted my hollyhock seeds last year, so I didn’t have any flowers from them last year, but hopefully I will this year. The plants are already starting to make an appearance.
    • Sunflowers – Sunflowers are a wonderful option for a cutting garden. I like to plant both taller sunflower varieties and medium height sunflowers to get a good mix. The ones I’m planning to go with this year are Sunflower Sunshine (I did these last year and they were wonderful!) and Teddy Bear Sunflowers (trying these out this year – I love their look!)
    • Zinnias – In my opinion, you can’t ever have too many Zinnias! Zinnias are so easy to grow and such beautiful colorful flowers. I tend to plant more zinnias than anything else. Zinnias are foolproof – the perfect flowers for beginning cut flower growers. This year, I’m going with these varieties of Zinnia: Big Red (these were stunning last year!), Purple Prince (always a favorite), Envy (I actually forgot to plant green zinnias last year and was so mad at myself), Dancing Girls (these have a bit of a Dahlia look) and this Cut and Come Again Mix (truly, the more you cut on these, the more they keep coming back!).
    • Amaranthus – a few of these seeds came in a mix of seeds I bought last year and I just fell in love with these weeping beauties. I’ve ordered both a green and deep purple variety of this flower to plant.
    • Coneflowers – Coneflowers and I have a good history. These are simple, easy to grow flowers that once they are bigger, you can divide over and over again and plant them all over the place. These are perennials as well, so they will come back every year. While I do tend to buy seeds for much of my cut flower garden, I’ve always had more luck with coneflower plants ready to go than growing these from seed.
    • Snapdragons – I tried snapdragons a long time ago and it didn’t work out too well, but this year, I’m giving them another go. This Madame Butterfly mix is just too pretty to not give a whirl.
    • Cornflowers – these are purely for the Circus. I’ve not planted cornflowers before, but the blues in this mix just scream the Circus’ name!
    • Snowman Marigolds – I usually turn my nose up at marigolds and I certainly wouldn’t consider them a cut flower, but this Snowman Hybrid variety stopped me in my tracks. They have a ruffled carnation look and I couldn’t resist trying them. It says they are good for cut flowers, so we shall see.
    • Gomphrena – another new one for me. These little globe type flowers are very cute and if they grow well, I think they will make great fillers and accent flowers in arrangements.
    • Wildcard – As of right now, I’m leaving this space open. There is a rose bush in this area I planted last year, but I’m not sure if it will stay there or not – we shall see!

    Step 4: Planting Your Flowers

    You’ll usually have a few options when it comes to planting – you can often choose from seeds, plants and of course, bulbs for some flowers.

    If you buy plants of course, you’ll put them right in the ground. Many seeds can go right in the ground as well, depending on the current weather. Always read your seed packets to determine if you need to start your seeds indoors first or if you can put them outside.

    Last year, I started my seeds indoors, but when I transplanted them outside, I also put some more seeds of the same varieties directly into the ground. Honestly, I couldn’t tell much difference between the flowers I had started indoors and the ones I started right in the ground. This year, I’ll be putting most of my seeds straight into the ground, unless the package suggests otherwise.

    Keep in mind that you’ll want to place your taller flowers in the back and work your way up to shorter flowers. Read the seed and flower labels for details on each flower’s growing height and width.

    Step 5: Water. Mulch. Weed.

    Seeds just planted and seedlings won’t need a whole lot of water to start with. You’ll want to keep the soil moist, but don’t overwater. As the seedlings get bigger and stronger and turn into plants, water more and you can use plant food as well.

    I also recommend that after the seedlings have grown quite a bit and are stronger to put a layer of mulch around around your plants. This helps to keep the water in and if you’re like me and you can’t get to watering every single day, this gives you a little leeway.

    Mulching will also help to keep weeds at bay, but you’ll still have some. If you aren’t sure if it’s a weed or a seedling (it’s ok! It’s happened to me too!), wait a while to see. While seedlings and plants are still small, I like to just pull weeds with my hands, but as the plants get bigger and stronger, you can get a hoe or a hand garden tool in there and do some serious weeding.

    Step 6: Enjoy all those gorgeous flowers!

    Cutting Garden

    We had bucketful after bucketful last summer and we enjoyed every bit of it.

    Try to go out and cut at least 2-3 times per week. Deadhead any flowers that died before you could cut them as this will help with reblooming.

    Flowers for a Cut Flower Garden

    This is one of those gorgeous red zinnias I mentioned above.

    Best Flowers for a Cutting Garden

    This color of Zinnia is another favorite.

    Best Cut Flowers to Grow in a Cutting Garden

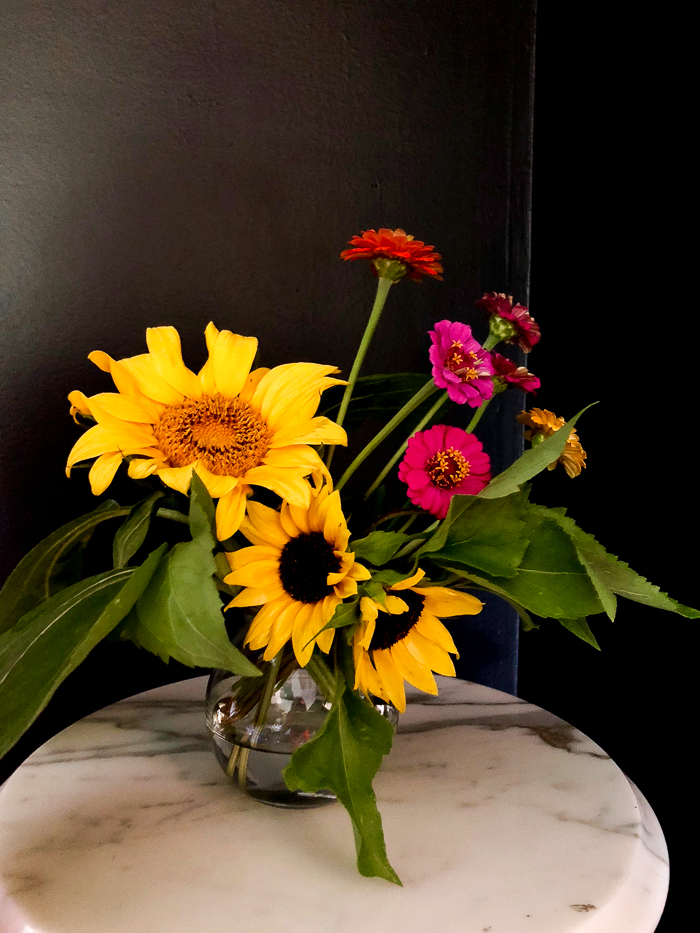
    These sunflowers were beautiful last year!

    Growing Cut Flowers for Beginners

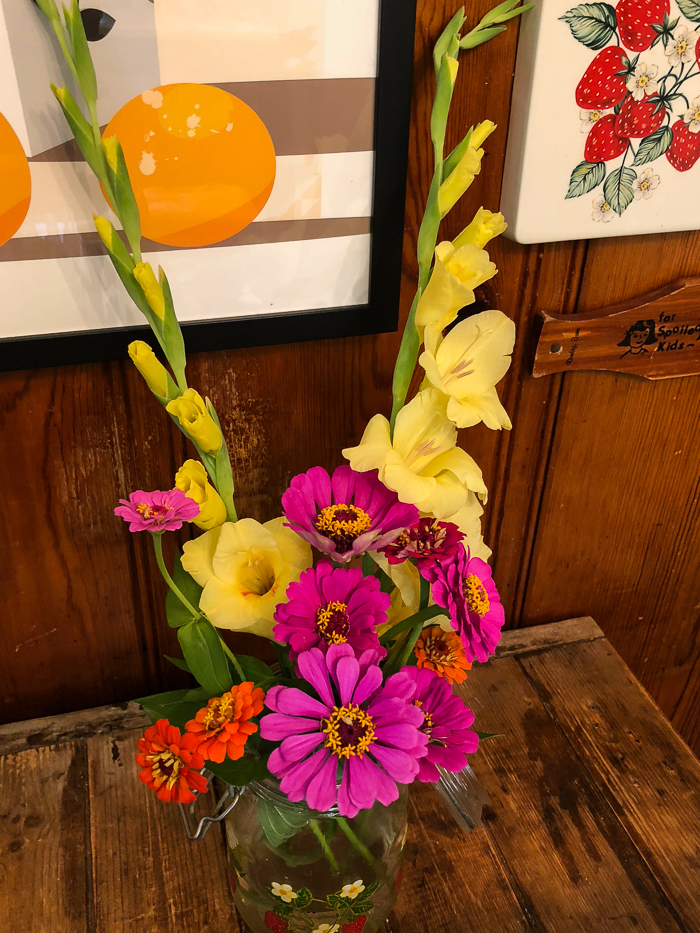
    Here’s a simple arrangement with some of the Gladiolus and Zinnias I grew.

    Creating flower arrangements from a cut flower garden.

    I love doing clusters of flowers and adding height with smaller flowers above them. I also keep as many leaves as I can -they add good interest to arrangements. Unfortunately, the sunflower leaves don’t look good for very long though.

    The biggest thing I can tell you to keep in mind is that, especially if you’re a beginner, don’t get discouraged if some of your flowers don’t do well or don’t take at all. Just enjoy what you have and try again next year with some new varieties. I had some that didn’t take at all last year and I’m sure that will be the case this year as well – it’s all part of it!

    If you have any tips for growing cut flowers or the best flowers for cutting gardens, please share below in the comments – I’d love to hear them!

    Looking for more outdoor inspiration?

    10+ Creative Flower Pot Ideas – you won’t believe some of these!

    DIY Flamingo Sprinkler – such a fun way to water!

    Tips for Beautiful Planters All Summer Long – keep those flowers gorgeous from the beginning right up till the very end!

    Our Front Yard Landscape Makeover – it’s a crazy difference!

    Want to come back to this flower garden guide later? Just pin the image below!

    Cut Flower Gardens for Beginners

    Get behind the scenes by following along on social media:

    Facebook | Instagram | Pinterest | Twitter

  • Power Tools 101: How to use a Circular Saw

    Power Tools 101: How to use a Circular Saw

    A circular saw is one of the more basic, versatile power tools. Below, you’ll learn about using a circular saw and it’s various parts. Before you know it, you’ll be teaching someone how to use a circular saw! 

    I have to admit – I was worried that the Power Tools 101 series may not be such a hit.

    I was wrong.

    And I’m so glad I was.

    I’m thrilled you guys are finding this helpful! We want to empower you to get your DIY on!

    By no means, am I pro at using every power tool in the book.

    I still ask Grunt Labor questions about them all the time and I still make him put on any new hinges for doors because it seems I always drill the holes for those in the wrong place.

    That’s ok. 

    I know the basics and for the most part, that’s all I need to know.

    With that being said, here are the basics of how to use a circular saw.

    Using a Circular Saw

    How to Use a Circular Saw - Basics of a Circular Saw - Rain on a Tin Roof

    Disclosure: Rockwell Tools sent me their compact circular saw and Versacut to review. However, all opinions are 100% mine. This post contains affiliate links for your shopping convenience. Click here to read my full disclosure policy.

    Please use all appropriate and proper safety precautions when using tools and attempting projects. All projects and tool usage are attempted at the reader’s own risk.

    If you are a first time circular saw user, I suggest that you have someone nearby who is familiar with circular saws when you first use it – just in case you have any questions and for safety’s sake. If you ever don’t feel comfortable cutting something, don’t do it. Wait until you have someone to help you who is comfortable with it. Power tools shouldn’t be scary, but you need to be careful with them at the same time.

    Also, and this is probably the only situation in which I will say this, no cheap beer (or your preferred poison) while using a power tool, y’all.

    And….always wear safety glasses when you cut something!

    Ok, let’s get started.

    Parts of a Circular Saw

    Grunt Labor and I have a few different types of circular saws.

    Using a Circular Saw - Parts of a Circular Saw - Rain on a Tin Roof

    The one we have had the longest and use the most is a Ryobi Cordless Circular Saw, which is pictured in the photo above. I’ve also noted the basic parts of the saw.  There are also corded circular saws available.

    I use our circular saw for longer cuts where it usually doesn’t matter if its perfectly straight or just cut little cuts.

    If you buy a new circular saw, you will most likely have to put the blade on. There will be instructions for this included, but all you do is remove that bolt in the center.

    Another thing to keep in mind when buying a new circular saw blade is that a blade with more smaller teeth will give you a smoother cut. If you select a blade with bigger and fewer teeth, then your cuts with a circular saw won’t be as smooth.

    How to change a Circular Saw Blade - Rain on a Tin Roof

    The blade guard will cover the bottom of the blade unless you move it.

    Circular Saw Blade Guard and How It Works - Rain on a Tin Roof

    Once you start sawing something, it will move around the blade as you saw.

    There are also functions on the circular saw where you can adjust the blade depth and angle.

    To adjust the blade depth, there is a knob on the back of our saw (I believe it is on the back with most saws).

    Adjusting the depth of a circular saw blade - Rain on a Tin Roof

    You simply turn it and the bottom plate will slide out.

    There is also a place to adjust the angle of your cut.

    Adjusting the angle of a circular saw cut - Rain on a Tin Roof

    This is on the front of our saw. This is used for bevel cuts.

    In all honesty, we rarely ever use these two functions on our circular saw. We tend to make bevel cuts on our miter saw, which I’ll cover in another Power Tools 101 post. Its just good to know those functions are there.

    Let’s get to the fun part – cutting.

    Cutting Wood with a Circular Saw

    When you go to cut something with your saw, you must push in the trigger on the side of the handle and pull the trigger on the inside of the handle to start the saw.

    Triggers on a Circular Saw - Rain on a Tin Roof

    Typically, you will push in that top trigger first, and then the bottom one while still pushing the top trigger.

    Before you cut something, measure and mark your line on your board or whatever you are cutting.

    Measure and Marking Your Lines When Using a Circular Saw - Rain on a Tin Roof

    Use that notch in the saw (as noted above) as a guide to keep your cut straight.

    When you begin to cut something, you will want to have the saw level, and don’t have the blade directly touching the wood – just barely by it as shown below.

    Cutting Wood with a Circular Saw - Rain on a Tin RoofYou will also have to pull up the blade guard when you first go to cut. Push your triggers and begin pushing the saw gently through your wood. Once you get your blade into your wood, you can release the blade guard and place that hand on the handle of your saw. If you are cutting something that is easily moveable, you may need to put that hand on the board to hold it steady, HOWEVER, keep your hands and fingers clear from the blade.

    And that’s all you do to cut. Easier than you thought?

    Other Types of Circular Saws

    We also have two other types of circular saws which we just got.

    Types of Circular Saw - Compact Circular Saw - Rain on a Tin Roof

    Rockwell Tools just sent us their compact circular saw (shown above). The compact circular saw is well, just that. Its a smaller version of a regular circular saw that is corded.

    It also has two triggers as a regular circular saw does.

    Using a Compact Circular Saw - Rain on a Tin Roof

    Since this compact circular saw is smaller, it is easier to maneuver.

    Rockwell also sent us their Versacut circular saw.

    Versacut Circular Saw - Rain on a Tin Roof

    The Versacut has a few more bells and whistles than the regular compact circular saw, however it is still a compact size. It can cut not only wood, but tile, pipe, and more. It is also corded.

    It also has a two part trigger system.

    Using a Versacut Circular Saw - Rain on a Tin RoofYou have to push that red trigger first and then the yellow one.

    It comes with an edge guide which allows you to get a straighter cut. You move the right part of the guide out and over your wood to the desired width.

    Using the edge guide on a compact circular saw - Rain on a Tin Roof

    It will move along the edge as you cut to give you a straighter cut.

    Kreg also makes a guide, which they call a Rip-Cut that you can attach to a regular circular saw and use as a guide.

    Using the laser on a compact circular saw - Rain on a Tin Roof

    The Versacut also has a laser guide which is really helpful if the guide isn’t big enough for what you are cutting. We haven’t really had a chance to dive into using the new compact circular saws yet, but so far I am pretty impressed with their bells and whistles.

    Any questions? Please leave them in the comments and I will do my best to answer them!

    Please leave your tips for using a circular saw in the comments as well! 

    Looking for more help with learning to use power tools?

    How to Use a Drill– it can actually do a whole lot more than you might think.

    How to Use a Miter Saw – one of my favorite power tools.

    How to use a Heat Gun and 15 things to do with it– another tool that has loads of different uses.

    How to use a Sander– a must have tool for furniture flippers. 

    Need tool suggestions? Here are the best tools for DIYers at any level.

    If you want to hang onto this post to refer to later, just pin the image below.

    Power Tools 101: How to Use a Circular Saw - Rain on a Tin Roof

    You know you don’t wanna miss any of this crazy.

    Stalk Me Here:

    Pinterest / Facebook / Twitter / Instagram

    Basic Info and How To for Using a Circular Saw - Rain on a Tin Roof

    SaveSave

  • Back to the Basics: Flatware Chest Makeover

    Back to the Basics: Flatware Chest Makeover

    Turn that dated flatware storage chest into a stunner with this easy flatware chest makeover. Don’t need silverware storage? No worries – these chests are great storage for all kinds of different things!

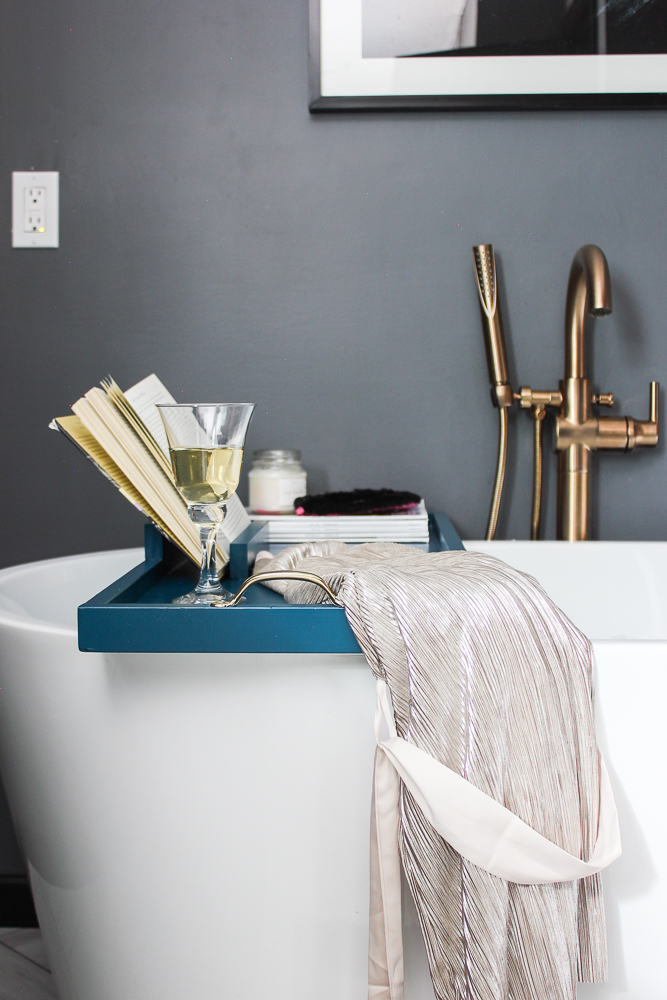
    In February, a few friends and I decided to launch a “Back to the Basics” blog hop – good and simple DIY projects that aren’t expensive, require simple materials, basic DIY skills and maybe the occasional power tool, but nothing too convoluted. 😉 That was when I showed you how to make the DIY bathtub tray with a book holder.

    I was thrilled with y’all’s response to the Back to the Basics projects! It seemed like these simple projects were things you were missing around “blog land” and guess what – we were missing them too!

    We are all back this month and have a few extra folks joining in as well and I think you’re going to love this round of basic DIY projects too!

    If you’re hopping over from Lauren at Bless’er House, welcome! Weren’t her scrap wood cutting boards awesome?

    This time around, I did a simple makeover project, that resulted in a big “wow” factor…

    Flatware Chest Makeover

    Isn’t that the sexiest flatware chest you’ve ever seen? ? After this makeover, I’m starting to think there isn’t much a glossy red can of spray paint can’t fix.

    This post contains affiliate links for your shopping convenience. Click here to read my full disclosure policy.

    Easy Silverware Chest Makeover

    Before we get started on how this silverware chest turned into a raging beauty, here’s a shot of it in its former state:

    Dated Silverware Chest Makeover

    Sad, wasn’t it?

    While I was a “Southern Belle” in one my preschool plays, there isn’t much that would classify me as one these days. However, my love for using great grandmother’s china on holidays, flanked by a good monogrammed napkin and my great aunt’s silverware might put me an inch or two closer to the title though. haha!

    I had been looking for a good sized silverware chest to hold everything for a while, but none I’d seen in retail stores had impressed me. When I found this one at Goodwill though for $5, I knew it had potential.

    Supplies and Tools Needed

    Steps

    Step 1

    Remove all the hardware from the chest. Sand the chest with a fine grit sandpaper to rough up the surface a bit in order to give the paint a better grip.

    Simple Silverware Chest Makeover

    If you are switching out the hardware, place your new hardware on the chest and make sure it will work with the old hardware holes. If it won’t, fill the holes with wood filler as needed, let dry, then sand those if needed.

    After you’ve done all the sanding, use a tack cloth to remove any sanding dust and particles from the chest.

    Step 2

    If you want to preserve the interior of the chest , use painter’s tape and plastic wrap to cover it and keep paint from getting on it.

    Easy Flatware Chest Makeover

    While the interior of my chest was not the prettiest of greens, I wasn’t up for relining it, so I taped the interior of my chest off.

    Step 3

    Apply spray paint to your flatware chest. I did about three coats of Apple Red.

    Step 4

    Attach the hardware. If you’re reusing the old hardware, just pop it back on. If you are doing new hardware, then drill new holes as needed.

    Red Flatware Chest Makeover

    The holes for the knobs on the front of the chest still worked fine for the new hardware there, but I did have to make new holes for the new handles I used on the side. Also, as you can see, I didn’t worry too terribly much about making those old holes completely flush – I knew the handles would hide them most of the time.

    Remove the tape and plastic wrap at this time as well. You knew that already though, didn’t you?

    Red Flatware Chest Makeover

    I used a few of my easy to make DIY selenite knobs as the hardware for the front. I love the contrast between the white stones and the red on the chest.

    Red Silverware Chest Makeover

    I had a couple of these brass cobblestone pulls left over from the built-in cabinetry in our master bedroom sitting area that worked perfectly for the sides of the chest.

    Vintage Silverware Chest Makeover

    If you don’t have a need for a silverware chest, then these would make excellent storage for so much more as well. You could easily just pull the inside lining and dividers out and put whatever you want to in them. In fact, I love how this one turned out so much that I’m going to be on the lookout for more to makeover and use as decorative storage.

    Vintage Flatware Chest Makeover

    Did you notice those lovely yellow napkins beside the chest?

    Monogrammed Napkins beside Silverware Chest

    Those are actually the Circus’ first set of specially monogrammed napkins! One of her chores is to set the table for dinner and when she discovered we had monogrammed napkins she could use, she had a ball choosing different ones each night. When I found a set of plain yellow ones, I told her she could have them monogrammed with her initials. She selected the design, font and colors herself. As I’m sure you guessed – we currently use those more than any of the other napkin sets we have.

    Up next on the Back to Basics Blog Hop is April from House by Hoff! You have to see the beautiful charcuterie boards she made!

    Catch up on all the Back to Basics projects this month below:

    Flatware Chest Makeover from Rain on a Tin Roof – You’re here!

    DIY Charcuterie Board from House by Hoff

    DIY Crock or Pottery from Thrift Store Canisters from So Much Better with Age

    DIY Wood Planter from The Turquoise Home

    Coffee Table to Bench Makeover from The Happy Housie

    DIY Cutting Boards from Scrap Wood from Bless’er House

    Follow on Social Media:

    Facebook | Instagram | Pinterest | Twitter

    Pin This Post
    Flatware Chest Makeover
  • That Peanut Farmer from Georgia.

    That Peanut Farmer from Georgia.

    Want to attend a Jimmy Carter Sunday School class? I’ve been and it’s definitely a once-in-a-lifetime experience! Below, you’ll find information for planning your trip to Maranatha Baptist Church in Plains, Georgia to attend former President Carter’s class!

    No matter what side of the aisle you’re on or what you think of his presidency, one thing is for sure – the peanut farmer from Georgia certainly turned out to be one amazing humanitarian.

    His smile is also quite contagious – the grin will win!

    The Carter Center, his non-profit organization has worked since the early 80’s to advance human rights and improve the quality of life for people all over the world. He’s received countless honors and awards for all his humanitarian efforts.

    Just this past month, he became the oldest living president in U.S. history – he doesn’t show many signs of slowing down though. He still teaches a Sunday school class at his church in his hometown of Plains, Georgia twice every month. A couple of friends and I put attending one of his classes at the top of our list last year and just before Christmas, we crossed that one off the bucket list!

    Maranatha Baptist Church: Jimmy Carter Sunday School Class

    Maranatha Baptist Church - Jimmy Carter Sunday school Class

    Y’all, it was truly an honor to attend this man’s Sunday school class. His message that day centered around waking up everyday and choosing to have hope even when there are so many negative things going on in the world. It was a simple message, but one that can make a very positive impact on your attitude.

    Just from hearing him talk for an hour, it was so obvious how much of a caring and thoughtful man he is. Positivity and humanity just radiate from him.

    If attending one of President Carter’s classes is something you’re adding to your list, here’s a little more information to help you plan.

    Travel to the Plains, Georgia Area

    My crew drove from Chattanooga down to the Plains area. It was part of our Fried Green Tomatoes Road Trip and for us, it was about a five hour drive. It wasn’t a bad drive at all though- lots of state highways with beautiful scenery.

    If the drive would be too much for you, then your best bet is going to be to fly into the Atlanta airport and then rent a car and drive the rest of the way. It’s about 135 miles from Atlanta to Plains.

    Where to Stay

    Plains, Georgia where Maranatha Baptist Church is and where the Carters still live is very small. The only lodging I found there was the Plains Historic Inn. Most people stay in Americus, Georgia when visiting Plains, which is about 20 minutes away. This was what we opted to do and stayed at the Americus Garden Inn.

    It was a very lovely bed and breakfast and the hosts, Kim and Susan, were incredibly welcoming and helpful. They knew we were attending the Sunday school service the following morning and would be leaving before breakfast was served, so they packed each of us a to-go breakfast.

    Another hotel option in the Americus area is the historic Windsor Hotel.

    Where to Stay when attending Jimmy Carter Sunday school - Windsor Hotel, Americus, GA

    We didn’t stay here, but we did have dinner at one of the restaurants here on Saturday night and the hotel was absolutely beautiful. The food was great too!

    Attending Jimmy Carter’s Sunday school class at Maranatha Baptist Church

    The Sunday school Class is held in the sanctuary of President Carter’s church, Maranatha Baptist Church in Plains, Georgia. As of right now, President Carter teaches two classes per month. You can find his schedule here.

    Get There Early

    The class starts at 10am (eastern time), however you’re going to need to be there much earlier. Our group of three got to the church at 5:30am. Upon arrival, every car is stopped and given a number. We were number 53 – so that means that yes, before 5:30, there were already 52 other cars ahead of us.

    Maranatha Baptist Church in Plains, GA

    Doors will open and seating will begin at 8am, going by the number you were given upon arrival. There are overflow rooms if the crowd is larger than what the sanctuary will hold, but the limit of people inside the church is capped at 475.

    We hung out in our car during the wait and slept for a bit before eating a packed breakfast from the Bed and Breakfast we had stayed at the night before.

    Other Attractions to See in Plains, Georgia

    After the Sunday school service, you can stay for the church service of course and afterwards, you can have the opportunity to have your photo taken with President and Mrs. Carter. Unfortunately, we had a good drive back home ahead of us and we wanted to see some of the other historical sites and attractions in the area before leaving, so we left after the Sunday school service. As Jason said, “It’s enough for me to know that I was here and heard him.”

    If you have some time, be sure to check out some of these other places in Plains…

    The Train Depot: President Carter’s Presidential Campaign Headquarters

    Jimmy Carter used the old train depot in Plains as his Presidential Campaign Headquarters.

    The Depot Presidential Campaign Headquarters for Jimmy Carter, Plains, GA

    The depot is filled with information and memorabilia from the campaign. They even have one of the old televisions in a cabinet from the 70s set up and continuously playing clips from the campaign trail.

    Plains Trading Post

    If you are a history buff or presidential campaign buff, then you absolutely must stop at the Plains Trading Post.

    Jimmy Carter Sunday school in Plains, GA - Plains Trading Post

    The Plains Trading Post is filled with all kinds of campaign memorabilia from countless presidential campaigns – even back to Lincoln! I am a sucker for the old campaign buttons and so I bought one from each presidential race from Kennedy forward. I turned them into ornaments for my USA Christmas tree. 🙂

    Jimmy Carter’s Boyhood Farm

    Also located in Plains, is Jimmy Carter’s childhood home and farm he grew up on.

    Jimmy Carter Sunday school trip, Plains, GA, Jimmy Carter Boyhood Home

    The house is open to tour, as well as what was once a little store to the right of it. The house is decorated and furnished as it would have been when Jimmy still lived there with his family.

    Jimmy Carter Boyhood Farm in Plains, GA

    We really enjoyed perusing through each room and learning more about how he grew up and what it was like in Plains back then. We were there just before Christmas, so the house was simply decorated for Christmas and I absolutely loved seeing them using a wagon as part of their Christmas decor – one of my favorite Christmas decorating moves!

    You can also visit other spots such as the historical Plains High school and more, which you can read about here.

    This was such a great trip and I’m so glad I have friends who are nerdy history people like me and love to mark things like this off their bucket lists too!

    If you missed it, on the way down to Plains, we stopped in Juliette, Georgia where Fried Green Tomatoes was filmed and ate at The Whistle Stop Cafe, then wandered around that area – we had a ball! Read all about that here!

    You might also want to read about these trips too…

    A Weekend in Nashville

    A Chattacation: Things to Do in Chattanooga, TN

    A Trip Along the World’s Longest Yard Sale

    Join us on Social Media:

    Facebook | Instagram | Pinterest | Twitter

    President Jimmy Carter's Sunday school Class
  • Simple DIY Party Decorations on a Budget

    Simple DIY Party Decorations on a Budget

    Throwing a birthday party, baby shower, graduation party or any other kind of event can get expensive quick! Your party decorations don’t have to be expensive though! Use these easy party decoration ideas to create beautiful DIY party decorations custom fit to your event!

    The Circus’ birthday is in May and the kid has been talking potential party themes since January. Nope, not kidding. I’m not surprised either though. She always gets into the party planning for her birthday and we do love to throw a good party around here. At the moment, she’s going between a dance party birthday and a dolphin birthday party. Yes, complete ends of the spectrum. She’s also considered, but upon further evaluation nixed a Power Ranger party and carnival themed party. Personally, I’m 100% on board for the dance party birthday. I’m seeing a red carpet flanked by “doormen”. You’ll of course have to be on the VIP list to get in. Inside, I’m seeing a dance floor complete with a disco ball. Upon further thought, maybe that should just be my birthday party. 😉

    The Circus’ birthdays have always been filled with lots of homemade party decorations that were cheap and easy to make. After six parties, I’ve come up with quite a few DIY party decorations that can work not only for birthday parties, but also for baby showers, graduation parties and more. Just take the general idea and modify it to fit your party’s theme or colors. 🙂

    This post contains affiliate links for your shopping convenience. Click here to read my full disclosure policy.

    Easy Party Decoration Ideas

    Custom DIY Party Invitations

    DIY Party Decorations

    Have’t made those party invitations yet? No worries! I’ve made all of the Circus’ party invitations using PicMonkey so that I can easily customize them to her and her party’s theme. Use this tutorial for a basic party invitation and this one for making the farm themed one you see above.

    DIY Party Backdrop

    Easy Party Decoration Ideas

    My most tried and true party decoration – a party backdrop made from plastic tablecloths. We’ve had one of these for four out of six of the Circus’ birthday parties and I’ve also made a couple of these for baby showers as well. These are the perfect focal point for your party. Place it behind your cake table, present table, or just leave it on an open wall to work as a photo backdrop too. If you’re using a banner, it’s the perfect backdrop for your party banner too. This thing is so easy to make – all you’ll need are a few plastic tablecloths, scissors and table. Full tutorial for this one HERE!

    Easy Party Banner

    Homemade Party Decorations

    Speaking of party banners, this one is easy peasy to make. No fancy Silhouette or Cricut required – just trace and cut. Find out how to make it here!

    If you want to be more elaborate with your party banner…

    DIY Party Decorations on a Budget

    I made this superhero style banner with Picmonkey. You can switch up the design to work with your party’s theme. See how to make your own HERE!

    Budget Flower Arrangements + Cheap Centerpieces

    Cheap and Easy Party Decoration Ideas

    For the Circus’ farm party, I wanted simple, but pretty flower arrangements on each table. Premade, ready to go arrangements aren’t cheap. To keep things wallet friendly, I bought three different bouquets of three different kinds of flowers, then mixed them all up in mason jars for the tables.

    If some kind of animal works with your party theme, raid your kid’s toys for little plastic animals, then adorn them with mini party hats. I borrowed farm animals from the Circus then topped each with mini party hats made from cupcake liners.

    DIY Cake Topper

    Budget Homemade Party Decorations

    Cake toppers can add so much to a cake and the party decorations and they can be super easy to make! I did the one above for the Circus’ first birthday using just scrapbook paper, stickers, ribbon and straws! You can easily customize it with colors, patterns and wordage for your party. I did a similar one before for a wedding shower and used the couples monogram on the topper. Find out how to make it HERE.

    DIY Cupcake Holders

    Simple DIY Party Decorations

    I made these cupcake holders using items from a thrift store and they added so much cuteness to the food table! I made mine white so that they can work with any party decor. The top has an inset that allows you to put a round piece of cardstock in, so that’s another place for you to add some color and decor! Find out how to make these cupcake pedestals HERE!

    Photos as Party Decorations

    Easy DIY Party Decorations on a Budget

    This is one of those party decorations that everyone will love to spend some time looking at – a picture collage. If you’re doing this for a birthday party, obviously doing it with the birthday number is a no-brainer. If you’re doing it for a wedding shower, use pictures of the couple both together and separate as they were growing up, then put the photos in the shape of what will be the initial of their last name. For graduation parties, select a picture or two from each year of the graduate’s school grades, then put them in the shape of their initial. More on how I did the one above is HERE!

    DIY Party Hat

    Simple Homemade Party Decorations

    This will always be my most favorite party hat. 🙂 I made this using good ole’ scrapbook paper and yarn pom poms. Super easy. Super adorable. See how to make your own party hat HERE!

    Semi-Homemade Party Decorations

    Easy and Affordable Party Decoration Ideas

    A great way to save time, but still have custom party decorations is to embellish store bought decorations. I like to call these semi-homemade party decorations. 😉 For the ones you see above, I bought plastic horses at the Dollar Tree then painted them in bright colors and glittered their manes. Then, I just glued them on the store bought party hats and wall decorations. See more about it HERE!

    DIY Party Decorations that will become keepsakes…

    Affordable Party Decoration Ideas

    To decorate some of the tables at the Circus’ farm party, I made some simple stencil art that was customized for her party theme. We hung onto these afterwards and now they are hanging in her bedroom! Obviously, farm animals and horseshoes aren’t going to work for every party. 🙂 For things like wedding showers, do art with the couples’ monogram, initials, future wedding date, etc. For baby showers, ask the parents-to-be how they are decorating the nursery and make the art match the nursery so they can use it in there afterwards!

    Personalized Table Decor

    DIY Party Decorations that are easy and cheap.

    Another great table decoration here – add height and personalization by making personalized cutouts relevant to your party theme. These were for the Circus’ birthday, so they have the birthday number on them and her initials. If you’re doing it for a wedding shower, make a bride and groom, rings or “I do!” cutouts. To make my cutouts, I bought a graphics file on Creative Market, then loaded them into my Silhouette to cut out.

    Any budget homemade party decorations you can add to this list?

    Pin This Post
    Simple DIY Party Decorations

    Join the Freak Show On:

    Facebook | Instagram | Pinterest | Twitter

  • Hassle Free Cleaning

    Hassle Free Cleaning

    This post is sponsored by Swiffer. All opinions are 100% mine.

    Every farmhouse should be equipped with a muddy boots and clothes drop zone-washroom.

    By farmhouse, I mean actual houses on farms, not farmhouse style houses in the middle of the city. Y’all know how I feel about that term being used in the design world these days.

    Said drop zone-washroom should be the first room you enter immediately after coming in from the muddy field. If one is muddy, they should not be permitted to pass the washroom until they have stripped off all their muddy boots, clothes, etc. It’s also preferable to have a shower, deep sink, washer and dryer in this space. And for the love of God, no shiplap. 😉

    You see, this is what happens when actual farmhouses don’t have one of these spaces…

    Mud. Everywhere.

    Our farmhouse floors get as dirty in one weekend as the average person’s floors over the course of a month.

    If you’ve ever done farm work, then you also know that there is little downtime. We usually get there on Friday evening, work all day Saturday, often a good bit of Sunday and then it’s time to head back. There’s very little spare time to clean the house.

    Luckily though, my Swiffer® WetJet Wood™ helps out. Cleaning up doesn’t take near as much time since I’m not lugging out a mop bucket, floor cleaner and mop.

    After a quick sweep with my Swiffer ® Sweeper ™, all I have to do is pull out my WetJet Wood™, put on a new microfiber-like pad (super soft so no worries they’ll mess up the flooring!) and in less than 10 minutes, I’m done.

    Swiffer® WetJet Wood™ is safe on finished wood surfaces, has an ultra fine mist spray + LED lights so you can see a little better in dark corners. My favorite aspect of this little baby though is that it has a quickdry solution. By the time, I’m done with all the floors, it’s already dry where I started. We aren’t having to wait forever for the floors to dry or hop and tiptoe over them.

    Ain’t nobody on a farm got spare time to wait for floors to dry. There’s much bigger fish to fry, or should I say cattle to work? 😉

  • Easy Step Stool Makeover with Scrapbook Paper

    Easy Step Stool Makeover with Scrapbook Paper

    Banish those basic step stools in just an hour or two with this idea for an easy step stool makeover using scrapbook paper and Mod Podge! You’ll make a huge difference for little effort and money!

    Making our closet more functional by adding more storage along the top of the closet system came with a little problem for this short girl.

    This post contains affiliate links for your shopping convenience. Click here to read my full disclosure policy.

    Easy Step Stool Makeover with Scrapbook Paper

    Green Velvet Baskets / Black and White Bins / Tassel Trim / Black Bins / Leopard Print Rug / Closet System / Velvet Hangers

    I was going to need a step stool to get to those baskets on top that I would occasionally need. I didn’t just want any basic step stool though – this was a great opportunity to add a little color, pattern and personality to the closet!

    Step Stool Makeover with Mod Podge and Scrapbook Paper

    I found a step stool on clearance and turned it into this beauty. This little step stool makeover was one of the most fun projects I’ve ever done. It was super easy too. 🙂

    Colorful DIY Step Stool Makeover

    Supplies and Materials Needed:

    Step 1

    If needed, spray paint your step stool first.

    Step Stool Makeover - Before

    Mine started out looking like this and that most definitely would not work for my closet. 🙂 The entire stool won’t be covered with scrapbook paper; you’re going to have some of the edges showing, so pick a color that works well with your scrapbook paper.

    Step Stool Makeover using Scrapbook Paper and Mod Podge

    I gave my stool a couple coats of semi-gloss white spray paint as I knew that would be a safe bet to go with my tropical leaves paper.

    Step 2

    After the paint has dried, lay out one piece of your scrapbook paper along one of the steps.

    Easy Step Stool Makeover

    Fold the paper over the step front to create a crease.

    Put the paper on the cutting mat and place the ruler a little ways in from the crease.

    Simple Step Stool Makeover with Scrapbook Paper

    Cut along the edge of the ruler. You want to leave a little space between the ruler and the crease to have a border of the white on the stool around the paper. To me, doing this just makes it look more finished.

    Step 3

    Put a coat of Mod Podge on the step you just cut the paper for.

    Step Stool Makeover with Mod Podge

    Apply the paper to the step and put a coat of Mod Podge on top of the paper as well.

    Easy Step Stool Makeover

    Step 4

    After the Mod Podge has dried, apply one more coat over the paper.

    Step 5

    Repeat the above process on each step and the sides of the step stool.

    For the sides of the step stool, I had to use two sheets of paper as shown below.

    Colorful Step Stool Makeover

    Again, remember to cut the paper slightly smaller than your creases to allow for a white border around the paper.

    Step 6

    Once you’ve applied all the paper, coats of Mod Podge and everything has dried, you’re ready to apply the upholstery trim.

    Simple Step Stool Makeover

    To do this, simply run a small bead of hot glue around the edges of your step stool, then apply the upholstery trim.

    Easy Step Stool Makeover with Scrapbook Paper

    Leopard Print Rug Here – only $15!

    Isn’t this the happiest little stool you ever did see?

    See the full closet makeover HERE!

    Want more great, but simple DIY projects?

    DIY Agate Slice Lamp Finials – you won’t believe how gorgeous these are, but how simple they are to make!

    Duck Tape Fringe Pillow – add fringe to anything on the cheap by making it with duck tape!

    Pin This Post
    Easy Step Stool Makeover with Scrapbook Paper and Mod Podge

    Join the Freak Show On…

    Facebook | Instagram | Pinterest | Twitter

  • DIY Makeup Vanity Table

    DIY Makeup Vanity Table

    If you’ve been longing for a space to sit and do your makeup that’s functional, pretty, and doesn’t take up too much space, then I’ve got an easy build for you – a DIY makeup vanity table! This vanity table is wall-mounted so it keeps the space light and airy. And did I mention it also has hidden storage?!

    My favorite part of our recent closet makeover has nothing to do with clothes. However, the fact that we finally got all the clothing and shoes organized allowed for this little nook to happen…

    DIY Makeup Vanity

    My favorite part of the closet is my little makeup vanity area. It makes me happy and it’s something I needed in here. I’ve always done my makeup in the closet because it has better lighting than our bathroom. A month ago, you would have found me sitting criss-cross applesauce on the floor in front of the mirror attached to the back of the closet door.

    Now you’ll find me getting pretty here. 🙂

    This DIY vanity table is a pretty simple build. I had it fully built and the paint drying within a few hours time, then hung it on the wall the next day. All you’ll need to know to build a makeup vanity like this for yourself is how to make a few simple cuts and use a drill.

    Oh, and did I mention it has storage?!

    This post contains affiliate links for your shopping convenience. Click here to read my full disclosure policy.

    Wall-Mount DIY Vanity Table with Storage

    My DIY makeup vanity is 36″ long, just a tad over 12″ deep and 5 1/2″ thick. You can alter the length pretty easily if needed. If you want to alter the other dimensions, you’ll have to switch up your wood sizes below and reconfigure accordingly.

    Supplies Needed:

    Tools Needed:

    Step 1

    Cut each of your 1″ x 12″ pieces down to 36″ long.

    DIY Vanity Table

    These pieces will be the top and bottom of your vanity table.

    Step 2

    Take one of the 1″ x 12″ scraps you just cut. Cut two 4″ pieces from the scrap.

    DIY Makeup Vanity Table

    These two 4″ pieces will be the sides of your vanity table.

    DIY Makeup Vanity Table

    Step 3

    Put wood glue along one cut edge of each of the 4″ pieces you just cut.

    Build a Makeup Vanity
    DIY Vanity Table with Storage

    Attach one 4″ piece to each end of one 36″ long piece using your brad nailer or finish nails and a hammer.

    DIY Makeup Vanity with Storage

    Step 4

    Flip over everything you just put together.

    Wall Mounted DIY Vanity Table

    Run glue along the remaining cut edges of the 4″ long pieces. Place the remaining 36″ long 1″ x 12″ on top and nail together.

    Wall Mounted DIY Makeup Vanity Table

    Clamp the ends together while the glue dries.

    Build a Wall Mount Makeup Vanity

    Step 5

    Cut the 1″ x 6″ down to 36″ long. Set aside.

    Cut the 2″ x 2″ down to 34 1/2″ long. Set aside.

    Step 6

    After a few hours, paint both the vanity table and the 1″ x 6″ piece you cut. I used a semi-gloss black color and gave my pieces three coats. You don’t have to paint the 2″ x 2″ piece as it won’t be seen.

    Mounting the DIY Vanity Table to the Wall

    Step 7

    Go to the wall where you are hanging your vanity table. From the floor, measure up 29 1/4″ and mark in several places. Use a stud finder to locate and mark your studs around that 29 1/4″ area.

    Mounting a DIY Makeup Vanity to the wall

    Attach the 2″ x 2″ to the wall at 29 1/4″ high using your drill with the 3 1/2″ long screws where the studs are. Place a level on top of the 2″ x 2″ to make sure it’s level. Adjust as needed.

    This will allow your makeup vanity to sit at 30″ high. If you want it higher or lower, adjust as you wish.

    Step 8

    Determine which side you want to be the back of your table. Attach the corner braces on the inside of the back of the table where the studs are located on the wall.

    DIY Wall Mounted Vanity Table with Storage

    To do this, I held my table up on top of the 2″ x 2″ and made a few pencil marks on the table where the studs would meet up. As you can see, these corner braces may not be evenly space on your vanity table. That’s ok. Really, you might not even need these. I just wanted to add a little extra support for the bottom of the table.

    Step 9

    Lay the 1″ x 6″ face down in front of the vanity table. Attach the hinges as shown below.

    DIY Wall Mount Makeup Vanity

    Step 10

    Place the makeup vanity on top of the 2″ x 2″. Secure the table to the 2″ x 2″ by first drilling pilot holes along the back of the table and then fastening the table to the 2″ x 2″ with the 1 5/8″ long construction screws.

    DIY Wall Mount Vanity Table

    Do this also on each side of the vanity table in the top back corner where the 2″ x 2″ would meet the table.

    Step 11

    Open up the front panel and fasten the corner brackets in the back to the wall using the 3 1/2″ long construction screws.

    Attach your hardware knob to the front panel as well.

    Fill any screw holes with putty and touch up paint as needed.

    DIY Makeup Vanity Table with Storage

    Mirror / Sconces

    This DIY vanity table is just the right size for me. Its small profile that attaches to the wall keeps things open and airy in the closet.

    Build a makeup vanity table with storage.

    Zebra Art Print / Leopard Print Rug / Brass Brackets for Hats / Single Clip Hangers for Hats

    Plus the drop down front provides plenty of storage for all my makeup.

    DIY Vanity Table with Storage

    Brass Stool / Mirror / Plug-In Wall Sconces

    The baskets easily slide in and out as needed.

    DIY Makeup Vanity

    Of course, the mirror and sconces do their fair share of upping the “wow” factor in this space. 😉

    See more of the closet makeover HERE!

    Looking for more easy build projects?

    DIY Bathtub Tray with Book Holder – minimal cuts and easy assembly!

    DIY Chippendale Desk – one of my most favorite projects ever! A beautiful desk that doesn’t come with an expensive price tag!

    DIY Modern Rustic Bookshelf – a great bookshelf with good storage and a simple build.

    Pin This Post
    DIY Makeup Vanity Table

    Join the Freak Show On….

    Facebook | Instagram | Pinterest | Twitter

  • DIY Master Closet Makeover

    DIY Master Closet Makeover

    It’s been a very busy two weeks, y’all! When I was trying to decide what space to do for the Choose Your Own Adventure Room Refresh hosted by Jeweled Interiors, one of the reasons I opted to go with my closet (besides the fact that it desperately needed a makeover) was because I thought it might be a little easier time-wise and project wise than taking on a larger room. This space still ended up being demanding on both fronts. Of course, part of that was due to me critiquing every little thing.

    This post contains affiliate links for your shopping convenience. Click here to read my full disclosure policy.

    Thanks to Hudson Valley Lighting, Minted and SEI for providing products for this makeover!

    I’m so glad we gave this closet a makeover though, y’all. It has given us a load more of functional space and it’s a true testament to how readymade plain Jane store bought products and DIY projects can come together to create a beautiful, organized and super functional space.

    The Master Closet Before

    DIY Master Closet Makeover
    Master Closet Before
    Master Closet Before
    Master Closet Before

    After: DIY Walk-In Master Closet Makeover

    The Closet Exterior

    DIY Master Closet Makeover

    DIY Green Carpet Wall / Closet Door Medallions

    I was already pretty pleased with the closet exterior, so I didn’t do too much here. I did a bit of sprucing up though by editing, adding art and styling.

    DIY Walk in Closet on a Budget

    I’m still a big fan of the color and texture the carpet wall adds to the space and how this table and details like the closet door medallions, the lamp, rattan basket and other items give it a “traveled and collected” feel.

    Master Closet Makeover

    Toro Art / Rome or Bust Art / Fonte Mourisca Art

    I wanted to add in more of that traveled feel and color with some art though. I went with Toro, Fonte Mourisca and Rome or Bust from Minted. Minted offers custom framing with all their art prints and you can choose from a wide variety of frame styles and sizes. I wanted the art to stand out and needed to keep the frames neutral since they were going on a very bold wall, so I opted for thin black metal frames. This way, they will also work with just about any other decor style if we ever change it up.

    Walk In Closet on a Budget

    Toro Art

    I got Toro in a larger size since he was a good neutral and he also adds some masculinity to the rest of our bedroom, which sports pink walls. He was also approved by Grunt, so brownie points there.

    Budget Master Closet Makeover

    The bookshelf on the other side of the closet doors desperately needed some styling help. I had scored the bookshelf for $10 at a thrift store a while back, but had never really worked to make it “pretty”. I kept the travel vibe going here as well.

    Master Closet Makeover

    These shelves hold lots of mementos from our trips – a seashell Grunt found on the beach the day we got married, a nod to my favorite city, pictures from our trips, a vase we made during our Booze No Baby trip 😉 and more.

    DIY Master Closet Makeover

    I found this guy at a thrift store and he fit perfectly in here too – guess we also have a bull theme going. ?

    Master Closet Ideas

    I added in another art piece from Minted here as well called Curaco. It pulls in a lot of colors from the space and of course continues the traveled feel.

    The Closet Interior

    Here’s where we really put in some work…

    DIY Master Closet Makeover

    And yes, one closet door edge is black and one is white. Of course, it’s by design. 😉

    DIY Walk In Closet on a Budget

    Leopard Print Rug / Closet System / Black and White Bins / Black Bins / Velvet Coat Hangers

    This is just your basic closet system we bought at Home Depot when we moved in about three years ago. It’s nothing fancy, but I feel like we were able to make it fancy (and functional at the same time!) by partnering it with pretty storage bins.

    That leopard print rug helps out a little too, doesn’t it? Can you believe that bad boy was only $15?!

    Master Walk In Closet Budget Ideas

    The top of our closet system wasn’t really all that functional before. You couldn’t tell, but the shelves didn’t go all the way to the back of the wall. There was a pretty good sized gap between the back wall and the shelf’s back edge. And they also bowed in the middle. We were just so tired of renovating when we finally moved in, we just used a lot of what we had and called it a day. Grunt switched all those out this time around though and they are much more functional now. The green bins hold handbags, seasonal items, work clothes, etc. – things that you don’t need on an everyday basis. That cute little step stool makes it easy for us folks with short girl problems to get to the top shelf. 😉

    Master Closet Ideas

    Isn’t it darling? It was a super fun and really easy little makeover I did with a stool I found on clearance at Home Goods – tutorial for it is here!

    Walk In Closet Ideas

    Black and White Bins / Tassel Trim on Bins / Black Bins / Black Velvet Coathangers

    I did do the one thing I had said I wouldn’t do – switch out my coat hangers. I am so glad I did though, y’all. These take up less space and they truly do keep those slippy sliding tops on the hangers. Switching out the coat hangers also made me realize how many pieces of clothing I had! I did some serious editing!

    Putting the bins in were a game changer for this space. Doing this allowed us to move all the things that were in the chest of drawers in the closet and move that big piece of furniture out that was taking up one corner of the closet.

    Walk In Closet Budget Ideas

    I dressed up the black and white striped bins with this colorful tassel trim. I just used fabric tape to apply it – easy peasy. The black bins got a simple white tassel. Tassels for everything up in here!

    The right side of the closet is my most favorite part about this whole space…

    DIY Walk In Closet Makeover

    Sconces / Zebra Art / Mirror / Stool

    This is one of the times when what I envisioned in my head actually turned out better in reality.

    Walk In Closet Makeover on a Budget

    Sconces / Mirror / Stool

    If you read my first post about the plans for this space, I told you that I actually do my makeup in here because surprisingly it has the best lighting in our house for that. Previously though, I would be sitting in the floor in front of the mirror on the back of the closet door putting my makeup on. Not anymore though! Now I’m sitting getting pretty at this dressing table.

    This wall mounted table was a really easy build (tutorial for it is HERE!) and the front even drops down to reveal storage inside. The Circus had a ball organizing all my makeup into the containers, although she was upset I wasn’t ready to let go of more and give it to her.

    Both the gorgeous stool and mirror are from Southern Enterprises. You can find the stool at Home Depot and the mirror at Overstock.

    Walk in Closet Makeover Ideas

    Sconce / Mirror

    I was going for a bit of a Studio 54 vibe in this area of the closet. Y’all know I’m enthralled with all that. The stool, mirror and sconces all help to create that and when I’m getting gussied up now, I can easily channel my inner Jerry Hall or Divine – depending on what the day calls for of course.

    DIY Master Closet Makeover

    When the sconces are lit up, I can really feel the disco vibe coming on. 🙂 They are from the Mitzi collection at Hudson Valley lighting and I love everything about them. They are plug-in, so no hard wiring required. I didn’t want the cords just flopping along the wall though so I customized some cord channels to keep them in place while adding a little color at the same time.

    Walk In Closet Ideas

    Zebra Art / Brass Brackets / Single Clip Hangers / Stool

    My jewelry and hats had previously been on top of the chest of drawers. Since we moved that out, I had to come up with new storage solutions for both.

    For the bracelet and necklace storage, I used acrylic rods anchored on brass posts that were leftovers from my curtain rods and stair rail.

    For my hats, I took these brass brackets, installed them upside down, then hung the hats from these single clip hangers onto the brackets.

    I love both the jewelry and hat storage solutions because now I can see everything that I have right in front of me – no digging for what I’m looking for! To top it off, I added in this Zebra art above it all. I’ve been eyeing that art for years and finally decided this was the space to put it.

    DIY Walk in Closet Ideas

    Stackable Shoe Shelves / Brass Hooks

    Opposite “my” side of the closet is our area for shoe storage and Grunt’s nook. He gets a nook, I get a side. Seems fair, right?

    As I told you in the progress post, I had a grand idea for elaborate shoe shelves in this area and as it turns out, DIY wasn’t the way to go there. We ended up buying readymade shoe shelves and stacking them on top of one another. They actually ended up giving us more shoe storage than we would have had with my not so brilliant idea and it was much easier as well. Sometimes, it is just easier and more effective to not DIY!

    Walk In Closet Ideas

    Not Just a Number Art / Brass Wall Hooks

    Halfway through this makeover Grunt asked for a bench or stool of his own to sit down and put on his shoes. I told him sure, but don’t count on it before this whole thing is done. Mama had a list a mile long to get through! On Sunday, he mentioned the stool again. I went and got this one I had bought at a thrift store a couple years back and handed it to him. I told him I thought I had some leftover cowhide print fabric in my closet. He took it upon himself to find the fabric and reupholster the seat himself. I don’t know if I’ve ever been more proud of him in my life. haha! He had already picked out the Not Just a Number art from Minted, so it fit perfectly over the stool. I bought quite a few of the brass wall hooks to add in throughout the closet as needed. These work perfectly in his space to hang his clothes for the next day and other odds and ends.

    That’s it for me! What do you think of the new space?

    A big thank you to Hudson Valley who supplied the lighting for the Choose Your Own Adventure Refresh and Minted who supplied the art.

    A special thanks also to SEI who provided me with the mirror and stool for this space.

    Be sure to see what everyone else did during the Choose Your Own Adventure Refresh…


    Jeweled Interiors | Haneen’s Haven | Dimples and Tangles | PMQ for Two | House Homemade | Pencil Shavings | Our Fifth House | Kaleidoscope Living | The Pink Clutch | At Charlotte’s House | Effortless Style Blog

    Join the Freak Show on Social Media:

    Facebook | Instagram | Pinterest | Twitter

  • Master Closet Refresh Progress

    Master Closet Refresh Progress

    It’s midway point in the Choose Your Own Adventure Refresh hosted by Jeweled Interiors. I’m refreshing my closet (see the plan HERE!). Time to check in and see how far I have (or haven’t) come….

    This post contains affiliate links for your shopping convenience. Click here to read my full disclosure policy.

    Thanks to Hudson Valley Lighting, Minted and SEI for providing products for this refresh!

    With every space I decorate, it becomes more clear that I am one hell of an overthinker.

    This master closet makeover has been no exception.

    It’s like I’m wired to automatically come up with some complicated plan (that truly didn’t seem that complicated in my head), when in reality, the solution to the problem is actually a pretty simple fix.

    Overthinking Exhibit #1: The Shoe Shelves

    If you remember from the “before” photos I shared with you last week, we had a serious shoe storage problem. We had some basic shoe shelves, but it wasn’t near enough to hold all our shoes and some of my heels didn’t even come close to fitting in the shelves without laying on their sides.

    Now, when I first started plotting this makeover, I envisioned “L” shaped corner shoe shelves in a corner of the closet. Brass brackets would support the shelves and we could vary the height between the shelves as needed to accommodate all heights of shoes.

    That was the seemingly un-complicated plan in my head that really turned into a pain in the you know what one Saturday afternoon. As it turns out, the brackets weren’t big enough to keep the shelves from bowing and the shelves themselves were just too heavy to be supported by brackets alone.

    After overthinking it some more, throwing my hands in the air, drowning my overthinking in booze and then finally doing an Amazon search for shoe storage, I came up with a truly simple and better idea for shoe storage.

    Buy readymade shoe shelves and stack them on top of one another.

    Master Closet Progress

    Sometimes its better to buy than DIY. We bought six sets of these Closetmaid shoe shelves to create our shoe storage.

    Master Closet Progress

    On some of the units, we left shelves out here and there to accommodate for taller shoes. And by we, I mean Grunt. All I did was find the shelves and suggest we stack them on top of one another. He assembled them all, played around with the shelf spacing countless times, anchored them to the wall – everything. He gets the gold medal on this one.

    I have some upholstery material ordered to use to cover that left side of the shelves. I’m not crazy about all the little bumps there on it from the screw covers. I was going to do it with the wallpaper I had included in my original closet plans, but as it turns out that won’t be here in time.

    Overthinking Exhibit #2: The Dressing Table

    In the corner opposite the shoe shelves, is where I planned to create a built-in dressing table coming out from the corner. Remember, it was going to look something like this…

    Master Closet Progress

    Sconces / Zebra Art / Mirror / Stool

    Well that space currently looks like this…

    Master Closet Progress

    Yep, the original plan didn’t work out. No worries though, I have come up with another solution and yes, it is a bit more simple than my original plan. Imagine that. The sconces are due to arrive tomorrow – so excited to get my hands on those! As you can see, the mirror and stool are already here and they are fabulous! I’m terrified of messing up the mirror before it goes on the wall, so the plastic is staying on it until then!

    Other Progress…

    Master Closet Progress

    Closet System / Black and White Storage Bins / Black Storage Bins

    Grunt switched out our old hanging rods that were bowing for heavy duty ones. Why didn’t we do that before?! He replaced the also bowing shelving on top for new shelves – so much better! I’ve gotten all of the things that were in the chest of drawers in here into bins. I’ve even edited down quite a bit of my clothes and really probably need to give it one more round of editing.

    And did you notice those fun little tassels??

    Master Closet Progress

    Tassel Trim / Black and White Storage Bins

    I wanted to pull more color in here so I added this tassel trim to the black and white bins. I can’t decide if I like how the tassel trim looks on the solid black bins, so I’m still playing around with those.

    On the exterior of the closet…

    Master Closet Progress

    DIY Green Carpet Wall / Toro Art / Rome or Bust Art / Fonte Mourisca Art

    I got a few new pieces of art up from Minted – Toro, Rome or Bust and Fonte Mourisca. I love the extra touches of color and interest they add to this wall – I think it was definitely needed here! I’m also planning to update some of these picture frames as well.

    Still on the To-Do List:

    • Cut, install and paint baseboard in missing spots.

    • Paint backs of closet doors and trim.

    • Install Dressing Table

    • Hang Mirror and Sconces

    • Switch out coat hangers for these (I said I wasn’t going to do this when I started this project, but the more I thought about it, I decided to just do it all now and be really happy with it instead of wishing I’d done this)

    • Hang hooks, brackets and other small storage hardware in closet.

    • Upholster side of shoe shelves with this fabric and maybe use elsewhere in closet too?

    • Tassels or some kind of decor for black bins – they look so sad with the fun tassels on the black and white striped bins. 🙁

    Still quite a few things to do, but the big projects are done – the paint is drying on the dressing table as I type! Lord willin’ and the creek don’t rise, I’ll have the full reveal for you next week!

    Literally on that creek not rising – we have loads of rain coming down in our neck of the woods and have been under a flood watch for a couple of days now! 

    A big thank you to Hudson Valley who is supplying lighting for the Choose Your Own Adventure Refresh and Minted who is supplying art.

    A special thanks also to SEI who has provided me with the mirror and stool for this space.

    Be sure to see how it’s going with the rest of the Choose Your Own Adventure Participants…

    Jeweled Interiors | Haneen’s Haven | Dimples and Tangles | PMQ for Two | House Homemade |Pencil Shavings | Our Fifth House | Kaleidoscope Living | The Pink Clutch | At Charlotte’s House | Effortless Style Blog

    Join the Freak Show on Social Media:

    Facebook | Instagram | Pinterest | Twitter

  • Choose Your Own Adventure Refresh: The Master Closet

    Choose Your Own Adventure Refresh: The Master Closet

    I don’t think that a closet is ever the first thing on anyone’s list to “fix up” when you move into a house. It certainly wasn’t the first item on mine and Grunt’s list when we moved in here.

    However, I think the older you get, the more you come to appreciate a functional, well laid out space even if it is just a closet – it seems to make life a little bit less hectic. Our closet is not functional or well laid out, despite it being a good sized walk-in closet. When we moved in here, we bought one of the basic closet systems from the Home Depot for one wall, some shoe shelves for another wall (that have never even came close to holding all our shoes), drug a chest of drawers in on one wall and called it done.

    We’ve been tripping on shoes ever since.

    And then the amazingly talented Jewel from Jeweled Interiors asked if I wanted to join in on a Choose Your Own Adventure Room Refresh. I threw my hand up like a kindergartener and screamed “Yes, yes!”

    This post contains affiliate links for your shopping convenience. Click here to read my full disclosure policy.
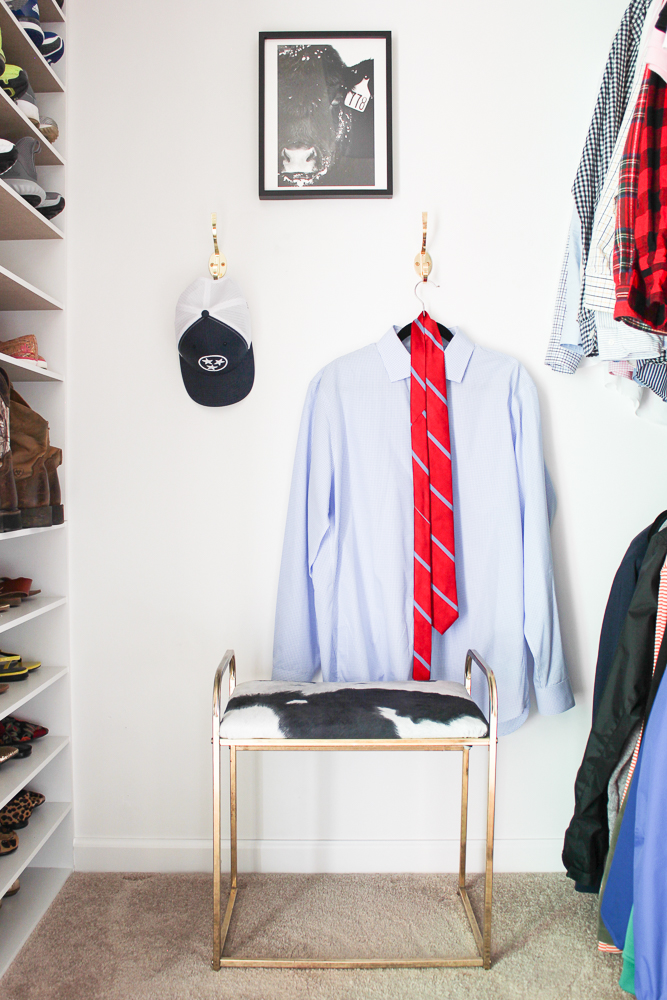
    Today, each of us participating in the Adventure Refresh are sharing the plans for our spaces; next week we’ll share the progress and on February 28th, we’ll all be sharing our finished spaces.

    I’m betting you’ve already figured out that I’m refreshing our closet. 😉

    I went through all the spaces in the house that could use a little refresh and decided that while it would be fun to freshen up the dining room or our actual master bedroom a bit, the master closet was the space in our house that needed the most help and had the most potential to add a little more sanity to our lives.

    Master Closet Refresh Plans

    Thanks to Hudson Valley Lighting, Minted and SEI for providing products for this refresh!

    Toro Art / Fiddle Leaf Fig Wallpaper / Tassel Trim / Black and White Striped Bins / Black Bins / Wall Sconces / Wall Mirror / Stool / Bust Art / Leopard Print Rug / Shoe Shelves

    See how I made the moodboard above HERE!

    It is a closet, so I’m not going overboard on the design, but I am aiming to create a space that functions better for us and is a place I actually wouldn’t mind spending some time in.

    The To-Do List…

    Add Art + Lighten Up Exterior

    On the outside of the closet. I’m planning to do just a little refreshing here – I still love my carpet wall, no matter what anyone else thinks. I’m going to add some different art to the left of the doors there above the marble table. I’m going to do three different pieces I think – Toro, Rome or Bust and Fonte Mourisca. I’m also debating on whether or not to lighten up the back of that bookcase with some fabric or wallpaper – thoughts?

    Make the Current Closet System More Functional + ReZone Items

    There it is y’all, the hot mess in all its glory.

    We’ll be leaving in the closet system we put in a few years back, but we’ll be doing lots of re-organizing and re-zoning of items. I’m planning to add storage bins along the top and storage bins in the vertical shelves as well. The shoes will be getting a new home.

    Better Shoe Storage

    This is to the left of the closet. There is way too much wasted space here that has a lot of potential. The plan here is to get all the stuff that’s currently in the dresser into the bins that will be in the vertical closet shelves. Then, we’ll put in some of those shoe shelves you saw in the design board above. They’ll be stacked on top of one another. I’m thinking of adding that fiddle leaf fig wallpaper onto the sides of the shoe shelves to add a little color and interest there.

    Built-In Dressing Table + Hook Storage

    This is the wall opposite the one you just saw. Again, more wasted space. The shoes will all go into the new shoe storage I just told you about. From there, I’ll be adding lots of different hook storage in here for various things and then I’m planning to build a dressing table into this space.

    Dressing Table

    Sconces / Wall Mirror / Zebra Art / Stool

    Funny enough, the closet actually has the best lighting for makeup. I realize this makes no sense at all. The overhead lighting in there is very bright and mimics daylight and since the closet is painted all white, that light just bounces off the walls. I put my makeup on in here (when I actually wear makeup) in the floor in front of the mirror that is attached to the back of one of the closet doors. Real fancy, right now, ya’ll. Looking to change that by creating a built-in dressing table with that gorgeous Harper Blvd mirror above it and flanked by those fabulous sconces from Hudson Valley Lighting. I’ve been eyeing this zebra art from Minted forever now and I finally think I’ve found the perfect place to put it here. And finally, this stool from SEI should take care of seating at the dressing table without taking up too much space.

    Those are the big to-do’s right now! I’ll have a progress update for ya next Thursday. You can also follow along on my Instagram stories for updates too!

    A big thank you to Hudson Valley who is supplying lighting for the Choose Your Own Adventure Refresh and Minted who is supplying art.

    A special thanks also to SEI who has provided me with the mirror and stool for this space.

    Be sure to see what the rest of the Choose Your Own Adventure Participants are tackling over the next couple of weeks…

    Jeweled Interiors | Haneen’s Haven | Dimples and Tangles | PMQ for Two | House Homemade | Pencil Shavings | Our Fifth House | Kaleidoscope Living | The Pink Clutch | At Charlotte’s House | Effortless Style Blog

    Join the Freak Show on Social Media:

    Facebook | Instagram | Pinterest | Twitter

  • DIY Bathtub Tray with Book Holder

    DIY Bathtub Tray with Book Holder

    Need a place to rest your book and your wine glass during bath time? This DIY bathtub tray is the perfect perch for just that! You can make this bath tray with a book holder using basic DIY skills and for about $20.

    If you read my Caftans and Cocktails post, then you may remember I talked about how I wanted to share more simple DIY projects this year – doable, non-expensive projects that require simple materials, basic DIY skills and maybe power tools occasionally – but no fancy ones.

    Good, simple DIY.

    As promised, I’ve rounded up a few of my favorite blogger friends and we are going to share with you a simple DIY project every other month throughout the year. We are all really excited to “get back to our roots” so to speak.

    If you’re coming over from Laura’s blog, The Turquoise Home, welcome! She is giving a great tutorial today on how to patch holes in drywall, so if you haven’t been there yet, be sure to after you leave here. There are also links at the end of this post to all the other bloggers getting back to the basics today as well.

    My project today is actually the brainchild of the Circus…

    DIY Bathtub Tray with Book Holder

    A DIY Bathtub Tray

    Right around the first of the year, she proclaimed that she needed a tray in the tub so that she could sip on her drink and read a book while bathing. And while she was a touch dramatic about it, I did think it was a pretty damn good idea. Since she insists on using my bathtub, I might as well make something that’s going to benefit not only her, but me too in the process.

    We wanted a bathtub tray that had a book rest, as well as a rim to help keep things from getting bumped and easily falling overboard. We were able to make this one for about $20, a little wood glue and some (very easy and simple) cuts.

    This post contains affiliate links for your shopping convenience. Click here to read my full disclosure policy.

    DIY Bathtub Tray with Book Holder

    Obviously, bathtub sizes differ. Our tray was made to fit a bathtub that is 31 1/2″ wide, outside edge to outside edge. You can easily adjust the measurements with this tray to fit any size bathtub. 🙂

    Supplies and Tools Needed:

    • 1 – 12″ x 3′ Pine Board or another similar board of your choice. I went with this one because it was the cheapest good piece of wood I could find in the length I needed. This bad boy was only $7 y’all. It’s my new go-to wood for projects.
    • 1 – 1″ x 2″ x 8′
    • 1 – 1″ x 2″ x 4′
    • Wood Glue
    • Long Bar Clamps or Hammer and Finish Nails or Nail Gun (I used just clamps, but if you don’t have those, you can use one of the other options to keep the boards in place as the glue dries.)
    • Circular Saw or Chop Saw or Miter Saw (you are only having to make straight cuts, so any one of those will do)
    • Handles – I used these screen door handles because they were the cheapest and still looked good.
    • Spray Paint in Color of Your Choice – mine is Krylon Peacock Blue
    • Drill

    Step 1

    Cut your big board, the 12″ x 3′ pine board, down to 33 1/4″. If your bathtub is not as wide as mine, then I suggest cutting the board down to where you have about a 1 1/2″ overhang on each side.

    Step 2

    Cut two pieces of the 1″ x 2″ x 8′ down to the length of the long sides of your tray base, the board you just cut. If you’re following my same dimensions, this should be 33 1/4″ as well.

    DIY Bath Tray with Book Holder

    Step 3

    Run wood glue along each long side of the tray base.

    DIY Bathtub Tray

    Place each of the 1″ x 2″s you cut along the edges of the tray base where you applied the glue and clamp together.

    DIY Bath Tray

    Be sure that the bottom of the 1″ x 2″ pieces are flush with the bottom edges of the tray base as shown below.

    Simple Bathtub Tray

    Let the pieces stay clamped together for a few hours or so.

    Step 4

    Cut two more pieces of 1″ x 2″ from the same 8′ long strip you already cut down to the width of the tray. If you’re following my exact measurements, this should be 13 9/16″.

    Simple DIY Bathtub Tray

    Apply wood glue to the short edges of the tray base, just as you did on the long edges. Put the 1″ x 2″ pieces you just cut along the edges and clamp together.

    Easy DIY Bath Tray

    Let the pieces stay clamped together for a few hours.

    Step 5

    *Note: This step creates wood blocks to go on the underside of the try to prevent it from getting knocked over the edge of the tub. If you aren’t concerned with this, you can skip this step. I however have a crazy six year old – we need them. 😉

    Take the uncut 1″ x 2″ x 4′ and cut two 6″ long pieces from it.

    Simple DIY Bath Tray with Book Holder
    I used scrap wood here, so disregard how it looks different than regular 1″ x 2″.

    Flip the tray over and using wood glue, attach each of these pieces 3 1/2″ inside from the short outside edge of the tray.

    Easy DIY Bathtub Tray with Book Holder

    Carefully flip the tray back over on a level surface and then place heavy objects on the tray and let it sit for a few hours.

    How to Make a Bathtub Tray

    Step 6

    Sand the tray smooth as needed.

    How to Make a Bathtub Tray with a Book Holder

    Caulk around the inside edges of the tray.

    Bathtub Tray with a Book Holder

    Step 7

    With the remaining 1″ x 2″ x 4′, cut two pieces that are each 10 1/2″ long.

    Apply wood glue to the “skinny side” of one of these pieces and place it in the center of one of the long edges of the tray, atop the edge as shown below.

    DIY Bath Tray

    Use clamps to hold it in place for a few hours.

    Step 8

    Take the remaining cut 10 1/2″ long 1″ x 2 piece, apply wood glue to the skinny side and place it in front of of the 1″ x 2″ you just attached to the tray edge. I placed mine 3 1/2″ out from the tray back so it could accommodate thicker books. You can play around with it before gluing it to decide where your piece would best fit.

    Place something heavy on top of this piece after gluing it to keep it set in place as it drys.

    DIY Bathtub Tray

    I didn’t have clamps that would fit around the back of the tray and over to this piece, so we got creative.

    Step 9

    Spray paint your tray – I did about three coats.

    Step 10

    Attach your handles to the short sides of the tray. I do suggest drilling a pilot hole first so you don’t crack the wood with the hardware screws.

    DIY Bathtub Tray with Book Holder

    Bathtub / Tub Faucet / Art Above Tub

    DIY Bath Tray with Book Holder

    We love how our tray turned out and have already put it to use! The only complaint from the Circus was that she didn’t get her bright turquoise paint on it.

    DIY Bathtub Tray

    I told her if she was going to always hijack my tub, then she was going to have to compromise on the paint color. 😉

    DIY Bath Tray

    Here’s to simple DIY projects that also prove themselves to be quite functional. Be sure to head over to Making Home Base and see how simple it is to frame a canvas! Don’t miss the other Back to the Basics DIY Projects below as well:

    Back to the Basics DIY Projects

    DIY Framed Canvas at Making Home Base | Settee Makeover at So Much Better with Age | How to Patch Drywall at The Turquoise Home

    Pin This Post
    DIY Bathtub Tray with Book Holder

    Join the Freak Show on: 

    Facebook | Instagram | Pinterest | Twitter

  • DIY Silhouette: How to Make a Silhouette The Easy Way

    DIY Silhouette: How to Make a Silhouette The Easy Way

    I have always loved a classic piece of silhouette art – especially when it’s my kid! When I wanted to make a silhouette art wall in our home, I figured out how to make a silhouette myself. And you know what? It’s easy! Find out how to make your own DIY silhouette below! 

    Remember last week, when I showed you my DIY tassel garland?

    You, do? Good.

    And remember in that same post, I said that if all went according to plan, I would show you how I did my silhouettes?

    You, do? Good.

    Well, you are about to see how to make a silhouette. But, over the course of the week, all has not went according to plan with the silhouettes. You see, the other day, I was just sitting at my dining room table minding my own business, trying to be a good blogger, when out of nowhere one of those silhouettes fell right off the wall. And the glass shattered into a million little pieces.

    No lie.

    And what’s weirder? There was no apparent cause for this fall. Nope, the nail was still in the wall when I went over there and the hook was just fine on the back of the frame.

    Strange.

    Do you believe in ghosts?

    I believe in ghosts.

    I think my Pap was just bored and trying to entertain himself at my expense.

    Just wait until the end of this post to call the asylum on me, you’ll want to see this first.

    DIY Silhouette Wall Art - an easy way to make your own silhouette art.

    So, here is the story of my silhouette wall and and the easy way to make silhouette art.

    How to Do a Silhouette

    This post contains affiliate links for your shopping convenience. Click here to read my full disclosure policy.

    First off, I only made one of those silhouettes on the wall.

    How to Make a Silhouette Easily

    Mine and Grunt Labor’s silhouettes were both made when we were kids. I smuggled mine away a long time ago and when Mama (Grunt Labor’s mom), found out I wanted a silhouette wall, she went and dug out his from long ago. Both of ours may be considered antiques by now.

    Heaven, help. If anyone asks, I’m 25.

    That’s my story and I’m sticking to it.

    I digress. So, all I needed was a silhouette of the kid.

    Materials Needed:

    • Side Profile Photo of the Person You Are Making a Silhouette Of
    • Printer
    • Black Paper
    • Scissors
    • Contrasting Paper for Mounting the Silhouette On
    • Mounting Squares

    Steps

    Step 1

    The first thing you’ll need is a side profile photo of the person you are making a silhouette of. You’ll want to have the person turn to their side, stand in front of their side straight on and snap a picture.

    In a rare moment of stillness, I snapped this side profile of my kiddo.

    How to Do a Silhouette - Snap a picture of the person.

    Step 2

    After I had my image, I loaded it onto my computer and cropped it around just her face using Picmonkey.

    Easy Way to Make Silhouette - side profile shot of person.

    I also turned it black and white, because all I have is a black and white printer. That’s not necessary of course.

    After you’ve cropped your image, save it to your computer.

    Step 3

    Next, open up a blank word document. Insert the picture you just cropped and saved into the document and make it just about as big as the whole page, then print it out.

    Step 4

    Using scissors, cut out the profile from the image you printed out. Also, cut a kind of curve into the chest of the person’s profile.

    How to Do Silhouette Art - cutout of person's profile.

    No, she doesn’t have a golden dinosaur growing out of her head. When I was done with the silhouette, I just popped it on my craft room wall with one of those push pins from my sassy message board.

    Step 5

    Lay the cut-out silhouette on black cardstock, trace the outline onto it and then cut it out.

    Of course, you could also use white paper or colored paper to do your silhouette. Black is just the traditional color.

    Step 6

    Mount your silhouette onto a contrasting piece of cardstock or paper.

    Silhouette Easy Art

    I spray painted frames gold I already had and mounted the silhouettes to scrapbook paper to serve as a mat. I like the unexpected pattern it adds to the art.

    And that my friends, is the easy way to make a silhouette.

    Do you have any tips for how to do silhouette art?

    Share them in the comments!

    Need more easy DIY art ideas?

    Monogram Photo Art – super easy wall art using your own photos!

    Free Printable Find Her Jesus Keep Her Well Art – perfect for those little girls in your life!

    DIY Wall Decor from a Gift Bag – there are some gorgeous gift bags out there these days!

    And here’s my trick for hanging heavy frames, mirrors and more!

    Want to come back for the instructions later? Just pin the image below! 

    How to Make Silhouette Art the Easy Way

    You know you don’t wanna miss any of this crazy.

    Stalk Me Here:

    Pinterest / Facebook / Twitter / Instagram

  • The Whistle Stop Cafe and More: A Fried Green Tomatoes Road Trip

    The Whistle Stop Cafe and More: A Fried Green Tomatoes Road Trip

    If you’re a fan of Fried Green Tomatoes (the movie!), then you’ve got to plan a trip to Juliette, Georgia, where the movie was filmed. You’ll love eating at The Whistle Stop Cafe and seeing all the landmarks from the movie in this charming little southern town!

    I think Fried Green Tomatoes will forever stand the test of time. Both the actual food and the movie. I don’t know that there’s nothing a plate of good fried green tomatoes can’t cure and I would argue that the same could be said of the movie. It’s in that same category with Steel Magnolias – when you see it’s on television, no matter how many times you’ve watched it, you know you’re going to stop and watch it again and you know you’re going to shed a tear or two as well.

    A couple of months ago, two friends and I took an overnight trip down to Plains, Georgia to attend former President Jimmy Carter’s Sunday school class. As it turns out, Juliette, Georgia, where Fried Green Tomatoes was filmed, is just a bit off the beaten path on the way down to Plains. And in Juliette, you can even eat at The Whistlestop Cafe. Yes, the real one that Ruth and Idgie ran in the movie.

    The Whistle Stop Cafe

    The Whistle Stop Cafe

    Two months later, I’m still giddy over the fact that I really got to go here.

    I first fell in love with the movie when I was probably in middle school, so it’s like one of those childhood dreams come true.

    Fried Green Tomatoes at The Whistle Stop Cafe

    We of course ate fried green tomatoes at the Whistle Stop Cafe and they were delicious.

    Fried Green Tomatoes at the Whistlestop Cafe

    You’d of thought Idgie and Ruth fried them up themselves. In fact, all three of us were very impressed with our meals. Jason put it best – you don’t always expect these kind of places to be really good since a lot of their business is just touristy because people just want to say they went. However, this was not the case at the Whistle Stop – it was all delicious!

    Fried Green Tomatoes Movie Landmarks

    After lunch, we perused the rest of Juliette, which is just absolutely charming. We started behind the Whistle Stop and kind of worked our way in a circle.

    BBQ Pit from Fried Green Tomatoes

    Frank Bennett BBQ Pit |Juliette, Georgia: Fried Green Tomatoes Road Trip

    Just behind the cafe, you can see the BBQ pit where Frank Bennett became some of the finest BBQ the south has ever seen – secret’s in the sauce, you know.

    Smokey Lonesome’s Shack

    Smokey Lonesome's House | Juliette, Georgia: Fried Green Tomatoes Road Trip

    To the left of the BBQ pit and behind some of the other shops in Juliette, Smokey Lonesome’s shack can still be seen.

    Smokey Lonesome's House | Juliette, Georgia: Fried Green Tomatoes Road Trip

    From here, we worked our way back up to McCrackin Street, the main street in Juliette.

    Buddy’s Arm’s Grave

    Buddy's Arm's Grave | Juliette, Georgia: Fried Green Tomatoes Road Trip

    Buddy’s arm is buried along McCrackin and so we stopped there to pay respects, of course.

    Ruth and Idgie’s Place

    Ruth and Idgie's Place | Juliette, Georgia: Fried Green Tomatoes Road Trip

    There are quite a few charming little shops along McCrackin and we of course visited them.

    Ruth and Idgie's Place | Juliette, Georgia: Fried Green Tomatoes Road Trip

    Most all of the shops/buildings along McCrackin were used in the movie, including The Little Red Barn shop that was Ruth’s and Idgie’s place. We also stopped in another shop for some honey from the bee charmer. 😉

    Fried Green Tomatoes Road Trip: Juliette, Georgia

    There are lots of unique things in all the different shops. Unfortunately, one of the things I fell in love with, this squirrel was not for sale.

    Juliette, Georgia: Fried Green Tomatoes Road Trip

    It was a rainy December day when we were there, but there were still some beautiful colors all around. I snapped this picture outside the bank building from the movie, which is now a gift shop. The owner of the shop told us that this building had actually just been built solely for the movie and was just a shell. It wasn’t fully enclosed and made useable until it was turned into a gift shop.

    Buddy Threadgoode and Ruth Jamison’s Graves

    After seeing everything we could in downtown Juliette, we drove just about five minutes up to a nearby church to see the graves of Buddy Threadgoode and Ruth Jamison.

    Buddy Threadgoode and Ruth Jamison's Graves from Fried Green Tomatoes Movie in Juliette, Georgia

    The Bee Charmer had already left some honey. 😉

    Jason reached in his pocket and found exactly three pennies and no more, which he deemed was a sign.

    Buddy Threadgoode and Ruth Jamison's Graves from Fried Green Tomatoes Movie in Juliette, Georgia

    I concur. There are some things in life you just can’t argue with. We left the three pennies there on the graves and headed south for the rest of our adventure.

    Towanda!

    For reference, Juliette is about an hour south of Atlanta. While it was a stop for us on our way on down to Plains, it’s still a great little day trip from the Chattanooga area or of course from Atlanta.

    Looking for more adventures in the South?

    Things to Do In Nashville – a must-visit city of the south!

    The Must Do’s in New Orleans – my personal favorite!

    Things to Do in Chattanooga, Tennessee – a great spot for family vacations!

    Fried Green Tomatoes movie Whistle Stop Cafe and More in Juliette, Georgia

    Join the Freak Show on: 

    Facebook | Instagram | Pinterest | Twitter

  • This Kitchen is for Dancing Free Printable

    This Kitchen is for Dancing Free Printable

    Kitchens aren’t just for cooking – more importantly, they’re for dancing! Grab this Kitchen is for Dancing free printable to jazz up your kitchen with something besides food!

    I’m sure many of you were thinking I must have really meant my whole spill about embracing the Caftans and Cocktails way of life seeing as how I haven’t posted for over two weeks since writing that post. Well, I definitely did mean it, but I also intended to have a couple of posts go up between then and now.

    But then there came a pesky little migraine that I just couldn’t kick and lingered around for the better part of two weeks. After multiple doctor visits, two trips to the ER, and a couple scans, I am better.

    I also now believe in the power of a Thorazine shot, despite how bad it hurts, and know that Valium is not everything it’s cracked up to be. That’s another story though. And yes, I do realize Thorazine is an antipsychotic medication, but when you haven’t slept for days, are nauseous and nothing else will crack the pain, apparently Thorazine will do the job – for a little while anyway.

    When you have a migraine that lasts for two weeks and this is the first one you’ve ever had, your mind lingers to the worst possible outcome. I mean why else, wouldn’t all the meds you’ve been prescribed knock this thing out. Needless to say, while laying in my bed and on the worst day of it all, in our closet (because it was the absolute darkest place in the house), I thought for sure I wouldn’t make it through the day. A million thoughts ran through my head from thinking that at least I’d die laying under my beloved fur coats to I should have done more of this and less of that.

    So, in celebration of finally being back to normal (or as normal as I’m ever going to be), I’m sharing this new printable I made for our kitchen.

    This Kitchen Is For Dancing Free Printable

    When something like this hits you out of the blue, you realize just how much more the little things in life mean – like family dance parties in the kitchen.

    How to Get the Kitchen is For Dancing Print

    You can get the This Kitchen is for Dancing sign in two different sizes by subscribing to the Rain on a Tin Roof email subscription (it’s free and no more than 2-3 emails a week, usually just when I publish new posts). Sign up below to get access to download the printable art. Once you’ve subscribed and confirmed your subscription, you’ll be directed to a page where you can download the art. When you sign up, you’ll also be able to access and download all the other free printables in my printable library.

    If you’re already an email subscriber here, then you can put your email address in the form above as well and it should automatically take you to the download page. Don’t worry – it won’t sign you up twice for my emails though! If that doesn’t work for some reason, then you can find a link to download the Kitchen is for Dancing art in my Printable Library. You can look at the bottom of the last email you received from me for the password.

    Tips for Printing the This Kitchen is for Dancing Print

    First off, these are for personal use only. Print as many as you wish to for yourself, but you may not print and resell or sell the files themselves.

    • Print on card stock or photo paper. Some photo paper has a more glossy sheen though, so keep that in mind as to whether you want that look or not.
    • If you’ve got a good color printer at home, then of course you can print them at home. I don’t, so I usually have my printable art printed at Staples.
    • If you’re going the photo paper printing route, then I suggest Mpix for printing. Their color quality is really good. You can also opt for a matte finish there as well.
    • You can print the art in two different sizes:
      • 8″ x 10″
      • 8.5″ x 11″ (typical printer paper and card stock size)
    • Before you print, be sure to check if the image is being cropped and adjust it to your liking if needed.

    Cheers to dancing any chance you get!

    Need more great printable art?

    Here’s Your One Chance Fancy – yep, just like the song, but in wall art form. 🙂

    Find Her Jesus, Keep Her Well (Miranda Lambert) art – perfect for the girls you love!

    Frankly My Dear, I Don’t Give a Damn Printable – a classic line, from a classic movie.

    Pin This Post
    This Kitchen is for Dancing Sign

    Join the Freak Show on:

    Facebook | Instagram | Pinterest | Twitter

  • DIY Modern Rustic Bookshelf

    DIY Modern Rustic Bookshelf

    Need a little more storage space in your home? Why not build a bookcase? This rustic bookshelf also has a gorgeous modern feel. It’s a simple DIY project that can easily be customized to your home’s style. 

    I am not a builder, y’all.

    I usually come up with amazing build projects and think they are going to be really easy and I can totally do it – then I have to call in Grunt Labor at some point for help.

    But this modern rustic bookshelf is so easy to build, Bill and I did it all by ourselves.

    Well, we did have Grunt Labor on standby.

    After Bill had decided what he wanted in his room makeover, I found this bookshelf over at Waiting on Martha.

    Rustic Bookshelf on animal print wall - Rain on a Tin Roof

    via

    I thought it would work perfect for his room, so I tracked down where it was from…All+Modern…and it was $1000.

    One Thousand Dollars.

    I’m sorry, but I just don’t know if I could ever bring myself to pay $1K for a bookshelf.

    On top of that, the bookshelf was quite a bit larger than what we needed or could even fit in the space. After looking at it though, I was totally like, we can build that. I sent an image of the shelf to Bill and asked if he liked it. His response was “That’s awesome.” So the next day, we went and bought our materials and came up with our own DIY bookshelf version for less than $50.

    Rustic Bookshelf DIY in a masculine bedroom - Rain on a Tin Roof

    It is seriously an easy build ya’ll and I am so thrilled with how well it turned out.

    Rustic Bookshelf DIY

    This post contains affiliate links for your shopping convenience. Click here to read my full disclosure policy.

    Materials Needed:

    Tools Needed:

    Cut List:

    • Five – 2″ x 10″ x 36″ (Cut the 2″ x 10″ x 10′ down into five 36″ long pieces.)
    • Four – 2″ x 10″ x 9 1/2″ (Cut the 2″ x 10″ x 10′ down into four 9 1/2″ long pieces.)
    • Eight – 2″ x 2″ x 6 1/2″ (Cut the 2″ x  2″ x 8′ down into eight 6 1/2″ long pieces.)
    • Eight – 2″ x 2″ x 9 1/2″ (Cut the 2″ x 2″ x 8′ down into eight 9 1/2″ long pieces.)

    Steps

    Step 1:

    Make all the cuts noted above.

    DIY Bookshelf - cutting the wood - Rain on a Tin Roof

    Step 2:

    Set aside the 2″ x 10″ cuts. Gather the 2″ x 2″ cuts, wood glue, nail gun and clamps.

    How to Build a Bookshelf - cutting the shelf supports - Rain on a Tin Roof

    Create a square using two of the 2″ x 2″ x 6 1/2″ pieces and two of the 2″ x 2″ x 9 1/2″ pieces as shown below. Put wood glue on all the joints and clamp.

    DIY Bookcase - assembling the shelf supports - Rain on a Tin Roof After clamping, nail the pieces together. Do not remove the clamps yet. We waited a few hours before removing the clamps to ensure the glue dried properly.

    Repeat this three more times to create a total of four “open” squares. These will become your shelf supports.

    After each square is completed and dried, paint or stain the squares the color of your choice.

    Step 3:

    Take one of the 2″ x 10″ x 36″ pieces and drill three pilot holes along the left end of the board.

    Drilling the holes for the rustic bookshelf - Rain on a Tin Roof

    After drilling the pilot holes, come back with a larger drill bit that is the size of the screws head and drill out just a little bit over the pilot hole – this is so you can countersink your screw and give the shelf a more finished look.

    On the same board, come in 9″ on the other end of the board and drill two more holes the same way you did above, however you only need one on each side of the board as shown below.

    Drilling pilot holes in the shelves for the DIY rustic bookshelf - Rain on a Tin Roof

    Step 4:

    Using the wood screws and drill, place one of the 2″ x 10″ x 9 1/2″ pieces on the end of the board where you drilled three pilot holes and secure it from the bottom of the longer 2″ x 10″ piece. Place one “open square” on top of the place where you drilled two pilot holes and secure this piece with wood screws from the bottom as well as shown in the image below.

    Assembling the diy bookshelf from the ground up - Rain on a Tin Roof

    It comes in really handy to have someone on standby to hold the pieces as you secure them.

    Step 5:

    Place one of the 2″ x 10″ x 36″ pieces on top of the pieces you just fastened together.

    Repeat the same process with the pilot holes and fastening the pieces together with the screws, however this time, you will be doing this from the top.

    The arrows in the image below indicate where your pilot holes and screws should go.

    How to Build a Bookcase - attaching the shelves - Rain on a Tin Roof

     Step 6:

    Place an open square and a solid square on the second shelf you just fastened together as shown below.

    How to Build a Rustic Bookshelf - attaching the supports - Rain on a Tin Roof

    Once more, you are going to drill pilot holes, then fasten the pieces together with screws as you did before. This time you will be coming up from the bottom. This is where we found that a right angle drill came in handy.

    DIY Rustic Bookcase - using a right angle drill - Rain on a Tin Roof

    It was easier to get the right angle drill into the tight spots, rather than the full size drill.

    Step 7:

    Place a 2″ x 10″ x 36″ piece on top of the open square and solid square you just fastened together.

    DIY Modern Rustic Bookshelf - assembling - Rain on a Tin Roof

    Repeat the pilot hole and fastening process as you did with the other shelves.

    Next, you will add on another open square and solid square, however you are alternating the location of each with each new shelf you add as you can see in the image above.

    Continue fastening on shelves and squares until you have no more left. You can also alter the size of the shelf by adding more or less shelves.

    Step 8:

    After the shelf is assembled, stain or paint it the color of your choice. I did this after the shelf was assembled, however, I should have done it before – would have been much easier!

    Modern Rustic Bookshelf DIY in a black and white bedroom - Rain on a Tin Roof

    $50 DIY bookshelf vs. $1000 bookshelf. I’ll take the $50 any day of the week.

    DIY Rustic Modern Bookshelf Build - guitar beside bookshelf - Rain on a Tin Roof

    Have you ever made a DIY bookshelf before?

    Want more easy DIY projects and decor ideas?

    See the full Masculine Bedroom Makeover – this shelf is used in here!

    How to Build Wall to Wall Shelves – built-in shelving that is easy, easy, easy to make and super functional.

    Power Tools 101 Series – Learn how to use a drill, saw and more – perfect for beginning DIYers!

    Want to remember this post? Pin the image below!

    How to Build a Modern Rustic Bookshelf - easy DIY project - Rain on a Tin Roof

    blog-signature-summer-15

    You know you don’t wanna miss any of this crazy.

    Sign up to get my posts delivered to your inbox here.

    Stalk Me Here:

    Pinterest / Facebook / Twitter / Instagram

    DIY Modern Rustic Bookshelf Build against a black wall - Rain on a Tin Roof

    SaveSave