Author: Jenna

  • Clothing Rack Dividers – Free Printable Set!

    Clothing Rack Dividers – Free Printable Set!

    Need to organize baby clothing or organize your clothes for a yard sale? Grab this free set of clothing rack dividers then! These clothing size dividers are great for kid’s closets, garage sales and more!

    After hosting yard sales 2-3 times a year for the past seven years or so, I’ve learned what works best and what doesn’t work well when it comes to organizing items in your sale and of course – selling as much as you can.

    Selling clothing at yard sales can be tricky. Even if you have really great pieces of clothing, if you don’t have the clothing displayed and organized well, then it won’t sell as much. Sure, you always have those people who will dig through piles of clothing, but I’m telling you right now if you have your clothing neatly organized and displayed, you will sell so much more of it.

    To keep all the clothing items hanging up and organized at our yard sale, I made a clothing rack for each category and clothing rack size dividers as well.

    Clothing Rack Dividers - Great for yard sales. - Rain on a Tin Roof

    These have made a world of difference in how much clothing we sell at our garage sales now!

    Clothing Size Dividers: Free Printables

    Clothing Size Dividers - Free Printable Set - Rain on a Tin Roof

    The printable size dividers include sizes 0 months – 3XL in a printable PDF file. The printable file, and all the other free printables in my Rain on a Tin Roof library, are available exclusively to my email subscribers. Just sign up below to get the size dividers and access to my free printable library!

    If you’re already a Rain on a Tin Roof subscriber, you can find the printable size dividers in my Printable Library. Look at the bottom of the last email you received from me for the password!

    Printing Tips

    • The clothing rack size dividers are made to print two per page.
    • Once you print them out, cut out around them and cut out the black line and black center portion on the dividers. This allows your dividers to easily go onto the dowel rod.
    • After printing and cutting mine out, I also opted to laminate them to keep them in better shape and make them last longer.
    Clothing Rack Size Dividers - perfect for kid's clothing and more - Rain on a Tin Roof

    I hope you find these helpful for selling more clothing at your next yard sale!

    Clothes Dividers - organizing clothes at yard sales. Rain on a Tin Roof

    The DIY clothes racks you see above are a great way to hang the clothes at your yard sale and of course, they work with the size dividers too!

    Have you used clothes dividers to organize clothing before?

    Don’t miss these helpful posts too…

    The Best Yard Sale Tips – all the lessons I’ve learned about having successful yard sales.

    How I Made $2K+ in Two Months Selling Our Clutter – get rid of all that clutter holding you down and make a little money while doing it!

    If you’d like to come back to this post in the future, you can pin the image below.

    Size Dividers for Clothing Racks for Yard Sales - Rain on a Tin Roof

    Keep up with us on social media:

    Facebook | Instagram | Pinterest | Twitter

    Signature

    SaveSave

  • Christmas at the Farm

    Christmas at the Farm

    If you saw yesterday’s holiday home tour, fair warning that this one is a complete 180 from that one. Yesterday, I shared our 70’s Landing Pad decked out for Christmas and today, I’m sharing our family’s farmhouse all done up for the holidays. It’s two very different decor styles!

    Before I go any further though, a big thanks to Marty from A Stroll thru Life for gathering all the forces and organizing this tour every year. Marty has gorgeous style, so if you haven’t checked out her holiday home tour, be sure to.

    If you’re following the tour line-up today and hopping over from Monica Wants It and this is your first time here, hello! Monica is absolutely killer at mixing chic, glam and classic styles to create gorgeous spaces! My tour probably won’t hold a candle to her’s!

    For the holiday decor at the farmhouse, I stick with more traditional / cozy / vintage decorations. So really, it’s a mish-mash of different styles I guess, but I think it works together and we like it. The farmhouse was my grandparent’s home so I also pull out a lot of things that were their’s to decorate with.

    This post contains affiliate links for your shopping convenience. Click here to read my full disclosure policy.

    Christmas at the Farm

    The Living Room

    Farmhouse Christmas Decor

    Blue Chair / Rug / Ottoman / Media Cabinet / Christmas Tree / Wingback Chairs

    Farmhouse Christmas Decor

    My absolute favorite thing in the living room this season is this little corner. The saddle stand just shines when it’s all done up for the holidays. I’m planning to paint the corner cabinet at some point, but for the holidays I hung my grandmother’s plastic popcorn Christmas tree over one door.

    Farmhouse Christmas Decor

    Grunt made the saddle stand for me for Mother’s Day this year. Hands down, it’s one of the best gifts I’ve ever received.

    Farmhouse Christmas Decor

    Little Red Wagon

    This is probably the fourth year I’ve jacked my kid’s little red wagon to use in my Christmas decor. I make no apologies and have every intention to do it for many Christmases to come.

    Farmhouse Christmas Decor

    The saddle stand holds my great-grandfather’s saddle on it that my dad gave me and my Pap’s cowboy hat. I added a little holiday color to the setup with the plaid blanket under the saddle and the greenery over the saddle. It’s my favorite thing in the whole space.

    Farmhouse Christmas Decor

    Wingback Chairs

    My father-in-law gave us his sleigh from his childhood a few years back. For the holidays, it became a side table of sorts beside the wingback chairs. I love how perfectly it fits in here.

    Farmhouse Christmas Decor

    Farmhouse Christmas Decor

    Christmas Tree

    I bought this Christmas tree for the farm last year. I wanted one that looked like we had just went out in the woods and chopped it down. This one fit the bill perfectly and I love it just as much this year.

    Farmhouse Christmas Decor

    Rug / Media Cabinet / Christmas Tree

    It’s meant to be more of a sparse tree and so the ornaments all really shine on it. I have rarely ever found a tree skirt that I just love so I often improvise and use blankets as tree skirts. I used a cowboy blanket that used to be in my dad and uncle’s room growing up for the tree skirt this year.

    Farmhouse Christmas Decor

    Wall Sconce / Large Vase / Small Vase / DIY Ornament Cluster

    To dress up the wall sconces, I put an ornament cluster around each. The larger vase holds ornaments that were Grunt’s grandmother’s. They are super fragile so I prefer to put them in the vase, rather that on the tree where they might fall and shatter. I also love how all the colors look together in the vase.

    Farmhouse Christmas Decor

    This little girl was a yard sale find. She had the perfect vintage vibe that goes well with the rest of the farmhouse so I knew she was meant to be here. She reminds me of my little circus too. 🙂

    That’s it for me! Up next on today’s Christmas home tours is Clean and Scentsible – Jenn always has absolutely beautiful holiday decorations! 

    Catch any homes you missed with the full Christmas home tour lineup below…


    Thursday, Dec. 6

    Pin This Post
    Farmhouse Christmas Decor
  • All Hail the Christmas Camel | It’s a Colorful Life Christmas Home Tour

    All Hail the Christmas Camel | It’s a Colorful Life Christmas Home Tour

    Unintentionally, camels became the theme of my holiday home tour this year.

    I didn’t mean for it to happen. It just did. I looked around my living and dining room after all the decorations were up and realized I had multiple camels varying in heights of nine inches to two feet looking back at me.

    We’re just going with it, ya’ll. Embrace the camel this season. When Christmas camels become a trend, just remember you saw it here first.

    Before you see the camels in all their holiday glory, let me first welcome any new folks here hopping over from Haneen’s Haven as part of the It’s a Colorful Life Christmas Home Tour. If you hadn’t already determined from my camel spill, I’m not all there. We just go with that too around here. Embrace it.

    Let’s get on with the tour, shall we?

    This post contains affiliate links for your shopping convenience. Click here to read my full disclosure policy.

    A Colorful Christmas Living Room

    Colorful Christmas Living Room

    Green Chairs / Multi-Colored Pillows / Mustard Pillows / Lion Art

    I never really mean to change out and switch up my holiday decor, but it never fails that I end up doing exactly that. And spend waaaay too long debating whether or not Santa should go on the table or Mrs. Claus. Or both. But then what would go where the other was supposed to go?

    Yea, it doesn’t make sense to me either. Again, just go with it.

    Colorful Christmas Living Room

    This little table and quite a few of the things on it are new additions. I scored the table at a yard sale as a package deal with a matching bamboo bar cart for $10. I know, crazy, right? And there’s camel #1 is taking up residence on the bottom shelf here. I’m lucky to have a group of friends who are always on the lookout for each other when it comes to holiday and general home decor. One of those friends, Ashley, found me that pretty camel at a thrift store. I had a great urge to put a holiday attired Barbie on top of him. I abstained. I won’t say it won’t happen before the holidays are over though.

    Colorful Christmas Living Room

    And here’s where Mrs. Claus ended up! She was a yard sale find and the sleigh she’s in was a thrift store find. Marilyn made the sleigh in 1985 and I know this because she signed it on the bottom along with the date. Marilyn, wherever you are, I love your sleigh and will take good care of it. That’s why Mrs. Claus is in it and not Santa. Sometimes you just can’t trust a man.

    See that little drum? It was not that pretty when I found it at the Goodwill. In fact, it was downright hideous. The fabric on it was atrocious. But I deconstructed it, re-wrapped it in pretty wrapping paper and for $0.99 ended up having a damn pretty drum. You can too – don’t pass up the hideous ones at thrift stores. Unless I get to them first, then there won’t be any for you. I’m feeling a drum themed Christmas coming on for next year.

    Colorful Christmas Living Room

    If you are new around here, I’m sorry-not-sorry if you were expecting a beautifully themed color-coordinated Christmas tree. We don’t do that. Our tree sports special ornaments, stuffed animals and even a shoe or two.

    Colorful Christmas Living Room

    Coffee Table (similar) / Sofa (similar) / Floor Lamp / Navy Pillows with Colorful Trim / Santa Pillow / Leopard Print Pillow

    Colorful Christmas Living Room

    This little vignette is a favorite of mine this year. The Staffordshire dog was a Goodwill find from the summer and obviously, it’s not a Christmas specific decoration, but I dare you to find a Staffordshire dog that’s prettier than when surrounded by holiday decor. Also, I’m sure it’s not one of the real Staffordshire dogs, but I’ve never shook at my head at a faux fur before and I’m not going to start shaking it now at fake Staffordshire dogs.

    Those jeweled coasters are a new favorite of mine as well. I bought a set as a gift this year and loved them so much that I bought myself a set too. They are absolutely the most gorgeous coasters I’ve ever seen. The dog agrees.

    Colorful Christmas Living Room

    Sidenote: If you tie pretty satin ribbon on anything non-holiday-esque, it automatically becomes authentic holiday decor.

    Colorful Christmas Living Room

    There’s the dog arrangement again. Because everyone should see it twice. From different angles. Did I mention I’m not even particularly fond of dogs? #gofigure

    The teal poinsettias are at Michael’s this year. I’m usually not a fan of faux flowers, they tend to be the only faux thing I shake my head at, but these oversized beauties stole my heart the minute I saw them. We’re faux-ever friends. I tied an ornament cluster (find out how to make those here) around the vase for an extra pop of color. And because there had to be something else substantial there to even out that oversized poinsettia.

    Colorful Christmas Living Room

    Eyes Art

    I also adorned just about every piece of oversized art in my house with hanging ornament clusters. Because you can never have enough colorful ornament clusters around your house for the holidays. Tell me I’m wrong. 

    Colorful Christmas Living Room

    Lion Art / Red Drapes / Green Chairs / Multi-Colored Pillows / Mustard Pillows

    Colorful Christmas Living Room

    Introducing camel #2. I spotted him on Facebook one day when someone from my hometown posted pictures of their yard sale and he was in it. My dear Judy, our group mom and also direct line to Jesus, went to pick it up for me. We don’t just call her a saint because she keeps us on her prayer list, it’s also because she’ll also do anything to help us even if it means picking up a stray camel from a yard sale.

    Colorful Christmas Living Room

    The teal poinsettias struck again in this vase flanked by a vintage Santa and bottlebrush trees. I also bought some extra poinsettias to stash away for future Christmases. You never know when you might need an oversized faux teal poinsettia. It’s always best to be on the safe side.

    Colorful Christmas Living Room

    I always cheat and use wrapped gifts as decor around the house too. I mean, what’s the use in going to all that trouble wrapping gifts and making them pretty to just stick them under the tree barely seen all season? Again, tell me I’m wrong. 

    Colorful Christmas Living Room

    This space is really dark and so I tried to lighten it up with the white garland, lots of colorful ornaments and candles. Of course, the candles also illuminate the Studio54 jeans art print. And that ain’t a bad thing. Everyone needs to see how great quality those jeans were. 😉

    Colorful Christmas Living Room

    There’s more drums – see I’m already priming for next year’s holiday theme.

    A Colorful Christmas Dining Room

    Colorful Christmas Dining Room

    Glass Table (similar) / Rug / Red Drapes / Abstract Art Print

    The dining room is pretty low key, compared to the living room. We use our dining room table for meals every night I cook, so I don’t like to clutter it up too much with holiday decor that I just have to move every night. I’m lazy. I admit it.

    Colorful Christmas Dining Room

    I added a tree in here this year. I mean, a friend was selling a silver tinsel tree and I had this big box of vintage ornaments I’d bought at a yard sale with no tree for them to go on. I needed the tree. I really didn’t have much of a choice, right?

    Colorful Christmas Dining Room

    Abstract Art Print

    Colorful Christmas Dining Room

    Also, photographing a silver tinsel Christmas tree that has multi-colored lights on it that’s right beside red velvet curtains is like the hardest thing ever. You’re guaranteed to get a redish overcast that may make you question whether or not there are a few demons around trying to steal our holiday joy and take over the souls of the nutcrackers to wreak havoc upon your home.

    I really hope that doesn’t happen.

    Colorful Christmas Dining Room

    Bar Cart / Record Player / Woman Art Print

    And for the finale, the almighty bar cart.

    And of course, camels. 

    Colorful Christmas Dining Room

    I found these glorious souls a couple of years ago. They don’t get stored away with regular Christmas decor; they have their own special cabinet they go in to make sure they are safe and protected throughout the year. We treat our camels right around here.

    Colorful Christmas Dining Room

    Colorful Christmas Dining Room

    The lamp tassel is something that stays on all year long, but just so happens to work well with holiday decor. Again, it’s really just another way for me to be lazy. See how to make the lamp tassels here.

    And of course, I added on an ornament cluster to the edge of the cart for good measure and all.

    Colorful Christmas Dining Room

    The little golden nutcracker is actually a corkscrew – another thrift store find.

    You can find the tutorial for those mini Christmas ornament drink stirrers right here. it will take you all of 10 minutes to make them and your holiday guests will think you’re totally the hostess with the mostess and not the hot mess that you really are. Or at least, that’s the case with me. 

    To summarize this post, hand-to-God, I was legit sober during the writing of this post. This is the normal me. And that folks, is terrifying.

    Up next is Mum Little Loves – I’m sure she’s sane, y’all.

    Catch any homes you missed with the full It’s a Colorful Life tour lineup below!

    Tuesday, December 4

    Dimples and Tangles

    PMQ for 2

    Monica Wants It

    Effortless Style 

    Wednesday, December 5

    Jeweled Interiors

    Haneen’s Haven

    Mum Little Loves 

    Thursday, December 6

    Pencil Shavings Studio

    The Pink Clutch

    Our Fifth House

    At Charlotte’s House

    Addison’s Wonderland

    Pin This Post

  • Christmas Decoration Ideas: Simple and Affordable

    Christmas Decoration Ideas: Simple and Affordable

    Decorating for the holidays can get stressful and expensive! These Christmas decoration ideas though are easy to make and affordable! And don’t worry – all of these simple Christmas decoration ideas are still gorgeous!

    Christmastime is officially here, y’all! I put the finishing touches on our holiday decorations a little over a week ago and this week, I’ll be sharing the holiday decor at both the farmhouse and the 70’s landing pad!

    I was going through my archives last week though and had forgotten about some of the decorations I’ve done in the past and used to do at our old house. I pulled a few of them together and came up with some favorites that are simple to make and easy on the wallet!

    Christmas House Decoration Ideas

    Sprinkle ornaments anywhere you can.

    Christmas Decoration Ideas

    Personally, I’m a sucker for just about any vintage glass ornament. Anytime I see them at yard sales or thrift stores, I snatch them up! I use them to make beautiful ornament clusters to decorate with, but I also just sprinkle them all around the house on trays, in vases and more. The colored ornaments in the tall vase on the right are actually ornaments from Grunt’s grandmother. I like them best in the vase because all the colors together are so pretty and they are a bit safer there than on the tree.

    P.S. – Find out how to make that elf-topped ornament tree here!

    Buy good wrapping paper (on the cheap!), pretty bows, then use the wrapped gifts as holiday decorations.

    Christmas House Decoration Ideas

    This one isn’t ground breaking, but it’s definitley one worth mentioning. First off, get yourself some beautiful gift wrapping paper. You don’t have to spend a fortune on it though. My go-to spot for great, pretty and thick wrapping paper is Home Goods. It’s usually $3- $4 a roll and they have a great selection. Then, buy yourself pretty ribbons to coordinate with the paper. I wait till it goes on sale at Hobby Lobby for half-off then I buy the satin rolls of ribbon there. Finally, once you’ve got the presents wrapped, stick a few under the tree of course, but also sprinkle the gifts around the house to act as decor!

    Whip up holiday drink stirrers for your parties.

    Simple Christmas Decoration Ideas

    I just shared the super simple DIY tutorial for this the other day. You can make these Christmas ornament topped drink stirrers in under 10 minutes. They are sure to spread holiday cheer while adorning cocktails!

    Create a garland for your tree from vintage Christmas storybooks.

    Affordable Christmas Decor

    I made this vintage storybook garland quite a few years back and it’s still one of my favorite Christmas decor pieces I’ve done. This one is of course a kiddo favorite too! Find out how to make it here!

    Decorate your tree for you!

    Living Room Christmas Decoration Ideas

    I am a huge proponent of decorating your tree for you! While I do think color-coordinated themed Christmas trees are gorgeous, I think you should have at least one tree in your home that is full of your kid’s ornaments, relics of your childhood, and just special objects that are priceless to you and not just all store bought fancy ornaments.

    Make the cabinets pretty.

    Kitchen Simple Christmas Decoration Ideas

    Give the kitchen a little holiday love by decorating the fronts of the cabinets. I made the cabinet decor on the left by buying one thing of garland at Michael’s, then cutting it into pieces, adding a leaf pick, ornament and ribbon to it. The reindeer one was made similarly with greenery that I cut up. The bottom ones have a more traditional red and green Christmas feel and are just little sprigs of boxwood I cut from my front yard, hot glued together, then used more hot glue to attach a ribbon and tie over the cabinets. I think clustering a few of any of these together would also make a gorgeous alternative to a wreath on your front door.

    Throw (not literally) an ornament cluster anywhere you can.

    Colorful Christmas House Decoration Ideas

    Ornaments clusters are another one of my favorite holiday decorations. I always make mine with glass ornaments because I like the shine, but you can make these with shatter proof ornaments as well. They are so simple to make – find out how here. I put them on corners of tables, my mantel, around lamps and just about anywhere else I can.

    Get creative with your Christmas card displays.

    Affordable Christmas Card Displays

    I think I end up doing a new type of card display just about every year. A few years ago, I made this raffle ticket Christmas card holder. When we moved though, I didn’t have a place to hang it. Last year, I made this ribbon tiny tree to display holiday cards.

    Have fun with your stocking holders.

    Christmas Stocking Decoration Ideas

    If you haven’t figured it out yet, we are all about having fun with our holiday decor around here! Our stocking holders reflect that for sure! Mine is topped with Barbie, Grunt’s with G.I. Joe and the Circus’ with a horse. It took all of 10 minutes to make them – get the tutorial for them here.

    No mantel? No problem. Hang the stockings in the windows.

    Traditional Christmas Decor Ideas

    At our old house, we didn’t have a fireplace or mantel. I used ribbon to hang our stockings from the curtain rod above the windows. I loved the look and we got compliments from multiple neighbors about how pretty they looked as they passed by our house.

    Stick greenery and shimmery things anywhere you can.

    Easy Christmas Decoration Ideas

    I really don’t like to completely take all my regular decor down and put it away during the holidays. Instead, I try to work it into the holiday decor as much has I can. One way I do this is by putting greenery and shimmery picks in anything that will hold something – like these cowboy boots.

    Get out vintage items with Christmas colors.

    Red and Green Holiday Decorating Ideas

    At the farmhouse last year, I pulled out lots of vintage pieces that had red and green Christmas colors like this old canteen and used them with the holiday decor. I filled this one with greenery and picks and topped it off with a printed off vintage style holiday Christmas card.

    Decorate the lampshades and pull out the old Christmas cards.

    Vintage Christmas Decorating Ideas

    I used more of those printable holiday cards to adorn lampshades at the farm as well last year. And that tray is holding a couple of holiday cards that my grandparents had sent out years and years ago!

    Create a musical tree skirt.

    Glam Christmas Decorating Ideas

    It doesn’t actually play music, but this record tree skirt was so simple to make and definitely gives off a musical vibe. You won’t need much more than thrift store records and spray paint to bring this idea to life.

    Make simple, but eye-catching wreaths.

    Christmas Wreath Decorations

    I love beautiful wreaths for the holidays, but I don’t have time to make elaborate ones. And funny enough, when I’ve tried to make elaborate ones, they always end up hideous! ha! One of my favorites I’ve ever made and that I still use every Christmas is this simple tinsel wrapped one with a vintage Santa in the middle.

    That star evergreen might look hard to make, but it’s actually really easy! All you’ll need is loose greenery and some paint sticks! Find out how to do it here!

    Hang wreaths in unexpected places.

    Easy Christmas Decoration Ideas with Wreaths

    I don’t know quite why, but I love the way a wreath looks when it’s hung over a mirror – especially when the mirror is reflecting the Christmas tree lights. Really, I just love wreaths hung anywhere and not just on the front door. Look for spots in your living room, kitchen and even bathroom to tuck small little wreaths and add a little Christmas cheer.

    Jack your kid’s toys.

    Budget Christmas Decoration Ideas - using your kid's toys.

    If your kid has a wagon, tell them you’re taking possession of it for the holiday season. Pay them rent if you have to. 😉 My daughter has this adorable little Radio Flyer and I adore the way it looks filled with a few small gifts. These little wagons also make great centerpieces on you holiday table! You could even fill a larger wagon with faux snow and miniature villages to create a small winter wonderland!

    Turn meaningful items into tree ornaments. 

    Meaningful Christmas Decoration Ideas

    I’ve already touched on this when I talked about decorating your Christmas tree for you; here’s some examples of those meaningful ornaments – old car keys, baby toys, your kid’s first pair of tennis shoes, and your grandmother’s glasses. 🙂

    What affordable Christmas decor do you just love?

    Want more holiday decorating inspiration?

    Christmas at the Farm – our family’s farmhouse decked out for the holidays in traditional colors and touches of vintage holiday decor!

    A Colorful Christmas – our very colorful and chic Christmas home tour!

    If you want to remember these Christmas decorating ideas for later, just pin the image below!

    Christmas Decoration Ideas for your entire house.
  • DIY Christmas Ornament Drink Stirrers

    DIY Christmas Ornament Drink Stirrers

    If you’re looking for a festive touch to your holiday party this year, make these Christmas ornament drink stirrers. It’s a simple DIY that will take about 10 minutes and costs around $10-$15.

    You might remember these fun little drink stirrers from last year’s Christmas home tour when they made their debut appearance. I love them just as much this year as I did last and maybe even more!

    DIY Christmas Ornament Drink Stirrers

    These will add a fun touch to any holiday party you might be hosting or just for casual drinks with friends one evening. Either way, everyone will think you’re the hostess with the mostess. 😉

    You can customize these with colors and patterns that reflect your holiday decor too!

    This post contains affiliate links for your shopping convenience. Click here to read my full disclosure policy.

    DIY Christmas Drink Stirrers

    Supplies Needed:

    • Festive Paper Straws – I opted for gold ones, but you could go with any color that fits with your holiday decorations.
    • Mini Ornaments – Mine came from Target. I believe you can find them at Michael’s and Hobby Lobby as well. Again, go with whichever colors/patterns you prefer.
    • X-Acto Knife

    Steps

    Step 1

    Using the X-Acto knife, cut a small hole in the bottom of each mini-ornament. You want the hole to be a little smaller than the end of the straw so that the ornament will fit snugly on the top of the straw.

    Step 2

    Place an ornament on one end of each straw. If you made your holes the right size, then you shouldn’t need anything else to hold the ornament onto the straw. If the ornaments are loose on the top of the straw, put a drop of hot glue either inside the ornament or just around the base of the ornament where it meets the straw to keep it in place.

    Christmas Ornament Drink Stirrers

    That’s it! Easy peasy, super simple.

    Have a designated spot for guests to drop their stirrers when they are finished with them. After the party, pull the ornament off the top of the straw and throw the straw away. This way, to create more stirrers, all you’ll have to do is just pop the ornaments on new straws!

    DIY Christmas Drink Stirrers

    I love that these also double as decor leading up the holidays.

    Cheers (complete with festive drink stirrers), friends! 

    Want more great Christmas decorations that are easy to make? 

    Use this tutorial to learn How to Make Ornament Clusters – super easy, but super gorgeous!

    DIY Record Tree Skirt – a fun twist on the traditional tree skirt!

    How to Make Character Stocking Holders – a great way to customize stocking holders for everyone in your family!

    Want to remember this holiday party idea for later? Just pin the image below!

    DIY Holiday Drink Stirrers
    DIY Holiday Drink Stirrers
  • Thoughtful and Useful Gifts for Grandparents

    Thoughtful and Useful Gifts for Grandparents

    While every grandparent loves those beautiful works of art they often get from the grandkids, maybe you want to step it up a notch this Christmastime. Of course, still let your little ones give them that artwork, but maybe add one of these Christmas gifts for grandparents to go along with it!

    Let’s talk holiday gifts for grandparents today!

    These gift ideas for grandparents are more geared as gifts from the grandkids. If you’re looking for gifts for grandparents that aren’t all about the grandkids, then check out these gifts for people who have everything. There are lots of ideas there for those hard-to-buy-for people like grandparents.

    Some brands provided products and/or compensation for inclusion in this gift guide. However, all thoughts and opinions are 100% my own. This post contains affiliate links for your shopping convenience. Click here to read my full disclosure policy.

    Gift Ideas for Grandparents

    Not just any calendar.

    Christmas Gifts for Grandparents

    Custom Wall Calendars

    If you’re on my gift ideas email list, I’ve already been talking about this gift idea for a week or two now – custom wall calendars. Every year, I make a Circus themed calendar (and not pictures of an actual circus, but my own little six year old Circus) and give them to grandparents, aunts and uncles. Every year, it’s one of everybody’s most favorite gifts – even the year I unknowingly included a photo that had the f-bomb in it. I go through pictures from the previous year and pull lots of favorites, then plug them into one the calendars at Photobook. It makes the perfect gift for grandparents! It does take 1-2 hours for me to go through the pictures, pull my favorites and then create the calendar, but I’m also knocking out about six or seven gifts in the process. If you’re thinking about doing these, then I suggest going ahead and doing it now before all the holiday hoopla really goes full force and you’re short on time. 🙂

    Games to Play with the Littles

    Gift Ideas for Grandparents

    Grandparent-Grandchild Activity Set

    This little game set includes 20 different activities that grandparents can play with their grandkids. They range from silly and playful to scientific. These cards will create hours of fun and special bonding time between grandparents

    To keep track of who’s winning those games…

    Christmas gift ideas for grandparents

    Grandkids vs. Grandparents Scoreboard

    Just how many times will the grandparents let the grandkids win? With this scoreboard, you can keep track of it. You can have this scoreboard personalized with whatever type of wording you want.

    Matching Slippers

    Useful Gifts for Grandparents

    Women’s Cally Slippers / Kid’s Charley Slippers  / Men’s Pile Lined Hardsole Slippers / Kid’s Cassie

    Give a joint gift to both the grandparents and kids this holiday season with matching slippers! You’ll be treating the grandparents to a pair of great slippers and the kids will be overjoyed to have slippers just like Grandma and Grandpa. At Minnetonka, there are colors available in both the Kid’s Charley and Cassie Slippers that match colors on multiple different styles of women’s slippers and men’s slippers.

    Decorate their tree.

    Good Gifts for Grandparents

    Photo Ornaments

    I can’t imagine a world without photo ornaments for your Christmas tree; they are always my favorite ornaments to put on the tree! Adorn Grandma and Grandpa’s Christmas tree with a new ornament this year and maybe even start a tradition of getting them a new one every year! You could go with a favorite picture of the littles or you could let the littles choose a favorite picture of them and the grandparents for the ornament. Find these custom photo ornaments here. You could even have fun with these and have ones made with an old family photo from when the grandparents were kids!

    For all those works of art…

    Gifts for Grandparents Who Have Everything

    Artwork Display

    This little clip display for artwork is perfect for grandparents as they can change out and display more than one piece of artwork from their grandkids all the time. You can choose from different fonts and colors on this display sign as well!

    Keep it classic.

    Photo Gifts for Grandparents

    Custom Silhouette

    I love, love, love silhouettes. I think they capture a different kind of beauty in a child that you don’t always get in an ordinary photo. I think grandparents can appreciate that as well. It’s really simple to get a custom silhouette of your child made with Minted. You just take a side profile picture of your child, select which color and size you want the silhouette to be, then just upload the picture.

    Something they can make together.

    Gifts for Grandparents

    Gingerbread House Kit

    Let both grandparents and the grandkids show off their mad skills while decorating this gingerbread house together. The house is already pre-assembled, so they can immediately start decorating (or eating)! This gingerbread house from Dylan’s Candy Bar comes with icing and all sorts of candies to decorate with.

    A book of memories. 

    Photo Gift Ideas for Grandparents

    Personalized Photobooks

    This one will take a little more time than the custom calendars, but it might be a little more special too. Create a custom photobook either full of the grandkids, grandkids and grandparents or a special trip or adventures they’ve went on together! Bring the kids in on the fun and let them pick out the pictures and wording for these photobooks!

    Can you add any Christmas gift ideas for grandparents to this list?

    More helpful gift ideas below!

    Gifts for the Impossible Man
    Funny Gift Ideas
    Gifts for Kids That Aren’t Toys
    Gift Ideas for Friends
    Unique Gifts for Someone Who Has Everything Already
    Gifts for Drinkers
    Best Gifts for People Who Travel
    Gifts for Sarcastic Friends
    Gifts for Book Lovers
    Gifts for People Who Love Music
    Gifts for New Homeowners
    Unique Personalized Gifts
    Gifts that Keep Giving
    Gifts for Her
    Gifts for Couples
    Gifts for Creative People
    Gifts for Foodies, Cooks and Entertainers
    Gifts for DIYers

    Are you getting our holiday gift guide emails? If not, sign up below for special discounts, sales and more great gift ideas!

    Want to come back to this list of gifts for grandparents later? Just pin the image below!

    Holiday Gift Ideas for Grandparents
  • Gifts for Beginning DIYers

    Gifts for Beginning DIYers

    Have some wanna-be DIYers on your gift list? Or maybe you’re wanting to start doing DIY projects yourself? Find great gifts for DIYers here or add some of these to your own holiday wish list!

    I often get comments on my DIY projects about people saying how they wish they could do DIY, but they just can’t. Or they don’t have the right tools. Or they don’t know where to start.

    Well, you can learn to do your own DIY projects, friends. If I can, anyone can. I know, I know, I know. You’ve heard that line a million times before. 

    I’m being serious though. Yes, it takes time. I wasn’t born with a drill in my hand. And I’m still learning. My DIY skills are still very much in that intermediate skill level when it comes to some projects.

    This gift guide for beginning DIYers was another request this year. I think some of you might be adding these items to your wish list, rather than buying for others though. 😉 It’s all good. I see you. I do it all the time myself. My Christmas wish list gets added to as I’m searching for gifts for all these guides and everyone on my list. 🙂

    Whether you are buying for others or adding items to your own list, I don’t think there’s a single item in this list of gifts for DIYers that any DIYer wouldn’t appreciate.

    Some brands provided products and/or compensation for inclusion in this gift guide. However, all thoughts and opinions are 100% my own. This post contains affiliate links for your shopping convenience. Click here to read my full disclosure policy.

    Gifts for Beginning DIYers

    The Basics

    Let’s start with the basics first. These are basic tools that every DIYer should have in their arsenal.

    Sidenote: I’m assuming that the beginning DIYer already has a set of screwdrivers, hammer, measuring tapes, etc. in their arsenal. If they don’t, then most definitely get those for them first. 

    Safety First.

    Gifts for DIYersSafety Glasses

    I am the safety nerd when it comes to DIY projects. If I’m doing any sort of project that requires me to cut wood, you can bet that I have on my safety glasses. I harp on Grunt Labor for not wearing them when he’s cutting wood. Anyone who does any sort of DIY projects with wood needs safety glasses!

    Help them get started by letting them decide what they need.

    Gifts for DIYers

    Lowe’s Gift Card / Home Depot Gift Card

    There isn’t a DIYer on this planet who wouldn’t appreciate a gift card to Lowe’s or Home Depot. They can use it for a new tool they’ve been eyeing or to get started on a project they’ve been wanting to tackle. If you’re not sure what exactly they could use in way of tools, get them a gift card. If they’ve been talking about building a coffee table (or whatever else- you get the idea!), get them a gift card. You can purchase actual plastic gift cards or e-gift cards from GiftCards.com and have them delivered straight to your gift recipient or to you so you can wrap it up all pretty.

    Keep it level.
    Gifts for Beginning DIYers

    Small Level / Large Level

    Every DIYer needs a good level. Personally, I think they need a couple of levels – a small one that is really handy for smaller projects and a larger one for, obviously, bigger projects. I probably use both my small and big levels equally. Besides checking to make sure things are level during your projects, the longer level especially is also great for drawing straight lines across a sheet of plywood to guide you as you cut it.

    Speed Square

    DIYer Gifts

    Speed Square

    A speed square is great for smaller jobs where you’re working with lumber such as 2″ x 4″s, 1″ x 4″s, etc. It has a lip that you place against the edge of the wood and then you can draw perfectly straight perpendicular or 45 degree angle lines for cutting.

    Framing Square

    Gifts for People Who DIY

    Framing Square

    A framing square is similar to a speed square, but obviously much larger. You can use this on larger pieces of wood, such as plywood, to check for squareness of wood, to draw straight lines for cutting, etc.

    Various Clamps

    Gifts for DIYers

    Spring Clamps / Bar Clamps

    I use clamps all the time. Of course, these are most often used when you’re gluing a couple or more pieces of wood together, but I also use my clamps to clamp together pieces of wood that I’m screwing together, cutting, etc. I recommend having two different kinds – smaller spring clamps and larger bar clamps as well. And in my personal opinion, you can never have too many bar clamps.

    Can Do Angle Clamp

    Gift Ideas for DIYers

    Angle Clamp

    This is perfect for that DIYer who doesn’t always have an extra set of hands to help out. This clamp will hold two pieces of wood together so that you aren’t trying to hold them yourself while also trying to screw them together.

    Good Sawhorses

    Good Gifts for DIYersSawhorse Pair

    Having a good pair of sawhorses is a necessity when you’re doing DIY projects. You don’t want a flimsy pair that will move around every time you move the piece of plywood around. You want a good, sturdy pair that will stay put. This pair of sawhorses also come with attached clamps, which is pretty handy.

    Cordless DrillGreat Gifts for DIYers

    Ryobi Cordless Drill

    Having a good cordless drill is like DIY 101. This is the drill we have and it’s never failed us. In fact, we bought another just like it to leave at the farm for when we need it there. Personally, we really like just about all of the Ryobi cordless tools. They do a good job and are really handy since the batteries are all interchangeable. There’s a guide here for using a drill and what all it can do if you need it.

    Drill Bits

    Gifts for Beginning DIYers

    Drill and Drive Set

    If they’re just starting out, they are going to need plenty of drill bits that will both drill holes and drive screws. This is a great set to get started out with. We have it as well.

    Circular SawGifts for Beginning DIYers

    Circular Saw

    If they don’t have any sort of power saw, then get them a circular saw. This is the most basic power saw you can get and it will cut just about anything. We have this circular saw too and I also wrote a guide about using it here.

    Jigsaw 

    Gifts for DIYers - JigsawJigsaw

    While circular saws cut straight, jigsaws can cut out all kinds of shapes. You can do straight cuts with it as well, but it’s made specifically for curved cuts. Again, this is the jigsaw we have and use all the time.

    Nail GunGreat Gifts for DIYersBattery Powered Nail Gun

    For beginning DIYers, I suggest going with a battery powered nail gun. This nail gun will shoot brad nails and work for basic DIY projects. It’s easy to use as well, since it’s battery powered.

    Gifts for Furniture Painting DIYers

    If you’ve got a person on your list (or yourself!) who is ready to dive into the world of DIY furniture painting, these are some of the tools I recommend for them.

    A Good Sander

    Gifts for Furniture PaintersPalm Sander

    With furniture painting, you’re going to have to sand pieces every now and then. I’ve had this palm sander for nearly 10 years and it hasn’t failed me yet. It’s easy to use and works great. There’s a guide to using this sander here.

    Heat GunGifts for Beginning Furniture Painting DIYers Heat Gun

    Heat guns aren’t a must when it comes to furniture painting, but they can come in really handy sometimes. Heat guns can do a myriad of things (see my post here about that), but they are really great for stripping furniture without a big ol’ mess. You can see how I did that here with this heat gun.

    Good Furniture Paint Gifts for Furniture Painters

    Ready No Sand Primer / Velvet Finishes Paint

    You can use all kinds of different paints on furniture, but one of the easiest to use and get started with is Velvet Finishes paint. Their Ready primer is also a great product because it will often eliminate the need for sanding a piece of furniture before painting. You could give your gift recipient a couple of these to play around with, along with a good paintbrush. Use code JENNA20 to get 20% off anything at Velvet Finishes this holiday season!

    Paint Sprayer
    Gifts for DIYersHomeRight Paint Sprayer

    If they’ve already dabbled a bit in furniture painting, then a paint sprayer made for furniture painting would be a great gift. This paint sprayer is the one I have and love – it sprays a very fine finish, which gives your furniture a professional look. It’s extremely easy to use as well – tutorial on how to use it here.

    Power StaplerGreat Gifts for DIYers

    Power Stapler

    I can’t tell you how much easier this tool has made my life. If you or your gift recipient plans to do any upholstery work, this power stapler is a life and time saver! There’s no beating in staples with a hammer because the staple gun didn’t push them in all the way. This one puts staples in flush in record time.

    Any gifts for DIYers you’ll be getting from this list or adding to your own wish list?

    Looking for more great gift ideas? Click any of the links below!

    Gifts for the Impossible Man
    Funny Gift Ideas
    Gifts for Kids That Aren’t Toys
    Gift Ideas for Friends
    Unique Gifts for Someone Who Has Everything Already
    Gifts for Drinkers
    Best Gifts for People Who Travel
    Gifts for Sarcastic Friends
    Gifts for Grandparents
    Gifts for Book Lovers
    Gifts for People Who Love Music
    Gifts for New Homeowners
    Unique Personalized Gifts
    Gifts that Keep Giving
    Gifts for Her
    Gifts for Couples
    Gifts for Creative People
    Gifts for Foodies, Cooks and Entertainers

    Are you getting our holiday gift guide emails? If not, sign up below for special discounts, sales and more great gift ideas!

    Pin This Post

    Gifts for Beginning DIYers

  • Gifts for People Who Love Music

    Gifts for People Who Love Music

    Have a music lover on your holiday gift list? Someone who lives and breathes music? Being that kind of person myself, I can say with confidence that one of these music gifts is going to be the perfect gift for that person. Whether they love rock, country, or something else, this list of music gift ideas will help you check off at least a name or two on your list.

    I did a gift guide for people who love music a couple years back and it was one of my favorite ones to do. When a couple of you wanted to see another one this year, I was more than happy to oblige!

    As you know, I love music and my musical tastes are all over the place – my playlists just might the only place where Tom Petty is often followed by Reba McEntire and preceded by Frank Sinatra.

    Needless to say, this list of music themed gifts is not limited to one single genre.

    Some brands provided products and/or compensation for inclusion in this gift guide. However, all thoughts and opinions are 100% my own. This post contains affiliate links for your shopping convenience. Click here to read my full disclosure policy.

    Music Gift Ideas

    Dolly Parton (or other artist of your choice) Devotional Prayer Candle

    Music Gifts

    Saint Dolly of Parton Devotional Prayer Candle

    I think it’s only right to start with the queen, don’t you agree? I fell in love with this candle earlier this year when Kari from A Graceful Life shared it with me. Grunt got it for me for my birthday and I’ve been praying to Saint Dolly ever since. So far, so good. Find the Dolly candle here. If Dolly wouldn’t be to your gift recipient’s liking, then you need to ditch that person. Kidding.

    Music Related DoormatsMusic Gift Ideas

    Hear You Knockin’ / Gangsta’s Paradise / Hello Darlin’

    Help them set the tone for their crib with a new music themed doormat that reflects their musical tastes. A fan of rap? Let them create their own Gangsta’s Paradise at home. Forever a Conway and country music fan? Why, Hello Darlin’.

    A Unique Notebook

    Music Themed Gifts

    Eagles Album Cover Notebook

    All of the notebooks from upcycleVinyl are made using album covers. I know, right? Super cool. I still love vinyl and I have to say, part of the reason is because of the amazing album art. My dad had this Eagles album as I was growing up and I remember always thinking this one was interesting. There are notebooks from every kind of genre in this shop. If you see one that someone on your list would love, snag it fast! These things are unique and there is usually just one of each in the shop!

    Personalized Guitar and Pick Holder

    Music Related Gifts

    Guitar and Pick Holder

    If you know a guitar player, this is both a handy little gift and a meaningful one. It can hold their guitar, picks and you can have it inscribed with a message of your choice. Find it here.

    The Only Truth Art

    Music Gifts for Music Lovers

    Only Truth is Music Print

    I absolutely love this art print because of just how true it is. If you have one of those devout musical people on your list, like where music can take them to a whole other level, transport them to someplace else completely, then this art print is a great gift for them and something they will really appreciate.

    One Speaker with Lots of Tricks

    Music Gift Ideas for Music Lovers

    FABRIQ Chorus Speaker

    Ok, so this speaker is a total game changer. Grunt and I recently received one of these as a gift and we fell in love the moment we got it hooked up. The FABRIQ Chorus is a bluetooth speaker, so it can connect to your phone or iPod and stream music through that, but it is also WiFi enabled and can connect to Amazon Alexa so it can play music that way too as well as do all the other stuff Alexa does. Plus, you can connect up to ten speakers and place them all around your home to create a whole house sound system. And did I also mention that the sound quality is great? The one pictured above is the larger Chorus. There is also a smaller version available as well here. We love this so much we are actually planning on adding one to our wish list to start our own whole house sound system – something we have always wanted!

    Entertainer Earrings
    Music Themed Gifts for Music Lovers

    Dolly Earrings / George Strait Earrings

    I think quite a few of us girls, and a few guys as well, wish we could just cozy on up with George Strait. These earrings though might be as close as we’ll ever get. The Circus received the Dolly ones for her birthday from a friend and since she let her holes grow up, I took ownership of them. I love them. I pretend that Dolly just whispers her words of wisdom into my ear throughout the day. You can get all sorts of folks on earrings from this shop.

    Rolling Stones Necklace Music Related Gifts for Music Lovers

    Rolling Stones Necklace

    Have you ever seen such a classy Rolling Stones Hot Lips symbol? Perfect for your friend who loves the Stones or a true Rock N’ Roll fan.

    Cassette Business Card Case and Stand
    Music Gifts for People Who Love Music

    Cassette Business Card Case and Stand

    This cassette card case is the absolute perfect gift for the musician on your list or someone who loves 90’s music and still longs for the mixtapes they created by recording songs on the radio. The icing on the cake is that they can carry it in their pocket or display it on their desk.

    Country Music Hair

    Music Gift Ideas for People Who Love Music

    Country Music Hair

    There was one thing I desperately wanted the most for Christmas last year and this book was it. Country Music Hair. The higher the hair, the closer to God, y’all and the ladies of country music most definitely knew how to get just as close to the Almighty as they could. This is a great coffee table book, but I also read the whole thing and enjoyed every bit of it. It doesn’t just talk about hair, but it tells stories about the women behind the hair – Tammy Wynette, Barbara Mandrell, my girl Reba and many more. It doesn’t leave out the boys either – it covers Waylon and Willie and the boys. See what I did there.

    Vintage Style Music T-Shirts

    Music Themed Gifts for People Who Love Music

    Various Music Related T-Shirts

    Another thing you can never ever go wrong with (or have too many of, in my opinion) is a great t-shirt rocking one of your gift recipient’s favorite singers or bands. I have always found the most affordable and best selection of vintage style music t-shirts here. I have a few of these myself and not only do they look great, but they are also those soft and cozy t-shirts. Technically, these are classified as “Men’s”, but I’ve always bought them for myself and they fit me just fine – not too tight, not too big. Browse through all the t-shirts here – most all of them are $20 or less, with many being $15 or less!

    Mama Tried Tote

    Music Related Gifts for People Who Love Music

    Mama Tried Tote

    I turned 21 in prison doing life without parole. 

    Lord, I love that song. This little tote is perfect for your country or Merle loving friend. It’s also available in black.

    1000 Record Covers Book

    Music Gift Ideas for Lovers of Music

    1000 Record Covers

    As I’ve already stated, I love old record covers. 1000 Record Covers goes through albums from the 60’s to the 90’s detailing the best record covers of rock. This book is a gift that a Rock n’ Roll fan will truly appreciate.

    Bluetooth Speaker Shower HeadGifts for People Who Love Music

    Bluetooth Speaker Shower Head

    I don’t have a shower head speaker, but we do have a bluetooth speaker built into our ceiling light in the bathroom. Just let me tell you that getting ready has never before been so enjoyable. I used to always play music from my phone while getting ready, but for me, it was just never loud enough. Now, I connect the bluetooth and let that bad boy play loud. The speaker above is here, and there’s another option here.

    Music Themed PillowsMusic Themed Gifts

    David Bowie – Ziggy Stardust Pillow / Personalized Mix Tape Pillow

    That David Bowie pillow is perfection! I am just crazy over it. You can have whatever you want written on the mix tape pillow – you could do names as shown or put the title of a favorite song. You can find a ton of different music related pillows on Etsy.

    Record CoastersBest Gifts for Music Lovers

    Record Coasters

    These coasters are only $18. They would make a perfect small gift for that music or vinyl lover on your list or a great stocking stuffer.

    Bluetooth SpeakerBest Gift Ideas for Music Lovers

    Bluetooth Speaker

    When Bill went away to college, Nick bought him a bluetooth speaker like this one. As he said, “You’ve always gotta be able to have the music.” We have a couple of bluetooth speakers around here and use them all the time. You won’t find us on the deck or me cooking without having music going on one. There are many things I could live without. A bluetooth speaker is not one of them.

    Personalized Music Themed DoormatsGift Ideas for People Who Love Music

    Amp Doormat / Mixtape Doormat / Vinyl Record Doormat

    I got my Dad and stepmom the personalized vinyl record doormat for Christmas last year and they absolutely loved it! I had it personalized with their last name and “Spinning Since 2005,” which was the year they got married. My dad is a big music lover, so this was a perfect gift for him especially. You can also have the mixtape and amp doormat personalized as well. I want the mixtape one for our house.

    Music Coffee Table Books

    Great Gifts for Music Lovers

    The Art of Rock / Honky Tonk: Portraits of Country Music / Who Shot Rock N’ Roll? / CBGB & OMFUG: Thirty Years from the Home of Underground Rock

    Some think coffee table books are just for decoration. I would have to strongly disagree with them. I think coffee table books should be about the things you find interesting and I think you should read them. I have ones in my living room about Mick Jagger, Elvis, etc. and I love every single one of them. Music themed coffee table books are great gifts for people who love music – they’ll enjoy them, they’ll be proud to display them and they make great conversation pieces.

    Music BookendsMusic Themed Gifts for People Who Love Music

    Guitar Bookends / Record Bookends

    These bookends are great for music lovers. Get the guitar ones for a friend who plays the guitar and the record ones for a person who loves vinyl.

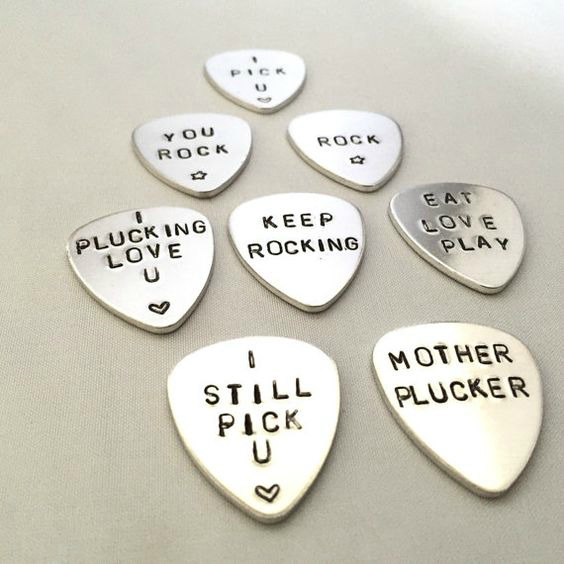
    Personalized Guitar Picks

    Best Gifts for a Music Lover

    Personalized Guitar Picks

    If you have someone on your list who plays the guitar, have some personalized guitar picks made for them. Find these here!

    What music themed gifts will you be picking up for someone on your list this year?

    More unique gift ideas can be found below!

    Gifts for the Impossible Man
    Funny Gift Ideas
    Gifts for Kids That Aren’t Toys
    Gift Ideas for Friends
    Unique Gifts for Someone Who Has Everything Already
    Gifts for Drinkers
    Best Gifts for People Who Travel
    Gifts for Sarcastic Friends
    Gifts for Grandparents
    Gifts for Book Lovers
    Gifts for New Homeowners
    Unique Personalized Gifts
    Gifts that Keep Giving
    Gifts for Her
    Gifts for Couples
    Gifts for Creative People
    Gifts for Foodies, Cooks and Entertainers
    Gifts for DIYers

    Are you getting our holiday gift guide emails? If not, sign up below for special discounts, sales and more great gift ideas!

    Want to come back to this list of music related gifts later? Just pin the image below!

    Music Gifts

  • Let the gift giving begin.

    Let the gift giving begin.

    I’m sure I’m breaking a few rules here. Yes, you did read the title of this post correctly – Let the gift giving begin. 

    I know, I know, I know – October isn’t over yet, and here’s the crazy lady already talking about holiday gifts.

    You’re damn straight.

    If this is your first holiday season with me here at Rain on a Tin Roof, then you should probably know that I absolutely love gift giving.

    This post contains affiliate links for your shopping convenience. Click here to read my full disclosure policy.

    Holiday Gift Giving

    Picking out the perfect gift for each and every single person on my list just makes me all kinds of giddy. And if a person isn’t on my list, but I run across something just perfectly meant for them, then I’m probably gonna get it for them anyway, because I just love giving people presents they will find either incredibly useful, meaningful, absolutely love, but wouldn’t buy for themselves or all of the above.

    I’m getting giddy just thinking about it all right now.

    A month or so back, I asked all of you what kind of gifts you would be looking for this holiday season, needed help with, etc. – and you answered. 

    So for the past month, I’ve been gathering gift ideas for both everyone on my list and y’all’s lists. 🙂 We’re going to talk gifts for music lovers, readers, cooks, drinkers, grandparents and much more. After all my gift guides are published, if you still have people that you have no clue what to buy for, then you’ve just got very difficult friends and family. I am going to have ideas for everyone on your list, folks – and for every budget.

    Tomorrow, I’ll be back with the first of many holiday gift guides of the season!

    In the meantime, to make sure you get every gift idea, every special discount I’m going to get you, and to make sure you know when a gift you’ve been eyeing goes on sale, be sure to sign up for my Holiday Gift Guide emails.

    When you sign up, from now throughout the holiday season, you’ll get roughly 1-3 emails from me per week packed with great gift ideas, discount codes, sales and more. It is absolutely free, y’all! Sign up using the box above or through this link.

    After you sign up, you’ll be directed to our gift ideas page. You should also receive an email with a link to confirm your subscription – make sure you confirm so you can get the emails!

    And if you just absolutely can’t wait to get started on your gift hunting, here are a few favorites I’ve found…

    Holiday Gift Ideas

    1/2/3/4/5/6/7/8

    1. Jeweled Crown Coasters

    Are these not some of the most gorgeous coasters you’ve ever seen? They are from The MET Store (yep, I didn’t know the MET had an online store either, but I’m so glad I discovered it!) and they are only $28 for the set. They have rims that will keep any condensation that builds up inside the coaster and not on the table. This is such a unique gift that is also useful. I’ve got three people on my list that are getting a set of these! Find them here.

    2. Custom Face Cookie Cutter

    Yes, you are looking at that correctly – that is a cookie cutter made to look like your gift recipient’s face! How fun is that?! The Circus has one of these headed her way, but I also think this couple version would be a fun, unique gift for couples!

    3. Custom Calendars

    Hands down, this is the gift that every single grandparent, aunt and uncle on my list, look forward to the most. The annual calendar of the Circus. Every year, I make a custom calendar filled with pictures of the kid. My family absolutely loves them. These are super affordable and something that grandparents, aunts and uncles enjoy the whole year through.  Right now, they are even 60% off using code OCT18!

    4. Coordinated Cocktail Napkins

    For either the hostess or the cocktail lover on your list, these coordinated cocktail napkins are sure to be a winner. And they are just $30 for a set of 8! If you’re on a really tight budget, break the set into two sets of four for two people on your list!

    5. Cozy Sheepskin Slippers

    You can never ever ever go wrong with a great pair of good, cozy slippers. These are lined with sheepskin, so they are sure to keep your gift recipient’s feet nice and toasty during the cold winter months. They are from Minnetonka, so you know they are going to last forever too! If a person is buying slippers just for themselves, then they usually just buy a cheap pair that will last a little while, they never splurge on something for themselves this cozy – do the splurging for them! Find these slippers here!

    6. Pig Ottoman

    This one is perfect for those kiddos on your list. An adorable ottoman where they can sit to tie their shoes, but then also hop on and pretend to ride that pig! I can just see the Circus on this one!

    7. Notebooks made from Record Covers

    If you’ve got a music lover on the list, then head to this Etsy store for loads of notebooks all made from album covers. This Michael Jackson one is just the tip of the iceberg – there are loads of different artists and genres to choose from! Shop them all here.

    8. Monogrammed Turkish Towel

    I love Turkish towels – they are beautiful and can fit with just about any home decor and have so many different uses. This one is perfect for those on your list that love a good monogram! You can choose from multiple different styles and colors!

    Happy gifting, y’all! 

  • Glam and Spooky Halloween Home Tour

    Glam and Spooky Halloween Home Tour

    It’s looked like Halloween around here for quite a while now (since early-mid September-ish!), and now the weather is actually starting to feel like Halloween as well! It was still crazy hot here in the South up until about last week. When we got back from fall break, we were so excited to find that fall had actually arrived to our neck of the woods!

    Besides regular Halloween festivities, this year we are also hosting a Halloween party at our house. I love decorating for Halloween anyway, but with the party, I wanted this year’s decorations to be a little “extra.” Our Halloween home definitely has spooky touches to it, but there’s also a bit of glitter and shine to make all the decor a little more fun than typical Halloween decorations…

    Glam and Spooky Halloween Home Tour

    This post contains affiliate links for your shopping convenience. Click here to read my full disclosure policy.

    The Dollar Tree and I were BFFs this Halloween season. They have these fantastic orange feather boas, which I ran along the handrails in the main entryway of my house.

    I also placed Dollar Tree skulls on every corner and end of the handrails. I just hot-glued some ribbon to the bottom of the skulls, then tied them on the handrails. Creepy + Glam, right?

    While I love the look of the faux spiderwebs that you can get and spread out all around your house and then to the moon and back, I don’t love the mess they make. Instead of the spiderwebs, I just throw creepy cloths everywhere and then add in spiders.

    Green Chair / Patterned Pillow / Mustard Pillow / Mohawk Lollipop Holder – Real One, Knock-Off One

    I always bring out my mohawk lollipop holder for Halloween too and fill it with red or orange suckers. I think it adds a touch of funny/creepy to everything.

    Lion Art / Red Curtains

    I think the colors I have in my living room also lend themselves well to Halloween decor. Funny enough, they also seem to work well when Christmastime rolls around. 🙂

    Skulls on Pedestals

    Skulls on Pedestals

    I made these skulls on pedestals a few years back and they are still one of my favorite pieces of Halloween decor.

    DIY Skull Drink Stirrers

    The skull drink stirrers were a DIY from last year and again, another favorite. They will come in handy at our Halloween party!

    Floor Lamp / Coffee Table (similar) / Sofa (similar)

    Eyes Art / Leopard Print Pillow

    I made the skull tree with a few styrofoam skulls and glittery black branches from Michael’s.

    DIY Snake Bowl

    I filled my gold snake bowl with plastic eyeballs and mini skulls. I found the glittery black mirror at Goodwill. I spent no less than 1,263 hours mulling over where to hang it on the wall and then finally decided it was best as a tray of sorts on the coffee table. Go figure.

    Horse Head (similar)

    I don’t even think you’ve seen this console table since I’ve had it – and I’ve had it since earlier this year! I knew I wanted a console table for this space, but could never find one that was quite right. I happened upon these console table plans and thought it might just be perfect for the space. I knew building this was too far above my skill level though. I handed it (and a case of beer) off to my two “resident builders,”  Wayne and Ron and they took care of it, doing an impeccable job as always. I’m so lucky to have those two guys to bounce my ideas off of and then build them for me if I can’t do it – especially when they take beer as payment!

    I glittered the stems on some white pumpkins and arranged them with another one of those orange feather boas on a pedestal tray.

    Studio54 Print 

    Don’t they go nicely with the Studio54 jeans advertisement? 😉

    I’ve had those Halloween head candles for years. I usually just scatter them around, but this year, I popped them on top of candlestick holders and I think I like them much better that way.

    I made the skull floral arrangement by cutting out the back of a styrofoam skull then gluing a vase to it. It’s one of my favorite pieces this year.

    Skeleton

    This guy is one of my just for fun decorations. I bought a skeleton, then propped him up in front of the window, complete with a sombrero. As you can tell from the looks of him and the empty tequila bottle, he had one too many margaritas.

    Bar Cart / Record Player

    This bar cart is always one of my favorite things to dress up for the holidays – especially Halloween.

    This year, I made it kind of feel like the “workspace” for the resident witch. 😉

    DIY Skull Sconce / DIY Lamp Tassel

    Toil and Trouble Free Printable

    Witch’s Hat / DIY Sparkly Witch’s Broom

    Free Printable Spell Book Cover

    Halloween Home Tour

    Free Printable Potion Labels / Potion Bottles

    I left the dining room table clear except for the skull candleholder. We eat in here most every night so I didn’t want to have to clear decorations off of it all the time.

    The Circus is all about lighting these candles while we’re eating. 🙂

    DIY Skull Candleholder

    DIY Glittery Brooms

    I also created this little vignette in the dining room – a place for parking brooms. 😉

    DIY Ampersand Pumpkin

    While the house is ready for Halloween, mine and the Circus’ costumes are not! I’ve got to get busy on those now!

    Happy Halloweening, Friends!

    You might also want to see…

    Easy DIY Halloween Decorations

  • DIY Cedar Planter Box using a Snap Together Frame

    DIY Cedar Planter Box using a Snap Together Frame

    Add some curb appeal to your home with this DIY cedar planter box. These cedar planter box plans use a SnapFence frame that literally snaps together, making this a simple build even for new DIYers. If cedar isn’t your thing, you can easily customize the frame with a different material.

    I am always a sucker for a great planter or flower pot. I couldn’t snatch up a swan planter quick enough at a yard sale the other day even though the guy selling it made sure to point out how badly the paint was chipping. I’ve also been on the lookout for a donkey flower pot ever since I spotted the most adorable one at a yard sale, but sadly they weren’t for sale.

    I also love a great planter box that can pull double duty as an address marker.

    This post is sponsored by SnapFence. All opinions are 100% mine.

    DIY Cedar Planter Box with Shrubs

    Isn’t this one great? This DIY cedar planter was made using SnapFence components, which are rails and connections made of PVC that is built to withstand the elements and make outdoor building projects a whole lot easier.

    Cedar Planter Box DIY

    This post contains affiliate links for your shopping convenience. Click here to read my full disclosure policy.

    For reference, the overall dimensions of my cedar planter box is 24″ high x 18″ deep x 36″ long.

    Materials and Tools Needed: 

    Steps

    Step 1: Assemble the SnapFence frame.

    Cedar Planter Box DIY Frame Materials

    Use the instructions found here to assemble the SnapFence frame for the planter. Working from the bottom up, use a rubber mallet to secure all the rails into the connectors. The video below shows how easy it is to build the frame.

    [adthrive-in-post-video-player video-id=”skCLhoqb” upload-date=”2018-10-02T11:50:16.000Z” name=”DIY Cedar Planter Box using SnapFence” description=”Add some curb appeal to your home with this DIY cedar planter. These cedar planter box plans use a SnapFence frame that literally snaps together, making this a simple build even for new DIYers. If cedar isn’t your thing, you can easily customize the SnapFence frame with a different material.”]

    If you aren’t a video person, then you can use the photos below as a guide.

    Cedar Planter Box Plans - constructing the frame.

    Literally, the instructions lay out exactly how to connect the frame. It took me less than 10 minutes to assemble the frame.

    If you’re curious about how well the rails and connections truly stay snapped together, well I can assure you, they are pretty darn tight. In order for me to get both the video and photos of the process for you, I had to put the frame together, then take it apart and put it together all over again. (Yes, if I were a smart person, I would have stopped to take photos the first time around, but I forgot.) Anywho, I had to really bang on some of the rails and connections with my rubber mallet in order to get the frame broken down. This stuff is very well made and very secure when it’s put together.

    Step 2: Attach the cement board.

    Once you have your frame in place, use the included screws to attach the cement board (concrete board / backer board / whatever you want to call it) to the SnapFence frame.

    DIY Cedar Planter - assembling the side panels.

    Step 3: Finish the Planter Box.

    At this point, you can choose to stucco the planter box, paint it or whatever else your little heart desires. I opted to clad mine with cedar planks.

    You’ll want to start with the short sides of your planter box.

    Place two uncut cedar planks along the bottom of each long side, flush against the cement board.

    Building a cedar planter box.

    Measure the distance between the two planks and cut five cedar planks down to this size. For each cut, use a new cedar picket. Don’t cut again from the same picket. Instead, set these pickets aside and they will be long enough for the long sides of the cedar planter box.

    Lay the planter box on the opposite short side you are working on.

    Applying cedar to a planter box.

    Lay one of your cut cedar planks on the bottom of the short side. You want it to go past the cement board but not extend past the SnapFence PVC feet. Think of the cedar planks as “floating” just above the ground. Make sure there is roughly the same amount of plank hanging over on each side where the long side planks will eventually be placed.

    Put Fuze It on the back of the cedar plank, then clamp into place.

    DIY wooden planter box using cedar.

    Take the rest of your cut exterior wood boards, apply Fuze It to each of those, then line them up and lay them out across the rest of the exposed cement board on this side, pressing each firmly in place as you go.

    Applying cedar boards to the diy planter.

    Once you have them all in place, place a few heavy objects on top to help the glue get a good bond with the cement board.

    Step 4

    After a few hours, repeat Step 3 on the other short side of the cedar planter box.

    Step 5

    After both short sides have been clad with cedar planks, use the same process to cover the long sides of the planter box with cedar. This time when measuring to cut the cedar planks, you’ll just measure from end to end of the cedar boards on either short side, rather than between them.

    DIY Cedar Planter Box with House Numbers

    Attach house numbers to the front of the planter if you wish.

    Place the planter wherever you wish. I think it would look great beside a mailbox, on the front porch or near a garage.

    Related: 10+ Creative Flower Pot Ideas

    Cedar Planter Box DIY with shrubs planted in it.

    Fill with plants and enjoy! I opted to go with tall boxwoods for our planter. With big planter boxes like this, I like to always have something in them that will stay green all year long and then add in annuals as the seasons change. This cedar planter would also be great for planting bulbs in. If you don’t want to fill the entire planter with soil, then fill the bottom of the planter with plastic bottles and jugs to take up space.

    If you want to protect the wood, then apply a coat or two of exterior water seal.

    You can also use Snapfence post ground pilings that can be attached to the bottom connections and anchored into the ground. I opted to forgo those as after I got the entire thing put together it was pretty heavy as is – I couldn’t lift it by myself. I knew that filling it with dirt was only going to make it even heavier and keep it in place, so I didn’t think I needed those.

    I love DIY planter boxes because you can customize them to your home’s exterior. This one is no different. If the cedar look isn’t your thing, you can absolutely go another route! Just think of the SnapFence frame as your blank canvas. 😉 SnapFence also makes lots of other Snap n Build kits like pet enclosures, garden walls, fence kits and more. And yep, you just snap ’em together. 🙂

    What would you cover your planter frame with?

    Want more outdoor project ideas and tips?

    Creating a Cut Flower Garden – perfect for beginners!

    DIY Painted Planter Pots – take basic planters and kick ’em up a notch!

    Want to remember this planter for later? Just pin the image below!

    Cedar Planter Box Plans using a Snap Together Frame
  • Glittery DIY Witch Broom

    Glittery DIY Witch Broom

    Learn how to make a witches broom using items from the Dollar Tree and your own yard! It’s so simple to make this sparkly DIY witch broom that you’ll only be sorry you didn’t make one sooner!

    This year for Halloween, I’m going to be a (not-so-basic) witch! Personally, I don’t think dressing up as a witch for Halloween ever goes out of style and I’m really excited to put my own personal spin on it this year. The Circus says she’s going to be my black cat, but then some days, she says she’ll be a witch with me and then some days, she’s just going to be a dog. So who knows what she will actually end up being?

    Every witch of course, needs a broom. If you ask me or the Circus, we’ll tell you that we prefer brooms of the glittery and sparkly variety.

    DIY Witch Broom for Halloween

    And glittery brooms, we have! I made these using supplies from my own backyard and The Dollar Tree. And you know what – I think these actually look better than a store bought glittery broom I bought a couple years back! Grunt agrees, so I’ll just go ahead and say it’s fact. 😉

    Here’s how you can whip up your own glittery, sparkly DIY witch broom this Halloween!

    How to Make a Witches Broom

    This post contains affiliate links for your shopping convenience. Click here to read my full disclosure policy.

    Supplies & Tools Needed Per Broom: 

    How to Make a Witches Broom for Halloween

    • 1 tree branch from your yard roughly four feet long and about 1 inch in diameter
    • Black Spray Paint
    • 5-7 Glittery Branches in the color of your choice
    • Jute Twine
    • Hot Glue Gun
    • Scissors

    Steps

    Step 1

    Remove all the smaller twigs and leaves from your large tree branch. Cut to size if needed. Spray paint the tree branch black.

    Step 2

    After the branch has dried, run a bead of hot glue on one glittery branch stem and glue it onto your tree branch near the bottom.

    Make a Witches Broom with stuff from your yard and the Dollar Tree.

    Place the glittery branch so that where it breaks off into smaller branches and fans out is right near where the real tree branch ends. Hold the glittery branch in place until the glue dries.

    Step 3

    Wrap twine tightly around where the two branches are glued together a few times.

    DIY Halloween Witch Broom using Dollar Tree Items

    Step 4

    Repeat steps 2-3 until you have covered your tree branch end with enough glittery branches for your liking. I used about 5-7 glittery branches per actual tree branch.

    Step 5

    Once you have put all the glittery branches you want on your tree branch, wrap more twine around where the tree branch and glittery branches meet. Cover any spots of glitter or black that may be coming through where the glittery branches are glued.

    Sparkly DIY Witch Broom for Halloween Decor

    Cut the twine when you are finishing wrapping and hot glue the end tightly in place.

    Fair warning – these do shed glitter, especially as you are putting them together. A little glitter never hurt anyone though. 😉

    How to Make a Sparkly Witches Broom for Halloween Decor

    The Circus has already staked claim on the pinky-purple one if she’s a witch, so I’ll be flying on the black or orange one. 😉

    Update: You can see me sporting my broom alongside my witch costume here!

    Any spot for a DIY halloween witch broom in your Halloween decor?

    Want more DIY halloween projects on a budget? You’re in the right place…

    DIY Skull Sconce – another awesome Halloween decoration made from Dollar Tree items!

    Easy DIY Halloween Decorations for $10 or Less – a collection of all my fave Halloween decorations that didn’t break the bank! Don’t miss these!

    Be sure to grab this free printable Spell Book cover too! No Halloween decor is complete without it!

    Want to come back to this one later? Just pin the image below!

    Glittery DIY Witch Brooms for Halloween

  • DIY Kids’ Play Table with Storage

    DIY Kids’ Play Table with Storage

    If you’ve got basic DIY skills, then you can easily make this kids play table in one weekend – and your kiddos will forever be grateful! On top of that, this activity table for kids with storage can easily be customized to fit the interests of your own individual child!

    I first must start by saying that Grunt Labor gets all the building credit for this one. While I helped with the final touches, the table might not be done if it weren’t for him. We had told the Circus we would build her one when she got a play horse stable for her birthday and two months later, we still hadn’t done it. Things had just been crazy with the guest bathroom and bedroom remodel. So one day while I was working away on those two spaces, Grunt went out in the garage and built this kids farm play table in just a few hours.

    kids play table

    It can actually be any kind of activity table for kids. We went with the farm theme because that’s the kind of stuff the Circus loves to play with. If your kid is more into Legos, the jungle or something else, it could totally be that instead. You’d just want to replace our “grass” with lego bases or jungle-esque stuff – whatever your kid likes.

    DIY Kids’ Activity Table with Storage

    This post contains affiliate links for your shopping convenience. Click here to read my full disclosure policy.

    For reference, our kids’ play table is 41 1/2″ x  39 1/2″. You can alter the dimensions below to make your activity table bigger or smaller as desired.

    Materials & Tools Needed for Table Construction:

    Cut List

    Using the circular saw, make the following cuts.

    • Cut the 2″ x 4″s into the following lengths:

    • 4 pieces – 20 1/2″ long (legs)
    • 2 pieces – 26 7/8″ long (frame around table)
    • 2 pieces – 48″ long (frame around table)
    • 1 piece – 45″ long (support underneath table)

    • Cut the 1″ x 2″s into the following lengths:

    • 2 pieces – 48″ long (rim around table)
    • 2 pieces – 31 1/2″ long (rim around table)

    • Cut the plywood down to 30″ x 48″.

    Steps

    Step 1

    Gather the 2″ x 4″ pieces that make up the frame of the table (2 – 26 7/8″ long pieces and 2 – 48″ long pieces) and the 2″ x 4″ piece that is the middle support (45″ long piece) underneath the table.

    Arrange the 2″ x 4″ frame pieces in a rectangle and place the 45″ long support piece in the middle. Use wood screws to attach the 2″ x 4″s together where each 2″ x 4″ meets.

    kids activity table with storage

    The photo above shows two support pieces. Ignore that. This was actually from the first round of Grunt making the table and it was way too big. He ended up disassembling it and making it to the dimensions noted in this post. The photo will help you get a visual though of how to construct the frame of the table.

    Step 2

    Attach the 2″ x 4″ leg pieces (the 20 1/2″ long pieces) to each corner of the frame using wood screws.

    activity table for kids

    Be sure that the 2″ x 4″ leg is flush with the bottom of the 2″ x 4″ frame you are attaching it to and also pushed into the corner of the frame. You can use clamps to hold it in place while you are screwing it to the frame.

    Go ahead and attach the casters at this time as well.

    kids farm table

    Step 3

    Flip the table over and put it on the ground. Place the plywood on top of the 2″ x 4″ frame you’ve just constructed. Attach it to the frame with wood screws all around the edges and in the middle where that middle support is.

    Step 4

    Attach the 1″ x 2″ pieces around the edges of the plywood using finish nails and a hammer or a nail gun.

    kids farm play table

    The bottom of the 1″ x 2″ should be flush with the plywood. This will create a rim around the activity table to keep things from falling off.

    Step 5

    Attach cup hooks to the sides of the 2″ x 4″ frame to hang bins from for storage.

    diy kids play table

    Our storage containers came from The Dollar Tree.

    How to Make It Into a Kids’ Farm Table

    As I said, you can customize the top of the activity table to meet your own child’s interests and needs. Here’s how we made ours a farm play table…

    Materials & Tools Needed

    Step 1

    Do the painting and staining first. We painted the legs and 2″ x 4″ frame white and stained the 1″ x 2″ rims so they looked like fencing. The only thing we didn’t paint first was the pond.

    Step 2

    Cut your green material down to the size of the plywood base and attach it to the table. We did this with a staple gun along the edges. You could also glue it if you wish.

    Step 3

    Determine where you want the pond to be on the kids’ farm table. Outline it using a pen or marker, then cut out that portion of the green material using an X-Acto knife. Once the green material is cut away, carefully paint that exposed portion of the plywood blue to resemble a pond.

    diy kids activity table with storage

    Step 4

    Place your faux trees wherever you desire. Ours wouldn’t stay standing very well, so we hot-glued them down.

    diy activity table for kids

    And that’s it!

    diy kids farm table

    The Circus has loved playing with her farm table. She had all her Schleich paraphernalia up on it and set up before we could even put the finishing touches on it. I’m glad we finally got it done for her.

    Having it on wheels is especially nice because it’s so movable.

    diy kids farm play table

    Will you be adding an activity table for kids to your to-do list?

    With Christmas just around the corner, this could be a great gift idea!

    You might also want to see…

    Drop Down Desk for Kids

    DIY Kids Wall Mounted Desk with Storage

    This is such an easy build! Any beginning DIYer could complete these! How to Build Wall to Wall Shelves in an hour for $50

    How to Build Wall to Wall Shelves

    How to Build a Children’s Stage with Hidden Dress-Up Storage

    Pin This Post

    kids play table with storage


  • DIY Skull Sconce in 15 Minutes

    DIY Skull Sconce in 15 Minutes

    If you’ve got 15 minutes to spare, you can easily whip up this DIY skull sconce to add to your Halloween decor! It lends a touch of spook for not a lot of money!

    Halloween is in full force at my house. The decorations are out and the costumes are being planned! Grunt Labor has actually said he thinks this is one of the best Halloween decorating years at our house – and I’m not even finished yet! *insert witch’s cackle here*

    I have whipped up a few new pieces of Halloween decor this year – this DIY Skull Sconce being one of them.

    Skull Sconce DIY for Halloween

    I made him using items from the Dollar Tree and Michael’s, so it doesn’t cost much at all and it took me about 15 minutes to make – not including paint dry time. P.S. Paint dry times are perfect for beer breaks. 😉

    How to Make a Skull Sconce

    This post contains affiliate links for your shopping convenience. Click here to read my full disclosure policy.

    Materials and Supplies:

    Steps

    Step 1

    Spray paint the wood plaque. You can do any color you wish, but since mine was for Halloween decor, I opted for black. Let it dry. After the plaque is dry, attach hanging hardware to the back of it.

    How to Make a Halloween Skull Sconce

    Step 2

    Brush Mod Podge on the candlestick. While the Mod Podge is still wet, sprinkle orange glitter on it and let it dry.

    DIY Glittered Candle Skull Sconce for Halloween

    Again, you can do any color, but orange was my pick. I do think it would also look cool with purple glitter against the black wood plaque.

    Step 3

    Remove the tag and small round hook from the top of the skull. Lay the skull on the cutting board and cut off a small portion of the back of the skull head as shown below.

    Skull Sconce for Halloween

    This is to make him lay flat against the wood plaque.

    Step 4

    Once the candlestick is dry, place it on top of the skull’s head and trace around its base onto the skull with a pen or pencil.

    DIY Skull Sconce Halloween Decor

    Use the X-Acto knife to cut out the circle and remove about 1/4″ to 1/2″ of the styrofoam below.

    Step 5

    Place a good amount of hot glue on the back of the skull. Place him in the lower middle portion of the wood plaque and press him firmly in place.

    Attach skull to oval plaque.

    Once dry, place the candlestick in the hole on top of the skull and hang it on the wall.

    Cordless DIY Skull Sconce Halloween Decor

    The candlestick is battery operated, but does not have a switch to turn on and off. I just leave the candlestick partially untwisted at the bottom where the battery connection is to keep it off and twist it closed when I want to turn it on. You’ll see what I mean when you get the candlestick.

    Happy Halloween Crafting and Decorating, Friends Witches! Will you be making a skull sconce?

    Need more Halloween decorating ideas? I’m your girl!

    Easy DIY Halloween Decorations– my favorite Halloween decorations that don’t cost a fortune to make and are easy to complete too!

    DIY Witch Broom – of the sparkly variety. 😉 Made using stuff from your yard and the Dollar Tree!

    DIY Skull Drink Stirrers – so easy, you won’t believe it! Perfect for parties, as well as decor!

    Want to come back to the instructions later? Just pin the image below!

    Easy DIY Skull Sconce for Halloween

  • Washed Out Stripes Bathroom Accent Wall

    Washed Out Stripes Bathroom Accent Wall

    This isn’t your typical striped accent wall. Instead of bold, solid stripes, these are toned down, washed out stripes to create a gorgeous blue accent wall. You can easily recreate this look with any colors of your choosing and have your own gorgeous bathroom accent wall in a day’s time. 

    As you guys well know, if I see a pattern/design/look, etc. that I fall in love, I’m usually going to try my best to mimic that design with paint and Frogtape. There have been countless times where I’ve scared Grunt Labor to death jumping out of bed to pause the television so I could snap a picture of it because I saw a design I knew I could pull off with Frogtape.

    There have also been times when I come to an abrupt halt on the sidewalk to snap a photo of the same kind of thing.

    I’ve also slammed on my breaks for the same thing.

    I think one reason why I’m so drawn to pulling off these patterns and designs with paint and Frogtape is because it’s such a huge bang for your buck. Huge. Often times, those designs I see are completely made out of wood mouldings. Don’t get me wrong, I love a room full of beautiful mouldings (and have some plans for that in my own dining room), but that gets pricey quick, plus there’s a lot of work that goes into installing moulding. A great striped accent wall, or any kind of painted and patterned accent wall for that matter, though might set you back $50 at most. Bang for your buck.

    When I was looking around for inspiration and ideas for the guest bathroom, I stumbled upon this image. I fell in love with the shiny finishes and the blue stripes on the walls. I loved how they weren’t completely solid. From what you just read above, I’m sure that you can figure out what my first thought was – “I can do that with Frogtape.”

    And so I did.

    bathroom accent wall

    I did opt to do two smaller stripes per section, rather than larger ones as I wanted these stripes to mesh really well with the rest of the space and not take over the show. I also opted for a lighter shade of blue as well. This bathroom accent wall turned out to be perfect for this space because it brought just the right amount of color and pattern into the room.

    The actual painting of the stripes takes no time at all, it’s the measuring and taping that does take some time, but it’s worth it. All in all, these were started and finished in the same day.

    DIY Washed Out Striped Walls

    This post is sponsored by Frogtape, however all opinions are 100% my own. Affiliate links included in this post.

    Materials and Supplies Needed: 

    • Frogtape – 1″ and 1.5″ sizes
    • Measuring Tape
    • Level (the longer the better)
    • Pencil
    • Plastic Putty Knife, Credit Card or something to smooth down edges of tape
    • Paint Color of Your Choice – My striped walls have Sleek White as the base color in a satin finish and the stripes are Peaceful Blue in satin. I only needed a sample size pot of the blue for this.
    • Paint Brush
    • Scrap Piece of Cardboard

    Step 1

    The first thing you’ll need to consider is the base color for your striped walls. I had already painted this bathroom in a slightly off-white color called Sleek White.

    Striped Accent Wall

    If you’ve already got a paint color on your walls that will work well with your stripe color, then proceed to step 2. If you want to switch out that base color though, do so first. Wait at least three days after painting before taping off the walls for the stripes, so that the paint on the walls have enough time to cure.

    Step 2

    Time to start measuring and taping off the walls! For reference, my walls from floor to ceiling in this space were 82.” Even if your walls are a little taller or shorter than mine, I think you should still be ok using the measurements I’ll give you, as I measured down some before even starting the pattern.

    Measure down 5″ from the ceiling and mark it. Do this several times along the length of your wall.

    Place your level on the wall along the marks you made. Make sure you’re level, adjust if needed, then draw a line along the level over the entire wall.

    Striped Walls

    If you look closely, you can see my line in the photo above. The line doesn’t have to be dark or heavy, just enough for you to see it.

    Run 1.5″ Frogtape along this line. The bottom of the tape should be on this line – therefore the tape is in part of that 5″ down measurement and not below it. Make sense?

    Painting Stripes on Walls

    Step 3

    Measure 2″ down from the bottom of the tape you just applied to the wall and mark it. Do this several times along the length of the wall.

    Place the level along your marks. Make sure it’s level, adjust as needed, then draw a line along the level just as you did before.

    Apply the 1″ Frogtape along this line over the entire length of the wall. The top of this tape should be at the 2″ mark.

    Blue Accent Wall

    If you placed your tape correctly, you should have about 2″ between both strips of tape.

    Step 4

    Measure 2″ down from the bottom of the piece of tape you just applied to the wall and mark it with your pencil. Do this several times along the entire length of the wall.

    Place the level along the marks, get it level, then draw a line with your pencil along the level.

    Bathroom Accent Wall

    Apply 1.5″ Frogtape along this line. The top of this tape should be along the line you just drew.

    Again, the measurement between the pieces of tape here should be about 2″.

    Step 5

    Measure 6″ down from the top of the piece of tape you just applied and mark it. Do this several times along the length of the wall.

    Place your level along the marks, level it, and draw a line along the level.

    Apply 1.5″ Frogtape along this line. The bottom of the tape should be along this line.

    Striped Accent Wall

    Step 6

    Repeat steps 3-5 working your way down the wall.

    Striped Walls

    I know it sounds a little tedious and complicated, but it’s really not all that bad. Once you get those first couple of rows completed, then you should have the hang of it pretty well.

    Painting Stripes on Walls

    Step 7

    Once you have all the tape applied to the wall, place a piece of tape on each of the thicker stripes. You will not paint these areas.

    Blue Accent Wall

    Also, remember to run some of the 1.5″ Frogtape along the corners of the walls to keep the blue from getting on the connecting walls.

    Step 8

    Use a plastic putty knife or credit card and firmly press along all edges of the tape to completely seal it.

    Bathroom Accent Wall with Washed Out Stripes

    Painting Stripes on Walls

    Step 9

    Grab the paint for the stripes, a paintbrush and a piece of cardboard you can use to wipe paint on.

    To paint the stripes on the wall, you are going to use a dry brush technique.

    Striped Accent Wall using Dry Brush Technique

    Dip the paintbrush into the paint. Wipe the brush on both sides along the edges of the paint jar/can as you bring it back out, then brush the excess paint off on the piece of cardboard. Just do a few swipes on the cardboard until you see that the color isn’t as “solid” as it was when you first swiped it on the cardboard.

    Brush your paint onto the outlined stripes on the wall.

    Striped Walls in the Bathroom

    The beautiful thing about this way of painting stripes on walls is that you don’t do multiple coats and you don’t have to worry about brush strokes. It’s perfectly fine if the paint is heavier in some places and lighter in others – that’s how it’s supposed to look! On top of that, if you didn’t get your stripes perfectly level, you really don’t notice because the paint isn’t super bold.

    If you decide you want it darker in some places, add more paint. If you put the brush on the wall and it’s too much paint for your liking, then have a wet cloth on standby and just wipe it right off.

    Step 10

    Immediately, after painting the stripes, remove the Frogtape from the wall.

    Painting Stripes on Bathroom Walls

    You will probably have some pencil marks along the wall. Lightly take a Magic Eraser to those and they will come right off. Just don’t rub too hard, because those things will take off paint. If it takes off a little paint, that will be fine as you won’t even notice since these are washed out stripes anyway.

    Blue Accent Wall in the Bathroom

    Chrome Ring Pulls / Oval Knobs / Faucet / Mirror, Similar Here and Here

    The blue accent wall is the perfect compliment to the white cabinetry, shiny fixtures and hardware.

    Bathroom Accent Wall with Washed Out Blue Stripes

    I especially love how it worked so well as the backdrop for the mirror.

    Striped Accent Wall with Washed Out Blue Stripes

    Faucet / Mirror, Similar Here and Here

    The blue really helped to bring out the color and pattern in the mirror frame.

    Striped Walls with Washed Out Blue Stripes

    Ginger Jar + Fern Art Print / Frame

    I didn’t want to get too much going on in here against the wall, so I opted for a small art print in a frame that compliments the mirror frame nicely. And every room needs some touch of green too, right?

    Do you see a bathroom accent wall with washed out stripes in your future?

    You might also want to see…

    Blue and White Bathroom with Washed Out Stripes

    The Complete Blue and White Bathroom Remodel

    Accent Wall Ideas

    Wall Painting Ideas and Paint Designs Anyone Can Do

    Pin This Post

    Painting Stripes on Walls with a Washed Out Effect


  • Easy DIY Halloween Decorations

    Easy DIY Halloween Decorations

    These easy DIY Halloween decorations will add a touch of Halloween splendor to your home in no time! These spooky decorations are simple to make and each costs under $10 for supplies! Here’s to Halloween – DIY style!

    It’s September! In my world, that means I’m busting out the skulls, spell book and witch’s hat among other things.

    I’m definitely not one to rush time, it already goes by far too fast for my liking, but I am excited about the upcoming holiday season and am ready to kick it off with Halloween.

    And if we’re being honest, I’ve had a full size fake skeleton sitting at my dining room table for three weeks now.

    Easy DIY Halloween Decorations

    Had to take advantage of that 50% off coupon at Michael’s while I could – those skeletons aren’t cheap! The Circus hooked him up with her Tilly Witch book. 

    Also, he rode home right beside me. In the passenger seat. Strapped in.

    DIY Halloween Decorations

    Honestly, I just wanted to freak people out on my way home and think about how much I would be talked about by complete strangers as the crazy lady driving with the skeleton in the passenger seat. I tried real hard to make it to where he was looking right out the passenger window with his hand up waving at people, but while he’s posable, he just wasn’t that posable. Bummer.

    Anywho, Halloween, Christmas and the 4th of July are my top three holidays. There’s magic in each (of different varieties) and when each one rolls around, I always say, “This one is my favorite.” But then the next rolls around and I say the same damn thing, so I guess all three are tied for favorite holiday in my book.

    I have quite a few new halloween decor ideas I’m working on this week, but to kick off this most wonderful time of the year (no, I don’t care that that song technically refers to Christmas), here are some of my favorite easy Halloween DIY projects I’ve done in the past.

    Let’s get our spook on, y’all, or as my Circus told me just this morning, “It’s almost Double Double Toil and Trouble time!”

    P.S. None of these should set you back more than $10 and most of them are less than $5! You’re welcome. 

    This post contains affiliate links for your shopping convenience. Click here to read my full disclosure policy.

    DIY Halloween Decorations

    Glowing Crystal Ball

    Magic Crystal Ball - easy halloween decorations to make

    DIY Crystal Ball Tutorial

    Such an easy halloween decoration to make, but that packs a serious punch! This crystal ball really glows! You’ll need just three things to make this bad boy and about five minutes!

    Glowing Cauldron

    glowing cauldron

    DIY Glowing Cauldron

    If you’ve got five minutes to spare, then you can whip up this fantastically spooky Halloween decoration! Add a witchy touch to your decor with this tutorial for a glowing cauldron!

    Ouija Board Tray

    Halloween Decorations

    DIY Ouija Board Tray with Free Printable

    You can attempt to summon spirits with this, but serving spirits on it is ideal. It’s creepy, but a breeze to make! Tutorial for it is here!

    DIY Halloween Coasters

    DIY Halloween Coasters

    Spooky-Glam Halloween Coasters

    After you serve up drinks on the Ouija board tray, hand your guests one of these coasters to rest their drink on! These are creepy, but have a touch of glam as well! Find the tutorial and free printables used for the coasters here!

    Skull Candleholder

    Easy Halloween Decorations

    Easy DIY Dollar Tree Skull Candleholder

    I love hitting up dollar stores for their cheap Halloween decor and then adding to it or manipulating it in some way to make it awesome. That’s exactly what I did here. I bought three skulls at the Dollar Tree, then made them into a candleholder. One of the easiest and cheapest pieces of DIY halloween decor I’ve ever done and damn it, one of my favorites. The tutorial for it is here.

    Glittery DIY Witch Broom

    Spooky Decorations

    Glittery DIY Witch Broom

    I made these brooms for Halloween decor using items from my yard and the Dollar Tree! Super easy to make and I love the shimmery, glittery look of these witches brooms. See how to make them here.

    Skull Sconce

    Halloween Decor Ideas

    DIY Skull Sconce

    This skull sconce was made using a combination of items from the Dollar Tree and Michael’s. The candlestick is battery operated, so no having to worry about flames with this one. The tutorial for this sconce is here.

    Double Double Toil and Trouble Printable

    DIY Projects for Halloween

    Double Double Toil and Trouble Printable / Ampersand Pumpkin

    Obviously, this printable combined with what I told you my daughter said to me this morning lets you know that “Double Double Toil and Trouble” is one of our favorite Halloween sayings. The Circus is also a big fan of the Double Double Toil and Trouble movie from the 90’s with Mary Kate and Ashley Olsen in it. Ok fine, I’m a big fan too. Freaking loved it when I was little. Me and Amanda Henry had that shit on repeat all through the Halloween season.  Anyway, I felt that needed to be commemorated in our Halloween decor, so I made this printable. You can download it for free as well. Your welcome. More details on it here.

    Also, I made that green ampersand pumpkin too. Tutorial for it is here. I love it because it can work well with basic fall decor like regular pumpkins and leaves, but then it can also look creepy when paired with Halloween decorations.

    The little black pumpkins are also finds from the Dollar Tree. They always have these little orange styrofoam pumpkins every year and I just bought some one year, painted them black and glittered their stem to make them creepy.

    Skull Drink Stirrers

    Halloween Decorating Ideas

    Skull Drink Stirrers

    These little things are probably one of the easiest things you could ever make. Seriously, you’d have them done in less than five minutes. The tutorial for them is here. Obviously, they do work great for drink stirrers, but for us, they double as decor until the Halloween party comes around!

    Printable Spell Book Cover and Potion Labels

    Decorating Ideas for Halloween

    Printable Spell Book Cover and Potion Labels

    Last year, the Circus and I created our own “potions” to use as Halloween decor. You can’t make potions without a spell book, so I whipped us up one of those too. You can get the printable files for these here.

    Don’t Drink and Fly Sign

    Easy Halloween Decor Ideas

    DIY Don’t Drink and Fly Sign

    This isn’t one of my Halloween projects, but I love it so much, I wanted to share it. My friend Kellie made this fun Halloween sign – love this for parties! See how she made it here!

    Skulls on Pedestals

    Easy Halloween Decor

    Skulls Upcycle

    This is an old project, thus the bad photography, but still a goodie. Again, I love those skulls from the Dollar Tree! I bought a few, spray painted them and then attached them atop thrift store candlestick holders. See more about them here.

    Eat, Drink and Be Scary Sign

    Halloween Treat Decor Ideas

    No tutorial for this one, but you don’t really need one! I spray painted some wood plaques, then Mod-Podged on a Halloween sticker I found at Hobby Lobby. To top it off, I added a glittery spider to the edge. This is perfect on top of our bar.

    Boo and Eek Pumpkins

    Halloween Pumpkin Decorating Ideas

    Boo and Eek Pumpkins

    These are more cutesy DIY halloween decor. I used Frogtape to paint some patterns on pumpkins, then my Silhouette to cut out the letters and polka dots. The full how-to is here.

    Witch’s Hat

    Halloween Decorations

    Witch’s Hat

    The little witch’s hat on the corner of the bar cart is another favorite Halloween decoration of mine. It adds a touch of sparkle wherever I put it. See how I made it here.

    Will you be adding any easy Halloween decorations to your home this Halloween?

    Want more decorating ideas for Halloween?

    Don’t miss my Halloween Home Tours – there’s one right here and another right here!

    Want to remember this post for later? Just pin the image below!

    Easy DIY Halloween Decorations

  • Farm Birthday Party Ideas

    Farm Birthday Party Ideas

    Whoever said a farm birthday party couldn’t be stylish too? These farm themed birthday party ideas prove that a farm party can be both fun and filled with adorable and humorous party decorations.

    When the Circus decided she wanted a farm theme party for her 6th birthday this year, I was totally on board, but I didn’t want it to be your typical farm theme party with everything black and white to reflect milk cows and hay all about. I wanted it to be colorful too – like her! I’m happy to say we successfully pulled off one full of personality, colorful farm themed birthday party!

    This post contains affiliate links for your shopping convenience. Click here to read my full disclosure policy.

    Decoration Ideas for a Farm Party

    These ideas are great for any gathering that is held on a farm or farm related in some way!

    Set the mood.

    Farm Birthday Party

    Create an entrance to your party and set the mood with a “Welcome to the Farm!” sign. Use hay bales to hold it up if needed and embellish with balloons, bandannas and more!

    Keep the tables simple.

    Farm Birthday

    There aren’t a whole lot of frills on a farm. Keep the table decorating simple by using red and white checkered tablecloths – a pattern that’s often seen on farms. Find the tablecloths here. This will also make for easy cleanup – these are just plastic, so after the party, just toss the soiled tablecloths in the trash!

    Affordable and Simple Flower Arrangements

    Farm Birthday Party Ideas

    Mason jars are a staple around farms. Fill them with grocery store flower bouquets that you mix and match yourself. For these arrangements, I bought three different bouquets at the grocery store, then just mixed flowers from each bouquet into each mason jar.

    Barnyard Games

    Farm Party

    Have a few barnyard games around for folks to play. This bean bag toss is fun for both kids and adults. It’s simply made from one sheet of plywood and a little spray paint.

    Farm Party Ideas

    Another easy play activity to create for kids at farm themed parties are these “horses” made from square hay bales and stick horses. Just place the stick horse in the hay bale and let the kids ride!

    Other barnyard games could include horseshoes, and pin the tail on the donkey.

    Ideas for a Farm Birthday Party

    These ideas are specifically for farm theme birthday parties! Personalize the party with the birthday kiddo’s age, name, and more!

    Mini Party Hats for Animals

    Farm Theme Party

    You probably noticed these cute little fellers in one of the photos above. I borrowed some of my daughter’s plastic farm animals, then adorned each with a mini party hat made from a cupcake liner. See how to make the hats here! I scattered these all around the party on the eating tables, food tables, etc. If you don’t have any farm animals on hand, you could use these.

    Farm Birthday Party Banner

    Farm Theme Party Ideas

    Create a birthday banner that reflects your farm theme by simply attaching letters to pieces of burlap using clothespins. Add more color to the banner by tying strips of colorful, patterned fabric to the ends.

    Farm Birthday Art

    Farm Themed Birthday Party

    Another simple farm party decoration I made were these pieces of art which I scattered all around the party. To make the one above with the farm animals, I used this stencil and just painted it on a small canvas, then just added the party themed stickers after the paint was dry.

    Farm Birthday Party

    I made this horseshoe art decoration for the party using this stencil. I personalized it a little more by adding “six” using stickers to the bottom of the horseshoe.

    The great thing about these party decorations is that after the party we hung them up in the kiddo’s room – nice little mementos to have!

    Animal Cutouts

    Farm Birthday Party Ideas

    To add some decorative height as needed around the party, I made these animal cutouts. First, I bought these animal silhouettes, then loaded them into my Silhouette cutting machine and cut them out on colorful pieces of card stock. I glued them onto small wood dowels, then added touches of glitter here and there. Personalize these with your child’s age and initials. Stick them in bottles or vases as desired – we opted for old Coca Cola glass bottles. We also hung onto these as little decor pieces after the party.

    Custom T-Shirt for the Birthday Boy or Girl

    For the birthday party, the Circus wore a cute little shirt a friend of ours made that said “Farm Fresh.”

    Don’t forget the party favors!

    Farm Birthday Party Favors

    Don’t just give them any ol’ party favor – give them a farm birthday party favor that they’ll enjoy for longer than just one day! We gave each of our party guests a packet of seeds and a small planting pot.

    Do you have any other farm theme party ideas to share?

    Need more budget DIY party decoration ideas? You’re going to need to see these then…

    Simple DIY Party Decorations on a Budget

    How to Make Farm Birthday Party Invitations using PicMonkey

    Easy DIY Party Background for $5

    And the full list of all my party ideas, decorations and more can be found HERE!

    Follow along on social media for more ideas:

    Facebook | Instagram | Pinterest | Twitter

    Farm Birthday Party Ideas
  • The Guest Bathroom: Peerless Faucet

    The Guest Bathroom: Peerless Faucet

    Switching out the bathroom faucet and shower head in our guest bathroom with Peerless Faucets not only helped to update the look of the space but made cleaning up even easier!

    This post is sponsored by Peerless, however, all opinions are my own.

    As you’ve already seen from the guest bathroom makeover reveal, we switched out both the sink faucet and the showerhead in here.

    Peerless Faucets

    The entire vanity/countertop/sink/faucet was well past due for an update. If you don’t remember, this is how it looked before…

    The Bathroom Before

    Well past it’s prime…Am I right or am I right?

    The vanity itself got a new paint job, the countertop and sink got replaced and a new faucet was installed.

    Peerless Bathroom Sink Faucet

    Peerless Faucet Bathroom Faucet

    We put in a quartz countertop paired with an under mount sink. To whoever created the under mount sink, I bow down in your presence. Any of you gals out there who’ve ever had to clean up after a guy trimming their bread can attest to how much easier it is to just wipe all those whiskers into an under mount sink as opposed to a traditional drop-in one. ?

    Peerless Faucet Xander Single Handle Bathroom Faucet

    For the faucet and all the other hardware in the bathroom, we opted to go with a chrome finish. Personally, I feel like polished chrome finishes never date. They are always classic and can work with just about any decor style. Also, chrome finishes tend to be less pricey and more timeless than some of the other finish options. ?

    Our faucet is the Xander Single Handle Bathroom Faucet from Peerless. I love single handle faucets because, again, how easy it is to clean up around a single handle faucet rather than a two handled one. There’s only one thing to work around on the countertop as opposed to two handles to scrub between. In addition to the ease of use and cleaning, the Xander Faucet is sleek and modern, and serves as a nice focal point for the room.

    Xander Single Handle Peerless Faucet

    The Xander has a clean, modern feel, but with rounded edges to soften it a bit. It was a good option for something to contrast nicely against the rest of the classic style bathroom. The Xander faucet can also work with a three hole faucet installation if that’s what you currently have. It comes with an escutcheon you can use to cover up those other two holes.

    Peerless SideKick Shower System

    The shower/tub combo also got quite the makeover. As with the vanity, the before was very dated…

    The Shower Before

    We removed the doors and had the entire tub unit professionally sprayed with a new finish.

    Peerless Faucet Sidekick Shower System

    Bye, bye beige, hello clean white. We also upgraded the shower head with the Peerless SideKick Shower System.

    Peerless Faucets Sidekick Shower System

    This shower system is truly a sidekick. Obviously, you can use it as a traditional shower head, but the detachable spray wand is a three-in-one little gem.

    The spray wand has a traditional spray pattern that is great for cleaning off dirty hands and feet that have just been digging in the dirt. When I come in from gardening, I always head for the bathtub to scrub my hands and arms because keeping all the mud and dirt contained in a bathtub is much easier than in a small bathroom sink.

    Sidekick Shower System

    The spray wand also has a waterfall function that mimics water being poured out of a cup, which is perfect for bath time for babies and kids.

    Last, but definitely not least, the SideKick Shower System also comes with a cleaning pad attachment.

    Peerless Faucet Sidekick Shower System Cleaning Pad

    Now this is where this shower system sealed the deal for me. Yes, my friends, no more grody bathtub brushes. Just spray on some bathtub cleaner, attach the cleaning pad, turn on your water and go to town. Cleaning a bathtub is so much easier with this thing. The guest bathroom is the only full bathroom downstairs so we often use it for cleaning up after working in the yard instead of tracking dirt through the whole house. This bathtub might not get used a whole lot, but when it does, it gets some pretty dirty people in it. ? That cleaning pad makes clean up a breeze.

    If you have pets, there is also a pet attachment that can go right on top of the spray wand.

    Peerless Faucet Sidekick Shower System Pet Cleaning Attachment

    This attachment has finger-like scrubbers that get into your pet’s fur easier than just a regular spray would, making them cleaner than ever.

    When the spray wand isn’t in use, you can opt to dock it with the shower head as you saw above, or you can place it elsewhere on the tub with the included suction holder for easy access.

    Sidekick Shower System by Peerless Faucet

    And if you’re worried about installation, don’t be. Installing the SideKick Shower System is pretty easy – you install it just like you would any other showerhead.

    It’s so nice to have a guest bathroom that is both beautiful and welcoming for guests, but also functional for us!

    What do you think about the Peerless SideKick Shower System?

    Pin This Post

    Peerless Faucets Sidekick Shower System with Pet Cleaner and Cleaning Attachment

    You might also want to see…

    Blue and White Bathroom Remodel

    Gift Ideas Signature

  • Why I Might Take Over the Guest Bedroom

    Why I Might Take Over the Guest Bedroom

    It was far past time for our guest bedroom to get a makeover. Now that it’s nearly done, I’m considering taking it over for myself because of one thing – the mattress. This Serta iComfort Hybrid mattress from Sears is the real deal.

    This post is sponsored by Sears. While this was a sponsored opportunity, all content and opinions are all my own. Affiliate links are included in this post.

    The Guest Bedroom.

    It’s often a room that’s overlooked. It tends to get the hand-me-downs. It’s always the last on the list.

    Well, I’m here today to take a stand for the guest bedroom.

    It’s time that the guest bedrooms of the world get a little special treatment. 

    Now, let me first say that I too was one of those people who neglected their guest bedroom.

    We’ve had this house for nearly three years and the guest bedroom just now got a (much needed) new look.

    Serta iComfort Hybrid Mattress for Guest Bedroom Makeover

    That’s how it looked when we first bought the 70’s Landing Pad. See, I told you. It desperately needed help. Just like the laundry room, it was sporting all blue walls and trim. We had a spare mattress and box springs in here (no bed frame, it was just on the floor), a random chair and nightstand. It was pitiful, y’all. I would literally apologize to guests as I took them in here. Luckily, they’ve always been family and close friends so they understood, but it never lessened my embarrassment of the space.

    This summer, I finally found some inspiration for the guest bedroom and even the guest bathroom (but that’s another post!) and we’ve totally transformed both spaces. While the guest bedroom isn’t 100% finished yet, the main part of the guest bedroom, the bed area, is….

    Serta iComfort Hybrid

    I’m happy to report that it’s now light and airy and, I think anyway, very welcoming. It might also not be what you would have expected from me. While the rest of the 70’s Landing Pad sports some moody tones and multiple nods to the 70’s and Studio54, the guest bedroom does not. I totally get that not everyone wants to sleep in a pink bedroom with one wall that’s covered with faux grass, like our master. Some people may not prefer to sip a cocktail below an oversized piece of lion art surrounded by black walls. Although, I don’t know why anyone wouldn’t accept a free cocktail just about anywhere. ? I wanted to keep the guest bedroom more neutral, so to speak. I wanted it to be a place where anyone would be comfortable in it. Grunt Labor said this space has a bed and breakfast vibe going on and that suits me just fine – hopefully that means our guests will be very comfortable here.

    Serta iComfort Reviews

    Grunt also informed me that I was making this room so good that we just might move into it.

    Well, I totally brushed that off – until the new mattress we got for the guest bedroom arrived.

    Oh. My. Stars. Ya’ll.

    The mattress and box spring set that had been in there was a hand-me-down set from Nick. It wasn’t bad, but it was old and we knew we needed to replace it. Sometimes, it’s hard for me to sleep when I’m not in my own bed, so I’m betting some of our guests have the same issue. We wanted to have a super comfortable mattress to help alleviate that problem as much as possible.

    Well, if they can’t sleep on this mattress, then I’ll put them on another bed and I’ll happily sleep on this mattress.

    Serta iComfort Review

    The mattress we received from Sears was the Serta iComfort Hybrid.  We ordered it from Sears.com as they had a good selection of top mattress brands.

    Serta iComfort Mattress Review

    The only other type of mattress we’ve ever purchased online before was a mattress in a box, so I was a little skeptical about ordering a traditional mattress online. However, Sears has a 180 night comfort guarantee, so I knew we would have plenty of time to try it out and return it if we didn’t like it.

    The delivery of the mattress was a breeze. Since it is a traditional mattress, it has to be delivered by a special delivery service. They call to set up a convenient delivery time for you and then come set it all up for you. Typically, it takes 5-7 days to have your mattress delivered from the time the order is placed and they will even haul away your old mattress for a small fee.

    Why did we choose the Serta iComfort Hybrid?

    Serta iComfort Hybrid Mattress

    The Serta iComfort Hybrid is the only mattress that combines both cooling memory foam with Serta’s newest and most advanced coil support system. So, you get a cooler mattress, good support and that soft cradle like feel in one mattress. Also, we knew that Serta had a great reputation for producing high quality mattresses.

    The real question though of course is, is it really all those things?

    Yes, my friends, it is.

    As soon as it was delivered, I laid down on it to make sure it was good enough for guests.

    I didn’t move for an hour.

    It was so comfortable that I just decided to take a break from work and lay there and watch television for a while.

    And when Grunt Labor got home, I had him lay on it and I’ll be damned if he didn’t lay down and do the same thing.

    We also slept on it a few nights as well just to make sure that it really had enough support for two people – we already knew it was comfy. We had opted to buy a bed frame that didn’t require a box springs, thus why we also needed a mattress with good support as well as comfort. We wanted to make sure that the mattress would really work on a bed without a box spring.

    And it did.

    Serta iComfort Mattress

    We slept so well and we were even on a queen size bed instead of our usual king. Honestly, it’s taking everything I have to not steal this mattress for our bed at the farmhouse that’s also a queen size. It is so comfortable, ya’ll.

    If you are looking for a new mattress right now that has both great support and great comfort, I highly suggest this one. If you also need a new box spring, you can even score one of those for free at Sears with the purchase of a Serta iComfort Mattress or Serta iComfort Hybrid Mattress through September 10th.

    Now, for all the pretty details…

    Like I said, the guest room isn’t 100% completed yet, but here’s what we’ve got so far…

    Serta iComfort Hybrid Reviews

    White X Bed

    As I said, we bought a new bed for in here as we had the mattress and box spring just laying on the floor before. I wanted to get a bed that was more open and airy and I didn’t want to deal with a bedskirt either. Of course, it had to be affordable as well. We ended up going with this one and it was only $175. So far, we are really pleased with it. It seems to be pretty sturdy and has a style that won’t easily date and will work with many different design aesthetics if we ever want to move it somewhere else.

    Serta iComfort Hybrid Mattress Review

    Side Table

    I actually hijacked the side table from the sitting area in our bedroom. It worked too well here not to! Plus, I had another side table that easily worked in our sitting area where this one had been. I bought some faux greenery to add a little more color here and also accessorized with some brass accent pieces I found at a thrift store. I mean, who can pass up a brass alligator that’s only one dollar!? Also, pineapples are a sign of hospitality, so that was a no-brainer!

    Serta iComfort Mattress Review

    Lemon Pillow

    I opted for classic, crisp white bedding and then added the lemon pillow for a punch of color and I thought, a touch of freshness to the bedding.

    Serta iComfort Mattress for the Guest Bedroom

    One wall in the guest bedroom had this little recess and it turned out to be the perfect size for fitting the bed into. We painted the recess in a classic navy color to add a little more interest and color to the space.

    Serta iComfort Mattress Review - Guest Bedroom

    Isle of Palms Art / Plug In Wall Sconce

    The Isle of Palms art was what started the whole makeover of this space. I happened upon it one day and knew that it would be the perfect jumping off point for the guest bedroom. That’s our favorite beach spot and where we vacation every year.

    Because there was only room for one nightstand here and to keep that space open for guests to put their things if needed, I installed a plug in wall sconce on either side above the bed. I love the touch of shine they add to the space, without it feeling too fancy.

    Guest Bedroom Makeover with Serta iComfort Hybrid Mattress

    Navy and White Striped Rug / Roll Up French Door Curtain Panels

    Besides giving the entire room a fresh coat of paint, all the trim and doors also got a fresh coat of paint. The morning sun comes straight through these doors, so I put up these room darkening panels for French doors. They were only $6 each, so I was really skeptical about them, but they truly do knock out nearly all the morning light in there when they are down and then they easily roll right up. I also bought a classic navy and white striped runner for in front of this door.

    Hoping to have this room fully completed by the end of September, so check back later to see the rest of it!

    Gift Ideas Signature

  • Blue and White Bathroom Remodel

    Blue and White Bathroom Remodel

    I think blue and white is a timeless decorating combination that doesn’t easily date. This blue and white bathroom makeover is full of budget remodeling and decorating ideas for your own bathroom. 

    Three months ago, this bathroom wasn’t even on my makeover radar. I knew it needed to be remodeled (knew it since we bought the house nearly three years ago ?) but it was definitely at the bottom of the list. However, just like I’ve said about the guest bedroom, when I showed guests where their bedroom and bathroom was, it was quickly followed by apologies for how bad each space looked. Granted, they were clean, but neither was pretty.

    I was finally spurred into action to makeover both the guest bedroom and bathroom when I found a piece of art that was the perfect jumping off point for the bedroom. I figured, “Jenna, you really can’t have a great looking bedroom and then crap for a bathroom.”

    The Bathroom Before:

    Blue and White Bathroom Before

    Blue and White Bathroom Before

    Told you it was bad.

    And the bathroom now…

    Blue and White Bathroom Decorating Ideas

    Blue and White Bathroom Decor

    I love this space now. I think it’s pretty and timeless and would be welcoming to any guests.

    Affiliate links included in this post.

    Blue and White Bathroom Decorating Ideas

    The guest bedroom sports a blue and white color scheme, so I decided to carry that over to the guest bathroom as well, but with lighter tones of blue. When it comes to timeless, classic, never-fail color schemes, I don’t think you can go wrong with blue and white.

    Blue and White Bathroom Remodel

    Chrome Ring Pulls / Oval Knobs / Faucet / Mirror, Similar Here and Here

    It’s also probably not exactly what you might expect from me. You might expect something like this at the farmhouse, but not the 70’s Landing Pad. The thing is that I really wanted whoever was staying here to feel comfortable and enjoy staying in the space. So, I opted for a more classic, neutral type design that just about anyone could relax in. You’ll see the same approach in the guest bedroom.

    And I really do love this space, y’all. It’s nothing like our master bathroom, but I just love the classic feel it has.

    Blue and White Bathroom Decorating

    So what all did we do? Well, we did quite a few things in here to really change the look of the entire space but without any big budget-busting changes.

    Starting from the bottom up, we put down new flooring. We went with vinyl hardwood look planks that snapped together and installed over the old tile floor.

    We kept the old vanity. I painted the entire thing and switched out the hardware though.

    Blue and White Bathroom Decor Ideas

    Chrome Ring Pulls / Oval Knobs

    As soon as I found those gorgeous ring pulls, I knew they were the ones. They were such a steal too – only $25 for five of them. They make a big impact for not a lot of money. For the drawers, I went with simple oval chrome knobs. These complimented the ring pulls well but without taking away from them.

    We got a new quartz countertop for the vanity as well as an under mount sink and new faucet.

    Blue and White Bathroom

    The old countertop was just well past its prime. I tried to think of ways that I could incorporate it into the bathroom’s new design, but there just wasn’t much of a way to work with it. On top of that, the old sink/faucet that had been there also had five holes – three for the actual faucet, one for a sprayer and one for a soap dispenser. Trying to find a replacement faucet to work with all that was not something I wanted to deal with.

    Blue and White Bathroom Decorating Ideas

    Faucet / More Details on Our Faucet and Shower Fixtures

    We did a single handle chrome faucet for in here. I’m all about the single handle because they are so much easier to clean around. I love chrome too because I always feel like it adds a touch of shine and dresses up a space nicely. I don’t think it dates easily either.

    Blue and White Bathroom Decor

    Mirror, Similar Here and Here

    The mirror was a Home Goods find – only $30! It’s light gray wood finish is a nice compliment to all the white and blue on the wall.

    Blue and White Bathroom

    Just about anytime I see one of these brass bamboo trays at a thrift store, I buy it and stash it away until I find a place for it somewhere. These are so gorgeous when they’re cleaned up and compliment just about any decor. This one worked perfectly on one side of the counter nestling together some hydrangeas, a thrift store elephant and a glass canister holding travel sized toiletries for guests if they need any.

    Blue and White Bathroom Decorating Ideas

    Bamboo Roman Shade

    One of the best deals I found for this bathroom was this white bamboo roman shade for only $20! They have other sizes and colors too and they are all on sale.

    Blue and White Bathroom Decor Ideas

    Hand Towel Holder / Ring Pull

    I continued the chrome fixtures with the hand towel holder as well. The large cabinet door just above it is actually the access to our electrical panel. To blend it in, I gave it a fresh coat of white paint like the vanity and also put one of the ring pulls on it as well.

    The walls got a fresh coat of paint and a washed-out stripe treatment on one wall.

    Blue and White Bathroom Makeover

    I wanted to create stripes that were pearl-like and sort of washed out. I love how they turned out and I think they add just the right amount of blue and interest to this wall. I’ll have a tutorial up on it soon.

    Blue and White Bathroom

    Ginger Jar + Fern Art Print / Frame

    I do kind of feel like every space needs a little touch of green somewhere – doesn’t necessarily have to be a real plant. ? I opted for this Ginger Jar + Fern Art Print. It kept with the blue and white theme and I think it has that classic, timeless feel like much of the bathroom does.

    Blue and White Bathroom Decorating

    I went with navy for the towels and bathmat to keep with the blue and white, but to add a little more interest. We also had the bathtub professionally coated with a new finish to get rid of that yucky beige color it had been sporting.

    Blue and White Bathroom Decor

    Shower Curtain

    The shower curtain has a pretty embroidered pattern on it that matches well with the blue on the accent wall.

    Blue and White Bathroom

    Towel Hook Holder, Here or Here

    I went with this towel holder because it had a touch of silver and the leaves were a fun addition to the space. The wood also went nicely with the mirror frame and frame the art is in. I don’t think it necessarily is a towel holder, but it worked perfectly for this space for just that.

    So what do you think? Do you like my take on blue and white bathroom decor? 

    Looking for more budget diy and decorating ideas? You might also want to see…

    Bathroom Remodeling on a Budget – Nine Ideas for High Style-Low Budget Bathroom Makeovers

    Nautical Traditional Bathroom Makeover – classic colors you can never go wrong with!

     Navy and White Kitchen Makeover – I’ve never met a good navy and white kitchen I didn’t like.

    Want to come back to this bathroom makeover later? Just pin the image below!

    Blue and White Bathroom

    Gift Ideas Signature

  • 9 Unique Ways to Makeover a Side Table

    9 Unique Ways to Makeover a Side Table

    Looking for a clever way to update a side table, end table or bedside table in your home? You want something more – something that pops! Here are nine unique DIY side table ideas that are totally doable – even for a beginning DIYer. You’ll be running for your paint by the end of this post!

    It’s been a while since I’ve been able to get my hands dirty with a good ol’ furniture makeover. I’m planning to end that hiatus soon since school has started back and we are finally getting back into a routine around here. There is literally one whole side of our garage that is filled with pieces just calling my name. Y’all know I can’t pass up a piece of thrift store or yard sale furniture with good lines.

    As I was going through the pieces and brainstorming ideas for what to do with each one, I also went through my gallery of past furniture makeovers looking for inspiration – perhaps a good spinoff of another makeover. 🙂 While doing so, I realized a few things:

    1. I like to turn things into bars.
    2. I especially like to give side tables new life or turn them into things they aren’t meant to be.
    3. My photo skills have vastly improved since the creation of this blog.

    I realize that most everyone only needs one bar in their home, but many people do need more than one side table. Or end table. Or bedside table. Or whatever the heck you want to call them. So, I’ve put together some of my favorite DIY end table ideas to get the inspiration flowing the next time you see a side table with fabulous lines, but needing a little love.

    Unique End Table Ideas

    This post contains affiliate links for your shopping convenience. Click here to read my full disclosure policy.

    Idea #1: Cover the Top with Wrapping Paper

    DIY Side Table Ideas

    Wrapping Paper Topped Table

    This little table makeover is definitely a blast from the past! It’s still one of my most favorite colorful pieces I’ve ever done though. I found this little table for a whopping $2 at a yard sale. The top was in really rough condition, but the rest of it was pretty good. I painted most of it a bright coral pink color and then remedied the top by apply wrapping paper. Get all the details on how I did it here. Wrapping paper tip: I find the best patterns and designs on wrapping paper at Home Goods!

    Idea #2: Give it a plaid treatment.

    Unique End Table Ideas

    Plaid Painted Side Table

    It’s been a few years since I did this plaid painted side table, but Grunt Labor will still tell you that he thinks it’s one of the best projects I’ve ever done. The crazy thing about it though is that it doesn’t require a single bit of measuring to get this pattern painted. I used Frogtape to “measure” everything – it was so easy! Tutorial for this guy is here. You can use any colors you want to create the plaid. I’ve always thought this would be really cute in pastel colors – especially for a little girl’s room.

    Idea #3: Get Beachy with It.

    Bedside Table Ideas

    Painted Beachy Colored Side Table

    The paint treatment on this side table is crazy easy to do – seriously, it’s hard to mess it up! I gave this piece a washed-out beachy vibe by painting the whole thing white first, then creating colored furniture glaze with paint and clear glaze from Velvet Finishes. If you get too much color on, then just wipe it off, if you want more, paint more on. Easy peasy. Again, you could do this with any color you wanted to. I think a small side table painted like this would be great in a mostly white bathroom to add a little color. You can read the full tutorial for painting pieces beachy style here.

    Idea #4: Confetti Style

    DIY End Table Ideas

    DIY Confetti Side Table

    This one is another super simple end table idea that just requires paint, tape and very little skill at all. Create “confetti” on the tabletop (or the whole table if you prefer!) by placing random strips of paint over the table before painting it. This creates a fun little table just begging for someone to put a drink, preferably with a little umbrella, on top of it. The full how-to on this one is here.

    Idea #5: Stenciled Top End Table

    Unique End Tables

    Leopard Print End Table

    If you want to add pattern to a tabletop, but don’t want to be confined to using tape to come up with something, then you could look for a stencil to paint onto a side table. I just happened to have this leopard print stencil lying around and went with it for this table that was on the back porch at our old house. The full makeover is here.

    Idea #6: Turn it into a bench.

    Side Table Ideas

    Side Table turned Bench

    And if you ask me what one of my favorite makeovers ever was, I’d say that one of them is definitely this little side table turned bench. I found this table at a thrift store for $7. The sides and legs of this table had perfect lines and there were gorgeous brass details on top of that. The top though had those weird slats and so I decided to cover those by adding a cushion on top. I love this piece because it can serve as a traditional side table or even a tall coffee table by just placing a tray on top of the cushion and putting drinks, remotes, whatever there. But, when you need extra seating or want to throw your feet up, just move the tray! See how I did this makeover here. Also, you can do this with any table that’s open underneath! P.S. If you’re looking for a gorgeous light blue color, that Tranquil that I painted this side table is hands-down one of my most favorite colors ever.

    Idea #7: Ditch the Tier.

    End Table Ideas

    How to Remove the Top Tier of Two-Tiered Tables

    So I found this two-tiered table at a local thrift store and I was immediately drawn to it’s mid-century lines. But then, I was like, “Damn, I hate that it’s tiered.” I’m not a huge fan of two-tiered tables. But then, I was like, “Wait I bet I can get rid of that tier.” And I did. And I have no idea why that had never occurred to me before. When I think about all the two-tiered tables I’ve passed up because of that tier and now knowing how easy it was to remove it, I get so mad at myself! Anywho, you can read about how I gave this table new life here.

    Idea #8: Layer on the Colors.

    Painted Side Table Ideas

    Caribbean Blue Layered Paint Side Table

    I just started experimenting more with layering paint colors earlier this year and this piece was one of the firsts I did. I created this look by using three different paint colors and creating different colored glazes with two of them. It actually isn’t as hard or complicated as it sounds and again, it’s a project that you can’t easily mess up! Find the tutorial here.

    Idea #9: Accentuate details with contrasting colors.

    Painted Bedside Table Ideas

    Gray and White Bedside Table Makeover

    And this one is really taking it back – one of the first furniture makeovers I posted about. See, my photography has definitely  improved. 🙂 Even though the photos here aren’t that great, I still love this simple idea for painting a bedside table that still commands attention. If you ever come across a piece that has good grooves on it, snatch it up. Then, choose two contrasting colors – I tend to go for an actual color and white together – and paint the majority of the piece the color and then pull out all those details with the white paint. The tutorial for how I did this one is here.

    Looking for more painting tips and inspiration?

    What kind of paint do I use on that? – a guide to all different types of paint and what kind to use on what material.

    How to Make Furniture Glaze in Any Color – the possibilities are endless!

    3 Easy Ways to Update Your Furniture Hardware – don’t toss it just yet!

    Want to come back to these side table ideas later? Just pin the image below!

    Unique Side Table Makeover Ideas
    Gift Ideas Signature

  • DIY Louvered Closet Door Makeover | Big Bang for Your Buck

    DIY Louvered Closet Door Makeover | Big Bang for Your Buck

    Louvered doors are dated and a complete pain to paint. Try this DIY louvered closet door makeover to squash both those problems! You won’t believe how much bang for your buck you’ll get with this project!

    As most of you know, I spent a large part of July busting ass to get the guest bedroom and bathroom inhabitable for Brandon and Caitlin when they came to visit. I did succeed in having everything painted and cleaned and looking pretty good by the time they got here, but there are still a few things to check off the list in each of those spaces before I’m completely done.

    This little makeover though that I did on the closet door in the guest room is by far one of the best “bangs for your buck” that I tackled in there and really probably one of the best bangs for your buck I’ve ever done.

    DIY Louvered Closet Door Makeover

    Can you believe that difference??? Ignore the odd paint job in the before picture – long story.  I probably spent about $25 on this louvered door makeover – see, I told you – huge bang for your buck. And if you have even just a little bit of woodworking/cutting knowledge, then the project itself is pretty easy!

    DIY Louvered Door Makeover

    I didn’t want to paint all those slats.

    Louvered Closet Door Ideas

    That’s exactly what sparked this closet door idea/makeover.

    I went down to the guest room to take some measurements, plot out some ideas and I ended up in the floor staring at that damn door already tired from just thinking about how much of a pain it was going to be to paint. Yes, I could have used my paint sprayer on it, but that would have meant taking the door off the hinges, finding a place to set it up in the garage, taping and covering everything else in the garage so it wouldn’t get paint on it and then sweating my rear end off while painting it because it was July. In the south. And as I’ve told you before, August in the south is just a notch below hell- July isn’t too far behind, friends. That was a lot of work and sweating for just one door.

    So then I started thinking about how I could get rid of those slats. Cutting them out crossed my mind, but then you’d have to find something to cover those empty spots. After closer inspection, I decided I could just cover the louvered part with luan and trim it out to look all purty.

    Louvered Door Makeover

    And it worked.

    How to Cover Louvered Doors

    This post contains affiliate links for your shopping convenience. Click here to read my full disclosure policy.

    Supplies and Tools Needed

    • Luan Panel(s) – How many you need will depend on the size of the louvered areas on your door. Measure from edge to edge of where the louvered portions begin and end. Take that measurement to the store to determine what size and how many luan panels you need. We used two project size luan panels for our door.
    • Decorative Moulding/Trim – Measure all sides of the louvered areas you’ll be covering. Add a foot or two to this measurement (in case you cut a piece too short – happens to the best of us ?) and buy that much trim.
    • Circular Saw
    • Miter Saw or Miter Box and Hand Saw
    • Brad/Finish Nailer and/or Finish Nails and Hammer
    • Caulk and Caulk Gun
    • Spackling or Wood Filler
    • Paint – The white on all the doors and trim throughout our house is Bit of Sugar by Behr.

    Steps

    Step 1

    If you haven’t already done so, measure the louvered area(s) you wish to cover on your door. Cut the luan panels down to this size using a circular saw. If you want to make this even easier on yourself, then take your measurements to the hardware store with you and have them cut the panels for you!

    After the panels are cut, use either a finish nailer or finish nails and a hammer to attach the panel to the doors.

    How to Cover Louvered Doors

    Put a nail in every corner, about 3-4 nails along the long edges and 2-3 more along the short edges.

    As you put the nails in, you can slightly angle them toward the door frame or you can go through the slats themselves. Just check the back of the door and nip off any nails that stick through the back.

    Closet Door Ideas

    Step 2

    Measure from edge to edge the top portion of the area you covered with luan. Cut your decorative trim a few inches longer than this measurement using a miter saw or miter box and hand saw, making 45 degree angle cuts at each end. I prefer to make these pieces longer then go back and cut off a little at a time until I get it just right. If you aren’t comfortable making angled cuts like that, then go with a flat trim instead of a decorative one and do straight cuts. This will give you more of a craftsman look on your door.

    Install that piece of trim with your finish nailer once you get it to the right length. Repeat with the opposite end, then do the sides measuring from the longest to longest end of the trim you installed.

    DIY Closet Door Makeover

    Step 3

    Once you get all the trim cut and installed, fill the nail holes with spackling or wood filler and caulk all the seams and edges.

    Louvered Closet Door Makeover

    If you have any small gaps where your trim joins, these can usually be caulked and you’ll never be able to tell.

    Step 4

    Paint it all! I gave our door two coats of paint.

    Covering Louvered Closet Doors

    It also got a shiny new doorknob.

    Closet Door Ideas: Louvered Closet Door Makeover

    Also, remember to leave the door open for a few days to fully cure. Yours truly forgot about that and that’s why there’s that little tiny piece of blue paint rearing its ugly head from where a bit of the white stuck to the door frame. #duhjenna

    What do you think? Pretty great bang for your buck, right?

    You might also want to see…

    DIY Painted and Patterned Doors – a great way to add interest with only paint!

    How to Paint Trim and Doors – the ultimate guide to a professional paint job, but you did it!

    Want to remember this post for later? Just pin the image below!

    How to Cover Louvered Doors - an easy DIY Louvered Door Makeover
    Gift Ideas Signature
  • Find Her Jesus Keep Her Well Printable

    Find Her Jesus Keep Her Well Printable

    Yesterday, the Circus had her very first day of Kindergarten.

    I’m still not quite sure how this is possible, but I know she’s ready for it! She totally rocked her first day.

    I’m so excited for her to start on this new adventure and of course, also just a little scared and a little sad too because now I won’t have my buddy for yard sale and thrift store Fridays. ?

    As you all know by now, I’m a huge country music fan and one of my favorite current female artists is Miranda Lambert. Girl can write a song like nobody’s business. I don’t think there’s ever been a single song on any of her albums that I haven’t liked. When the Circus was born and as she’s grown, a line from one of Miranda’s songs, Mama I’m Alright, has always repeated through my head:

    Find Her Jesus Keep Her Well
    Help Her Do More Right Than Wrong at the End of the Day

    I had every intention years ago to create wall art with those lines for the Circus’ room, but apparently it took kindergarten registration to actually make that happen.

    Find Her Jesus Free Printable Art

    In case any of you have any little (or big!) girls of your own out there, I wanted to share with you as well. I also made the Find Her Jesus, Keep Her Well art in three different styles. My girl is all about blues and teals right now, so the one above was made with her specifically in mind.

    I loved the pastels on this floral print contrasting with the black font though as well.

    Free Printable Miranda Lamber Song Lyric Art

    And I also did one with a pretty floral wreath around the text. This one comes in both a regular vertical size print and a square version as well.

    Find Her Jesus Keep Her Well Song Lyric Art

    How to Get the Find Her Jesus Art

    You can get all three of the printable art pieces in all the different sizes available by subscribing to the Rain on a Tin Roof email subscription (it’s free and no more than 2-3 emails a week, usually just when I publish new posts). Sign up below to get access to download the art. Once you’ve subscribed and confirmed your subscription, you’ll be directed to a page where you can download the art. When you sign up, you’ll also be able to access and download all the other free printables in my printable library.

    If you’re already an email subscriber to this freak show we run around here, then you should be able to input your email address in the form above as well and it should automatically take you to the download page. Don’t worry – it won’t sign you up twice for my emails though! If that doesn’t work for some reason, then you can find a link to download the Find Her Jesus art in my Printable Library. You can look at the bottom of the last email you received from me for the password.

    Free Printable Find Her Jesus Miranda Lambert Song Lyric Art

    Tips for Printing the Find Her Jesus Keep Her Well Art

    Please note, these are for personal use only. Print as many as you wish to for yourself, but you may not print and resell or sell the files themselves.

    • Print on card stock or photo paper. Some photo paper has a more glossy sheen though, so keep that in mind as to whether you want that look or not.
    • If you’ve got a good color printer at home, then of course you can print them at home. I don’t, so I typically print out my things like this at Staples or another printing center like that.
    • If you’re going the photo paper printing route, then I typically use Mpix for printing. Their color quality is really good. You can also opt for a matte finish there as well.
    • Each image comes in two different sizes:
      • 8″ x 10″
      • 8.5″ x 11″ – each image is centered with white space around it on this size.
    • Additionally, the wreath style art comes in a square size as well.
    • Before you print, be sure to check how the image is being cropped and adjust it to your liking before printing.

    Find Her Jesus Keep Her Well Free Printable Art

    I haven’t quite decided where I’m going to put this print just yet, but I’m leaning heavily toward the Circus’ bathroom. I think that’s the perfect place for her to see it everyday as she gets ready for school.

    Here’s to all our little Circuses!

    You may also want to see…

    How to Create an Object and Text Feature Wall | Perfect for a kid's room and totally customizable! Great way to add a kid's unique personality to their room!

    How to Create an Object and Text Feature Wall

    DIY Wall Mounted Drop Down Desk - perfect for kids or adults - customize how you like - an easy DIY project.

    DIY Drop Down Desk with Storage

    How to Build a Children's Stage - this is an easy DIY build for your kid's playroom with hidden dress-up clothes storage as well!

    How to Build a Children’s Stage

    Pin This Post

    Find Her Jesus Keep Her Well Free Printable Art from Miranda Lambert Song

    Gift Ideas Signature

  • 127 Yard Sale, The World’s Longest Yard Sale: Tips for Shopping

    127 Yard Sale, The World’s Longest Yard Sale: Tips for Shopping

    The 127 Yard Sale is the world’s longest yard sale. It typically runs the first Thursday – Sunday of August every year and stretches all the way from Alabama to Michigan. You can find some real treasures and great deals along the yard sale route! Below you’ll find basic information and my best tips for shopping the HWY 127 yard sale!

    If you live in a town that the longest yard sale passes through, then you might have a love-hate relationship with the yard sale. I grew up in a small town along the 127 corridor sale and that was sometimes the case for me. I absolutely love yard sales, but the traffic that comes with the 127 sale is unreal sometimes. Furthermore, it’s like everyone forgets how to use a turn signal and the car in front of you may slam on their brakes at any given moment because they spotted a woven turkey basket to add to their collection.

    All that being said, I was totally one of those people who was driving slow, failing to use my blinker and slamming on my brakes last Saturday. All in the name of yard saleing.

    So if you live where the longest yard sale passes through – I get it. Also, I’m sorry for my lack of proper driving skills during the yard sale. It’s only once a year though and there are treasures to be had, so the good outweighs the bad – in my opinion anyway.

    I’ve also seen the yard sale go through phases. My earlier memories of it was as it being true yard sales. It progressed to where lots of antique vendors came and sat up and you could hardly find a good deal at all. Slowly, I’ve started seeing more of those true yard sales again and more good deals. And that makes me very happy.

    Last Saturday, myself and four of my friends loaded up and did a leg of the world’s longest yard sale. We had such a great time and found so many great deals. In case you aren’t familiar with the yard sale, I wanted to write a post about it and give you some tips for shopping it in case you decide to find some treasures for yourself next year during the sale.

    Hwy 127 Yard Sale Dates

    The 127 yard sale is typically the first Thursday – Sunday in August every year. However, the yard sale used to run for a full week back in the day and some people still abide by that timeline. The Circus and I were shopping the yard sales the Saturday before the Thursday that the yard sales were officially supposed to begin this year.

    *The official dates for the 2019 longest yard sale are August 1st-4th. So go ahead and mark your calendars.

    Highway 127 Yard Sale Location

    The longest yard sale runs all the way from Gadsden, Alabama to Addison, Michigan. Technically, it starts at either end and you can work your way from one end to the other if you so wish.

    127 Yard Sale Route from Michigan to Alabama - Rain on a Tin Roof

    Photo via 127YardSale

    From where it begins in Michigan all the way to Chattanooga, Tennessee, the yard sale follows Highway 127. Highway 127 ends in Chattanooga at the foot of Signal Mountain, but the yard sale picks back up again along the Lookout Mountain Parkway in Lookout Mountain, Georgia and then on into Alabama.

    In all, the yard sale goes through six states – Michigan, Ohio, Kentucky, Tennessee, Alabama and Georgia and covers 690 miles.

    I have never completely went from one end to the other. The farthest I’ve ever been was from Dunlap, Tennessee to the Kentucky line one year. This year, I did some shopping in Dunlap, Pikeville and then all along the Lookout Mountain Parkway leg of the sale.

    The Longest Yard Sale: Tips for Shopping

    Go with friends and/or family.

    First off, anything like this is a hell of a lot more fun with friends. I went with four other friends this past weekend and we had an absolute ball. Besides laughing at a few questionable items we saw for sale, going with friends is also great because sometimes they might spot something you didn’t that they know you’ll love. Plus, there are some places along the route where you’re in the middle of nowhere – it’s always best to have a buddy when Deliverance could be just one wrong turn away. That being said, the sale route is full of some truly gorgeous scenic drives.

    My great uncle and I went one year – the year I made it to Kentucky. That was during the time when there seemed to be antique dealers at every turn. I bought one single item during that trip, but it’s still one of my most favorite yard sale trips because as we were walking through all the sales, my uncle would point out all these things that he remembered having around his house when he was growing up.

    Take multiple vehicles and fuel up.

    This past trip, our posse had one SUV and one truck. The truck bed of course held any larger furniture pieces that we found and the SUV held the smalls.

    Also, if you see you’re getting down to a 1/4 of a tank of gas or so, go on and fuel up at the next gas station you see. There are some stretches where there isn’t a service station for quite a while.

    When and Where to Start

    A lot of this is up to you. Before you go, decide where on the route you want to start and what direction you’re going to go in. If you really want to do the entire thing, then you’re going to want to take off work for at least 3-5 days, I think. It kind of depends on how often you stop at sales. Most of the sales will be open by about 8am each morning. Closing times vary – I saw some people closing up shop around 4pm, but have shopped at some until around 6pm. If you are making this a multi-day event, you’ll need to also book hotels. Since I have always lived so close to the sale, I’ve never made it an overnight trip.

    Take cash.

    While I’m sure if you are purchasing a big ticket item from a person who is more of an antique vendor you could use a credit card, but for the most part, you’re going to want to have cash. Have plenty of ones, a few dollars in quarters and of course, fives, tens and twenties are good too. I was actually quite surprised by how few people selling had change – I thought that was yard saleing 101. There were a few times this worked in my favor though – I handed them a $5 bill for a $1 item, but since they didn’t have change, they took the $0.50 I offered them instead.

    Take bags and/or boxes.

    Take some of those reusable grocery bags you have at home or boxes and set them up in your trunk or hatch or whatever. As you buy items, put them in your bag or box. If each person in your crew has their own container of some sort, then this will make dividing things up easier when you’re done. You may also want to throw in a little newspaper or bubble wrap in case you need to wrap up breakables that you purchase.

    Wear comfortable shoes and clothing.

    Seriously y’all. This is not the time to be cute – especially if your spending a good portion of your time during the sale on the more southern routes. It’s the first weekend of August in the South – we’ve bypassed “hot” and went to just a few degrees below hell. Put on comfortable, breathable clothes. I wore my shortalls with a t-shirt underneath. I opted for the shortalls, because like regular overalls, there are plenty of pockets where I can carry my wallet, keys and phone and not have to lug around my entire purse. If you have to carry a purse, opt for a small lightweight one that you can sling across your body.

    I also suggest tennis shoes or some kind of comfortable shoes that are closed toe. You’re going to be walking through lots of yards and some fields. There might be holes here and there. You want comfortable shoes. Additionally, in the mornings or if it rains, these places will be wet – you don’t want wet feet all day, thus why I also suggest closed toe shoes. If you’ve got rain boots, throw those in the car if you want to.

    Hydrate.

    Again, it’s August in the south. Drink plenty of water, people. If you’ve got room, pack a cooler with iced down water. However, if you don’t want to take up valuable potential space for all the treasures you’ll find, people are always selling drinks all over the yard sales for usually $1 or less.

    How to find the best deals.

    Our group consists of deal finders. We are all cheap. The thing with the 127 yard sale (as I said above) is that there are lots of people who are more antique/vintage dealers that will rent a space for the sale and set up shop. These people tend to be selling their items at prices you would see at your local antique store. Those aren’t the kind of prices we are looking for at yard sales. There are some people who do the 127 sale looking for those kinds of things and will pay those prices. We don’t. We believe yard sales should have yard sale prices. And as my friend Ashely put it, “We don’t care what it sells for on eBay.” Lord, I can’t tell you how many times I overheard some vendor saying that to people. If we wanted to shop on eBay or at an antique store, then we would! We’re yard saleing for a reason, dammit.

    This year, my friend Ashley recommended that we take the Lookout Mountain Parkway route of the yard sale. She had done it before with coworkers and swore that it was much better in terms of having “real” yard sales with yard sale prices. She was right! There were of course still some vendors along the way that were essentially asking retail prices for their items, but we got pretty good at identifying those sales and skipped them. If you’re really looking for the good deals, then use these tips while shopping the longest yard sale:

    Have a lookout. 

    I was in the lead with the truck and the SUV behind me. Jason rode with me and was the lookout. As we would approach sales, I would slow down and he would look to see if he thought it was worth us stopping at.

    Stop at those church sales. 

    God bless all the little old church ladies who donate their time and unwanted items to church sales. They tend to have really good stuff at really good prices. They are also just as sweet as can be.

    Don’t discount the yard sales off the main route. 

    Somewhere along the way, you’re going to see signs pointing off the main route to yard sales. These can be hit or miss. More often than not, I’m probably going to check them out because there are going to be a lot of people who don’t want to get off the main route, so there might be a few gems there just waiting for me.

    A barn or building full of stuff isn’t always great. 

    You’ll see a lot of yard sales where they have an entire building or barn with stuff in it for sale. In our experience, this stuff was all overpriced.

    If there’s a field full of people set up, then prices probably aren’t that great. 

    There are lots of property owners along the yard sale route that will rent out their land to vendors during the sale. You’ll see quite a few really large areas just covered with vendors. In my experience, those people are typically more overpriced. If you see maybe 2-5 people set up selling somewhere though, you might find a good deal there. For the most part though, we found the best prices at family yard sales along the way.

    Offer less.

    Don’t forget that you can offer less than what they are asking. This is especially true at the end of the day on Saturday and on Sunday. Toward the end of the day on Saturday, we ran into quite a few people who were packing it up or told us that would be their last day. They were very much ready to make a deal so they didn’t have to take it all with them. This is even more so the case on Sunday since it is the final official day of the yard sale.

    Enjoy the scenery and atmosphere. 

    One of my best friends, Jason, rode with me this past weekend when we hit up the sale and we both really enjoyed the scenery along the route. We both agreed that if you wanted to see parts of the real south – not the big cities, but small southern towns, that the longest yard sale was definitely a way to do it and find some great deals at the same time. Stop at local restaurants to eat – skip the chains! We had lunch at a little BBQ place and it was some of the best BBQ I’ve had.

    And now for what you’ve really been wanting to know – What did I get at the yard sale?

    Longest Yard Sale - My finds - Rain on a Tin Roof
    Hwy 127 Yard Sale Finds and Tips for Shopping - Rain on a Tin Roof
    World's Longest Yard Sale - My purchases - Rain on a Tin Roof
    Highway 127 Yard Sale - treasures from my trip - Rain on a Tin Roof
    The Longest Yard Sale - Santas found on the route - Rain on a Tin Roof
    127 Garage Sale Purchases - Rain on a Tin Roof

    I spent $57 at the yard sale during the one day I went with my friends and I got everything you see above. The full breakdown:

    • A glorious Camel Stand/Side Table (Jason’s dear mom, Judy, who is our group mom, actually picked this up for me at a 127 yard sale in our home town, I’m including it here though since I got it on Saturday! Thank you, Judy!!)
    • Countless Christmas decorations include vintage Santas, nutcrackers, vintage Christmas signs, outdoor lights, basic ornaments, a bow maker, lights, two brass horns and more.
    • Two Brass Camel Home Decor Accessories
    • A Vintage, but Broken Toy Train that I plan on jazzing up for Christmas and a smaller train car to bling out for Christmas as well
    • Three Vintage Brooches
    • A Clock originally purchased in Saudi Arabia that will get adorned with vintage Santas for Christmas
    • Vintage Picnic Basket
    • Umbrella with a Wooden Duck Head Handle – I’m a sucker for old umbrellas with adorable handles!
    • A random bunch of bamboo
    • Multi-Colored Animal Lights
    • Multiple Pieces of Clothing
    • Two Wool Plaid Blankets that are heavy, warm and will be beautiful at Christmastime
    • Framed Fern Cross Stitch
    • Framed Carousel Art (going to jazz that frame up with a pop of color!)
    • Halloween Candelabra
    • Not pictured: a kid’s play guitar, one Beanie Baby and a Barbie Horse Drawn Carriage (all for the Circus.)

    I did a Facebook live on Sunday going through everything I bought, if you didn’t catch it, you can watch it here!

    The Circus and I did do a few of the 127 yard sales the weekend before and there were a few other things I got then too that aren’t pictured here. I think that day I spent about $30 or so.

    Have you shopped the 127 Yard Sale before? Share your yard sale experience in the comments!

    Don’t forget to mark your calendars for next year!

    Also, you can find more information and resources about the longest yard sale on 127yardsale.com!

    Most importantly – strap those treasures in on your way back….

    World's Longest Garage Sale - Tips for Going and Shopping - Rain on a Tin Roof

    Couldn’t risk breaking that camel!

    Looking for more tips on finding great deals? 

    How I find the Good Stuff on Craigslist and Other Second Hand Selling Sites – my tips for finding the bargains!

    Want to have a yard sale of your own? Check out my tried and true yard sale tips here!

    Want to save this 127 sale post for later? Pin the image below!

    Information and Tips for Shopping the 127 Yard Sale - Rain on a Tin Roof
    Gift Ideas Signature