Author: Jenna

  • Decorating Ideas for Knotty Pine Paneling

    Decorating Ideas for Knotty Pine Paneling

    Have knotty pine paneling in your home and not sure what to do with it? Before you paint over it or tear it out, try these knotty pine walls decorating ideas – it just might make you love that paneling after all.

    As you know from my Ramblings post a few weeks ago, I had three makeover projects underway at the 70’s Landing Pad – the mudroom/laundry room, the guest room and the guest bathroom. The mudroom is finished, but the other two are still in progress and I have until Thursday night to finish them. That’s when the Man of Questionable Honor and his wife show up. As you might imagine, it is madness here.

    At the same time, I’ve also been working on a few projects at the farm including the design plan / color scheme for the den and adding more color to the kitchen. So basically, I’m just asking for a mental breakdown. 

    For the most part though, with the exception of some damaged drywall on the ceiling which did cause a full-on “Screw it. I’m done for the day,” attack on Friday, the den is coming together pretty well. I’ve just been adding to the kitchen as I find different things, so it hasn’t really been all that stressful.

    As you might remember, both the farmhouse den and kitchen are clad with knotty pine tongue and groove walls. Gasp!

    While most people would be reaching for a can of paint or a sledgehammer, I absolutely refuse to do either. You see, I love that damn pine paneling. I can’t imagine that house without it. In fact, when we got the farmhouse house back from the previous tenants, my number one fear was that they had painted the paneling. When my uncle called me as he was walking through the house for the first time after the tenants had moved out, his words were, “It’s bad. Really bad. But the paneling is ok.” Everything else can be fixed, but that paneling, by God, you couldn’t just replace it with drywall. It’s got over 50 years of grease from fried chicken, cigarette smoke and memories in it. There are just some things that can’t be replaced.

    Obviously, I could write a sonnet about this damn paneling.

    So, in a nutshell, the paneling and I work together. Perhaps, I should have just said that in the beginning and spared you all my ode to the paneling.

    So far, I’ve come up with three great ways, in my opinion, to make knotty pine paneling shine in a space.

    Disclosure: Minted provided me with some of the art for these spaces. Bellacor provided me with the lighting for the den. All opinions are 100% mine. This post contains affiliate links for your shopping convenience. Click here to read my full disclosure policy.

    Knotty Pine Paneling: How to Decorate With It

    Colors that Go with Knotty Pine

    Obviously, knotty pine rooms are going to be very brown. Typically, you’re going to have a neutral flooring as well, whether it’s carpet or hardwood. In order to keep the space from just being a brown pit, add some color, but you want to balance it all out with a neutral.

    Knotty Pine Walls Decorating Ideas - Den with Knotty Pine - Rain on a Tin Roof

    Chair Upholstery

    I’ve found that blues and greens work really well with paneling. The den isn’t quite finished yet (I still have to get pillows and draperies made as well as a few other things), but so far I have added in these two green chairs and this rug and it’s made a huge difference.

    I couldn’t afford new chairs, so I stalked Facebook marketplace for a while and found a set of chairs that I liked for only $50, then had them recovered in this material. Chattanooga folks, I used Don’s Trim Shop and they did an excellent job as well as having the best price! The only thing I would have done differently is used some thicker material for the upholstery. This one works, but it is thin. I didn’t realize that when I ordered it.

    I layered in my beloved cowboy blanket on one of the chairs to add more pattern and color. I’m also going to have pillows made for these chairs in a floral print to soften them a bit.

    I got super lucky and found the 8′ x 10′ area rug at Ross one day. I wasn’t even looking at rugs that day, but literally stumbled upon it while in the store. It was $50!

    Now, I don’t plan on filling the entire space with navy and dark greens. That would make it too dark. Opposite these chairs, I’m going to put in a neutral loveseat in either beige or cream. I just haven’t found one that I like yet that also fits in my budget. The lighter upholstery on the loveseat will help to lighten up the space more too.

    In the kitchen, I’ve been working on this wall and have pulled in lots of different colors here.

    Knotty Pine Walls in the Kitchen - Rain on a Tin Roof

    I’ve still got that green and navy going on with the barstools that help to anchor all the color, but I also added in bright pops of color with the art. I also balanced all of that color out by going with lots of white backgrounds and frames on the art.

    So, pull in color, but balance it out with lighter neutrals. 

    Make the Knotty Pine Walls Sing

    It is no secret around here that I love a great piece of art. I am picky about my art though. It always has to meet at least one of two conditions though: it has a special meaning to me or my family or it’s love at first sight.

    With the pine walls, I knew that adding gorgeous art would really make the walls sing. Minted is one of my go-to places for great art. I love that you can choose to buy just the art prints or you can choose to have it framed – and the selection of frames is great.

    In the den, the star of the show is, as you’ve already seen, the cow.

    Knotty Pine Paneling in the Den - Rain on a Tin Roof

    Faze Wall Art Vertical / Faze Wall Art Horizontal

    This piece of art was both one of those instant loves and also meaningful. Originally, I thought I would fill the den with lots of different floral prints to soften the walls, but then I saw this little guy and the deal was sealed. I come from a long line of cattle farmers, so this one also has special meaning. This one is called Faze. The vertical version is sold out, but you can still get this print in a horizontal version here.

    Colors that go with Knotty Pine - Greens - Rain on a Tin Roof

    I went with the French Farmhouse frame for this one. It has pretty corner details and a whitewashed finish, which looks good against the paneling.

    Along one wall in the den, we have a closet and two doors open against this wall on either side. There’s no place for furniture along this wall, so we opted to put in more art and meaningful objects here.

    Pine Paneling - Meaningful Art - Rain on a Tin Roof

    The wooden yoke above the closet was my great-grandfather’s that my Pap had put in the shed years and years ago. We brought it in, cleaned it up and mounted it on the wall. On either side of the closet doors, I mixed art and little mementos from both my Pap and Grunt’s grandfather.

    Pine Walls with Americana Art - Rain on a Tin Roof

    America Print

    When we cleaned out Grunt’s grandparent’s house back in the fall, we brought home two of his grandfather’s military hats and a mounted bayonet that had been given to him while he was stationed in Okinawa in the 60’s. When I saw this America print, I knew it would be the perfect compliment to these pieces.

    On the other side, there’s a nod to my Pap.

    Decorating a Room with Knotty Pine Tongue and Groove Walls - Rain on a Tin Roof

    Open Gate Art Print

    Grunt actually picked out this piece of art, Open Gate, it just happened to fit perfectly beneath my Pap’s belt and a couple of pieces from his old truck.

    DIY Art on Knotty Pine Walls - Rain on a Tin Roof

    Folks, if you ever want to hang a belt on the wall, just know it will take lots of zip ties and patience.

    I had pulled a few pieces off my Pap’s old truck a couple of years ago and finally found the perfect place for them. I mounted one of the Cheyenne tags and the center of the steering wheel in a shadow box and hung them above the belt.

    Paint Colors that Go with Knotty Pine - Navy and Greens in the Kitchen - Rain on a Tin Roof

    The kitchen wall has a variety of different pieces of art and objects. This is the one full wall in that space where I can really add color in. The rest of the kitchen is cabinetry, counters and appliances.

    Knotty Pine Walls in the Kitchen - Decorating with Colorful Art - Rain on a Tin Roof

    Orange Print

    The orange print was one of the first pieces I got for this space. I knew the bright colors would be the perfect punch of color for the kitchen. I’ve also mixed in a couple of family photos on this wall.

    Knotty Pine Wall Decorating Ideas in the Kitchen - Rain on a Tin Roof

    Chair Art Print

    The strawberry plaque was my Grannie’s that she used to have hanging in here, as was the Board of Education. The back of it is actually signed by many of her former students. The chair print, called Family Reunion (Uncle James), is a new addition. I knew it was coming to my house as soon as I saw it. My grandparents had a couple of those kinds of chairs at one point and I remember them sitting on the hill in them.

    Pine Paneling in a Kitchen - using colorful art to decorate it - Rain on a Tin Roof

    Hummingbird Art Print

    On the other side, I have a picture of me and Grannie and two more of her things that she had hanging in the kitchen – the Peggy’s Kitchen and the Some Visitors Bring Happiness sign – that sign has always cracked me up. The little hummingbird is a new addition. Grunt’s grandmother liked hummingbirds, so I got it and put it in here as a nod to her.

    Add a Touch of Shine to Knotty Pine Paneling

    And finally, my last tip for decorating with knotty pine walls – give it some shine.

    Shiny Light Fixtures with Knotty Pine Paneling in the Den - Rain on a Tin Roof

    I think that every room looks better with a touch of sparkle. In the den, I added a bit of this with a new lighting fixture from Bellacor.

    Pendant Lighting against Knotty Pine Walls - Rain on a Tin Roof

    Jaxon Polished Nickel Four Light Chandelier

    This is called a chandelier light, but I feel like it’s more of a pendant light. Either way, the sparkle of the polished nickel was exactly what this room needed. It lightens up the space and gives it a polished feel. Who says knotty pine can’t be a little fancy?

    Polished Nickel Pendant Light in Knotty Pine Den - Rain on a Tin Roof

    The lines of this fixture are pretty traditional though, so I feel like it will stand the test of time in terms of decorating trends – just like I’m making the knotty pine paneling stand the test of time.

    What side are you on when it comes to knotty pine paneling – yay or nay?

    Need more decorating tips?

    Got faux wood paneling from the 70’s? Read these 5 Ways to Decorate a Room with 70’s Wood Paneling.

    Need help plotting out your room design? Use this post to learn how to make a moodboard for your space.

    Low budget? Here are five ways to decorate your home on a small budget.

    Want to come back to this post later? Just pin the image below! 

    Knotty Pine Walls Decorating Ideas - Colorful Kitchen - Rain on a Tin Roof
    Gift Ideas Signature
  • Mudroom & Laundry Room Combo Ideas

    Mudroom & Laundry Room Combo Ideas

    Do you have a laundry mudroom space in your home? Whether the two are combined in one space or separate, this makeover will give you mudroom laundry room ideas that are pretty, but most importantly, functional.

    This is one of those projects in which I eat my words.

    Full on crow.

    So here’s the thing.

    A few years back, when everyone and their mama was giving their laundry rooms these beautiful makeovers, I was like, “Nope. Totally not spending money to make my laundry room look better when no one ever sees it.”

    Also, I hate bandwagons. And that seemed like a kind of bandwagon thing. So I totally ran running in the opposite direction.

    Back then though, we lived in the Beloved Foreclosure. And the laundry room was in the garage, hence there really wasn’t a laundry room at all, more like a spot for the washer and dryer. So duh, totally not putting in pretty tile or an elaborate wallpaper there.

    And then we moved into the 70’s Landing Pad.

    And in the 70’s Landing Pad, we have a laundry room that opens to the den. And also to our backyard. So it also functions like a mudroom for us. We use this space a good bit. And when people are over, they see this space. And there was no door to close it all up.

    And it was looking like this…

    The mudroom laundry room before.
    The laundry room mudroom before.

    Disclosure: Aiden Lane provided me with the bench and ironing center. All opinions are 100% mine. This post contains affiliate links for your shopping convenience. Click here to read my full disclosure policy.

    It’s been two years since we moved into the house and y’all, we hadn’t done a thing to this space. Well, I had ripped down the curtains in a fit of anger one day, but besides that, the walls and trim were still adorned with cornflower blue.

    On top of it all, the room was just gross. The walls and tile floor all needed a good scrubbing like five years ago.

    Obviously, it was also ugly.

    I knew this space needed to look better. I couldn’t just close a door and it be hidden. And, I wanted it to look better.

    But I didn’t really know where to start or what I wanted to do with it besides that it needed to be a functional laundry room and it would be good to also use it as a mudroom to drop and store things that we take outside to play with and things for the pool.

    Mudroom Laundry Room

    Finally, inspiration struck and the whole design plan came together for this space in under 24 hours when I happened upon this wallpaper one afternoon.

    This light bulb moment is when it also became obvious to me that I was about to eat crow.

    Mudroom Laundry Room Ideas - swimmers wallpaper

    So I did what I said I wouldn’t do. I spent money on my laundry room. I also made it function as a mudroom to justify the costs more in my head. 😉

    The space is now light, bright, airy, colorful and I love every damn inch of it. As it turns out, that crow didn’t taste half bad.

    Laundry Mudroom Ideas

    Let’s start as you enter the room…

    Bright Fresh Paint and a Deep Cleaning

    Mudroom laundry room - beige walls, bright pops of color.

    Wall Paint / Beach Towel / DIY Island

    This is looking into the laundry / mudroom from the den. Obviously, I painted all the walls and trim. The trim and back door got a fresh coat of white paint and the walls got a coat of Vanilla Paste – bye bye cornflower blue. Now, I refused to replace the tile in here. Instead, I spent a few days scrubbing it clean with my SteamMachine and it’s brass brush attachment.

    Cleaning the tile in the laundry room.

    Y’all, this tile was disgusting – I wore out four of those brass brushes. I hadn’t realized just how bad it was. For the most part, it cleaned up really well. There are some spots on the grout that didn’t clean up, but I think they are permanent stains and that’s alright – it’s just a mudroom and laundry room.

    Maximize Storage

    Laundry mudroom ideas - hook storage on walls.

    Beach Towel / Leaf Hooks (similar)

    I tried to take advantage of just about every inch of wall space I had and maximize it for storage and function. On this wall, I hung three hooks to hold wet towels as people come in from the pool.  I also splurged on a new beach towel because it coordinated perfectly with that flamingo art print. Also, we use the heck out of beach towels around here with our pool so it won’t just be hanging there looking pretty.

    Make It Fun with Art

    Mudroom Ideas - fun art, flamingo print.

    Flamingo Print

    Since most of the walls in here are neutral, I wanted to bring in lots of playfulness and color with art. This flamingo print called Bird Bath fit the bill. I think it has a slight Palm Beach vintage type feel to it and y’all know, I’m a sucker for that. Plus, anytime I see a flamingo or a flamingo art print, I always think of the Circus at age two carrying around plastic flamingos from the screened in porch at our old house kissing and loving on them.

    Go for a Bold Wallpaper

    Mudroom Laundry Room Makeover using colorful swimming wallpaper.

    Swimmers Wallpaper

    This wallpaper was what spurred the whole makeover. I fell in love with its somewhat vintage, but colorful and playful feel. The fact that it was so colorful made it basically effortless to coordinate other things in the room with the wallpaper – I had a slew of colors to choose from that would work well with it.

    Don’t forget special art.

    Mudroom Laundry Room Ideas - swimmers on wallpaper

    Shadow Box

    Also on this wall, I added one single piece of “art” – one of the Circus’ swimsuits from when she was a baby. From the time I found the Swimmers wallpaper, I knew putting one of her swimsuits on the wall was only fitting. I bought this shadow box from Michael’s, ironed the swimsuit really well then used pins and double sided tape to mount it inside the frame.

    Squeeze in a bench with storage.

    Mudroom Ideas - Bench with Storage

    Hart Storage Bench

    Since this is the room where everyone usually heads to the pool and/or backyard from, a place to sit down and put some sunscreen on or take some muddy shoes off was needed. However, as I said earlier, I also wanted to create as much storage as I could for this space. This Hart Storage Bench from Target met both those criteria.

    Mudroom Laundry Room: Bench with Hidden Storage

    Hart Storage Bench

    First off, it’s gorgeous. To me, this bench has a classic feel that won’t easily date and I feel like it might also have a touch of Hampton/Nantucket style in there too. I’ve never been to either place, but ya know, that’s what this bench tells me. 😉 Second, it seems extremely  well made. You do have to put it together, but this thing is solid. Third, it has hidden storage! And last but not least, all that for under $150!

    Mudroom Laundry Room Ideas - White Bench with Hidden Storage

    Hart Storage Bench

    The seat of the bench is divided into two sections that each lift up for hidden storage. I stashed away all our extra beach towels in here and still have room left to grow.

    Incorporate a Workspace for Laundry or Small Outdoor Projects

    Turning to the right of the bench, is a backdoor that leads outside as well as the kitchen island from our previous house.

    Laundry Room Ideas - Island for folding clothes with buckets for storage underneath.

    DIY Island

    When my in-laws remodeled the kitchen at our old house (remember – they moved into the Beloved Foreclosure after we bought the 70’s Landing Pad), they wanted a kitchen island with more hidden storage. Since Grunt and I built the kitchen island that was there ourselves (while I was pregnant and with barn wood from my great grandfather’s barn), I wanted to hold on to the island. We brought it to our house and put it against this wall in the laundry room as a folding center of sorts.

    I found the red and aqua buckets at Target in their seasonal/summer section and was so excited to find them since they matched perfectly with the Swimmers wallpaper. They were just $6 a piece too! They hold work shoes and larger outdoor play items like basketballs, etc. – great storage space!

    Be Playful

    Mudroom Ideas - playful art, girl with a beach ball

    Play the Day Away Art Print

    When I found this Play the Day Away art print, it was obvious it would work perfectly in the mudroom laundry room, but I also loved it because it’s a little reminder to literally play the day away and have a good time right before you walk out the backdoor.

    Also, if you’ve seen any of my Instagram Stories lately, you know I’ve been working on my cut flower garden this summer. Those sunflowers were cut straight from that garden!

    Don’t try to hide the washer and dryer away.

    Mudroom Laundry Room Combination - workspace for folding clothes.

    Turning the corner again, is where our washer and dryer are housed.

    Mudroom Laundry Room Ideas for a Combined Space - washer and dryer in nook.

    If you remember from the before photo, this space had doors on it. We actually opted to take those doors off and get them out of the way to make it a little easier to do laundry. I should also state here that Grunt Labor does all our laundry and if taking doors off to make it easier makes him happier while doing the laundry, then I’ll do that and whatever else it takes so that I don’t have to do the laundry. Praise Jesus for men who do the laundry, because otherwise our family would be running around either naked or in smelly clothes.

    I did give this entire closet/now alcove a coat of paint to brighten it up. I also replaced the shelf that was above the washer and dryer as the old one was gross and one side was being held up with a vertical 1″ x 4″ coming up from the ground.

    Maximize Wall Space

    To the right of the washer /dryer area, we installed a wall mount ironing center.

    Laundry Room Ideas - Wall Mounted Ironing Center to save space.

    Wall Mount Ironing Center

    Previously, the ironing board was stashed to the side of the dryer and the iron was in the upstairs closet. I realize this made no sense at all. Needless to say, when something needed ironed, I really evaluated how badly it needed ironed before I lugged everything out. And more often than not, I ended up wearing something that was a little wrinkled. This ironing center makes it so much easier to get things ironed.

    Mudroom - Laundry Room Ideas - Ironing Center Mounted on Wall

    Wall Mount Ironing Center

    All you do is open the door, flip down the ironing board and pull out your iron, starch, whatever you need. It can all be stored right there in the cabinet. There’s even a couple of hooks for you to hang stuff on if needed.

    Mudroom - Laundry Room Makeover Ideas - storage baskets on wall.

    There was also another open closet area in this space when we first got the house. We opted to remove some of the trim around the opening in order to fit the refrigerator in here that had once been in the kitchen. This frig holds lots of cold drinks that people can easily run in and get when they are outside.

    Get Creative with Storage

    Mudroom Storage Ideas - vintage locker baskets mounted on wall for storage.

    There was a little wall space here left for claiming and I did just that by adding more storage here. I hung vintage metal locker baskets with cup hooks (be sure to hit studs or use anchors if you do this!) to hold more outdoor related items. The top one has all our sunscreens and the bottom one holds smaller pool toys like water guns, etc. I went with the cup hooks so that the whole basket could easily be taken off the wall to take outside and then just brought back in and popped up on the wall again.

    That’s it for this mudroom laundry room makeover, but probably not the first time I’ll have to eat my words. 😉

    Share any modern mudroom laundry ideas you have in the comments!

    Looking for more great ways to organize and maximize storage?

    DIY Clothes Rack – an easy fix for extra clothes storage!

    5 Simple Storage and Organization Ideas – simple, but effective and affordable!

    Colorful Mudroom Makeover – bright, colorful and super functional!

    10+ Kitchen Ideas for Decorating, Organizing and Storage – the hardest working room in the house!

    Want to remember these ideas for later? Just pin the image below!

    laundry and mudroom ideas
    Gift Ideas Signature
    Mudroom and Laundry Room Makeover Ideas

    SaveSaveSaveSave

  • Free Printable Cow Art

    Free Printable Cow Art

    Use this free printable cow art to bring a touch of chic country charm to your home. There are five different cow prints – each in color and black and white – that you can choose from. The best part? They are all free for you to use – personal use only though!

    We call my uncle the cow whisperer.

    He can walk into a barn lot, and even without a bucket of feed, after a minute or two, he can often walk right up to a cow without it running away.

    He’s been practicing his whole life, so this should be no surprise.

    The rest of us though, well we have to tiptoe in and hide behind fence posts to keep them from running off – unless we have a few buckets of feed. In that case, they’ll come up pretty quickly.

    Needless to say, it took a good hour, quite a few awkward positions, stepping in cow shit a time or two, and a good zoom lens to get good photos of some of the cows to use as wall art.

    The buckets of feed didn’t last as long as I needed them to.

    Cow Art - Free Printables

    But I succeeded.

    They did spot me, but when they did, I went still and quiet as I’d learned from the cow whisperer himself.

    Cow Print - Free Printable Art Prints

    The key, I believe, is to talk softly and make no sudden moves. It’s almost like your romancing a damn cow.

    Be warned though, there are no perfumed candles to set the mood.

    Cow Wall Art

    I managed to get five pretty good shots of the cows. I’ve turned them into printable wall art that I’ll be using myself and also sharing with you if you’d like. You can print off each image in either color or black and white and decorate with them however you wish – just remember they are for personal use only, no reselling.

    Cow Art Print

    How to Get the Free Cow Prints

    You can get all five of the cow art prints in both color and black and white by subscribing to the Rain on a Tin Roof email subscription (it’s free and no more than 2-3 emails a week, usually just when I publish new posts). Just sign up below to get access to download the cow printables. Once you’ve subscribed and confirmed your subscription, you’ll be able to download the art. When you sign up, you’ll also be able to access and download all my other free printables in my printable library.

    If you’re already a Rain on a Tin Roof subscriber, you can find a link to download the printable cow art in my Printable Library. You can look at the bottom of the last email you received from me for the password. Additionally, you should also be able to put your email address in the box above and it should automatically take you to the download page. It won’t sign you up twice for my emails though.

    Cow Printable

    Tips for Printing the Cow Wall Art

    Again, these are for personal use only. Print as many as you wish to for yourself, but don’t print and resell.

    • Print on card stock or photo paper. Some photo paper has a more glossy sheen though, so keep that in mind as to whether you want that look or not.
    • If you’ve got a good color printer at home, then of course you can print them at home. I don’t, so I typically print out my things like this at Staples or another printing center like that.
    • If you’re going the photo paper printing route, then I typically use Mpix for printing. Their color quality is really good. You can also opt for a matte finish there as well.
    • Each image is centered with white space around it on an 8.5″ x 11″ size sheet of paper. I do this so that you can print on card stock or 8″ x 10″ photo paper and it still work without cropping the image too much. If you do print on 8″ x 10″ photo paper or another smaller size of photo paper, just be sure to look and see how the image is being cropped and adjust as needed before printing.

    I hope you enjoy this printable cow art – here’s to romancing the cows! 😉

    You might also want to see…

    Free Printable Horse Art - color, black and white, watercolor - perfect for framing for wall art.

    Free Printable Horse Art

    Here's Your One Chance Fancy Free Printable Art

    Free Printable Fancy Art

    Pin This Post

    Printable Cow Art

    Gift Ideas Signature

    SaveSave

  • Things to Do in Pigeon Forge | The Circus’ Birthday Trip

    Things to Do in Pigeon Forge | The Circus’ Birthday Trip

    Pigeon Forge, Tennessee is loaded with countless things to do that your entire family will enjoy. There are so many things to do in Pigeon Forge including the Dollywood theme park, dinner shows, shopping, and numerous other Pigeon Forge attractions like go-kart racing, putt-putt golf and more!

    For over a year, the Circus has been talking about going to the Dolly Parton museum (located inside Dollywood) to see Dolly’s dresses. I can’t count how many times she’s mentioned it. We kept meaning to get around to it last year, but that just didn’t happen. So at the beginning of this year, Grunt and I decided that for the Circus’ birthday, her gift from us would be a trip to Dollywood and Pigeon Forge to make her wish come true. Besides that, I love giving her experiences for her birthday rather than loads of gifts.

    Things to Do in Pigeon Forge

    Grunt and I both love to travel and visit both new-to-us places and old favorites. Of course, we want to pass that love along to the Circus. We love to see her face light up during all our adventures. Our trip to Pigeon Forge proved that she loves adventures and trips just as much as we do. She has yet to stop talking about all the different things we did. I hope she’s always up for an adventure.

    Enough sappiness already, right?

    Our main purpose of this trip had been to go to Dollywood, but we ended up doing lots more in Pigeon Forge and had an absolute ball. Both Grunt and I were pleasantly surprised with quite a few of the attractions we visited. Here’s the lowdown on where we stayed and everything we did.

    A big thanks to the media folks at both Dollywood and My Pigeon Forge for providing us with tickets to multiple attractions in the area. 

    Where to Stay in Pigeon Forge

    Pigeon Forge is full of all kinds of different lodging. There are hotels for just about every budget and you can even rent a cabin in the area. For this trip though, we stayed at Dollywood’s DreamMore Resort.

    Where to Stay in Pigeon Forge - DollyWood DreamMore Resort

    And it was amazing. 

    You guys, we were so impressed. We absolutely fell in love with the resort. I never doubted that the resort would be great, but I guess it also never occurred to me just how amazing it would be. I mean, it’s Dolly Parton’s hotel – how could she not do anything less than amazing?!

    Dollywood DreamMore Resort in Pigeon Forge

    Isn’t that picture everything? It’s my favorite from the entire trip. If you follow me on Instagram, you might have already seen it there. I titled it “Just Two Girls with Big Dreams.”

    It’s not an overly huge resort, so it’s not jammed packed with people, which was a plus for us. It’s just big enough and it has the amenities you would expect at a large resort.

    DreamMore Resort in Pigeon Forge

    They have a large pool outside and another one inside. We did both of them and enjoyed each. There is also a barn outside where story time is held for kiddos every evening.

    DreamMore Resort

    Every day from 4pm – 6pm, Dolly’s pink lemonade is served up. We enjoyed quite a few cups of that in rocking chairs that are just about around every corner at the resort.

    Of course, Dolly herself is around every corner as well.

    DreamMore Resort in Pigeon Forge, TN

    We loved seeing all the albums along the walls. The Circus went through pointing to all the ones we had and all the ones she wants.

    One of the best things about staying at the DreamMore Resort are the perks you can get at Dollywood. If you stay at the DreamMore and visit Dollywood during your stay, you get a TimeSaver pass good for some of their most popular attractions. That keeps you from having to wait in super long lines at those rides! It’s also good for some of the shows at Dollywood. On top of that, you can also take a shuttle, free of charge, right from the resort to the theme park. They drop you off at an entrance separate from the main entrance and you can walk right in without having to stand in long lines. They’ll pick you back up too!

    Things to Do in Pigeon Forge, TN

    Pigeon Forge Attractions

    There are countless attractions in Pigeon Forge ranging from theme and water parks to shopping, museums, comedy shows, go-karts, arcades and much more. We were in the area for three days and two nights and managed to pack quite a bit into that time period, but there is still so much more we could have done if we had a little bit more time!

    Dollywood

    I think it might be a sin to visit Pigeon Forge and not go to Dollywood. If you aren’t aware, Dollywood is a theme park that Dolly Parton herself started.

    There are lots of rides – and we realized just how much of a daredevil our daughter is.

    Dollywood - Things to Do in Pigeon Forge

    That’s her and her daddy all the way up there!

    There wasn’t a ride she wasn’t up for riding, unfortunately though, her height did knock her out of the running for a few of them. She loved everything she did get to ride though.

    Things to do in Pigeon Forge, TN - Chasing Rainbows Museum at Dollywood

    One thing that I really love about Dollywood and how I think it differs from other theme parks is that it’s not just rides. Dolly Parton’s museum, Chasing Rainbows, is located in the park and ya’ll, it was just awesome. The museum holds countless artifacts from Dolly’s life. This museum was what the kid has been talking about going to visit for over a year.

    You can see her Coat of Many Colors as shown above.

    Dolly Parton Museum Chasing Rainbows at Dollywood

    There are also displays from all the various movies she’s been in. The Circus has just discovered the 9 to 5 song, so she was all about seeing the outfits and parts of the set from the movie.

    Chasing Rainbows Museum about Dolly Parton at Dollywood in Pigeon Forge

    And then she made her way over to The Best Little Whorehouse in Texas display and I thought she would nearly come undone over all those dresses. We have the album, but of course, she’s not quite ready for that movie, although she can’t for the life of herself, understand why. 😉

    Dollywood also offers lots of different shows throughout everyday. We didn’t go to any of those, (I was outvoted!), but there were quite a few I would have liked to see that sounded good.

    Hollywood Wax Museum

    The Circus wanted to visit a wax museum when we were in Nashville this past February, but we didn’t have the time. This trip though, we made it a point to take her to the Hollywood Wax Museum in Pigeon Forge. My stars, y’all, I had no idea how much she would love it. She thought it was so cool to see some of her favorite stars in life size figures.

    Hollywood Wax Museum - Pigeon Forge Attractions

    Grunt also got to make believe for a little while. 😉

    Things to Do in Pigeon Forge - Hollywood Wax Museum

    It truly is amazing how true to life and real these things look.

    The Track Family Fun Park

    The Circus wanted to ride some go-carts as well, so we visited The Track Family Fun Park for that. She of course, loved it and would have ridden all day and night if we would have let her. The Track also has Blaster Boats you can ride. I’m not a huge fan of wet rides, so I let her and her daddy do that. Keep in mind though that just because you aren’t in the water, doesn’t mean you aren’t at risk of getting sprayed by the boats. Not that I’m talking from experience or anything. 😉

    There’s also an arcade there and just like her Mama, she loves a good arcade. This kid though has the magic touch. She’s now played that game above three different times at two different arcades and each time, she hits the jackpot.

    The Track Family Fun Park Arcade - Pigeon Forge Attractions

    Seriously, if you need an arcade buddy, she’s your girl.

    Magiquest, Mirror Maze & Pirate Golf

    When the kid saw the big Magiquest building shaped like a castle, she immediately wanted to go in there. Grunt and I didn’t think it would be something that we would really enjoy as we aren’t really into the Harry Potter/Lord of the Rings/Magi stuff like that. But, since it was the kid’s birthday trip, we gave it a whirl.

    And we all loved it.

    Magiquest is actually four attractions in one – Magiquest, Pirate Golf, Mirror Maze and Laser Challenge. We did the Magiquest first. Each person is given a wand programmed specifically to them and their Magi name, then you have to go through various different spaces that look like an old village and forest to find charms and unlock new levels. We all had a ball doing it.

    Pigeon Forge Attractions - Mirror Maze at Magiquest

    We also did the Mirror Maze here, the first we’d ever done, and it was a lot of fun, although I’m sure we all looked like idiots holding our arms out everywhere.

    Things to do in Pigeon Forge, TN - Pirate Golf

    And finally, we did a little putt-putt golf, blacklight Pirate style. I didn’t know pirates preferred black lights, but whatever works!

    Titanic Museum

    This place is very impressive. As if a huge building made to look like the Titanic isn’t enough, wait until you see everything that’s inside. The museum has very in-depth information relating to the Titanic, crew members and passengers. There are artifacts and even a glacier inside. Sorry for the lack of photos from this place; photos inside the museum weren’t allowed.

    The Outlets

    Shopping! There is literally a slew of shopping to be had in Pigeon Forge. There are multiple outlet malls and never was I so grateful to have them so close on a trip! Once we got up there, it was more rainy and cooler than we had expected or packed for, and so that sent us to the nearest outlet mall to find some cheap raincoats and a couple of long sleeve shirts to get us through a couple of cool mornings and nights.

    The Dolly Parton Statue in Sevierville

    If you didn’t know, Dolly is from the area herself and there is a statue of her outside the courthouse in Sevierville. We had a little extra time one night before dinner, so we headed there to take a picture.

    Visit My Pigeon Forge for more great attractions in the Pigeon Forge area as well.

    Dinner Shows in Pigeon Forge

    Pigeon Forge is also loaded down with various types of dinner shows. We had never done a dinner show in Pigeon Forge before, but did two on this trip.

    Hatfield and McCoy Dinner Feud

    So going into this dinner show, both Grunt and I didn’t really expect much. We were just kind of like, ‘We’ll give it a shot, but won’t be surprised if it’s not very good.’

    Well we were wrong. 

    The Hatfield and McCoy Dinner Feud - Dinner Show in Pigeon Forge, TN

    The Hatfield and McCoy Dinner Feud was so much fun. Now, it doesn’t actually talk about the real facts and information surrounding the real feud that took place between the Hatfields and McCoys (I feel my former history teacher self starting to come out.), but it is hilarious, full of entertainment and just an overall good time.

    The Circus was glued to the show the entire time and still talks about her favorite parts from the show. On top of that, she ate more fried chicken than I ever thought her little belly would hold and got worried when she thought the waitress might take it away. If you ever get a chance, go see it!

    Dolly Parton’s Smoky Mountain Adventures Dinner Show

    To round out our trip, on our last night we went to Dolly Parton’s Smoky Mountain Adventures Dinner Show.

    Dinner Shows in Pigeon Forge - Dolly Parton's Smoky Mountain Adventures Dinner Show

    While it was different than the Hatfield McCoy show, it was still just as good. There’s lots of music, dancing, acrobats, comedy and more. Once again, the Circus was glued to the show. She got her face painted just before the show at The Outpost just outside the auditorium where there are games, face painting and refreshments available before every show. And this time around, she cleaned her plate of mac and cheese and baked ham, then jacked both mine and her father’s portions as well. It was a fantastic night.

    Another trip in the books for us and another great time had! I’m sure we’ll head back to Pigeon Forge in the next year or two – as soon as the Circus has grown tall enough to ride all the crazy daredevil rides. 😉

    Do you have any fun things to do in Pigeon Forge to add to this list?

    You might also want to see…

    What to Do with One Night in Chattanooga

    Disney World Tips for the Average Family - save time, money, your sanity and have a better family vacation with these Disney tips!

    Disney World Tips for the Average Family

    A Weekend in Nashville: Things to Do, Places to Go and Things to See in Nashville, Tennessee

    A Weekend in Nashville

    Pin This Post

    Things to Do in Pigeon Forge

    SaveSave

    SaveSaveSaveSave

  • The Best Painting Tools List for Furniture Refinishing

    The Best Painting Tools List for Furniture Refinishing

    Furniture painting and refinishing can be quite intimidating when you’re first getting into it. The key though is to the right tools in order to get the best possible furniture makeover. I’ve painted countless pieces of furniture and this is my list of the best painting tools for furniture refinishing. 

    Last week, I got an email from a reader.

    I just love those. 🙂

    They asked if I could do a post on what kinds of tools and supplies I use when I’m stripping, painting or refinishing furniture.

    And I thought to myself, “Duh. Why haven’t you done that before, Jenna?!”

    So here it is. These are my must have products, tools and supplies for all your furniture makeovers. I’ve used these over and over again and they have continually proved their worth.

    Best Painting Tools List for Furniture Refinishing

    This post contains affiliate links for your shopping convenience. Click here to read my full disclosure policy.

     Best Painting Tools for Furniture Refinishing

    A Good Respirator Mask 

    Best Painting Tools

    Safety first, y’all. Anytime I have to strip, sand or spray paint anything, I always wear a mask. While you probably won’t die from a few spray paint fumes, they certainly don’t help. I typically use this kind of respirator (pictured above). Once you start painting a piece, you can usually take the mask off as long as you aren’t using spray paint. Masks do wear out over time. Once I see mine getting pretty dirty, I switch it out.

    Lead Test

    If you’re dealing with an old piece of furniture, check to make sure it doesn’t contain lead. You can do this with a lead test. If it does contain lead, do not sand it. Either paint directly over it or get rid of the piece of furniture.

    Heat Gun & Scraper

    Painting Tools List

    If you have to remove paint or want to strip a piece down to the bare wood, I suggest using a heat gun. Using a heat gun to strip furniture is by far much less messier than using a liquid stripper. Here’s a tutorial on how I stripped and re-stained my buffet. I personally use and love my HomeRight Heat Gun. It also came with a good scraper and other shaped scrapers to get in nooks and crannies.

    Sandpaper and/or Power Sander

    Best Sander for Refinishing Furniture

    If you do strip furniture, you are going to have to sand it lightly before painting or staining it to give it a smooth surface. You can do this with plain old sandpaper or a sanding block or with a power sander. I usually use my power sander for this task. I have a DeWalt sander and it hasn’t failed me yet. In my opinion, it’s the best sander for refinishing furniture. Some people prefer a pointed sander, but I really love this one. Here’s a tutorial on how to use a power sander and what kind of sandpaper to use when. If you aren’t putting any kind of primer on your piece before painting it, its a good idea to give it a light sanding first to rough up the finish. This helps the paint better adhere to the piece.

    Wood Filler

    Best Painting Tools - Wood Filler

    If you need to cover up old hardware holes, dings or scratches in your furniture, you are going to need wood filler. My personal favorite is Elmer’s Wood Filler. There is a full tutorial here on how to cover old hardware holes.

    Tack Cloth

    Painting Tools List - Tack Cloths

    I could sing the praises of tack cloths for days. Tack cloths are sticky pieces of cheesecloth that pick up any dust or dirt on the furniture before painting. Before painting, always, always, always wipe down your piece with a tack cloth. This keeps any dust and dirt from messing up your finish.

    Tarp, Old Blankets or Sheets

    If you are painting something inside on floors that you care about, put a tarp or old blanket or sheet under the piece. While it is pretty easy to scrape paint specks off hardwood or tile floors, it does take time. If you are painting on top of carpet, please don’t skip this step.

    A Good Primer 

    Best Primer for Furniture

    If you are using a regular latex based paint and don’t want to sand your furniture beforehand, I highly suggest using a good primer before applying your paint. Using a good primer will allow your paint to get good adherence to your furniture. My picks for the best primers for furniture are Zinnser and Ready. Anytime you are painting over a piece of furniture that has a glossy sheen, use a primer. Painting directly over a glossy sheen can cause your paint to adhere improperly. If you have more questions about primers, then read this post about priming and prepping furniture.

    Painter’s Tape

    Best Painting Tools - FrogTape

    If you plan to make any sort of pattern, design, or want to avoid getting paint on certain parts of the piece you are painting, be sure to use a good painter’s tape to block off that area. It’s no secret that FrogTape is my go-to painter’s tape. Its never failed me once. They also have a delicate surface version that can be used on freshly painted surfaces, a tape for painting textured surfaces, and patterned tapes in chevron, wave, and scallop.

    High Quality Paint Roller, Paint Brush, or Paint Sprayer

    Best Paint Brush for Furniture

    Your paint rollers and brushes can make or break your paint job. If you don’t invest in good, high quality rollers and brushes, you can be left with a finish that is full of fibers from the roller and hairs from the brush. My pick for best paint brush for furniture are Purdy brushes and my go-to rollers are these Purdy ones as well. A high quality paint brush will also minimize the brush strokes in your paint finish. If you want to decrease all chances of roller marks and brush strokes, go with a paint sprayer, which is what I usually do. My personal favorite is the HomeRight Finish Max. It’s easy to use and give a fine, professional finish. In you’re interested in learning more about the paint sprayer, read this post about how it works and how to use it.

    Floetrol

    Painting Tools List - Floetrol

    If you don’t have a paint sprayer or can’t use one for your project, you can add Floetrol to the paint to dramatically reduce brushstrokes. I had to do this when I painted my bathroom vanity since I couldn’t move it and I can barely see any brushstrokes. You just add a little to your paint and mix it in. (Directions are on the bottle.)

    Paint 

    Best Paint for Furniture

    Obviously when painting a piece of furniture, you need paint. This is not the place to skimp. Always invest in a good quality paint for your projects. It will save you time, money, and headaches in the long run. My personal picks for the best furniture paints are Velvet Finishes and Behr. If you have more questions about specific types of paint and what kind to use on certain surfaces, read this post.

    Topcoat

    Best Topcoats for Furniture

    After spending all that time prepping and painting a piece, it’s not a bad idea to protect it with a topcoat. My usual topcoats are Minwax Polycrylic or Velvet Finishes Protect. Topcoats are not always necessary on some pieces and with some paints. I’ve got a whole list here of different kinds of topcoats and when to use them. 

    Do you have any favorite furniture refinishing tools? 


    Looking for more furniture painting tips and tricks? I'm your girl!

    What Kind of Paint Do I Use on That? - every type of paint and which surfaces to use it on.

    Prepping Furniture to Paint - when to sand, when to degloss and when you can skip it!

    Tips & Tricks to Keep Paint from Peeling & Scratching - it's the worst, right?

    FAQ: Painting Furniture - all the questions I've ever gotten asked about painting furniture in one place.

    Want to come back here later? Just pin the image below!

    List of tools for painting furniture | What to Use to Paint Furniture | Supplies for Painting Furniture | How to Makeover Furniture

    Keep up with all my furniture makeovers on social media:

    Pinterest / Facebook / Twitter / Instagram


    SaveSave

  • What kind of paint do I use on that? Types of Paint and When to Use Them

    What kind of paint do I use on that? Types of Paint and When to Use Them

    A trip to your local hardware store to select paint can often become overwhelming. There are lots of different types of paint out there and knowing which type of paint to choose for a project can get confusing. Use this guide to learn about the different types of paint and which would be the best paint for furniture, wood, plastic, metal and laminate surfaces.

    I really thought that all the information to know about painting furniture was out there in internet land for everyone to see and no one needed to hear anymore from me besides the occasional furniture makeover, on the subject. However, I get questions all the time asking what kind of paint for certain kinds of furniture, when to sand / when not to sand pieces, when to prime / when not to prime, and so on. Apparently, people still have questions on this topic and I’m cool with that. It gives me something to write about that I love writing about. So to answer one of those questions, this post is all about what kind of paint to use on what surface.

    Types of Paint

    This post contains affiliate links for your shopping convenience. Click here to read my full disclosure policy.

    Best Paint for Wood

    Generally, you can use just about any kind of paint on wood surfaces, whether it’s wood furniture, wood trim or other wood surfaces.

    Best Paint for Wood

    Navy End Table painted with Velvet Finishes / Coral End Table painted with Latex Paint

    Oil-Based Paint

    Oil-based paint is great for furniture makeovers in terms of durability over time. However, it’s not as easy to deal with as latex and other specialty furniture paints are. With an oil-based paint, you absolutely must make sure you use a high-quality paint brush that will work with oil-based paint. Generally, it just works better to brush oil-based paint on, rather than rolling it. Oil-based paint is also known to have fewer brush strokes as well. Clean-up for oil-based paint is not a picnic. You have to use mineral spirits or paint thinner to clean your brushes and any paint off you as well. Most oil-based paints won’t require an additional topcoat though.

    Types of Paint: Oil Based Paint

    One really important thing to note with oil-based paint is that it should not be painted directly over latex paints. If you really want to use oil-based paint over latex, then first sand it, prime it with a water-based primer and then use your oil-based paint.

    Latex Paint

    Types of Paint: Latex Based Paint

    Your basic latex paint that you can find at local home improvement stores is also fine to paint wood surfaces with. Generally, it is much easier to work with than oil-based paints, however the durability over time isn’t as great, but it’s not bad by any means. If you paint something with a semi-gloss or gloss sheen, then you may not need an additional polycrylic topcoat depending on much use your surface will get. If you paint something with a latex paint that has a flat, eggshell or satin sheen, I would definitely finish up with a polycrylic topcoat for added protection. If you’re looking for low sheen, go with the satin polycrylic. Latex paint can be cleaned up with soap and water. One thing to note with latex paint is that brush strokes are more likely. To minimize these as much as possible always use a good, high quality paintbrush and mix in a little Floetrol – it’s like magic in a bottle for eliminating brush strokes.

    Best Paint for Wood Furniture: Speciality Paints

    Specialty Paints

    Since furniture painting has become such a big deal, there have been a number of specialty paints created specifically for painting furniture. Many of these make furniture painting easier in some way or another that oil-based and latex paints don’t always offer.

    Velvet Finishes Paint

    It’s no secret around here that I often use Velvet Finishes for my furniture projects.

    Best Paint for Furniture

    Velvet Finishes has a built-in topcoat and usually does not require sanding or priming unless the piece has a shiny or glossy finish on it before painting. If your piece is glossy, you can use their Ready product on it before painting, which is a spray primer that you just spray on, let it sit, then wipe off.

    Chalk Paint

    Many people love chalk paint. I’m not one of those people. I don’t detest it, but it’s just not my cup of tea. Most chalk paints don’t require you to prime or sand your piece before painting, which is great. Most chalk paints do require you to give it some sort of topcoat though. Many people use wax to seal it.

    Milk Paint

    I’ve never personally used milk paint, so I certainly can’t speak to how well it works myself, but I have heard good things about it from others. I think most people go with milk paint when they are looking to achieve a farmhouse effect on their furniture.

    Types of Paint for Laminate Surfaces

    Painting laminate furniture and surfaces is a whole other beast. It can be done, but not super easily. To paint laminate furniture, I think you should always prime the piece first. I’ve used Zinnser Primers for this and have had good results.

    Types of Paint: Zinsser Primer

    I have painted laminate pieces before without priming them first and it didn’t turn out so hot.

    Latex Paints

    After priming your piece, you can follow up with at least two coats of latex paint. Just like I noted above, use a good brush and Floetrol to prevent brush strokes.

    My personal pick for latex paint that you can buy at your local home improvement store is Behr paint. I’ve always gotten good results with it and while it is a little more expensive than other brands, I think it’s well worth it.

    Oil Based Paints

    You can also use oil-based paints over laminate if you first prime it. Using an Oil Based paint would provide more durability over the long run.

    Velvet Finishes

    I have used Velvet Finishes over laminate furniture before and it did pretty well. I still suggest using a good primer on it first though.

    Topcoat It

    With laminate furniture, I highly suggest giving it some extra protection. Give it a couple coats of Polycrylic after you finish painting it to really try and protect that surface.

    Types of Paint: Polycrylic Topcoats

    Even if you follow all these steps, there will most likely come a time down the road when your painted piece of laminate furniture will chip or the paint may start to peel away. This is just the nature of painting laminate furniture.

    Types of Paint for Plastic Surfaces

    Types of Paint: Spray Paint for Plastic Surfaces

    Plastic Planters Spray Painted with Geometric Designs

    Spray Paint

    Hands-down, anytime I have something plastic to paint, I head for the spray paint. It’s the easiest way to get the paint on there without brush strokes and gives pretty good adhesion on plastic pieces. Prime the piece first with a spray paint primer (especially if it’s really shiny) and then follow up with a few coats of spray paint. I’ve used Rust-Oleum, Krylon and Design Masters spray paint and have been pleased with all of them.

    Types of Paint for Metal Surfaces

    I generally go with one of two paints when it comes to metal surfaces: Oil-Based Paint or Spray Paint. If it’s a big metal piece that I’m painting, I’ll go with oil-based paint like I did with my metal handrail. If it’s something metal that’s smaller, I’ll go with spray paint.

    Types of Paint for Metal Surfaces

    Metal Stair Railings painted with Oil-Based Paint / Spray Painted Metal Laundry Hamper 

    Oil-Based Paint

    Oil-Based paints bond really well to metal surfaces. You can use it in a paint sprayer if you want to or brush it on, which is what I tend to do. Just remember, and I know I’ve said this like 2.1 million times now, always use a good, high quality paintbrush! It really does make a world of difference when painting. One thing to remember when you are painting something with oil-based paint that’s bigger in scale is to work in sections. You can’t easily go back over places to touch them up after you’ve already put one coat of paint on. While oil-based paint takes longer to dry, that also means your finish gets messed up if you try to go back over a part that is partially dried. My personal pick for oil-based paint is Behr’s.

    Spray Paint

    If you’ve got something smaller that’s metal, let’s say a lamp or something, then I would head for the spray paint aisle. It’s just easier to work with and will still provide great adhesion and durability. I used spray paint on that metal laundry hamper you saw above.

    Types of Paint for Upholstered Surfaces

    So you’ve been considering painting some upholstery, eh? This is a topic that many people seem to have mixed feelings on. I have painted an upholstered chair before, however it was a chair that wasn’t going to get a whole lot of use, therefore I wasn’t too worried about the comfort of it.

    Types of Paint for Upholstered Surfaces

    Chair Upholstery painted with Velvet Finishes Paint

    In that one instance, I used Velvet Finishes paint for the upholstery. I think it took about three coats to fully cover the upholstery. Upholstery does suck up a lot of paint, so be prepared to paint on multiple coats.

    Those are my picks for the best types of paints for wood, laminate, metal, plastic and upholstery surfaces.

    Do you have any favorites or other questions?

    Now that you’ve read all the nitty-gritty details, you might find it useful to have a one-page guide on what kind of paint can be used on what kind of surface – lucky for you, I’ve made one just for you! Click below to get access to it! 

    Types of Paint Quick Reference Guide

    If you’ve got any other painting questions at all, please leave your questions in the comments!

    Need more painting help?

    Click on any of the links below to get my opinion. (Which by no means is a professional opinion. I’ve only painted, oh, say 2.4 million pieces of furniture. Ok, that’s stretching it a bit.)

    Types of Paint to Use on Kitchen Cabinets – I’ve painted cabinets five times now. Here’s my take on which paints to use.

    Painting 101: Topcoats and When to Use Them – topcoats can be confusing, right? This guide breaks them all down.

    Must-Have Tools and Supplies for Painting Furniture – my tried and true tools of the trade.

    My Best Tips and Tricks for Painting Furniture – from over 10+ years of painting.

    FAQ: Painting Furniture – all the questions I’ve ever been asked about painting in one.

    blog-signature-summer-15
    pin-this-post-2
    Types of Paint - Best Paint for Wood Furniture

    SaveSave

  • Farm Birthday Invitations using Picmonkey

    Farm Birthday Invitations using Picmonkey

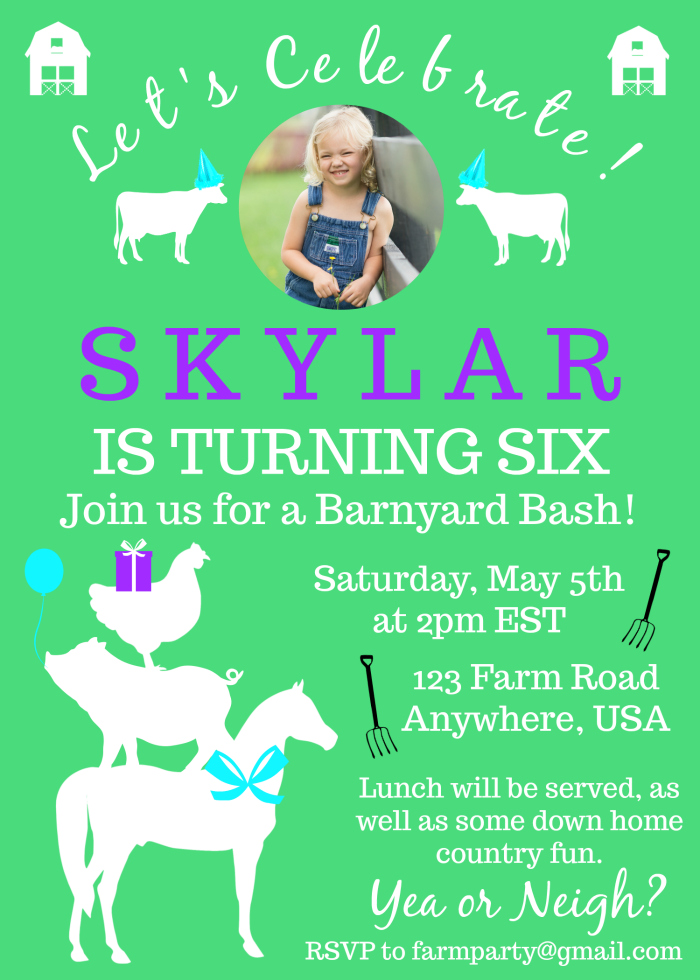
    Every year, I make a customized birthday party invitation for the Circus’ party. This year, it’s a farm themed birthday, so I made farm birthday invitations. It’s actually pretty easy to make your own invitations and on top of that, it’s much more affordable than buying customized ones via other sources. Use this guide to make your own farm invitations or as a guide to whip up your own different themed party invitations. 

    Another birthday in the books for the Circus! I can’t believe it, but she is already six!

    This year, she wanted a farm themed birthday party. As I always do, I made the invitations for her birthday myself using Picmonkey. It took me about an hour or a little less to put this one together and order the actual printed invitations. The best thing about making your own invitations though is that they can be 100% customized to fit the party and the birthday kiddo. Bonus – it’s much more affordable to make and print out your own invitations instead of going with another design and print service somewhere else online.

    Here’s the farm birthday party invitations we ended up with this year for the Circus’s celebration…

    Farm Birthday Invitations Tutorial - fully customizable - Rain on a Tin Roof

    Isn’t it adorable? Here’s how we did it…

    Farm Invitations Tutorial

    This post contains affiliate links for your shopping convenience. Click here to read my full disclosure policy.

    The video below will completely walk you through the steps of making your own birthday invitations using Picmonkey and even printing them out. Like I said, you will be able to completely customize this invitation to your own liking. You can change the fonts, colors, anything like that. In the video, I do show you exactly how I did mine, but you can change it up however you like.

    Before you start to create your own invitation, there are a couple of things you need:

    1. Farm Animal Images 

    To create farm animal birthday invitations, you have to have some cute farm animal graphics, of course! The one thing Picmonkey does not have are any farm animal images. They have just about every other kind of graphic you could need, but no farm animals. (Come on, Picmonkey – get on it!) So, you will need to have those on hand before you start. I purchased this pack of farm animal silhouettes from Creative Market to use. It was $5 for 42 farm related images and it was a steal. Not only did I use these for the invitations, but I also used them for decorations at the party as well.

    2. Photo of the Birthday Kid (Optional)

    I always like to put a photo of the Circus on her birthday invitations. I keep one every year and that way, you can always look back and see how much they changed from year to year. If you don’t want to include a photo on your invitation, then you can just replace the photo with another farm themed image or something else to your liking. I’ll show you how to crop the photo into a circle in the video.

    Ready to get started on your own farm party invitations? Watch the video below! I’m also including written directions as well below the video, but the video will give you the best visual. First, go to Picmonkey!

    [adthrive-in-post-video-player video-id=”isvGrWP0″ upload-date=”2018-05-22T13:12:10.000Z” name=”How to Make Farm Birthday Party Invitations using Picmonkey” description=”Make these farm birthday invitations for free using Picmonkey. You can make them completely customized to fit your birthday party’s details and even add a photo of the birthday kiddo! You can make your own invitations in under an hour with this tutorial – all you need to do is print them! “]

    Here’s what I did step-by-step. As you do this, be sure to leave plenty of blank space around the edges of your invitation. This will ensure that when you go to print the invitations that none of your text or images will get cut off.

    Barnyard Invitations: Step by Step

    Steps

    Step 1

    Create the circle image of the birthday guy or gal.

    Go to Picmonkey. Select Edit > Computer > Select the Photo of the birthday kid you want to use.

    Go to the square on the left that says Frames > Shape Cutouts > Circle.

    Size and move the circle until you have the photo cropped as you like it. Export the image and save it to your desktop.

    Step 2

    Go to the Picmonkey homepage. Select Design > Blank Canvas > Print Size, 5×7. Scroll toward the bottom and select the vertical blank one.

    Step 3

    Select Canvas Color on the left side. Choose the color you want your background to be. We used a green color, which was 4adc7c. You can simply type that into the letter box under Canvas Color if that’s the same one you wish to use.

    Step 4

    Click on the Butterfly icon on the left, which is the Overlays menu. Click Add Your Own. Find and choose the barn images or whatever other image you wish to use and put one in each of the upper corners of the invitation.

    Repeat this process and add in the animals on top of one another in the lower left hand corner as well.

    Use the Overlay box that pops up with each image to turn the images white or whatever other color you want to use.

    Step 5

    Click on the Tt on the left. Add in a text box using the font Black Jack. Type in “Let’s Celebrate!” Make it white or another color you want to use. Click on the Effects button on the text menu box that pops up and select curve. This will curve the text. Place this text box near the top of the invitation.

    Step 6

    Click on the Butterfly icon > Add Your Own. Select the photo you cropped into a circle. Size and place it just under “Let’s Celebrate!”

    Step 7

    Add in the rest of the text.

    Click on the Tt button again and add in the rest of the details for your party. Below is a detailed image noting each text font and colors.

    Sorry about the typos in the invitation near the bottom – you get the idea though! 

    Farm Invitations - Fonts and colors - Rain on a Tin Roof

    Step 8

    Add in the rest of your images.

    Go back to the Butterfly icon > Add Your Own. Add in the cows on either side of the photo. Add the pitchforks beside the date and address.

    Go to the Apple icon on the left. Select Celebrate. This is where you can add the balloon and party hats. To add the gift and bow, select Santaland from the Apple icon. You’ll find those under that theme. Below is another image with all the details on the images I used.

    Barnyard Invitations - graphics and overlays to use - Rain on a Tin Roof

    Step 9

    After you’ve got your invitations exactly how you like them, click Export along the top and save it to your computer. You can also click the Save icon along the top and that will save it to your Picmonkey hub, which will allow you to come back in and edit the invitation if needed. I generally like to do both of those options in case I do need to come back in and edit the invitation for some reason.

    Step 10

    Print your invitations!

    You can also print your invitations right from Picmonkey. Once you’ve exported and saved your party invitation to your desktop, go to the Picmonkey homepage. Scroll down to the bottom and click on Picmonkey Print under Apps + Tools.

    Select Flat Cards > Get Started > 5×7 > Single Sided > Whichever paper type you prefer > How Many Invitations You Need > Upload Your Invitation. Make sure everything looks good and that nothing is cut off on the edges, then finish your order!

    Farm Party Invitations - how to make your own - Rain on a Tin Roof

    Isn’t she a cutie? Of course, I’m partial though. 😉

    Have you ever created your own invitations for parties? Tell us about them in the comments!

    Looking for more ideas for your birthday celebrations? 

    Get more ideas for farm birthday parties here!

    How to Make a Party Banner with Picmonkey – yep, I use Picmonkey to make party banners too!

    Another Kind of DIY Party Invitation using PicMonkey – this one is a more basic invitation that could work for lots of different party themes.

    Want to know what else Picmonkey can do? Check out these 17+ Picmonkey Tutorials, Tips and Projects then.

    Want to refer back to this post later? Pin the image below!

    Farm Birthday Party Invitations Tutorial using Picmonkey - Rain on a Tin Roof

  • DIY Countertops: Upholstered Countertop for Built In Cabinets and Other Ideas

    DIY Countertops: Upholstered Countertop for Built In Cabinets and Other Ideas

    Countertops are one of those things that can creep up on ya and take a big bite out of your project budget fast. These DIY countertop ideas for built in cabinets are creative and easy on your wallet. 

    When I installed the built in cabinetry in my recent office makeover, the one thing I didn’t worry too much about was what I would do for a countertop. I just assumed I’d be able to pop a 1″ x 12″ across the top of the cabinet run, paint it and call it a day.

    Wrong.

    Never ever ever expect anything to go smoothly when it comes to home projects.

    DIY Countertop Ideas - Upholstered Countertop

    As it turned out, the wall I was installing my built-ins on had a huge hump in it that I had to work around. This caused a major hiccup in the countertop department.

    Here’s the thing though.

    Not everyone is going to have a huge hump that some drywall guy thought looked decent enough forty years ago. So if you are planning to install built in cabinets somewhere in your home, first, I’m going to give you some ideas for the countertops that will work if you don’t have a huge hump in your wall, which you most likely won’t. 🙂 And then, I’m going to show you how I worked around my little problem and made an upholstered countertop for my built-ins, in case you have that problem too. And even if you don’t have a big hump in your wall (lucky you!), you can still do the upholstered countertop if you like it!

    First off, if you have no clue as to what I’m talking about when referring to my office built-ins, then read this post first.

    Affiliate links included in this post.

    Countertop Ideas for Built In Cabinets

    Idea #1: Use two 1″ x 8″s or a combination of other 1″ boards.

    If the cabinets you purchased for your built-ins are like mine, stock wall cabinets, then the tops of them are right around 12″ deep. While one would think, you could just go buy a 1″ x 12″ at your local hardware store, cut down the length to fit and nail it in place, you would be wrong, because a 1″ x 12″ is actually not 12″ wide, but only 11 1/4″ wide, therefore, you would have a gap left to fill on top of your cabinets.

    The solution to this would be to purchase two 1″ x 8″s, cut them down to the length of your cabinet span, place them side by side on top of your cabinets, secure them in place, then fill holes and gaps and paint. 1″ x 8″s are actually 7 1/4″ inches wide, so you would have a total 14 1/2″ to cover those cabinets, leaving you with a nice overhang.

    You could also use a combination of other 1″ boards like 1″ x 3″, 1″ x 4″, 1″ x 6″ – just depends on what you want the countertop to look like and how many boards you want to cut.

    If you have access to a local lumber mill that mills their own lumber, then you may be able to contact them and have them custom cut a piece, such as a 1″ x 14″ just for you.

    Idea #2: Custom Laminate or Stone Countertop

    You could go to your local home improvement store or stone store and have them come out, measure and cut a custom size countertop for your built-ins. They would be able to give you a single slab of countertop in the exact measurements you would need. This is going to be a pricier option though.

    Idea #3: DIY-ish Laminate Countertop

    You can purchase in-stock laminate countertops at your local home improvement store, then cut them down to the size you need for your built-ins. If you went with true base cabinets, this would just be a matter of cutting down the length of the countertop. If you went with wall cabinets like I did for your built-ins though, you would need to cut down the width and length of the countertop, which can be a little more tedious. This option isn’t as pricey as custom laminate or stone counters, but would probably run you around $75 – $100 depending on what size you needed. We installed some built-in cabinetry using base cabinets in the sitting area of our bedroom and this is what we opted to do there. You can see how it turned out here.

    Idea #4: Faux Stone Countertop using an Old Laminate Countertop

    If you’ve got a local Habitat for Humanity or another store that sells building and housing materials that have been removed from homes, then you could go there and find a piece of laminate countertop that would fit your built-in, then turn them into “soapstone” counters using this DIY method that I did in one of our previous homes.

    Idea #5: Plywood Countertop

    If your cabinet run isn’t longer than a piece of plywood (8 ft.), you could take your measurements to your local Home Depot or Lowe’s, get a piece of their high quality sanded 3/4″ plywood and have them cut it down to the size of your built-ins – remember to leave a little for overhang. Go home, install it on the cabinets using a finish nailer, fill holes, caulk and then paint or stain it. If you buy the good quality sanded plywood, this should give you a pretty good looking, smooth countertop for your built-ins.

    Idea #6: Perpendicular 1″ x 3″s or Beadboard

    This idea is courtesy of the one and only Wayne. Wayne is Nicky’s dad and he is my go-to guy for when I run into any snags when it comes to any home project. The man knows everything. I called Wayne over to come and help me troubleshoot the cabinets and counter of my built-ins when I realized that I had the huge hump in my wall. He had the idea to take multiple beadboard panels (the small ones that fit together tongue and groove style) or 1″ x 3″ pieces, cut them down to where there was a 1 1/4″ overhang and then put them perpendicular on the top of the cabinets. So instead of having just a couple of long pieces of boards as the counter, you would have lots of pieces going along the cabinet top that almost created a shiplap type look. You could paint or stain the pieces after you installed them all.

    This idea would also work if you have a hump in the wall because you would be custom fitting each individual piece of wood. The only reason I opted to not go with this solution was because I thought it might give the built-ins more of a farmhouse look and my office definitely is not farmhouse. We all know how I feel about shiplap.

    Alas, those ideas either wouldn’t work for my built-ins due to the large hump in the wall or they just weren’t my style. So, I created an upholstered countertop for my built-ins. If you’re interested in that option, here’s how I did mine.

    How to Make an Upholstered Countertop for Built In Cabinets

    Materials & Tools Needed

    Please note, If you don’t have a big hump in the wall like I did, then you can skip some of these steps. 🙂 You could just cut a piece of plywood to size, attach it to your cabinet tops and skip to step #3.

    Steps

    Step 1: Install the 1″ x 6″ or 1″ x 8″

    First, cut a 1″ x 6″ or 1″ x 8″ down to the length of your built-ins (wall to wall or however long your complete built-in is, filler pieces included.) Place that piece on the front edge of your cabinet tops, slightly overhanging it over the cabinet edges by 1 1/4″ or so. Make sure your overhang measurement is the same over the whole span of your built-in, then nail the 1″ x 6″ into place.

    Countertop Ideas

    This is going to allow you to have a smooth countertop front that will have an even overhang all the way across.

    Step 2: Install the Plywood Pieces Against the Wall

    Next, take 3/4″ plywood and cut it into pieces that are the length, plus a little (measure to about the middle of the gap between the cabinets that are side by side), of each individual cabinet. For the width, cut the plywood at the biggest measurement between your wall and the 1″ x 6″.

    Countertop for Built In Cabinets

    Place the plywood piece along the back of the cabinet tops, then using a carpenter’s pencil, run it along the wall on the back of the plywood piece.

    Cheap Countertop Ideas

    This is called scribing. It’s going to give you the shape of your wall so you can custom fit that piece of plywood to it. Once you’ve scribed, use a jigsaw or circular saw to cut along the line you drew. Repeat until the piece fits and attach it to the cabinet tops using a brad nailer or a hammer and finish nails.

    DIY Countertops

    Repeat this whole process with the plywood pieces until you’ve covered the entire span of your built-ins.

    Step 3: Upholster the Countertop

    Lay your upholstery material out along your countertop – this is the material I used. Pull a little bit of excess up around the back and the edges.

    Countertops Ideas - Upholstering a Countertop

    Cut a piece of lattice trim to the length of your countertop span. Place the trim along the back of the countertop, on top of the upholstery material.

    DIY Upholstered Countertop

    Attach the lattice trim to the wall where studs are using a finish nailer or finish nails. As you attach the trim, push it down firmly both onto the upholstery material and against the wall.

    Trim off the excess material along the front edge of the countertop, leaving enough overhang to staple under the countertop.

    Upholstered Countertop for Built In Cabinets

    Pull tightly on the front of the upholstery and staple it under the overhang of the countertop. Trim any excess material as needed.

    Cut two lattice strips to the length coming out from the end corners of each wall to the edge of the countertop. With these, repeat the same process you did with the lattice piece on the back.

    Step 4: Install Quarter Round Trim (Optional)

    If you still have any gaps around where the lattice trim and the upholstered countertop meet, you can cut quarter round trim and install it along those areas. I did have to do this because I still had some gaps to contend with. Quarter round is very flexible though, so it easily curved into all those gaps and closed them.

    Step 5: Paint the Trim

    Fill any holes in the lattice trim and quarter round with spackling or wood filler. If you have any gaps along the wall, caulk those. Paint the trim whatever color you wish. I opted to go with the color of my built-in cabinets.

    Cheap Countertop Ideas - DIY Upholstered Countertop

    The upholstery I used for my countertop is a faux leather crocodile pearl, so it wipes easily, but also has a little shine to it.

    DIY Countertops - How to Upholster a Countertop

    And so the saga of the built-ins ends.

    Thank ya, Jesus.

    Can you add any DIY countertop ideas to this list?

    If you haven’t seen how I installed the built-in cabinetry, you can read how to do that right here.

    You might also want to see…

    Home Office Makeover with Budget-Friendly DIY Projects: An Office Makeover on a Budget with lots of Office DIY Decor

    Complete Home Office Makeover

    Yes, please! Great DIY countertop makeovers that are doable and affordable!

    More DIY Countertop Makeovers

    Pin This Post

    Countertop Ideas - Upholstering a Countertop on Built In Cabinets

  • DIY Built-In Cabinets using Stock Wall Cabinets

    DIY Built-In Cabinets using Stock Wall Cabinets

    By far, one of the best things I did when I completed my office makeover was installing built in cabinets. They gave me loads more of hidden storage. I can just close the cabinet doors on all that clutter! These DIY built in cabinets were made using unfinished wall cabinets as base cabinets.

    When I first showed you my office makeover back in March, I said that I was so mad at myself for not doing it sooner because I felt like having an office that was organized and beautiful made me much more productive. The more I thought about it though, the more I am kind of glad I waited a while to whip this space into shape. Granted, I shouldn’t have waited two years, but waiting did help me to pinpoint a few things that I knew I needed to add or change in my office to make it more functional – these built-in wall cabinets being one of those things.

    Built In Cabinets using Stock Cabinets - Blue cabinets against wall - Rain on a Tin Roof

    I have a pretty good size closet in here, but it holds all my craft supplies. I desperately needed something that would both store and hide away all the paperwork, files, etc. that go along with running your business from your house. The solution to that were these DIY built-in cabinets using stock cabinets. Since I was short on floor space in this room, I ended up buying stock wall cabinets and used them as base cabinets for these built-ins. With a little bit of work, these stock cabinets look custom built for this space. 

    Using Prefab Cabinets for Built-Ins

    This post contains affiliate links for your shopping convenience. Click here to read my full disclosure policy.

    Obviously, since these built in wall cabinets were made for a certain space in my house, my measurements won’t match up exactly to yours. I’m going to list out everything I used and how I installed the cabinets and trimmed them out, but keep in mind, this is a project that will vary by size depending on where you are actually installing your built-in cabinets.

    Supplies & Tools Needed for the Built-In Cabinets

    Steps

    Step 1: Remove Existing Baseboard

    Before building or installing anything, you’ll want to remove the existing baseboard that is in the space where you’ll cabinets will go.

    DIY Built In Cabinets - preparing the space - Rain on a Tin Roof

    To do this, you should be able to use a small pry bar and hammer along the back wall the cabinets will sit against. For the sides, come out about 12″ from the corner of the wall, mark it and then use an oscillating saw going in at that mark to cut out that portion of the baseboard instead of having to remove the whole thing. Be sure to check the depth of your stock cabinets first though – they might be different than mine!

    Using Prefab Cabinets for Built Ins - Removing the baseboard - Rain on a Tin Roof

    The photo above was taken after the cabinets were installed, but I wanted you to have an idea of what I was talking about with the oscillating saw. They are really a great little tool to have.

    Step 2: Build a Frame for the Cabinets to Sit On

    Since these are wall cabinets, they are shorter than typical base cabinets. If you just install them without putting them on a base, they are going to feel really small in a room and you’re going to be bending over more than you should. To bring the height of the cabinets up, build a base for them consisting of 2″ x 4″s and plywood.

    You will want your frame to be as long as the space you are installing your cabinets in and as deep as your cabinet bottoms, about 12″. Again though, be sure to double check the depth of your cabinets.

    Built In Wall Cabinets - making a base - Rain on a Tin Roof

    I found it easiest to first assemble a basic 2″ x 4″ rectangle frame, put it in the space, then add in more 2″ x 4″ supports.

    Add 2″ x 4″ supports every 16″ inches. You’ll want to drill a pilot hole first, then attach the pieces with your screws to keep from splitting the wood.

    DIY Built In Office Cabinets - building a base and supports for the cabinets - Rain on a Tin Roof

    I screwed the supports along one side of the frame first, flipped it, then put the screws in on the other side. Being able to push the frame against the wall while attaching the screws made it easier to get the screws in.

    DIY Built Ins with Stock Cabinets - attaching the cabinet base to the wall - Rain on a Tin Roof

    To finish off the base for the cabinets, you’ll want to cut out either one full piece of 3/4″ plywood or multiple pieces to fit and cover the top of the 2″ x 4″ base. Attach the plywood with screws to the 2″ x 4″ base.

    Installing DIY Office Wall Cabinets - Rain on a Tin Roof

    It’s perfectly fine to piece together scraps of plywood you have on hand here, as long as they are all 3/4″. You won’t be able to see this part once the cabinets are installed.

    Step 3: Set the Cabinets in Place

    Bring your cabinets in and set them up however you wish on the base. Most likely, you’ll want to space them out so that you have a relatively even amount of empty space at each end of the cabinets.

    Built In Office Cabinets using Unfinished Wall Cabinets - putting on the base - Rain on a Tin Roof

    Once you have everything how you want it, remove the end cabinets. You’ll need to add small wood blocks along the front side edge of each end cabinet that is closest to the wall.

    Home Office Cabinets - filling the end gaps - Rain on a Tin Roof

    The blocks don’t have to be a certain size. I just pulled out a piece of scrap wood I had. Attach it just behind that edge lip. Put a little glue on it and then nail it to the side of the cabinet. You’ll attach your filler pieces of wood to these little wood pieces once your cabinets are installed.

    Step 4: Install the Cabinets

    Put your end cabinets back in place. Check to make sure the cabinets are where you want them. Use a stud finder and mark where the studs are on the wall just above the tops of your cabinets.

    I had a spot/hump on my wall that stuck out more than the rest of the wall. Knowing that I couldn’t push the cabinet back any farther into that area, but that I would be able to use wood shims to pull the other cabinets out more if needed, I started by installing the cabinet that butted up to that hump in the wall.

    You can see in the photo below what I’m talking about.

    Built In Cabinets - installing on the wall and shimming - Rain on a Tin Roof

    Attach the cabinets to the wall with screws. The key to installing the cabinets is to make sure that each cabinet bottom is even with the cabinet base you built and that each individual cabinet meets up nicely to the cabinets beside it. This may mean that some cabinets aren’t flush with the wall. Use wood shims as shown above to make the cabinets meet the wall and allow a screw to hold it all together.

    Step 5: Install the Filler Pieces

    If you had gaps on the ends of the cabinets, now is the time to cut those filler pieces to the length of the cabinets and nail them to the small wood blocks you attached to the cabinet ends.

    DIY Built in Wall Cabinets using Unfinished Stock Cabinets - Rain on a Tin Roof

    I used a finishing nail gun, but you could also use a hammer and finish nails. I was able to use a 1″ x 4″ on each end of my cabinets as filler pieces. Of course, yours may be different depending on how much empty space you had at the end.

    Step 6: Trim Out the Base

    You don’t want the exposed 2″ x 4″ frame to be what you see at the bottom of the cabinets. You want that to look more built-in and finished.

    Cut your piece of 1″ x 4″ to the length of your cabinet run and attach it to the base just where the cabinet bottom ends and the plywood base begins. You can use a finish nailer or a hammer and finish nails for this.

    DIY Built In Cabinet Plans using Prefab Cabinets - Rain on a Tin Roof

    You’ll still have a small gap at the bottom. To cover this, cut a piece of lattice strip wood to the length of your cabinet run and nail it on top of the 1″ x 4″ near the bottom to where it meets the floor.

    Step 7: Painting the Built-Ins

    Fill all your nails holes with spackling or wood filler. Caulk any gaps along the edges, between cabinets and the trim, then prime and paint.

    Because these were unfinished oak cabinets and I wanted the grain of the wood to show as little as possible, I did two coats of primer and three coats of paint.

    DIY Built In Office Cabinets - Blue Cabinets against Peach Wall - Rain on a Tin Roof

    If you don’t care too much about the grain showing, you can easily get by with one coat of primer and two coats of paint.

    For the paint, I do suggest opting for a semi-gloss or gloss finish, so that you can easily wipe it clean as needed.

    DIY Built Ins Using Stock Cabinets - Blue cabinets with upholstered countertop - Rain on a Tin Roof

    I found these cute marble like knobs to top off my built-in office cabinets with – they were a steal!

    And then there’s the countertop. Because this is already such a long post, I put the how-to for the countertop into another post. You can read about countertop ideas for the built-ins here and how I upholstered my countertop as well.

    Do you have any plans for adding built in office cabinets to your home? 

    Need more home office inspiration?

    The Full Office Makeover– see the full before and after of my office space including all the budget DIY projects that went into it. 

    DIY Chippendale Desk– can you believe I actually built my desk? It’s a really simple build and won’t cost more than around $100. 

    DIY Wall Mounted Drop Down Desk with Storage– short on space? This wall mounted desk is a great solution!

    12 Stylish and Comfortable Office Chairs – it’s hard to find a chair that fits both criteria, right? Well, I’ve found 12 that do!

    Want to save this project for later? Pin the image below!

    DIY Built In Office Cabinets using Unfinished Stock Wall Cabinets - Rain on a Tin Roof
  • thredUP Reviews: How to Find the Good Stuff Faster

    thredUP Reviews: How to Find the Good Stuff Faster

    thredUP is an online secondhand clothing marketplace that has thousands of pieces of brand name, high quality, gently used clothing at a fraction of the cost. They add thousands of new pieces everyday. There are great deals to be had at thredUP, but it can also get overwhelming  because of how much they do offer. In these thredUP reviews, I’ll share some tips and tricks for shopping thredUP that keep you from spending countless hours in front of your computer and will instead help you find the good stuff there in record time. 

    This post contains affiliate links for your shopping convenience. Click here to read my full disclosure policy.

    It’s no secret that I love thrift stores, yard sales, consignment stores and all other forms of secondhand shopping. I make at least one, usually more, trips to some of my local favorite thrift stores each week. Here lately, I’ve been perusing one of my favorite online secondhand shops more often though – thredUP. I found thredUP a few years back and I loved it, but it was so overwhelming to me because there were literally thousands and thousands of pages full of items to browse through. I could easily spend an hour in front of the computer looking through the pages and not find but one or two possible things I might get.

    My experience with thredUP has changed now though…

    I got smart about shopping on thredUP and now, I can find multiple fantastic clothing items at great prices (sometimes normally way expensive brands) in hardly any time at all! I’m so excited about all I’ve been able to find on there recently using these tricks that I wanted to share them with you. Y’all, just a couple weeks ago, I got 10 pieces of clothing for just $140. That included five tops, one romper, one blazer, one dress, one top for the Circus and one romper for the Circus!

    Are you ready for the life-changing thredUP shopping tips?

    thread Up Reviews

    thredUP reviews - Tips for Finding the Good Stuff on thredUP - Rain on a Tin Roof

    I thought it would be helpful to share my tips for finding the gems on thredUP with both a video and screenshots. You can watch the video just below and I’ve also written out my tips for using thredUP below the video as well. On top of that, I also put together some outfit ideas using pieces I’ve gotten from thredUP too.
    [adthrive-in-post-video-player video-id=”kKesUZf5″ upload-date=”Wed May 02 2018 17:39:43 GMT+0000 (Coordinated Universal Time)” name=”How to Find the Good Stuff on ThredUP” description=”A review of ThredUP including how ThredUP works and tips for finding the good stuff.”]

    Tip #1: Browse thredUP on your computer, not your phone.

    When I look on thredUP, I like to open up different pieces I like in new tabs. Doing this on my phone is a nightmare, but on my computer, it’s much easier and I can easily click back and forth between tabs to compare items.

    Tip #2: Plug in your sizes.

    Before you ever start shopping on thredUP, plug in your sizes under your account.

    thread up reviews - how to find good clothes easier - Rain on a Tin Roof

    As long as you check that little box that says “Always set filters to My Sizes,” then anytime you are browsing for clothing on thredUP, they will only show you items available in your sizes.

    Tip #3: Check your recommendations.

    After you’ve done some browsing and purchased a few items from thredUP, they will start gathering item recommendations for you. I’ve found some great pieces this way!

    thredup reviews buying clothes - looking at recommendations - Rain on a Tin Roof

    You can see your item recommendations both under your account, by clicking on Account Details at the top > My Shops > Recommendations. You can also scroll down the thredUP homepage to see recommendations for you as well.

    Tip #4: Check new arrivals often.

    thredUP clothes - look at new arrivals - Rain on a Tin Roof

    thredUP adds thousands of new quality items daily. I tend to scroll through the first four or five pages of the new arrivals once a day or once every couple of days. This is where you can find some awesome pieces before someone else snatches them up!

    Tip #5: Use those filters!

    Anytime you’re browsing on thredUP, you’re going to have filters on the left of the page – use those! This is especially helpful if you’re looking for something specific or wanting to stay in a certain price range.

    thredUP review - always use the filters - Rain on a Tin Roof

    There are filters for price, brand, style, color and much more!

    Tip #6: Favorite Items / Add to Cart

    If you find an item you like, be sure to either add it to your cart or favorite it.

    How to Use thredUP  - add items to cart - Rain on a Tin Roof

    If you absolutely love it and are pretty sure you’re going to buy it, add it to your cart right then! You’ll have 24 hours to purchase it before it’s put back out there for someone else to snatch up. If you aren’t quite sure, you can favorite an item as well so you don’t forget it.

    Tip #7: Favorite Item Notifications

    So let’s say you find a piece you love, BUT it’s already in someone else’s cart. 🙁 What you need to do is click the “Get Notified” button on that item.

    thredUP shopping tips - get notifications when an item becomes available.

    If the person doesn’t purchase the item, you will get an email when that item is available for purchase.

    Tip #8: Shop the Seller’s Other Items & Similar Brands

    If you find an item you love, see if that seller has other items for sale by scrolling down the page.

    thredUP tips - check more from the seller.

    Chances are, if you like one thing that seller has for sale, then you might like more! I have found great pieces this way!

    Another thing to check out in this area is that “Brands Similar to …” link – these are brands that are going to have clothing similar to the item you’re looking at. You can also keep scrolling down on an item’s detail page to see other similar items as well!

    Tip #9: Shopping by Brand

    I’ve already told you that you can shop by brand using the filters, but you can also shop by brand through an item’s detail page.

    thredUP - buying brand name clothing - Rain on a Tin Roof

    Simply click on the brand name and you’ll be taken to a page with other items in your size from that brand.

    Tip #10: Use the Search Feature and Turn on Search Notifications

    If there is something specific you are looking for, search for it.

    thredUP reviews - use the search feature - Rain on a Tin Roof

    If thredUP doesn’t have what you want right now, turn on the search notification button for that search and you’ll be notified when new items are added in your size matching your search specifications.

    Tip #11: Use Your Favorited Items to Shop Similar Items

    You can see your favorite items by going to your account details > My Shops > Favorites. You can also click the heart in the upper right hand corner on the thredUP homepage. Here, you’ll see all the items you have favorited. It will tell you if items are still available, sold or in someone else’s cart.

    ThredUP shopping - see similar items based on your favorite items. - Rain on a Tin Roof

    If items are sold or in someone else’s cart, you can click the “Shop Similar” button to see items that are similar.

    Tip #12: Check the children’s section!

    If you’ve got a kiddo or grandchildren, then don’t discount that kids clothes section at thredUP! I have found some seriously cute pieces at great prices for the Circus there. Just like with the adult clothing, you can filter by size, type, style, price, etc.

    thredUP Clothes Outfit Ideas

    Here are a few outfit ideas using some of my latest scores from the online consignment shop, thredUP.

    Black Gingham Button Up + Green Satin Skirt

    thredUP clothes Outfit Ideas - Rain on a Tin Roof

    I found this green skirt at a local thrift store and as soon as I found it, I knew it would be perfect with a black gingham shirt. I searched for one on thredUP, saved the search so I would get notified when new black gingham items were added and when the right one came around, I snagged it!

    Tassel Romper

    Outfit using clothes from thredUP - romper - Rain on a Tin Roof

    I love rompers because they are effortless outfits – you don’t have to coordinate pants with tops, it’s all right there already put together for you! I got this romper from thredUP for $19!

    Red Checked Button-Up + Distressed Jeans + Boots

    thredUP outfit ideas - red checked shirt and distressed jeans - Rain on a Tin Roof

    I call this my tablecloth shirt because it reminds me of those vinyl picnic tablecloths. I love it though and that shirt was only $11!

    Long Pink Skirt + Black and White Striped Tank

    long pink skirt and black and white tank top from thredUP review

    Both the skirt and the shirt here were thredUP purchases. That skirt is by far, one of the best secondhand clothing purchases I’ve ever made – I love it! It was $45, but I had been looking for one just like it for a long time and it’s a great brand – DKNY. The shirt was only $5!

    Pink Gingham Peplum Top + Jeans

    thredUP outfit - pink gingham peplum top and jeans - Rain on a Tin Roof

    I kind of have a thing for gingham – can’t you tell?! No way this pink gingham peplum top wasn’t coming to my house since it was just $10!

    Red Tank + Black and White Dress

    Red tank dress with black and white skirt from thredUP - Rain on a Tin Roof

    This dress was one of those pieces I took a chance on. It’s a brand I wasn’t familiar with and had never worn before. I loved the combo though of the stripes and the pop of red and it was only $17 and since I could return it if it didn’t work, I decided to chance it. I’m glad I did because it does fit and I love it paired with the pops of blue on these heels!

    Leopard Print Blazer + Guns N’ Roses Tank + Red Jeans

    thredUP clothes outfit ideas - leopard print blazer with Guns 'N Roses tee shirt and red jeans - Rain on a Tin Roof

    Blazers are my jam – I can’t get enough of them. This leopard blazer from thredUP is lightweight, so great for spring and summer nights. I’ll also look for any excuse to wear one of my band tees and this blazer is great paired with my GNR sleeveless shirt. The blazer was $19 on thredUP.

    Black Peplum Top + Pink Jeans

    thredUP outfits - black peplum top with pink jeans and leopard print wedges - Rain on a Tin Roof

    This is a casual outfit that can be easily dressed up or down depending on what kind of shoes and jewelry you want to wear with it. Black and pink is another favorite color combo of mine as well. This top was only $13 on thredUP. It’s just a simple black color, but it fits perfectly and I love it’s peplum flare!

    Have you shopped on thredUP before? If you’ve got any great tips to share, please tell us in the comments!

    Oh and if you’re ready to do a closet clean-out yourself, you can request a  clean out bag to send in your gently used clothing and get a little cash for it!

    Want to hang on to this post to remember all the tips? Pin the image below!

    thredUP Reviews - How to find the good stuff - Rain on a Tin Roof

    SaveSave

    SaveSave

    SaveSave

  • Latest Good Reads No. 3

    Latest Good Reads No. 3

    It’s been too long since we’ve talked good books!

    We went to the beach over spring break a few weeks ago and for our family, that means we read. A lot. We also play on the beach, ride bikes and eat good food, but there’s a whole lot of reading done as well.

    This list of my latest good reads contains books from that vacation as well as just the usual reading I do at home. I always try to have a book on my nightstand that I’m reading. Having a book to escape to after dinner and before bed really helps to keep me from constantly going through all the things in my mind that need to be done. It makes me less stressed and more calm – for the most part, anyway. 😉

    Let’s begin! If you’re new around here, I’ll also include links at the end of this post to previous posts containing more of my favorite books.

    This post contains affiliate links for your shopping convenience. Click here to read my full disclosure policy.

    Latest Good Reads No. 3

    Latest Good Reads No. 3 Book Reviews

    That Summer by Lauren Willig

    That Summer by Lauren Willig Book Review

    That Summer

    After I read The Forgotten Room that was authored by Karen White, Lauren Willig and Beatriz Williams, I knew I wanted to read more of Willig and Williams’ work. I was already an avid Karen White fan. Well, this book by Lauren Willig, That Summer, did not disappoint. It is set in England and goes back and forth between present day and the 1850s. The main character, Julia, has just inherited a house from an aunt and it was all a complete surprise to her. She stumbles onto a painting hidden behind a false panel in an armoire, which makes her dive deeper into the history of the house and the family she barely knows. I love books that take you back and forth between past and present, connecting the dots over time and that’s exactly what this one did – great read! You can find That Summer here.

    The Family Plot by Cherie Priest

    The Family Plot by Cherie Priest Book Review

    The Family Plot

    Oh man, do I love Cherie Priest! As you guys know, I love a good ghost story. That’s exactly what The Family Plot is and it was great. I first discovered Cherie Priest when a friend suggested I read her Eden Moore series (which is amazing!). She has other books as well, but they didn’t intrigue me as much as the Eden Moore series had. When I found out she had written a new book that was about an old house, ghosts, family secrets AND that it was set right here in Chattanooga – I couldn’t get my hands on it fast enough! I read through this baby in just a little over a day. It was that good. If you love old houses, are an architectural salvage junkie and aren’t scared by a good ghost story, get this book now! She also leaves the ending somewhat open for a sequel – fingers crossed!

    Looking for Salvation at the Dairy Queen by Susan Gregg Gilmore

    Looking for Salvation at the Dairy Queen by Susan Gregg Gilmore Book Review

    Looking for Salvation at the Dairy Queen

    This is one of those good southern books about a girl who is just trying to find her place in the world. When I got this book, I didn’t realize it but the author actually wrote for the local Chattanooga newspaper. Apparently, I have a thing for local books and authors. Looking for Salvation at the Dairy Queen is set in a small north Georgia town in the 1970s and centers around Catherine Grace Cline, a preacher’s daughter who has one thing in mind and that’s getting away from that small town. However, she ends up realizing sometimes what you think you want isn’t actually that at all. If you like Fannie Flagg books, then you’ll probably like this one too!

    Sea Change by Karen White

    Sea Change by Karen White Book Review

    Sea Change

    Of course, there has to be a Karen White book on this list. 🙂 I think I’m thisclose to having read every single book of hers. This one though, it quickly made its way to one of my favorites of hers. Sea Change is another book that goes back and forth between past and present, but in the same location. It’s set on Saint Simons Island in Georgia during both the present day and the early 1800s. Ava and Matthew have just gotten married and moved to his family’s home on the island that has been there for centuries. What Ava doesn’t realize though is that she has been on the island before – both in her current life and a past one. This one is so so so good, guys!! If you haven’t already, add it to your list!!

    The Whole Town’s Talking by Fannie Flagg

    The Whole Town's Talking by Fannie Flagg Book Review

    The Whole Town’s Talking

    This book totally has an unexpected ending. In fact, I don’t know that the ending was like anything I had ever read before and I’m convinced its something that only Fannie Flagg could come up with. The Whole Town’s Talking follows the birth of a small town in Missouri from it’s creation to its end. And much of the book is set in the town’s cemetery. It’s not a ghost story though, it’s about lives and people and how we all effect each other and grow and change alongside each other. It’s a really good feel good book. You can find it here.

    The Peach Keeper by Sarah Addison Allen

    The Peach Keeper by Sarah Addison Allen Book Review

    The Peach Keeper

    This is the second book by Sarah Addison Allen that I’ve read and it was another good read. The Peach Keeper takes place in a small town in North Carolina. When an old house is restored, a skeleton is discovered and sets in motion a chain of events that will lead Willa, one of the main characters, to discover that her family has some secrets and that she must also face her own issues she’s been putting aside. Find this book here.

    That’s it for this round!

    If you’ve got any book suggestions, please leave them in the comments. That’s how I’ve found so many of some of my favorite books!

    If you want more book suggestions, then you can click the links below:

    Latest Good Reads No. 1

    Latest Good Reads No. 2

    The Best Ghosts, Witches and Such Books

    The Best Southern Books

    More Favorite Southern Books

  • Here’s Your One Chance Fancy Printable Art

    Here’s Your One Chance Fancy Printable Art

    Who doesn’t love Reba McEntire’s song, Fancy? Seriously, y’all. It’s a total classic. My little five year old self would literally sit in front of the television watching TNN (The Nashville Network) back in the day before heading to school just praying to see the Fancy video. And honestly, if you don’t like it, I just don’t know that we can be friends. Just to commemorate how amazing that song is, here’s some Here’s Your One Chance Fancy printable art to adorn a wall in your home – and to remind us to take those chances. 😉

    Here's Your One Chance Fancy Printable Art, free printable art inspired by Reba's song, Fancy.

    If you saw my office makeover, then you already know this art made an appearance in there – as well as Dolly Parton and Burt Reynolds. I like to cover all my bases. 

    Fancy Song Printable Art

    In there though, I printed off this art in a somewhat uncommon rectangle size, a 5″ x 15″, and then made a frame for it. In that particular space, I really wanted something more rectangular and didn’t want it to be as big as a normal printable size because I didn’t want to take away from Dolly who is just to the right of Fancy.

    Because I know most people would just want a normal size of this art, I also made it in a standard printable 8.5″ x 11″ size.

    Reba McEntire Fancy Printable Art

    And if you want to print it on regular photo paper, there’s enough white space to crop it down and fit it onto those sizes as well.

    I also did two different font variations and color variations. You can choose from the more chic skinny font, the thicker brushstroke font, if you want Fancy in black or red and if you want a white or black background. If you do want the more horizontal, rectangle size, I’m including that size with these free printables as well and those also have the same variations of the standard 8.5″ x 11″ size.

    So really with all these options and sizes, there’s no excuse to not put this up somewhere in your house and all hail Queen Reba. 😉

    How to Get the Fancy Free Printable Art

    All the Fancy printables are free for my Rain on a Tin Roof email subscribers. Just sign up below to get access to download the printables and to also get all the other free printables in my printable library.

    If you’re already a Rain on a Tin Roof subscriber, you can find a link to download the Fancy printable art in my Printable Library. Look at the bottom of the last email you received from me for the password! And, if technology doesn’t fail me, you should be able to put your email address into the box above as well and it should take you straight to the download page. And nope, it shouldn’t sign you up twice for my emails. 🙂

    Here’s Your One Chance Fancy Printable Printing Tips

    First things first, these are for personal use only. Feel free to print as many as you wish for yourself! Please do not print these and try to sell them. Please do not copy my files and try to sell them on Etsy or anywhere else. Basically, please be a good and honest person. 🙂 Because if you’re not, then I’ll sic my posse on you. 🙂

    Printing the Vertical 8.5″ x 11″ Size

    • The vertical images can be printed as is on 8.5″ x 11″ sizes of paper. I suggest using a good card stock when printing.
    • If you want smaller sizes, there is enough white space around the text that you should be able to print in those sizes as well.

    Printing the Horizontal 5″ x 15″ Size

    If you want to go with the size I printed my Fancy art out on, then you’ll have to find a place that will print that size. I went with Mpix. They offer the 5″ x  15″ size and their color quality is wonderful.

    I hope you guys enjoy this little nod to an iconic song – Here’s Your One Chance Fancy…

    You might also want to see…

    Free Printable Horse Art - color, black and white, watercolor - perfect for framing for wall art.

    Free Printable Horse Art

    AWESOME idea to really showcase the art - super affordable too! DIY Lucite Frame + Gone With the Wind Printable via RainonaTinRoof.comDIY Lucite Frame + Free Gone with the Wind Printable

    These would be GORGEOUS framed - and so much cheaper than other art! They are FREE! Instant Art: Banana Leaves Watercolor Printables via RainonaTinRoof.com

    Banana Leaves Watercolor Printables

    Pin This Post

    Here's Your One Chance Fancy Free Printable Art

  • DIY Wall Mounted Desk with Storage

    DIY Wall Mounted Desk with Storage

    Have a small space where you’d like to fit in a wall mounted desk? Need a little storage there too? You’re in the right place then! This DIY wall mounted desk is a simple build that folds down to reveal space for your computer or writing and hidden storage.

    This project has only been completed for a month or so and I can already confidently say that it is hands-down the Circus’ most favorite thing I’ve ever made her – a wall mounted drop down desk.

    DIY Wall Mounted Desk - with storage and writing space - Rain on a Tin Roof

    Y’all, she is at this desk everyday. In fact, before I could even get photos of it, I had to give it a good wipe down because she’d already gotten marker ink and glue on it from her various art projects.

    And from a mama’s point of view, it is so nice to have all her art supplies (sans paint because we ain’t letting her run wild with paint just yet) in one place. And to be able to just close it all up and hide the mess is the icing on the cake.

    DIY Fold Down Desk - folded up - Rain on a Tin Roof

    This DIY desk can easily be made to work for both kids and adults. For adults, you’ll just want to raise up the mounting height a bit and possibly increase the overall size of the desk. For me though, even as an adult the size is more than adequate.

    This post contains affiliate links for your shopping convenience. Click here to read my full disclosure policy.

    DIY Fold Down Desk

    Supplies and Tools Needed

    Cut List

    Make the following cuts using either a miter saw or circular saw.

    1. Cut the 1″ x 8″ x 8′ piece of wood into the following lengths:

    • Two pieces that are 28″ long
    • Two pieces that are 17 7/8″ long

    2. With the remaining 1″ x 8″ piece of wood that is left, cut four small squares. These don’t have to be perfect at all.

    3. Using a circular saw, cut the 3/4″ plywood project panel down to 28″ x 19 1/2″.

    4. Using a circular saw, cut the pegboard project panel down to 26 3/8″ x 17 7/8″.

    Steps

    Step 1

    Gather your measured and cut four 1″ x 8″ pieces, drill and longer wood screws.

    Drop Down Desk Assembly - Rain on a Tin Roof

    Arrange the boards as shown below.

    Drop Down Wall Desk - putting together the frame - Rain on a Tin Roof

    Attach each longer 1″ x 8″ piece to each shorter 1″ x 8″ piece at the end of each board using two screws on each board. Drill a pilot hole first and then drill your screws in.

    To keep these pieces from ever coming apart, you can also apply wood glue along the edges of the boards before attaching together with screws if you wish. We did not do this, as I do think it’s strong enough as is, but if you’ve really got a rough and tumble kiddo, this could be a good idea.

    Step 2

    Lay your cut plywood panel on top of the 1″ x 8″ frame to make sure it fits properly. It should cover the entire frame.

    Building a diy wall mounted desk with storage. Rain on a Tin Roof

    Adjust as needed.

    Step 3

    If you plan to paint your desk, go ahead and do so now. The Circus wanted two colors, so we painted the frame Tropical Sea and the drop down portion of the desk Yellow Groove.

    How to Make a DIY Fold Down Desk - mounts to wall - Rain on a Tin Roof

    After the yellow was dry, she also made a design with tape to block off a few areas to paint the Tropical Sea on as well.

    Painting the DIY Wall Desk - Rain on a Tin Roof

    Step 4

    Get your cut piece of pegboard, the four small 1″ x 8″ square pieces you cut and the longer wood screws.

    Pegboard in back of drop down desk - Rain on a Tin Roof

    Place a square in each corner of the backside of the desk frame. Drill a pilot hole and then fasten the square wood piece to the desk frame with one of your longer screws.

    Assembling the drop down wall desk - Rain on a Tin Roof

    After you’ve attached all four wood pieces, place your cut pegboard piece through the front of the desk frame and attach it to each wood square using a smaller wood screw.

    Wall Mounted Desk with Storage Building Plans

    Step 5

    Lay your drop down desk front on it’s face directly in front of the desk frame.

    Attach the frame and desk front together by using the 90 degree surface hinges.

    DIY Desk plans for a wall mounted desk -  Rain on a Tin Roof

    Step 6

    Get both your left hand lid support hinges and your right hand lid support hinges. Attach each following the package directions.

    Building Plans for a Wall Mounted Desk - Rain on a Tin Roof

    An important thing to note here is that you might have to play with these right and left hinges a bit. For me, the lower portion that goes on the drop down front needed to be scooted in a bit more than what the package directions said (as you can see from my holes above!). This could vary from different brands of hinges. If you do have to play around with it and end up with a few holes, just fill with wood filler, sand and paint over them.

    Step 7

    Attach the magnetic latches at the top of the drop-down desk frame and lid using the mounting instructions on the package.

    Tutorial for building a wall desk - Rain on a Tin Roof

    Step 8

    Attach whatever pretty knob you’ve decided to go with on the top front of your drop-down desk.

    Step 9

    Determine where you want to hang your new DIY drop down desk. To do this, I had the Circus sit on the seat I knew she would be using at the desk and then held the desk up to see where it would be best to hang it for her. Make a mark on the wall where you want it to hang.

    Grab a stud finder and mark all the studs in that area.

    On the back of the desk, measure the area between the top two wood squares you attached in the corners. Cut your 1″ x 2″ furring strip to that length or slightly less than.

    Space Saving DIY Wall Mounted Flip Down Desk - Rain on a Tin Roof

    Place the furring strip on the wall and attach it to the wall where studs are using your drill and the longer wood screws.

    Attaching the Wall Mounted Desk to the Wall - Rain on a Tin Roof

    Use a level to check for levelness before placing the second screw into the furring strip and wall.

    Step 10

    Place the drop down desk on top of the furring strip. Using your longer wood screws, attach the desk to the furring strip you just attached to the wall. I put three screws along the back of our desk top as shown below.

    Small Space DIY Wall Mounted Fold Down Desk - Rain on a Tin Roof

    Drop it down and enjoy!

    Fold Down Desk Plans - Rain on a Tin Roof

    She absolutely loves this thing.

    Wall Mounted Flip Down Desk Plans - Rain on a Tin Roof

    We used pegboard hooks to organize and hang most of her art supplies.

    Tutorial for a Space Saving Wall Mounted DIY Desk - Rain on a Tin Roof

    The two purple baskets are part of this set of pegboard baskets that we spray painted. The other baskets are from the Dollar Tree.

    DIY Wall Mounted Drop Down Desk with Storage - Rain on a Tin Roof

    We also placed a few other Dollar Tree baskets along the bottom to hold colored pencils, crayons and random other art supplies.

    Hands down, this space saving wall desk is the best thing I’ve built for the kid so far!

    Have you made a DIY wall desk before? Need one anywhere? 🙂

    Want more great ideas for your kids?

    DIY Dress Up Closet– so easy to make and they will love it!

    Easiest Ever DIY Lemonade Stand– great for those budding entrepreneurs!

    Easy DIY Children’s Stage with Hidden Dress-Up Clothes Storage– they will love you forever for making this one!

    If you’d like to save this diy desk build to refer back to later, pin the image below!

    Fold Down Wall Desk Plans - Rain on a Tin Roof
  • Spring Home Tour

    Spring Home Tour

    You guys, when did it become March?! Heck, when did it become March is nearly over and April is riding in fast? It seems like just a few weeks ago, I was planning out all my projects for the year, feeling like I had plenty of time to tackle all 100 things on my list (ha!) and then bam, March is almost gone! Anyone else feel the same way?

    If you’re new here, hello! My name is Jenna and as you might have noticed at the top of this page, I believe in flying your freak flag in every aspect of life – from decorating to just being your everyday self. Did you just come from Rhoda over at Southern Hospitality? I really love her take on decorating – she has a classic, timeless style that is always so perfectly put together. She’s a sweetheart too! Also, a big thanks to Marty at A Stroll thru Life for hosting the tours – I love her gorgeous style. It’s the perfect amount of traditional mixed with touches of glam.

    Today, I’m going to take you on a tour of our 70’s Landing Pad – a split-level house built in the 70’s that we’ve been remodeling for the past few years. Fair warning – my style may not be your cup of tea. There are black walls, punches of color and a sofa and coffee table that I feel would have held their own among other decor at Studio54.

    Also, if you aren’t new here, you’ll see that some of the spaces in my home haven’t changed since the last home tour. I’m not one of those people who is constantly wanting to switch things up in their house and I don’t generally change things up for each season with the exception of a few pumpkins at fall and Christmas decorations. Once I have a room how I like it, there’s a good chance it will stay that way until I just so happen to run across inspiration somewhere that sends me wanting to change something up. I don’t generally seek to redecorate my home every few months, year, etc. I like to enjoy the rooms instead of constantly trying to change it up. So, if you found my living room atrocious last year, you’ll find it the same way this year.  😉

    If you’re interested in shopping details for some of the items in my home, then I’ve included affiliate links below each photo. The links will take you to the exact item in my home or a similar item if the exact one is no longer available. 🙂

    2018 Spring Home Tour

    Living Room

    Renovated Split-Level Home Tour Full of Color and Character - 70's Inspired Living Room Design

    Sofa, (similar) / Coffee Table (similar) / Snakeskin Rug (similar) / Floor Lamp / Red Velvet Drapes / Chandelier

    Nothing has really changed in the living room. I do have a new console table that is going to go against the wall to the left of the sofa, but I have yet to get it painted! This room is still one of my favorites in our home.

    Renovated Split-Level Home Tour Full of Color and Character - 70's Inspired Living Room Design

    Eyes Art / Coffee Table (similar) / Palm Print Pillow / Navy Pillow with Colorful Trim / Cheetah Pillow

    Renovated Split-Level Home Tour Full of Color and Character - 70's Inspired Living Room Design

    Lion Art / Snakeskin Rug (similar)

    Renovated Split-Level Home Tour Full of Color and Character - 70's Inspired Living Room Design

    Green Chair / Mustard Pillow with Colorful Trim / Colorful Accent Pillow / Gold Table (similar)

    Kitchen

    Renovated Split-Level Home Tour Full of Color and Character - The Kitchen

    Green Bamboo Runner / Acrylic Wine Rack / Lemon Dish Towel (similar) / Stirring the Pot Dish Towel

    Same with the kitchen, y’all – no changes really! We just got this space finished at the beginning of last year and I’m still really pleased with how it all turned out.

    Renovated Split-Level Home Tour Full of Color and Character - The Kitchen

    Faucet

    Renovated Split-Level Home Tour Full of Color and Character - The Kitchen

    DIY Kitchen Banquette / Green Cone Pendant Light / Palm Print Pillow / Malachite Pillow / Tiger Stripe Pillow

    > See More of the Kitchen Here <

    My Office

    Renovated Split-Level Home Tour Full of Color and Character - Light and Airy Peach Office Makeover

    Light Fixture / Cabinetry / Desk Chair / Leopard Print Rug (similar) / DIY Chippendale Desk

    This space is a new addition to my home tour. I got it finished up a month or so back and man, do I love working in this space. It’s light and bright, but also full of color and personality.

    Renovated Split-Level Home Tour Full of Color and Character - Light and Airy Peach Office Makeover

    Elephant Stool (similar) / Upholstery on Window Cornice

    Renovated Split-Level Home Tour Full of Color and Character - Light and Airy Peach Office Makeover

    Cabinetry / Cabinetry Knobs / Leopard Art / Burt Reynolds Photo / Dolly Photo

    And yes, that is the nude Burt Reynolds Cosmo spread from the 70’s. 😉

    Renovated Split-Level Home Tour Full of Color and Character - Light and Airy Peach Office Makeover

    DIY Painted and Patterned Doors / DIY Chippendale Desk

    > See More of the Office Here <

    The Circus’ Room

    Renovated Split-Level Home Tour Full of Color and Character - The Little Girl's Bedroom

    DIY Object and Text Feature Wall / Brass Bed (similar) / Tassel Pillow (similar) / Rug

    There have been a few new changes / additions to the Circus’ room!

    Renovated Split-Level Home Tour Full of Color and Character - The Little Girl's Bedroom

    Wall Color / Rug / Cowgirl Lampshade (similar)

    #21, her Mama cow is proudly displayed in her room. I think we are now on baby calf #3 or #4 now though – that is #1 in the picture.

    Renovated Split-Level Home Tour Full of Color and Character - The Little Girl's Bedroom

    Mirror (similar)

    Renovated Split-Level Home Tour Full of Color and Character - The Little Girl's Bedroom

    DIY Sunglasses Holder / DIY Headband Holder

    Renovated Split-Level Home Tour Full of Color and Character - The Little Girl's Bedroom

    Bookshelf Details / Fuchsia Curtains / Tassel Pillow (similar) / All Love Pillow / Cowhide Bench (similar)

    On the other side of the window, I just got finished with this drop-down desk for her.

    Renovated Split-Level Home Tour Full of Color and Character - The Little Girl's Bedroom

    Donkey Watercolor Print

    She has become quite the little artist and loves making crafts, coloring, etc. I think she’s been at this spot at least once a day since I got it finished. I’ll have the tutorial for it on the blog soon.

    Renovated Split-Level Home Tour Full of Color and Character - The Little Girl's Bedroom

    Cute Little Girl with Blonde Curls – One of a Kind. 😉 

    Master Bedroom & Sitting Area

    I have changed up things in the master bedroom just a bit.

    Renovated Split-Level Home Tour Full of Color and Character - Palm Beach Chic Master Bedroom

    DIY Headboard / Chandelier / Palm Art Print / Bedding, Similar Here and Here / Green Drapes

    I felt like this space needed a little more color and pattern so I added in some new pillows and a throw.

    Renovated Split-Level Home Tour Full of Color and Character - Palm Beach Chic Master Bedroom

    DIY Headboard / Bedding, Similar Here and Here / Navy Velvet Pillows / Malachite Pillows / Cheetah Pillow

    When we had to clean out Grunt Labor’s grandmother’s house, no one wanted the brass lamps that were in her living room. I knew they would be perfect for our master, so I brought them home and cleaned them up.

    Renovated Split-Level Home Tour Full of Color and Character - Palm Beach Chic Master Bedroom

    Palm Art Print / How to Make a Huge Frame for Cheap / Malachite Pillows / Cheetah Pillow / Purple Throw

    It’s nice having a little something from their home in ours.

    Renovated Split-Level Home Tour Full of Color and Character - Palm Beach Chic Master Bedroom

    DIY Headboard / Bedding, Similar Here and Here / Navy Velvet Pillows / Malachite Pillows / Cheetah Pillow / Purple Throw

    I’m also playing around with these gold tables at the end of the bed here. I’ve had them for over a year – found them at a thrift store!  I could never figure out what to do with them, but didn’t want to get rid of them. On a whim, I decided to try them at the end of the bed and so far, I like them. What do you think?

    Renovated Split-Level Home Tour Full of Color and Character - Palm Beach Chic Master Bedroom

    DIY Headboard / Navy Velvet Pillows / Malachite Pillows / Cheetah Pillow / Purple Throw

    I was a little scared to try purple in here with this throw, but I am so glad I did! It meshes perfectly with everything else.

    Renovated Split-Level Home Tour Full of Color and Character - Palm Beach Chic Master Bedroom

    DIY Black and White Diamond Feature Wall

    Renovated Split-Level Home Tour Full of Color and Character - Palm Beach Chic Master Bedroom

    Renovated Split-Level Home Tour Full of Color and Character - Palm Beach Chic Master Bedroom

    Mirror / Banana Leaf Art Print 

    Renovated Split-Level Home Tour Full of Color and Character - Palm Beach Chic Master Bedroom

    DIY Carpet Covered Wall

    And while many thought I would tire of the carpet covered wall, I still love it. It brings great texture to the space. I have switched out the chair that was in the corner there for this bookshelf, another thrift store find.

    Renovated Split-Level Home Tour Full of Color and Character - Palm Beach Chic Master Bedroom

    Yes, there are a few empty photo frames there. I’m notorious for putting out frames and taking forever to actually put pictures in them.

    Master Sitting Area

    We are still enjoying having the sitting area of our master bedroom finished.

    Renovated Split-Level Home Tour Full of Color and Character - The Master Bedroom Sitting Area

    Wallpaper / Rug / Chairs & Ottomans / Mirror (similar) / Lamp / Table

    It definitely has more of a masculine vibe than the main bedroom does and that’s ok – Grunt deserves it.

    Renovated Split-Level Home Tour Full of Color and Character - The Master Bedroom Sitting Area

    Cabinet Pulls / Cabinet Knobs / TV Cabinet / Horn 

    I did add in this console table along one wall. It’s the first piece of furniture Grunt and I ever bought together. I think it’s now on it’s third or fourth life, as I’ve lost track of how many times I’ve painted it. I think it fits well here though. The art print and lamp were more thrifted finds!

    Renovated Split-Level Home Tour Full of Color and Character - The Master Bedroom Sitting Area

    > See More of the Sitting Area Here <

    I hope you enjoyed my tour today! If you’d like to keep up with what I’m doing and find out when there are new DIY projects or decorating ideas on the blog, then I’d love to have you sign up for my email list right here. You also get access to some great freebies such as printable art when you sign up.

    The next stop on today’s round of tours is Kim from Tidbits and Twine. She has a gorgeous French farmhouse style, but with beautiful pops of color injected throughout.

    SaveSaveSaveSave

    SaveSave

    SaveSave

    SaveSaveSaveSaveSaveSave

  • DIY Ottoman Coffee Table

    DIY Ottoman Coffee Table

    This post is sponsored by Velvet Finishes and Boho Luxe Home provided the fabric for this project. All opinions are 100% mine. Affiliate links included in this post. 

    This project isn’t anything groundbreaking. If you’ve ventured on Pinterest anytime since it’s invention, then I’m sure you’ve seen a few versions of how to turn a coffee table into an ottoman – this one is just my take on it.

    I found this little table at a thrift store and in all honesty probably fell in love with the caster wheels more than anything. I had high hopes I could clean them up.

    Take an old coffee table and turn it into an ottoman type coffee table.

    The biggest problem with this piece was the top of it. Most of the top except just around the edges had one of those faux leather inlays and it was in rough condition. Fixing that problem was what led to my idea of putting an upholstered cushion on the top of the table to make it an ottoman coffee table – and it can also serve as extra seating.

    How to Make an Ottoman Out of An Old Coffee Table - easy DIY project for your living room.

    DIY Ottoman Coffee Table

    Supplies & Tools Needed:

    Steps

    Step 1

    If the coffee table you are using is dirty or has shiny finish, you’ll want to clean it up and degloss it first. I also removed those metal accent pieces from the table at this time as well. I just felt those dated it a bit too much and they would have been a huge pain to paint around. To remove those, I just cut them with pliers in a couple of places and then they just pulled right out.

    Take an old coffee table and turn it into an ottoman type coffee table.

    Mine was’t too terribly shiny, but it was very gross. I used Ready to both clean and degloss at the same time.

    Ready: A spray primer that both cleans and deglosses.

    Ready is by far one of my most favorite furniture painting products because it’s such an easy deglosser and cleaner to use. You just spray it on, let it sit a minute or two, then wipe it clean with a paper towel.

    Ready: A spray primer that both cleans and deglosses - just wipe off with a paper towel.

    Gross, right? And that paper towel was just from around the top edges of the coffee table.

    If you don’t have a shiny finish on your piece and you plan on using Velvet Finishes paint for your project, then you can skip the Ready as Velvet Finishes paint already has a primer built-in. You just have to use the Ready when your piece is glossy to begin with or when you want to clean it first.

    Wipe down your table with a tack cloth before moving on to make sure you remove any bits of dirt or dust left on it.

    Step 2

    After you’ve cleaned and deglossed your piece if needed, you can start painting.

    Velvet Finishes Tranquil - a deep teal blue hue.

    I opted to go with Velvet Finishes Tranquil for this piece. The blue hue worked well with all the different colors in the upholstery fabric. Since it’s not too bright of a blue, I think it also helped to anchor the piece with all the pattern that was going on in the material. Tranquil is one of my most favorite Velvet Finishes colors because there isn’t much it doesn’t pair great with.

    I just brushed it right on with a paintbrush and gave the whole piece two coats.

    Sidenote: This is the second project I’ve got out of that one container of Tranquil and there’s still a good bit left. This stuff covers really well.

    Step 3

    I wanted to add a little more dimension to the table base, rather than it just being a flat color. Since the upholstery was going to be busy, I felt that adding a bit something more to the base would also help to even things out.

    I saw this as my chance to try out a new Velvet Finishes product – their metallic gold Enhance glaze.

    Velvet Finishes Enhance Metallic Glaze

    For the most part, this works just like the regular Velvet Finishes dark glaze, it’s just thicker.

    You’ll want to work in small sections, as this does dry fast. I used a small paintbrush to apply the glaze just along the edges and crevices of the table.

    Velvet Finishes Enhance Metallic Glaze - applying.

    After applying a little glaze to a portion of the table, I came back with a t-shirt scrap and wiped off the excess glaze, while at the same time pushing the glaze into that crevice.

    Velvet Finishes Enhance Metallic Glaze - wiping away a part of it.

    This made it to where the gold really helped to accentuate those lines.

    Step 4

    Because this is a coffee table that can also be used to kick your feet up on or sit on, I wanted to add a little more extra protection to it besides the topcoat that already comes in Velvet Finishes paint.

    Velvet Finishes Protect - added protection for your painted pieces of furniture.

    To do that, I gave the whole piece a coat of Protect. One coat is all you need and you can simply brush it on or use a foam brush if you wish.

    Step 5

    Once you’ve cut your plywood piece down to the size you want your upholstery portion to be, cut a piece of upholstery foam to the size of the plywood. Cover that with batting and then with your upholstery material.

    DIY Ottoman Coffee Table - cut a piece of plywood to size, cover it with foam, batting and upholstery material.

    Flip it over, pull everything tight and staple all along the edges. My plywood piece is about two inches smaller all the way around than my table top. I needed to cover up that old vinyl / leather top so I used that as my guide.

    To attach the upholstered top to the coffee table, I used heavy duty velcro, putting a strip on each side of the cushion/table.

    If you’ve got a solid coffee table that doesn’t have the drawer or openings like mine does, then alternatively, you could get under the table, and use a drill to screw from the bottom of the coffee table up into the plywood cushion top.

    DIY Ottoman Coffee Table - How to add a cushion top to an old coffee table.

    I love how beautifully this piece turned out. It has the perfect punch of pattern and color.

    How to Make an Ottoman Out of An Old Coffee Table - easy DIY project for your living room.

    I was able to clean up the drawer knobs and caster feet with Bar Keeper’s Friend.

    DIY Ottoman Coffee Table - can also double as a bench for extra seating in your living room.

    And that upholstery – I think I fell in love with it even more once it was paired with the Tranquil paint! This is just one of the gorgeous colorful prints that Boho Luxe Home offers!

    Add an upholstered top to a coffee table to create an ottoman or extra seating for your living room.

    And the touch of gold detailing I did with the glaze adds the perfect amount of depth, I think.

    What do you think about this piece?

    You might also want to see…

    FAQ: Painting Furniture

    OMG. I'm in love. French Country Chair Modern Makeover

    French Country Chair Modern Makeover

    Oh my goodness! If you love the beachy washed out look in home decor, then you have to see this! It's so easy! How to Create a Beachy Colored Look with Paint | Beach Decorating | Nautical Decor | Ocean Living | Beach Living | Aqua | Furniture Makeover

    How to Create a Beachy Colored Look with Paint

    Pin This Post

    How to Make an Ottoman Out of An Old Coffee Table - easy DIY project for your living room.

    SaveSave

    SaveSaveSaveSaveSaveSave

    SaveSave

  • One Night in Chattanooga

    One Night in Chattanooga

    This post is sponsored by Booking.com, however all opinions are 100% mine. Affiliate links included in this post.

    I have lived in Chattanooga for nearly a decade now and this city still surprises me sometimes.

    I grew up driving from the country over the mountain to come to Chattanooga for things like school clothes or to see a movie. We took field trips to the Tennessee Aquarium. Other than that though, I never really ventured out into the city for much else. Even when I came to college over here, I basically went straight to my classes and straight back home. I was terrified of driving downtown. Two lane roads versus lots of one way streets and multiple lanes can break a country girl out in a cold sweat. I’m happy to say, I can easily maneuver throughout the whole downtown Chattanooga area now though and even know shortcuts that Grunt doesn’t know and he’s been here longer than I have. Parallel parking though, well I’m still working on that one.

    In the time I’ve been here, many parts of downtown Chattanooga have changed – for the better. The Southside has underwent a huge revitalization and it is nothing short of amazing. When Grunt and I go downtown, there’s a good chance, we’ll end up somewhere in the Southside for dinner, drinks or other fun. A few weeks ago, Grunt and I had the opportunity to visit the Chattanooga Choo Choo – yes, the very same one from the song – and we were pleasantly surprised at what we found.

    I decided the best way to share all our favorite things about the Chattanooga Choo Choo and what we love to do downtown in general would be to create an itinerary of sorts for ya – just in case you ever want to come for a visit.

    One Night In Chattanooga

    Where to Stay in Chattanooga - The Chattanooga Choo Choo Hotel

    Where to Stay

    The Chattanooga Choo Choo

    The Choo Choo is a perfect hotel choice because it’s so close to everything. Now, as I mentioned before, Grunt and I were pleasantly surprised by all the changes made and still being made at the Choo Choo. It had been a long time since I had last been to the Choo Choo to just walk around and check it all out- like senior prom long time ago. It wasn’t bad or anything back then, but it also wasn’t anywhere that I just had to get back to soon.

    Things have changed. 

    The Choo Choo has been revitalizing their entire property. They have brought in unique new restaurants, have retail shops in train cars, a live music venue, a guitar museum, a bar in a train car and so much more. I was so impressed with everything I saw going on down there. It’s actually on my list now for the Circus and I to visit one day when she’s out of school.

    In fact, the Chattanooga Choo Choo made Booking.com’s Book the U.S. list – a list of 51 of the most unique properties in the United States and the District of Columbia. The Choo Choo is in good company – also on the list is Southfork (yes, the Southfork – totally on my bucket list!), a castle in Kentucky (who knew Kentucky had castles?) and a jail in New Orleans (another city that holds a special place in my heart.)

    Why would the Chattanooga Choo Choo be so unique though? Besides the fact that it was made nationally popular by Glenn Miller’s song?

    Where to Stay in Chattanooga - Stay overnight in a train car at the Chattanooga Choo Choo Hotel!

    Well, for one, you can opt to stay in a train car during your visit.

    Where to Stay in Chattanooga - Stay overnight in a train car at the Chattanooga Choo Choo Hotel!

    The Choo Choo has multiple different train cars that can be your hotel room. If a regular hotel room is more your jam, then they also have the MacArthur Building on site with newly renovated rooms.

    Where to Stay in Chattanooga, TN - the Chattanooga Choo Choo Hotel.

    Also, can I please get some railing like that for my staircase? Hubba, hubba.

    Right now, Booking.com is holding a Chief Booking Officer Contest – if you enter, you could be the lucky one to win $50,000 to travel to as many of the unique properties on the Book the U.S. list as you can in 50 days! You can enter the contest here and also see the full list of the most unique properties as well. 

    If you win and need a travel buddy, I’m sure I could work some free time into my schedule – especially if you’re going to hit up Southfork. 😉

    You can also click here to get $30 off a Booking.com reservation if you need to book a getaway now!

    Where to Eat

    One of the great things about staying at the Choo Choo hotel is that there are so many great restaurants within walking distance. A few of our favorites…

    Stir

    One Night in Chattanooga - Where to Eat in Chattanooga, Tennessee

    Stir is actually located on the Chattanooga Choo Choo property and oh man, is it good. We have frequented it quite a few times. The night we stayed at the Choo Choo we had drinks and an appetizer at Stir before going on to dinner at a new restaurant we hadn’t tried before. They are known for their cocktails and by far, their 1948 Margarita is my favorite. Grunt and I are also big fans of their truffle fries.

    Alleia

    We were so excited to finally be able to try this Italian restaurant. So many of our friends had been raving about it, but we just hadn’t been able to go. Oh my gosh, ya’ll. The food was amazing. We did a full five course Italian meal, splitting each course and it was the way to go, everything was delicious. This was just down the street and around the corner from the Choo Choo.

    Clyde’s

    Another one that is in walking distance, Clyde’s is more laid-back casual food. It’s still delicious. We’ve gone here many times with groups of friends.

    Feed

    Just across the street from Clyde’s is Feed. It’s a great place for groups or just couples – once more, the food is awesome.

    There are a slew more of restaurants within walking distance of the Choo Choo – these are just a few of our personal favorites.

    What to Do

    Songbirds

    Things to Do in Chattanooga - Visit Songbirds, a guitar museum at the Chattanooga Choo Choo Hotel.

    Songbirds is a guitar museum that is jaw-dropping.

    Things to Do in Chattanooga - Visit Songbirds, a guitar museum at the Chattanooga Choo Choo Hotel.

    There are guitars, upon guitars, upon guitars. It’s an amazing collection and just about every one has a special history. Songbirds is located right on the Choo Choo property. You can also catch a show at Songbirds as well – they have songwriters who perform regularly at the guitar museum and other musical events at their venue below the museum – a Fleetwood Mac cover band was there when we visited the Choo Choo. We’ve also seen The Breakfast Club, an 80’s tribute band there before.

    Comedy Catch

    If comedy is more your thing, you can catch a comedy show at the Comedy Catch, also located on the Choo Choo property.

    Regan’s Place & Westbound Bar

    Two of my favorite bars in Chattanooga are located right beside the Choo Choo – Regan’s Place and Westbound Bar. Regan’s is a retro dance bar and Westbound is a country music bar. They both fulfill my diverse musical tastes and they are side-by-side each other.

    What to Do in Chattanooga - Station Street, where it's legal to have an open container.

    Both bars are located on Station Street, right beside the Choo Choo. The best thing about this area is that it’s an open container street – one of only a few in the state of Tennessee – you can take your drink from Stir and walk right over to Westbound or wherever else on the street.

    Walk Around!

    The entire Choo Choo property is filled with lots of great little things…

    A craft beer bar inside a train car at the Chattanooga Choo Choo.

    You can visit one train car where you can try out various kinds of craft beer.

    Things To Do in Chattanooga - Visit the Chattanooga Choo Choo - great for kids!

    Of course, you’ll want to actually take a picture with the Chattanooga Choo Choo.

    Where to Stay in Chattanooga - The Chattanooga Choo Choo Hotel, inside Terminal Station.

    Terminal Station, where you will check-in to the hotel is absolutely beautiful. I adore the old track signs hanging above the doors.

    Where to Stay in Chattanooga - The Chattanooga Choo Choo Hotel, inside Terminal Station.

    And that ceiling – another hubba hubba moment.

    The Chattanooga Choo Choo Property

    Of course, they also have plenty of old train cars to explore.

    The Next Day…

    If you have more time to spend in Chattanooga, then there are lots of other attractions in our city. I actually wrote about some of the best places to visit in Chattanooga right here.

    Before you go, don’t forget to enter Booking.com’s Chief Booking Officer Contest right here for your chance to win $50,000 to travel to some of the most unique properties on their Book the U.S. list!

    All my readers also get $30 off their next Booking.com reservation by using this link!


    Pin This Post

    What To Do With One Night in Chattanooga, Tennessee - a Chattanooga travel guide full of things to do in Chattanooga!

    SaveSave

    SaveSave

    SaveSave

  • DIY Chippendale Desk

    DIY Chippendale Desk

    I almost gave up on this idea no less than 10 times.

    I mulled over tons of different options and ideas for how to build this chippendale desk for weeks.

    Nearly every idea I came up with seemed to eventually hold up a bright red STOP sign.

    I would go back to the drawing board. Sometimes, I would even go straight to my computer and start searching for a desk I could buy because I just didn’t think this idea was going to work out.

    But I kept coming back to it. I just couldn’t leave the vision I had in my head of this chippendale beauty behind.

    And then magically, it was like it all came together. It was more than a light-bulb moment.

    Actually, it was just a hell of a lot of back and forth in my head, troubleshooting, mulling over all the different ways it could possibly be done and then making Grunt be my sounding board for all the above.

    But I did it.

    Yes, I.

    I built this little baby all by myself.

    DIY Chippendale Desk - an easy diy desk plan that has a high end look but costs less than $100 to make.

    At first glance, that might seem like a big deal, but I assure you if I can do this, anyone can.

    And don’t fret – you don’t have to make those chippendale panels yourself…

    DIY Chippendale Desk

    This post contains affiliate links for your shopping convenience. Click here to read my full disclosure policy.

    Supplies & Tools Needed

    Cut List

    • Using your circular saw, cut the sheet of plywood into two pieces:

    • 1 piece should be 29″ x 48″ – this is going to be the front panel of your desk.
    • 1 piece should be 29 7/8″ x 48″ – this is going to be the top of your desk.

    • Using either your circular saw or a miter saw, cut the 1″ x 4″ x 6′ into two pieces that each measure 28 3/4″ long.

    • Using either your circular saw or a miter saw, cut the 1″ x 2″ x 6′ down to 46 5/8″ long.

    If you don’t want to do the cutting yourself, then usually your local hardware store will cut them for you.

    Steps

    Step 1

    First, you’re going to need to reinforce your chippendale panels. When I first pulled my panels out of the wrapping, I quickly noticed that some of the fretwork wasn’t super secure. To keep all the fretwork in place, you want to put wood glue between all the joints.

    How to Make a Chippendale Desk from readymade chippendale panels - an easy desk plan idea.

    Just squeeze a little bit of glue where every joint is, as noted above, then rub your finger over the joint to push the glue into the joint. Once that side of the chippendale panel is dry, flip it over and do the same thing to the other side. It might not seem like this is going to make a huge difference, but it really does. Wood glue is serious stuff.

    Do this with both chippendale panels, front and back. Let the glue fully dry before proceeding to the next step.

    Step 2

    Now, you’re going to be attaching feet to the chippendale panels.

    Lay both chippendale pieces down with the inside facing up. You’ll also need both of your cut 1″ x 4″ pieces (the 28 3/4″ long pieces) now too.

    DIY Chippendale Desk - easy DIY desk build.

    Run wood glue along the inside edge of the chippendale panel that is 28 3/4″ long. Be sure you are gluing on the right edge – the chippendale panels are not perfect squares!.

    DIY Chippendale Desk - easy DIY desk build.

    Place your cut 1″ x 4″ pieces along where you just ran your glue and secure it with a finish nailer or with finish nails using a hammer.

    DIY Chippendale Desk - easy DIY desk build.

    Stand your panels up.

    Easy Desk Idea - build a chippendale desk from readymade chippendale panels.

    Let this dry completely before moving on to the next step.

    Step 3

    Now, you’re going to attach the front solid panel of the desk.

    Stand both chippendale panels up on their feet. Attach corner braces along the sides and foot of each panel as shown below.

    How to Make a Chippendale Desk from readymade chippendale panels - an easy desk plan idea.

    You’ll use single hole corner braces, the 3/4″ inch ones along the chippendale panel and one double hole corner brace, the 1 1/2″ ones, where the foot is.

    Place the 29″ x 48″ piece of 3/4″ plywood in front of the brackets, then attach the brackets to the plywood panel.

    An important thing to note – before attaching the brackets to the plywood panel, make sure the screws aren’t too long and won’t go through the front of the plywood. Some brackets come with longer or shorter screws than others. If your screws are going to be too long for the plywood panel, then just go to the hardware store and buy shorter screws that have about the same size screw head as the ones that came with your brackets.

    How to build a chippendale desk for less than $100.

    Step 4

    Now, you’re going to put on the desk top.

    Start by attaching four single hole braces (3/4″ braces) along the top edge (shown below) of the front panel of plywood you just attached.

    DIY Chippendale Desk

    Attach two more single hole braces (3/4″ braces) to each chippendale side panel along the top, as shown below.

    DIY Chippendale Desk

    Lay your 29 7/8″ x 48″ piece of plywood on top of the front panel of plywood and the side chippendale panels making sure everything is even and squared up how you want it, then just like you did with the front plywood panel, attach the top plywood panel to the corner braces you just installed.

    Easy Desk Ideas: How to build a chippendale desk from readymade chippendale panels.

    Step 5

    Now, for a little added support in the back of the desk, you are going to attach your cut 1″ x 2″ wood piece that you cut down to 46 5/8″ long just along the inside top at the back of your desk.

    DIY Desk Idea - Make a chippendale style desk easily.

    Place it so that it meets up with that inside frame of the chippendale panel.

    Easy DIY Chippendale Desk

    Attach the 1″ x 2″ to the desk using the 1 1/2″ double hole corner braces on each side as shown in the image above.

    Step 6

    Caulk any gaps in the desk to give it a nice clean finished look. I caulked all along the places where the plywood met the chippendale panels.

    Step 7

    Prime and paint the desk.

    I opted to prime my desk before painting it so the raw wood wouldn’t soak up too much of the paint. I was very glad I did because it allowed me to only need one coat of the oil-based paint, which we all know isn’t great fun to work with.

    DIY Chippendale desk - priming.

    That was after the primer coat.

    And the finished DIY Chippendale Desk….

    How to Build a Desk: Easy DIY Chippendale Desk Plan

    Desk Chair / Leopard Print Rug (similar) 

    Isn’t she a beaut? It is the perfect size for my smaller office with the perfect touch of interest.

    Easy DIY Desk Plan - How to Build a Chippendale Desk

    So – do you think you’ll give this easy desk plan a whirl?

    You might also want to see…

    How I DIYed those Built In Cabinets:

    DIY Built In Office Cabinets

    The Full Office Makeover:

    Home Office Makeover with Budget-Friendly DIY Projects: An Office Makeover on a Budget with lots of Office DIY Decor

    Budget-Friendly DIY Office Makeover

    Really great list of 12 Stylish and Comfortable Office Chairs - most are very affordable as well! Great desk chairs!

    12 Stylish and Comfortable Office Chairs

    If you want to come back to this project later, just pin the image below!

    DIY Chippendale Desk - an easy diy desk idea that looks high-end but is less than $100.

  • Traditional Casual Living Room Updates

    Traditional Casual Living Room Updates

    *This post is sponsored by DISH, however all opinions are 100% mine. Affiliate links may also be contained in this post.

    It’s been awhile, but if you took the farmhouse Christmas tour, then you may have noticed that there were a few changes/updates to the living room there. Usually just about the time I declare a room “done”, it turns out that I either add, takeaway or switch something up. #storyofmylife

    These little changes though really brought the room together even more.

    Here’s what happened…

    Traditional Casual Living Room - living room decor ideas for a traditional, but casual and comfortable room.

    Rug / Sofa (similar) / Ottoman / TV Stand / Botanical Prints / Tufted Wing Chairs

    The art I had gotten for our master bedroom ended up not working at all in there. The colors just did not mesh well with the other colors in the space. Luckily though, it did work well in the living room, so I started a game of musical art.

    Traditional Casual Living Room - living room decor ideas for a traditional, but casual and comfortable room.

    Sofa (similar) / Wheat Pillow / Navy Patterned Pillow / Art Above Sofa

    I moved two of the botanical prints that had been above the sofa to above the television and hung the piece of art that was originally for our master above the sofa. It actually ended up being a much better scale for that area anyways!

    Traditional Casual Living Room - living room decor ideas for a traditional, but casual and comfortable room.

    And the botanical prints took up the perfect amount of blank space above the television.

    Traditional Casual Living Room - living room decor ideas for a traditional, but casual and comfortable room.

    TV Stand / Botanical Prints / Rug / Tufted Wing Chairs / Red Pillow

    I felt like the television area still needed a little something though. I had held onto the plugin wall sconces from our last home’s living room ever since we moved because I loved them so much. And as it turned out, those fit perfectly on either side of the tv.

    There’s one other small addition to this area. Our DISH Hopper and Amazon Alexa. Easily control TV with your voice…

    Traditional Casual Living Room - living room decor ideas for a traditional, but casual and comfortable room.

    Our DISH Hopper DVR got a new buddy – an Amazon Alexa. Do you have one? Have you heard of them? Let me just go on and tell you that our family considers it the cat’s meow when it’s paired with our DISH Hopper. I didn’t think the DISH Hopper could get much better since it already lets us record up to 16 channels at once, has Netflix built in and lets you easily skip commercials, but pairing it with Amazon Alexa is icing on the cake.

    DISH Hopper + Amazon Alexa Integration

    The DISH Hopper + Amazon Alexa union provides you with Hands-Free TV™ viewing. You can tell Alexa to turn to a show or channel you want to watch, to search for certain movies, actors, or actresses and to even pause, fast forward, rewind and more – all with just the sound of your voice.

    Traditional Casual Living Room - living room decor ideas for a traditional, but casual and comfortable room.

    I’m pretty sure as soon as it hears the Circus say “Alexa…,” it starts searching for Tom and Jerry, the Circus’ newfound current favorite cartoon.

    For a limited time and while supplies last, DISH is offering new customers a Free Hopper DVR and Voice Remote. That means you can really maximize your lazy days by simply hitting a button on the remote and telling your Hopper what to show you instead of searching through hundreds of channels.

    To get more information on what all DISH has to offer or to go ahead and take advantage of the Free Hopper + Voice Remote offer, call 866-614-3461. 

    The one last small change I made in here was on the opposite side of the room with this little nook.
    Traditional Casual Living Room - living room decor ideas for a traditional, but casual and comfortable room.

    Linen Arm Chair /  Spindle Table / Horse Head Bookends / Lamp

    I forgot I had this pillow that was my great aunt’s until I was going through storage cabinets one day and found it. I’ve always loved the colors on it, but never had a perfect place for it.

    Traditional Casual Living Room - living room decor ideas for a traditional, but casual and comfortable room.

    I was tickled pink when it fit in so well with that chair and the rest of the living room space.

    Don’t you just love it when those little unexpected things make everything mesh so perfectly together?

    Pin This Post

    Traditional Casual Living Room - living room decor ideas for a traditional, but casual and comfortable room.

  • A Home Office Makeover Full of Budget-Friendly DIY Projects that Look High End

    A Home Office Makeover Full of Budget-Friendly DIY Projects that Look High End

    If you work from home, then take my advice.

    Get your home office in tip-top shape.

    Paint it. Decorate it. Organize it. Make it you.

    I’m not sure quite how, but somehow, magically, once you do that, you become so much more productive. So much more saner.

    So much more feeling like maybe you can just make it through this day.

    Hand to God, ever since I have gotten this office done, I feel like I have been so much more less stressed than before.

    Why in the hell did I wait nearly two years after moving into the 70’s Landing Pad to make my office me?

    Screw making the kitchens, bathrooms and living rooms beautiful, I’m starting to become a cheerleader for making your workspace beautiful and functional before the rest of all that.

    And you know what the best thing about this office makeover is?

    It was all done on a budget. I DIY’ed a lot of things in this space and did a lot of reusing what I already had as well.

    Ok, here is what the office looked like when we first bought the house:

    The Office Before

    The previous tenants had left behind the desk as well as the hardwood floors that were loosing their finish.

    When we moved in, I put my old desk in here, hung some curtains, threw in some other things and called it a day. You can see photos of that here. There was too much going on though. Too much stuff in the room, too much stark white wall, too much brightly colored patterns against stark white walls. It just didn’t work.

    Now though, it works…

    Home Office Makeover Full of Budget-Friendly DIY Projects

    This post contains affiliate links for your shopping convenience. Click here to read my full disclosure policy.

    Home Office Makeover with Budget-Friendly DIY Projects: DIY Chippendale Desk, peach walls, blue cabinets, leopard prints

    Wall Color / Light Fixture / Cabinetry / Desk Chair / Leopard Print Rug (similar) / DIY Chippendale Desk

    It feels more open. There are fewer things, but more storage. It’s light and airy, without being stark. It’s…exactly what I needed to stay sane.

    Ok, and wanted too. And honestly, it turned out better than I ever imagined it would!

    Let’s talk details.

    First, the walls got a fresh coat of paint.

    Home Office Makeover with Budget-Friendly DIY Projects - Peach walls, leopard prints, DIY Chippendale desk and more!

    This room is small, so I didn’t want anything too dark, but didn’t want white walls. I went with Citrus Delight by Behr. It’s a peach color, which actually looks even lighter in this space than what the sample card showed because that window faces the sun nearly all day.

    The leopard print rug has been in my office since we moved in. I’ve had it for a few years now and it has to be one of the best yard sale purchases I’ve ever made – it was only $2. The rug is also covering up where the finish was wearing off the hardwoods – no money in the budget to fix all that yet.

    I had also switched the ceiling fan out for that light fixture a few years back and it stayed.

    I added built-ins along the back wall.

    Home Office Makeover with Budget-Friendly DIY Projects - built-ins made from stock cabinetry.

    Cabinetry / Cabinetry Knobs

    I needed some serious storage in here. I have a closet, but it holds all my my craft supplies and extra home decor accessories. I needed something for paperwork and office supplies and all that ho-hum stuff. I bought unfinished wall cabinets, built a base for them and then attached them to the wall. Once I got in the middle of the project, I discovered I had a very bowed wall of drywall and that made the install much tougher, but still worth it. Read the tutorial here on how I added the built-ins.

    Home Office Makeover with Budget-Friendly DIY Projects - built-ins made from stock cabinetry.

    Dolly Print / Leopard Print / Burt Print

    The countertop of the built-ins is actually upholstered in a durable faux leather pearl vinyl. I had to get creative there because of the bowed drywall. The tutorial for upholstering a countertop is here.

    Home Office Makeover Ideas - framed picture of Dolly Parton

    Dolly Print / Leopard Print / Burt Print

    Dolly is front and center in the office. Grunt says it’s funny to walk in and see me working with Dolly watching over me. I’m hoping she’ll shower some of her greatness on me. I found the Dolly print here and used this gold frame from Target to showcase her.

    Home Office Makeover Ideas - affordable art.

    Leopard Print / Burt Print / Upholstery on Counter / Cabinetry Knobs

    And you can’t have Dolly without Bert. 😉 I actually decided several months back that Bert was going in my office. That’s the picture from his 1972 Cosmo spread. I found it here. The seller offered it in an 8×10 size, but I wanted one bigger, so I messaged them and they were able to set me up with a 12 x 18 size. Because of the size of the actual photo, there is a good bit of white space around it when you get it in any size. Because of that, I decided to get it semi-custom framed. Since it’s such an odd size, I had a custom mat cut for it, but then just bought a frame that was already premade. I used Michael’s for framing it and they did a wonderful job. In fact, I think the framing girl was just as excited about framing Burt as I was! I got the leopard from Society6 a few months ago. I didn’t know the full plan for the office yet, but I knew he would be great alongside Bert – and I was right.

    Home Office Makeover with lots of DIY project ideas that are affordable - printable Fancy artwork.

    Over on the other side of the cabinetry is a bust I’ve had for years and finally found the perfect place for. I asked on my Instagram stories what I should paint him and Optometrist Jackie suggested a marbled finish. I gave it a whirl and I think it turned out pretty well.

    Home Office Makeover with lots of DIY project ideas that are affordable - free printable Here's Your One Chance Fancy artwork.

    I also whipped up a little custom art as well. Me and Reba were tight when I was a kid. And Fancy, well it was most definitely my favorite song, even in elementary school. I figured this line would serve as some good motivation.

    And did you notice my new desk?

    Home Office Makeover full of Budget-Friendly DIY Decor Projects like this DIY Chippendale desk!

    Desk Chair / Leopard Print Rug (similar) 

    I built it, ya’ll! Me! All by myself! It might look complicated, but I assure you, it was a pretty simple build. The how-to for the desk build is right here. That’s my same office chair I’ve had for a few years, it still worked perfectly in the space and is comfortable as well.

    I did have a bit of a hard time parting with my old desk, which was actually my Pap and Grannie’s kitchen table at one time. However, it just wasn’t as functional as I really needed my desk to be. I have plans for it at the farmhouse and I know Pap would have been proud that I built the new desk myself.

    Home Office Makeover Ideas that are low-budget - uses vases and vintage glassware to wrangle desk items.

    DIY Faux Crystal Vase

    That’s the DIY faux crystal vase I made last year that I’m using as a pen/pencil holder. The little glass dish tray was my great-grandmother’s. She used it to feed her chickens with. Not kidding! One of my great aunts started cleaning out family stuff years ago and brought me a few different things – this being one of them. She said she always remembered her feeding the chickens out of that dish and when she died, she just had to get it for the memories.

    On the other side of the desk, I created an inspiration board of sorts.

    Home Office Makeover Idea: DIY Fabric Covered Bulletin Board

    That just means I wrapped pretty fabric around a bulletin board and added nailhead trim. I love how that green fabric works with the peach walls and blue cabinetry though – the perfect pop of color.

    Easy Home Office Makeover Idea: DIY Fabric Covered Bulletin Board

    Green Upholstery Fabric / Nailhead Trim

    Instead of individual nailheads, I used the rolled nailhead trim which helped me keep straight lines. It was a huge timesaver as well.

    Home Office Makeover Idea: DIY Fabric Covered Bulletin Board

    One of the biggest, yet easiest and super cheap things I suggest anyone do in their home office is to hang a pretty towel hook.

    Home Office Decor and Organization Idea - use a fancy towel hook to hold your computer bag.

    Not for towels of course, but for your computer bag or camera bag or whatever kind of bag you need to hang on it. It’s so much better than throwing it on the floor and tripping over it. Not that that’s happened to me or anything.

    Home Office Decor Ideas - Easy Upholstered Window Cornice with Tassels

    I also brought more of that glorious green upholstery fabric onto the other side of the room on a window cornice. Such a simple and cheap DIY project with so much bang for your buck. A yard and a half of this fabric (only $15 a yard!) gave me more than enough for the cornice and the bulletin board.

    Home Office Decor Ideas - Easy Upholstered Window Cornice with Tassels

    Green Upholstery Material / Tassel Trim

    I found the tassel trim at Hobby Lobby and it added some more color and fun to the space.

    Home Office Makeover with Budget-Friendly DIY Projects - painted and patterned closet doors.

    DIY Painted and Patterned Closet Doors

    I had actually painted these closet doors (full tutorial here) before we moved into the house and I still love them. They worked great with the space and the peach paint color, so I happily kept them as they were.

    Home Office Decor Ideas: Blow up loved one's handwriting from cards to use as art.

    My little $5 elephant stool finally found a home!

    Home Office Decor Ideas - stack colorful books together.

    Elephant Stool (similar)

    He’s another one of my best yard sale purchases ever! I loaded him up with a few of my favorite colorful coffee table books. There is a similar elephant stools I found here.

    And finally, one of my favorite touches in the room…

    Home Office Decor Ideas: Blow up loved one's handwriting from cards to use as art.

    I scanned a couple of old cards and envelopes where my Pap had written my name and signed his and turned them into wall art. They are right across from my desk, so all I have to do is look up and it makes me smile.

    So all in all, I have roughly right around $600 in the office makeover. The biggest chunk of that is the built-in cabinetry, which was around $300, but so worth it. The desk was less than $100 to make and then there’s around another $200 in paint, fabric, art, frames and various other supplies.

    I for one though think that for just having spent $600, the whole space looks more like a million bucks. 😉

    What do you think about the office makeover?

    You might also want to see…

    DIY Built-In Office Cabinets from Stock Cabinets

    DIY Chippendale Desk - an easy diy desk idea that looks high-end but is less than $100.

    DIY Chippendale Desk

    Really great list of 12 Stylish and Comfortable Office Chairs - most are very affordable as well! Great desk chairs!

    12 Stylish and Comfortable Office Chairs

    Pin This Post

    Home Office Makeover with Budget-Friendly DIY Projects: An Office Makeover on a Budget with lots of Office DIY Decor

    SaveSave

  • DIY Clothes Rack for Garage Sales

    DIY Clothes Rack for Garage Sales

    Got a garage sale coming up? Learn how to make a clothes rack for a yard sale below! This simple to build DIY clothes rack for garage sales is great for not only secondhand sales, but excess clothes storage as well!

    Yard sale season is so close, I can almost taste it.

    Nearly every Friday come spring, the Circus and I will load up and hit all the area yard sales.

    And then on Saturday morning, we’ll do it again, courtesy of our chauffeur, Grunt Labor.

    And of course, my friends and I have become quite popular for our own yard sales as well.

    You have read The Yard Sale Chronicles post, right?

    At least two or three times a year, we all get together and host a yard sale, generally at my house. We hang out in the garage in our matching t-shirts drinking beer, Arbor Mist or Sangria if we’re lucky enough to get Kathryn to make it that day. We laugh and carry on and on more than one occasion, we’ve had customers ask if they can hang out with us for the rest of the day just for the entertainment.

    Yard sale days are a big deal around here.

    And since we’ve done it so much now, we just keep getting better and better at them. We have great signs, our shit is organized and mostly priced.

    And we all make a little money just for putting our shit for sale in the driveway, hanging out together and drinking.

    If that isn’t a win-win situation, then I don’t know what damn well is.

    My friend Jason recently had the grand idea of hosting a Secondhand Market. Basically, it was kind of like an upscale yard sale indoors. He did a great job organizing it and it went extremely well.

    At our yard sales, we generally hang a dowel rod between one of the garage door openings to hang clothes on, but for the Secondhand Market, I knew we would need clothes hanging storage that would stand alone. I made some DIY clothes racks that were a super simple build and to top them off, I also made printable size dividers to use for the sale.

    DIY Clothes Racks - perfect for extra hanging clothes storage, yard sales and kid's closets. Rain on a Tin Roof

    I’m sharing both the instructions for the homemade clothes rack and the printables with you!

    How to Make a Clothes Rack for a Yard Sale

    This post contains affiliate links for your shopping convenience. Click here to read my full disclosure policy.

    How to Make a Clothes Rack For a Yard Sale from 2x4s - Rain on a Tin Roof

    These are a super simple build and inexpensive as well. I made three different sizes (height wise) of these racks. I’m sharing the instructions for the shortest one, 4′ tall, below. The other two I made were 4 1/2′ tall and then 5′ tall. You can make taller ones, simply by cutting your 2″ x 4″ end posts to whatever your desired height is.

    Tools & Supplies Needed:

    Steps

    Step 1

    Make your cuts first. Cut the 2″ x 4″ pieces down to the following lengths:

    • 2 – 48″ long pieces
    • 8 – 10″ long pieces

    I used my miter saw to cut my pieces, but you can use a circular saw as well.

    If you want to cut your dowel rod down to a certain length, you can do that now as well. I bought mine at 8 feet long and opted to leave them that long.

    Step 2

    Take each of your 48″ long 2″ x 4″ pieces and mark 1 1/2″ down on one end of each piece. Using your drill and the 1 1/4″ hole saw drill bit, drill out a hole at each mark you made. This will be the top of your clothes rack where each dowel rod will slide into.

    Making a diy clothes rack for yard sales.

    Step 3

    Take one of the 48″ long 2″ x 4″ pieces and lay it flat against the ground. On the opposite end of where you drilled out your hole, attach one of the 10″ long 2″ x 4″ pieces perpendicular, but lined up on one edge of the 2″ x 4″ as shown below.

    Making homemade clothes racks for garage sales. Rain on a Tin Roof

    I did this using my nail gun because it was close by and made the job go super fast. A good ol’ hammer and nails or wood screws will do the trick as well though.

    Turn the 48″ long 2″ x 4″ on its side. Line up another 10″ long 2″ x 4″ piece and attach it as shown below.

    Homemade clothes racks for garage sales. Rain on a Tin Roof

    Turn it again. Attach another 10″ piece.

    Hanging clothes on DIY Clothes Racks for yard sales. Rain on a Tin Roof

    Repeat one more time.

    Extra Clothes Storage: How to Make a Clothes Rack - Rain on a Tin Roof

    You should have four feet on your 48″ long 2″ x 4″.

    Making a clothes rack for garage sales. Rain on a Tin Roof

    Repeat this process with the other 48″ long 2″ x 4″.

    Step 4

    Slide the dowel rod through the top holes of each 2″ x 4″.

    DIY Clothes Rack for Hanging Clothes at Garage Sales - Rain on a Tin Roof

    That’s all there is to the clothes racks!

    How to Hang Clothes at a Garage Sale - clothes on racks - Rain on a Tin Roof

    How to Hang Clothes at a Garage Sale

    Once you get all your clothes on the racks, if the dowel rod is sagging in the middle, then just move your end leg pieces in more.

    Garage Sale Clothes Rack - Rain on a Tin Roof

    This will stabilize the clothes rack and you’ll still have plenty of hanging room on the ends and in the middle.

    When hanging clothes, it’s always a great idea to divide the clothing by gender (male/female), adult sizes, and children’s sizes. On top of that, it’s even better if you divide it by size. This makes it much easier for your yard sale customers to browse through the clothing and find what may fit them, instead of them getting frustrated that everything is so unorganized.

    To organize and divide the clothing, be sure to grab this set of free printable size dividers right here!

    Print off as many sets as you’ll need for organizing the clothing. I have a set for adult men, adult women, little boys and little girls clothing.

    Yard Sale Clothes Rack - Rain on a Tin Roof

    I hope you’ll find the racks and size dividers helpful for selling more at your next yard sale!

    More posts you might find helpful:

    The Best Yard Sale Tips – all the things I’ve learned about hosting yard sales for the better part of a decade.

    How I Made $2K+ in Two Months Selling Our Clutter – find out my tips for getting the most money for your clutter!

    Want to remember these clothes racks for later? Pin the image below then!

    Homemade Clothes Racks for Yard Sales and Extra Storage - Rain on a Tin Roof
    Gift Ideas Signature

    SaveSave

  • Cheap Fabric by the Yard: Discount Upholstery Fabric under $15 a Yard

    Cheap Fabric by the Yard: Discount Upholstery Fabric under $15 a Yard

    Upholstery and drapery fabric can be pretty pricey. Here though, you’ll find over 50 options of cheap fabric by the yard that isn’t pricey. It’s all under $15 a yard! Plus, find out where to find the best discounted prices for cheap upholstery fabric online. 

    In the last month or so, I have scoured online fabric stores looking for the perfect upholstery material for projects in my office and upcoming projects at the farm. Usually, I end up finding the perfect fabrics, but not at the perfect prices.

    Champagne taste on a beer budget. The story of my life. 

    This time around though, I was pleasantly surprised to find a wide array of gorgeous home decor fabrics at really great prices! Here’s a fist bump to the fabric industry!

    I picked some of what I think are best ones out there and rounded ’em up below. If you’re looking for some great upholstery options or some inspiration for your next home project, then start here – all of these home decor fabrics are less than $15 a yard!!

    Where to Buy Cheap Fabric Online

    In my experience, these are the three top places for finding indoor outdoor quality fabric at good prices:

    Fabric.com

    Fabric.com has one of the largest selections of upholstery fabric I’ve ever seen. There is some more high end fabrics, but there is a big ol’ selection of discount upholstery fabric too.

    Online Fabric Store

    Online Fabric Store is very similar to Fabric.com – they have a lot of different types of fabrics, with a great selection of cheap fabrics.

    Joann 

    While Joann does have brick and mortar stores that sell fabric, they actually have a ton more fabric online that isn’t available in stores! You can use coupons to get extra discounts too!

    Cheap Upholstery Fabric Online: Top Picks

    This post contains affiliate links for your shopping convenience. Click here to read my full disclosure policy.

    Affordable Blue Home Decor Fabrics

    Cheap Fabric by the Yard - Blue Home Decor Fabrics - Rain on a Tin Roof

    1 / 2 / 3 / 4 / 5 / 6 / 7 / 8 / 9 / 10 / 11 / 12 / 13 / 14 / 15

    There are a lot of blues here, I know. I just kept finding so many that were gorgeous that I couldn’t not include them all. My personal favorites are:

    2 – Those roses! You’ll see them more in this post in other colors as well!

    5 – The cobalt dragons. These sooo need to go somewhere in my house! I love the cobalt in this print – doesn’t make it too much.

    11 – A blue leopard print. I love this twist on leopard print. I think the blue gives it a traditional, but lighter feel.

    Affordable Green Home Decor Fabrics

    Cheap Upholstery Fabric Online - Green Home Decor Fabrics - Rain on a Tin Roof

    1 / 2 / 3 / 4 / 5 / 6

    I just used #2, the green cheetah type print, on the cornice in my office makeover – I’ll have photos of it up soon! It’s a gorgeous print and I’m so glad I found it for my office.

    I’m desperately trying hard to find a place to fit #3, the zebras, into my house somewhere. Aren’t those great?

    Affordable Red Home Decor Fabrics

    Where to Buy Cheap Fabric Online - Red Upholstery Fabrics - Rain on a Tin Roof

    1 / 2 / 3 / 4 / 5 / 6

    I really like how the black was brought in to #1. Sometimes black and red can feel like a little too much together, but I think it’s the perfect pattern here.

    I also love those bold red roses in #2 – the color is just stunning.

    Affordable Pink Home Decor Fabrics

    Discount Upholstery Fabric - Pink Home Decor Fabric - Rain on a Tin Roof

    1 / 2 / 3 / 4 / 5 / 6

    I think #1 might just be my favorite flamingo print I’ve seen on fabric to date. It’s not too childish and has a chic feel.

    I adore those pink roses (#3) – they have a gorgeous vintage feel. Yes, they are the same print as the red ones above, just a different color. That pattern comes in lots of different colors!

    Affordable Black and Gray Home Decor Fabrics

    Cheap Home Decor Fabric by the Yard - Black and Gray Upholstery Fabrics - Rain on a Tin Roof

    1 / 2 / 3 / 4 / 5 / 6 / 7 / 8

    A good black and white stripe never goes out of style, but I especially love how the stripes on #5 have a more painted feel. They aren’t too stuffy.

    Affordable Floral Home Decor Fabrics

    Cheap Upholstery Fabrics by the Yard - Floral Home decor Fabrics - Rain on a Tin Roof

    1 / 2 / 3 / 4 / 5 / 6 / 7 / 8 / 9 / 10

    Floral prints – particularly ones that have a vintage vibe – and I are having a moment. I’m starting to think about the design for the screened-in porch at the farmhouse since it never got done last year and I’m really leaning toward some vintage feel floral prints paired with mint green and black and white.

    What are your favorite discount upholstery fabrics?

    Have a favorite place for finding cheap home decor fabric by the yard? Tell us where in the comments!

    Here are similar posts you might find helpful…

    How I Buy Fabric Online Without Seeing It In Person First – a little technique I use for making sure those fabrics are going to work well together when I get them in place!

    20 Affordable Upholstered Accent Chairs – gorgeous chairs at great prices!

    How to Waterproof and Repel Stains on Fabric – protect that beautiful fabric on your furniture with this!

    If you’d like to hang onto this post for the future, pin the image below!
    Where to Find Cheap Upholstery Fabric Online - Affordable Home Decor Fabrics - Rain on a Tin Roof

    Gift Ideas Signature

    SaveSave

  • Best Paint for Cabinets

    Best Paint for Cabinets

    Ready to give your kitchen cabinets a coat of paint? That’s great! It can be stressful determining what kind of paint to use on cabinets though, right? This guide lays out the best paint for cabinets and the pros and cons of each, as well as my personal experience with each.

    I get multiple painting questions every week. I thought I had covered most all painting topics with my Complete Guide to Painting Anything, but getting those questions tells me that I haven’t. And that’s totally ok! That’s what I’m here for – to answer as many of your DIY questions as I can or be helpful in other ways.

    I’ve had quite a few questions about painting cabinetry – both kitchen cabinets and bathroom vanity cabinets, so I thought I would go over the different types of paint you can use for painting cabinets.

    As I always say with posts like this, I am not a professional painter. While I have painted more things than I could ever possibly count, I don’t have a piece of paper that certifies I have a degree in painting. 😉 I have painted around 10 sets of kitchen cabinets, bathroom vanities, etc. though with multiple different types of paints so I have learned a little bit.

    This post contains affiliate links for your shopping convenience. Click here to read my full disclosure policy.

    What Kind of Paint to Use on Kitchen Cabinets

    There are various types of paint that can be used on kitchen cabinets, bathroom cabinets, etc. The main ones being:

    Oil-Based Paint

    Latex Paint

    Alkyd Paint

    Cabinet Painting Kits

    I’ve used each of these, as well as others, when painting cabinets in the past. Here’s my experience with each.

    Best Paint for Kitchen Cabinets

    Let’s start with the first time I painted cabinets…

    Rust-Oleum Cabinet Transformations Kit

    Best Paint for Cabinets - White Rustic Kitchen - Rain on a Tin Roof

    When we bought the Beloved Foreclosure, I didn’t really have much knowledge about painting cabinetry at all. However, our kitchen cabinets there were in great need of a makeover. Since I was such a novice and since this was before the days of Pinterest and I had no idea people actually wrote blogs about painting cabinets, I felt better about having a kit that would guide me step-by-step along the way. I used a Rust-Oleum Cabinet Transformations Kit to paint all the cabinets in the kitchen. The kit walked me through everything and it was easy to do, yet time consuming. The kit even came with a deglosser to use for priming the cabinets to paint.

    Pros:

    Walks you through everything step-by-step, usually no sanding required, everything you need sans the paintbrush is in the box. Easy cleanup.

    Cons: 

    There were brush strokes in the finish. More expensive than just buying each product in the kit individually.

    Durability:

    Pretty good. If I remember correctly, this finish stayed on the cabinets for about 2 years before I decided that I wanted a different look. I don’t remember lots of scratches or the paint peeling off.

    Would I use the kit again? 

    Yes, if I still didn’t have much knowledge about painting cabinetry, but since I know everything about painting that I do now, I wouldn’t spend my money on the kit, instead I would just buy the paint, deglosser, and whatever else I needed separately as it would be cheaper and just the same.

    You can read more about this kitchen remodel here.

    Velvet Finishes Paint

    What Kind of Paint to Use on Kitchen Cabinets - Navy and White Kitchen - Rain on a Tin Roof

    When I decided I wanted a different look for our kitchen cabinets at the Beloved Foreclosure, I used Velvet Finishes paint on them. At that point, I had used Velvet Finishes on lots of furniture pieces and wanted to give it a whirl on my cabinets. Before painting the cabinets, we removed the shiny finish with Ready (a spray on primer/deglosser), then painted the cabinets and finally finished them off with a topcoat of Protect.

    Pros: 

    Definitely one of the easiest paints to use, good variety of colors to choose from. Easy cleanup of brushes / paint supplies.

    Cons: 

    This paint is more expensive than regular paint you get from a local hardware store. There were some brushstrokes in the finish, but that could have been due to the fact that the previous finish had brushstrokes.

    Durability:

    Good. Before we moved out of that house, there were a few scratches in the paint here and there on our cabinets. I will say that we are tough on our house, so some of that could be due to us.

    Would I use it again?

    Yes, but I think I am more partial to it for furniture rather than larger projects like cabinets.

    You can read more about my kitchen cabinet painting experience with Velvet Finishes here.

    Latex Paint (Satin, Semi-Gloss, Gloss Finishes)

    What Kind of Paint to Use on Cabinets - Purple Bathroom Vanity - Rain on a Tin Roof

    I have used regular latex paint on bathroom vanities multiple times. I tend to lean toward semi-gloss and gloss finishes for the paint as it holds up better to wear and tear and you don’t always have to use a topcoat with it. If you use a satin finish latex paint, then I suggest giving it a topcoat of polycrylic as well for added protection. When priming your surface before using this kind of paint, you’ll want a shine-free surface. You can sand to get this or use a deglosser. I also like to give cabinets a coat of primer, such as KILZ or Zinnser after sanding/deglossing and before painting when using latex paints. I think it helps to give the paint a better grip on the cabinets.

    Pros: 

    Definitely the cheapest route, but do choose a good quality latex paint. My go-to is usually Behr. Can use Floetrol with the paint to prevent brush strokes. Easy clean-up. Can usually wipe any spills right off the cabinet with a wet cloth.

    Cons: 

    Latex paints are more prone to scratching and peeling off more so than other paints. There are more steps involved with priming and top coating as well.

    Durability:

    Ok, if you aren’t going to be giving the cabinetry super hard use. The durability is even better if you top it with a polycrylic topcoat.

    Would I use it again?

    Yes. I actually opted to use Behr Premium Plus Semi-Gloss Latex paint on the cabinets I installed in my office.

    You can read more about the bathroom makeover that includes the vanity pictured above here.

    Alkyd Paint

    What Type of Paint for Kitchen Cabinets - Black Cabinets in Kitchen - Rain on a Tin Roof

    When we bought the 70’s Landing Pad, it was obvious the kitchen cabinets needed a new paint job. Honestly, they really need to be replaced, but that wasn’t in the budget then and still isn’t quite yet. A paint job had to work for now. I did a lot of research and had heard about an Alkyd paint called Benjamin Moore Advance that was supposed to be great for cabinets. I decided to give it a whirl. It’s durability is supposed to be like that of an oil-based paint, but it goes on like a latex paint. Before painting the cabinets, I still had to degloss them all before painting. No topcoat is needed with this paint though.

    Pros:

    Easy cleanup. No topcoat needed. No brush strokes.

    Cons:

    More expensive than regular latex paint. Smelly, but not as much as oil-based paint.

    Durability:

    I do think this paint is more durable than regular latex paints, but I don’t think it is as durable as oil-based paint. We don’t have any big scratches in the finish or anything like that on our cabinets that are painted with it, but there are some spots around the cabinet knobs where the paint is wearing off.

    Would I use it again?

    Yes. Behr has actually came out with an Alkyd paint now as well and I used it on my daughter’s playroom stage here.

    You can read about our kitchen remodel where I used this paint here.

    Oil-Based Paint

    Best Paint for Kitchen Cabinet - Oil Based Paint on Cabinets - Rain on a Tin Roof

    I used oil-based paint on the bathroom vanity cabinet in our guest bathroom. This was the first time I ever used oil-based paint on cabinetry and I have to say – I was impressed.

    No, oil-based paint is not the easiest paint to work with, it’s smelly and the clean-up afterward isn’t super fun either, but it’s hard to beat the durability of oil-based paint. This paint dries to a hard finish that’s hard to scratch off. If you need to wipe up any dirt or marks, just use a damp cloth. On top of that, oil-based paint leaves virtually no brush strokes.

    I have also used oil-based paint on my office desk and it has held up wonderfully. My desk works hard and I’m not always nice to it, but the paint has stood strong.

    Pros: 

    Most durable. No brush marks. Usually takes fewer coats than other paints.

    Cons: 

    Smelly, clean-up.

    Durability:

    Very.

    Would I use it again?

    Absolutely.

    You can see more of this bathroom makeover where I used oil-based paint on the vanity cabinet here.

    Stain + Polyurethane

    Types of Paint for Cabinets - Stain on Bathroom Vanity Cabinet - Rain on a Tin Roof

    If you’re looking to go with the wood grain look instead of the painted look, then you’re probably going to be using stain. I have stained cabinets before and have been very happy with the results. I stained the vanity in our master bathroom and it has held up extremely well. Of course, if you want to stain your cabinets, they will either need to be already unfinished cabinets or be stripped. You can read more about stripping pieces here. If you stain something, you will want to topcoat it with a polyurethane to keep it from fading and protect the piece. Stains themselves don’t have much protection in them.

    Pros:

    Probably a little cheaper than using some of the more expensive paints. No brush stokes.

    Cons: 

    If you have to strip your pieces, it’s going to take some time and might be more difficult depending on how much you have to strip off.

    Durability:

    Pretty durable.

    Would I use it again?

    Yep.

    One thing to keep in mind when painting cabinets is that any paint is going to chip over time. That is just the nature of the beast. The key is choosing the best paint for your project and yourself that will keep that from happening as long as possible.

    If you’ve got any other cabinet painting questions or anything you can add from personal experience, please drop it in the comments below!

    What type of paint for kitchen cabinets have you used before?

    Looking for more painting help or DIY kitchen ideas?

    Painting 101: The Complete Guide to Painting Anything – all your questions answered.

    DIY Kitchen Island – we made this out of old barn wood and salvaged porch posts.

    If you’d like to refer to this post in the future, pin it below!

    Kinds of Paint to Use on Cabinets - paint for kitchen and bathroom cabinets - Rain on a Tin Roof

    Gift Ideas Signature


    SaveSave

  • Free Printable Horse Art

    Free Printable Horse Art

    If you love a beautiful piece of horse art, but don’t always love the price tag that comes with it, then this horse wall art is for you! These printable horse images are free and make beautiful decor for your walls! 

    My pap bought my brother and I a horse once.

    His name was Charley.

    I shit you not.

    He bucked my brother and I off one day though and after that my pap just told us Charley ran off to the ridge. In reality, he got sold.

    I didn’t get on another horse for a while, but when I did, it was on a trail ride out west and once we had made it to the top of a hill with extremely steep sides, my saddle turned sideways and I had to clench my thighs so hard to hang on that I felt like I’d worked out everyday for a week solid after that.

    I have not been on a horse since.

    There are lots of times though when I walk over to the barn lot at the farmhouse and I look at those horses that I think it might be nice to ride.

    Horse Wall Art

    Horse Art - black and brown and white horses - Rain on a Tin Roof

    Then I realize I don’t actually know anything about riding a horse, needless to say saddling one up and never did so maybe I’d better just crank up the four-wheeler.

    The Circus on the other hand is determined to learn how to ride. She has no fear when it comes to these horse and prefers to be inside the fence with them rather than out.

    One day, I have no doubt she will ride a horse of her own.

    Horse Wall Art - black horse with white face - Rain on a Tin Roof

    While these horses reside at the farmhouse, they are owned by family friends. We love having them there though and the Circus loves spoiling them with apples and carrots. The horses know it’s going to be a good day when the red truck pulls up the drive.

    I spent some time a couple weeks back sneaking around them to capture some photos and they turned out so well that I wanted to share them with you.

    Free Horse Pictures to Print - Brown and White Horse - Rain on a Tin Roof

    There are three different images – one of each horse alone and one of them together.

    Printable Horse Images - watercolor horse art - Rain on a Tin Roof

    I also did variations of each image – there is a regular color version, a black and white version and a watercolor version.

    Printable Horse Art - Black and White Horse - Rain on a Tin Roof

    Printable Horse Wall Art - black and white horse pictures - Rain on a Tin Roof

    You can print them off and frame them or decorate with them however you wish. They are for personal use only though, folks. No reselling. 🙂

    Free Horse Pictures to Print

    You can get all three of the horse printables and each variation  by subscribing to the Rain on a Tin Roof email subscription right here.

    Once you’re subscribed, you’ll receive an email with instructions on how to access my free printable library and that is where you will find the horse printables.

    If you’re already a subscriber, then just look at the last email you got from me, which is probably the email that had the link to this post, scroll to the bottom of the email and you’ll find the instructions there for accessing the printable library!

    Free Printable Horse Pictures - Watercolor Horse Art - Rain on a Tin Roof

    A few tips for printing:

    I suggest printing on card stock or photo paper. Photo paper will most likely give you more of a deeper and possibly glossy color if you go with a glossy finish, so keep that in mind if you like that look or not.

    If you’re just going the card stock printing route, then you can of course print them at home from your own printer, or if you don’t have a color printer like me, then I take them to Staples print center.

    If you’re going the photo paper printing route, then I highly suggest using Mpix for printing them – I print all of my photos there and they have excellent color quality.

    I have centered each of the images with white space around the edges on an 8.5″ x 11″ size paper. That way, if you print on card stock, you’re good to go and if you go with 8″ x 10″ photo paper, you’re good to go too, you just won’t have as much white space. Just check to see how the photo printing software you use is cropping the image before you print it.

    I hope you guys enjoy these printable horse images as much as we enjoy the horses! 

    Want more great printable art…for free?

    Banana Leaves Watercolor Printables– these are gorgeous and perfect for anyplace you would like a pop of color.

    “Frankly My Dear…”Gone with the Wind Printable– the exact words uttered by Rhett to Miss Scarlet….

    Printable Cow Art – just like these horse printables, this set comes in various shots and styles as well!

    If you’d like to remember this post is here, you can pin the image below:

    Free Printable Horse Images for Wall Art - watercolor and black and white images. Rain on a Tin Roof

    Gift Ideas Signature

    SaveSaveSaveSave

    SaveSave

    SaveSave

  • Make This Simple Valentines Wreath DIY in Under 30 Minutes

    Make This Simple Valentines Wreath DIY in Under 30 Minutes

    Looking for a simple valentine door wreath to make? This valentines wreath DIY will take you only 30 minutes to less to make – and it’s beautiful!

    I never knew Grunt Labor’s grandfather, but after the many stories I’ve heard about him, I feel that we would have gotten along quite fabulously.

    Although, he would have never used the term fabulously. 

    Among other things, we both liked to hang onto things. Some might call it hoarding. I, and maybe Grandpa, though would perhaps call it collecting. You never know when you might need something for a rainy day.

    Also before I came along, a dumpster was rented and Mama and one of Grunt’s uncles, Vic, cleared out one of the rooms in the house from the “junk” Grandpa had accrued.

    Apparently, Grandpa was sitting in his chair in the den while all this was going on talking about all the great stuff they were throwing away.

    If I had been there, I’m sure I would have agreed with him.

    And then probably sneaked out around to the back of the dumpster and climbed in to rescue some of the treasures.

    So, this past fall when it was time to clean out Grunt’s grandparents’ entire house, there was another dumpster rented.

    This time I was there though, so as you can imagine not quite everything handed to me to go to the dumpster actually made it to the dumpster. 😉

    One of those things being a handful of little Valentine cards Grandpa had received in the 1930s.

    I just wouldn’t have been able to live with myself had I tossed them into that dumpster. You’d be the same way, right?

    And so, I brought them home and last week, the Circus and I made this simple little diy valentine wreath using a couple of the valentines.

    Simple Valentines Wreath DIY with flowers and vintage valentines.

    This wreath took all of about 10 minutes – not including paint drying time of the ring, but that is totally optional.

    Don’t have your own vintage valentines to use? No problem! I’ve got you covered with a link below where you can print off vintage valentines to use!

    This post contains affiliate links for your shopping convenience. Click here to read my full disclosure policy.

    How to Make a Valentine Wreath

    Tools and Supplies Needed:

    Supplies for making a valentine door wreath.

    Steps

    Step 1

    I opted to spray paint my metal hoop gold. This is totally optional, but if you’re doing this, do it first.

    Note: You could also tweak this wreath and use a heart wreath form to give it more Valentine zing!

    Step 2

    Disassemble the bouquet. Start wrapping the greenery and florals on the ring.

    How to make a valentine wreath using faux flowers.

    If you go with the kind of bouquet or a similar one like we got, then the flowers already have wire in them, so they just wrap right around that ring, no extra wire needed.

    diy valentine wreath using a wire hoop

    They stay where you put them, but then you can also move them around the ring if needed as well. So much nicer than having to mess with that bare wire and poking yourself.

    Valentine Day Wreaths using a wire hoop and faux flowers.

    Leave some space between the flowers for where you think you want your valentines to go. Put as many or as few flowers on your ring. We covered about 1/4 of the ring or so.

    Using vintage valentines and faux flowers to make a front door valentine wreath.

    Step 3

    Now you can attach your vintage valentines. Now, being as how the valentines I was using were special to us, I didn’t want to permanently put them on this wreath or damage them by putting hot glue directly on them and then onto the wreath. So, I opted to use mini-clothespins to attach my valentines.

    Vintage Valentines you can print.

    I just stuck a clothespin on the valentine, then hot-glued the clothespin onto the metal ring or flower stem wherever I wanted it to go. Of course, if you aren’t attached to your valentines, you can just hot glue them right onto the wreath.

    Valentines wreath with printable vintage valentines.

    You can add in as many or as few valentines as you like. We opted for two of our favorites – a boy and girl and angled them to where they were kind of looking at one another.

    Step 4

    Take some of the skinny ribbons and wrap them around the metal ring and between the flowers and valentines, filling in as much or as little as you like. If you want to add a little more somethin-somethin to the wreath, then you could also embellish with a pom pom or two.

    Step 5

    Hang it up! We just used a wide peach colored ribbon to do this. You can drape the wreath over your front door and secure it on the other side or simply hang it from a nail or command hook on the wall somewhere.

    Vintage Valentine Decorations - a valentine wreath.

    I do love how the clothespins makes the valentines pop out from the flowers a little more than they might otherwise do.

    valentine day wreath ideas with ribbon, flowers and valentine cards.

    I just adore the sweetness of vintage valentine decorations, don’t you? They truly don’t make ’em like that anymore.

    easy valentines wreath diy with a simple look.

    Here’s to one handful of “junk” that didn’t get away, Grandpa!. 😉

    What kind of valentine day wreaths have you made before?

    Looking for more valentine decorating ideas?

    Here’s some fun valentine decor and cards the Circus and I made one year.

    And here are some great valentine ideas from a few blogging friends:

    Valentine Heart Printables (printed on clear address labels) via So Much Better with Age

    Valentine’s Day Dining Room via House by Hoff

    Love Print via Two Twenty One

    Adorable o”fish”ally Free Valentine Printables via The Happy Housie

    Want to come back to this valentine wreath tutorial later? Just pin the image below!

    how to make a valentine wreath with a vintage feel

    Follow on social media for more simple holiday crafts!

    Facebook | Instagram | Pinterest | Twitter

    Easy valentine wreath craft with flowers, valentines and ribbon.

    SaveSaveSaveSave