Author: Jenna

  • One Stop Workshop: DIY Mobile Workbench + Pegboard Organization

    One Stop Workshop: DIY Mobile Workbench + Pegboard Organization

    This is a sponsored conversation written by me on behalf of True Value. The opinions and text are all mine.

    As you know, I’ve been on a purge streak lately. I’ve said good riddance to so much clutter in our house that I’m actually a little embarrassed by just how much we had. Quickly followed by the purging, a huge wave of motivation to get more organized arrived.

    I mean, when you’ve cleaned out so much stuff, you don’t want to end up once more as a finalist for your own television show about your hoarding tendencies, right? So to prevent that and the sheer embarrassment of realizing just how much junk you had, you organize it.

    And just let me tell you, organizing feels so good.

    I just can’t even begin to tell you the amount of satisfaction I have gotten out of seeing a space come to its full organized potential. I don’t care how nerdy it makes me sound. 

    And let me just show you the latest shining example of this organization spree that took place in our garage.

    Create a one-stop workshop in your garage with this DIY Mobile Workbench and Pegboard Organization Ideas.

    Just look at that, y’all! I can actually find the tools I need when I need them. I’m not scrounging around through tool boxes and bags or banging my head on metal shelves in the tiny cramped closet in our garage that once held so many of our tools.

    The sad thing about this whole thing is that we had this pegboard in our garage from the beginning.

    Create a one-stop workshop in your garage with this DIY Mobile Workbench and Pegboard Organization Ideas.

    We just never utilized it to its full potential. I’m equally ashamed and giving myself a swift kick in the rear end about that fact. Now, I can find things. I don’t have multiples of things I don’t need in various locations of the same room. And did you notice my new workbench?

    Create a one-stop workshop in your garage with this DIY Mobile Workbench and Pegboard Organization Ideas.

    I made that.

    Well, I didn’t actually make the metal cabinetry part because I’m not that good, but I made those cabinets into a mobile workbench. That’s right – it can go anywhere and it was so easy to do. I’m not going to lie – after this space was completed, I actually just sat there and stared at it awhile. It makes me so happy, I just want to get out there and jump into a new building project.

    Here’s how we made it all happen with the help of some products from True Value…

    One-Stop Workshop: Pegboard Organization + DIY Mobile Workbench

    Pegboard Organization

    1. Get pegboard on the walls. 

    If you don’t have pegboard in your garage or workspace already, get some up. Like I said, we already had this in our garage when we bought the house, but had never utilized it. Pick up some pegboard panels and 2 x 4s from your local True Value. Determine where you want to hang your pegboard and locate the studs in that wall. Either nail or screw up the 2 x 4s along the studs, then attach the pegboard to the 2 x 4s with nails or screws.

    2. Lay out tools and determine what hooks and accessories you need. 

    Next, I suggest laying out all the tools you want to get up on the pegboards and determine what kind of pegboard hooks and accessories will work best for hanging those items.

    Create a one-stop workshop in your garage with this DIY Mobile Workbench and Pegboard Organization Ideas.

    For our pegboard, I bought the following from True Value:

    3. Get the tools on the pegboard.

    I found that working from the bottom up works best. This is kind of a game where you just have to play around with the location of some of your tools and determine what fits best where.
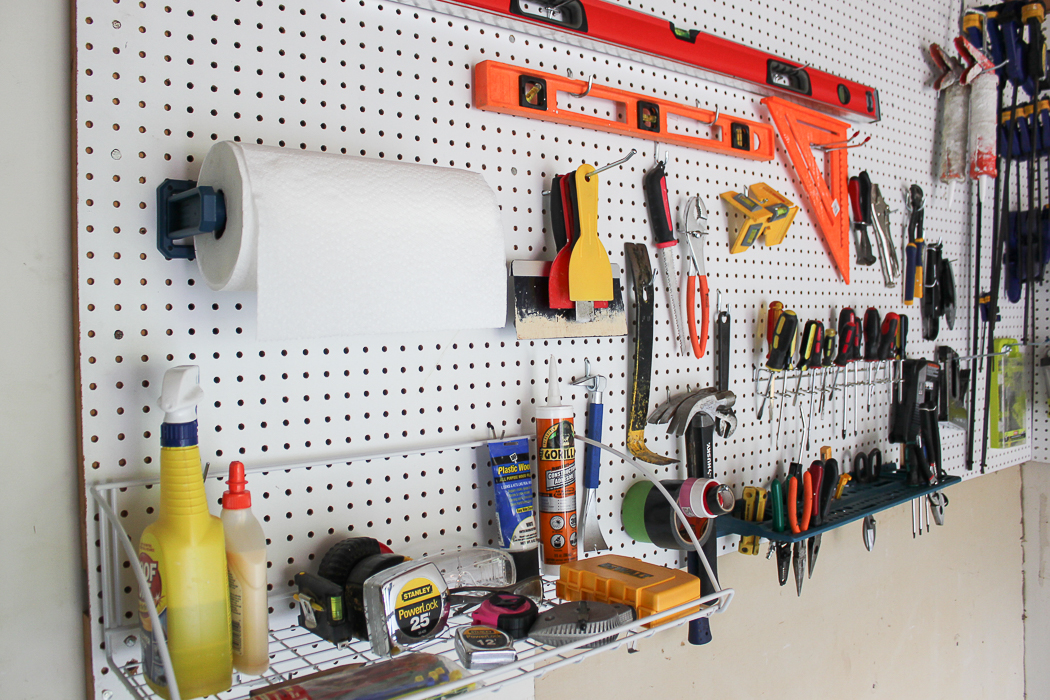
    Create a one-stop workshop in your garage with this DIY Mobile Workbench and Pegboard Organization Ideas.

    If you go with a paper towel holder, keep it lower for easy access. I suggest doing the same with the utility shelf as well.

    Hanging multiples of the same tool types helps to save on space and utilize those hooks to their maximum potential. I did this with all of our rolls of tape, hammers, scrapers and more.

    Create a one-stop workshop in your garage with this DIY Mobile Workbench and Pegboard Organization Ideas.

    Use two single hooks, one on each side, for longer tools such as levels.

    Organize your screwdrivers by type and put any single random tools that will fit in the 3-in-1 tool holder.

    Create a one-stop workshop in your garage with this DIY Mobile Workbench and Pegboard Organization Ideas.

    I grouped my clamps together by size and hung them up on single heavy-duty 8 and 10 inch hooks.

    Create a one-stop workshop in your garage with this DIY Mobile Workbench and Pegboard Organization Ideas.

    For the power tools, I used either two 6, 8, or 10 inch hooks to hold each power tool up deepening on its size.

    For easy access to small parts such as washers, nuts, bolts, screws, nails, etc., I put the small parts storage cabinet in the lower corner of the pegboard and attached it with screws that went into the 2 x 4s holding the pegboard up. The video below for the DIY mobile workbench also touches on the pegboard organization.

    DIY Mobile Workbench

    Create a one-stop workshop in your garage with this DIY Mobile Workbench and Pegboard Organization Ideas.

    You’ll Need: 

    • Two – Five Drawer Tool Chests on Wheels
    • One sheet of 3/4 inch plywood, cut into the following sizes:
      • Two pieces cut to 26 1/4″ x 17 3/4″
      • One piece cut to 53 1/2″ x 18″
    • Drill
    • 1 1/4″ or 1 1/2″ Screws

    Step 1

    Lay a piece of the plywood cut to 26 1/4″ x 17 3/4″ into the top of each tool chest. Each chest has a rim along the top that will keep the wood from sliding out.

    Step 2

    Lay the long piece of plywood cut to 53 1/2″ x 18″ across both smaller sheets of plywood and the tool chests. Line up everything up nicely.

    Step 3

    Using either 1 1/4″ or 1 1/2″ screws and your drill, connect all three pieces of wood together. Put a screw in each of the four corners of each tool chest.

    That’s it! I told you it was simple!

    Create a one-stop workshop in your garage with this DIY Mobile Workbench and Pegboard Organization Ideas.

    A few tips and ideas for the workbench: 

    • If you want to make the workbench top completely permanent, then before putting the smaller pieces of plywood on the tool chests, apply an adhesive such as Liquid Nails to the top of the chests, then put the plywood on top of that.
    • You can also opt to leave the larger piece of plywood off the top and have two smaller mobile workbenches as well. This was initially our plan, but in the end we wanted to have the option for both a smaller and a larger workbench.
    • If you ever want to remove the workbench top to transport it a farther distance, separate the chests or store it away, you can leave the top together and simply lift it off the tool chests as one piece.

    Alright guys, I’m off to plot out my next project that puts this baby to use!

    Do you have any great garage organization ideas to share? 

    Pin This Post

    Create a one-stop workshop in your garage with this DIY Mobile Workbench and Pegboard Organization Ideas.

    This is a sponsored conversation written by me on behalf of True Value. The opinions and text are all mine.


    SaveSaveSaveSaveSaveSaveSaveSaveSaveSaveSaveSaveSaveSaveSaveSaveSaveSaveSaveSaveSaveSaveSaveSave

  • Sweater Weather! The Best Sweaters Under $50

    Sweater Weather! The Best Sweaters Under $50

    We stayed at the farm this past weekend and when we woke up on Saturday morning…..it was chilly.

    I needed long sleeves.

    You know what that means, don’t you?

    Fall is just around the corner.

    And with fall comes….Sweater Weather.

    Sweater Weather is my favorite.

    And so in an effort to get my closet in shape for the upcoming sweater weather, I went on a sweater hunt and found the following gems, each of them less than $50.

    affiliate links may be included in this post. 

    The Best Sweaters Under $50

    Best Sweaters for Fall Under $50: Polka Dot Sweater

    Polka Dot Sweater

    Polka dots never go out of style. This sweater rocks by itself or you could pair it with a gingham collared shirt later on in the season for added warmth and to up your outfit game. I personally love the classic navy with white polka dots, but you can also get it in gray with gold metallic dots – both options are just $30!

    Best Sweaters for Fall Under $50: A Blazer Sweater, dressy and cozy

    Sweater Blazer

    It’s like my love of sweaters and blazers came together in a brief shining moment to create this sweater blazer. I bought a sweater blazer years ago and have loved it since. I haven’t seen any in a while though, so I was thrilled to find this one. Pair this camel colored one with navy pants for a dressier look or jeans for a more casual look. It also comes in gray. Right now, it’s on sale for $49, so snatch it up while you can.

    Best Sweaters for Fall Under $50: Cardigans for Fall

    Extra Long Sweater Cardigan

    I have fallen in love with these longer cardigans I’ve been seeing. I think the last time I had one was in high school and I have to say – I’m so glad they are making a comeback. I love the garnet color on this one, it seems very fall-ish, but it also comes in black and a light heather gray.

    Best Sweaters for Fall Under $50: Cardigans for Fall

    Rib Knit Sweater Cardigan

    There are lots of sweater cardigan options out there this year. 🙂 This one has more texture with the ribbing and seems to be a little thicker as well. You can also grab it in gray.

    Best Sweaters for Fall Under $50: Cardigans for Fall

    Forest Long Sweater Cardigan

    I promise this is the last sweater cardigan option I’ll leave you with – they’re just so good! This one is a bit shorter than the last two, but I love this green shade and it’s also the cheapest of the three at $30. It also comes in white, black and a dark gray color. I think this green hue though would be perfect with wine colored jeans and tall brown boots. This one is also currently en route to yours truly.

    Best Sweaters for Fall Under $50: Scallop Edge SweaterScallop Edge Sweater

    You might remember this one from the Nordstrom Sale – it was one of my top picks and this scallop edged beauty is on sale again for less than $40. There are five different colors to choose from and this one is really a perfect sweater for pairing with dress pants for work.

    Best Sweaters for Fall Under $50: Off the Shoulder Black and White Bell Sleeve Sweater

    Off the Shoulder Bell Sleeve Sweater

    This one is definitely more of the fancy variety as well – I’m thinking perfect for date night with a pair of great jeans and pretty heels. I love the black and white contrast here.

    Best Sweaters for Fall Under $50: Oversized Sweater for Fall with Back DetailV-Neck Back Twist Sweater

    This one is cozy-comfy, but with a twist….literally

    Best Sweaters for Fall Under $50: Oversized Sweater for Fall with Back DetailV-Neck Back Twist Sweater

    Isn’t that back detail gorgeous?! I want so badly to snatch this one up, but here’s my conundrum: the store it’s at is one I’ve never heard of before, Poppoly. It looks like one of those sites that is overseas and I’ve taken a chance before on a similar online store and was very pleased with my purchase, but I’m just always so hesitant. Have any of you ordered from there before?

    Best Sweaters for Fall Under $50: Oversized Cozy V-Neck Sweater

    Simple V-Neck Sweater

    I love the length on this one. You could pair it with jeans or leggings and it would be adorable. I think it would be killer with a great pair of jeans and heels. You can also get it in black. I just ordered it in this gray color.

    Best Sweaters for Fall Under $50: Cozy V-Neck Sweater with Push-Up Sleeves

    Black V-Neck Sweater with Scrunchable Sleeves

    This one is very similar to the last one, but it has sleeves that can easily be rolled up if you get too hot. It also seems a little baggier too. It also comes in gray. Best Sweaters for Fall Under $50: Bell Sleeve Dressy Sweater

    Flare Sleeve Sweater

    Another flare sleeve beauty. You can also get this one in black or white, which I think are more dressier, while this navy version is more casual. Right now, this one is on sale for $47.

    Are you sweater weather ready? My closet is about to be!

    [show_shopthepost_widget id=”2808149″]

    You might also want to see…

    Best Affordable Fall Fashion Finds - all under $50, includes tops, jeans, sweaters, shoes and more!

    Best Fall Fashion Finds Under $50

  • NuCore Flooring: How It’s Holding Up After A Year

    NuCore Flooring: How It’s Holding Up After A Year

    Multiple times a week, I get questions about the NuCore flooring we put down throughout the living room, dining room and kitchen in our house. Apparently, it’s become a very popular option in flooring. NuCore is an engineered floor, that looks like hardwood, but is actually a tough top layer of luxury vinyl adhered to a stable, rigid, and waterproof core.

    I don’t always get to answer those questions in a timely manner, so in an effort to be able to answer people’s questions more efficiently and to also give an update as to how well it has held up after a year, I decided writing a post about it was the best way to go.

    Just so we’re clear, this post is in no way sponsored by Floor and Decor, which sells NuCore Flooring. They did provide me with the flooring last year in exchange for two product review posts, but this post was not part of that deal.

    I figured the best way to go about this was in Q & A format, so I’ve gathered all the questions I get about NuCore and answered them below. Let’s get down to it, shall we?

    This post contains affiliate links for your shopping convenience. Click here to read my full disclosure policy.

    NuCore Waterproof Flooring: How It’s Holding Up After a Year

    Q: How do you install it? 

    A: I actually wrote a post about just that, which you can find it here. You can also watch the short video below as well, the post will go into more detail.
    [adthrive-in-post-video-player video-id=”EmAIvJzB” upload-date=”Wed Jun 29 2016 14:23:39 GMT+0000 (Coordinated Universal Time)” name=”Rain on a Tin Roof – How to Install NuCore Flooring” description=”How to Install NuCore Flooring by Rain on a Tin Roof”]

    In a nutshell, it’s pretty easy to install.

    Q: About how long did install take?

    A: Of course this is going to depend on the size of the room you are installing it in, but once you get the hang of installing it, it goes pretty fast. My husband worked on ours after work for about two hours a day. On average, he was probably able to complete one good sized room done in 2-3 days time, so that’s about 4-6 actual work hours.

    Q: How do you install it on stairs?

    A: You can install a few planks on the stairs and then fit the edges with the coordinating stair noses that are offered. What we opted to do though, was replace our old stair treads with actual hardwood treads. We used the stair noses on the edges of where the top floor dropped off to the stairs.

    NuCore Flooring Review: Here's how this waterproof, vinyl plank flooring performed, one year later.

    The photo above shows NuCore on our landing and then a stair nose at the edge.

    Q: Can you install this on top of existing tile?

    A: Yes. That being said, you would want to make sure the tile was level and in good condition.

    Q: How thin is it?

    A: 6.5mm

    Q: What do I do if the transition from NuCore to another flooring in my home is of varying heights?

    A: You should be able to use a coordinating reducer to make the transition smoother.

    Q: How does this stuff stay in place without gluing it down? 

    A: NuCore is a floating tongue and groove installation. The more you snap together, the heavier it becomes, which helps to keep it in place. We also put quarter round trim around the baseboard and edges of the NuCore once it was installed to give it a finished look. This of course also helps to keep it in place.

    Q: Do your floors need to be even for the install to be easy?

    A: I don’t think they would have to be perfectly level, but you would want them pretty level. If the levelness varies by room, you could always use transitions and reducers in those areas.

    Q: Did you lay down any kind of barrier or just install it directly on the floor?

    A: No, we didn’t lay down a barrier underneath, just installed it straight on top of the floor. The flooring has cork on it which also helps as a sound barrier.

    Q: Can you lay down a barrier underneath NuCore? 

    A: The flooring specifically says you don’t have to put any sort of underlayment or barrier under the flooring, however if you prefer to do so anyways, I would suggest asking the folks at Floor & Decor who sell NuCore.

    Q: Is the flooring renter-friendly or would it ruin the floor underneath? 

    A: It shouldn’t ruin the floor underneath, as you aren’t having to put down a barrier underneath it or nail it down.

    Q: My concern is that the cork backing might show imperfections in the sub floor over time. Do you have any places in your sub floor that is showing up after a year of being installed?

    A: I haven’t noticed any places like that. There is one place where there had been two different subfloors and they didn’t meet up quite right. I can tell where that spot is when I walk on it, but not when I look at it.

    Q: How can floors with joints be waterproof?

    A: I am by no means an expert on answering this question. I’m not the creator of this product, an engineer or a scientist who could tell you the specifics on how that works. In my personal opinion, I would assume since this flooring has tongue and groove joints, that keeps water from seeping through. Of course, you do have to make sure that your joints are tight when you install it. That being said, the core of the flooring is also waterproof as I noted above.

    Q: So is it really waterproof? 

    A: Yes, at least with the water issues we have had. Shortly after moving in, we had a major dishwasher leak. The drain was clogged up and the water came out all in our floor. The end edge of the NuCore flooring buts up to the dishwasher of course and we never had an issue with the floor buckling, deteriorating or anything else because of the water. Now of course, we didn’t let the water sit there for hours to just see what happened, but all in all, no issues. Our dog also had a few accidents on the NuCore and the flooring didn’t seem to absorb any of the urine at all.

    Just as a little extra information, this is what one reader left as a comment on one of my previous posts about NuCore: “It’s the material that the flooring is made of that makes it water proof. I put a sample of NuCore halfway in a bucket of water overnight along with other flooring samples and the NuCore was the only one that came out undamaged.”

    Q: Any thoughts on if it feels like vinyl? It looks really nice, but walking on it in shoes, socks, bare feet, does it feel cheap or “plasticky”?

    A: Personally, I don’t think it feels cheap or plasticky. I always associate a vinyl floor with a slick feel and a shiny look and I don’t think that NuCore has either one of these.

    Q: Does the flooring have any physical texture?

    A: Yes, there is some texture to the flooring. It’s not too deep that it would catch and hold dirt and dust, but it does give it a little more character.

    Q: Does it scratch easily?

    A: It doesn’t scratch easily, but our flooring has gotten some scratches. You have to hunt for them though. The scratches aren’t white, but brown in color, so they blend in with the floor.

    The scratches on our flooring was from our boxer dog. As she got older, she lost control of her back legs and they would often fall out from her under her, which caused some scratching on the floor and then caused her to try and get a better grip on the floor to get back up.

    NuCore Flooring Review: Here's how this waterproof, vinyl plank flooring performed, one year later.

    You can hardly see any of the scratches on the floor in our living room, dining room, or hallway. The only place you can really see them well are right in front of really well-lit places. The photo above was taken in front of our all glass sliding door. The scratches aren’t very noticeable or deep, you have to look for them. I noted some of the ones above with the arrows.

    Q: Has it dented easily? Have you noticed denting or divots where chairs or furniture have been sitting on it?

    A: No, we haven’t had any dents at all.

    Q: Have you had any problems with it splitting at the seams?

    A: We have one place where a seam popped. I think it is mainly due to the fact that we put a very large and heavy piece of furniture right beside that seam though. And when I say a large and heavy piece of furniture, I’m talking about a piece of furniture that my husband refers to as “the steel box.” It’s super heavy.

    Q: Does it muffle sound well? 

    A: This is something I haven’t really paid that much attention to, so I might not be the best person to answer it. That being said, if I haven’t noticed it, maybe it means it does muffle sound pretty well. I think that the cork backing helps to absorb some of the sound. We live in a split-level house and the NuCore is installed primarily on the upper level. With the exception of spending some time in our den on the lower level, I’m not down there very much to determine if it does or does not muffle the noise significantly.

    Q: Does it make a click-clack noise when the dogs walk across the floor?

    A: Yes, the dogs paws and toenails do make that sound as they walk across the floor.

    Q: Will it break under pressure of heavy furniture?

    A: We haven’t had any pieces break, but we did have that one seam pop up as noted above.

    Q: What do you clean NuCore with? 

    A: At first, I was using Mop n’ Glo, but then someone commented on one of my NuCore posts saying that Floor and Decor suggested not using that to clean it with as it could yellow it. So, I switched to just Swiffer Wet Pads. I usually go over it first with my Shark vacuum using the hardwood floor attachment (which is awesome), then the Swiffer Wet Pad.

    Q: Is it ok to get your house sprayed for bugs with the NuCore? Will the flooring be ok being exposed to the spray? 

    A: I’ve had our house sprayed once every three months for pests since we’ve moved in and there has never been an issue with the spray damaging the flooring.

    Q: Where do you buy NuCore and how much does it cost?

    A: You can purchase NuCore at Floor & Decor and it costs about $2.40 – $3.00 a square foot.

    Our overall thoughts:

    We are really pleased with our flooring. I’ll be the first to say that we give our floors a beating. There’s me, Grunt Labor, the Circus, and a dog. We live in our house, we don’t tiptoe around it and this stuff has held up. We have dropped tools on the floor, drug things across it, and with the exception of those scratches from the dog, it’s held up. We have two more places in our house that we still need to update the flooring in and we’re considering NuCore for those places as well. Grunt Labor is really pushing for it because of how easy it is to install. The only other type of flooring we might put in those places would be tile. Either way, both places see a lot of foot traffic and potential water – one is the laundry room, the other a long hallway between our garage and den and both are in the lower level of our house, which is partially underground, since our house is a split-level.

    Read more NuCore Flooring Reviews in the comments.

    If you’ve installed NuCore before, please add your thoughts on it in the comments as well.

    More posts about NuCore:

    How to Install NuCore Flooring – this was a DIY project for us and this is how we we did it.

    Why We Opted for NuCore Flooring – why we went for this flooring over others.

    Want to be able to quickly refer back to this post? Pin the image below. 

    NuCore Flooring Review: Here's how this waterproof, vinyl plank flooring performed, one year later.

    SaveSaveSaveSaveSaveSave

  • How I Made $2K+ in Two Months Selling Our Clutter

    How I Made $2K+ in Two Months Selling Our Clutter

    The title of this post speaks for itself.

    We had a ton of stuff piled up in the garage, in the guest bedroom, in our closets – everywhere. Yes, I have slight hoarding tendencies. 

    Most of that stuff, we didn’t need.

    So I finally sifted through all the clutter, went all “You are the weakest link. Goodbye.” on many things and then sold them.

    Given the amount of things I’ve sold in the last couple of months, I’m sure that some of my Facebook friends thought we might have been going through a rough patch financially. There were a few “Is everything ok?” messages I received, but no, we aren’t having to skip meals or anything. That being said, we were working on the farmhouse remodel and there were a lot of unforeseen expenses that came our way such as getting the whole house replumbed, a new garage door, a new water heater and lots of other things that added up pretty quickly. To help pay for all of that, I pulled on my big girl panties, waded through the excess furniture, clothing, home decor items, and random other miscellaneous stuff that had been piling up, and sold whatever we didn’t need or want anymore.

    I didn’t keep track of the exact amount of money I made from selling all the unwanted items, but I know it is somewhere in the neighborhood of $2,000 over about two months because I paid $1500 cash for all the plumbing updates and new garage door at the farmhouse, then had a little over $500 left to spend on other items.

    Here’s how I did it. From beginning to end. The cleaning out to the selling. All of it. 

    Now y’all, keep in mind that you may have more or less things to sell than I did. Your things may  be worth more or less than mine were. Don’t go getting all scrappy with me if you don’t make $2000. This is one of those “results will vary” kind of deals. I feel like a commercial saying that, but there are some people out there who might think I can magically put $2K in their pocket by them reading this post. I’m not a magician, y’all. 

    How I Made $2K+ in Two Months Selling Crap We Didn’t Need

    1. Go Through Your Entire House

    This is, of course, the no-brainer here. You are going to have to go through every room, every closet, every nook and cranny and be ruthless.

    Purge like you’ve never purged before.

    No matter how big or small the item is, if you no longer need it, don’t like it anymore, doesn’t fit anymore, or haven’t used it in a year, let it go.

    I had been holding onto multiple pieces of furniture, some small, some larger, from our previous home as well as some pieces I had picked up at yard sales and thrift stores, because I kept telling myself I might need them here or there or at the farm. I took a long, hard look at each of the pieces and determined that I really didn’t need about 90% of it. The only things I kept were a couple of side tables for when we makeover the guest room and a couple of pieces to makeover and then sell because I knew I would get a substantial amount of more money out of those pieces if I just took a little time to redo them.

    I went through all of our closets and got rid of anything that no longer fit or that we hadn’t worn in a year.

    I went through the closet in my office where I keep little home decor knick-knacks and got rid of any that I hadn’t used in a year.

    Just turn on some good music, grab yourself a beer and get to purging, baby. 

    Gather all the items you are purging in one space. For us, we used our guest bedroom.

    2. Create Two Piles / Categories.

    After you have gathered all the items you no longer want/need in one space, create two piles or categories within the space.

    Category One: Larger items that can be sold locally online such as on Craigslist, Facebook, Close5 app, Letgo app, etc. I only sold items locally. I wasn’t going to deal with the headache of shipping items.

    Now you might be asking yourself, “How do I decide what could be sold online?” Here are the general guidelines I go by when determining what I will sell online locally…

    Try to Sell Items Online First if They Meet the Following Criteria:

    • You think it will sale for $20 or more. (This is a personal preference here, but I’ll only take the time to list something online if it will sell for $20 or more. You might have a higher or lower number.)
    • Furniture – just about any furniture piece, unless it’s badly damaged or banged up, I will list online.
    • Item Lots – I group all my daughter’s outgrown clothes together by size and try to sell in one big lot or in smaller lots to a few different people.

    Category Two: Smaller items that can be sold at the upcoming yard sale you will now be having since you cleaned out so much shit. 😉

    You might have some things you think just need to be tossed in the trash right then and you can totally do that, but y’all, I tend to put those items in my yard sales first. You would be amazed at what some people buy at those. My friend Jason’s mom, sent over old bras with him to sell in one of our yard sales and they went like hotcakes. Hell, Kathryn even sold a bottle of partially used shampoo at one of our sales! I think she was just going to give it away, but someone actually paid money for it!

    3. List the larger and higher-value items for sale via local online marketplaces.

    You’ve got your two piles now – one for the things to try and sell locally online and the other for your yard sale. Let’s get those higher priced items listed for sale now!

    First:

    • Take photos of the items you will be listing for sale online.
      • Take photos in well-lit spaces.
      • Shoot from different angles.
      • Get detailed shots.

    How to Sell Your Used Items via Facebook, Craigslist, Yard Sales and More.

    • Take measurements of each piece.
    • Make note of any imperfections.

    Next –

    List your items for sale on:

    • Your Local Craigslist Page – if you don’t already have an account, you’ll have to create one and then it will walk you through setting up a listing.
    • Facebook Marketplace – type in “Facebook Marketplace” in the Facebook search bar while you are logged in and it will bring up local listings in your area, then click the blue button on the right that says +Sell Something.

    How to Sell Your Used Items via Facebook, Craigslist, Yard Sales and More.

    • Local Facebook Yard Sale Pages – while logged into your Facebook account, do a search there for “InsertYourTownHere Yard Sale.” There are probably lots of local yard sale pages already out there that you can request to join and then list your items for sale. Once in the group, if you scroll down a little on the right, you will see more suggested groups that will most likely also be local yard sale groups you can join and list your items on.
    • Your Own Facebook Profile – If I have items that I think some of my friends might be interested in buying, then I will also list them for sale on my personal Facebook page. I just create a post detailing what I’m selling and then list the items in the comments. I’ve found this very useful for selling lots of kid’s clothing and smaller home decor items.How to Sell Your Used Items via Facebook, Craigslist, Yard Sales and More.
    • Close5 and Letgo Apps – you can download both of these apps for free on your smartphone and list items you wish to sell.

    When Listing Your Items Be Sure to Include:

    • The photos you took of the item.
    • What the item is (yes, there are some people that just can’t tell from photos)
    • Measurements (especially for furniture!)
    • Any imperfections on the item – photos of these imperfections are helpful for buyers as well.
    • The overall condition of the piece (Brand New, Like New, Excellent, Great, Good, etc.)
    • What the item is used for or what it could potentially be used for – for example, a dresser could also be used as a buffet or sideboard in a dining room. I also had a piece once that could double as a storage cabinet or a bar.
    • The item location or where you are willing to meet someone to sell the item.
    • Any other buying criteria you have. In all my listings, I always include the following language:
      Located in ABC City. Pickup only. Cash Only. First Come, First Serve. No holds. Cross-Posted.

    If it’s a smaller item that you are willing to meet someone with, then replace “Pickup only” with “Willing to meet at” and then wherever you want to meet. I don’t hold anything for anyone unless I have cash in hand from them. The “cross-posted” lets people know that the item is posted for sale in multiple places and not just that one. Below is a posting of mine for a table and chairs set that I sold.

    How to Sell Your Used Items via Facebook, Craigslist, Yard Sales and More.

    Any large furniture pieces that I sell are usually pickup only items. I’m fine with putting a small side table, mirror, or something similar in my car and meeting someone with those, but if it’s a bigger piece that requires more than one person to load it, then that person has to pick it up. I don’t care to help them load it when they come, but I won’t deliver or meet with those items. The main reason for this is that I’m not going to haul something across town and then they decide they don’t like it when they see it. That being said, having a stranger come to your house can be a little scary though. Here are my tips on that…

    Things to Keep In Mind for Selling Pickup Only Items When People Come to Your Home: 

    • Try to have the item in a spot at your home that is very easily accessible to where the person would park and also that is very visible to neighbors. For me, I have found that my garage works best for this. As soon as someone sets up a time to come see something, I have Grunt help me pull that piece right smack dab by the garage door and that way I can just open the garage door and show the person the piece right there. If the weather isn’t questionable, I’ll even pull the piece outdoors. What you really don’t want to do is have a person walk all through your house to see something.
    • Try to set up times for people to view items when someone else is also at your house with you.
    • If someone else can’t be there with you when someone comes, then send a text to your significant other or a friend saying, “Hey, just wanted to let you know someone is coming to look at XXX at XXX time.” I do this with Grunt Labor if he isn’t home. If I don’t text or call him after that person is set to arrive, then he calls me to make sure everything is ok.
    • Only let people come over to see items during daylight hours. Yes, I know bad things still happen during the broad daylight, but still, it’s better to have them come during the day rather than at night.
    • Sometimes people will come and look at an item and say they want to buy it, but can’t take it with them that day. If you’re a sweet, kind soul, then you may take their word for it. Because I’m not a sweet, kind soul though, I tell them that they have to leave at least half of the cost of the item as a deposit for me to hold it for them. I also tell them that it must be picked up within a week or I keep that money and also re-list the item to sell.

    Things to Keep In Mind When You Are Meeting People to Sell Items: 

    • Meet only during daylight hours and in populated areas you are familiar with. I tend to lean toward grocery store parking lots, large retail store parking lots, etc.
    • Take someone with you or let your significant other or a friend know what you’re doing, just like I noted above.
    • Be sure to ask them what type of car they will be driving so you can be on the lookout for them.

    Here’s another sale posting where I sold a lot of toddler shoes and was willing to meet the buyer:

    How to Sell Your Used Items via Facebook, Craigslist, Yard Sales and More.

    After Listing Your Items for Sale: 

    • Keep a good eye on your email, Facebook Notifications, Facebook Messenger, phone, etc. for anyone who may be contacting you about purchasing an item.


    • “Renew” Your Items on Craigslist every 48 hours.

    With Craigslist, after you list an item, you can renew it once every 48 hours for the first 30 days that it is listed. This bumps your listing to the top of the sale category you posted it in. To do this, login to your Craigslist account, and you should see a link that says “Renew” beside your listing. Click that.

    • Bump Your Sale Posts in Facebook Yard Sale Groups

    Like renewing your Craigslist sale posts, bumping your sale posts in Facebook yard sale pages will also move them to the top of the discussion. To bump a listing, you simply comment on the sale post by writing “bump.” Most Facebook yard sale groups have rules about how often you can bump posts, so make sure you are following those. Generally, I bump those posts about once a week.

    • As items sell, be sure to delete the listing.

    I try to delete items that sale just as soon as they are sold. That way I don’t get calls about them and people don’t get mad if they see something for sale and then it turns out, it isn’t anymore. Be sure to delete the listing on all the outlets that you listed it on – Craigslist, Facebook, etc.

    • Lower prices if needed.

    If I haven’t had any bites on items that I’ve listed after a couple of weeks, then I will lower the price some.

    4. Have a Yard Sale.

    And now, the final piece of the “get money for the crap you don’t need” puzzle. Have yourself a yard sale. Now is the time to get rid of all of those smaller items you set aside in the yard sale pile earlier. I wrote a post last year detailing all of my tips for the most successful yard sales, which you can read here. All the information you should need for a great yard sale is in that post. One thing I will add though is that if you’re doing a big clean-out where you have lots of larger items that you have listed online for sale, then wait about a month after listing those before having your yard sale. That way, you can add any items that didn’t sale online to your yard sale as well. From my experience, you can usually make a little more money on those larger items by selling them online as I’ve noted above, rather than at a yard sale, thus why I suggest waiting a month.

    I think that just about covers it.

    Here’s to reclaiming some of your square footage and making a buck or two while doing it!

    If you have any selling tips, please do share them in the comments! I’m always up for hearing more ideas! 

    You might also want to read…

    DIY Clothes Rack and Free Printable Size Dividers - great for yard sales or organizing babies closets.

    DIY Clothes Rack and Free Printable Size Dividers for Your Next Yard Sale

    Three Things That Could Cut Your Electric Bill In Half

    Three Things That Could Cut Your Electric Bill In Half

    Five Ways to Decorate Your Entire Home on a Tiny Budget 

    Pin This Post

    How to Sell Your Used Items via Facebook, Craigslist, Yard Sales and More.

    SaveSave

  • Fancy That | 02

    Fancy That | 02

    I’ve got another round of Fancy That for ya today. I’m so glad that you guys liked the first post and idea of this series. It’s kind of like we get to go shopping together even though we’re all spread out everywhere.

    Here are a few budget buys that have caught my eye lately…

    Fancy That.

    Fancy That | Budget Buys for the home, kids, and her!

    *affiliate links may be included in this post.

    one / two / three / four / five

    1. A Big Living Room Sale

    Traditional Casual Living Room - living room decor ideas for a traditional, but casual and comfortable room.

    Hayneedle is currently having a big living room sale and on top of the sale prices, there are even some discount codes available that will save you even more. It just so happens that a few of the pieces in my living room at the farmhouse are on sale. My TV stand is on sale and you can get an extra 10% off when you use the code LIVINGROOM.

    Traditional Casual Living Room - living room decor ideas for a traditional, but casual and comfortable room.

    My tufted wing chairs, available in both beige and gray are 56% off.

    Fancy That | Budget Buys for the home, kids, and her!

    One of my favorite chairs I’ve ever had, this blue linen arm chair is also on sale as well as the wall mirror that is hanging above it. You can also get an extra 10% off the wall mirror when you use the code MIRROR.

    Master Bedroom Sitting Area Ideas | Master Bedroom Sitting Room Ideas | Master Bedroom Sitting Area with TV

    And finally, the mirrored fretwork television cabinet that we have in our master bedroom sitting area is also included in the sale. You can get an extra 10% off of it with the code LIVINGROOM.

    2. These Shoes!

    Fancy That | Budget Buys for the home, kids, and her!Fun Flats

    Ok, am I crazy for loving these shoes? I’ve never had a pair of flats like these before, but I am so drawn to these shoes – especially the golden color for fall. I think they would all go great with just a pair of jeans dressed up or down. What do you guys think?

    3. I’m busting out the pumpkins.

    Fancy That | Budget Buys for the home, kids, and her!

    Welcome Fall Print / Glittery Pumpkin Soap Dispenser / Pumpkin & Truck Pillow

    You read that right – I have officially pulled out my fall decor. I’m hoping I can will a few cool breezes our way to escape from all this heat! Kirkland’s has all their fall decor out now and I always love shopping there for stuff like that because it’s so affordable. It’s one thing to invest lots of money in decor you use year out, but I don’t like to spend bookoos for something I only have out for a month or two. I love the blues and greens in that Welcome Fall print and it’s only $15! The glittery pumpkin soap dispenser adds a little touch of fall and Halloween in the bathrooms and it’s only $5. And I love that pillow with the truck and pumpkins – I think it would fit in perfectly at the farm.

    4. ‘Tis the time to buy outdoor furniture.

    Fancy That | Budget Buys for the home, kids, and her!

    Red Chair / Green Chair

    If you want new outdoor furniture, this is the time to buy it. Just about every place has it on sale right now. I found these chairs from World Market and I would love to get a couple of them for my favorite hill. They remind me of the ones my grandparents used to have when I was growing up.

    5. Educate the Children.

    Fancy That | Budget Buys for the home, kids, and her!

    I just discovered these “Who Are” books for kids last year and I just love them. They are designed more for older elementary kids, but that hasn’t stopped me from buying them for the Circus. They are in chapter form, but have pictures to go along with them. I found the Rolling Stones edition last week and immediately snatched it up. As soon as it arrived, the Circus and I sat down and read it. Of course, we both loved it. 😉

    That’s all for now – any great things you’ve found lately?

    [show_shopthepost_widget id=”2783728″]

    SaveSaveSaveSave

  • Making the Knotty Pine Look Good: The Farmhouse Kitchen Plans

    Making the Knotty Pine Look Good: The Farmhouse Kitchen Plans

    Disclosure: Bellacor provided me with the lighting for this room and Minted provided me with the art. All opinions are mine. Affiliate links may be included in this post.

    We are in the home stretch of the farmhouse remodel, y’all! Well, the home stretch of the interior of the farmhouse anyway. We still have a lot of cleaning up and painting to do to the exterior of the house and the outbuildings, but it’s too hot for that right now, so for the most part we’ve been working inside.

    We’ve finished up the living room (see how it turned out here), are thisclose to finishing the bathroom and now I’m setting my sights on the kitchen. This is what the kitchen looked like when we got the house:

    Farmhouse Kitchen Before

    The Kitchen Before

    The Kitchen Before

    Since then, we have had to have the kitchen sink completely replumbed, I’ve been able to find and repair some of the missing drawer fronts, the walls, cabinets and flooring have been scrubbed, we tossed the stove and dishwasher and have replaced the light fixture, outlets, switches, faucet and probably done other things I can’t remember right now…

    As I told you when I first wrote about this project, the knotty pine walls and cabinets are staying. That being said, the lower cabinets are in pretty poor condition. While the upper cabinets and most of the paneling on the walls cleaned up pretty well, the lower cabinets are actually losing much of their finish as you can probably see by the photos. Still, I don’t plan on painting them. I’m hoping to be able to lightly sand them and then give them a fresh coat of poly. The cabinet hardware also needs a good cleaning for sure or to be replaced.

    The countertops will be staying for now as well. After giving them a good cleaning, they are still in pretty good condition. We’ll use them as long as we can – because budget!

    Here’s where the kitchen is headed:

    Farmhouse Kitchen Plans

    Light Fixture / Navy & White Striped Fabric / Faucet / Barstools / Art

    We’ve already replaced the old ceiling fan with a new semi-flush mount fixture.

    Drava 6 Light Semi-Flush Mount Ceiling Fixture

    In the kitchen, I wanted a fixture that would make somewhat of a statement, but it couldn’t be too fancy. This is definitely not a crystal chandelier kind of kitchen. I found this semi-flush mount that fit the bill perfectly. It works well with the paneling without standing out too much, provided plenty of light and has a modern farmhouse vibe that fits well with our style. It’s also less than $200, so it’s budget friendly.

    In my Pap’s old workshop by the house, we found this cool table that is going to function as an island in the kitchen.

    Pulling this table out only cost me one yellow jacket sting, which really is a good deal given the multiple nests that were in the workshop and the huge snakeskin we saw there. It obviously needs a good deep cleaning. After that, I’m going to see how much of the rust I can get off and then go from there as to whether or not to paint that metal part or not. I have actually hung onto the Ralph Lauren Inspired green, navy and white barstools from the Beloved Foreclosure and I think they will go perfectly with this island.

    Ralph Lauren Inspired Barstools Tutorial

    I also think they’ll add a much needed shot of color to the room. And as it just so happens, I also have the navy and white curtain panels from our last house as well, that I’ll be shortening for the windows in the kitchen.

    Navy and White Upholstery Fabric

    They will of course tie in with the upholstery on the barstools, add color and a little more lightening to the space with the navy and white stripes.

    We have also went ahead and replaced the faucet as the old one was leaking pretty badly.

    Delta Trinsic Pull Down Faucet

    Grunt and I both love the Delta Trinsic faucet we have in the kitchen at The 70’s Landing Pad, so we opted for the same faucet for the farmhouse, but in a matte black finish. Like the light fixture, it seems to give off that modern farmhouse kind of vibe to me and also works well with the paneling.

    And then there’s the other side of the kitchen…

    Eventully, the kitchen flooring will get replaced. We had hoped to replace it sooner rather than later, however the budget isn’t allowing for that right now. Instead I got on my hands and knees and scrubbed it with bleach and then cleaned it again with a basic floor cleaner. It actually cleaned up pretty well given what it looked like before.

    Growing up, the kitchen table was always against this wall. It was rectangular and came out from the wall longways and I can still see my Pap sitting there drinking his coffee every morning in the same spot. If you look closely at the paneling there, you can even see where the table was up against the wall there for all those years. That kitchen table is actually now where I sit and write this very post as well as most all the other posts I’ve ever written on this blog. I made it into my desk a few years ago and I really like working here each day on the same table where so many meals were eaten, countless conversations were had and hours were spent digging for one single recipe for Chicken Spaghetti out of a box of a thousand.

    For us, having a kitchen table in here really just wouldn’t make sense. The island will work better for our needs and we’ll eat family meals in the dining room. Instead of a kitchen table on this wall, I’m planning to do a gallery wall.

    Tropical Still Life Print

    This is the first piece of art I have for the wall. I have probably been looking at this Tropical Still Life print for two years now, but have never had the perfect place for it. It’s bright colors just always sucked me in and when I came across it again while gathering ideas for the farmhouse, I knew this would be perfect for the kitchen. It brings in some much needed bright colors against the dark walls and the green ties in perfectly with the barstools. The wall isn’t going to be just filled with art prints though! My grannie used to have lots of little knick-knacks hanging on that wall and above the cabinets and I actually still have quite a few of those pieces. (Yes, I am a packrat and damn proud of it!) I’m planning to work them all into the wall somehow.

    That’s all I have for now, but what do you think? Can I balance out all the knotty pine and make it work? 

    [show_shopthepost_widget id=”2783498″]

    SaveSaveSaveSave

    SaveSave

  • Tops, Sweaters, Dresses and More Under $50 (Most under $40!)

    Tops, Sweaters, Dresses and More Under $50 (Most under $40!)

    *affiliate links may be included in this post.

    Last week when I published the first Fancy That post, some of you guys couldn’t believe that Nordstrom had such great prices. Well, they do currently have their anniversary sale going on, but even when they don’t you can still find some really great prices on clothing. Personally, it’s one of my top three favorite stores. What I think is the best thing about Nordstrom though is that they offer free shipping and free returns – on everything. You can buy a $10 scarf and they’ll ship it free and if you don’t like it when it gets to you, you can return it for free. I really prefer to try on clothes in my own house, rather than in stores so this works great for me. I just feel less rushed and I can try on tops with different pants, dresses with different shoes, etc. 

    Anywho, the sale is going on for just a few more days and over the past week, I keep finding myself clicking over there to make sure I hadn’t missed anything. 

    And of course I had. 😉 

    I’ve found some great tops, sweaters, dresses and more for under $50 – and most of these are actually under $40 with some even under $20! 

    Budget Fashion Picks

    Nordstrom Sale Picks Under $50

    Ruffle Hem Bell Sleeve Top

    Love this top – starts off simple, but finishes fun with the ruffle hem and bell sleeves. Comes in four different colors and is $40! Pair it with jeans for a more casual look or with dress pants for work! 

    Nordstrom Sale Picks Under $50

    Double Ruffle Sleeve Blouse

    Another fun shirt for less than $40 – yes, I am a sucker for ruffles sometimes! It also comes in three different colors and honestly, the red version is stealing my heart. Just like the top above and many of my other picks, you could pair this one with jeans or dress pants. It would even be really fun with shorts! 

    Nordstrom Sale Picks Under $50

    Scallop Edge Sweater

    I love sweater weather. I think it’s often when I feel most comfortable. There’s just something about a good sweater. This scallop edge sweater is so adorable, comes in seven different colors and is less than $40. I love this pink version because I think it would look killer with black dress pants or faux black leather pants – ya know, a little bit sweet and a little bit fiesty. 😉 

    Nordstrom Sale Picks Under $50

    Nike Tempo Shorts

    If you see me in the summer making a run to the hardware store, working outside or running around like a chicken with its head cut off, I’ll be in these shorts. I have a blue million of them in different colors and they are my favorite gym shorts by far. During the sale, they are $23! 

    Nordstrom Sale Picks Under $50

    Sweatshirt Dress

    Hello effortless outfit for the fall! How cozy does this sweatshirt dress look? Throw it on, add a pair of sneakers and instant cuteness! It’s on sale for $45 and comes in three different colors. 

    Nordstrom Sale Picks Under $50

    Ruffle Hem Tank

    Yes, another ruffle hem! Unlike the one above that also has bell sleeves though, you could layer on a blazer with this one. And we all know how much I love blazers. 🙂 Comes in two different colors and is under $40. 

    Long Open Front Sweater Cardigan 

    I had kind of written off long cardigans – and then I saw this one. I love how it’s not too bulky like a lot of longer sweater cardigans are. It’s also great for layering in the fall and winter. This one also comes in really great colors that I hadn’t seen on sweater cardigans before. My personal favorites are those above, but it comes in two other colors as well and is less than $50. 

    Nordstrom Sale Picks Under $50

    Blue and Red Plaid Scarf / Multi-Colored Scarf

    If you want new scarves for the winter, then grab them now! The blue and red plaid one is less than $12 and the multi-colored one is $19! 

    Nordstrom Sale Picks Under $50

    Portrait Collar Top

    I love this shirt for a few reasons – that collar, those sleeves and it can be worn in the spring, summer and fall! Pair it with white jeans in the spring and summer or shorts in the summer and dark colored pants in the fall – I’m thinking a wine colored skinny jean. 🙂 And this shirt my friends, is less than $30!

    Nordstrom Sale Picks Under $50

    Ruffle Side Trim Top

    Another work or play top! Not only is is playful, but it should be cozy too as it’s a fleece knit. It’s under $40 and comes in four different colors. The gray is more casual, but they also have it in black, pink and red which seem like dressier colors. 

    Nordstrom Sale Picks Under $50

    Draped Utility Jacket

    As of the writing of this post, mediums are the only sizes left in this jacket, but I had to go on and share it because it’s such a great versatile jacket for the fall. That color is going to go with just about any outfit and it’s on sale for $45. 

    Nordstrom Sale Picks Under $50

    Moto Jacket

    This is the only thing here that’s a little more than $50, but I really wanted to let you know about it because it’s on sale for a great price. It’s usually $98, but is on sale for $65. Grunt Labor got me this moto jacket in a carmel color for Christmas last year and hands down, it’s one of my favorite jackets. 

    Ok, let me know if you find any goodies from the Nordstrom Sale that I may have missed! 

    [show_shopthepost_widget id=”2767660″]

    SaveSaveSaveSaveSaveSave

    SaveSave

    SaveSave

    SaveSave

    SaveSave

    SaveSave

    SaveSaveSaveSaveSaveSaveSaveSave

  • 5 Ways to Decorate Your Entire Home On a Tiny Budget

    5 Ways to Decorate Your Entire Home On a Tiny Budget

    This is a sponsored post written by me on behalf of CORT. All opinions are 100% mine.

    With the farmhouse remodel, there are some rooms where the budget is teeny-tiny and by teeny-tiny, I mean practically non-existent. #truth

    The whole thing didn’t have a big budget to start with and then when we realized that we really needed to replumb the entire house, had to have a new hot water heater and replumb the kitchen and bathroom, and then that the garage door was about to cave in on itself, the budget shrunk even more. Needless to say, we have gotten creative when it comes to furnishing the farmhouse. I don’t have photos of the entire house makeover just yet, but I did want to share some of the ways I’ve been furnishing and decorating the farmhouse on a teeny-tiny practically non-existent budget.

    Ways to Decorate Your Entire Home on a Tiny Budget

    1. Sell or Trade What You Don’t Like or Need to Get What You Do

    This by far has been the biggest thing I’ve done to pad the budget and get the pieces we need and want for the farmhouse. I’ve literally sold a garage and guest room full of stuff. Some of it I had always planned on selling at some point and some of it was stuff I had held onto just in case I wanted to use it in the future. Well, it was time for it all to go! I’ve sold probably no less than 20 different pieces of furniture in the past few months. With that money, I’ve turned around and bought the things we needed for the farmhouse. We also held a yard sale to sell all the smaller items such as decorative accessories, clothing, housewares, etc. that we didn’t need or want.

    I actually wrote a post about how I sold our clutter to make $2K over two months time.

    If you see something you like that someone else is selling, you could also ask them if they might be interested in a trade for one or more of your items – one man’s trash is always another man’s treasure. 😉

    2. Be the Community Picker-Upper.

    Ok, that sounds weird, but here’s how it works. Many of your family and friends probably have lamps, furniture, etc. that they no longer use but that you might like to have. Put out a call on Facebook asking if anyone has anything you might need. Tell them you will come pick it up yourself and pick-up any other junk they might need hauled off. This gets you what you want and helps them clear out some clutter! You might even find some other diamonds in the rough among that junk they want you to haul off!

    Ways to Decorate Your Entire Home on a Tiny Budget

    My dining room table is living proof that this method works. That table was in a house that Nicky’s dad, Wayne (who I love to death because he will tell us how to build or make anything and get us started on it too) bought. He didn’t want it and lots of other things in the house, so I had Grunt Labor and Nicky bring the table to me and also haul back over some other stuff he didn’t want. Win-win for everyone! Well, except maybe for Grunt and Nicky who were forced to haul stuff for me. hehehehehe.

    3. DIY the Look You Want

    When I painted the black and white gallery wall in my previous living room, I wanted a pair of brass sconces to flank either side of the television on the wall. However, all the brass sconces I liked were waaaaayyyy out of my budget. Instead, I bought silver sconces, then spray painted them with brass spray paint.

    Ways to Decorate Your Entire House on a Small Budget

    They looked so good and the finish was just like the higher-end ones that I had originally wanted. When you see a lamp, light fixture, side table, etc., that you want but can’t afford, shop for something similar in scale and lines, then paint it to make it like the one you do want, but on a budget! There are more DIY ideas for decorating your home in this blog post, Expert Tips for Decorating on a Budget and Outfitting Your Entire Home from CORT as well!

    4. Shop Your Own Space

    Now, this does take away from decorating another space in your house, but if you’re focusing on say the living room where you and your family will spend a lot of time as will guests, then it might be worth it to move something from a bedroom to the living room. This is especially true of things that aren’t often used in certain areas of your house.

    Ways to Decorate Your Entire Home on a Budget

    We have a floor lamp in our master bedroom sitting area that I love, but honestly we just haven’t used it that much since we got it, so I’m taking it over to the farmhouse to be used there.

    5. Dominate the Thrift Stores

    This one definitely isn’t new, but you simply can’t forget just how many bargains you can find for your home in secondhand shops. The key though to getting the good stuff at these places is to drop in often. I try to visit some of my favorite thrift stores at least twice a week. And really, anytime that I’m driving by one and have 10 minutes or so to spare, I just drop in and take a gander. Ask the clerks there when they put out new items as well. Most stores put out new items throughout the day, but some have a certain schedule when they put new items out. If they do, try to be sure and visit the store on that day.

    Ways to Decorate Your Entire Home on a Budget

    Both that dresser and lamp that are in our master bedroom are secondhand finds!

    And of course, don’t forget the one universal-will-never-date tip for decorating your home – if you don’t like it as is, throw some paint on it! 

    You can find more Expert Tips for Decorating on a Budget and Outfitting Your Entire Home on the CORT blog.

    You might also find these posts helpful…

    How to Make a Moodboard – easy way to create design boards to plan out your next room makeover.

    How I Made $2K+ in Two Months Selling Our Clutter – clear out the clutter and make some money doing it!

    The Best Yard Sale Tips for Getting Rid of All Your Crap – once you’ve got the clutter cleared, here are tips for selling it at a yard sale!

    Five Ways to Decorate Your Entire Home on a Tiny Budget

    SaveSaveSaveSaveSaveSave

  • Fancy That | 01

    Fancy That | 01

    Super soft t-shirts.

    A gorgeous green velvet headboard.

    Face moisturizer.

    A classic striped tote.

    Cream curtain panels. 

    Random list, yes.

    Also, not so random though as they are five things I’ve become smitten with over the past few weeks. 

    I thought it might be fun to start a new series around here where I share some of my latest favorite purchases and/or soon-to-be purchases that are also budget-friendly. And maybe you could share some of your latest and greatest finds in the comments too? 

    Sound like a plan? 

    And let’s call it Fancy That. 

    Because that’s just a fun title, right? 😉 

    Fancy That.

    Fancy That | Budget Home, Fashion, and Beauty Finds

    *Affiliate links may be included in this post. 

    1/2/3/4/5

    1. Classic Goes With Anything Tote

    Budget Buys: Classic Tote Bag

    Stripe Faux Leather Tote

    I’ve been looking for a good-sized tote to hold my laptop, planner, notebook and other items for when I travel. The one I’ve been using holds everything, but it gets pretty uncomfortable carrying around after a while because the shoulder straps aren’t long enough. I found this tote when the Nordstrom Anniversary sale started and immediately ordered it. It fits the bill and then some. It holds all those things I mentioned above as well as my wallet, a good book, a little cosmetic pouch and has longer straps for better comfort. To top it off, it’s only $35 right now during the Nordstrom Anniversary Sale. 

    2. Forest Green Tufted Headboard

    Budget Buys: Green Velvet Tufted Headboard

    Forest Green Tufted Queen Headboard

    We’re about to start the guest room makeover at The 70’s Landing Pad and while we have a mattress, we don’t have a headboard. I found this queen size one for only $150. Isn’t it gorgeous? Right now, it’s the top contender for the guest room. I don’t think I’d have any trouble creating a room design around that gorgeous hue of green. 😉 

    3. Neutrogena Rapid Wrinkle Repair Moisturizer

    Budget Buys: Face Moisturizer

    Neutrogena Rapid Wrinkle Repair Moisturizer

    I’ve always tried to take really good care of my skin, but in the past year or so, I’ve been trying even harder. The problem can often be though that good skincare products don’t always come cheap. While I’m totally ok to spend a little more on some products (like a $70 face mask that was totally worth it and has lasted for months), I can’t really afford to spend $70 on a moisturizer. I did a good bit of research and found that this Neutrogena Moisturizer was awarded a best budget beauty buy multiple times. I decided to give it a whirl around the start of the summer and y’all, I have been so impressed. It instantly brightened the look of my skin just by applying it and I noticed an overall significant improvement a few weeks into using it. It also has SPF built right into it, which is a must for me. It’s just under $20 too, so definitely in the budget. 

    4. Super Soft Comfy Tee

    Budget Buys: Super Soft Tee

    Rounded V-Neck Tee

    This t-shirt is another Nordstrom Anniversary sale find and I am so glad I stumbled upon them. One of my go-to outfits in the summer is a pair of jean shorts with a plain, soft t-shirt and then dressing it up with a cute belt, sandals and jewelry. I needed new white and black t-shirts, so I ordered this tee in both of those colors and since getting them, I’m thinking about ordering more colors. These tees are really soft, a great length, looser fitting, but not too loose and less than $20 during the sale. They do run a little big, so I sized down one. 

    5. Solid Color Blackout Curtain Panels

    Budget Buys: Solid Curtain Panels

    Solid Color Blackout Curtain Panels

    For the master bedroom at the farmhouse, I wanted solid color cream curtain panels to lighten up the space a little since the walls are a dark blue. I found these panels a few weeks back for $20 each on sale and went on and ordered four. I hung them up at the farm this week and love them!!! They are perfect for the space, the material is nice and heavy, but pretty at the same time and since they are cream, I can pair just about any other patterns with them. I thought I was getting a good deal at $20 per panel, but now they are on sale for $12 a panel! They also come in 11 other colors if the ivory isn’t what you’re looking for! They are available at $12 a panel both here and here.

    Any good buys you’ve found lately? 

    [show_shopthepost_widget id=”2761531″]

    SaveSaveSaveSaveSaveSave

  • Ya gonna hang weeds on the wall?

    Ya gonna hang weeds on the wall?

    Disclosure: I partnered with Hayneedle on this makeover, however all opinions are 100% mine.

    My uncle has always tended to tell me like it is. So when he walked into the farmhouse a couple of weeks ago and saw framed botanical prints laying against the wall with a hammer and nails beside them, his remark was, “Ya gonna hang weeds on the wall?”

    I didn’t try to explain that it was in fact spring leaves art and not weeds. Instead, I just said. “Yep.” There are some people you just don’t argue with and men in overalls who have worked all day fit into that category.

    I must say though.

    I right like those framed weeds. 

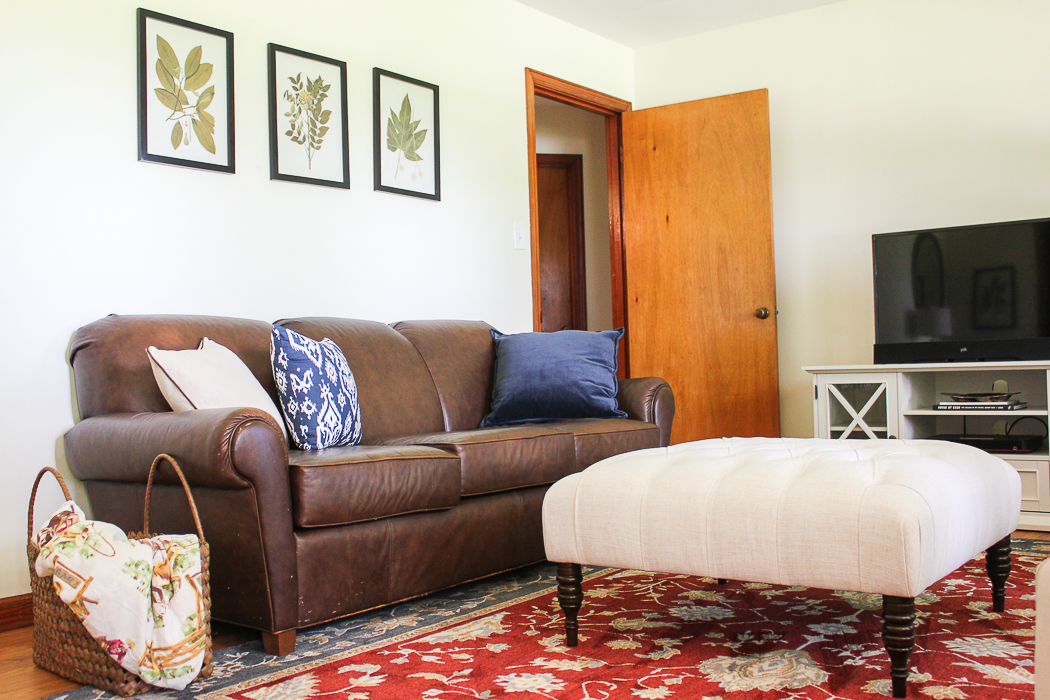
    Traditional Casual Living Room - living room decor ideas for a traditional, but casual and comfortable room.

    Spring Leaves Artwork / Ottoman / Rug / Beige Pillow / Navy Patterned Pillow / Solid Navy Pillow

    Yes folks, the living room at the farmhouse is done. We started with this…

    And now we have this…

    Traditional Casual Living Room - living room decor ideas for a traditional, but casual and comfortable room.

    Spring Leaves Artwork / Ottoman / Rug / Beige Pillow / Navy Patterned Pillow / Solid Navy Pillow / Hampton TV Stand / Arm Chairs / Red Patterned Pillows / Navy Curtains

    Yes, it is a total 180˚ from my usual design.

    And I love this room just as much as I do our living room at the 70’s Landing Pad. 

    Traditional Casual Living Room - living room decor ideas for a traditional, but casual and comfortable room.

    Arm Chairs / Red Patterned Pillows / Navy Curtains / Pedestal Side Table / Vase

    Trying to put my Studio54 style into action at the farmhouse would have been like me trying to fit into the jeans from my senior year of high school. 

    Similar to putting makeup on a pig, it would’ve stuck out like a sore thumb. 

    Traditional Casual Living Room - living room decor ideas for a traditional, but casual and comfortable room.

    Blue Linen Arm Chair / Cream Pillow / Spindle Table / Cream Lamp / Horse Bookends

    Filling the farmhouse with chippy painted furniture and cladding the walls with shiplap wasn’t the ticket either though. 

    I wanted to make this room, and eventually the whole house, have a classic, timeless, traditional feel while still keeping it comfortable and also being a reflection of us. The walls are beige, but I worked in a few of our favorite colors – navy, red and green into the accents in the room. There is a nod to the farm with the addition of my beloved cowboy blanket that’s managed to stick around in the family for 50 years. 

    We love how the room turned out and I like to think that my grandparents would too. Here’s hoping anyway. 🙂 

    You can see the full reveal of the room on Hayneedle’s blog. 

  • Latest Good Reads

    Latest Good Reads

    I just finished another book reading binge, which means we went to the beach 🙂 and I realized I haven’t shared some of my favorite books that I’ve read lately with you guys! I love that so many of you love the same kind of books I do and I love even more that you give me book suggestions that always turn out to be great!

    I’ve got eight books for you here that I’ve read since March or so. I don’t think I could pick a favorite one out of the bunch because they are all so good and most are pretty varied in content as well.

    Here ya go, fellow bookworms!

    *Affiliate links may be contained in this post.

    Latest Good Reads

    The Ashford Affair

    Latest Good Reads: The Ashford Affair by Lauren Willig

    The Ashford Affair

    After reading The Forgotten Room which was co-authored by Karen White, Beatriz Williams and Lauren Willig, I really wanted to read more books from Williams and Willig since I loved that book so much but hadn’t read anything else from either of them. As you probably know by now, I was already a huge fan of Karen White’s books. I decided to go with The Ashford Affair by Lauren Willig and oh man, was it good! After attending her grandmother’s birthday party, Clemmie, a young lawyer, starts to unravel a family secret that will take her all the way to Europe and Africa. This book was absolutely wonderful and sucked me in from the beginning. It most definitely will not be the last Lauren Willig book I read.

    The Secret Life of Violet Grant

    Latest Good Reads: The Secret Life of Violet Grant by Beatriz Williams

    The Secret Life of Violet Grant

    Like I said, I also wanted to read something from Beatriz Williams, another author of The Forgotten Room. For my first book of hers, I went with The Secret Life of Violet Grant. I will say that the book started out a little slow for me, but once things started speeding up, I was hooked! The main character is Vivian and when a suitcase shows up at her apartment belonging to an aunt who was thought to have disappeared or died over 50 years ago, Vivian becomes curious and starts to investigate into this mysterious aunt Violet of hers to find out what really happened. Vivian is a really fun, tell it like it is character and I loved Williams’ writing style in this book – I even found myself calling girlfriends fun old broads. This book definitely gets a five star rating in my book and it also won’t be the last Beatriz Williams book I read.

    The All-Girl Filling Station’s Last Reunion

    Latest Good Reads: The All-Girl Filling Station's Last Reunion by Fannie Flagg

    The All-Girl Filling Station’s Last Reunion

    I am a bit ashamed to say this, but this was the first book I’ve ever read by Fannie Flagg. I know – it’s a downright disgrace. But after reading this one, I will be reading more of Miss Flagg’s work. This books goes back and forth between the 1940’s and the present day when Sookie Poole from Alabama nearly has a mid-life crisis when she discovers that her mother isn’t actually her mother at all. She traces her roots back to the mid-west and a filling station in the 1940’s that was ran by a group of tough, but fun old broads. 😉 In this story, Sookie soon discovers that life can start all over again anytime you damn well please for it to.

    The Night The Lights Went Out

    Latest Good Reads: The Night the Lights Went Out by Karen White

    The Night The Lights Went Out

    Of course, none of my book review posts would be complete without a couple of Karen White novels thrown in. The Night the Lights Went Out is a wonderful book. It’s about scandal in a small southern town with twists and turns like you wouldn’t believe, yet in the end it comes full circle. Merilee is recently divorced and thinks she has found a friend in the midst of the saga, but really it’s someone masquerading from her past. Another main character in the book, Sugar is a sassy southern style older lady that everyone needs a dose of in their lives! Sugar has her own secrets as well though and as it turns out, both she and Merilee are more strong and courageous than they thought. Definitely a must-read in my book!

    The Sound of Glass

    Latest Good Reads: The Sound of Glass by Karen White

    The Sound of Glass

    Quite a few of you had suggested The Sound of Glass to me in one of my previous good reads posts and once again, you were right – it’s so good! The Sound of Glass is definitely one of my favorite Karen White novels. Merritt has been a widow for a couple of years when she finds out that she is now the owner of her deceased husband’s grandmother’s home in South Carolina. Merritt’s husband had never spoken of his past with her, so she is shocked to say the least. Upon arriving in South Carolina, she is soon also greeted by her stepmother and half-brother which complicate things for her even more. Soon, she begins to discover that her deceased husband and his grandmother were hiding something and somehow it connects to her. On top of that, her stepmother is also holding something back as well. Merritt has to gather her strength in order to create a new life for herself and face the things she’s pushed aside for so long. If you haven’t read The Sound of Glass, you simply must!

    Mississippi Blood

    Latest Good Reads: Mississippi Blood by Greg Iles

    Mississippi Blood

    If you’ve read any of my previous favorite books posts, then you know that I love Greg Iles and that his Natchez Burning trilogy is an absolute favorite of mine. Mississippi Blood is the final book in the trilogy and I was so happy when it was released. I won’t give away any of the details of the book here because if you haven’t read the first two books, then it would give too much away that’s in them. The whole trilogy takes place in Natchez, Mississippi and starts with Penn Cage’s father being arrested for murder. However, that turns out to be just one small piece in the puzzle. The series goes back to he 60’s linking the Double Eagles group, similar to the KKK, but much more terrifying, to the event that has put his father in jail. This whole series is a roller coaster ride that will literally have you catching your breath in some moments and in tears at others. If you love books based in the South and thrillers, then read this series. Start with Natchez Burning, then The Bone Tree and finally Mississippi Blood. I promise you won’t be disappointed.

    The Quiet Game

    Latest Good Reads: The Quiet Game by Greg Iles

    The Quiet Game

    After reading the Natchez Burning series, I wanted to read more of Greg Iles’ Penn Cage novels, who is the main character in Natchez Burning. I started with the first Penn Cage novel, The Quiet Game. Just as with the Natchez Burning series, it did not disappoint. You definitely don’t have to read this book first to read the Natchez Burning series. It’s also set in Natchez, Mississippi and is another thriller. Secrets that are threatening to destroy his family and a secret that could take down notable people in his city are all linked together. Penn must uncover the truth to set his family free.

    Dead Sleep

    Latest Good Reads: Dead Sleep by Greg Iles

    Dead Sleep

    Yes, another Greg Iles book. I had been wanting to read Dead Sleep for a while now, as it’s one of the few books of Iles that has a female as the main character. It’s a stand-alone book, it’s not part of a series or anything, but the characters in this book do show up in the Natchez Burning series later on. Jordan Glass is the main character and is a world-traveling photographer. She stumbles into an art museum all the way across the world and sees a painting of her sister, who appears either dead or sleeping, but who has definitely been missing for a year or so. The painting is part of a series of paintings and will lead her on a journey to find out what really happened to her sister and the other women in the paintings. I loved this book. While it’s different than most of Iles’ other books, Dead Sleep is just as good of a thriller as the rest of his books.

    Ready to get cozy with a new book yet?

    Be sure to leave me some of your latest favorite books in the comments!

    You might also want to see…

    The latest and greatest reads - if you're a bookworm, you can't miss this post!

    More Favorite BooksThe Best Southern Books - A list of books about or set in the south that every lover of the south should read! Really great book recommendations!

    The Best Southern Books

    SaveSave

    SaveSave

  • A Diamond In the Rough

    A Diamond In the Rough

    Disclosure:  This post was sponsored, and paid for, by SunTrust Mortgage. All opinions are my own.

    When we found the 70’s Landing Pad, it was not perfect…by any stretch. In fact, it was downright ugly inside and out. 

    The 70's Landing Pad

    We weren’t necessarily looking for a new home, but this one was in the perfect location. We wanted to get my in-laws moved closer to us either by finding a home that would fit us all in it or finding a home for them in our current neighborhood. We looked at lots for building a house for all of us, we looked at a couple of homes that would house us all and we looked at houses for them in our neighborhood. Nothing though was quite right. 

    As it turns out though, the 70’s Landing Pad was just right for us, after a little work, and our previous house was just right for them, after they made some changes to it. 

    Funny how things work out, right? 

    If you’ve been around here for the last two years or so, you may remember just how much work the 70’s Landing Pad needed. A lot. And most all of that work had to be done by us because there was a tight budget. With the exception of the master bathroom remodel and some drywall work, we DIYed everything in this house. That would include a kitchen remodel, bathroom remodel, new flooring throughout, painting every single wall, and a hundred other small things. I get tired just thinking about it still. But you know what? It was so totally worth it. 

    That’s what our kitchen looked like when we first got it. 

    And this is where we’re at now. 

    It took time, and a seven man band of friends and family to get it done, but it’s now completely “us.” 

    With a little Johnny and June thrown in. 😉 

    The hall bathroom was another project that we DIYed…

    With the exception of the new tile flooring, the rest of the makeover was just paint. We painted the existing vanity and switched out the hardware and faucet and then of course painted the walls as well. We also upgraded the old lighting fixtures. The updates were pretty easy, but had a big impact. 

    We also DIY-ed some reconfiguring of the master bedroom. 

    This bedroom is honestly too big. Don’t get me wrong, it’s nice, but a lot of the space was just wasted. We ended up taking part of the bedroom and turning it into a closet and turning the previous closet, which was conveniently located on the backside of my daughter’s room into a playroom for her.

    It took time, but we were able to take the not-so-perfect home and make it the perfect home for our family.

    While we DIYed a lot on this house, we did leave things like plumbing and drywall work to the pros as that’s not our specialty. I think whenever you take on a whole house remodel, it’s important to identify what you know you can do yourself, what you think you can learn to do and what most definitely needs to be left to a pro and then budget accordingly.

    All that being said, when you’re looking for a new home, try to look past that ugly wallpaper circa 1993 and the disgusting puke green paint that graces the master bedroom and instead envision it with your own personal touches. Those rooms are just waiting for your magic touch. 😉 

    When you’re ready to purchase that diamond in the rough, you can start at SunTrust Mortgage where their team of experts can help you find the right kind of mortgage that fits your lifestyle. They have a whole library of resources and tools to help turn that lump of coal into a diamond. 

    If you’re a new home buyer, then also snag this Guide to Home Buying here that walks you through the process step-by-step. Then, start dreaming and scheming  about that new house! 

    You can take the full “before” tour of our 70’s Landing Pad here and then see how far we’ve come here. 


    Comments submitted may be displayed on other websites owned by the sponsoring brand.

    SaveSave

    SaveSaveSaveSave

    At SunTrust Mortgage, we make it a priority to learn all about your unique circumstances. Confidence starts with a conversation. 

    Talk with a SunTrust Mortgage expert today. 

    This post was sponsored, and paid for, by SunTrust Mortgage. All opinions are my own.

  • The Farm: Traditional Casual Master Bedroom Design

    The Farm: Traditional Casual Master Bedroom Design

    I’m going to be real honest.

    I didn’t expect to be this excited about how the master bedroom is shaping up at the farm. When it comes to design, I’m usually not traditional at all. I mean, have you seen the 70’s Landing Pad? But with the farm house, I felt going more traditional, but casual was the best route to go.

    In my completely unprofessional opinion, there’s really something to be said about listening to the house and working with it instead of against it, ya’ll.

    I love how this bedroom is looking you guys. There’s just paint on the walls and a new light up, but it’s already making me smile.

    Before I jump into the design plan, here’s what the room started out looking like:

    And the plan for the bedroom is….Traditional Casual. 

    *Affiliate links may be included in this post. I have also partnered with Minted on the art for this space, Bellacor on the lighting and Mohawk on the rug. I keep it real though – all opinions are 100% mine. 

    Traditional Casual Bedroom

    This traditional casual bedroom design brings in timeless elements that won't easily date, but also packs a punch of personality and color too.

    Headboard / Solid Navy Pillows / Dragon Pillows / Chandelier / Rug / Morning Mist Wall Art / Ivory Curtain Panels / Mirror / Lamp / Dresser

    Let’s break it down, shall we?

    *Lots of you have asked for a tutorial on how to do design boards like the one above. That tutorial is coming next week, guys and gals, so stay tuned! They are easy! 

    The Wall Color 

    Traditional Casual Master Bedroom Design - a timeless design that also includes color and personality.

    It’s called Newbury Port Blue by Benjamin Moore, however I had it color-matched at Home Depot and mixed in Behr Marquee paint. It’s already on the walls over at the farm and it. is. gorgeous. In fact, I loved it so much that I’m also painting the dining room that same color. The gold medal goes to Grunt Labor for picking out this color – that’s right, he picked it.

    The design and decorating of this house is on a pretty tight budget, y’all. Luckily, my job allows me to partner with some awesome brands on a few things here and there, but there’s still a ton of things we need for the house that I can’t just go out and buy – because money! So, we are putting a lot of things into action that we had stored from our previous home and using quite a few hand-me-down pieces as well. The headboard from our previous master bedroom is one of those pieces.

    The Bed

    Traditional Casual Master Bedroom Design - a timeless design that also includes color and personality.

    Headboard / Solid Navy Pillows / Dragon Pillows

    This isn’t the same exact headboard we have, but it’s a damn close match. I am so glad we didn’t get rid of it. I think it’s going to look great in the master at the farm. I haven’t decided on actual bedding yet, but it will probably be mostly white with a few accent pillows. I love how the navy pillows bring in the wall color to the bed and the dragon pillows add pattern, interest and a bit more color to the space.

    The Chandelier

    Traditional Casual Master Bedroom Design - a timeless design that also includes color and personality.

    Minka-Lavery Tibury Polished Nickel Chandelier

    This baby is quite the showstopper in the space. The polished nickel finish just pops off those navy walls. As you well know, I’m usually a brass finish kind of girl and it’s still #1 in my book, but Grunt Labor does not share the same love of brass. At all.  We compromised on a polished nickel finish for the space. I think it’s a timeless look that won’t easily date at all. More details on this fixture are here and they also have multiple other fixtures in this collection here.

    The Rug

    Traditional Casual Master Bedroom Design - a timeless design that also includes color and personality.

    Mohawk Home Studio Perfection Sea Rug

    With the walls being dark, I wanted to have lighter shades on the floor. The floor itself is a light stained hardwood, which is good. The brown edge on this rug from Mohawk will contrast nicely with that and the lighter blue complements it well. We’ll also be putting a rug pad down under the rug to make it a bit more cushy and cozy, but it will also serve to protect the hardwoods and extend the life of the rug.

    The Art

    Traditional Casual Master Bedroom Design - a timeless design that also includes color and personality.

    Morning Mist Wall Art

    I wanted the art to be lighter than the walls and also bring in some green from the pillows. This piece called Morning Mist from Minted did just that. You can customize the size and frame with art from Minted, so I also opted for a silver frame to coordinate with the the chandelier.

    Window Treatments

    Traditional Casual Master Bedroom Design - a timeless design that also includes color and personality.

    Ivory Curtain Panels

    With such dark walls, I wanted to lighten up the room a little with the curtain panels. I also wanted to keep it simple, so we are planning to just go with basic ivory curtain panels.

    Dresser, Mirror & Lamp

    Traditional Casual Master Bedroom Design - a timeless design that also includes color and personality.

    Mirror / Lamp / Dresser

    We were going to use a spare hand-me-down dresser we had on hand as the TV stand in the living room, but as it turns out, we were able to get a media center for it, so the dresser, much like the one pictured above, is destined for the master bedroom. I want to bring a little more silver to this space, so I’m hoping to get that mirror or a similar one. And finally, I want to bring in a little more cream with a lamp on the dresser.

    The master bedroom design might be traditional, but I think it still packs some color and personality.

    What do you think?

    [show_shopthepost_widget id=”2712884″]

    You might also want to see…

    Tour the Before of the Entire Farm House

    The Farm: Living Room Design Plan

    The Farm: Traditional Casual Living Room Design

    Traditional Casual Master Bedroom Design - a timeless design that also includes color and personality.

    SaveSave

  • 5 Tips for Beautiful Planters All Summer Long

    5 Tips for Beautiful Planters All Summer Long

    Disclosure: This post is sponsored by Proven Winners, however all opinions and flower pot mishaps are 100% mine. 

    A few weeks ago, I was perusing the Home Depot completely unaware of the valuable life lesson that was about to play out before my very eyes.

    The Circus and I had a slew of errands to run before her birthday party that was in just a few days and picking up spray paint at the Home Depot was one of those things on the list. Prior to leaving the house that morning, I had actually showered, washed my hair and even applied a little makeup.

    I was on top of my game.

    This was a Friday and by washing my hair that morning, I was good to go for another few days sans hair washing.

    You know you hate washing your hair everyday too. Just own it already. 

    After we picked up our spray paint, the Circus and I decided to take a quick peek at the planters in the garden center. I had been on the hunt for some new ones to flank either side of our front door.

    I spied some nice, classic large cream planters on a shelf a tad higher than myself. They were stacked upside down on top of one another and as I reached up to tilt them down and pull them off the shelf, I thought nothing about the fact that it had rained earlier this morning.

    I thought nothing about that fact until the water which had collected on the bottom side of the planters hit me right on top of the head and totally ruined my freshly washed and styled hair.

    I looked at the Circus, not knowing whether I wanted to laugh or cry and trying hard to keep the long list of expletives from emerging out of my mouth. She didn’t know what to say either, but after about 10 seconds of just staring at me with her mouth slightly open, she finally said, “You look funny, Mama.”

    So we just went with it. For the rest of the day, we completed our errands – gross hair and all.

    And yes, we bought the planters.

    Tips for Beautiful Planters All Summer Long

    So besides sharing life lessons learned at the Home Depot, I also thought that today I would share some easy tips for beautiful planters all summer long.

    Something great needs to come out of water on my freshly washed hair, right?

    5 Tips for Beautiful Planters All Summer Long

    Tip #1

    Drill drainage holes in the bottom of your planters if they don’t already have them.

    Tips for Beautiful Planters All Summer Long - be sure to drill drainage holes in the bottom of your planters if they aren't there already.

    Do not skip this, y’all! Lots of planters already come with predrilled drainage holes, but some don’t. The planters I bought had places to drill out the holes, but they weren’t pre-drilled out. To drill the drainage holes, just put a drill bit on your drill and put a few holes in the bottom of the planter. If the excess water can’t drain from the planter, your flowers aren’t going to make it.

    Tip #2

    If I would have filled these planters completely with soil, there’s no telling how much money I would have spent just in soil! To reduce the amount of soil you need, use fillers in the bottom of your planter pots.

    Tips for Beautiful Planters All Summer Long - fill the bottom of your planters with plastic bottles to help drainage and reduce the amount of soil you need.

    For these planters, I used an old plastic pot that came from another plant and then used plastic bottles around that pot. I probably came about 1/3 – halfway up with the filler in these pots. I left plenty of room for dirt and the roots of the flowers to grow.

    Tip #3

    Choose the right annuals for your space.

    Tips for Beautiful Planters All Summer Long - choose annuals that are proven to perform well.

    Planting flowers that will perform well in your area as well as in the space you are planting them is crucial to getting and keeping beautiful planters all summer long.

    These planters are on our front porch, which faces west and is in full sun pretty much all day. We have zero shade in the front of our house and we live in Tennessee, so it gets pretty darn hot around here in the summer. For this reason, we needed flowers that were very heat tolerant and liked the sun.

    Tips for Beautiful Planters All Summer Long

    We went with Angelface Perfectly Pink Angelonia, Indigo Charm Petunia, and Sweet Caroline Bewitched After Midnight Ipomoea all from the Proven Winners line of annuals.

    Besides being flowers that will perform well on our front porch, this combination of flowers also goes along with the filler, spiller and thriller approach to container gardening – to really make a planter pop, you want one flower in it that fills, one that spills and one that thrills. A thriller plant is going to add height to your planter; for me, these were the Angelface Perfectly Pink Angelonias. The filler is going to help your planter look more full and will usually be more of a mounded flower – like the petunia. The spiller is going to be a plant that is literally going to spill over and hang over the edge of your planter – like the sweet potato vine.

    Tip #4

    Now you’ve got the perfect flowers and you just need to arrange them.

    Tips for Beautiful Planters All Summer Long - arrange the annuals correctly.

    You want to put your thriller (the taller one) in the back of the planter and then your filler and spillers side-by-side in the front of your planter.

    Tips for Beautiful Planters All Summer Long

    After you plant your flowers, give them a good drink of water.

    Tip #5

    Don’t forget to water and feed throughout the summer!

    Annuals aren’t plant ’em and forget ’em flowers. At a minimum, they need to be watered regularly, but if you really want to knock your planters out of the park, then feed them on a regular basis with good plant food. So that I don’t forget to water and feed my planters this year, right after planting them, I put a daily reminder in my phone to water them and then at around the three week mark, I put a reminder in to feed them weekly. Now, if your planters aren’t under cover like mine are, then if it rains, you don’t have to worry about watering them as often.

    Tips for Beautiful Planters All Summer Long

    I can’t wait to see how gorgeous these planters get this summer!

    You can find great container recipe ideas from Proven Winners here – they do all the work for you and tell you exactly what works well together! You can also snag a free copy of their Gardener’s Idea Book here and they have a slew of gardening ideas and tips on their Proven Beauty website.

    Happy Planter Season!

    You might also want to see…

    DIY Cedar Planter Box  – using a simple snap-together frame!

    10+ Flower Pot Ideas – unique ideas for beautiful flower pots!

    Pin This Post

    Take the guesswork out of container gardening with these easy tips for beautiful planters all summer long - anyone can do this!

  • How to Make a Party Banner with PicMonkey

    How to Make a Party Banner with PicMonkey

    The Circus has turned five. 

    I’m not sure how we got here, or how we made it here all in one piece, but nevertheless, we did. #thankyajesus

    For her birthday party, she wanted a superhero theme – mostly Wonder Woman, but with a splash of Supergirl and Batgirl as well. #girlpower

    I was far too excited about this one. I love Wonder Woman. And really, all things girl power. 

    For the party, I made one of my super easy, super cheap party backdrops, then layered on a Wonder Woman / Superhero Style party banner I made using PicMonkey. 

    This tutorial will teach you how to make a party banner with PicMonkey. Customize the DIY party banner with your party theme - easy DIY Party Decor!

    The banner is really easy to make with PicMonkey. After you’ve created it, you just print it out, cut out the shapes, and string it together. 

    How to Make a Party Banner with PicMonkey

    Besides obviously needing a computer and the internet, you’ll also need a couple of other things after you print out the banner.

    Tools & Supplies

    Steps

    Step 1.

    Watch the video below to first make the banner using PicMonkey. Keep in mind you can customize the banner however you wish once you have the basic shape of the banner made – change up the colors, switch out the backgrounds, etc.

    Some of the fonts and features I used for the banner are part of PicMonkey’s Premium Features which aren’t available with the free version of PicMonkey. You can switch those out and use their free features or you can spring for the premium features, which are $3.99 – $7.99 per month. Personally, I couldn’t live without the premium features and the price is more than worth it to me. 
    [adthrive-in-post-video-player video-id=”MqDcJrnE” upload-date=”Tue Jun 06 2017 19:00:07 GMT+0000 (Coordinated Universal Time)” name=”How to Make a Custom Party Banner with PicMonkey” description=”Learn how to make a custom party banner using Picmonkey.”]

    Step 2. 

    Upload each of your banner files to a place where you can print them off. I used Staples for this and just uploaded all of my files into their copy and print services website, placed the order, then picked them up in-store. I printed mine out on a heavy 8.5 x 11 cardstock so that they would lay nice and flat against the backdrop. Also, be sure you print multiples of any letters you may need more than one of.

    Step 3.

    Once you get your banner sheets printed out, cut out around the shapes as I noted in the video. 

    Step 4. 

    To string the banner together, use the X-Acto knife and cut a small slit in each upper corner of each bunting. Weave your ribbon, string, or golden lasso 😉 through the buntings to connect them together. 

    This tutorial will teach you how to make a party banner with PicMonkey. Customize the DIY party banner with your party theme - easy DIY Party Decor!

    Hang the banner on the wall with thumbtacks or push pins. 

    This tutorial will teach you how to make a party banner with PicMonkey. Customize the DIY party banner with your party theme - easy DIY Party Decor!

    Our mini Wonder Woman thought the party decorations were pretty cool! 

    Do you have any favorite things to whip up with PicMonkey?

    You might also want to see…

    How to make a DIY birthday party backdrop for $3.

    DIY Birthday Party Backdrop

    Simple DIY Birthday Party Banner with Paper and Scissors

    DIY Birthday Banner with Paper, Scissors and a Marker

    17 PicMonkey Tutorials, Tips, and Projects

    PicMonkey Tutorials, Tips and Projects

    Pin This Post

    This tutorial will teach you how to make a party banner with PicMonkey. Customize the DIY party banner with your party theme - easy DIY Party Decor!

  • A Weekend in Nashville

    A Weekend in Nashville

    For a girl who loves country music as much as I do, it should be no surprise that I love Nashville, Tennessee, Music City U.S.A. 

    I grew up watching Ralph Emery host Nashville Now, The Crook and Chase Show and rarely missed a country countdown on TNN (The Nashville Network) from age five on. There is nothing in this world like good country music and no place quite like Nashville. 

    For my birthday a couple weekends ago and our anniversary as well, Grunt Labor and I took a weekend trip to Nashville. As always, it didn’t disappoint. Here’s what we did while we were there and what I would highly recommend you doing if you are ever in the area…which you should make it a point to be in the area at some point in your life. That’s just my completely biased opinion though of course. 😉 

    A Weekend in Nashville

    Disclosure: Visit Music City provided us with passes to some of the local attractions we visited, however all opinions are my own. 

    Our first stop wasn’t actually in Nashville, but in Lynchburg, Tennessee – the home of Jack Daniels. 

    Jack Daniels Distillery

    A Weekend in Nashville: Things to Do, Places to Go and Things to See in Nashville, Tennessee | Jack Daniels Distillery

    Lynchburg was about a 45 minute detour on our way to Nashville, so we decided to head there first and visit the Jack Daniels distillery. We had planned on taking a tour, but we weren’t good planners and the next available tour was too late in the day for us. Nevertheless, we walked about the visitor center there, which was cool. 

    I had heard that if you go to Lynchburg, the place to eat there is Miss Mary Bobo’s Boarding House. I did make reservations for that and I am so glad I did.

    Miss Mary Bobo’s

    Y’all. It was so good. 

    A Weekend in Nashville: Things to Do, Places to Go and Things to See in Nashville, Tennessee | Miss Mary Bobo's Boarding House

    You’re seated with other guests at a round table and the food is served on a lazy susan. The food is cooked with lard and real butter and Jack Daniels and it is just so damn good. While we were there, they served catfish, slaw, greens, ribs, okra, cornbread, rice casserole, and apples. Oh and there was pecan pie for dessert. I may or may not have had to unbutton my britches for the rest of the ride to Nashville. 

    We had tickets for the Eric Church concert both the Friday and Saturday nights that we were in town, so after checking into our hotel, The Gaylord Opryland, we headed downtown. We didn’t have much time for dinner, so we grabbed a quick bite at Paradise Park and also took in the music from their live band, then headed onto the concert. 

    Eric Church Concert

    Yes, I had a shirt made that said Good Girls go to Church specifically for this concert. Big thanks to my friend, Ashley for whipping that one and another out for me for the following night’s concert! 

    The concert was absolutely amazing, ya’ll. 

    A Weekend in Nashville: Things to Do, Places to Go and Things to See in Nashville, Tennessee

    I don’t know if any of you listen to Eric Church, but if you like good country music, then I highly suggest him. He doesn’t have that new country sound like some new artists do that I’ll refrain from mentioning. He kind of has a southern rock sound, but with a dose of old school country. He killed it both Friday and Saturday night. 

    On Saturday, we hit up a couple of our usual stops and a new one..

    The Johnny Cash Museum

    A Weekend in Nashville: Things to Do, Places to Go and Things to See in Nashville, Tennessee | Johnny Cash Museum

    This was our first visit to the Johnny Cash Museum and it did not disappoint. They have so many personal pieces of Johnny and June’s that it’s just amazing to behold. It’s incredibly informative and very personal. 

    A Weekend in Nashville: Things to Do, Places to Go and Things to See in Nashville, Tennessee | Johnny Cash Museum

    This wall of his records was one of my favorite things in the museum. It’s astounding just how many records he made. 

    Country Music Hall of Fame and Museum

    I always love going to the Country Music Hall of Fame and Museum. They have special exhibits throughout the year and while were were there, one of those was dedicated to the group Alabama.

    A Weekend in Nashville: Things to Do, Places to Go and Things to See in Nashville, Tennessee | Country Music Hall of Fame and Museum

    Which as everyone knows, is the greatest country music band of all time. It was a great exhibit and I’m so glad we got to see it. Even with all the permanent exhibits they have, I still find something that I didn’t see the last time we were there. 

    And finally, it isn’t a trip to Nashville without stopping at the Ryman. 

    The Ryman Auditorium

    A Weekend in Nashville: Things to Do, Places to Go and Things to See in Nashville, Tennessee | The Ryman Auditorium

    The Ryman, the mother church of country music, is where the Grand Ole Opry first aired on the radio and put country music on the map. I love just walking around this place and soaking it all in. I’m quite sure that Minnie still walks the stage on occasion. 🙂 

    That was all we had time for this trip, but there’s a little girl who was super pumped to see all the pictures of Dolly from the Country Music Hall of Fame and Museum, so I think we might have another trip to Nashville in our future. If you want more ideas for what to do in Nashville and where to eat, read this post too from one of our other trips there. You can also check out the Visit Music City website for more Nashville goodness. 

    Looking for more great weekend trips? Here’s a few more of our favorites…

    The Must Do’s of New Orleans – Best. City. Ever.

    Things to Do in Chattanooga, Tennessee – Pardon me, but is that the Chattanooga Choo Choo?

    Want to remember these Nashville travel tips for later? Just pin the image below!

    A Weekend in Nashville: Things to Do, Places to Go and Things to See in Nashville, Tennessee
  • The Farm: Living Room Design Plans

    The Farm: Living Room Design Plans

    *This post is sponsored by DISH, however all opinions are 100% mine. Affiliate links may also be contained in this post.

    So I warned you that the design of my grandparent’s house that we’ll be living in part-time was going to be very different than what our 70’s Landing Pad looks like. I wasn’t kidding. Are you ready for the first design plans? Let’s start with the living room…

    Before

    First off, the wood trim isn’t going anywhere. It does need some cleaning up where paint was splattered on it over the years, but we are keeping it as-is otherwise. I think my Pap would strike me dead from the grave if I painted over it. 😉 He loved a beautiful piece of stained wood.

    This is a longer room than it is wide, so there might be some furniture re-positioning going on once we get it all in there, but for the most part, here’s where we’re going with this space.

    The Plan

    The Farm: Living Room Design Plan

    Drapes / Sofa / Chairs / Ottoman / Rug

    We’re calling it Traditional Casual. Growing up, the living room at my grandparent’s home was always the more formal room, but it was always warm and welcoming too – it’s where we always arranged ourselves to open gifts at Christmas. I wanted to stay true to that, while also making it work for us.

    The walls are going to get a fresh coat of a light beige paint (Beige! Can you believe it?!), but we’re going to add some more traditional colors into the space with the drapes, rug and leather sofa. We’ll also throw in some accent pillows as well.

    The Farm: Living Room Design Plan

    Wall Color / Dresser / Sconce / Rug

    On the wall opposite the sofa, is where the television will reside. Growing up, the den always held the TV and never the living room, but the den is small and I decided it would be better used for us as an office of sorts. In my head, the den is going to be a library as well where I’ll write a book, while looking out the window but we all know how that will probably work out. 😉

    We have a hand-me-down dresser very much like the one above, that will hold the television. I’m considering putting sconces on either side of the TV like we did in the living room at our Beloved Foreclosure.

    One of the issues we’ve had to figure out about this whole part-time country living was the TV service. In the beginning, I thought maybe we would be able to get by without cable since we would be there just part of the time. And then Grunt reminded me about football season. Duh. TV is a must. In my hometown, there is one cable TV provider in the area and well, they don’t offer all the channels we would like or even a price we would like either. We looked at alternatives and eventually settled on DISH.

    The Living Room Design Plans

    Besides having all the premium channels, sports channels and Netflix integrated right into their services at a good price, DISH also has amazing customer service. Seriously, the installer showed up to install our dish, which is free by the way, and I didn’t even have our television out of the box or set-up. He must have realized how much I had on my plate by the looks of my paint covered overalls, no makeup, crazy hair and crazy talk, so bless his heart, he took all of it out, set it all up and then neatly arranged all the instruction manuals and other paperwork that had came with the TV.

    We were also able to take advantage of a promotion that DISH is currently offering – a free Polk soundbar – I’ll let you guess about how excited Grunt was at the thought of turning up that soundbar during football games – just like you’re in the stadium, baby. 😉 Besides the free soundbar, if you’re a new DISH customer, you can also take advantage of their free TV mounting or a set of bluetooth headphones, but only thru July 30th! Use the following offer codes during checkout to make sure you get yours: Polk Soundbar – DISHSOUND967, TV Mount – MOUNT4753 or Bluetooth Headphones BTOFFER852.

    DISH also offers a 2 Year Price Guarantee, which is a huge deal for us. We’ve went round and round with cable companies in the past because their rates skyrocket after the first six months, a year or really whenever they decide to change their mind, but DISH isn’t like that. We can budget for that cost for at least two years without it changing. You can find more information about getting DISH at your house by visiting their site or calling 877-625-0157.

    So while we are currently rocking a somewhat redneck TV setup in the living room, we’ve got premium TV service. Little blonde hair girls with curls and overall-wearin’ uncles not included with DISH offers. 😉

    What do you think about the living room design?

    Pin This Post

    Traditional Casual Living Room

  • DIY Party Invitation using PicMonkey

    DIY Party Invitation using PicMonkey

    Create your own customized party invitations for any event using this Picmonkey invitation tutorial! No more paying a boatload for custom party invites – now you can do it yourself on the cheap with Picmonkey invitations! 

    This post contains affiliate links. 

    Once more, its that time of the year.

    When Mama drinks a little more cheap beer than usual.

    When she may cry simply because the streamers aren’t twisting just right.

    When she is hovering on the edge of a nervous breakdown.

    That’s right, its birthday season around here.

    Why I put this much stress on myself for the kid’s party, I do not know. I mean, let’s be honest. The minute the kid dropped her first cuss word, that mother of the year award was out of my reach. As if a perfectly decorated birthday party would bring it back.

    One thing however, that is going right in the birthday planning are the party invitations I made using PicMonkey.

    Picmonkey Invitation Tutorial

    Bless you, PicMonkey.

    Bless you for helping me keep a little piece of what sanity I have left.

    Here’s how I made my Picmonkey invitations. You can customize them to your liking or party theme however you wish.

    DIY Picmonkey Invitations

    These were really easy to make. I think I had it all done in about an hour – more time to make those streamers just perfect.

    Steps

    Step 1

    If you don’t already have a Picmonkey account, you’ll need to sign up for one. You can get a free trial here or just go ahead and pay the $6 a month if you want – it’s completely worth it and honestly, it’s a steal for how much you save making stuff like this yourself.

    Step 2

    Select a background you want to use.

    I went with the different colored polka dots because the kid’s party is a Care Bear theme and ya know, there are lots of rainbows in Care-A-Lot and I didn’t want bears to be exploding from every surface. I just googled rainbow polka dots, or polka dots, or rainbow, until I found an image that I liked and was large enough to work for what I needed. And of course, that was free. When you have your image saved, open it up in PicMonkey, and crop it down to an 8×10 size or a rectangle size of your choice. I do 8×10 and then print in 5×7 sizes. Doing the larger size just gives a better resolution – or I think so anyway. Picmonkey InvitationsStep 3

    Put an overlay on top of the background. 

    Obviously, if you tried to put your text on top of all those different colors, it isn’t going to stand out very well. To help with this, put a white faded overlay on top of your background. Do this by selecting the butterfly icon, then the geometric tab, then the rectangle, size it as needed, change the color to white and fade it to 15%. Center it on the background.

    Picmonkey Invitation Tutorial

    Step 4

    Add your text and other images. 

    To make this easier on you and me, I have this handy little graphic that tells you exactly what fonts and images I used.

    You can send me a cheap beer to thank me for it.

    Picmonkey Invitations

    Last year’s birthday party invitations had quite a few different fonts going on. This year, I stuck with just a few different ones because there was so much going on with the background.

    Step 5

    Save and Print.

    Once you’ve got the invitations to your liking, save them on your desktop. After that, go to Picmonkey Print and print out the invitations or you can also print them elsewhere if you wish. I typically print out our invitations in a 5″ x 7″ size.

    Have you ever made party invitations using PicMonkey or something else?

    You may also want to see…

    This tutorial will teach you how to make a party banner with PicMonkey. Customize the DIY party banner with your party theme - easy DIY Party Decor!

    How to Make a Superhero Party Banner with Picmonkey

    Top 10 Posts of 2013 from RainonaTinRoof.com

    DIY Party Backdrop for $5

    Pin This Post

    Custom Picmonkey Invitation Tutorial

    You know you don’t wanna miss any of this crazy.

    Stalk Me Here:

    Pinterest / Facebook / Twitter / Instagram

    SaveSaveSaveSave

  • The Easiest Way to Clean Really Gross Vinyl Upholstery

    The Easiest Way to Clean Really Gross Vinyl Upholstery

    The Circus and I have trekked through some interesting places in our yard sale and estate sale adventures. There are times I pray she doesn’t blurt out something about how bad it stinks wherever we are or how dirty the place is. Oftentimes, I bathe her in Germ-X when we get back in the car.  Sometimes I pray there isn’t a psychopath waiting for us at the end of a long hallway in a dark basement.

    The latter scenario is how I came to find this little gem.

    Before tossing that grime covered vinyl chair out, try this idea for cleaning vinyl upholstery. You might be surprised at how easy it is to clean vinyl!

    Unfortunately though, this little gem was quite rough to begin with. The whole thing had to get a new paint job and the upholstery….

    Before tossing that grime covered vinyl chair out, try this idea for cleaning vinyl upholstery. You might be surprised at how easy it is to clean vinyl!

    Whoo lawd, the upholstery, it was bad. It was greasy and grimy and after I loaded that thing in my truck, I’m certain I used an entire thing of hand sanitizer on my hands. That being said though, I bought it from a sweet old lady who was moving and honestly, I just don’t think she was able to get up and down those stairs to clean it anymore, bless her heart.

    My first thought was that I would have to replace the upholstery completely, but I really loved that cute yellow piping on the cushions. So, instead I decided to try cleaning it with a cleaner I had used on a Mid-Century Modern sofa and chairs that had been in similar condition when I purchased it. 

    And it worked. 

    Like a charm. 

     How to Clean Vinyl Upholstery

    This post contains affiliate links for your shopping convenience. Click here to read my full disclosure policy.

    Before tossing that grime covered vinyl chair out, try this idea for cleaning vinyl upholstery. You might be surprised at how easy it is to clean vinyl!

    Side note: There might be other cleaners that work, but this was the best one I found after trying a few. This post is NOT sponsored by Zep in any way, I was just amazed at how well their product worked and wanted to share with you.

    Step 1. 

    You want to work in small sections, so first spray a section of part of the piece you are working on. With these cushions, I started with the top, fully cleaned it, then moved to the sides, cleaning each side completely before moving to the next one. 

    Before tossing that grime covered vinyl chair out, try this idea for cleaning vinyl upholstery. You might be surprised at how easy it is to clean vinyl!

    Let the cleaner sit on the upholstery for about 2-3 minutes. 

    Step 2.

    Using your scrub brush, give the vinyl a good scrubbing. You should literally see the dirt, grease and grime start to lift away. 

    Before tossing that grime covered vinyl chair out, try this idea for cleaning vinyl upholstery. You might be surprised at how easy it is to clean vinyl!

    Step 3. 

    After you have scrubbed the section thoroughly, come back with a paper towel and wipe up all that gross junk. 

    Before tossing that grime covered vinyl chair out, try this idea for cleaning vinyl upholstery. You might be surprised at how easy it is to clean vinyl!

    With these cushions, it only took one round of cleaning per section. However, if your piece is really heavy with dirt and grime, it might take a couple of passes with the cleaner. 

    Before tossing that grime covered vinyl chair out, try this idea for cleaning vinyl upholstery. You might be surprised at how easy it is to clean vinyl!

    And because no cleaning post is good without a little side-by-side before and after action:

    Before tossing that grime covered vinyl chair out, try this idea for cleaning vinyl upholstery. You might be surprised at how easy it is to clean vinyl!

    What’s even funnier is that I didn’t realize the vinyl was actually supposed to be white when I bought it, I knew it was dirty, but I just assumed it was more of a beige-y color with all the dirt. 

    Before tossing that grime covered vinyl chair out, try this idea for cleaning vinyl upholstery. You might be surprised at how easy it is to clean vinyl!

    I think the yellow piping is just too cute on these chairs. How could I not try to salvage those cushions?!  

    Before tossing that grime covered vinyl chair out, try this idea for cleaning vinyl upholstery. You might be surprised at how easy it is to clean vinyl!

    Any tricks you have for cleaning upholstery? 

    Want more shortcuts for cleaning? See these then…

    How to Remove Rust and Polish Chrome – do not throw away rusty metal just yet! Try this first!

    How to Clean Brass – who knew it was supposed to look like that?

    Want to come back to this vinyl upholstery cleaning tip later? Just pin the image below!

    Before tossing that grime covered vinyl chair out, try this idea for cleaning vinyl upholstery. You might be surprised at how easy it is to clean vinyl!
  • Non-Cheesy Mommy and Me Outfits

    Non-Cheesy Mommy and Me Outfits

    I’m not one of those moms.

    You know those moms.

    Those moms who ooooooo and ahhhhh over their kids every single minute of every day. Those moms who want to spend every waking moment they can with their kids. The ones who post a new picture of their kid on Facebook every single day and often multiple times a day.

    Those moms.

    I’m not that mom.

    I’m not judging that mom. I’m just not that mom. I love spending time with the Circus – don’t get me wrong. But if I were to spend 24/7 with that child, we would both be carted off to the asylum when the cops showed up. I would probably be intoxicated as well.

    That being said, the Circus and I are one of those moms and daughters who do, on occasion, dress alike.

    It all started a couple years back when I bought us matching green palm print jumpsuits. Now, everytime I buy a new piece of clothing, the Circus says, “Can I get one like that too?”

    We don’t match every day. Hell, we don’t match once a month. We’re more on a bi-monthly or quarterly basis of matching. I’d have to make fun of myself if we matched more than that. And we don’t do cheesy matching outfits either. I’d drop dead and consider myself a complete failure if she ever asked me to wear matching shift dresses and cardigans.

    Here are some of our favorite kinds of Mommy and Me Outfits – of the non-cardigan variety. 😉

    *affiliate links may be included in this post. 

    Mommy and Me Outfits

    Mommy and Me Rocker Outfit

    Non-Cheesy Mommy and Me Outfits including mommy and me dresses and shirts.

    KISS Sleeveless T-Shirt / Women’s Distressed Shorts / Women’s Red Sandals / Kid’s KISS T-Shirt / Kid’s Red Sandals / Kid’s Distressed Shorts

    Obviously, this is my favorite, as I proclaimed my love of band tees last week. I snagged the Circus that KISS t-shirt a couple weeks back – it’s $7, so a no-brainer for me. My KISS t-shirt is different than the one pictured above, but I ordered that same style in the Rolling Stones and Guns ‘N Roses version and love it. The shirts are really soft and are a little longer than usual, so you can easily tuck them in if you want to. I also love that they are sleeveless for summer. I did size up one on those t-shirts though as they are junior sizes. And did I mention those sleeveless rocker tees are less than $15?!  I went on the hunt for a good pair of distressed shorts that weren’t also daisy dukes and found these. They are a good length – not to short, not too long and very comfy. I’ve also got those red sandals for myself.  😉

    Chambray Dresses + Cowboy Boots

    Non-Cheesy Mommy and Me Outfits including mommy and me dresses and shirts.

    Women’s Off Shoulder Chambray Dress / Women’s Red Cowboy Boots / Kid’s Cold Shoulder Chambray Dress / Kid’s Red Cowboy Boots

    We are having family photos taken in a few days and these are the outfits I’m planning on the Circus and I wearing. I got lucky enough to have a girl who loves her red cowboy boots just as much as I love mine. The funny thing about this whole ensemble is that my chambray dress is actually cheaper than her’s! Fit tip: For the women’s chambray dress, I sized up one.

    Navy Romper + Gold Sandals

    Non-Cheesy Mommy and Me Outfits including mommy and me dresses and shirts.

    Women’s Gold Sandals / Women’s Off the Shoulder Navy Romper / Kid’s Navy Romper / Kid’s Gold Sandals

    Jumpsuits and rompers are my jam during the spring and summer. I don’t care how many jumpsuits I already have – I want more. I’m always on the hunt for great ones. I just picked up a fantastic red one the other day and when I modeled it for Grunt Labor, he asked if I was planning a trip to Mexico. Well maybe I will. The Circus saw me in it and said I should wear it all the time and then of course, asked for her own. I wasn’t able to find a cute red little girl’s romper or jumpsuit to coordinate with mine, but I do have a navy romper similar to the one above and found this cute little girl’s version. Pair it with gold sandals and well, you’re golden. 😉 I would advise sizing up on the women’s romper as it is a junior size.

    Here’s to Mommy & Me Outfits of the Non-Cheesy Variety!

    Do you have any favorite Mommy and Me combinations?


    [show_shopthepost_widget id=”2663105″]

    You might also want to see…

    Love band t-shirts? Get four ideas for how to wear band tees outfits right here! Great ideas for ways to wear band shirts!

    Four Ways to Wear Band T-Shirts

    Looking for summer sandals? Here are 12 pairs of sandals under $30. These affordable sandals offer something for everyone's style!

    12 Pairs of Sandals Under $30

  • How to Rock Black Walls

    How to Rock Black Walls

    Disclosure: This post is sponsored by SmithHonig, however all opinions are 100% mine. Affiliate links may be contained in this post.

    If there is one thing in the 70’s Landing Pad that everyone thought I was crazy for doing, it was painting the walls black.

    That move was also one that I’ve never thought twice about – I love how those black walls in our living room and dining room turned out.

    I get that black walls aren’t for everyone and that’s totally ok. On the other hand though, besides the golden band, (haha – see what I did there? Please tell me someone around here knows Randy Travis?), people have said “I LOVE your black walls, but I just don’t think I could ever pull it off.”

    Well you can. And I’m here to tell you how.

    You see, I had no damn clue what I was doing when I painted those living room and dining room walls black. I just knew I wanted black walls. After they were black was when I had to learn how to actually decorate the space with the black walls.

    How to Decorate with Black Walls

    The key to having a beautiful room with black walls is to make those walls the backdrop, not the focal point. The black walls should accent the rest of the room. Think of them as supporting actors, but not the star of the show. I’m all about metaphors around here. 😉

     1. Balance out the black with another neutral.

    Black is a neutral. To soften the black, I also brought in white and ivory tones to our living room. The sofa is white, the bar is ivory and the cabinetry is also neutral. I’ve found that making these bigger pieces like the furniture neutral with black walls helps to balance the walls out.

    Love black walls but not sure how to decorate with them? Here are great decorating ideas for rooms with black walls!

    Navy Velvet Pillows with Colorful Trim / Floor Lamp / Coffee Table (similar) / Red Velvet Drapes / Sofa (similar)

    2. Pull in something big with pattern.

    In my case, it was my snakeskin patterned rug. Now you might not want to go with something so boldly patterned, but definitely try to get something big in there that’s patterned.

    3. Pick 2-4 other colors (actual colors, not neutrals) to liven up the space.

    For our living room, I went with dark reds, emerald green, mustard and a little navy. I’ve found using these actual colors on textiles works best with black walls. I went with solid dark red velvet drapes on the windows. This added a big dose of color on the walls that broke up the black.

    I pulled in emerald green on my two accent chairs and then added more colors in with the accent pillows on those chairs.

    Love black walls but not sure how to decorate with them? Here are great decorating ideas for rooms with black walls!

    Green Chairs / Vintage Gypsum Pillow / Mustard Velvet Pillow with Tassels / Lion Print / Red Velvet Drapes

    I loved these chairs when I got them, but I fell in love with them even more when I got those pillows.

    Love black walls but not sure how to decorate with them? Here are great decorating ideas for rooms with black walls!

    Green Chairs / Vintage Gypsum Pillow / Mustard Velvet Pillow with Tassels

    My friend Kellie and her friend, Melanie recently started a new company called Boho Luxe Home and these beauties came from there. They have gorgeous, colorful home décor items including pillows, wall art, and more.

    Love black walls but not sure how to decorate with them? Here are great decorating ideas for rooms with black walls!

    For these chairs, I went with solid golden velvet pillows that have a patterned band around them and then smaller patterned pillows, called Vintage Gypsum, in front that are the same pattern from the band on the velvet pillows. These added the perfect amount of extra color to these chairs and the whole space overall. The velvet pillows come in lots of different contrasting piping options.

    On the white sofa, I pulled in that same color pattern again, but this time around velvet navy pillows and a touch of leopard print.

    Love black walls but not sure how to decorate with them? Here are great decorating ideas for rooms with black walls!

    This pulled all the accent colors together throughout the whole room. Boho Luxe Home pillows come in many different shapes, sizes and patterns. You can view the whole collection here. Another one of my favorites from their line is this All Love pillow that is in the Circus’ room.

    Love black walls but not sure how to decorate with them? Here are great decorating ideas for rooms with black walls!

    I love the design and colors on this pillow, but I also love the message. 🙂 This one is also available as wall art. Besides pillows, Boho Luxe Home also offers canvas, metal, wood and leather art. Shop their whole collection here.

    4. Have big focal points.

    Like I said earlier, you want your black walls to be a supporting actor and not the star of the show. One way to do this is by having large focal points against your black walls – like big art. I like big art and I cannot lie.

    Love black walls but not sure how to decorate with them? Here are great decorating ideas for rooms with black walls!

    Lion Print / Red Velvet Drapes

    In my living room, one of the focal points is the oversized lion art. The black walls set it off and it’s also nicely framed by my red drapes.

    The same is true in my entryway.

    If you love black walls and dramatic interior design, you have to see this entryway makeover! It's full of deep moody colors and breathtaking art! Dramatic Entryway Makeover | Soul Seeking Art via Minted | Vintage Chandelier | Black Walls

    Chandelier / Eyes Art

    The art is the focal point, but damn those black walls set it off. 😉

    5. Sprinkle in a few metallics.

    Whether it’s brass, chrome, copper or nickel, just about any metallic looks great with black. I actually spray painted my coffee table gold and love how it looks against the black.

    Love black walls but not sure how to decorate with them? Here are great decorating ideas for rooms with black walls!

    Navy Velvet Pillows with Colorful Trim / Coffee Table (similar) / Sofa (similar) / Eyes Art

    You may have also noticed that the side table between my two green chairs is metallic as well. I also added in metallic accessories on top of the bar too.

    Love black walls but not sure how to decorate with them? Here are great decorating ideas for rooms with black walls!

    Green Chairs / Vintage Gypsum Pillow / Mustard Velvet Pillow with Tassels / Gold Table (similar) / DIY Crystal Vase

    So, yes, you CAN rock black walls. Just remember to add in a few neutrals, some color, big art and a little metallic.

    What do you think of black walls?

    Pin This Post

    Love black walls but not sure how to decorate with them? Here are great decorating ideas for rooms with black walls!

    Disclosure: This post is sponsored by SmithHonig, however all opinions are 100% mine. 

    SaveSave

  • Cleaning Up Vintage Brass

    Cleaning Up Vintage Brass

    This is a sponsored post written by me on behalf of Scrub Daddy. All opinions are 100% mine.

    I get giddy like a schoolgirl over a good piece of vintage brass. I already have more pieces of it than I can use in my own house, but with starting the pop-up shops, I’ve gained just one more excuse to be on the hunt for it. As if I needed an excuse, anyway. 😉

    Rarely do I ever find a piece of vintage brass that is clean and shiny. Buying those pieces does mean more work for me to clean them up, but it’s really not too bad at all. Even if a piece hasn’t been cleaned up in the past decade and is sporting a few rust spots, I can typically have an average piece of brass cleaned up in 10 minutes or less.

    Cleaning Up Vintage Brass | Learn how to clean brass in under ten minutes to make it look like new again.

    When I clean up brass, I tend to go for a Scrub Mommy, which is part of the Scrub Daddy family – American’s Favorite Sponge. I’m just waiting on them to release brothers and sisters too. 😉

    Cleaning Up Vintage Brass | Learn how to clean brass in under ten minutes to make it look like new again.

    All Scrub Daddy products are scratch free, which is a must for brass, but a Scrub Mommy is different in that it is two-sided. On one side is the traditional unique FlexTexture®, which is firm in cold water and soft in warm water, and on the other side is a soft sponge. I load up the sponge side with brass polish and go about cleaning up the brass. If there are any rust spots on the brass, I flip the Scrub Mommy and use the FlexTexture® side on those spots, which easily powers through them.

    Cleaning Up Vintage Brass | Learn how to clean brass in under ten minutes to make it look like new again.

    The built-in eyes and mouth are good for getting awkward places on the pieces as well.

    Cleaning Up Vintage Brass | Learn how to clean brass in under ten minutes to make it look like new again.

    The gunk, so to speak, and other particles picked up stays in the Scrub Daddy, but will also easily rinse out when you’re ready. And when you rinse it out, the odors go with it too.

    After cleaning the brass, I rinse it off with water and dry it immediately. Don’t let any water sit on it – as that will just leave you with water spots.

    You can find Scrub Mommy at All Major Retailers. Also, be sure to visit the Scrub Daddy Facebook page for more cleaning ideas with Scrub Daddy and special offers!

    Happy vintage brass cleaning! 

  • 12 Pairs of Sandals Under $30

    12 Pairs of Sandals Under $30

    Sandal season is upon us. Honestly, I’m usually not a huge sandal person. My favorite kind of shoes, during any season are my closed toe pumps. However, sandals are a necessity for me because I can’t exactly walk all around parks and zoos all summer with the Circus and Grunt Labor in a pair of pumps. When I went to put on a pair of my sandals a few weeks back, I found that two pairs were coming apart at the seams and one pair was actually missing part of its heel. I wasn’t really surprised as I had bought all of them years ago and worn the heck out of them.

    It was time for new sandals.

    At first, I suffered sticker shock. While the sandals I found did start to change my mind about how cute sandals could be, they were also about $70, which I couldn’t bring myself to pay for sandals. So I dug around more and found these awesome pairs of sandals all for under $30.

    Slowly but surely, I might just be learning to love sandals a little more.

    12 Pairs of Sandals Under $30

    *Affiliate links may be contained in this post. 

    Looking for summer sandals? Here are 12 pairs of sandals under $30. These affordable sandals offer something for everyone's style!

    Gladiator Sandal

    I like the slight wedge that these sandals have. This one is also available in gold and white colors.Looking for summer sandals? Here are 12 pairs of sandals under $30. These affordable sandals offer something for everyone's style!

    Pop of Pink and Orange Sandal

    If you like your sandals to have a a pop of summer color, then take a look at these. I love that bright pop of pink and orange on this pair. You can also get these in a tan/denim combo and black/cognac combo. Looking for summer sandals? Here are 12 pairs of sandals under $30. These affordable sandals offer something for everyone's style! Cognac Wedge Sandal

    These have a bit more of a heel than the other ones I shared above have. That being said, I think these sandals would be really easy to dress up. You can also get them in black. Looking for summer sandals? Here are 12 pairs of sandals under $30. These affordable sandals offer something for everyone's style!

    Black Fringe Sandals

    Fringe details get me every. single. time. I have actually seen sandals nearly identical to this pair for around $70 – these though, are less than $25! Looking for summer sandals? Here are 12 pairs of sandals under $30. These affordable sandals offer something for everyone's style!

    Studded Gladiator Sandals

    If you like the gladiator look sandals, but need a little extra bling, these studded ones are on point. They also come in black and white.Looking for summer sandals? Here are 12 pairs of sandals under $30. These affordable sandals offer something for everyone's style!

    Red Tassel Sandals

    The moment I saw these sandals, I knew they were coming home with me. I would have even paid more for them, but they were only $25! You can also get these sandals in black and taupe.

    Looking for summer sandals? Here are 12 pairs of sandals under $30. These affordable sandals offer something for everyone's style!

    Cognac Strap Sandals

    I bought these as well and they are going to be my go-to-casual-works-with-anything sandal this summer. I was in desperate need of a new pair of comfortable, brown sandals and these fit the bill. They are also available in black.
    Looking for summer sandals? Here are 12 pairs of sandals under $30. These affordable sandals offer something for everyone's style!

    Strappy Taupe Sandals

    If you need a good pair of neutral sandals that will work with anything, these are the ones. These babies are neutral without being boring. 🙂 Looking for summer sandals? Here are 12 pairs of sandals under $30. These affordable sandals offer something for everyone's style!

    Floral Sandals

    I am usually not a floral print kind of person at all, but I love these floral print sandals! Looking for summer sandals? Here are 12 pairs of sandals under $30. These affordable sandals offer something for everyone's style!

    Gladiator Sandals

    I ordered these gladiator sandals in black and love them. They have just the right amount of detail without being too much.
    Looking for summer sandals? Here are 12 pairs of sandals under $30. These affordable sandals offer something for everyone's style!

    Black Sandals with Gold Detail

    The gold band on the end of these sandals totally won me over. Black and gold is a favorite combination of mine, as you well know. 😉 You can also get them in a nude/gold and floral/gold colors. Looking for summer sandals? Here are 12 pairs of sandals under $30. These affordable sandals offer something for everyone's style!

    Brown Fringe Sandals

    More fringe detail on these, but this time the fringe covers nearly the whole top of your foot. You can get these in both brown and black.

    Here’s to sandal season! It might just be making a comeback in my book.

    [show_shopthepost_widget id=”2652051″]

    SaveSave

  • How to Turn a Side Table Into a Bench

    How to Turn a Side Table Into a Bench

    This post is sponsored by Velvet Finishes, however all opinions are 100% mine. Affiliate links may be contained in this post.

    Sometimes I forget how much I love painting furniture. Before this project, it had been too long since my last furniture makeover. With a few furniture painting projects prior to this one, there seemed to be hiccups every time I turned around and I think I finally just got burned out for a little while. Hiccups happen. A lot. That break and this project though, was exactly what I needed to remind me how much I love seeing a piece of furniture do a 180°.

    This is a great furniture makeover idea for an end table makeover - find out how to turn a side table into a bench. Easy side table redo in a day!

    This one turned out better than I imagined. I took an old, beat up side table and turned it into a classy bench. In the process, I also fell in love with this new blue color – more on that in a minute though.

    How to Turn a Side Table Into a Bench

    Tools & Supplies

    Steps

    Step 1

    This is what my table looked like to begin with:

    This is a great furniture makeover idea for an end table makeover - find out how to turn a side table into a bench. Easy side table redo in a day!

    Now, I came up with the idea for turning this into a stool because of the way the tabletop was with those slats. I fell in love with the lines of the legs and the brass hardware on the table, but that slatted top was weird. That being said, you can still turn any side table into a stool – it’s just a matter of making the upholstered top whatever size you want it to be.

    To start with, I sprayed the table down with Ready.

    This is a great furniture makeover idea for an end table makeover - find out how to turn a side table into a bench. Easy side table redo in a day!

    This helps to remove any shine left behind from the previous finish and also works as a cleaner. Ready is kind of like a de-glosser and cleaner in one. Most of the time, it’s going to eliminate the need for priming or sanding.

    All you do is spray it on there, let it sit for a few minutes and then just wipe it off.

    This is a great furniture makeover idea for an end table makeover - find out how to turn a side table into a bench. Easy side table redo in a day!

    You can see above some of what it took off my table there.

    Step 2

    Now, you’re ready for paint. Velvet Finishes has just introduced new colors to their line. When I saw them, I was so excited to get my hands on a few of them. Tranquil was one of those colors.

    It’s not a navy blue or a bright blue, but somewhere in the middle and I love, love, love it. I gave my piece two coats of Tranquil.

    This was also my first time using the Velvet Finishes brushes. I really liked how smoothly they applied the paint.

    This is a great furniture makeover idea for an end table makeover - find out how to turn a side table into a bench. Easy side table redo in a day!

    The Circus has become very adamant about assisting in painting lately, so I let her have at it and help me. Those slats didn’t really have to be painted since they were getting covered up, but ya know, it gave her something to do. 😉

    Step 3
    After the final coat of paint was dry, I followed up with Protect for a little added protection.

    This is a great furniture makeover idea for an end table makeover - find out how to turn a side table into a bench. Easy side table redo in a day!

    Since this piece was getting a new life as a bench, I wanted to give it a little more protection against legs and banging feet. I also used the Reviver paint brush to apply the Protect.

    Step 4

    The next step is to make the cushion for the top of the table. Since I had those weird slats on the top of my table, I made my cushion the same size as that area to cover it up. If you’re doing this on a solid tabletop, then just determine how big you want your cushion to be and cut a piece of 1/2″ plywood down to that size.

    This is a great furniture makeover idea for an end table makeover - find out how to turn a side table into a bench. Easy side table redo in a day!

    After you cut the plywood to size, lay it on top of a piece of foam and trace the shape of the plywood onto the foam, then cut the foam to size. You can do this with a utility knife, but I finally bought an electric knife to cut my foam with about a year ago and it has been one of the best purchases I’ve ever made. That sucker cuts through foam like butter instead of having to do all that sawing with a knife.

    Once the foam is cut, put a little glue on the plywood, then attach the foam to it.

    Step 5

    Lay batting over the foam and cut enough out to wrap around all the edges of your cushion. Do the same with your upholstery material.

    This is a great furniture makeover idea for an end table makeover - find out how to turn a side table into a bench. Easy side table redo in a day!

    Finally, wrap the wood and foam with the batting and material, stapling it securely to the other side. You can use a regular utility stapler to do this, but I do prefer a power stapler. Like with the electric knife, it just makes the job go so much faster and smoother. No hammering in staples that don’t go all the way in.

    Step 6

    After your table is fully dry, use your drill with a small drill bit attached and drill pilot holes a little inside the four corners where your cushion will go. I did this from the underside, but I think you could probably do it from the top too. Finally, place your cushion on top. Attach the cushion onto the tabletop by screwing it from the bottom up through the pilot holes.

    This is a great furniture makeover idea for an end table makeover - find out how to turn a side table into a bench. Easy side table redo in a day!

    Isn’t that color gorgeous???? I definitely see myself using this color on more furniture in the future. I am just crazy over it.

    This is a great furniture makeover idea for an end table makeover - find out how to turn a side table into a bench. Easy side table redo in a day!

    The material I used was actually left over from recovering my old dining room chairs. It is called Williamsburg Portobello Vase Ladybug. I love how it looks against the Tranquil. I also cleaned up the brass hardware with Bar Keepers Friend to make it look all shiny and new.

    What do you think of this new color?

    You might also want to see…

    How to get a layered Caribbean Blue Look When Painting Furniture - easy way to paint furniture by layering on colored furniture paint glazes.

    How to Get a Layered Caribbean Blue Look

    Happy Painting!

    Pin This Post

    This is a great furniture makeover idea for an end table makeover - find out how to turn a side table into a bench. Easy side table redo in a day!

    *This post is sponsored by Velvet Finishes, however all opinions are 100% mine.

    SaveSave