Learn how to make your own party invitations with this PicMonkey invitation tutorial! You can customize it with any colors or fonts of your choice.
This post contains affiliate links for your shopping convenience. Click here to read my full disclosure policy.
With the kid’s 1st birthday quickly approaching, I realized I had better get some invitations made for her birthday party.
As many of you already know, I am a big PicMonkey fan. I love all the cool things it lets you do with photos. And for just $6 a month, it is well worth the money since you can save boatloads on creating your own invitations, holiday cards and more and not pay retail for them! If you don’t have a Picmonkey subscription yet, you can get a free trial by clicking here.
I have used PicMonkey for my master bedroom wall art, my blog design, and to make my pictures “pin-worthy,” among other things. So, with the help of Picmonkey, I whipped up some pretty stellar invitations for the kiddo’s birthday.
Picmonkey Invitation Tutorial

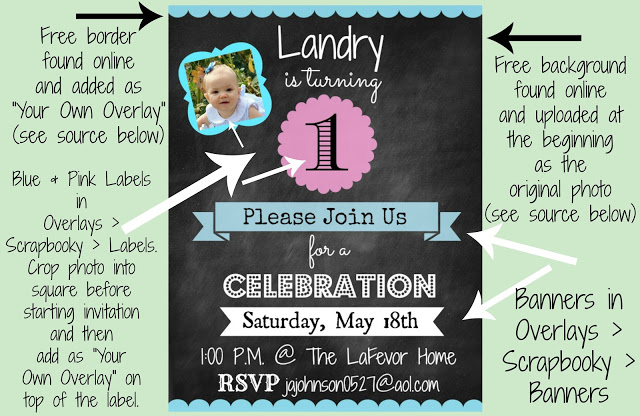
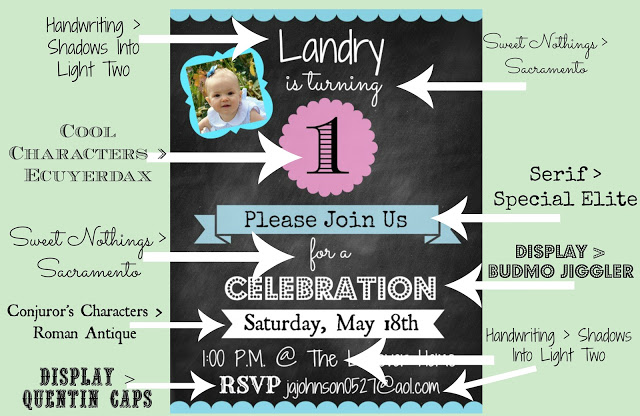
What kind of Picmonkey invitations will you whip up?
Want to see other party invitations I’ve made with Picmonkey…
Colorful Polka Dots Invitation – a basic party invitation that’s great for any party!
Farm Birthday Party Invitation – perfect for your next hoedown!
Need more party ideas? Here you go:
How to Make a Superhero Party Banner with Picmonkey – easy and you can switch it up to match your party’s decor!
DIY $5 Party Backdrop – so stinkin’ easy, cheap and an awesome party decoration!

Sarah {Limited Space Organizing} says
I LOVE THIS POST!!! I’m a fellow lover of picmonkey and this is amazing!! Thank you for showing what each thing is and where to find it. GREATTTTTTT post!!!!
-Sarah
Meredith says
Genius! I love picmonkey too, and this idea will come in handy.
Shannon Hawk says
This is really cute! I love PicMonkey, there is sooo much you can do with it!
cooking with curls says
Cool tutorial, thanks for sharing:)
Madalyn McArthur says
I love it, thanks for sharing!
Jamie Alanna says
Wow! What a great job! Love this invite. Gotta do this next birthday 😉 BTW, your little girl is adorable!!
Jamie
Sarah Wells says
So cute, thanks for sharing! I LOVE using PicMonkey, but hadn’t thought of making invitations.
Whitney says
thank you thank you for this!! so helpful!!
mail4rosey says
This is a great post. So many people seem to really be loving Picmonkey right now. I’m visiting today from the Talking about Thursday hop. 🙂
erinz says
Thank you so much! I followed your instructions (down to using the exact same fonts) & my invitation looks so cute!!!
Jenna LaFevor says
Yay!! That is great! I am so happy I could help you!
Emily @ Two Purple Couches says
Thank you for posting this How To! I’ve been wondering how others create such awesome graphics in PicMonkey. Yay! Now I know how 🙂 Oh, and I use the free version for all of my photo edits, too. I don’t want to pay if I don’t have to! And so far, I don’t have to!
Jenna @ Rain on a Tin Roof says
You are so welcome! PicMonkey is amaze balls!
Amanda says
Thank you so so much for this how to… my daughter’s birthday invitations look absolutely perfect and didn’t cost a cent, now conjuring up ideas for what else I can make with it!
Jenna @ Rain on a Tin Roof says
That is awesome, Amanda! I am SO glad it was so helpful for you! I just love PicMonkey! Have fun at the party!
Kelly says
This is great! I just have to figure out how to do overlays now!
Jenna @ Rain on a Tin Roof says
Kelly, its easy to do overlays! Once you get in there and start playing with PicMonkey, it will come easily!