Got a garage sale coming up? Learn how to make a clothes rack for a yard sale below! This simple to build DIY clothes rack for garage sales is great for not only secondhand sales, but excess clothes storage as well!
Yard sale season is so close, I can almost taste it.
Nearly every Friday come spring, the Circus and I will load up and hit all the area yard sales.
And then on Saturday morning, we’ll do it again, courtesy of our chauffeur, Grunt Labor.
And of course, my friends and I have become quite popular for our own yard sales as well.
You have read The Yard Sale Chronicles post, right?
At least two or three times a year, we all get together and host a yard sale, generally at my house. We hang out in the garage in our matching t-shirts drinking beer, Arbor Mist or Sangria if we’re lucky enough to get Kathryn to make it that day. We laugh and carry on and on more than one occasion, we’ve had customers ask if they can hang out with us for the rest of the day just for the entertainment.
Yard sale days are a big deal around here.
And since we’ve done it so much now, we just keep getting better and better at them. We have great signs, our shit is organized and mostly priced.
And we all make a little money just for putting our shit for sale in the driveway, hanging out together and drinking.
If that isn’t a win-win situation, then I don’t know what damn well is.
My friend Jason recently had the grand idea of hosting a Secondhand Market. Basically, it was kind of like an upscale yard sale indoors. He did a great job organizing it and it went extremely well.
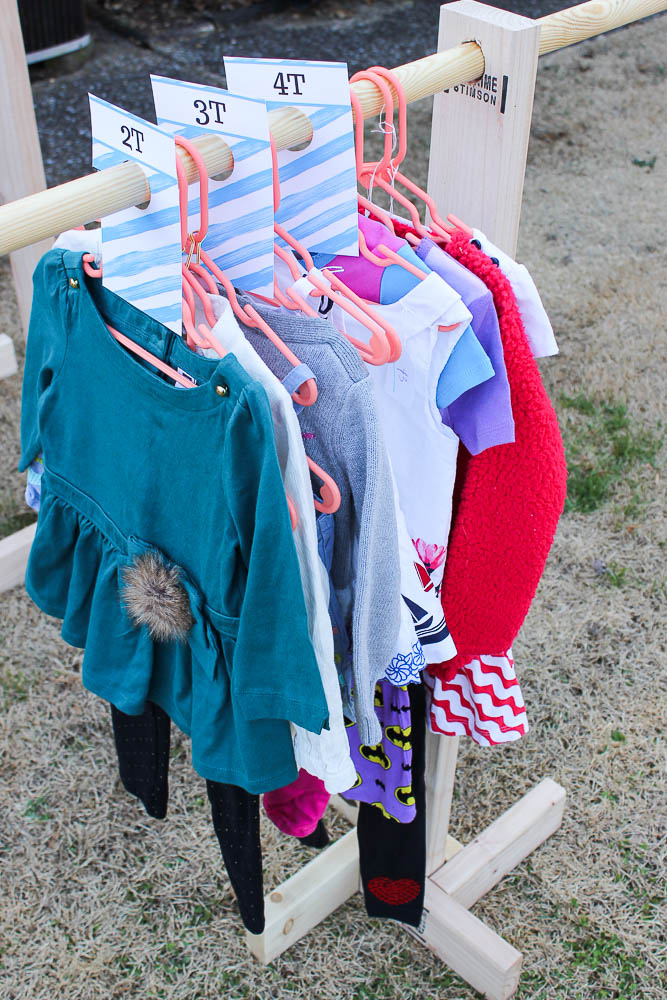
At our yard sales, we generally hang a dowel rod between one of the garage door openings to hang clothes on, but for the Secondhand Market, I knew we would need clothes hanging storage that would stand alone. I made some DIY clothes racks that were a super simple build and to top them off, I also made printable size dividers to use for the sale.
I’m sharing both the instructions for the homemade clothes rack and the printables with you!
How to Make a Clothes Rack for a Yard Sale
This post contains affiliate links for your shopping convenience. Click here to read my full disclosure policy.

These are a super simple build and inexpensive as well. I made three different sizes (height wise) of these racks. I’m sharing the instructions for the shortest one, 4′ tall, below. The other two I made were 4 1/2′ tall and then 5′ tall. You can make taller ones, simply by cutting your 2″ x 4″ end posts to whatever your desired height is.
Tools & Supplies Needed:
- 2 – 2″ x 4″ x 96″ Studs
- 1 1/4″ Round Dowel Rod – mine were each 8 ft. long, but you can choose whatever length you wish to fit your needs.
- Circular Saw or Miter Saw
- Drill and 1 1/4″ Hole Saw Drill Bit
- Hammer and Nails or Nail Gun and Air Compressor or Wood Screws
Steps
Step 1
Make your cuts first. Cut the 2″ x 4″ pieces down to the following lengths:
- 2 – 48″ long pieces
- 8 – 10″ long pieces
I used my miter saw to cut my pieces, but you can use a circular saw as well.
If you want to cut your dowel rod down to a certain length, you can do that now as well. I bought mine at 8 feet long and opted to leave them that long.
Step 2
Take each of your 48″ long 2″ x 4″ pieces and mark 1 1/2″ down on one end of each piece. Using your drill and the 1 1/4″ hole saw drill bit, drill out a hole at each mark you made. This will be the top of your clothes rack where each dowel rod will slide into.

Step 3
Take one of the 48″ long 2″ x 4″ pieces and lay it flat against the ground. On the opposite end of where you drilled out your hole, attach one of the 10″ long 2″ x 4″ pieces perpendicular, but lined up on one edge of the 2″ x 4″ as shown below.

I did this using my nail gun because it was close by and made the job go super fast. A good ol’ hammer and nails or wood screws will do the trick as well though.
Turn the 48″ long 2″ x 4″ on its side. Line up another 10″ long 2″ x 4″ piece and attach it as shown below.

Turn it again. Attach another 10″ piece.

Repeat one more time.

You should have four feet on your 48″ long 2″ x 4″.

Repeat this process with the other 48″ long 2″ x 4″.
Step 4
Slide the dowel rod through the top holes of each 2″ x 4″.

That’s all there is to the clothes racks!

How to Hang Clothes at a Garage Sale
Once you get all your clothes on the racks, if the dowel rod is sagging in the middle, then just move your end leg pieces in more.

This will stabilize the clothes rack and you’ll still have plenty of hanging room on the ends and in the middle.
When hanging clothes, it’s always a great idea to divide the clothing by gender (male/female), adult sizes, and children’s sizes. On top of that, it’s even better if you divide it by size. This makes it much easier for your yard sale customers to browse through the clothing and find what may fit them, instead of them getting frustrated that everything is so unorganized.
To organize and divide the clothing, be sure to grab this set of free printable size dividers right here!
Print off as many sets as you’ll need for organizing the clothing. I have a set for adult men, adult women, little boys and little girls clothing.

I hope you’ll find the racks and size dividers helpful for selling more at your next yard sale!
More posts you might find helpful:
The Best Yard Sale Tips – all the things I’ve learned about hosting yard sales for the better part of a decade.
How I Made $2K+ in Two Months Selling Our Clutter – find out my tips for getting the most money for your clutter!
Want to remember these clothes racks for later? Pin the image below then!


Kelsey says
I know this wasn’t what you were intending…but these would also make great limbo sets! The wheels in my head are totally turning!
Jenna says
hahahaha!! This is true, Kelsey!
Erlene says
Omgee, this is such a good idea to hang stuff for a yard sale. I’ve been cleaning out stuff and I totally need to do one. Thanks for sharing on Merry Monday. Pinned.
Teresa says
Great yard sale prep ideas! Thank you for sharing on Party in Your PJ’s. Pinned!
Sherry says
Great idea!! Thanks for sharing at Home Sweet Home!
Kelly says
Is there a particular reason you chose 1 1/4″ for the dowel rod? Could you forsee an issue if they were 1″ instead?
Jenna says
1″ should be fine – there isn’t a huge difference between that and 1 1/4″
Mirthe Alkema says
I love this! I am from Holland, I sell clothes on markets and i always struggle with organizing the size on the clothes rack. I would love to receive your mail with these printable size dividers!
Felecia says
Hi, Jenna, l ran across your post. I love your ideal’s. I was searching for, clothes rack ideal’s and your diy clothing racks are what l was looking for. Thank you , omg they were very easy to put together .They are perfect!, u are a God send; again Thank you.
Jenna says
Awesome! so glad you found it helpful!
Mary Ohara says
Too much trouble to go to just for garage sale😮😳
Claire says
Do you think I could make the feet removable with a nut and bolt?
Jenna says
Absolutely!
Michelle Law says
I love this rack idea. We have a yardsale every year as a fundraiser for our church. I think I will utilize this in the upcoming years for clothing as opposed to tables. Thank you for sharing.
Allison Pozsgay says
Im having a yard sale in 3 weeks and I love this idea you shared. Do you have the price range of this project for the 3 racks. And I love the template for the sizes. Any suggestion on shoe’s?
Chris says
We made the racks today. I got the 1 1/4 hole saw & 1 1/4 dowel rod. The dowel rod wouldn’t go in…we upped the hole to 1 3/8 & it slid in perfectly.
Super easy instructions (thanks for the pics too!)
Thanks!!
Amber says
Thank you for these instructions! I made them tonight, super easy and took under an hour start to finish with a hammer and nails. Might make another set since I was only able to find 48″ (L) dowels at my HD.
Sheri says
Do you think it would be sturdy enough to make your poles 8 ft and put the two holes so there would be double rods