Tag: organization

  • Five Minute DIY Stuffed Animal Storage

    Five Minute DIY Stuffed Animal Storage

    Does your kid have their very own, very complete stuffed animal zoo? Same here! They were taking over our lives until we got creative with our own DIY stuffed animal storage. Take advantage of your vertical space and learn how to store stuffed animals better below!

    As many of you may know, the kid and I are frequent thrift store shoppers. Thursday afternoons are what we like to refer to as ‘Thrift Store Thursday.’ I pick her up from school, we grab a snack from Sonic and onto the thrift stores we go to snag the treasures.

    One day at one of our usual thrift store haunts, the Circus and I noticed how they were displaying their stuffed animals vertically on chains. Now that I wrote that out, it sounds kind of like a 50 shades stuffed animal version, but I assure you that is not where this is headed. 😂

    Anywho, we analyzed their stuffed animal hanging storage that day and decided we could modify it and make it work perfectly in the Circus’ playroom.

    diy stuffed animal storage

    We came home, determined what we needed and pretty soon storing stuffed animals around here became so much easier. Did I mention that my kid is stuffed animal obsessed?

    Related: Need a different kind of toy storage in your kids room? Try these wall to wall shelves that we also use in my daughter’s play area!

    This post contains affiliate links for your shopping convenience. Click here to read my full disclosure policy.

    Hanging Stuffed Animal Storage

    This is an easy to install DIY project you can tackle in mere minutes!

    Supplies and Tools Needed:

    Steps

    Step 1


    Mark the location where you want your ceiling hooks to go. Keep in mind you want to come off the wall with them a bit as the stuffed animals will take up some space against the wall. We brought ours out about nine inches.

    Install the ceiling hooks according to the package directions.

    hanging stuffed animal storage - installing ceiling hooks

    Step 2

    Hang the plastic chain on the hooks.

    how to store stuffed animals - hanging chain from the ceiling

    Adjust the chain to the length of your liking.

    Step 3

    Clip the hooks onto the stuffed animals and hang on the chain.

    stuffed animal storage - hanging animals on plastic chains with clip hooks

    We did three vertical rows for the plush toy storage.

    stuffed animal storage ideas- hanging chain from the ceiling and hanging animals from clip hooks

    Organize stuffed animals to your liking. As you can see though, we have no organization method.

    storing stuffed animals vertically by hanging chains from the ceiling

    Let tell you though, having every last teddy bear, dog, rabbit, and all other species very visible has significantly reduced the risk of me breaking a leg in an attempt to find a certain animal.

    Related: Kids Play Table with Storage – perfect for playing farm, legos and more!

    Do you have any creative storage ideas for toys? Share them in the comments!

    Looking for another great idea for the kids? Here’s a few of our homeruns…

    Play Based Learning Play Stations – they won’t know they are learning while they’re playing too!

    How to Build a Kids Stage – and it has hidden storage for dress up clothes!

    DIY Wall Mounted Desk – this one has hidden storage as well and your kids will love having their very own creation station!

    Want to come back to this simple stuffed animal storage solution later? Just pin the image below!

    diy hanging stuffed animal storage from the ceiling - stuffed animals hung from the ceiling on chain.

    Keep up with more of myself and the Circus’ shenanigans on social media:

    Facebook | Instagram | Pinterest | Twitter

  • DIY Clothes Rack for Garage Sales

    DIY Clothes Rack for Garage Sales

    Got a garage sale coming up? Learn how to make a clothes rack for a yard sale below! This simple to build DIY clothes rack for garage sales is great for not only secondhand sales, but excess clothes storage as well!

    Yard sale season is so close, I can almost taste it.

    Nearly every Friday come spring, the Circus and I will load up and hit all the area yard sales.

    And then on Saturday morning, we’ll do it again, courtesy of our chauffeur, Grunt Labor.

    And of course, my friends and I have become quite popular for our own yard sales as well.

    You have read The Yard Sale Chronicles post, right?

    At least two or three times a year, we all get together and host a yard sale, generally at my house. We hang out in the garage in our matching t-shirts drinking beer, Arbor Mist or Sangria if we’re lucky enough to get Kathryn to make it that day. We laugh and carry on and on more than one occasion, we’ve had customers ask if they can hang out with us for the rest of the day just for the entertainment.

    Yard sale days are a big deal around here.

    And since we’ve done it so much now, we just keep getting better and better at them. We have great signs, our shit is organized and mostly priced.

    And we all make a little money just for putting our shit for sale in the driveway, hanging out together and drinking.

    If that isn’t a win-win situation, then I don’t know what damn well is.

    My friend Jason recently had the grand idea of hosting a Secondhand Market. Basically, it was kind of like an upscale yard sale indoors. He did a great job organizing it and it went extremely well.

    At our yard sales, we generally hang a dowel rod between one of the garage door openings to hang clothes on, but for the Secondhand Market, I knew we would need clothes hanging storage that would stand alone. I made some DIY clothes racks that were a super simple build and to top them off, I also made printable size dividers to use for the sale.

    DIY Clothes Racks - perfect for extra hanging clothes storage, yard sales and kid's closets. Rain on a Tin Roof

    I’m sharing both the instructions for the homemade clothes rack and the printables with you!

    How to Make a Clothes Rack for a Yard Sale

    This post contains affiliate links for your shopping convenience. Click here to read my full disclosure policy.

    How to Make a Clothes Rack For a Yard Sale from 2x4s - Rain on a Tin Roof

    These are a super simple build and inexpensive as well. I made three different sizes (height wise) of these racks. I’m sharing the instructions for the shortest one, 4′ tall, below. The other two I made were 4 1/2′ tall and then 5′ tall. You can make taller ones, simply by cutting your 2″ x 4″ end posts to whatever your desired height is.

    Tools & Supplies Needed:

    Steps

    Step 1

    Make your cuts first. Cut the 2″ x 4″ pieces down to the following lengths:

    • 2 – 48″ long pieces
    • 8 – 10″ long pieces

    I used my miter saw to cut my pieces, but you can use a circular saw as well.

    If you want to cut your dowel rod down to a certain length, you can do that now as well. I bought mine at 8 feet long and opted to leave them that long.

    Step 2

    Take each of your 48″ long 2″ x 4″ pieces and mark 1 1/2″ down on one end of each piece. Using your drill and the 1 1/4″ hole saw drill bit, drill out a hole at each mark you made. This will be the top of your clothes rack where each dowel rod will slide into.

    Making a diy clothes rack for yard sales.

    Step 3

    Take one of the 48″ long 2″ x 4″ pieces and lay it flat against the ground. On the opposite end of where you drilled out your hole, attach one of the 10″ long 2″ x 4″ pieces perpendicular, but lined up on one edge of the 2″ x 4″ as shown below.

    Making homemade clothes racks for garage sales. Rain on a Tin Roof

    I did this using my nail gun because it was close by and made the job go super fast. A good ol’ hammer and nails or wood screws will do the trick as well though.

    Turn the 48″ long 2″ x 4″ on its side. Line up another 10″ long 2″ x 4″ piece and attach it as shown below.

    Homemade clothes racks for garage sales. Rain on a Tin Roof

    Turn it again. Attach another 10″ piece.

    Hanging clothes on DIY Clothes Racks for yard sales. Rain on a Tin Roof

    Repeat one more time.

    Extra Clothes Storage: How to Make a Clothes Rack - Rain on a Tin Roof

    You should have four feet on your 48″ long 2″ x 4″.

    Making a clothes rack for garage sales. Rain on a Tin Roof

    Repeat this process with the other 48″ long 2″ x 4″.

    Step 4

    Slide the dowel rod through the top holes of each 2″ x 4″.

    DIY Clothes Rack for Hanging Clothes at Garage Sales - Rain on a Tin Roof

    That’s all there is to the clothes racks!

    How to Hang Clothes at a Garage Sale - clothes on racks - Rain on a Tin Roof

    How to Hang Clothes at a Garage Sale

    Once you get all your clothes on the racks, if the dowel rod is sagging in the middle, then just move your end leg pieces in more.

    Garage Sale Clothes Rack - Rain on a Tin Roof

    This will stabilize the clothes rack and you’ll still have plenty of hanging room on the ends and in the middle.

    When hanging clothes, it’s always a great idea to divide the clothing by gender (male/female), adult sizes, and children’s sizes. On top of that, it’s even better if you divide it by size. This makes it much easier for your yard sale customers to browse through the clothing and find what may fit them, instead of them getting frustrated that everything is so unorganized.

    To organize and divide the clothing, be sure to grab this set of free printable size dividers right here!

    Print off as many sets as you’ll need for organizing the clothing. I have a set for adult men, adult women, little boys and little girls clothing.

    Yard Sale Clothes Rack - Rain on a Tin Roof

    I hope you’ll find the racks and size dividers helpful for selling more at your next yard sale!

    More posts you might find helpful:

    The Best Yard Sale Tips – all the things I’ve learned about hosting yard sales for the better part of a decade.

    How I Made $2K+ in Two Months Selling Our Clutter – find out my tips for getting the most money for your clutter!

    Want to remember these clothes racks for later? Pin the image below then!

    Homemade Clothes Racks for Yard Sales and Extra Storage - Rain on a Tin Roof
    Gift Ideas Signature

    SaveSave

  • One Stop Workshop: DIY Mobile Workbench + Pegboard Organization

    One Stop Workshop: DIY Mobile Workbench + Pegboard Organization

    This is a sponsored conversation written by me on behalf of True Value. The opinions and text are all mine.

    As you know, I’ve been on a purge streak lately. I’ve said good riddance to so much clutter in our house that I’m actually a little embarrassed by just how much we had. Quickly followed by the purging, a huge wave of motivation to get more organized arrived.

    I mean, when you’ve cleaned out so much stuff, you don’t want to end up once more as a finalist for your own television show about your hoarding tendencies, right? So to prevent that and the sheer embarrassment of realizing just how much junk you had, you organize it.

    And just let me tell you, organizing feels so good.

    I just can’t even begin to tell you the amount of satisfaction I have gotten out of seeing a space come to its full organized potential. I don’t care how nerdy it makes me sound. 

    And let me just show you the latest shining example of this organization spree that took place in our garage.

    Create a one-stop workshop in your garage with this DIY Mobile Workbench and Pegboard Organization Ideas.

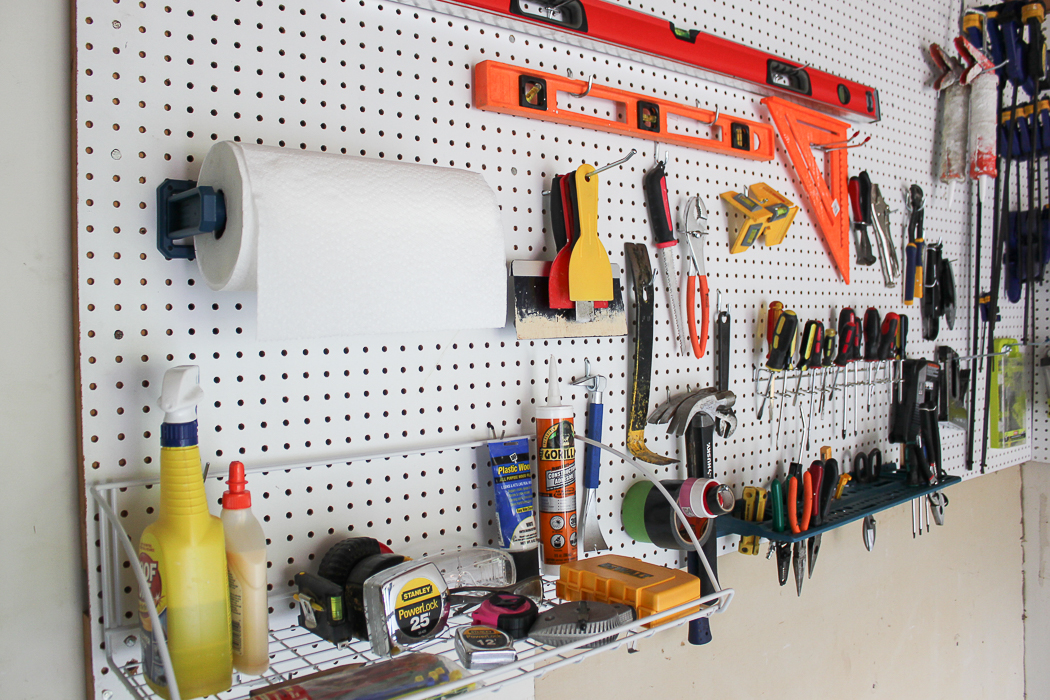
    Just look at that, y’all! I can actually find the tools I need when I need them. I’m not scrounging around through tool boxes and bags or banging my head on metal shelves in the tiny cramped closet in our garage that once held so many of our tools.

    The sad thing about this whole thing is that we had this pegboard in our garage from the beginning.

    Create a one-stop workshop in your garage with this DIY Mobile Workbench and Pegboard Organization Ideas.

    We just never utilized it to its full potential. I’m equally ashamed and giving myself a swift kick in the rear end about that fact. Now, I can find things. I don’t have multiples of things I don’t need in various locations of the same room. And did you notice my new workbench?

    Create a one-stop workshop in your garage with this DIY Mobile Workbench and Pegboard Organization Ideas.

    I made that.

    Well, I didn’t actually make the metal cabinetry part because I’m not that good, but I made those cabinets into a mobile workbench. That’s right – it can go anywhere and it was so easy to do. I’m not going to lie – after this space was completed, I actually just sat there and stared at it awhile. It makes me so happy, I just want to get out there and jump into a new building project.

    Here’s how we made it all happen with the help of some products from True Value…

    One-Stop Workshop: Pegboard Organization + DIY Mobile Workbench

    Pegboard Organization

    1. Get pegboard on the walls. 

    If you don’t have pegboard in your garage or workspace already, get some up. Like I said, we already had this in our garage when we bought the house, but had never utilized it. Pick up some pegboard panels and 2 x 4s from your local True Value. Determine where you want to hang your pegboard and locate the studs in that wall. Either nail or screw up the 2 x 4s along the studs, then attach the pegboard to the 2 x 4s with nails or screws.

    2. Lay out tools and determine what hooks and accessories you need. 

    Next, I suggest laying out all the tools you want to get up on the pegboards and determine what kind of pegboard hooks and accessories will work best for hanging those items.

    Create a one-stop workshop in your garage with this DIY Mobile Workbench and Pegboard Organization Ideas.

    For our pegboard, I bought the following from True Value:

    3. Get the tools on the pegboard.

    I found that working from the bottom up works best. This is kind of a game where you just have to play around with the location of some of your tools and determine what fits best where.

    Create a one-stop workshop in your garage with this DIY Mobile Workbench and Pegboard Organization Ideas.

    If you go with a paper towel holder, keep it lower for easy access. I suggest doing the same with the utility shelf as well.

    Hanging multiples of the same tool types helps to save on space and utilize those hooks to their maximum potential. I did this with all of our rolls of tape, hammers, scrapers and more.

    Create a one-stop workshop in your garage with this DIY Mobile Workbench and Pegboard Organization Ideas.

    Use two single hooks, one on each side, for longer tools such as levels.

    Organize your screwdrivers by type and put any single random tools that will fit in the 3-in-1 tool holder.

    Create a one-stop workshop in your garage with this DIY Mobile Workbench and Pegboard Organization Ideas.

    I grouped my clamps together by size and hung them up on single heavy-duty 8 and 10 inch hooks.

    Create a one-stop workshop in your garage with this DIY Mobile Workbench and Pegboard Organization Ideas.

    For the power tools, I used either two 6, 8, or 10 inch hooks to hold each power tool up deepening on its size.

    For easy access to small parts such as washers, nuts, bolts, screws, nails, etc., I put the small parts storage cabinet in the lower corner of the pegboard and attached it with screws that went into the 2 x 4s holding the pegboard up. The video below for the DIY mobile workbench also touches on the pegboard organization.

    DIY Mobile Workbench

    Create a one-stop workshop in your garage with this DIY Mobile Workbench and Pegboard Organization Ideas.

    You’ll Need: 

    • Two – Five Drawer Tool Chests on Wheels
    • One sheet of 3/4 inch plywood, cut into the following sizes:
      • Two pieces cut to 26 1/4″ x 17 3/4″
      • One piece cut to 53 1/2″ x 18″
    • Drill
    • 1 1/4″ or 1 1/2″ Screws

    Step 1

    Lay a piece of the plywood cut to 26 1/4″ x 17 3/4″ into the top of each tool chest. Each chest has a rim along the top that will keep the wood from sliding out.

    Step 2

    Lay the long piece of plywood cut to 53 1/2″ x 18″ across both smaller sheets of plywood and the tool chests. Line up everything up nicely.

    Step 3

    Using either 1 1/4″ or 1 1/2″ screws and your drill, connect all three pieces of wood together. Put a screw in each of the four corners of each tool chest.

    That’s it! I told you it was simple!

    Create a one-stop workshop in your garage with this DIY Mobile Workbench and Pegboard Organization Ideas.

    A few tips and ideas for the workbench: 

    • If you want to make the workbench top completely permanent, then before putting the smaller pieces of plywood on the tool chests, apply an adhesive such as Liquid Nails to the top of the chests, then put the plywood on top of that.
    • You can also opt to leave the larger piece of plywood off the top and have two smaller mobile workbenches as well. This was initially our plan, but in the end we wanted to have the option for both a smaller and a larger workbench.
    • If you ever want to remove the workbench top to transport it a farther distance, separate the chests or store it away, you can leave the top together and simply lift it off the tool chests as one piece.

    Alright guys, I’m off to plot out my next project that puts this baby to use!

    Do you have any great garage organization ideas to share? 

    Pin This Post

    Create a one-stop workshop in your garage with this DIY Mobile Workbench and Pegboard Organization Ideas.

    This is a sponsored conversation written by me on behalf of True Value. The opinions and text are all mine.


    SaveSaveSaveSaveSaveSaveSaveSaveSaveSaveSaveSaveSaveSaveSaveSaveSaveSaveSaveSaveSaveSaveSaveSave

  • 5 Simple Storage and Organization Ideas that are Life-Changing

    5 Simple Storage and Organization Ideas that are Life-Changing

    Ok, I feel like the title of this post is slightly dramatic. But. These five simple storage and organization ideas have seriously changed and simplified our home.

    Whenever we moved into the 70’s Landing Pad, something happened to me.

    I got bit by the purge and organize bug. This bug bite though, was a welcome one.

    I got rid of so much stuff, y’all. Enough for two huge yard sales and now even more waiting for another yard sale in our garage. (P.S. My best yard sale tips are here.)

    I went label and bin crazy. Whatever could fit in a bin, went in one and got a label slapped on top of it.

    By no means am I now an organizing pro. Trust me, I still have hot messes in many areas of our house. But after doing these five things, I’m always trying to figure out what else I can better store, organize, purge, etc.

    Here are the best five things I’ve done to organize and create storage in our home since we’ve moved in. All of them are pretty simple and most are very budget-friendly. Cheap and easy, baby. My kinda projects. 😉

    Simple Storage and Organization Ideas

    Affiliate links may be contained in this post.

    1. Cleaning Closet

    Create a cleaning closet - even more great ideas in the post! 5 Simple Storage and Organization Ideas that are Life-Changing

    If you’ve ever looked for cleaning or organization ideas on Pinterest, no doubt you’ve seen this idea from lots of other people. I’m certainly not trying to steal the credit for it and honestly there are so many people who’ve done this, I’m not sure who the “originator” is. I just wanted to show you my version. We had enough room in our master bedroom closet to move all the coats in there and free up this hall closet to make it the “cleaning closet.” It houses all our cleaning supplies in one central location which has been so handy. All the cleaning bottles are held in an over-the-door shoe organizer.

    You’ll have to forgive my poor pictures of this space – it’s in the hallway which isn’t exactly the roomiest place on earth. 

    Create a cleaning closet: 5 Simple Storage and Organization Ideas that are Life-Changing

    I also bought a half-size hanging organizer which holds dust rags, wipes and Swiffer refills. I’ve got more details on how I organized this space (and a great tip for easy bathroom cleaning!) in the video below.

    2. Entertainment Center turned Storage Central

    A.K.A. The Three Boxes of Steel

    5 Simple Storage and Organization Ideas that are Life-Changing: Turn an old entertainment unit into a storage center! More great storage ideas in the post!

    I picked up this old entertainment unit at a local thrift shop for $100. I knew I would need something bigger than anything I had to go against the long wall that connects the living room and dining room. I sent Grunt Labor and Nicky to get it, but didn’t tell them anything about it’s size. They both came back and thanked me kindly for having them pick up three steel boxes. I haven’t been able to send them on any errands since. Lurking behind those doors though isn’t a television….

    5 Simple Storage and Organization Ideas that are Life-Changing: Turn an old entertainment unit into a storage center! More great storage ideas in the post!

    It’s storage central for all our china, wine glasses, entertaining items, serving pieces, etc.

    5 Simple Storage and Organization Ideas that are Life-Changing: Turn an old entertainment unit into a storage center! More great storage ideas in the post!

    I was able to put all the items that had been in two buffets at our old house into this piece with room to spare.

    You can watch the video below for more details on our cleaning closet and entertainment unit turned storage central.
    [adthrive-in-post-video-player video-id=”HFDwE4ai” upload-date=”Tue Aug 30 2016 00:00:00 GMT+0000 (Coordinated Universal Time)” name=”Rain on a Tin Roof – Life Changing Organization Ideas” description=”Use these simple storage and organization ideas to make your home a little less hectic.”]

    3. Vanity Organization

    In the master bathroom at the new house, we ran into a slight organization problem with the vanity, it has no drawers – only two large doors. Now that was the look I wanted and it was far cheaper to buy it than one that had drawers, but just having one big open space wasn’t great for organizing items.

    Bathroom Organization - more great ideas in the post! 5 Simple Storage and Organization Ideas that are Life-Changing

    I fixed that with bins and baskets from the Dollar Tree.

    Use command hooks and Dollar Tree bins for vanity organization. More great ideas in the post! 5 Simple Storage and Organization Ideas that are Life-Changing

    My favorite little trick here was hanging these small baskets with command hooks on the back of the vanity door. The top one has my toothbrush and toothpaste, the middle one has Q-tips and cotton rounds and the bottom one has my hair clips and nail clippers. It is great for keeping all those little items that would normally fall into the deep abyss in one place.

    Bathroom Organization - more great storage ideas in the post! 5 Simple Storage and Organization Ideas that are Life-Changing

    Inside the vanity, I just arranged bins and put items in them accordingly. These actually stack, but I’ve found they are better for us just sitting there.

    4. More Containers and Bins and Easy Labels

    The Dollar Tree container aisle and I have been great friends. Not only did I use them for the bins above, but also for organization in my kitchen drawers.

    Great and really simple storage ideas! Pretty cheap too! 5 Simple Storage and Organization Ideas that are Life-Changing

    The baskets in the kitchen drawers help keep cooking utensils from getting pushed to the back of the drawer where I can’t find them.

    I also used larger bins and the baskets in my craft closet.

    Awesome and really simple ideas! 5 Simple Storage and Organization Ideas that are Life-Changing

    All of this stuff used to just be dumped in drawers at our old house. I organized everything and labeled the bins with FrogTape so that if I ever needed to change out the label, there wouldn’t be any sticky residue left behind. Like I said earlier, I certainly still don’t have it all together. You can see that shelf below is a hot mess – it’s where I keep all the random home accessories that haven’t found a home yet and also a troll that was Grunt Labor’s when he was a kid. I know – weird.

    5. Maximized Under-Bed Storage

    Two of the three beds at the 70’s Landing Pad have SmartBase Foundations.

    5 Simple Storage and Organization Ideas that are Life-Changing - how to maximize under-bed storage! More great ideas in the post!

    The SmartBase Foundations work as the bed rails and box spring for the bed, but increase the storage underneath. So where you see the top of the foundation that the mattress sits on would normally be the top of the box springs, therefore the base creates more storage under the bed because it doesn’t take up as much room as a traditional box spring would. We were going to have to buy bed rails and a box springs for both our bed and the Circus’ bed. Getting the smart bases instead was cheaper and increased our storage, so it was a no-brainer. It’s been especially handy in the Circus’ room.

    Do you have any other simple organizing tips or storage ideas? I am all ears, y’all! Hopefully I was able to help you a little bit and send the organizing bug your way. 😉

    Liked this post? Then you’re probably going to want to see these…

    This is an awesome printable - perfect for decluttering your home! 9 MUST READ Cleaning Tips!

    15 Days to a Clutter-Free Home

    Full of easy to do ideas that are pretty, but also functional. 10+ Kitchen Ideas: Decorating, Organizing, Storage

    10+ Kitchen Ideas for Decorating, Organizing and Storage

    Create a one-stop workshop in your garage with this DIY Mobile Workbench and Pegboard Organization Ideas.

    One Stop Workshop: Ultimate Pegboard Organization + DIY Mobile Workbench

    Had NO CLUE on most of these! Must Read Cleaning Tips

    9+ Must Read Cleaning Tips

    blog-signature-summer-15

    pin-this-post-2

    These budget friendly simple storage and organization ideas will have you wishing you had known about them sooner! They will simplify your home and life!

    SaveSave

    SaveSave

  • Color Coded Organization

    Color Coded Organization

    Let’s get one thing clear.

    I am not an organization guru.

    Heck, I’m not really a guru of any sorts. I just fly my freak flag and do what works.

    I have my own weird methods for organizing and storing stuff.

    For example, the kid has three different boxes in her room for small toys.

    One holds things that could potentially be living: plastic dinosaurs, My Little Ponies, Smurf figurines, Little People, California Raisin figurines, etc.

    I don’t know where I come up with this stuff either.

    Or why I consider Smurfs and California Raisins to be potentially living things.

    Another box holds non-potential living things: wooden blocks and plastic easter eggs.

    I know, it makes no sense.

    And the last box holds paper items: stickers and things to write on.

    Shocking. One box actually makes sense.

    See what I mean when I say that I do what works for me?

    I knew you would get me – you’re my people.

    This is my latest “what works for me” organizing method:

    Color Coded Organization 

    And shockingly, this may actually make sense to more people than myself.

    This is such an easy organizing idea and it holds family members accountable for their mess! Color Coded Organization

    Disclosure: This post was a collaboration with Velvet Finishes. All opinions and ridiculous organization methods are 100% mine. This post contains affiliate links for your shopping convenience. Click here to read my full disclosure policy.

    Here’s the deal.

    I hate clutter.

    (Thus why I shared the 15 days to a Clutter Free Home Checklist last week.)

    That doesn’t mean clutter never happens around here.

    It happens all the time. 

    And then life happens.

    And I don’t have time to pick up all the clutter everyday because I was chasing the kid trying to make her keep her clothes on while its 30 degrees outside.

    In an effort to combat the clutter and at least corral it, I picked up cheap plastic bins and then assigned a color combination to myself, the kid, and Grunt Labor. The bins stay in the living room and each of our bins contain our own items. At the end of the week, we each go through our bins and put whatever has accumulated there over the week back into its proper place.

    Make sense?

    Good. Here’s how I made them.

    Color Coded Organization Bins

    Materials & Supplies Needed: 

    This is such an easy organizing idea and it holds family members accountable for their mess! Color Coded Organization

    • Plastic Bins (Mine were $3 each at Target in the Dollar Spot.
    • Paint Colors of your choice. (I opted to give these a bit of a cohesive feel by painting everyone’s bottom stripe, Modern by Velvet Finishes, a bold blue. The kid chose Bold, a bright yellow, for her other color, Grunt chose Vivid, which is a fabulous red hue, and I went girly and opted for Glamorous, a pink color.
    • FrogTape 
    • Paint Brush

    Steps

    Step 1: 

    Tape off where you want your stripes to be.

    This is such an easy organizing idea and it holds family members accountable for their mess! Color Coded Organization

    You could actually get much more creative and decorative than I did with this and opt for a different pattern or design. However, I am in a “simple” mode right now (probably also referred to as a lazy mode), so easy stripes were just the ticket.

    Step 2: 

    Paint your color on.

    This paint works on just about any surface! No priming needed on plastic - just brush it on!

    As I said above, I used all Velvet Finishes colors on these bins. To be honest, I wasn’t 100% sure if this paint would work on plastic – but it did. No priming it at all! That’s totally why my heart has been captured by this paint – its the lazy girl’s paint. 

    I did three light coats of each color and was impressed by the fact that I still got super saturated, pretty colors.

    Step 3: 

    As soon as you’ve painted on your final coat, remove the FrogTape. If you let the paint dry before removing the tape, you risk the tape pulling some of the paint off.

    Put the bins where everyone can easily access them and lay down the law.

    If you have crap in this room, it goes in your bin. 

    This is such an easy organizing idea and it holds family members accountable for their mess! Color Coded Organization

    Yea, I’m still working on getting the two year old to understand that.

    This is such an easy organizing idea and it holds family members accountable for their mess! Color Coded Organization

    I have to say, I was a little worried about these sticking out like a sore thumb with the decor, but I am digging their colorfulness.

    Have you done any color coded organization before?

    Or maybe you just have an organizing tip you want to share that doesn’t involve classifying Smurfs as potential living things??

    More Organization and Storage Ideas:

    5 Simple but Life-Changing Storage and Organization Ideas – super affordable too!

    10+ Kitchen Ideas for Decorating, Organizing and Storage – and they’re pretty!

    You know you don’t wanna miss any of this crazy.

    Sign up to get my posts delivered to your inbox here.

    Stalk Me Here:

    Pinterest / Facebook / Twitter / Instagram

    pin-this-post

    This is such an easy organizing idea and it holds family members accountable for their mess! Color Coded Organization

    SaveSave