
It was a blue and pink themed party with LOTS of DIY party decorations (did you really expect me to pay lots of $$ for it all considering how cheap I am?)!
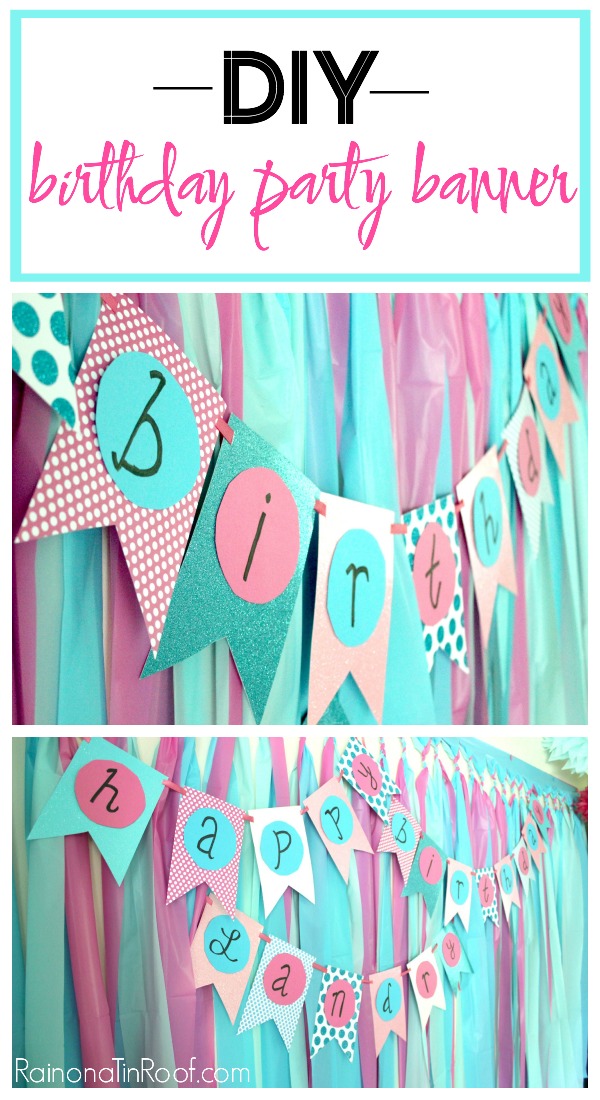
This DIY party banner hung on top of the DIY party backdrop. The banner was super simple to make and turned out really cute! Really, it can be a DIY banner for any kind of celebration – customize it to your own liking!
This post contains affiliate links for your shopping convenience. Click here to read my full disclosure policy.
Happy Birthday Banner DIY Project
Materials Needed:
- Scrapbook Paper or Cardstock (I got about two “flags” out of a 12×12 piece of scrapbook paper. I got all my paper at Hobby Lobby.)
- DIY Birthday Banner Template (found here)
- Adhesive Mounts of some sort (I used these)
- X-Acto Knife or Hole Punch
- Ribbon (I used this kind)
- Sharpie
- Scissors
I know I took pictures of this process, but it appears, I have deleted those photos! I am so sorry, but I promise, this is so easy you really don’t need photos.
Steps
Step 1:
Print out the banner template noted in the supply list from Miss Lovie Creations. She did a great job of making her DIY birthday banner and I did mine similar to hers.
 |
| Source |
Step 2:
Cut out the template. I used regular scissors for this.
Step 4:
Cut out the traced pieces. I used scissors for this as well, but you could use the X-Acto knife.
Step 5:
Place the circle template over scrapbook paper or card stock. Trace as many circles as letters you need. Again, you’ll need 13 to spell out “Happy Birthday.” I chose to use just blue and pink solid card stock for this so that my letters didn’t disappear on patterned paper.
Step 6:
Cut out circles.
Step 7:
Write your letters on the circles. I used a pencil to sketch the letters out and then just went over them with a sharpie.
Step 8:
Use the adhesive mounts or some other adhesive to attach the circles to the flags. Hot glue would probably work fine as well.
Step 9:
Use the X-Acto knife to cut small slits in each upper corner of the flags. If you don’t want to use the X-Acto knife for this, you could also use the hole punch.
Step 10:
Weave your ribbon in and out of the flags to string them together, then hang with thumbtacks.
All done! Easy peasy!


Now aren’t you glad you learned how to make a birthday banner?


Erin @ Sugar Magnolia says
That looks great! Next year I will definitely be making the banner for Levi’s birthday party myself!
Lindsey Domer says
Adorable! Love the colors, polka dots and streamers! 🙂 So fun!
toddlindsey.com
pablaencasa says
So pretty and easy! thanks for sharing 🙂
Celestina Marie says
Hi Jenna, Just darling! Love this banner for your daughter’s first birthday. The color is so cheerful. Thank you for sharing. and, thank you for stopping by and your kind comment and invite to the link party.
Have a great week.
Hugs, Celestina Marie
Shannah @ Just Us Four says
This banner is so cute! I love it. Definitely going to have to put your tutorial to work for my daughter’s upcoming birthday party in August.
gin says
love the banner! thanks for the invite for the Monday link=up.
Sherry at The Rusty Pearl says
I love this and will use this .. thanks so much .. Fabulous as always my sweet friend.. .hugs
Tara from The Magnolia Barn says
I love customized banners for parties! This is adorable. Thanks for sharing!
MomHomeGuide.com says
Thanks for the tutorial! I will try to make this — my twin daughters’ birthday is coming up soon! 🙂
srpprcrftr says
Your banner is so incredible awesome. Couldn’t think of better words for how it looks. You did such a great job. It’ll be nice when she gets older so you can show her pics of her b/d party and the wonderful banner her Momma made for her party.
Love her name, so pretty and different. Love your blog gal.
Angela Ryder says
Cute banner! Thanks for sharing!!~~Angela
creativeramblingsblog.com says
Really cute, I love the colors.
<3 Sarah
Lauren- SAHM I am says
Thank you, this is exactly what I have been looking for!
Kathy Penney says
Absolutely gorgeous! Looks like it could have come from a party store. Great job! And I just love the name of your blog. 🙂
Linda @ With A Blast says
This is so cute, Jenna! I like the color combo 🙂 {must admit, I have only used store-bought banners before!} Thank you for linking this at the WEDNESDAYS ADORNED FROM ABOVE Blog hop !
Christine says
So pretty!!!! The banner is perfect!
Thanks so much for sharing this at The DIY Dreamer… From Dream To Reality last week! Looking forward to partying with you again tomorrow evening!
Stacey says
Very cute! Great colors too!
Thanks for sharing at the party!
Stacey
Diana Styborski says
Very cute, and I love the table cloth backdrop too.
I’m stopping by from the link up at better with age.
Swing over my way when you get a chance 😉
Diana Styborski says
Woops, forgot the link
Babystybs.blogspot.com
Allie says
Thanks for using my template and linking back to me! Your banner looks awesome! Such a cute color scheme and I love the different patterned papers you used. Happy weekend!
villsvilladiego says
Wow,this one helped a lot for me. Now, I don’t have any problems with regards to what my aunt is favoring me to do.
Jenn says
Thank you for the great ideas and how to steps. I made the birthday backdrop, Pom poms and banner (changed from the bunting style) and it looked amazing at my daughters first birthday party.
Jenna @ Rain on a Tin Roof says
YAY! Jenn, I love getting comments like this!! I’m so glad you were able to use the tutorials! Happy birthday to your little girl!
Ashley says
This is a great idea. thanks for sharing it anyway. 🙂
Now, I can consider this one for the rest of my kid’s birthday parties. 🙂
Good job my dear:)
Rachel says
This looks like something you would buy at an expensive, custom hobby store. I love how simple it is! My nieces birthday is coming up so I’ll have to let my sister-in-law know about this.
Jenna @ Rain on a Tin Roof says
Awesome, Rachel!! Thank you!
Nancy M. says
I think it’s a very pretty banner! I love how the colors compliment the drapery behind it. Good job!
Jenna @ Rain on a Tin Roof says
Thanks, Nancy! It was really simple too!