You won’t believe how easy it is to make this DIY cupcake holder! Not only are these cupcake holders adorable, but they are also super easy to make, can be easily customized to fit your party decor and you can make them with items you find at the thrift store! Here’s how to make a cupcake stand that will wow your party crowd…
Yes, me again. Back with more DIY party decorations from the blue and pink birthday party extravaganza. This time, I’m super excited to share these DIY cupcake stands with you. I think they are just adorable and I made them using items I found at thrift stores!

This post contains affiliate links for your shopping convenience. Click here to read my full disclosure policy.
DIY Cupcake Stand
Materials and Supplies Needed:
- Candlestick Holders – doesn’t have to be a certain size or color, although I wouldn’t go too terribly tall with them. Can be wood, metal or whatever else.
- Old Baking Pans with Pretty Edges – old tart pans work great for this, or just about any round or square pan with fluted or pretty edges. I found mine at Goodwill.
- Liquid Nails or E6000 Glue or ProBond Glue (A glue that will adhere metal to wood. I used Liquid Nails.)
- Spray Paint Color of Your Choice – I opted for white so that I would have white cupcake stands that could work with lots of different party themes.
- Scrapbook Paper that coordinates with your party’s theme or colors
Steps
Step 1
Be sure that the candlesticks and baking pans are clean. Attach the old baking pans to the candlesticks using whichever glue you opted to go with. For me, my pans looked best flipped upside down on the candlestick with the fluted edges pointing down. It’s up to you, though!
Let the glue fully cure overnight.
Step 2
Spray paint the cupcake stands with the color of spray paint you opted for. Let dry completely. You could also opt to spray paint the candlesticks and pans different colors before gluing if you wanted to go for a really colorful or contrasting look.

Step 3
After the cupcake holders are completely dry, cut a circle or square out of your coordinating scrapbook paper that is roughly the size of the top of your cupcake stand tops.

Place the paper on the top of the stand to add a little more pizzaz to the stands. You don’t have to glue it on, it should just sit on top of the stands. Then, for your next party, you can switch up the paper to work for that party’s theme.
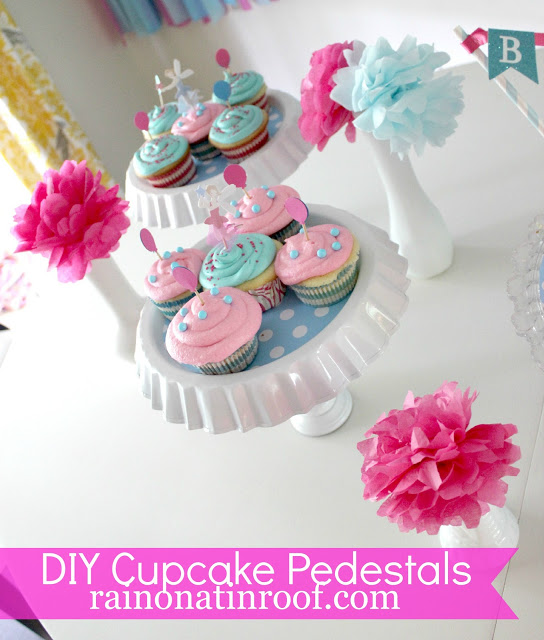
Aren’t these just adorable little cupcake display ideas? And so easy and cheap to make!
The cost of this project:
• Baking Dishes: $1.50 each = $3 total
• Candlestick Holders: Free (my aunt was going to throw them away. hello?! Give them to the hoarder, please!)
• Spray paint and liquid nails were all on hand already!
$3 TOTAL!
Bam! That’s what I call a deal!
Other great ideas you could do with these:
• Use as a cake stand or cake plate for smaller cakes.
• Make the stands using various sized baking pans and candleholders, then glue one on top of another to create a tiered cupcake stand or cupcake tower.
Have you made your own cupcake stands before?
Looking for more great DIY party decor ideas?
DIY Party Decorations on a Budget – my best party decor that doesn’t break the bank, but still leaves guests oohing and ahhing.
How to Make a Party Hat – completely (and easily!) customizable for any event!
DIY Plastic Tablecloth Party Backdrop – don’t worry, you’re going to make those cheap tablecloths look so pretty!
Want to remember these little cupcake stands for later? Just pin the image below!

Get more creative ideas on social media!

Susan Jackson says
Love, love, love these cupcake pedestals. I am definately going to give it a try. Susan @ throughmyporchwindow.blogspot.com
Krista thehappyhousie says
They look adorable Jenna – get diy project and I love how you styled it – it looks absolutely perfect for a party!
Krista
ingrid@nowathomemom says
love it, they look so pretty! love how the cupcakes look on top of the cupcake holders! 🙂
Tried and Twisted says
I wondered if those were baking pans! The result is perfectly fancy!
Toodles,
Sara
Meredith S says
Jenna,
These are really cute. As to the burnt one, if you hadn’t said anything I would have just thought it was chocolate! 😉 Thanks for sharing.
Therese Feeman says
Oh my goodness! The beauty of the birthday keeps coming. I Love it! Beautiful and creative Jenna. Um, did I miss it? Did you actually perfectly ice those cuppies too? 😉
Actually, laughed out loud when you wrote “give it to the hoarder, please.” Hilarious!
cooking with curls says
I have one of those unknown baking pans. I cannot remember what it’s purpose was 🙁 And since I am new to pinterest, I have never seen those before!!! They are awesome 🙂
Katie Murphy says
Wow, these turned out great and look like they were meant to be cupcake holders all along! I honestly had to do a double take of the photos because I thought they were made that way, haha.
Suzy says
Really cute project! Sometimes it pays to be a hoarder. LOL! I mean that in a good way Jenna!
Tara @ Suburble says
So cute! I actually haven’t seen this project before, so it’s brand new to these eyes! I love that you dressed them up with the paper – it’s the little details that count!
srpprcrftr says
You never fail to amaze me, what a great save and redo. Those are wonderful. I’ll have to keep my eyes out at Goodwill and other thrift stores. You were so smart to put them together, awesome you got the candle sticks free from your aunt, I’m so jealous of your finds, they are perfect and the price was sure right. Lucky little devil. Happy days
They might have been tart pans.
Sheilam57 says
They are actually tart pans. My dad was a Master Baker and we owned a bakery as I was growing up. He would make strawberry shortcakes with this pan. Hope this helps.
Angela Ryder says
Really great project!!! I’ve been “pinning” ways to make cake plates for an upcoming wedding party I’m hosting! BAM!! These fit the bill!! Thanks!! Off to “pin” it!!~~Angela
Craftivity Designs says
I really like how you added the blue polka dot paper for the party! It would be a simple way to pretty up an cake stand for a party.
– Lora
KC Coake says
What cute cupcake pedestals! So great what you were able to put together with $3.
KC
Deborah@Green Willow Pond says
Wow, you have had a busy May! Love these cupcake holders. I picked up one of these pans at a thrift store too, but haven’t decided what to do with it. I think I’ll pick up couple more now that I see your sweet use for it.
Thank you for sharing it and your pretty banner backdrop at What We Accomplished Wednesdays. Have a great weekend!
Hugs,
Deborah
Brandi says
Oh how cute! I love that they were so inexpensive to make.
Our Pinteresting Family says
I absolutely love these! They look awesome with the wrapping paper added. 🙂
Kristina says
Saw you on Green Willow Pond feature. What a really cute idea! Great Job! The cupcakes look great too 🙂
Desiree @ The 36th AVENUE says
It is adorable… I am featuring it tomorrow during the link party.
Stacey says
I love this! And I have that exact paper from Wholeport! I am headed to Goodwill today to find some supplies…adorable!
Stacey
Trish - Mom On Timeout says
I keep meaning to make some of these myself 🙂 Great tutorial and I love how they turned out – so cute! Pinned and featuring tonight!
Gail Wilson says
LOVE the cupcake holders! too darn cute!
catching you!
Mindi@MyLove2Create says
These are awesome, I love the unknown baking devices you used such cuteness!!!
Jocelyn says
Those tart pans make adorable cupcake stands…I love how the edge looks ruffles when turned upside down. Too cute!!!
Dianne says
Very cute and very clever. Your unknown item is actually part of a tart pan. There are 2 pieces…similiar to the pans you use to bake cheesecake. The part you have is the side and there is a base…plain silver circle. So that when you are ready to serve your tart, you just pick up the base and let the side piece…like yours…fall to the side.
Really adorable idea!
Jenna @ Rain on a Tin Roof says
Thanks so much, Dianne! I have since found out it is a tart pan – I would have never known! That is so cool!
cynthia says
i’m pretty sure those are tart pans…….cute project.
Jenna @ Rain on a Tin Roof says
Yep, Cynthia, that’s what I’ve heard since I wrote the post!
Alli says
How adorable! I am a cake stand fanatic and when I saw your pic at Throwback Thursday, I had to rush right over. I’m so copying this! Thanks for sharing and for linking up with us!
Jenna @ Rain on a Tin Roof says
I’m so glad you like it! It was so simple and turned out so stinking cute, I was amazed!
Toodie says
I have two pans similar to those, plus single size ones because I just HAD to have them years ago. I’ve used one of the big pans once and none of the others at all. That is such a great idea! The little single serving ones could be single cupcake holders. You’re brilliant!
Jenna @ Rain on a Tin Roof says
The single serving ones would be so cute as single holders! That’s a great idea! Yep, I love mine and they were so simple!
Denyse @ Glitter, Glue & Paint says
Jenna! These are so cute. I love the way you made use out of the unknown baking device…LOL
Thank you for sharing at Throwback Thursdays!
xoxo
Denyse
Jenna @ Rain on a Tin Roof says
Thanks, Denyse! Gotta love those unknown baking devices!
Karen, the next best thing to mummy says
These look great I am definitely going to try to make some I know that they won’t be as good as yours though #turnituptuesday@_karendennis
Jenna says
Thanks so much, Karen!
Sue from Sizzling Towards 60 & Beyond says
This is a lovely idea and looks so effective.Thanks for sharing with us at #overthemoon link party. I’m sharing on social media. Hope to see you at next week’s linkup
Jenna says
Thanks, Sue!
Hil says
That’s so cute!! I want it to come with the cupcakes too though
Thanks for sharing at #bloggerspotlight!
Jenna says
Thanks, Hil!
Katherines Corner says
so cute. Thank you for sharing at TFT, pinned! xo
Jenna says
Thanks, Katherine!
Sandra L Garth says
Super cute and yet another reason for me to go to the thrift store.
Jenna says
hahaha!! True that! Thanks!
Mother of 3 says
Such a cute idea! I would not have thought to use old cake pans for a cupcake stand. I just love these. Pinned.
Jenna says
Thanks! They were super easy to make!
Theresa says
Thanks for sharing your DIY at the Inspiration Spotlight party @DearCreatives Pinned & sharing.
Jann Olson says
I love making these! I made a pink one in February and use it for so many things. So cute!! Thanks for sharing with SYC.
hugs
Jann
Sherry says
Cute idea! Thanks for sharing at Home Sweet Home!