While I have come to love split-level homes, I have not come to love the metal handrails that tend to always accompany split-level entries.
You know what I’m talking about.

Those handrails that belong outside. Not inside.
Alas, it seems every builder in the 70’s just had to have these metal eyesores in the stairways. There are some things I will wholly embrace from that era – such as wood paneling. At this point in my life though, those metal handrails are not one of the things I wish to embrace.
However, my pocketbook doesn’t exactly have enough money in it for me to totally kick that handrail to the curb just yet.
For the time being, I chose to just paint the handrail and live with it. I wanted to make sure it took as little away from the overall feeling of the entryway though. I wanted the art, lighting, rug and lucite handrail going downstairs to be the stars. For that reason, I thought it best to paint the handrail black to kind of blend it in with the walls.

As you know, the handrail is metal. Painting metal in general is different than painting a wall or a piece of furniture. You can’t use latex paint unless you just want to have the paint peeling away in a matter of days. Here’s how I painted my metal handrail.
This post contains affiliate links for your shopping convenience. Click here to read my full disclosure policy.

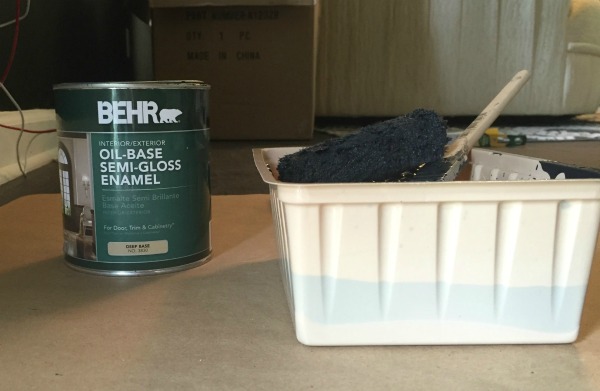
- Oil Based Paint – I used Behr’s oil based paint in a semi-gloss black.
- Small Good Paintbrush – I used a Wooster Pro 1.5” angled paintbrush. Notice I bolded the word “good.” Use a good, high quality paintbrush. When painting metal, having a good paintbrush is a necessity.

Step 1.
Tape off around any walls, trim, or floors as needed. Lay paper or dropcloths underneath your railing for paint splatter.
Step 2.
Working in small sections, brush the paint onto your railings. Do not try to roll the paint on with a roller. I tried this initially and it doesn’t work well at all. I ended up going back over all the rolled places with a paintbrush. This is one of those things where you have to suck it up and brush the whole damn thing. Oil based paint takes longer to fully set-up and dry, however you cannot easily go back over places you missed while the paint is drying as it will mess up the finish. This is why you want to work in those small sections.

Do the top of the railing all at once. Then go back and do entire spindles and in between them all at once and so on. Apply the paint in long even strokes – don’t go back and forth with the brush. As soon as you see you are starting to run out of paint, get more on your brush and overlap a little where you left off. If you apply the paint this way, then you should only have to apply one coat.
Step 3.
If you end up having to do an additional coat, wait at least a full 24 hours before reapplying the paint. Be sure that no one touches the paint while it is curing as it will smudge and mess up your finish. It may take 3-5 days for the paint to fully cure, so be as careful as you can around the railing during this time.

You should have little to no brush strokes if you bought the good paintbrush. Oil based paint is very good about self-leveling when used with a good brush.
Our metal handrail runs the length of the upper staircase, as well as a good bit around the top of the stairwell. It took me about 4 1/2 hours to paint the entire thing and I only needed one coat. I do think that if you wanted to, you could unscrew the handrail, take it outside, and spray the handrail with oil based paint in a paint sprayer. I wasn’t willing to go to all that trouble though. You could also spray paint it outside, but I find that over time spray paint will wear off of something when it’s constantly in use – like a handrail.
Do you have any tips to share for painting metal handrails or just painting metal in general?
Need more painting and home improvement tips?
DIY Lucite Handrail – a drop dead gorgeous handrail that only looks like a million bucks.
The Full Entryway Makeover – see how we made over the entire entryway…
My Best Tips for Painting Furniture – any kind of furniture at all.
Want to remember these metal painting tips for later? Just pin the image below!


Sharon H says
OH, that makes such a difference! I could even live with that metal railing this way???? Good job.
Jenna @ Rain on a Tin Roof says
Isn’t the difference crazy, Sharon!? I know – I can definitely live with it for a while like this. 🙂
Jenny says
Did you sand brfore painting?
Cindy says
Did you have to sand the railings before painting? I have white railings that have chips with black undercoat.
Jennifer says
They look sooo of much better!!
Jenna @ Rain on a Tin Roof says
Thanks, Jennifer! I think so too!
Patty says
It wasn’t just the 70’s they put those metal railings in. My mom and dad bought their new home in 63 it was a split level with the metal rails and paneling in the basement.
They say ignorance is bliss in my case that was so true. My mom wanted the living room painted so being the good daughter that I was I said “I will paint it for you” so I did and that included the metal railing. It took me forever to paint that large room and that dang railing, but without really knowing what I was doing it was painted with an oil base. I didn’t tape anything off I just cut in You know I didn’t even use a drop cloth, didn’t even know what that was haha, but the artist in me got it done and my mom loved it and when my mom and dad sold that house that paint job still looked great, I think I was 17 when I painted that room and railing.
I wouldn’t dream of painting today without a drop cloth or tape, I have to say it was beautiful when I finally finished and not a drop of paint on those beautiful hardwood floors. My mom was so happy with that paint job she dropped hints about the rest of the house, but I never caught any of them, that was enough for me, haha.
Jenna @ Rain on a Tin Roof says
Oh Patty, you were a brave soul!!! I have went a few times without a drop cloth because I forgot or thought “this is small, I don’t need it.” And I was wrong!!!! You are so sweet to have done that for your mom!
Patty says
I kind of got carried away and I meant to tell you, your railing looks great, ain’t it amazing what a little bit of paint can do, it can change the look of a room more than anything I can think of whether it be a railing or just one wall or a piece of furniture.
I love the colors you chose it looks so rich and uptown. I love the way you throw caution to the wind and take chances and just beautifully pull it all together.
Jenna @ Rain on a Tin Roof says
Thanks, girl!!! And no one has ever described me as “uptown” – I’ll take it!
Missy says
I have mental railing too, in my house built in 1936! I used the same method years ago and they still look pretty darn good. I have thought about having a wooden handrail installed over the metal to update the look. I think I would like the use of wood and metal. Don’t know if it’s possible.
Jenna @ Rain on a Tin Roof says
I think I would like the wood and metal together as well, Missy. When I look at my railing though, I can’t quite wrap my head around how it would all work with the current one. Glad to hear your railings are still holding up well!
Sara says
Paint is my best friend!! Your use of it on the hand rail, proves the point, that paint makes a world of difference!! Bravo to you!!
Jenna @ Rain on a Tin Roof says
Preach sister! It’s my best friend too!
Pam S says
I didn’t think I was a fan of metal railing either. But you made that look really nice (really!). Seems almost invisible, fading into the walls! How nice 🙂
Jenna @ Rain on a Tin Roof says
Thanks, Pam! I was hoping to make it fade more into the walls, so I’m glad you think it does just that!
Shirley says
Looks so much better painted black Jenna. I remember painting metres of green outdoor railings black. It seemed never ending! You have done so much on your new home in such a short time.
Jenna @ Rain on a Tin Roof says
It did seem never ending, Shirley!! haha! When you’re doing it with a brush only, it seems like it takes forever – but worth it!
Kelly d says
Yeah!!!!i have metal handrails too(kind of an oxidized blue color??)been wanting to do something with them…this is it!!!thank you so much!!!
Jenna @ Rain on a Tin Roof says
Awesome, Kelly! So glad I could help!
Jay says
Thanks for including how much time is required for the paint to cure. I think I can keep the railing guarded for 3 to 5 days while the paint cures! Do you have any more information on looking choosing new metal railings? Thanks!
Daphne Gilpin says
Thanks for pointing out that oil-based paints are good at self-leveling, as long as they’re used with a good brush. My husband and I are thinking about having new metal railings installed on our balconies soon. I’m glad to know we’ll be able to change up the color and have it look good, as long as we use oil based paint for the job.
Barbara Frey says
These are the kind of project that needs a lot of patience. I love how you manage to make this railing so wonderful. I just wanna try to paint my stairs. With metal getting rusted over time it really needs a makeover.
Tammie Houston says
I am planning to change our mailbox and repaint the handrail in our swimming pool because it is rusty already. Thanks for your guide on how to properly paint it, however, my wife wants to hire a professional and make our mailbox switched to iron. I hope we could find a professional soon because I want to surprise her before she arrives from an out of town trip. Cheers!
James says
Could you update how this has held up over time? My wife really wants to do this, but I am hesitant as I don’t want a mess of flaking paint in a years time.
Thanks!
Sandra says
Did you remove the old paint or sand before repainting?
Lisa says
We just got an $18,000 quote to redo our railing! Black paint here I come. Thank you so much for the tips – the difference is incredible.
Sheryl says
Thanks for all the info! My rails are
Painted white, I have no idea how many coats! Is there any need to sand the railings first? Or can I just paint directly on it?
Thanks again for the great article!
Jodie says
Did you have to sand it down and remove the old paint at all? If so how far down did you sand?
Thanks