This post is sponsored by FrogTape, however all opinions are 100% mine. Affiliate links may be contained in this post.
Last week I left you with a design board that included visions of palms, pink, black and green dancing in your my head. The master bedroom makeover’s theme is Well Traveled – one of FrogTape’s 2016 design trends.
This week’s master bedroom makeover update is about the prep – creating a pattern on your wall with FrogTape® to make a kick-butt and take names accent wall.
If you remember from my design board, I wanted to do a variation of the pattern I painted on my office closet doors and also on a larger scale.

And that’s exactly what I did. First though, I had to get the walls painted.

To start with, I taped off all the trim in the room with FrogTape® Delicate Surface. I had actually sprayed my trim with my paint sprayer just a couple days prior to painting the walls and before new carpet went in, so I used the Delicate Surface since the paint was still fresh.
After painting all the walls pink, I turned my attention to the one wall that would be my accent wall. First I measured it’s length, which was 196″. To get the design I wanted, I needed to create multiple even sections across the wall. I played with the 196″ and found that if I divided 196″ by 7, I would get seven 28″ sections across the wall. At that point, I went across my wall and made a mark at every 28 inches.

After making my marks, I used a level to draw a line vertically down from each mark.
After that, I ran strips of FrogTape® vertically right over those marks. I had let my paint dry for nearly a week, so I went with the FrogTape® Multi-Surface on this wall.

Obviously, the tape width is larger than the line (I used the 1.41″ width), so I just eyeballed the line under the tape and kept it in the middle of the tape as I ran it down the wall.

Next, I used a yardstick and marked 6″ and 18″ down from the ceiling on every other strip of tape.
On the other strips of tape, make marks 12″ down from the ceiling.

Next, run pieces of FrogTape® diagonally from the 6″ and 18″ marks to the 12″ marks to create diamonds.

Continue this down the wall.

You will also want to run strips of tape on both edges / corners of the wall as well as seen in the photo above.
I wanted to add in one more “layer” of pattern underneath this one. To do this, I got back out my yardstick and made a mark 30″ down from the ceiling on the strips of tape that had originally gotten the 6″ and 18″ marks. On the strips of tape that had originally gotten the 12″ marks, I made marks 24″ and 36″ down from the ceiling.
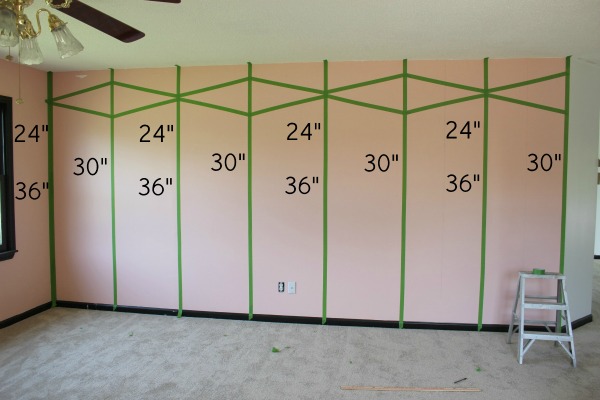
Next, I ran diagonal tape strips from the 24″ and 36″ marks to the 30″ marks to make more diamonds.

Use an X-Acto knife to even up your tape edges and to remove the strips of tape in the middle of the diamonds as shown below.

Use a credit card or your fingertips and firmly push down along all the tape edges to seal it.

After all the tape was secured down, I painted over the wall with black paint.

I did two coats of the black. I could have probably gotten by with one coat, but did two just for good measure. I used FrogTape® Multi-Surface for the accent wall. I had waited about a week between painting the wall and doing the taping and painting of the design, so using regular FrogTape® would be just fine for this part of the project.
Immediately after applying your last coat of paint, remove the FrogTape.

I had been feeling pretty good about the pink and black color scheme. But, when I got all the tape off the feature wall, I wasn’t loving the pink and black together there.

While the black trim and plain pink walls worked well on the other two walls in this room, it just seemed too much on the feature wall. So as I like to say – I had to back up and punt. I opted to change the pink on the feature wall to white. Instead of mapping out my entire design again, I just used FrogTape® Delicate Surface and taped off around the black parts of the wall and painted the white in-between. And after two coats of white paint and removing more tape…

I got exactly the product I’d been looking for.

This wall is by far one of my favorite feature walls I’ve done to date. What do you think about it?


Disclosure: This post is sponsored by FrogTape®, however all opinions and love of diamond patterned walls are 100% mine.

Marty@A Stroll Thru Life says
Oh my word, this is tedious work, but I can’t wait to see the end result. You amaze me with your accent walls.
Jenna @ Rain on a Tin Roof says
Thanks, Marty! The most tedious part was figuring out the measurements, the rest wasn’t too bad!
Patty says
I have never been any good at doing this sort of thing, if something turns out good it is by accident, I would never attempt a wall that big. I look at your wall and your tape is perfect and I love the design. I want to see more, can’t wait. It is going to be so beautiful, but what is so cool is that it is what you have created, you and grunt, no expensive designers, you have searched out and bought what you need yourselves and carefully planned everything out, and when you are done it will be your home in every way with the things you love and with fun and elegance it will have been designed with the circus in mind and as she grows up,
It is all you and your glorious family.
My only problem with the whole thing is your moving to slow.
I want to pass on some advice to you that I saw, “Never use power tools while drinking wine, the dust gets in the wine and ruins it”. haha
Jenna @ Rain on a Tin Roof says
You could TOTALLY do this, Patty!!! With this wall, the key with getting the lines straight were using a level. It made it SO much easier. And thank you – I kind of think that it’s more like home when you decorate it yourself! 🙂 Glad you agree. And that advice – brilliance! haha!
Sheila Moore says
Well Dang I was looking forward to seeing the end result. Guess I’ll have to wait…I know it’ll look fabulous!
Jenna @ Rain on a Tin Roof says
Sorry for the wait, Sheila! I promise it will be worth it though!
Julie says
OMG can’t wait to see the finish product! YOU ARE AWESOME!!!!!!!!!!!!
Jenna @ Rain on a Tin Roof says
hahaha!! Thanks, Julie!
Dharma says
OK now I am getting excited. It’s so graphic! I should totally hit the highway and bring you a sweet tea. You know, for moral support while you paint lol
Jenna @ Rain on a Tin Roof says
Can you spike the sweet tea?! haha!
Dharma says
HA, it never occurred to me not to!
Jenna @ Rain on a Tin Roof says
That’s my girl! 😉
Brigitte says
LOVE!
Jenna @ Rain on a Tin Roof says
Thanks, Brigitte!
Debra Bartels says
Just amazing!
Jenna @ Rain on a Tin Roof says
Thanks, Debra!!!
mary ballerin says
Tease! After seeing the cool diamonds I thought I was going to see the end result. 😉 Ugh, I’ve always wanted to live near water, I saw a house listed with a river view, it was built in 1978. I think about it being empty and going wild with the paint sprayer. It has good bones, just needs a face lift. There are closet doors like yours, the main bathroom has swag lights, a big mirror that could be framed, walk-out basement ….. I might call my realtor.
Jenna @ Rain on a Tin Roof says
I am dying to show it to you guys as well, Mary! So, did you call the realtor? 😉
mary ballerin says
I’ve been putting it off, I think it’s priced kind of high, I’m watching the listing online while I wait for my wood fence to be installed. Realtor is a long-time friend, I can call him anytime. By the time I do he might know more about the house, it was a new listing. Still on my mind though!
Jenna @ Rain on a Tin Roof says
Good plan, Mary! 🙂
Sarah says
Can’t wait to see how it turns out!! Your tape job looks impeccable.
Jenna @ Rain on a Tin Roof says
Thanks, Sarah! I can’t wait to share the reveal!!
Emily @ The Benson Street says
WOW! Can’t wait to see the end result! I’m sure it is amazing. Thanks for sharing at the Monday Funday Party!!
Jenna @ Rain on a Tin Roof says
Thanks, Emily!
Jann Olson says
Frog tape is the best thing they ever invented! 🙂 A lot of prep work, but the results make it well worth the time! Thanks for sharing with SYC.
hugs,
Jann