If you follow me on Facebook, you may remember a month or so back when I posted this picture.

Disclosure: This post is sponsored by HomeRight. However, all opinions and love of the color green is 100% mine. This post contains affiliate links for your shopping convenience. Click here to read my full disclosure policy.
HomeRight offered a challenge to their brand ambassadors.
They offered to send us one of the IKEA Tarva 3 drawer chests and then have at it – An IKEA Tarva Hack.
There are three things I have never passed up in life:
1. A Good Challenge
2. Free Furniture
3. Cheap Beer
My fingers and toes and arms and legs were crossed in hopes that I would be one of the five chosen ambassadors drawn from a hat for this challenge.
And I was.
*Insert 7th grade girl squeal here, along with fist bumps.*
So what did I turn my chest into?
A drink bar.
A green one.
With pretty gold accents.

To say that I’m happy with this piece is an understatement.
I am still bouncing off the ceiling, throwing confetti, fist bumping the air excited about this piece.
IKEA Tarva turned Bar Cabinet
Steps
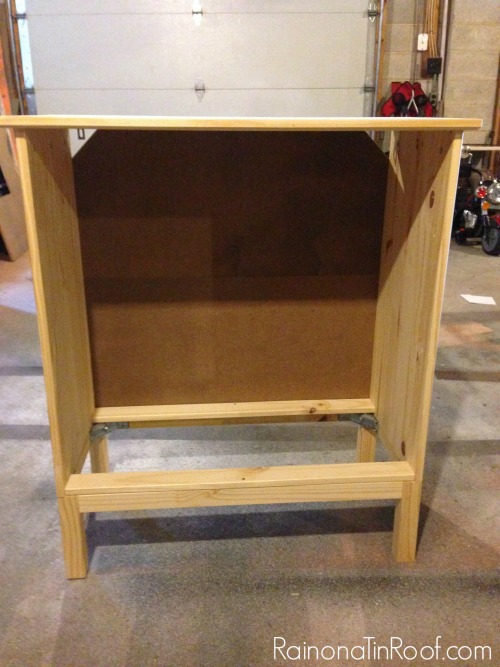
#1: Put the “frame” together
First off, I put the piece all together just as the directions from IKEA said to with the exception of the drawer slides. I just skipped that part. When the directions started telling me to put together the drawers, I stopped and had this:
#2: Construct the doors
The second thing I did was construct the doors. I wanted to use as much of the wood as I possibly could from this piece so I used the drawer fronts to make the two doors.
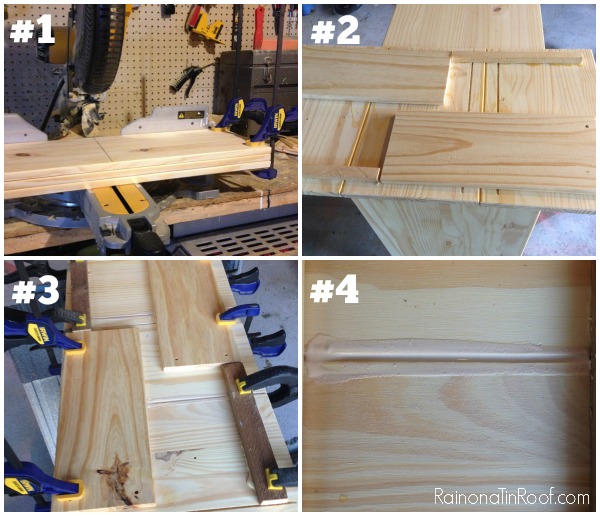
I made the doors by first lining up all three of the drawer fronts and clamping them together. I measured to the middle of the top drawer front, then used our miter saw to cut right down the middle of all three drawer fronts. This left me with six pieces – three for each door. (#1 in the photo above.)
Next, I found some pieces of wood that could be used to hold all three pieces of wood together to make a door. I used two drawer sides (that came with the Tarva) for each door and some scrap pieces I had laying around. (#2 in the photo above.)
After I laid out the wood pieces to hold the backs of my doors together, I put glue on the pieces and clamped them down to the door front. (#3 in the photo above.)
Finally, I ran some glue along the backside seams of the door as well (where the old drawer fronts meet). (#4 in the photo above.)
I let the glue fully cure for one day, then I flipped the doors over and filled in the gaps of what were the drawer fronts with wood putty. I also filled the holes that had been pre-drilled for the hardware as well. After the putty was dry, I sanded it smooth.

#3: Construct the Shelves
The bottom shelf is pretty easy. All you do is measure the inside bottom of the frame and cut out a piece of MDF to that size. Leave about a 1/2 inch of clearance in the front so that those wood pieces (I’m sure there is a technical word for those, but you know I don’t do technical) on the back of your doors will have room. After you have your piece cut, run wood glue along the bottom inside edges of the chest and place your piece of wood on top.
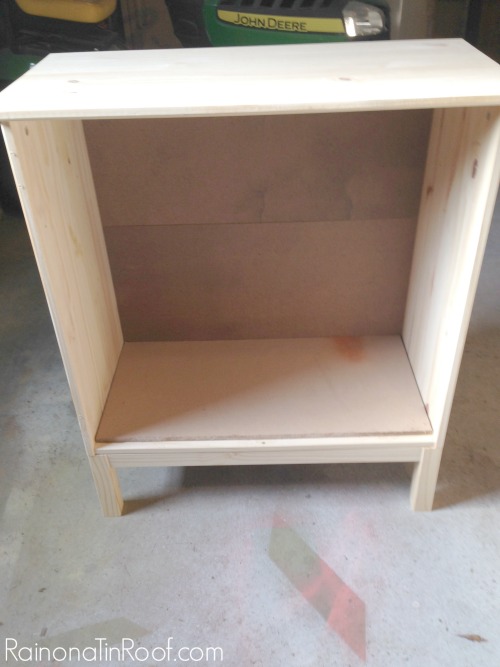
The photo above doesn’t show it, but you will need to put some weight on the shelf to make sure it gets a good grip with the wood glue and the chest’s frame. I did this with the super technical resourceful method of stealing landscape bricks from my yard and placing a few around the edges.
For the top shelf:
Take two of the remaining drawer sides that came with the chest and cut 3/4″ off the short sides. I once more clamped them together and did this with my miter saw. (#1 and #2 in the photo below.)
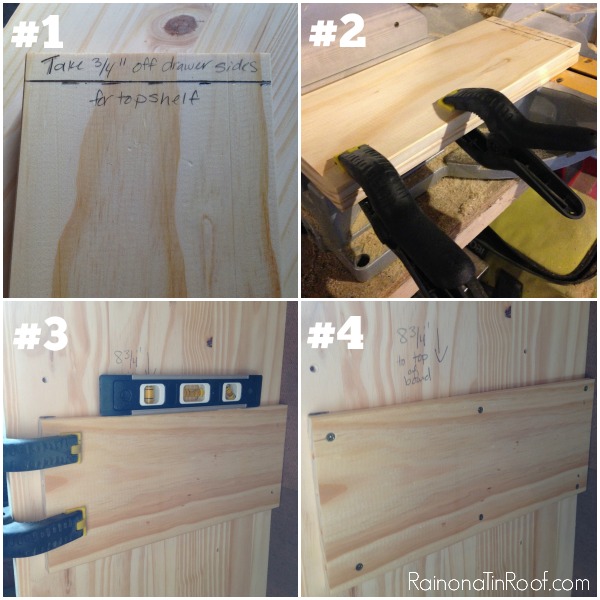
After they were cut, I measured 8 3/4″ down from the inside top of the chest and put the pieces there. Apply wood glue to the back of the pieces first, then clamp them to the chest’s frame making certain they are level. Use small screws to attach them to the frame and then remove the clamps. (#3 and #4 in the photo above.) Do this on both sides.
Make the top shelf the same way you made the bottom one by measuring the inside of the chest. Apply wood glue to the wood pieces on the edges and then place your shelf on top and weight it down for a little while.

#4: Paint It, Baby!
Here’s the fun and easy part – paint it!

I used my HomeRight FinishMax Pro (which as you can see in the photo above works overtime for me) to paint this piece. The paint I used is a new find for me. It is called Velvet Finishes and requires no priming or topcoat. I used the Baroque color in my sprayer and gave the chest three light coats. The paint worked just fine in the sprayer – just needs watering down a bit. The sprayer gave the paint a flawless finish. After the paint dried, I used a dark glaze over the entire piece to give it a bit more dimension.
#5: Attach the Doors
I Grunt Labor did this with simple utility hinges that I picked up at our local hardware store. Screw them onto your doors first and then onto the edges of the chest that are facing you. (Make sense?)
*I must pause here and give a big thank you to Grunt Labor and Bill. Remember how I said the easy part was painting the chest? It totally was. Making the doors and shelves were pretty easy too. However, for me the hardest thing was lining up the hinges correctly to make sure the doors were even. Grunt Labor and Bill swooped in and saved me from an imminent meltdown on that one. Thank you, guys.
#6: Add the Hardware
I used two of the knobs that came with the chest, but I gave them what I’m proclaiming to be a “gold nugget” look with my HomeRight Heat Gun. I’ll post the tutorial for those soon. I also added flat L corner braces to the corners of each of the doors.
And the result is…

Gorgeousness.
Sheer gorgeousness.

See those gold nugget beauties?
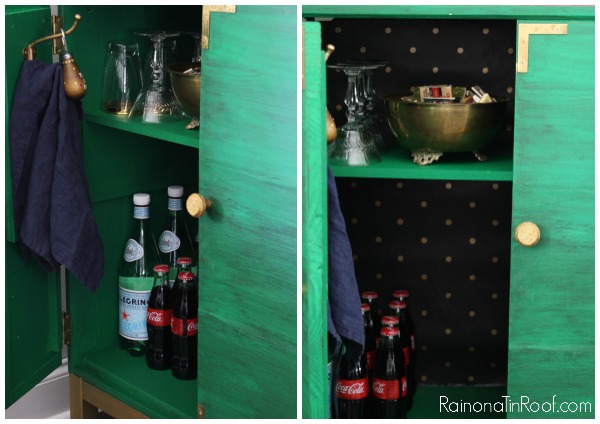
I added a towel hook on the back of one door for easy towel access and (more importantly) easy bottle opener access.
I also spiced up the back interior of the cabinet with black and gold polka dotted wrapping paper.

Love a great home decor hack?
Be sure to see how I turned this bookcase into a dress up closet for my kiddo.
Don’t miss these 14+ painted rug hacks either.
And here are five more IKEA Tarva hacks!

Stalk Me Here:
Pinterest / Facebook / Twitter /Instagram


Liz says
This is fabulous. You are so creative. I would use this sprayer on EVERYTHING!!!!!
Jenna @ Rain on a Tin Roof says
Thank you, Liz! Honestly, I can’t believe it turned out so well. I wasn’t sure if the doors would work or not – but they did!!
Stacey says
Our dining room table, six chairs, buffet and china hutch that were my grandma’s. It’s a hugely impossible job that I’ve been talking myself out of for the past couple of years. It’s time they needed an update!!!!
Jenna @ Rain on a Tin Roof says
Girl, I understand why you have been putting it off!! That is a huge undertaking with a regular paintbrush and roller! Good luck on the giveaway!
Sarah @ 702 Park Project says
Oh, my list could go on and on! I’d love to try out the sprayer on a wingback chair that I plan to paint navy.
Karen J says
Wow! Loving it! Have shamefully been coventing one of these sprayers. I have dressers, book cases and tables I want to transform!
Jenna @ Rain on a Tin Roof says
Thanks, Karen!! Its totally something worth coveting! haha! 🙂
April says
Great ideas! I have an old cabinet-sort-of-thing that I got from a thrift store that I plan to turn into a bar. It’ll be quite tricky I think. I’ve had it for a very long time! Thanks for the inspiration!
Alina says
I’d love to use it on my kitchen cabinets.
Sean C says
My son’s dresser and nightstand could desperately use this!
Hope Williams says
Oh I love the gold accents! It is the icing on the cake! Definitely going to pin it for sure! What’s the scoop on this paint???? I’m all for not having to deal with a paint brush or waxing EVER AGAIN!
Proud of you for finishing in the top five girl! We will all push for number 1 overall!! Hot Damn !!
Jenna @ Rain on a Tin Roof says
Thanks, Hope!! I don’t think it would have been complete without the gold accents. This paint is awesome!!! I’m actually going to be writing a detailed post about it tomorrow!!! Get excited!
chris aka monkey says
i have watched you paint almost everything in and out of your house with your homeright finish max pro and i have had serious envy so i would be like you and paint everything starting with my wicker headboard and chair thanks jenna xx
Jenna @ Rain on a Tin Roof says
I do use it for everything!! Love it! Good luck, Chris!!
Stacie says
Looks great. I have a few projects i could use that on.
Jenna @ Rain on a Tin Roof says
Thanks, Stacie!
Patricia C says
I have some older furniture that I would love to update
Susan M. says
You knocked it out of the ballpark! I’ll never look at angle brackets the same again! If I won well, first I’d definitely “*Insert 7th grade girl squeal here, along with fist bumps.*” and then I’d use it on an old secretary that I’ve been putting off painting because I don’t have a decent sprayer which means I need to paint by hand and we all know how much fun THAT is!! 🙂
Thanks for the opportunity – my fingers are crossed.
Jenna @ Rain on a Tin Roof says
Thanks, Susan!! *insert 7th grease girl squeal here and fist bumps* haha!! Good luck – this sprayer would be awesome for your secretary!
pamela murphy says
Love It!! Thanks for sharing!!
Jenna @ Rain on a Tin Roof says
Thank you, Pamela!
Lindsay says
Love it! Looks great!
Jenna @ Rain on a Tin Roof says
Thanks, Lindsay!
Sarah says
The details are friggin’ great! Those L-brackets are the perfect touch! Love. 🙂
Jenna @ Rain on a Tin Roof says
Thanks!! I don’t think it would have been as good without the l-brackets! I love adding those to pieces – cheap and big impact!
Julie A. Shearer says
OMG…… I love it!! What an awesome job. Thanks for sharing and a chance to win.
Jenna @ Rain on a Tin Roof says
Thanks, Julie!!
Darla Bunyan says
I have been buying some furniture on the cheap to re-vamp, so far, I have SO many projects that I am overwhelmed. This might really help my procrastination! Thanks for the chance!
Terrie says
I am putting a new railing on my deck and a paint sprayer would save me loads of time.
Sahana says
wow! Love your makeover especially adding the towel hook was a great idea. Gold accents in green background is perfect!
Jenna @ Rain on a Tin Roof says
Thanks, Sahana!!
Terri Hughes says
I would use the sprayer on the entertainment center. Thanks for the giveaway!
Patty says
Wow that cabinet is so dang gorgeous. I know I keep saying this but you are so talented, I would never have thought to turn that into a cabinet, and I love the color. Well done.
Jenna @ Rain on a Tin Roof says
Thanks, Patty! You know, you totally give me an ego boost every time you say that? haha!! Honestly, I wasn’t sure if the cabinet idea would work – I had no clue if I could really make doors from drawers fronts, but it worked! yay!
Samantha says
Jenna this is gorgeous…..not only did you paint it in my favorite color green but you made a chest of drawers into a cabinet….pure genius….I am so pinning this. Love the inside also.
If I had a paint sprayer I’d paint all my “wood” furniture in the house from brown to something that pops, I’m sick of everything so brown in my house but I don’t want to leave streaks from the paintbrush.
Jenna @ Rain on a Tin Roof says
Thanks, Samantha! That shade of green is my favorite too – just can’t get enough of it!
Kristin says
There are so many projects going on in my house right now, but I would love to paint my kitchen cabinets white, so that would be the first one.
Casey Georgens says
Great giveaway and love the drink bar. I have so many projects I NEED that sprayer for!
Jenna @ Rain on a Tin Roof says
Thanks, Casey!
beverly e says
I have a desk and chair that need a new paint job… that’s where I’d start with a Finish Max Pro, but I’ve got LOTS of projects from there! Thanks for the chance to win!
Cindy Dahlgren says
I have a bunch of old furniture from my MIL, and it needs updating badly. I don’t like painting with a paint brush, so I would be so delighted to win this. cdahlgren at live dot com
Laura says
Wow! What a difference. You have some imagination.
Jenna @ Rain on a Tin Roof says
Thanks, Laura!
Savannah says
You are so amazing, I’m a huge fan! I would love to buy one of these and do the same thing (unless you copyrighted this. In that case, I’d mix it up a bit) because I need a place to safely store my journals. THIS IS AWESOME! I advertised you on my blog!!
Jenna @ Rain on a Tin Roof says
Thanks so much, Savannah! I totally don’t have it copyrighted. It would be perfect for storing your journals. You are so sweet to give me a mention on your blog – thank you!
Savannah says
Maybe you’d like to check out my blog, even if it isn’t as fabulous as yours 😀
Jenna @ Rain on a Tin Roof says
I actually did check it out after your first comment! 🙂 And it is fabulous! And super inspiring! Keep it up!!
Paula says
What a beautiful piece of furniture! You have such great ideas, Jenna!
Jenna @ Rain on a Tin Roof says
Thank you, Paula!
Michele Behlen says
I have a dresser that I have wanted to refinish and this would be perfect.
Mel Keene says
The FinishMax would make it so easy to paint my little girl’s dresser and desk! They are the last two projects to finish her bedroom’s recent makeover!
Paula@SweetPea says
I would use it on a table I want to makeover.
Vanessa says
I love this makeover transformation.
Jenna @ Rain on a Tin Roof says
Thanks, Vanessa!
Emily @ Two Purple Couches says
This is amazing, Jenna! Love, love, love that gorgeous green! And I cannot wait to see how you made those knobs! If I won the paint sprayer, I’d give our kitchen table a much-needed makeover!
Jenna @ Rain on a Tin Roof says
Thanks, Emily!! I LOVE that color too! I’m glad you like the knobs, because I was a little worried I may be the only one in the world who liked them!
Chelsea says
I am so impressed with this, Jenna! I can’t believe those doors are made from the drawer fronts! You can’t even tell that there’s three pieces there! Awesome job my friend, I want a drink cabinet now!!
Jenna @ Rain on a Tin Roof says
Thanks, Chelsea! I was so worried the drawer front to door idea wouldn’t work, but I’m so thrilled it did!
Nina @ Everyday Enchanting says
I love the Ikea Tarva- it is seriously so versatile! And this is an awesome way to decorate it! I’m also very intrigued by that paint sprayer- I feel like I could definitely use it a lot!
Jenna @ Rain on a Tin Roof says
Thanks, Nina! Yes, I love these Tarvas too – great for so many things, just like the paint sprayer!
Susan M says
This sprayer would be very happy at my house! I’ve been eying some potential projects already : ).
Amanda S. says
I love this! What a difference!
I would paint the used coffee table I just found.
Jenna @ Rain on a Tin Roof says
Thanks, Amanda!
Ashley says
I would use it for everything, but the first thing I would use it on is a chest of drawers!
I LOVE the green and gold!
Fibia says
I would use it on everything. I would start with an old night stand. Thank you for the giveaway.
Afton says
I have a dresser/tv stand that desperately needs painting, but I can’t fathom doing it by hand!
Andrea Kincannon says
I have the Tarva bed frame that i could use it on. I would repaint a table top that I have.
Jackie S says
Love the way you transformed the dresser. I would never think to do that.
Jenna @ Rain on a Tin Roof says
Thanks, Jackie! I wasn’t sure how well it would work, but I’m so glad it did!
Jessica says
I would love this for painting our kitchen cabinets.
Ashley C says
I’d use it on our computer desk, it really needs painted
demureprincess7(at)gmail(dot)com
Heather @ Southern State of Mind says
This is AMAZING! And TOTALLY channeling your Ralph Lauren barstools.
Jenna @ Rain on a Tin Roof says
Thanks, Heather!!! It totally reminded me of the Ralph Lauren barstools as well!
Heather @ Southern State of Mind says
PS: If I won I would paint everything in my house. Literally. Everything. LOL
Sarah says
Turned out absolutely fabulous! Love the color and am loving the fact that you are giving away a sprayer. Fingers crossed!
Jenna @ Rain on a Tin Roof says
Thanks, Sarah! Good luck!!
KWolff says
I have a new to me hutch for my kitchen that is in need of a fresh coat of paint. This would be perfect because I could claim it as my own! 🙂
Lorah Marquardt says
Awesome project!
Jenna @ Rain on a Tin Roof says
Thank you!
Christine says
I would use it to paint all of my furniture!
Nicole says
I would use the FinishMax Pro on this old wooden bench my mom gave me that I have been wanting to paint for my hallway.
Sherri Howell says
What a great transformation!! I love the beautiful bright color. You always knock it out of the park! I have so many things to paint, but I think that I would start on my garage doors since it is finally starting to cool off here in Texas. Thanks!
Jenna @ Rain on a Tin Roof says
Thanks, Sherri! I’m in love with that color too!
mary fanara coleman says
I have a great wooden hutch that could use this.
Trish F says
Hello, I have a handed down large oval stained dark pine table from the 70’s, complete with leaves. I’ve always kept a table cloth on it but recently have thought of painting it, so that is what I will tackle first. Thanks for a great giveaway!
Kristy says
A sprayer would be Life. Changing! My dining table is ready for a make over!!
lesley says
my BFF and i have some pallet projects that this would be awesome for!
carol clark says
actually its a small fence project i would use this for
Julie Spear says
AWESOME project!!! A booze cabinet is a great idea, and I can’t believe you got such a gorgeous one, out of such a blah standard furniture piece!!! love it! I have been wanting to try that Velvet Finishes paint – good to see your recommendation… LOVE that green color! Man, I need to win me this paint sprayer! my garage is overflowing with “paint project pieces”, LOL!! I know you understand my freakish hoarding tendencies. I hope you win the challenge, I will be voting for you!!!
Jenna @ Rain on a Tin Roof says
I couldn’t agree more – a booze cabinet is always a good idea! haha! Yes, the velvet finishes paint was great – I especially love that green color! And I couldn’t have done this without the sprayer – well I could have, but it would have taken a lot longer! Good luck!
angie says
I love it! And i could totally use that sprayer!!
alliekm1 says
What a great idea! I just love the way you transformed the dresser into a bar!! I would never think to do that.. so creative! Luckily, there are people out there like you to help give me ideas! haha! 🙂 I’m currently redoing our patio furniture and this weekend tackling refinishing our wood door. I have a list of projects a mile long but one at a time. I’ve been looking at paint sprayers but it’s not in the budget right now. Winning one would be awesome!! 🙂
Jenna @ Rain on a Tin Roof says
Thank you, Allie! I wasn’t sure if it would work or not, but I’m so glad it did!! Thank you!
amy pugmire says
I want to refinish and paint my kids dressers and bed.
Kim says
A few dressers I’m preparing to redo.
ellen casper says
I would paint my bedroom set that is 20 years old
Patty says
You have amazing creativity! I would love to win the sprayer and tackle kitchen cabinets! Thanks for the opportunity.
Jenna @ Rain on a Tin Roof says
Thanks, Patty! This would be great for cabinets!
Natalia K. says
You are so inspiring!!!!! I have so many furniture that I would love to work on that the spray paint can come handy!
Jenna @ Rain on a Tin Roof says
Thanks, Natalia!
Jessica Gourley says
We have some nightstands I want to paint navy…with some lovely brass knobs, am I right?!
Jenna @ Rain on a Tin Roof says
You are SO right! Navy + Brass = ALWAYS AMAZING
Dawn K says
I have been wanting to try a paint sprayer but have been a little intimidated – your piece looks so amazing I am ready to take the leap!! Have SOOO many projects in the garage this would make SOOO much easier 🙂
Jenna @ Rain on a Tin Roof says
Thanks, Dawn!! This paint sprayer is really simple to learn!! I have had some bad experiences with ones in the past, but this one was a breeze to use!
Doris Styles says
I would use it on all the furniture in my home….I’ve wanted one of these for so long.
Marsha Anderson-Corns says
I would paint the two dressers that are in our daughter’s room. They were mine and are dingy and dated!!
Terrie Griggs says
I love these “L” bracket corners, gives this a wonderful Asian feel. And I really, really want that HomeRight Sprayer!
Jenna @ Rain on a Tin Roof says
Thanks, Terrie! I love adding those “L” brackets to pieces – adds great character on the cheap!
Dad says
I am confused. How do I or where do I vote?
Dad says
Never mind I found out how.
Corey says
I am realizing that several of the accent pieces that I always pick out, all come from you! Love all the green, navy, white and gold. Love!
Jenna @ Rain on a Tin Roof says
hahaha!! Girl, I love that combo too!! Doesn’t get any better!