Category: Furniture Makeovers

Furniture makeovers using various different paints and techniques. A one-stop-shop for all things related to furniture painting.

  • How to Decoupage a Table with Wallpaper

    How to Decoupage a Table with Wallpaper

    Here’s a great idea for your next furniture makeover – layer on some wallpaper! This tutorial shows you how to decoupage a table with wallpaper – use this method on any piece of furniture to add unexpected interest and pattern!

    Y’all, I can hardly believe it either, but I’m writing a new blog post! Go me!

    Whew, it has been some hectic last few months. Getting the store ready to open, opening the store, getting into the new swing of things, grand opening celebration, 4th of July – it’s been a lot. A good lot though.

    I’ve been wanting to write a new blog post for well over a month now, but time just wasn’t on my side. I’m starting to find my new routine though, so hopefully I’ll get this two job thing figured out.

    Enough about me. How are you guys? Are you all making it through this pandemic ok? Have you adjusted to this weird new normal? We’re trying to stay positive, yet realistic here. Sometimes it’s hard, right?

    Let’s chat about something bright and colorful today, shall we? Something that got a whole new lease on life….

    how to decoupage a table with wallpaper - bird wallpaper applied to base of white table

    This bird table! Doesn’t it just make you smile? I used some leftover wallpaper I had from our bright and colorful mudroom makeover. It was quite drab before…

    how to apply wallpaper on furniture - basic table before painting and applying wallpaper.

    I passed it by several times at a local thrift store months and months ago. Finally, it hit me one day as to what it could be, so I brought it on home!

    How to Apply Wallpaper on Furniture

    Supplies and Tools Needed

    Step 1

    If you’re painting your table or piece of furniture a different color than what it already is, you’ll need to do this first.

    While my table was super heavy and solid, it had a laminate covering over much of the wood. Since laminate surfaces can be tricky to paint, I opted to go with an oil-based paint to get maximum adhesion and durability.

    Lightly sand the surface of the table to scuff it up and give the paint something more to adhere to.

    how to wallpaper furniture - scuffing up the surface with sandpaper

    After sanding the piece of furniture, use a tack cloth to remove any sanding dust or dirt left behind.

    Step 2

    Apply primer to the surface. Let fully dry, then follow up with your paint.

    wallpaper table - painting the furniture white first.

    I did two coats of Behr Oil Based Paint in Bit of Sugar. You’ll need to wait for each coat of paint to dry completely before applying a new coat. Oil based paint takes quite a while to fully dry; I give all my pieces a full 24 hours of dry time when I use oil based paint.

    Step 3

    After the final coat of paint is completely dry, you’re ready to apply your wallpaper.

    Measure and cut one piece of wallpaper to fit the surface you are covering. Leave 4″ – 6″ of extra paper on each each of the wallpaper. Apply a good coat of wallpaper paste to the surface, then put the wallpaper in place. Use a smoothing tool to work any air bubbles out from under the paper. I used a smoothing brush for this since I was working with a rounded surface. If you’re applying the paper to a flat surface, you could also use a flexible smoothing tool.

    Note: If you don’t have wallpaper paste, you could probably use Mod Podge as well.

    decoupage table - applying wallpaper to the base of the furniture.

    If you need more than one strip of wallpaper to cover the surface, then cut another piece and apply the same way, being sure to match up the wallpaper pattern.

    Step 4

    Trim any excess paper from the edges using a sharp craft knife.

    Wallpapered Furniture - white table with colorful bird wallpaper on table base.

    I love how this adds beautiful color and interest to an otherwise basic table. Wouldn’t this be fun in a breakfast nook or a sunroom?

    While you can wallpaper just about any furniture surface, I wouldn’t recommend applying the wallpaper to a table top that gets a whole lot of use. If people sit and eat there or if it’s a coffee table that sees a lot of action, the wallpaper is probably going to get torn at some point. If you have a side table or some other piece of furniture that is more for decor than hard use, then you could definitely give it a whirl on the top.

    Decoupaged table - bird wallpaper applied to table.

    If you don’t have any spare wallpaper on hand, then you could always use book pages, scrapbook paper, wrapping paper, etc.

    This piece is for sale at Local Depot. It did hurt to put a price tag on it, but I really don’t have a place for it right now. 🙁 I hope someone else will love it as much as I do though.

    Do you have any furniture pieces just begging for a touch of wallpaper?

    Looking for more upcycled furniture makeover ideas?

    Easy Furniture Painting Techniques – these still pack a punch though!

    How to Paint a Plaid Pattern – it sounds hard, but it’s sooooo easy!

    How to Make Furniture Glaze in Any Color – again, easy and colorful!

    Want to come back to these wallpaper table instructions later? Just pin the image below!

    Follow along on social for more furniture flips!

    Facebook | Instagram | Pinterest | Twitter

  • Restore Wood Furniture with Just Two Things from Your Kitchen

    Restore Wood Furniture with Just Two Things from Your Kitchen

    If you’ve got old furniture that is looking worn, dull and dated, then give it new life with these simple steps for how to restore wood furniture. You’ll just need a couple of things that I bet you already have on hand – no chemical stripper or sanding required!

    If you’re signed up for my email newsletters, you know I’ve been helping my aunt redo her bedroom. We completely remodeled her and my uncle’s master bathroom last fall. By “we”, I mean that I helped with the design and then handed it over to the contractor. My uncle’s version is probably somewhere along the lines of “Jenna spent all my money.” Either way you look at it, my aunt and uncle got a killer new bathroom that is so much more functional for them. I really need to snap some pics and show you what we did. I digress though.

    The bathroom remodel snowballed into a kitchen remodel for them that should happen within the next month or so – can’t wait to show you that one when it’s done too! Somewhere along the way, my aunt got hit with the decorating bug and much to my uncle’s dismay I’m sure, we are now also redoing their master bedroom, mudroom/garage entry and she’s told me when we’re done with that, we’re moving to the living room. She’s a woman on a mission, folks.

    The furniture they have in their bedroom was actually my grandparent’s bedroom furniture. And since our family’s side is a sentimental bunch, we don’t easily part well with things of that nature. Sorry, Aunt Sherry. So a non-negotiable for my uncle was that the bedroom furniture stay.

    The bedroom furniture though, well it had most definitely seen better days. The finish was worn and dull and the pulls were dirty. Initially my aunt wanted to completely refinish it, but she decided she would try to clean it up first. I gave her my secrets for restoring old furniture (without sanding!) and cleaning up the hardware. She put some elbow grease to it, and boom, that 50+ year old bedroom furniture was born again.

    How to Restore Wood Furniture - before and after

    Can y’all even believe that?! And no, she didn’t paint the hardware or use a single chemical / topcoat / whatever on the wood! She took the ‘before’ photo and I took the ‘after.’ Don’t worry, I’m going to have a talk with her about photo angles. 😜

    I’ve used this furniture refinishing trick a few times now and I’ve had the same results – it’s really like magic.

    This post contains affiliate links for your shopping convenience. Click here to read my full disclosure policy.

    How to Restore Furniture

    Restoring Old Furniture - stained antique dresser before.

    Supplies Needed:

    Step 1

    Remove all items from the piece of furniture including the hardware. Wipe the piece clean with a damp cloth or a tack cloth to remove any dirt or dust. If you use a damp cloth, let the furniture dry completely before proceeding.

    Step 2

    Mix 1 part white vinegar with 1 part vegetable oil. I generally do a cup of each.

    Step 3

    Using a clean, soft cloth, rub the mixture onto the wooden furniture.

    To be on the safe side, I suggest testing the solution in an inconspicuous spot on the furniture first, then proceed if all goes well. I’ve never had an issue with this mixture, but if you’ve got a priceless piece of sentimental antique furniture, it’s best to err on the side of caution.

    As you apply the mixture to the furniture, most scratches will disappear and shine will be restored!

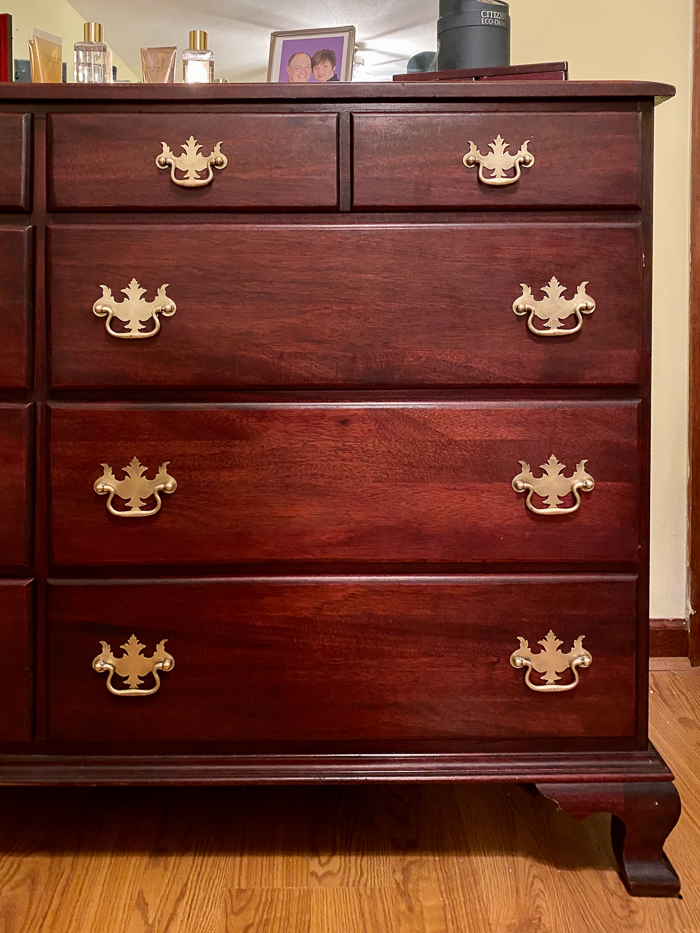
    How to Restore Furniture - restored antique mahogany dresser after.

    As I said before, I’ve used this solution for refinishing wood furniture before and I’ve gotten great results. I’ve done it on both dark wood like this, but also on light wood as well and it worked perfectly on both.

    Related: Need to remove paint from furniture and then restain it? Then read this post on restaining furniture.

    Did you also notice how well her brass pulls cleaned up?

    How to Clean Old Brass Hardware

    Supplies Needed:

    • Brass Polish (Brasso is what I use) and/or Bar Keepers Friend
    • Two Cloths – one for cleaning and one for polishing
    • Gloves

    Step 1

    Depending on how dirty your hardware is, you may be able to get by with brass polish alone. If the hardware is really bad though, using Bar Keepers Friend will often drastically cut down on cleaning time.

    To clean the hardware, simply wipe on the Brasso or create a paste with the Bar Keepers Friend and scrub until the grime is gone. I wrote a whole post solely on how to clean brass hardware using Bar Keepers Friend right here.

    Use gloves because this stuff is rough on your hands!

    Step 2

    Once you’ve removed all the tarnish and grime from the hardware, rinse it well, then polish with a clean soft cloth.

    How to Restore Wood Furniture Without Sanding - restored mahogany dresser and brass pulls.

    I’m so glad she was able to bring this bedroom set back to it’s former glory!

    Can you share any tips on how to restore wood furniture without sanding?

    Looking to save yourself more time on furniture makeovers or cleaning things up? Here’s a few of my tricks…

    Velvet Finishes Paint – the no priming, no topcoat way to paint furniture! And yes, I’m serious.

    Waxing Furniture Tips – the easy way to wax furniture if you prefer to go that route!

    Vinyl Seat Cleaner – the best way I’ve found to clean vinyl upholstery.

    How to Clean Copper – restore copper to its original beauty in a fraction of the time!

    How to Remove Rust from Chrome – yes, you can salvage that chrome furniture! Try this trick before tossing it!

    Want to remember this furniture tip for later? Pin the image below to quickly come back here!

    How to Restore Wood Furniture without Stripping or Sanding

    Get more tips on social media:

    Facebook | Instagram | Pinterest | Twitter

  • Easy Furniture Painting Techniques That Still Bring the WOW Factor

    Easy Furniture Painting Techniques That Still Bring the WOW Factor

    Bring the WOW factor to your painted furniture pieces without spending hours and hours in the garage! These furniture painting techniques are simple, but still result in a gorgeous “after.”

    I have three or four pieces of furniture in my garage waiting on me to do something amazing to them. One day in the near future, I’m going to make all their dreams come true.

    I have to, otherwise my husband is going to ban me from anymore thrift store furniture purchases. 😆

    I went through my furniture makeover gallery the other day looking for inspiration as to what direction to go with those pieces. I’m thinking I might revive one or two with one of my “oldie but a goodie” furniture painting techniques, but in a new light. We shall see what I have up my sleeve…

    Furniture Painting Ideas Techniques

    Painting Patterns and Designs on Furniture

    One of my favorite ways to make painted furniture pop is with an unexpected design or pattern on it.

    Painting plaid on the side table was actually really simple! All you’ll need are four different coordinating paint colors and painter’s tape – and you don’t have to measure a thing! It obviously takes a few different coats of paint, but it’s worth it!

    Painter’s tape came to my aid again with the gold “confetti” touches on the coral side table.

    For the tuxedo bar, I freehanded the design from a photo of a friend wearing his tuxedo style t-shirt – it was much easier than it may sound!

    Helpful Tip: When using painter’s tape on a piece of furniture, walls or anywhere else, be sure to remove the tape right after your last coat of paint before the paint dries. If you let the paint dry completely before removing the tape, you risk the tape pulling the paint off!

    Related: Wall Paint Design Ideas with Tape

    Layering Paint and Glazes

    It took me a while to come to the “glaze side.” I was a hold out for a really long time. Now, I’m not sure why! I will say though, I prefer the dark glazes on unexpected colors and I don’t like it when it’s used to create a weathered farmhouse look. Anyone else?

    To create the washed out feel on the blue table, I actually used a clear glaze and mixed a touch of blue paint with it to get the look.

    The fuchsia dresser topped with the dark glaze is one of my favorite unexpected paint and glaze pairings. After painting the dresser in the bright pink, it was a whole lot on the eye, so I toned it down with the glaze.

    My IKEA Tarva hack was how dark glazes won me over. After turning the dresser into a bar and painting it green, I felt it needed a little something more. Dark glaze to the rescue.

    The caribbean blue table came to fruition by me just playing around and adding layers of paint on top of one another. I used two or three paint colors to get the added depth.

    Related: Here’s a great tutorial for How to Make Your Own Furniture Glaze in Any Color

    Contrasting Painted Furniture

    furniture painting ideas - half stained and half painted

    Mid Century Dressing Table Makeover

    I don’t like to paint stained furniture unless the finish is badly damaged. This mid century modern dressing table was mostly in great condition, except for the top. The drawers were gorgeous and I didn’t want to mess with them. So, I opted to only paint the top of the dressing table and leave the rest of the piece untouched.

    Related: If you’re looking for a different approach to staining furniture, read this about how to make your own colored stains.

    See more furniture makeovers with stain and paint combos here.

    Embellishing Painted Furniture

    That red beauty you see wasn’t always quite so embellished. The glass doors were plain, clear glass and the bottom doors were basically wood slabs. Adding fretwork panels to the piece made a world of difference.

    Decorating furniture with wrapping paper. It’s a thing, don’t ya know? This side table was only $3 at a yard sale, but had a badly damaged top. Wrapping paper to the rescue.

    Painting Upholstery

    painted pink and navy upholstered chair technique

    Polka Dot Chair

    I don’t recommend painting upholstery for everyday pieces you will constantly be sitting in. But for accent pieces or chairs you don’t often use, go for it! I completely painted this entire chair – upholstery and all!

    Want to dive into more furniture painting ideas, tips and tricks? See these then…

    How to Wax Furniture the Easy Way – if you prefer waxing furniture, save your wrists and read this tip!

    Restaining Furniture without the Mess – complete how-to on stripping and restaining furniture without the mess that liquid strippers cause.

    Want to come back here later? Just pin the image below!

    Simple Furniture Painting Ideas

    Keep up with more painting inspiration on social media:

    Facebook | Instagram | Pinterest | Twitter

  • 9 Unique Ways to Makeover a Side Table

    9 Unique Ways to Makeover a Side Table

    Looking for a clever way to update a side table, end table or bedside table in your home? You want something more – something that pops! Here are nine unique DIY side table ideas that are totally doable – even for a beginning DIYer. You’ll be running for your paint by the end of this post!

    It’s been a while since I’ve been able to get my hands dirty with a good ol’ furniture makeover. I’m planning to end that hiatus soon since school has started back and we are finally getting back into a routine around here. There is literally one whole side of our garage that is filled with pieces just calling my name. Y’all know I can’t pass up a piece of thrift store or yard sale furniture with good lines.

    As I was going through the pieces and brainstorming ideas for what to do with each one, I also went through my gallery of past furniture makeovers looking for inspiration – perhaps a good spinoff of another makeover. 🙂 While doing so, I realized a few things:

    1. I like to turn things into bars.
    2. I especially like to give side tables new life or turn them into things they aren’t meant to be.
    3. My photo skills have vastly improved since the creation of this blog.

    I realize that most everyone only needs one bar in their home, but many people do need more than one side table. Or end table. Or bedside table. Or whatever the heck you want to call them. So, I’ve put together some of my favorite DIY end table ideas to get the inspiration flowing the next time you see a side table with fabulous lines, but needing a little love.

    Unique End Table Ideas

    This post contains affiliate links for your shopping convenience. Click here to read my full disclosure policy.

    Idea #1: Cover the Top with Wrapping Paper

    DIY Side Table Ideas

    Wrapping Paper Topped Table

    This little table makeover is definitely a blast from the past! It’s still one of my most favorite colorful pieces I’ve ever done though. I found this little table for a whopping $2 at a yard sale. The top was in really rough condition, but the rest of it was pretty good. I painted most of it a bright coral pink color and then remedied the top by apply wrapping paper. Get all the details on how I did it here. Wrapping paper tip: I find the best patterns and designs on wrapping paper at Home Goods!

    Idea #2: Give it a plaid treatment.

    Unique End Table Ideas

    Plaid Painted Side Table

    It’s been a few years since I did this plaid painted side table, but Grunt Labor will still tell you that he thinks it’s one of the best projects I’ve ever done. The crazy thing about it though is that it doesn’t require a single bit of measuring to get this pattern painted. I used Frogtape to “measure” everything – it was so easy! Tutorial for this guy is here. You can use any colors you want to create the plaid. I’ve always thought this would be really cute in pastel colors – especially for a little girl’s room.

    Idea #3: Get Beachy with It.

    Bedside Table Ideas

    Painted Beachy Colored Side Table

    The paint treatment on this side table is crazy easy to do – seriously, it’s hard to mess it up! I gave this piece a washed-out beachy vibe by painting the whole thing white first, then creating colored furniture glaze with paint and clear glaze from Velvet Finishes. If you get too much color on, then just wipe it off, if you want more, paint more on. Easy peasy. Again, you could do this with any color you wanted to. I think a small side table painted like this would be great in a mostly white bathroom to add a little color. You can read the full tutorial for painting pieces beachy style here.

    Idea #4: Confetti Style

    DIY End Table Ideas

    DIY Confetti Side Table

    This one is another super simple end table idea that just requires paint, tape and very little skill at all. Create “confetti” on the tabletop (or the whole table if you prefer!) by placing random strips of paint over the table before painting it. This creates a fun little table just begging for someone to put a drink, preferably with a little umbrella, on top of it. The full how-to on this one is here.

    Idea #5: Stenciled Top End Table

    Unique End Tables

    Leopard Print End Table

    If you want to add pattern to a tabletop, but don’t want to be confined to using tape to come up with something, then you could look for a stencil to paint onto a side table. I just happened to have this leopard print stencil lying around and went with it for this table that was on the back porch at our old house. The full makeover is here.

    Idea #6: Turn it into a bench.

    Side Table Ideas

    Side Table turned Bench

    And if you ask me what one of my favorite makeovers ever was, I’d say that one of them is definitely this little side table turned bench. I found this table at a thrift store for $7. The sides and legs of this table had perfect lines and there were gorgeous brass details on top of that. The top though had those weird slats and so I decided to cover those by adding a cushion on top. I love this piece because it can serve as a traditional side table or even a tall coffee table by just placing a tray on top of the cushion and putting drinks, remotes, whatever there. But, when you need extra seating or want to throw your feet up, just move the tray! See how I did this makeover here. Also, you can do this with any table that’s open underneath! P.S. If you’re looking for a gorgeous light blue color, that Tranquil that I painted this side table is hands-down one of my most favorite colors ever.

    Idea #7: Ditch the Tier.

    End Table Ideas

    How to Remove the Top Tier of Two-Tiered Tables

    So I found this two-tiered table at a local thrift store and I was immediately drawn to it’s mid-century lines. But then, I was like, “Damn, I hate that it’s tiered.” I’m not a huge fan of two-tiered tables. But then, I was like, “Wait I bet I can get rid of that tier.” And I did. And I have no idea why that had never occurred to me before. When I think about all the two-tiered tables I’ve passed up because of that tier and now knowing how easy it was to remove it, I get so mad at myself! Anywho, you can read about how I gave this table new life here.

    Idea #8: Layer on the Colors.

    Painted Side Table Ideas

    Caribbean Blue Layered Paint Side Table

    I just started experimenting more with layering paint colors earlier this year and this piece was one of the firsts I did. I created this look by using three different paint colors and creating different colored glazes with two of them. It actually isn’t as hard or complicated as it sounds and again, it’s a project that you can’t easily mess up! Find the tutorial here.

    Idea #9: Accentuate details with contrasting colors.

    Painted Bedside Table Ideas

    Gray and White Bedside Table Makeover

    And this one is really taking it back – one of the first furniture makeovers I posted about. See, my photography has definitely  improved. 🙂 Even though the photos here aren’t that great, I still love this simple idea for painting a bedside table that still commands attention. If you ever come across a piece that has good grooves on it, snatch it up. Then, choose two contrasting colors – I tend to go for an actual color and white together – and paint the majority of the piece the color and then pull out all those details with the white paint. The tutorial for how I did this one is here.

    Looking for more painting tips and inspiration?

    What kind of paint do I use on that? – a guide to all different types of paint and what kind to use on what material.

    How to Make Furniture Glaze in Any Color – the possibilities are endless!

    3 Easy Ways to Update Your Furniture Hardware – don’t toss it just yet!

    Want to come back to these side table ideas later? Just pin the image below!

    Unique Side Table Makeover Ideas
    Gift Ideas Signature

  • The Best Painting Tools List for Furniture Refinishing

    The Best Painting Tools List for Furniture Refinishing

    Furniture painting and refinishing can be quite intimidating when you’re first getting into it. The key though is to the right tools in order to get the best possible furniture makeover. I’ve painted countless pieces of furniture and this is my list of the best painting tools for furniture refinishing. 

    Last week, I got an email from a reader.

    I just love those. 🙂

    They asked if I could do a post on what kinds of tools and supplies I use when I’m stripping, painting or refinishing furniture.

    And I thought to myself, “Duh. Why haven’t you done that before, Jenna?!”

    So here it is. These are my must have products, tools and supplies for all your furniture makeovers. I’ve used these over and over again and they have continually proved their worth.

    Best Painting Tools List for Furniture Refinishing

    This post contains affiliate links for your shopping convenience. Click here to read my full disclosure policy.

     Best Painting Tools for Furniture Refinishing

    A Good Respirator Mask 

    Best Painting Tools

    Safety first, y’all. Anytime I have to strip, sand or spray paint anything, I always wear a mask. While you probably won’t die from a few spray paint fumes, they certainly don’t help. I typically use this kind of respirator (pictured above). Once you start painting a piece, you can usually take the mask off as long as you aren’t using spray paint. Masks do wear out over time. Once I see mine getting pretty dirty, I switch it out.

    Lead Test

    If you’re dealing with an old piece of furniture, check to make sure it doesn’t contain lead. You can do this with a lead test. If it does contain lead, do not sand it. Either paint directly over it or get rid of the piece of furniture.

    Heat Gun & Scraper

    Painting Tools List

    If you have to remove paint or want to strip a piece down to the bare wood, I suggest using a heat gun. Using a heat gun to strip furniture is by far much less messier than using a liquid stripper. Here’s a tutorial on how I stripped and re-stained my buffet. I personally use and love my HomeRight Heat Gun. It also came with a good scraper and other shaped scrapers to get in nooks and crannies.

    Sandpaper and/or Power Sander

    Best Sander for Refinishing Furniture

    If you do strip furniture, you are going to have to sand it lightly before painting or staining it to give it a smooth surface. You can do this with plain old sandpaper or a sanding block or with a power sander. I usually use my power sander for this task. I have a DeWalt sander and it hasn’t failed me yet. In my opinion, it’s the best sander for refinishing furniture. Some people prefer a pointed sander, but I really love this one. Here’s a tutorial on how to use a power sander and what kind of sandpaper to use when. If you aren’t putting any kind of primer on your piece before painting it, its a good idea to give it a light sanding first to rough up the finish. This helps the paint better adhere to the piece.

    Wood Filler

    Best Painting Tools - Wood Filler

    If you need to cover up old hardware holes, dings or scratches in your furniture, you are going to need wood filler. My personal favorite is Elmer’s Wood Filler. There is a full tutorial here on how to cover old hardware holes.

    Tack Cloth

    Painting Tools List - Tack Cloths

    I could sing the praises of tack cloths for days. Tack cloths are sticky pieces of cheesecloth that pick up any dust or dirt on the furniture before painting. Before painting, always, always, always wipe down your piece with a tack cloth. This keeps any dust and dirt from messing up your finish.

    Tarp, Old Blankets or Sheets

    If you are painting something inside on floors that you care about, put a tarp or old blanket or sheet under the piece. While it is pretty easy to scrape paint specks off hardwood or tile floors, it does take time. If you are painting on top of carpet, please don’t skip this step.

    A Good Primer 

    Best Primer for Furniture

    If you are using a regular latex based paint and don’t want to sand your furniture beforehand, I highly suggest using a good primer before applying your paint. Using a good primer will allow your paint to get good adherence to your furniture. My picks for the best primers for furniture are Zinnser and Ready. Anytime you are painting over a piece of furniture that has a glossy sheen, use a primer. Painting directly over a glossy sheen can cause your paint to adhere improperly. If you have more questions about primers, then read this post about priming and prepping furniture.

    Painter’s Tape

    Best Painting Tools - FrogTape

    If you plan to make any sort of pattern, design, or want to avoid getting paint on certain parts of the piece you are painting, be sure to use a good painter’s tape to block off that area. It’s no secret that FrogTape is my go-to painter’s tape. Its never failed me once. They also have a delicate surface version that can be used on freshly painted surfaces, a tape for painting textured surfaces, and patterned tapes in chevron, wave, and scallop.

    High Quality Paint Roller, Paint Brush, or Paint Sprayer

    Best Paint Brush for Furniture

    Your paint rollers and brushes can make or break your paint job. If you don’t invest in good, high quality rollers and brushes, you can be left with a finish that is full of fibers from the roller and hairs from the brush. My pick for best paint brush for furniture are Purdy brushes and my go-to rollers are these Purdy ones as well. A high quality paint brush will also minimize the brush strokes in your paint finish. If you want to decrease all chances of roller marks and brush strokes, go with a paint sprayer, which is what I usually do. My personal favorite is the HomeRight Finish Max. It’s easy to use and give a fine, professional finish. In you’re interested in learning more about the paint sprayer, read this post about how it works and how to use it.

    Floetrol

    Painting Tools List - Floetrol

    If you don’t have a paint sprayer or can’t use one for your project, you can add Floetrol to the paint to dramatically reduce brushstrokes. I had to do this when I painted my bathroom vanity since I couldn’t move it and I can barely see any brushstrokes. You just add a little to your paint and mix it in. (Directions are on the bottle.)

    Paint 

    Best Paint for Furniture

    Obviously when painting a piece of furniture, you need paint. This is not the place to skimp. Always invest in a good quality paint for your projects. It will save you time, money, and headaches in the long run. My personal picks for the best furniture paints are Velvet Finishes and Behr. If you have more questions about specific types of paint and what kind to use on certain surfaces, read this post.

    Topcoat

    Best Topcoats for Furniture

    After spending all that time prepping and painting a piece, it’s not a bad idea to protect it with a topcoat. My usual topcoats are Minwax Polycrylic or Velvet Finishes Protect. Topcoats are not always necessary on some pieces and with some paints. I’ve got a whole list here of different kinds of topcoats and when to use them. 

    Do you have any favorite furniture refinishing tools? 


    Looking for more furniture painting tips and tricks? I'm your girl!

    What Kind of Paint Do I Use on That? - every type of paint and which surfaces to use it on.

    Prepping Furniture to Paint - when to sand, when to degloss and when you can skip it!

    Tips & Tricks to Keep Paint from Peeling & Scratching - it's the worst, right?

    FAQ: Painting Furniture - all the questions I've ever gotten asked about painting furniture in one place.

    Want to come back here later? Just pin the image below!

    List of tools for painting furniture | What to Use to Paint Furniture | Supplies for Painting Furniture | How to Makeover Furniture

    Keep up with all my furniture makeovers on social media:

    Pinterest / Facebook / Twitter / Instagram


    SaveSave

  • What kind of paint do I use on that? Types of Paint and When to Use Them

    What kind of paint do I use on that? Types of Paint and When to Use Them

    A trip to your local hardware store to select paint can often become overwhelming. There are lots of different types of paint out there and knowing which type of paint to choose for a project can get confusing. Use this guide to learn about the different types of paint and which would be the best paint for furniture, wood, plastic, metal and laminate surfaces.

    I really thought that all the information to know about painting furniture was out there in internet land for everyone to see and no one needed to hear anymore from me besides the occasional furniture makeover, on the subject. However, I get questions all the time asking what kind of paint for certain kinds of furniture, when to sand / when not to sand pieces, when to prime / when not to prime, and so on. Apparently, people still have questions on this topic and I’m cool with that. It gives me something to write about that I love writing about. So to answer one of those questions, this post is all about what kind of paint to use on what surface.

    Types of Paint

    This post contains affiliate links for your shopping convenience. Click here to read my full disclosure policy.

    Best Paint for Wood

    Generally, you can use just about any kind of paint on wood surfaces, whether it’s wood furniture, wood trim or other wood surfaces.

    Best Paint for Wood

    Navy End Table painted with Velvet Finishes / Coral End Table painted with Latex Paint

    Oil-Based Paint

    Oil-based paint is great for furniture makeovers in terms of durability over time. However, it’s not as easy to deal with as latex and other specialty furniture paints are. With an oil-based paint, you absolutely must make sure you use a high-quality paint brush that will work with oil-based paint. Generally, it just works better to brush oil-based paint on, rather than rolling it. Oil-based paint is also known to have fewer brush strokes as well. Clean-up for oil-based paint is not a picnic. You have to use mineral spirits or paint thinner to clean your brushes and any paint off you as well. Most oil-based paints won’t require an additional topcoat though.

    Types of Paint: Oil Based Paint

    One really important thing to note with oil-based paint is that it should not be painted directly over latex paints. If you really want to use oil-based paint over latex, then first sand it, prime it with a water-based primer and then use your oil-based paint.

    Latex Paint

    Types of Paint: Latex Based Paint

    Your basic latex paint that you can find at local home improvement stores is also fine to paint wood surfaces with. Generally, it is much easier to work with than oil-based paints, however the durability over time isn’t as great, but it’s not bad by any means. If you paint something with a semi-gloss or gloss sheen, then you may not need an additional polycrylic topcoat depending on much use your surface will get. If you paint something with a latex paint that has a flat, eggshell or satin sheen, I would definitely finish up with a polycrylic topcoat for added protection. If you’re looking for low sheen, go with the satin polycrylic. Latex paint can be cleaned up with soap and water. One thing to note with latex paint is that brush strokes are more likely. To minimize these as much as possible always use a good, high quality paintbrush and mix in a little Floetrol – it’s like magic in a bottle for eliminating brush strokes.

    Best Paint for Wood Furniture: Speciality Paints

    Specialty Paints

    Since furniture painting has become such a big deal, there have been a number of specialty paints created specifically for painting furniture. Many of these make furniture painting easier in some way or another that oil-based and latex paints don’t always offer.

    Velvet Finishes Paint

    It’s no secret around here that I often use Velvet Finishes for my furniture projects.

    Best Paint for Furniture

    Velvet Finishes has a built-in topcoat and usually does not require sanding or priming unless the piece has a shiny or glossy finish on it before painting. If your piece is glossy, you can use their Ready product on it before painting, which is a spray primer that you just spray on, let it sit, then wipe off.

    Chalk Paint

    Many people love chalk paint. I’m not one of those people. I don’t detest it, but it’s just not my cup of tea. Most chalk paints don’t require you to prime or sand your piece before painting, which is great. Most chalk paints do require you to give it some sort of topcoat though. Many people use wax to seal it.

    Milk Paint

    I’ve never personally used milk paint, so I certainly can’t speak to how well it works myself, but I have heard good things about it from others. I think most people go with milk paint when they are looking to achieve a farmhouse effect on their furniture.

    Types of Paint for Laminate Surfaces

    Painting laminate furniture and surfaces is a whole other beast. It can be done, but not super easily. To paint laminate furniture, I think you should always prime the piece first. I’ve used Zinnser Primers for this and have had good results.

    Types of Paint: Zinsser Primer

    I have painted laminate pieces before without priming them first and it didn’t turn out so hot.

    Latex Paints

    After priming your piece, you can follow up with at least two coats of latex paint. Just like I noted above, use a good brush and Floetrol to prevent brush strokes.

    My personal pick for latex paint that you can buy at your local home improvement store is Behr paint. I’ve always gotten good results with it and while it is a little more expensive than other brands, I think it’s well worth it.

    Oil Based Paints

    You can also use oil-based paints over laminate if you first prime it. Using an Oil Based paint would provide more durability over the long run.

    Velvet Finishes

    I have used Velvet Finishes over laminate furniture before and it did pretty well. I still suggest using a good primer on it first though.

    Topcoat It

    With laminate furniture, I highly suggest giving it some extra protection. Give it a couple coats of Polycrylic after you finish painting it to really try and protect that surface.

    Types of Paint: Polycrylic Topcoats

    Even if you follow all these steps, there will most likely come a time down the road when your painted piece of laminate furniture will chip or the paint may start to peel away. This is just the nature of painting laminate furniture.

    Types of Paint for Plastic Surfaces

    Types of Paint: Spray Paint for Plastic Surfaces

    Plastic Planters Spray Painted with Geometric Designs

    Spray Paint

    Hands-down, anytime I have something plastic to paint, I head for the spray paint. It’s the easiest way to get the paint on there without brush strokes and gives pretty good adhesion on plastic pieces. Prime the piece first with a spray paint primer (especially if it’s really shiny) and then follow up with a few coats of spray paint. I’ve used Rust-Oleum, Krylon and Design Masters spray paint and have been pleased with all of them.

    Types of Paint for Metal Surfaces

    I generally go with one of two paints when it comes to metal surfaces: Oil-Based Paint or Spray Paint. If it’s a big metal piece that I’m painting, I’ll go with oil-based paint like I did with my metal handrail. If it’s something metal that’s smaller, I’ll go with spray paint.

    Types of Paint for Metal Surfaces

    Metal Stair Railings painted with Oil-Based Paint / Spray Painted Metal Laundry Hamper 

    Oil-Based Paint

    Oil-Based paints bond really well to metal surfaces. You can use it in a paint sprayer if you want to or brush it on, which is what I tend to do. Just remember, and I know I’ve said this like 2.1 million times now, always use a good, high quality paintbrush! It really does make a world of difference when painting. One thing to remember when you are painting something with oil-based paint that’s bigger in scale is to work in sections. You can’t easily go back over places to touch them up after you’ve already put one coat of paint on. While oil-based paint takes longer to dry, that also means your finish gets messed up if you try to go back over a part that is partially dried. My personal pick for oil-based paint is Behr’s.

    Spray Paint

    If you’ve got something smaller that’s metal, let’s say a lamp or something, then I would head for the spray paint aisle. It’s just easier to work with and will still provide great adhesion and durability. I used spray paint on that metal laundry hamper you saw above.

    Types of Paint for Upholstered Surfaces

    So you’ve been considering painting some upholstery, eh? This is a topic that many people seem to have mixed feelings on. I have painted an upholstered chair before, however it was a chair that wasn’t going to get a whole lot of use, therefore I wasn’t too worried about the comfort of it.

    Types of Paint for Upholstered Surfaces

    Chair Upholstery painted with Velvet Finishes Paint

    In that one instance, I used Velvet Finishes paint for the upholstery. I think it took about three coats to fully cover the upholstery. Upholstery does suck up a lot of paint, so be prepared to paint on multiple coats.

    Those are my picks for the best types of paints for wood, laminate, metal, plastic and upholstery surfaces.

    Do you have any favorites or other questions?

    Now that you’ve read all the nitty-gritty details, you might find it useful to have a one-page guide on what kind of paint can be used on what kind of surface – lucky for you, I’ve made one just for you! Click below to get access to it! 

    Types of Paint Quick Reference Guide

    If you’ve got any other painting questions at all, please leave your questions in the comments!

    Need more painting help?

    Click on any of the links below to get my opinion. (Which by no means is a professional opinion. I’ve only painted, oh, say 2.4 million pieces of furniture. Ok, that’s stretching it a bit.)

    Types of Paint to Use on Kitchen Cabinets – I’ve painted cabinets five times now. Here’s my take on which paints to use.

    Painting 101: Topcoats and When to Use Them – topcoats can be confusing, right? This guide breaks them all down.

    Must-Have Tools and Supplies for Painting Furniture – my tried and true tools of the trade.

    My Best Tips and Tricks for Painting Furniture – from over 10+ years of painting.

    FAQ: Painting Furniture – all the questions I’ve ever been asked about painting in one.

    blog-signature-summer-15
    pin-this-post-2
    Types of Paint - Best Paint for Wood Furniture

    SaveSave

  • DIY Ottoman Coffee Table

    DIY Ottoman Coffee Table

    This post is sponsored by Velvet Finishes and Boho Luxe Home provided the fabric for this project. All opinions are 100% mine. Affiliate links included in this post. 

    This project isn’t anything groundbreaking. If you’ve ventured on Pinterest anytime since it’s invention, then I’m sure you’ve seen a few versions of how to turn a coffee table into an ottoman – this one is just my take on it.

    I found this little table at a thrift store and in all honesty probably fell in love with the caster wheels more than anything. I had high hopes I could clean them up.

    Take an old coffee table and turn it into an ottoman type coffee table.

    The biggest problem with this piece was the top of it. Most of the top except just around the edges had one of those faux leather inlays and it was in rough condition. Fixing that problem was what led to my idea of putting an upholstered cushion on the top of the table to make it an ottoman coffee table – and it can also serve as extra seating.

    How to Make an Ottoman Out of An Old Coffee Table - easy DIY project for your living room.

    DIY Ottoman Coffee Table

    Supplies & Tools Needed:

    Steps

    Step 1

    If the coffee table you are using is dirty or has shiny finish, you’ll want to clean it up and degloss it first. I also removed those metal accent pieces from the table at this time as well. I just felt those dated it a bit too much and they would have been a huge pain to paint around. To remove those, I just cut them with pliers in a couple of places and then they just pulled right out.

    Take an old coffee table and turn it into an ottoman type coffee table.

    Mine was’t too terribly shiny, but it was very gross. I used Ready to both clean and degloss at the same time.

    Ready: A spray primer that both cleans and deglosses.

    Ready is by far one of my most favorite furniture painting products because it’s such an easy deglosser and cleaner to use. You just spray it on, let it sit a minute or two, then wipe it clean with a paper towel.

    Ready: A spray primer that both cleans and deglosses - just wipe off with a paper towel.

    Gross, right? And that paper towel was just from around the top edges of the coffee table.

    If you don’t have a shiny finish on your piece and you plan on using Velvet Finishes paint for your project, then you can skip the Ready as Velvet Finishes paint already has a primer built-in. You just have to use the Ready when your piece is glossy to begin with or when you want to clean it first.

    Wipe down your table with a tack cloth before moving on to make sure you remove any bits of dirt or dust left on it.

    Step 2

    After you’ve cleaned and deglossed your piece if needed, you can start painting.

    Velvet Finishes Tranquil - a deep teal blue hue.

    I opted to go with Velvet Finishes Tranquil for this piece. The blue hue worked well with all the different colors in the upholstery fabric. Since it’s not too bright of a blue, I think it also helped to anchor the piece with all the pattern that was going on in the material. Tranquil is one of my most favorite Velvet Finishes colors because there isn’t much it doesn’t pair great with.

    I just brushed it right on with a paintbrush and gave the whole piece two coats.

    Sidenote: This is the second project I’ve got out of that one container of Tranquil and there’s still a good bit left. This stuff covers really well.

    Step 3

    I wanted to add a little more dimension to the table base, rather than it just being a flat color. Since the upholstery was going to be busy, I felt that adding a bit something more to the base would also help to even things out.

    I saw this as my chance to try out a new Velvet Finishes product – their metallic gold Enhance glaze.

    Velvet Finishes Enhance Metallic Glaze

    For the most part, this works just like the regular Velvet Finishes dark glaze, it’s just thicker.

    You’ll want to work in small sections, as this does dry fast. I used a small paintbrush to apply the glaze just along the edges and crevices of the table.

    Velvet Finishes Enhance Metallic Glaze - applying.

    After applying a little glaze to a portion of the table, I came back with a t-shirt scrap and wiped off the excess glaze, while at the same time pushing the glaze into that crevice.

    Velvet Finishes Enhance Metallic Glaze - wiping away a part of it.

    This made it to where the gold really helped to accentuate those lines.

    Step 4

    Because this is a coffee table that can also be used to kick your feet up on or sit on, I wanted to add a little more extra protection to it besides the topcoat that already comes in Velvet Finishes paint.

    Velvet Finishes Protect - added protection for your painted pieces of furniture.

    To do that, I gave the whole piece a coat of Protect. One coat is all you need and you can simply brush it on or use a foam brush if you wish.

    Step 5

    Once you’ve cut your plywood piece down to the size you want your upholstery portion to be, cut a piece of upholstery foam to the size of the plywood. Cover that with batting and then with your upholstery material.

    DIY Ottoman Coffee Table - cut a piece of plywood to size, cover it with foam, batting and upholstery material.

    Flip it over, pull everything tight and staple all along the edges. My plywood piece is about two inches smaller all the way around than my table top. I needed to cover up that old vinyl / leather top so I used that as my guide.

    To attach the upholstered top to the coffee table, I used heavy duty velcro, putting a strip on each side of the cushion/table.

    If you’ve got a solid coffee table that doesn’t have the drawer or openings like mine does, then alternatively, you could get under the table, and use a drill to screw from the bottom of the coffee table up into the plywood cushion top.

    DIY Ottoman Coffee Table - How to add a cushion top to an old coffee table.

    I love how beautifully this piece turned out. It has the perfect punch of pattern and color.

    How to Make an Ottoman Out of An Old Coffee Table - easy DIY project for your living room.

    I was able to clean up the drawer knobs and caster feet with Bar Keeper’s Friend.

    DIY Ottoman Coffee Table - can also double as a bench for extra seating in your living room.

    And that upholstery – I think I fell in love with it even more once it was paired with the Tranquil paint! This is just one of the gorgeous colorful prints that Boho Luxe Home offers!

    Add an upholstered top to a coffee table to create an ottoman or extra seating for your living room.

    And the touch of gold detailing I did with the glaze adds the perfect amount of depth, I think.

    What do you think about this piece?

    You might also want to see…

    FAQ: Painting Furniture

    OMG. I'm in love. French Country Chair Modern Makeover

    French Country Chair Modern Makeover

    Oh my goodness! If you love the beachy washed out look in home decor, then you have to see this! It's so easy! How to Create a Beachy Colored Look with Paint | Beach Decorating | Nautical Decor | Ocean Living | Beach Living | Aqua | Furniture Makeover

    How to Create a Beachy Colored Look with Paint

    Pin This Post

    How to Make an Ottoman Out of An Old Coffee Table - easy DIY project for your living room.

    SaveSave

    SaveSaveSaveSaveSaveSave

    SaveSave

  • How To Get a Layered Caribbean Blue Look When Painting Furniture

    How To Get a Layered Caribbean Blue Look When Painting Furniture

    This post is sponsored by Velvet Finishes, however all opinions are 100% mine. Affiliate links are included in this post.

    Rarely do furniture projects go as planned around here.

    In fact, they often go full speed ahead, jump the track and end up over the bridge in the opposite direction of where I had intended it to go.

    But then there are those few.

    Those few little pieces that when I’m working on them, it’s just like they whisper to me, “But what if…”

    And sometimes that “what if” ends in a big ball of fire.

    But sometimes, every once in a while, those “what ifs” end in something pretty cool.

    How to get a layered Caribbean Blue Look When Painting Furniture

    From far away, this little table might not look like much.

    But it’s not just a blue painted table, y’all. Look a little closer…

    Easy furniture painting technique - create a Caribbean Blue finish by layering colored glazes.

    It’s actually a blue-green table that I’m calling Caribbean Blue. See all that glorious color layering going on there? It was so easy to do.

    And I’m going to show you just how easy.

    How To Get a Layered Caribbean Blue Look When Painting Furniture

    How to get a layered Caribbean Blue Look When Painting Furniture - the supplies.

    Step 1

    My table looked like this to begin with:

    How to get a layered Caribbean Blue Look When Painting Furniture - the table before.

    It was a remnant from Grunt’s Grandmother’s estate sale. It had a few dings and dents as much old furniture will, but it had pretty good bones. I started by cleaning and deglossing it at the same time with Velvet Finishes Ready. Simply spray it on, let it sit a minute or two, then wipe it clean with paper towels or an old towel.

    Step 2

    Like I said, I had a different plan originally for this table. I was going to paint it in Velvet Finishes Baroque and then outline it so to speak, along all the lines and corners with white. So, I started by giving it about two coats of the Baroque.

    How to get a layered Caribbean Blue Look When Painting Furniture - first coat of paint.

    I just painted it on with a good paintbrush. It covered really well and stuck to the table nicely. The photo above is after the first coat.

    Step 3

    Once I got finished with the Baroque, was when the table whispered to me.

    You know – the “What if….”

    And so my mind wondered to making some colored glazes to layer on top of the green.

    And then I thought about how well blues and greens often go together, so I pulled out my Handsome and Modern paints and started mixing up glazes.

    How to get a layered Caribbean Blue Look When Painting Furniture - mixing the colored glaze.

    I started with Handsome. Making colored glazes is super easy with Velvet Finishes. All you do is add a little bit of their Enhance Clear Glaze to a plastic cup, add a little paint to it and mix.

    How to get a layered Caribbean Blue Look When Painting Furniture - mixing the colored glaze.

    Since this was a small table, I didn’t need much of either at all. I added a splash of glaze, then a trickle of paint and mixed.

    Then, you just paint it on with your paintbrush.

    How to get a layered Caribbean Blue Look When Painting Furniture - applying the colored glaze.

    The photo above shows one layer of the Handsome. Work in small sections. If you get more than you like in one spot, just wipe it up with a cloth.

    You can add as many layers as you wish. I ended up doing one layer of the Handsome glaze, then two layers of the Modern glaze to get my Caribbean Blue look. I made the Modern glaze the same way as the Handsome, just switching out the Handsome color for Modern, which is a lighter and brighter blue than the Handsome.

    How to get a layered Caribbean Blue Look When Painting Furniture - easy furniture painting technique.

    The Enhance Glaze also works as a topcoat, so you’ve got some added protection built-in there.

    How to get a layered Caribbean Blue Look When Painting Furniture

    If you prefer to have more green than blue, then you could flip-flop my instructions and paint the blue on first, then come back with green glazes.

    Easy furniture painting technique - create a Caribbean Blue finish by layering colored glazes.

    I think it has a worn and weathered type look, but in a modern way. What do you think?

    You might also want to see…

    How to Create a Beachy Colored Look with Paint – gorgeous layered, washed out color.

    How to Make Furniture Glaze in Any Color – yep, ANY color! And it’s easy!

    How to Paint a Plaid Pattern without Measuring – All you need is tape!

    Gift Ideas Signature

    Pin This Post

    How to get a layered Caribbean Blue Look When Painting Furniture - easy way to paint furniture by layering on colored furniture paint glazes.

    SaveSave

  • Two-Tiered Table Makeover | How to Remove the Top Tier

    Two-Tiered Table Makeover | How to Remove the Top Tier

    This post is sponsored by Velvet Finishes, however all opinions are 100% mine.

    I see these little two-tiered end tables all the time at thrift stores and yard sales. For the most part, I tend to pass them by. Some are pretty nice, but I’ve just never been a big fan of the whole two-tiered aspect of these tables. I know it was hot back in the day, but just not up my alley.

    I don’t know why taking the top tier off though never occurred to me before now.

    I guess I needed to see one of these little guys that had really great lines.

    Two Tiered Table Makeover - How to remove the top tier! Such a great diy furniture makeover idea!

    Like this Mid-Century Modern style one that I happened upon at a local thrift store.

    At first glance, I was like, “Oh man, I wish it wasn’t two-tiered.”

    Then, I thought, “Wait! I bet I can cut that off!”

    So I snatched it up, brought it home and got to work.

    And it was so much easier than I ever thought it would be.

    Two-Tiered Table Makeover | How to Remove the Top Tier

    Tools & Supplies

    Steps

    Step 1

    Flip the table over and look for where the top tier is attached. Using a screwdriver, wrench or your hands, remove the screws or bolts holding the tier on.

    Two Tiered Table Makeover - covering the old holes.

    Mine had four nuts and bolts holding it in place. I was able to just unscrew them with my hands. I also unscrewed the legs of the table just to get those out of the way while I was working on it.

    Step 2

    Find four small pieces of wood that will cover the holes where the screws had been.

    Two Tiered Table Makeover - covering the old holes.

    I had a paint stick on hand so I just cut four small pieces from it.

    Step 3

    Place wood glue around the holes on the underside of the table, then place a small piece of wood over each hole pressing it firmly into place.

    Two Tiered Table Makeover - covering the old holes.

    Let these sit for at least a few hours.

    Step 4

    Flip the table over and fill the holes on top where the tier had once been with wood filler.

    Two Tiered Table Makeover - covering the old holes.

    Since these holes are pretty deep, you’re probably going to have to fill the holes a few times. I found it best to fill the hole, let dry, sand smooth, repeat. I did this about three times before the holes were even with the table.

    Step 5

    Once the wood filler is dry, smooth and even, you’re ready to start prepping and painting.

    Two Tiered Table Makeover - painting supplies.

    This table had a really shiny finish on it. In order for the paint to get the best adhesion, that finish needed to go before applying the paint. To do that, I used Ready.

    Two Tiered Table Makeover - prep it with Ready to remove old shiny finish.

    Ready is a spray primer / deglosser. You just spray it on, let it sit for a few minutes, then wipe it clean with a towel. Ready also cleans away dust at the same time. For this table, I had to do three rounds of Ready to get the shine gone.

    Step 6

    Let the table fully dry and then you’re ready to paint.

    Two Tiered Table Makeover - paint it

    I opted to go with Luxurious for the table top. It’s black, but not a super deep black. I was leaving the legs as they were so I knew black would go well with those stained legs. I did two coats of Luxurious on the table. This Velvet Finishes paint has great coverage – I know this is a small table, but I bet I didn’t use more than 1/2 –  3/4 of a cup of paint.

    Step 7

    After the Luxurious paint was dry, I gave the table a coat of Protect.

    Two Tiered Table Makeover - topcoat.

    Velvet Finishes paint already has a topcoat built-in, but since this little table might see a lot of action as a coffee table, end table, etc., I wanted to go on and give it some added protection. All you need is one coat of Protect and you just brush it right on.

    After the table was dry, I put the legs back on just as they were. They weren’t in too bad of condition and y’all know I love a good paint and stain combination anyway.

    Two Tiered Table Makeover - How to remove the top tier! Such a great diy furniture makeover idea!

    I think removing that top tier makes the table much more functional. It can be a great coffee table for a smaller room, it could still be an end table / side table, or it could even be a bench!

    Two Tiered Table Makeover - How to remove the top tier! Such a great diy furniture makeover idea!

    Sidenote: That Seventies Glamour book is one of my all-time faves. 😉 It has a totally corny cover, but the photos inside are awesome. 

    Two Tiered Table Makeover - How to remove the top tier! Such a great diy furniture makeover idea!

    Two Tiered Table Makeover - How to remove the top tier! Such a great diy furniture makeover idea!

    I won’t be so quick to pass up those little two-tiered tables anymore! What about you?

    You might also want to see…


    How to Turn a Side Table Into a Bench– one of my all time fave hacks!

    Mid-Century Modern Dressing Table Makeover in a Day – such a beauty that still gives a nod to it’s 60’s roots!


    Pin This Post

    Two Tiered Table Makeover - How to remove the top tier! Such a great diy furniture makeover idea!

    SaveSave

  • Mid-Century Modern Dressing Table Makeover

    Mid-Century Modern Dressing Table Makeover

    This post is sponsored by Velvet Finishes, however all opinions are 100% mine. Affiliate links may be included in this post, which means if you purchase something through one of those links, I may earn a small commission, but you won’t pay a dime more.

    This project is the kind of project that keeps me going sometimes. It’s just another furniture makeover. Nothing groundbreaking. Nothing phenomenal. I won’t be able to fill up my retirement account with it.

    But this little mid-century modern dressing table makeover made me feel a little bit better about the past few weeks I’ve been having.

    Mid-Century Modern Dressing Table Makeover - a painted and stained furniture makeover combination with Velvet Finishes.

    About four out of five projects I’ve had on my to-do list either didn’t happen, didn’t go as planned at all or just flat out went up in smoke.

    And then this little piece came along and renewed my hope in my DIY self.

    I started with this…

    Before: Mid-Century Modern Dressing Table Makeover - a painted and stained furniture makeover combination with Velvet Finishes.

    I’ve had this piece for a while and found her at a rummage sale. Judging from the holes on top of her and space in the middle, I think she was once a beautiful mid-century modern dressing table with a mirror across her top.

    Now, I’m not usually one to paint wood that’s in good condition. The funny thing about this piece was that her top and sides were in really rough condition, lots of nicks, scratches and of course, those holes on top where a mirror once was, but the drawers were in excellent condition. Oh, the glorious drawers – aren’t the details on them just beautiful!

    So I thought about it for a while and knowing that I really didn’t want to cover up those drawers with paint that were in great condition, I instead opted to just paint the top and sides of this piece and leave the drawers untouched.

    And it turned out perfectly – went off without a hitch – in just a day.

    See how my faith was restored now?

    Mid-Century Modern Dressing Table Makeover

    Tools & Supplies

    Mid-Century Modern Dressing Table Makeover - a painted and stained furniture makeover combination with Velvet Finishes.

    I used:

    Steps

    Step 1

    First, I filled those holes on top of the table and fixed any deep scratches, dents and dings that were there as well. I used wood filler and sandpaper to smooth it out. There’s a tutorial here for how to fill holes.

    Step 2

    Next, I removed the drawers and taped off around the edges of the trim that went around those – I wanted to keep that part stained as well.

    Mid-Century Modern Dressing Table Makeover - a painted and stained furniture makeover combination with Velvet Finishes.

    Basically, I just wanted to paint the exterior frame of the table. I also ran FrogTape along the upper part of the legs to make sure I didn’t accidentally get paint on them.

    Step 3

    This piece had a bit of shiny topcoat left on it where I was planning to paint, so I needed to remove that in order to get my paint to adhere well to the surface there. To do this, I used Ready.

    Mid-Century Modern Dressing Table Makeover - a painted and stained furniture makeover combination with Velvet Finishes.

    I just sprayed it on the top and sides of the table, let it sit for a few minutes, then wiped it down with a clean cloth. This removes the shine and cleans at the same time. I was careful not to get the Ready on any part that wasn’t getting painted though.

    Step 4

    After that, I gave the piece two coats of Velvet Finishes Handsome, which is a perfect navy color.

    Mid-Century Modern Dressing Table Makeover - a painted and stained furniture makeover combination with Velvet Finishes.

    I just brushed the color right onto the piece with one of the Reviver series paint brushes. Paint glides on really smoothly with these brushes.

    Step 5

    Since stained wood has so many different variations in its finish, I didn’t want a stark contrast between the navy painted top and sides and the stained drawers on this piece. So to add more dimension to the painted portions, I applied Enhance Dark Glaze to the painted portions after the paint had dried.

    Mid-Century Modern Dressing Table Makeover - a painted and stained furniture makeover combination with Velvet Finishes.

    The glaze is really simple to apply.

    Mid-Century Modern Dressing Table Makeover - a painted and stained furniture makeover combination with Velvet Finishes.

    You just brush it on, let it sit for a minute or two, then gently wipe the excess away.

    Mid-Century Modern Dressing Table Makeover - a painted and stained furniture makeover combination with Velvet Finishes.

    You want to wipe it away very lightly. I ended up doing two rounds of the Enhance glaze to get the look I wanted.

    Mid-Century Modern Dressing Table Makeover - a painted and stained furniture makeover combination with Velvet Finishes.

    Similar Gun Bookends

    Enhance Glaze also works as a topcoat, so even though Velvet Finishes paint already has a topcoat built-in, this piece will have even more added protection. Isn’t the depth the glaze added gorgeous? I love it with the Handsome paint.

    Mid-Century Modern Dressing Table Makeover - a painted and stained furniture makeover combination with Velvet Finishes.

    Similar Snakeskin Lamp

    I think this piece would make a great media console.

    Mid-Century Modern Dressing Table Makeover - a painted and stained furniture makeover combination with Velvet Finishes.

    Similar Snakeskin Lamp / Similar Gun Bookends

    Cheers to a project finally going off without a hitch, friends!

    You might also want to see…

    How to Turn a Side Table into a Bench

    How to Make Furniture Glaze in Any Color

    Pin This Post

    Mid-Century Modern Dressing Table Makeover - a painted and stained furniture makeover combination with Velvet Finishes.

    SaveSaveSaveSaveSaveSave

    SaveSaveSaveSave

    SaveSave

    SaveSaveSaveSave

    SaveSaveSaveSave

  • How to Turn a Side Table Into a Bench

    How to Turn a Side Table Into a Bench

    This post is sponsored by Velvet Finishes, however all opinions are 100% mine. Affiliate links may be contained in this post.

    Sometimes I forget how much I love painting furniture. Before this project, it had been too long since my last furniture makeover. With a few furniture painting projects prior to this one, there seemed to be hiccups every time I turned around and I think I finally just got burned out for a little while. Hiccups happen. A lot. That break and this project though, was exactly what I needed to remind me how much I love seeing a piece of furniture do a 180°.

    This is a great furniture makeover idea for an end table makeover - find out how to turn a side table into a bench. Easy side table redo in a day!

    This one turned out better than I imagined. I took an old, beat up side table and turned it into a classy bench. In the process, I also fell in love with this new blue color – more on that in a minute though.

    How to Turn a Side Table Into a Bench

    Tools & Supplies

    Steps

    Step 1

    This is what my table looked like to begin with:

    This is a great furniture makeover idea for an end table makeover - find out how to turn a side table into a bench. Easy side table redo in a day!

    Now, I came up with the idea for turning this into a stool because of the way the tabletop was with those slats. I fell in love with the lines of the legs and the brass hardware on the table, but that slatted top was weird. That being said, you can still turn any side table into a stool – it’s just a matter of making the upholstered top whatever size you want it to be.

    To start with, I sprayed the table down with Ready.

    This is a great furniture makeover idea for an end table makeover - find out how to turn a side table into a bench. Easy side table redo in a day!

    This helps to remove any shine left behind from the previous finish and also works as a cleaner. Ready is kind of like a de-glosser and cleaner in one. Most of the time, it’s going to eliminate the need for priming or sanding.

    All you do is spray it on there, let it sit for a few minutes and then just wipe it off.

    This is a great furniture makeover idea for an end table makeover - find out how to turn a side table into a bench. Easy side table redo in a day!

    You can see above some of what it took off my table there.

    Step 2

    Now, you’re ready for paint. Velvet Finishes has just introduced new colors to their line. When I saw them, I was so excited to get my hands on a few of them. Tranquil was one of those colors.

    It’s not a navy blue or a bright blue, but somewhere in the middle and I love, love, love it. I gave my piece two coats of Tranquil.

    This was also my first time using the Velvet Finishes brushes. I really liked how smoothly they applied the paint.

    This is a great furniture makeover idea for an end table makeover - find out how to turn a side table into a bench. Easy side table redo in a day!

    The Circus has become very adamant about assisting in painting lately, so I let her have at it and help me. Those slats didn’t really have to be painted since they were getting covered up, but ya know, it gave her something to do. 😉

    Step 3

    After the final coat of paint was dry, I followed up with Protect for a little added protection.

    This is a great furniture makeover idea for an end table makeover - find out how to turn a side table into a bench. Easy side table redo in a day!

    Since this piece was getting a new life as a bench, I wanted to give it a little more protection against legs and banging feet. I also used the Reviver paint brush to apply the Protect.

    Step 4

    The next step is to make the cushion for the top of the table. Since I had those weird slats on the top of my table, I made my cushion the same size as that area to cover it up. If you’re doing this on a solid tabletop, then just determine how big you want your cushion to be and cut a piece of 1/2″ plywood down to that size.

    This is a great furniture makeover idea for an end table makeover - find out how to turn a side table into a bench. Easy side table redo in a day!

    After you cut the plywood to size, lay it on top of a piece of foam and trace the shape of the plywood onto the foam, then cut the foam to size. You can do this with a utility knife, but I finally bought an electric knife to cut my foam with about a year ago and it has been one of the best purchases I’ve ever made. That sucker cuts through foam like butter instead of having to do all that sawing with a knife.

    Once the foam is cut, put a little glue on the plywood, then attach the foam to it.

    Step 5

    Lay batting over the foam and cut enough out to wrap around all the edges of your cushion. Do the same with your upholstery material.

    This is a great furniture makeover idea for an end table makeover - find out how to turn a side table into a bench. Easy side table redo in a day!

    Finally, wrap the wood and foam with the batting and material, stapling it securely to the other side. You can use a regular utility stapler to do this, but I do prefer a power stapler. Like with the electric knife, it just makes the job go so much faster and smoother. No hammering in staples that don’t go all the way in.

    Step 6

    After your table is fully dry, use your drill with a small drill bit attached and drill pilot holes a little inside the four corners where your cushion will go. I did this from the underside, but I think you could probably do it from the top too. Finally, place your cushion on top. Attach the cushion onto the tabletop by screwing it from the bottom up through the pilot holes.

    This is a great furniture makeover idea for an end table makeover - find out how to turn a side table into a bench. Easy side table redo in a day!

    Isn’t that color gorgeous???? I definitely see myself using this color on more furniture in the future. I am just crazy over it.

    This is a great furniture makeover idea for an end table makeover - find out how to turn a side table into a bench. Easy side table redo in a day!

    The material I used was actually left over from recovering my old dining room chairs. It is called Williamsburg Portobello Vase Ladybug. I love how it looks against the Tranquil. I also cleaned up the brass hardware with Bar Keepers Friend to make it look all shiny and new.

    What do you think of this new color?

    You might also want to see…

    How to get a layered Caribbean Blue Look When Painting Furniture - easy way to paint furniture by layering on colored furniture paint glazes.

    How to Get a Layered Caribbean Blue Look

    Happy Painting!

    Pin This Post

    This is a great furniture makeover idea for an end table makeover - find out how to turn a side table into a bench. Easy side table redo in a day!

    *This post is sponsored by Velvet Finishes, however all opinions are 100% mine.

    SaveSave

  • Prepping Furniture to Paint: When to Sand, When to Degloss, and When to Prime

    Prepping Furniture to Paint: When to Sand, When to Degloss, and When to Prime

    Not sure if you should sand first before painting that table? Could you skip the sanding? Maybe just degloss instead? Or maybe prime? This guide to prepping furniture to paint should answer all those questions and more…

    I will be the first to say that not every piece of furniture I’ve ever painted has turned out so well. There have been pieces where the paint just peeled off, where the old finish bled through or where the paint color decision wasn’t exactly my best.

    That kind of stuff happens. I don’t have a PhD in furniture painting, but I have learned from my mistakes. With the exception of the poor paint color decisions, the root of the problem often stemmed from not prepping the furniture properly before painting it.

    While there are some pieces where you can just slap the paint right on there without doing diddly squat, there are some pieces that require a bit more prep work. So, here are my tips on prepping furniture for painting – when you should sand it, when you should degloss it, and when you should prime it.

    Prepping Furniture: When to Sand, When to Degloss and When to Prime

    This post contains affiliate links for your shopping convenience. Click here to read my full disclosure policy.

    Do you have to sand before painting?

    I know. Sanding furniture can be a pain in the butt and messy. There are times you can skip it, but sometimes not so much.

    Do you have to sand before painting - sanding wood before painting it.

    If the finish of the piece you are painting is damaged or chipping in any way, then always sand first. If you try to paint over that, then your new paint job will start chipping off almost as soon as you paint it on there.

    If the piece you are painting has any rough spots, like let’s say you’re painting new wood, then you need to sand those spots smooth before painting as well.

    Sanding Furniture to Paint

    What to Sand With

    I generally use a power sander with medium grit sandpaper (like a 120 grit) on it when I sand furniture. You can also use just regular medium grit sandpaper without a power sander as well, it will just take you a good bit longer. I have a tutorial here about using power sanders if you need it.

    After sanding furniture, I usually give it a go-over with my Shop Vac and then follow-up with a tack cloth. If there isn’t that much dust, then I just use a tack cloth. Either way – don’t skip the tack cloth! It keeps you from having dirt and dust bumps in your finish.

    Got holes, gouges, dents or dings?

    If you’ve got any holes, gouges, dents or dings in the piece you are painting and want to smooth those out, then this is the time to do it. Fill them with wood filler and then sand smooth.

    How to Paint Furniture Without Sanding or Priming

    When You Can Just Degloss Furniture

    There are times when you can skip sanding furniture. However, before painting it, you might need to degloss it.

    how to paint furniture without sanding by using a stain and paint deglosser.

    If the piece you are painting has any sort of finish on it that is shiny, slick, glossy, semi-glossy, even satin, then you need to degloss it before painting it.

    What is deglosser?

    Exactly what it says it is. 🙂 It’s a liquid that removes the glossy finish from painted or stained surfaces.

    Deglosser vs. Sanding

    Now, if you already sanded it, you probably already removed that shine, so don’t worry about de-glossing it. You should always sand the piece if you have uneven surfaces as well. A paint deglosser can be used when the piece is in good condition and you only need to remove that shiny finish.

    How to Degloss Paint

    My go-to deglosser is Ready.

    Using paint deglosser to remove the shine.

    You just spray it all over your piece of furniture, let it sit for a few minutes and then wipe it clean with a cloth or paper towels. Ready will remove the shine from the finish. If you have something that has a really thick shiny topcoat, it make take a few rounds of Ready. I’ve also used Klean-Strip Sander Deglosser and it worked well too, the application is just a little messier.

    When You Should Prime Furniture

    A lot of times, if you had to sand your piece of furniture or degloss it, you usually won’t need a primer.  There are two cases though where I always tend to use a primer before applying my actual paint:

    1. When I’m painting something a much lighter color than what it already is. 

    Let’s say I’m painting something white that started out black. I can just go on and paint tons of coats of white on it until I get all the black covered, or I could start with a coat of primer to reduce the overall number of coats of the white paint. Make sense?

    2. When I’m painting over a stain or wood with red undertones. 

    Some stains and woods such as mahogany, have lots of red undertones. I’ve found that these red undertones can easily bleed through your paint finish – especially if you are painting the piece a lighter color rather than a darker color. I suggest a minimum of one coat of primer to keep those red colors from bleeding through.

    Of course, if you have other stains on your furniture that you are afraid may bleed through, go ahead and give those spots at least a coat of primer. Primer is also good if you have a musty or stinky piece of furniture. It helps to kill those smells.

    Also, if you’re painting raw wood that’s never been painted or stained before, giving it a coat of primer before painting it helps to reduce your number of coats of paint. Otherwise, the wood will soak up a lot of your paint color.

    Best Primer for Furniture

    You can find different primers at your local home improvement store. I generally use Kilz primer or Zinnser primer. You’ll apply just as you would your paint – with a roller and brush or you can use it in a paint sprayer. I’ve got a tutorial here for using a paint sprayer when priming and painting furniture if you need it.

    When You Can Skip Sanding, Deglossing and Priming

    There will be times that you can skip all these things. If the finish on your furniture isn’t damaged or chipping, it’s flat not shiny and you aren’t painting it a drastically different color, then you may be able to just go ahead and start painting. Before painting though, do make sure the piece is clean. You can wipe it down with a wet cloth to do this. Follow up with a tack cloth to pick up any bits of dust or dirt your cloth might have missed. If you are skipping sanding, deglossing and priming, then I do suggest using a paint that already has a built-in primer such as Velvet Finishes, Behr Marquee, or Behr Premium Plus just for good measure. There are also other paints out there that have this (I think chalk based paints have it), but I’m not very familiar with those.

    Do you have any tips for prepping furniture or to make it easier?

    Perfecting your furniture painting skills? You might want to see these too then…

    What kind of paint do I use on that? – The ultimate guide to all types of paints and what kind of furniture to use them on.

    Furniture Painting 101: Topcoats and When to Use Them – ever wondered if you should use a topcoat on painted pieces and if so, what kind? Here’s your answer…

    Best Paint for Cabinets – All the paints I’ve used on cabinetry and what I think is the best.

    FAQ: Painting Furniture – All the FAQ I get about painting in one place.

    Want to remember these furniture prepping tips for later? Just pin the image below!

    A complete guide to prepping furniture to paint to ensure a long-lasting finish. Tells you when to sand, when to degloss and when to prime.
    blog-signature-summer-15

    SaveSaveSaveSaveSaveSaveSaveSave

  • FAQ: Painting Furniture

    FAQ: Painting Furniture

    I feel like I should preface posts where I give tons of information like this with “I’m not a professional!” I don’t have a degree in painting furniture, interior design or anything like that. What I do have is nearly a decade’s worth of painting furniture, decorating and things of that nature under my belt. So while I don’t own a piece of paper stating that I know what the hell I’m talking about, I do have a hell of a lot of experience. 😉

    Besides writing about tons of furniture makeovers I’ve completed, I’ve also written multiple posts pertaining to painting in general: my favorite tools for painting, what kind of topcoats to use with what kind of paint and on what kind of furniture, my best painting tips, how to use a paint sprayer for furniture makeovers, and what kind of paint to use on what surface. As I said in one of those more recent articles though, there are always still questions. I’m totally not complaining about that! I love answering your painting questions to the best of my ability because painting furniture, walls and essentially my entire body in the process is something I enjoy.

    These painting questions are ones I get pretty regularly. I thought it might help to put them all in one place. And if you have a question that isn’t answered here, please leave it in the comments and I will respond to you as well as add it in this post. Let’s do this thang!

    This post contains affiliate links for your shopping convenience. Click here to read my full disclosure policy.

    FAQ: Painting Furniture

    Q: Can I use oil-based paint in a paint sprayer?

    A: With the paint sprayer I use, a HomeRight Finish Max, you can use oil-based paint in it. You just need to follow the instructions on the paint can as to how to thin the paint. Also, I have tutorial here on how to use a paint sprayer.

    Q: Can I paint over oil-based paint with a latex-based paint?

    A: Based from my experience, I wouldn’t do it. I’ve tried this before and it has just never ended well. I’ve heard of some people having success with sanding the finish, priming it, then going over it with latex-based, but I’ve never had much success with it. If you really want to try it, I would suggest doing it in a small spot first and seeing how that goes.

    Q: What type of topcoat/sealer should I put on my kitchen cabinets?

    A: If they are stained or painted a dark color, go with a polyurethane. If they aren’t stained, go with a polycrylic. Polyurethanes have a tendency to yellow over time and polycrylics don’t. It should be said though that polyurethanes are tougher in terms of protection than polycrylics. Also, here is a guide for determining what kind of topcoat to use on what.

    Q: Do I need a topcoat on top of a satin or eggshell paint?

    A: Yes. Unless you used a semi-gloss paint, you usually always need a topcoat with flat, satin or eggshell finishes. You can use a polycrylic in a satin finish to keep the piece from having too much shine.

    Q: I painted my piece of furniture and put a topcoat on it. I put it back in use and a few days later, I grabbed a magazine off it I had placed there and it seemed like the magazine had to be “peeled” off the furniture. It even left a little of the ink from the magazine on the table. What happened?

    A: The paint and/or topcoat didn’t have enough time to fully cure. Some paint jobs can take weeks to fully cure, especially if you are in a high humidity area. After your paint and topcoat have dried to the touch, you can move it back into place. I suggest letting it sit “undecorated” though for at least a week. If it has drawers or doors, leave those slightly open as well to let them fully cure. After a week, lay a magazine on top of the piece for a few hours and close the doors/drawers. If after a few hours, everything is removed and opened without sticking, you should be good to go, if not, let it cure longer. I’m in Tennessee and if I makeover a piece of furniture during the summer, I tend to wait as long as possible before decorating and fully closing the doors and drawers on it. I will wait usually at least two weeks.

    Q: After painting my piece, I noticed little tiny bumps in my finish. What happened?

    A: Those little bumps are little bits of dust and dirt most likely. Before applying paint to your piece, always be sure to wipe it down well with a tack cloth. Paint your furniture in places where there isn’t much dust flying around as well. If you have a shopvac, then it’s a really good idea to vacuum the piece after sanding it, then going back over it with a tack cloth and finally painting it.

    Q: What can I put over a piece of furniture if I want to add photos to the top of it?

    A: Mod Podge works well for this. First, apply Mod Podge to the surface where the photos will be placed, then put the photos on top of that and finally put another coat of Mod Podge over the photos. I would suggest doing at least two light coats of Mod Podge on top of the photos to really protect them.

    Q: What kind of paint do I use for trim? And what color(s) do you use or have you used?

    A: Always use a semi-gloss or gloss for trim. They will be much more durable and easier to wipe clean than flat, satin, or eggshell finishes. In the 70’s Landing Pad, I’ve used Limousine Leather and Bit of Sugar, both by Behr and both in semi-gloss finishes on the trim. In our Beloved Foreclosure, I used Crumb Cookie by Valspar, but had it mixed in Behr paint.

    Q: What kind of paint would I use on a brass/metal fireplace surround?

    A: Once more, I’ve never done this, but I know that Rust-Oleum makes a high-heat spray paint that I think would work well for this. Just be sure to keep the paint out of the actual fireplace.

    Have more questions about painting? Please leave them in the comments below and I’ll respond to them there and add them to this post.

    You might also find these posts helpful:

    What kind of paint do I use on that? | A guide to what types of paint you can use on various surfaces. Good information for anyone who is new to furniture painting or doesn't know what paints can be used on what surfaces.

    What Kind of Paint Do I Use on That: A guide to the types of paint you can use on various surfaces.

    Lists lots of different topcoats, what to use each one on and how to do it. Painting 101: Topcoats and when to use them

    Topcoats and When to Use Them

    The ULTIMATE LIST of the best products to use for painting furniture! 12 Must Have Tools and Supplies for Painting Furniture

    Must-Have Tools and Supplies for Painting Furniture

    Are you a furniture painter or want to learn how to paint furniture? Then DO NOT miss this article - it's filled with the best tips for painting furniture!

    My Best Tips & Tricks for Painting Furniture

    blog-signature-summer-15

    pin-this-post-2

    All your questions about painting furniture answered in one place. Great guide for beginners and a great reference for more experienced furniture painters.

    SaveSave

  • How to Create a Beachy Colored Look with Paint + Video

    How to Create a Beachy Colored Look with Paint + Video

    Disclosure: This post was a partnership with Velvet Finishes. However, all opinions and negligence of trying out the colored stain sooner are 100% mine.

    Last year, I figured out a way to make furniture glazes in any color. When I did that, I had just tried out different colors on spare pieces of trim I had lying around. I always intended to go back and makeover an actual piece of furniture using the method.

    But then life happened. #bestofintentions

    A few weeks back, as I was clearing stuff off the front porch at our-previous-house-soon-to-be-the-inlaws-house, (don’t judge me that we still haven’t gotten all of our stuff out of there, ok?) I picked up an old table and was about to toss it.

    How to Create a Beachy Colored Look with Paint: The Table Before

    But then I realized that this table would be the perfect candidate to try out my colored glaze on.

    Yes, this table had been sitting on my porch for the past year and never once did this idea pop into my head before. #smh

    So I finally tried out my colored glaze on that table.

    Oh my goodness! If you love the beachy washed out look in home decor, then you have to see this! It's so easy! How to Create a Beachy Colored Look with Paint | Beach Decorating | Nautical Decor | Ocean Living | Beach Living | Aqua | Furniture Makeover

    And I ended up with this really cool beachy colored look.

    How to Create a Beachy Colored Cook with Paint

    Affiliate links may be contained in this post.

    Tools & Supplies
    Oh my goodness! If you love the beachy washed out look in home decor, then you have to see this! It's so easy! How to Create a Beachy Colored Look with Paint | Beach Decorating | Nautical Decor | Ocean Living | Beach Living | Aqua | Furniture Makeover
    Steps

    **Psst – there’s a video toward the end of this post you can view that has these steps as well. Just don’t judge my very elementary video skills. 

    Step 1. 

    First, you’ll want to make sure the surface you are painting is clean. I did this with Velvet Finishes Ready. Ready will clean your furniture and de-gloss it at the same time, which means you don’t have to worry about using a primer or sanding before you paint. Simply spray it on the table, let it sit for a minute or two, then wipe it down with paper towels.

    Step 2. 

    To achieve the beachy colored look, you want a base color of white on your piece before you add on the colored glaze.

    Oh my goodness! If you love the beachy washed out look in home decor, then you have to see this! It's so easy! How to Create a Beachy Colored Look with Paint | Beach Decorating | Nautical Decor | Ocean Living | Beach Living | Aqua | Furniture Makeover

    I gave the table two coats of Minimalistic, a true white, before layering on the glaze.

    Step 3. 

    After the Minimalistic was good and dry, I made the colored glaze.

    Oh my goodness! If you love the beachy washed out look in home decor, then you have to see this! It's so easy! How to Create a Beachy Colored Look with Paint | Beach Decorating | Nautical Decor | Ocean Living | Beach Living | Aqua | Furniture Makeover

    To make the glaze, I used Velvet Finishes Boheme and Enhance Clear Glaze. All you do is mix a little bit of glaze with a little bit of paint.

    Oh my goodness! If you love the beachy washed out look in home decor, then you have to see this! It's so easy! How to Create a Beachy Colored Look with Paint | Beach Decorating | Nautical Decor | Ocean Living | Beach Living | Aqua | Furniture Makeover

    I do this in a plastic cup so I can just throw it away when I’m done rather than having to clean out a paint tray. #lazygirl You’ll want a little more of the clear glaze than the paint. The consistency should be watery. You can see how little is in that cup in the photo above – you won’t need to mix up much at all. This stuff goes a long way. Once more, you can watch the video below to see it in action. This is something where you may have to go back and add a little more glaze or a little more paint to the mixture. You really can’t mess it up though.

    Step 4. 

    With a paintbrush, apply the colored glaze to your surface.

    Oh my goodness! If you love the beachy washed out look in home decor, then you have to see this! It's so easy! How to Create a Beachy Colored Look with Paint | Beach Decorating | Nautical Decor | Ocean Living | Beach Living | Aqua | Furniture Makeover

    Just put a little on your brush – you don’t need much at all – and brush it back and forth just like you would with paint. If your glaze is too dark or too colored to your liking, use a lint free cloth to wipe away some of the glaze, but be sure to do so before it dries. With this table, I started by wiping up some of the glaze as I went, but decided I actually liked it better with the glaze as-is on the table, so I just brushed it on the entire table and let it dry.

    Here’s the video if you want to see it all in action:

    [adthrive-in-post-video-player video-id=”EyicUR72″ upload-date=”Fri Jul 22 2016 19:16:29 GMT+0000 (Coordinated Universal Time)” name=”Rain On A Tin Roof – How To Create A Beachy Look With Paint” description=”Learn how to create a beachy colored look with paint! Use any color you want!”]

    Stellar video skillz, no? #icrackmyselfup

    After the table dried, I was left with this cool beachy vibe on it.

    Oh my goodness! If you love the beachy washed out look in home decor, then you have to see this! It's so easy! How to Create a Beachy Colored Look with Paint | Beach Decorating | Nautical Decor | Ocean Living | Beach Living | Aqua | Furniture Makeover

    So of course, I threw the Circus’ swimsuit, sunglasses and beach hat on top of the table for photos. Because really, who can deny how cute a little girl’s swimsuit is? 

    Oh my goodness! If you love the beachy washed out look in home decor, then you have to see this! It's so easy! How to Create a Beachy Colored Look with Paint | Beach Decorating | Nautical Decor | Ocean Living | Beach Living | Aqua | Furniture Makeover

    What do you think of the beachy colored look? Any colors you think would work great for mixing up your own colored glazes?

    Liked that? Then see this…

    DIY Bright Colored Wood Stains – wood grain, beware!

    How to Make Furniture Glaze in Any Color – your makeovers will never be the same!

    Polka Dot Chair Makeover – everything is better with polka dots, right?

    blog-signature-summer-15
    pin-this-post-2
    How to Get a Beachy Look with Paint | DIY Beachy Decor | Furniture Glaze Recipe | Furniture Makeover Ideas | Furniture Glaze Technique

    Disclosure: This post was a partnership with Velvet Finishes. However, all opinions and negligence of trying out the colored stain sooner are 100% mine.

    SaveSaveSaveSave

  • My Best Tips and Tricks for Painting Furniture

    My Best Tips and Tricks for Painting Furniture

    I started painting furniture 10 years ago. I had no “how-to” guide and my internet was still dial-up, so needless to say, that wasn’t much help. I had no clue exactly what I was doing, but I dove in anyway. Needless to say, those first few pieces didn’t turn out so great. But, I kept going. I’ve learned a lot since that first piece and today, I’d like to share with you my best tips and tricks for how to paint furniture. 

    When I painted my first piece of furniture nearly 10 years ago, I would have never dreamed painting furniture would become “all the rage” in the DIY world. Now, you can’t get on Pinterest without something about painting furniture popping up within five minutes.

    In all honesty, I had no idea what I was doing when I first painted furniture. I do remember using a black Sharpie to mark up the piece, then painting over it, then sanding where the Sharpie marks were to distress it. See – I had no clue. Distressed furniture isn’t my style too much anymore, but in the last decade, I have learned some best practices for painting furniture.

    Tips and Tricks for Painting Furniture

    Prepping Furniture to Paint: When to Sand, When to Degloss, When to Prime

    How to Paint Furniture | Tips and Tricks - Prepwork

    Prepping Furniture to Paint

    First things first – prep work. No, you cannot simply just start painting furniture without the proper prep work! Read this article to determine what prep work you need to complete first before painting.

    Best Paint for Furniture

    Best Paint for Furniture

    What kind of paint do I use on that? 

    Having trouble figuring out what type of paint you should use on a certain surface? This article will guides you through the various types of paint and what kind of surface you can use each one on.

    Best Top Coats for Painted Furniture

    Painting Furniture - Top coats for painted furniture.

    Painting 101: Topcoats and When to Use Them

    Topcoats used to elude me. I had no clue what kind of topcoat to use when. This post breaks each topcoat down and gives examples of what topcoat to use when.

    Peeling Paint on Furniture?

    Furniture Painting Tips and Tricks - Peeling Paint

    Why is my Paint Peeling?

    This had to happen to me a few times before I figured out what I was doing wrong. Have you had paint peel on a piece of furniture you painted? Is it not one of the most frustrating feelings in the world?! This post helps fix that little problem.

    FAQ: Painting Furniture

    FAQ: Painting Furniture | Every question you have about painting furniture answered in one place! Great information for beginner furniture painters!

    FAQ: Painting Furniture

    I get questions often about painting furniture. To make it helpful to everyone, I started putting all those Q & A’s in one place.

    Best Painting Tools and Supplies for Furniture

    The BEST tips for painting furniture - 12 must have tools and supplies for getting painted furniture right the first time!

    12 Must Have Tools and Supplies for Painting Furniture

    There are a few tools and supplies for painting furniture that I’ve become partial to. They haven’t let me down yet.

    How to Use a Paint Sprayer for Painting Furniture

    This post has THE best tips for not only how to use a paint sprayer but also how to paint furniture in general. If you're a furniture rehabber, don't miss it!

    Power Tools 101: The Ultimate Guide to Using a Paint Sprayer

    For bigger furniture painting projects, I tend to use my paint sprayer. I’ll be the first to say, I used to detest paint sprayers. The problem though was that I hadn’t found the right one. After I finally did find the right one, I fell in love.

    Furniture Painting Techniques

    The No Priming, No Topcoat Way to Paint

    Furniture Painting Techniques

    The No Priming, No Topcoat Way to Paint

    If you’re looking for the easiest way out when painting furniture, then you need to read this one.

    How to Get a Beachy Colored Look when Painting Furniture

    Oh my goodness! If you love the beachy washed out look in home decor, then you have to see this! It's so easy! How to Create a Beachy Colored Look with Paint | Beach Decorating | Nautical Decor | Ocean Living | Beach Living | Aqua | Furniture Makeover

    How to Create a Beachy Colored Look

    If you’re a fan of a washed-out “beachy” look, then you will definitely want to see how easy it is to create a beachy colored look with paint and glaze.

    How to Make Colored Stain

    Did you know you can make COLORED stain?! How about trying this instead of painting furniture the next time?! Lots of other great furniture painting tips here too!

    How to Make Colored Stain

    Colored stain definitely isn’t for everyone, but it’s a fun technique to use on smaller pieces. It’s also really easy to make.

    How to Make Furniture Glaze in Any Color

    Instead of using antique glaze, make your own COLORED glaze! How fun would this be for a beach house or a kid's room?! There are lots of other great tips for painting furniture in this article too!

    How to Make Furniture Glaze in ANY Color

    Another type of thing that isn’t for everyone, but fun and easy to make. You can make furniture glaze in any color and then layer it on top of your paint. I really like the way most colors look layered on top of white – it has a beachy feel to it.

    How to Strip & Restain Furniture

    The least messiest way to strip furniture and then restain it. How to Strip Furniture and Restain It

    How to Strip and Stain Furniture

    Sometimes you might want to stain a piece, rather than painting it. This post will walk you through how to strip furniture to restain it.

    Caribbean Blue Layered Furniture Painting Technique

    Easy furniture painting technique - create a Caribbean Blue finish by layering colored glazes.

    How to Get a Layered Color Look

    This technique uses three different colors to achieve a layered look when painting furniture.

    Aged Pink Look on Furniture

    Gorgeous rich color! And no priming required with this paint! Glamorous Dresser Makeover

    Aged Pink Furniture Painting Method

    Use this tutorial to achieve an aged pink look on furniture. It helps to calm down those ultra bright hues, like fuchsia a bit.

    Painting Designs on Furniture

    How to Paint a Plaid Pattern

    Painting designs on furniture

    How to Paint a Plaid Pattern

     The best thing about this painting design is that no measuring is required to get those perfect lines!

    Tuxedo Bar Front Design

    DIY Tuxedo Bar | Learn how to paint a bar front or any piece of furniture with a mostly flat front to look like a tuxedo jacket. Awesome idea for a furniture makeover!

    DIY Tuxedo Front Bar

    This was such a fun painted design to do on a bar front – it wasn’t too hard either!

    Polka Dot Furniture Painting Pattern

    Simple Polka Dot Chair Makeover - She used Velvet Finishes to paint the chair and upholstery! So adorable and very Kate Spade inspired!

    Simple Polka Dot Painting Technique

    Painting polka dots on furniture is a piece of cake!!

    Do you have any great tips for painting furniture? Please share with the rest of us in the comments!

    You're going to want to see this too...

    Wall Painting Ideas and Paint Designs ANYONE Can Do! This article is FULL of DIY painting ideas including wall painting techniques, wall painting designs and other painting ideas!

    Wall Painting Ideas & Paint Designs Anyone Can Do

    pin-this-post-2 Tips for Painting Furniture | How to Paint Furniture | Furniture Painting Techniques | Furniture Painting Ideas | Furniture Makeover Ideas blog-signature-summer-15

  • The Circus’ Yellow Bookshelf Makeover

    The Circus’ Yellow Bookshelf Makeover

    This project was sponsored by HomeRight, however all opinions are 100% mine. 

    About a year ago, a friend and I went out one Saturday morning thrifting. We got to the first stop, but it was wasn’t opened yet. However, outside was a bookshelf. A bookshelf that wasn’t anything to write home about – except for the doors and the hardware.

    She used a paint sprayer to paint this piece of furniture and it looks so simple! Yellow Bookshelf Makeover | Furniture Makeover | Furniture Painting

    The bookshelf had a price tag of $40. I had no need for a bookshelf – but those doors…and that hardware.

    We drove down to another thrift store until the other one opened. Upon returning to the thrift store with the bookshelf, there was a woman eyeing my the bookshelf. The store still hadn’t opened yet. The woman was eyeing the bookshelf quite intensely. As the store doors opened, I decided I couldn’t let this bookshelf go. So I did what anyone else would do in my situation. I did a quick side shuffle or two and ran through the doors as soon as the owner opened them and proclaimed I would be buying the bookshelf – probably a bit louder than necessary.

    And then the bookshelf sat in my garage for the better part of a year and I kind of started to feel a little bad for stealing it away from the other lady when I hadn’t even figured out to do with it.

    I got over that real quick though after I realized it would be perfect in the Circus’ new room.

    She used a paint sprayer to paint this piece of furniture and it looks so simple! Yellow Bookshelf Makeover | Furniture Makeover | Furniture Painting

    This was such a simple makeover, but some serious BAM as well with that bold yellow.

    Simple Bookshelf Makeover

    This post contains affiliate links for your shopping convenience. Click here to read my full disclosure policy.

    Tools & Supplies

    Steps

    Step 1:

    Before painting anything, I cleaned this bad boy up. I sprayed Ready, a liquid spray primer, on the piece to remove dust, dirt and dead bugs that the bookshelf had housed in the garage.

    Step 2:

    This bookshelf had some laminate in some places. To make sure my paint stuck to those spots well, I gave the entire bookshelf a coat of Kilz Primer before painting the piece yellow.

    yellow-bookshelf-makeover-8

    It’s important to strain the paint before putting it in your sprayer.

    She used a paint sprayer to paint this piece of furniture and it looks so simple! Yellow Bookshelf Makeover | Furniture Makeover | Furniture Painting

    Even if it is brand new paint, I suggest straining it. I just picked up a cheap strainer at TJMaxx and use it as my paint strainer. After straining the paint, add water to thin it. The Finish Max comes with an instruction manual that tells you how to thin your paint. It also comes with a handy little tool to use so you know when it’s thinned enough.

    How to thin paint with the HomeRight Finish Max Paint Sprayer

    I’m borrowing this image from a previous post as I neglected to take a picture of me using my handy little tool during this project.

    After adding water to the paint and mixing, simply dip the viscosity cup into the paint and count how many seconds it takes the paint to run out of the cup. For latex paints, properly thinned paints should run out in 25-40 seconds. If you’re in that timeframe, you’re good. If you’re not, add more water.

    After thinning your paint properly, spray the paint onto your piece standing about 5-10 inches away from the piece you are painting. (If you’ve never used a paint sprayer before, there’s a complete how-to here.) Clean out your paint sprayer afterwards.

    Step 3:

    After letting the primer dry, load your paint sprayer up with your choice of paint color. Once more, remember to strain and thin the paint. Step back and spray the paint onto your furniture.

    She used a paint sprayer to paint this piece of furniture and it looks so simple! Yellow Bookshelf Makeover | Furniture Makeover | Furniture Painting

    I did two coats of yellow.

    She used a paint sprayer to paint this piece of furniture and it looks so simple! Yellow Bookshelf Makeover | Furniture Makeover | Furniture Painting

    I laid out my actual shelves and doors on sawhorses and tables to paint them.

    Step 4:

    After your piece is dry, I suggest following up with a topcoat to help protect the finish. I used a semi-gloss polycrylic, which actually doesn’t have to be thinned, but should be strained before putting it into your paint sprayer. I did one coat of the topcoat.

    She used a paint sprayer to paint this piece of furniture and it looks so simple! Yellow Bookshelf Makeover | Furniture Makeover | Furniture Painting

    Isn’t it adorable? Of course, I haven’t filled it with all her books yet, I just wanted a few on there for now to give you an idea of how it would look.

    She used a paint sprayer to paint this piece of furniture and it looks so simple! Yellow Bookshelf Makeover | Furniture Makeover | Furniture Painting

    I do like the idea of mixing in the stuffed animals with the books – makes it a little more decorative.

    I can’t believe I just referred to stuffed animals as decorative. I guess that’s what happens when your kid owns more of them than an actual zoo has animals.

    She used a paint sprayer to paint this piece of furniture and it looks so simple! Yellow Bookshelf Makeover | Furniture Makeover | Furniture Painting

    I used Bar Keepers Friend to clean up the hardware.

    What do you think of the yellow? Is it too bold for you?

    You might also want to see…

    The Ultimate Guide for How to Use a Paint Sprayer - from set-up to thinning the paint to an easy clean-up, its all here!

    How to Use a Paint Sprayer

    SO adorable! She used a paint sprayer to paint this piece of furniture and it looks so simple! Yellow Bookshelf Makeover | Furniture Makeover | Furniture Painting

    Disclosure: This post was a collaboration with HomeRight, however all opinions and running ahead of people to buy something I want is 100% mine.

    SaveSave

  • How to Paint a Plaid Pattern for Lazy Gals

    How to Paint a Plaid Pattern for Lazy Gals

    This post is sponsored by Velvet Finishes, however all opinions are 100% mine. 

    You guys. You guys. You guys.

    No. Really. You guys.

    I did something.

    I did something I wasn’t sure I could do at all. I was sure it would be an utter failure. I held my breath with each brushstroke and removal of FrogTape.

    But it wasn’t a failure.

    It. Was. A. WIN.

    That table is PAINTED - she PAINTED on that plaid pattern and it actually looks really easy. She even tells you how to do it without having to measure anything! How To Paint a Plaid Pattern | Furniture Makeovers | Furniture Painting | DIY Projects | Painting Patterns

    You see that plaid beauty? I painted it. It’s not a stencil, it’s not contact paper, it’s paint!

    And I didn’t measure one iota of a thing to do it….because I’m lazy…and bad at math.

    How to Paint a Plaid Pattern Without Measuring

    Affiliate links may be contained in this post.

    Materials & Supplies:

    How To Paint a Plaid Pattern WITHOUT Measuring - you will not believe how easy it is! Furniture Makeover | Furniture Painting | DIY Projects | Plaid Pattern

    Step 1:

    Prep your painting surface. My little table had a leopard print I stenciled on it a couple years back. It had resided on the screened-in porch, but never really got used all that often. I didn’t want to part with the table as I really liked it’s bones, so I opted to re-do it with a plaid print. First, I used Ready to prime the table.

    How To Paint a Plaid Pattern WITHOUT Measuring - you will not believe how easy it is! Furniture Makeover | Furniture Painting | DIY Projects | Plaid Pattern

    Just spray it on, let it sit for a few minutes, then wipe down the surface. Ready will remove any shine the previous finish may have had and any dust or dirt as well.

    Step 2:

    Give the surface a few coats of Vivid.

    How To Paint a Plaid Pattern WITHOUT Measuring - you will not believe how easy it is! Furniture Makeover | Furniture Painting | DIY Projects | Plaid Pattern

    Reds are always hard to even out in color, so it might take a few more coats than with other colors. It took three for my table. Let the final coat dry overnight.

    Step 3:

    Place your yardstick in the middle of the table. It doesn’t have to be perfect – I eyeballed mine. On each side of the yardstick run a piece of 1.5″ Delicate Surface FrogTape along the length of the table. The yardstick I have from Home Depot is almost the exact same size as the 1.5″ FrogTape, thus why I suggested it – it makes the spaces between your tape and the tape almost identical in size, thus no measuring!

    How To Paint a Plaid Pattern WITHOUT Measuring - you will not believe how easy it is! Furniture Makeover | Furniture Painting | DIY Projects | Plaid Pattern

    You do want to make sure you use Delicate Surface tape as this paint is still relatively fresh. Delicate Surface tape is made for painted surfaces that are just a few days old.

    After running two pieces of FrogTape along each side of the yardstick, remove the yardstick and place it on one side of either piece of tape, then run another piece of tape along the side of the yardstick that doesn’t have tape.

    How To Paint a Plaid Pattern WITHOUT Measuring - you will not believe how easy it is! Furniture Makeover | Furniture Painting | DIY Projects | Plaid Pattern

    Continue moving your yardstick and running your tape until your table has strips of tape all across it as shown above.

    After all your tape has been ran, firmly run your finger or a credit card edge along the edges of the FrogTape to seal it. Do not skip this step! If you don’t do this, you risk having the paint bleed through the tape.

    Step 4:

    Paint two coats of Luxurious in between the tape pieces on your surface.

    How To Paint a Plaid Pattern WITHOUT Measuring - you will not believe how easy it is! Furniture Makeover | Furniture Painting | DIY Projects | Plaid Pattern

    Remove the FrogTape immediately after brushing on your final coat. Let dry overnight.

    Step 5: 

    Place your yardstick in the center of the surface perpendicular to the black stripes you painted. Once more, run two pieces of 1.5″ Delicate Surface FrogTape along both sides of the yardstick.

    How To Paint a Plaid Pattern WITHOUT Measuring - you will not believe how easy it is! Furniture Makeover | Furniture Painting | DIY Projects | Plaid Pattern

    Just like you did before, move the yardstick to one side of a tape strip and then place another tape strip along the other edge of the yardstick. Repeat this over the entire surface until your surface resembles the image shown below.

    How To Paint a Plaid Pattern WITHOUT Measuring - you will not believe how easy it is! Furniture Makeover | Furniture Painting | DIY Projects | Plaid Pattern

    Remember to firmly press down along the edges of the FrogTape after you have applied it to seal the edges.

    Step 6:

    Using the 1″ Delicate Surface FrogTape, cover the black stripes on your surface.

    How To Paint a Plaid Pattern WITHOUT Measuring - you will not believe how easy it is! Furniture Makeover | Furniture Painting | DIY Projects | Plaid Pattern

    The easiest way I found to do this was to take a piece of the 1″ FrogTape and run it along on edge of the black and then run another piece of tape along the other edge of the black. The tape will overlap in the middle. Repeat this until your Luxurious stripes are covered and you have lots of little squares. Once more, remember to firmly push down on the edges of the FrogTape to seal it.

    Step 7:

    Within the squares you created with the tape, paint a couple coats of Timeless.

    How To Paint a Plaid Pattern WITHOUT Measuring - you will not believe how easy it is! Furniture Makeover | Furniture Painting | DIY Projects | Plaid Pattern

    Remove the FrogTape immediately after applying your final coat. Your surface should look similar to the image below after you remove the tape.

    How To Paint a Plaid Pattern WITHOUT Measuring - you will not believe how easy it is! Furniture Makeover | Furniture Painting | DIY Projects | Plaid Pattern

    Let dry overnight.

    Step 8:

    Using the 1″ Delicate Surface FrogTape, run strips of tape just a little outside each black edge. This should create small lines of black within the tape as shown below. Once more, I didn’t measure this at all – I just eyeballed it.

    How To Paint a Plaid Pattern WITHOUT Measuring - you will not believe how easy it is! Furniture Makeover | Furniture Painting | DIY Projects | Plaid Pattern

    Firmly seal the edges of the tape with your finger or the edge of a credit card.

    Step 9:

    Brush on a couple coats of Minimalistic between the tape where the black is.

    How To Paint a Plaid Pattern WITHOUT Measuring - you will not believe how easy it is! Furniture Makeover | Furniture Painting | DIY Projects | Plaid Pattern

    Immediately remove the tape after your final coat. Let it dry overnight.

    Step 10: 

    Repeat the previous two steps above, except this time on the gray areas on your surface.

    How To Paint a Plaid Pattern WITHOUT Measuring - you will not believe how easy it is! Furniture Makeover | Furniture Painting | DIY Projects | Plaid Pattern

    Paint Minimalistic between the pieces of tape. Remove the tape after your final coat. Let dry overnight.

    Step 11:

    Velvet Finishes paint does not always require an additional topcoat as there is already a topcoat built into the paint. However, if you have painted something that is going to get a lot of action and use, then an additional topcoat is suggested. I plan on this going into either the den/man cave or Bill’s room as a side table or night stand at the 70’s Landing Pad, so I opted for the extra protection.

    how-to-paint-a-plaid-pattern-14

    I just brushed on one coat of Protect to give the surface more protection and even a bit of shine.

    That table is PAINTED - she PAINTED on that plaid pattern and it actually looks really easy. She even tells you how to do it without having to measure anything! How To Paint a Plaid Pattern | Furniture Makeovers | Furniture Painting | DIY Projects | Painting Patterns

    This table turned out more awesome than I ever dreamed. I fully realize that sounds corny and I fully don’t give a damn.

    That table is PAINTED - she PAINTED on that plaid pattern and it actually looks really easy. She even tells you how to do it without having to measure anything! How To Paint a Plaid Pattern | Furniture Makeovers | Furniture Painting | DIY Projects | Painting Patterns

    Ok, what are you going to plaid up?

    You might also want to see…

    How to Make Colored Furniture Glaze: 11 Colorful Furniture Makeovers

    How to Make Furniture Glaze in Any Color

    DIY Tuxedo Bar | Learn how to paint a bar front or any piece of furniture with a mostly flat front to look like a tuxedo jacket. Awesome idea for a furniture makeover!

    DIY Tuxedo Painted Bar

    pin-this-post-2

    How to Paint a Plaid Pattern | DIY Furniture Makeovers | DIY Painting Ideas | Painting Techniques | Painted Furniture Ideas

    blog-signature-summer-15

    Disclosure: This post was a collaboration with Velvet Finishes, however all opinions and over-excitement about painting a plaid pattern all by myself are 100% mine. 

    SaveSave

  • When in doubt…go polka dots.

    When in doubt…go polka dots.

    This post is sponsored by Velvet Finishes, however all opinions are 100% mine. 

    I’m ashamed to tell you how long I’ve had this chair sitting in the garage ready to be made over. I’ll say it’s been the better part of a year at the least. It was one of those purchases that went like this:

     It’s $10! I can’t pass it up for $10!

    But you don’t need it Jenna.

    I know that. But it’s $10!!!

    You don’t need it.

    $10.

    Make a smart decision, Jenna. 

    Ok. I’m buying it. 

    Said conversation was between myself and myself of course.

    So since I really had no clue what to do with it or where I would put it, it just sat for a while. And then one day, I got a wild hair and decided I would attempt to paint the upholstery on this piece rather than re-upholstering it since I’d never tried painting it before. I only had $10 to lose.  Here’s how it turned out…

    Simple Polka Dot Chair Makeover - She used Velvet Finishes to paint the chair and upholstery! So adorable and very Kate Spade inspired!

    Not half bad! I didn’t set out for it to turn out so preppy / Kate Spade-ish, but I think it works with the chair pretty well. Here’s what I did…

    Polka Dot Chair Makeover

    Affiliate links may be contained in this post.

    What I Used: 

    Step 1

    The upholstery of this piece was not in great condition. It looked like a cat had maybe clawed around the edges a bit, so I cleaned up that with some scissors first.

    Simple Polka Dot Chair Makeover - She used Velvet Finishes to paint the chair and upholstery! So adorable and very Kate Spade inspired!

    After that, I actually got out my shop vac and vacuumed really well in all the nooks and crannies of the upholstery since I knew I was going to paint it.

    Step 2 

    After vacuuming, I painted the wood portions of the chair with Velvet Finishes Handsome.

    Simple Polka Dot Chair Makeover - She used Velvet Finishes to paint the chair and upholstery! So adorable and very Kate Spade inspired!

    Handsome is the same color I used on my kitchen cabinets. It’s a classic navy shade. I just used my paintbrush and painted right onto the wood. If you have a really shiny finish to begin with, you can prime your piece with Ready, which is a simple to use spray primer, before painting it. If you don’t have a shiny finish, then you usually won’t need a primer with Velvet Finishes. I did two coats of Handsome.

    Step 3

    I let the Handsome dry overnight, then the next day, I tackled the upholstery. First, I taped off around the woodwork so I wouldn’t get any paint there, then I just slapped on some Glamorous with my paintbrush.

    Simple Polka Dot Chair Makeover - She used Velvet Finishes to paint the chair and upholstery! So adorable and very Kate Spade inspired!

    It took about four coats of paint on the upholstery, which I expected since I knew the upholstery would absorb so much of the paint.

    Step 4

    After the upholstery dried it was a little bit “tough” so to speak. Kellie had told me that sanding it with a fine grit sandpaper would loosen it up.

    Simple Polka Dot Chair Makeover - She used Velvet Finishes to paint the chair and upholstery! So adorable and very Kate Spade inspired!

    So that’s what I did. I lightly sanded over all the upholstery with about a 150 grit sandpaper. It made the upholstery feel less “tough” and more like a faux leather type upholstery.

    Step 5

    After sanding, I thought the chair was a little boring – it needed some pattern or something to make it pop, so I added in polka dots.

    Simple Polka Dot Chair Makeover - She used Velvet Finishes to paint the chair and upholstery! So adorable and very Kate Spade inspired!

    I just used a medium sized pouncer and Minimalistic and randomly placed polka dots all over the upholstery.

    Simple Polka Dot Chair Makeover - She used Velvet Finishes to paint the chair and upholstery! So adorable and very Kate Spade inspired!

    And all of a sudden, it became an incredibly cute chair.

    You can still see some of the upholstery’s pattern through the paint, but unless you are painting plain fabric, I think that’s gonna happen.

    Simple Polka Dot Chair Makeover - She used Velvet Finishes to paint the chair and upholstery! So adorable and very Kate Spade inspired!

    The pillow is from Target – it’s the first purchase for the Circus’ new room at the 70’s Landing Pad. It went with the chair perfectly, so I couldn’t resist not using it in the photos.

    What do you think of the preppy polka dotted chair?

    pin-this-post-2

    Painted Chair Makeover | How to Paint Upholstery | Furniture Makeover Ideas | Furniture Painting Ideas | Furniture Painting Techniques

    blog-signature-summer-15

    You know you don’t wanna miss any of this crazy.

    Sign up to get my posts delivered to your inbox here.

    Stalk Me Here:

    Pinterest / Facebook / Twitter / Instagram

    Disclosure: This post was a collaboration with Velvet Finishes, however all opinions and hoarding of chairs I don’t need are 100% mine.

    SaveSave

  • Show Me Your Grain…Your Wood Grain.

    Show Me Your Grain…Your Wood Grain.

    This post is sponsored by HomeRight, however all opinions are 100% mine. Affiliate links may be contained in this post.

    I won’t lie.

    The sight of a beautifully bold painted piece of furniture (preferably either kelly green, navy blue or a bold red) makes my heart soar.

    Not as much as Grunt Labor makes my heart soar, but pretty close.

    However, I have come to really appreciate a good grain…a good wood grain that is, because chocolate isn’t a grain yet, is it? I’m still waiting for chocolate to be classified as “good” for me.

    Here are a few of my favorite stained and painted furniture makeovers…

    Painted & Stained Furniture Projects with a HomeRight Finish Max / Furniture Makeovers / DIY File Cabinet Table / Cobalt Blue and Stain

    Stacy Risenmay is a lucky girl. Because all I want to do is steal her bedside table. The cobalt blue and stain combo is beautiful.

    Painted & Stained Furniture Projects with a HomeRight Finish Max / Furniture Makeovers / Hall Tree

    This is another shade of blue paired with stain that I think is stunning. Gail from My Repurposed Life made a hall tree from a door and sewing table. I’m usually not a big aged paint effect person, but I do love the depth the aging has on this shade of navy. She used her HomeRight Finish Max on this project.

    Painted & Stained Furniture Projects with a HomeRight Finish Max / Furniture Makeovers / Midcentury Modern Dresser Makeover

    A never fail combo is stain and white – especially on mid-century modern pieces like this one from While They Snooze.

    Painted & Stained Furniture Projects with a HomeRight Finish Max / DIY Pegboard

    Addicted 2 DIY made this stained pegboard organizer using her paint sprayer. She also has some good tips here for using stain in a paint sprayer.

    Painted & Stained Furniture Projects with a HomeRight Finish Max / Furniture Makeovers / Stripped and Stained Buffet Makeover

    My stripped and re-stained buffet makeover is one of my most favorite makeovers ever. I was actually a little worried about going back to stain after the piece had been a bold red, but it was totally the right decision. I used my HomeRight Heat Gun to strip it easily.

    Painted & Stained Furniture Projects with a HomeRight Finish Max / Furniture Makeovers / DIY Platform Bed

    Lauren from The Thinking Closet opted for a beach-y hued stain for her bed.

    Painted & Stained Furniture Projects with a HomeRight Finish Max / Kitchen Table Makeover / Furniture Makeover

    Ask Anna actually stripped and re-stained the top of this table, as well as painting the bottom of it. If you need tips on cleaning your paint sprayer after using stain in it, she’s your girl.

    Painted & Stained Furniture Projects with a HomeRight Finish Max / Furniture Makeovers / Dresser turned Home Gym

    This idea from HomeJelly is nothing short of genius. She took an old dresser and turned it into a home gym. She stained the top and feet, but painted the rest with her Finish Max. Now, as much as I would like to think this piece would actually motivate me to work out, I’m probably wrong. The idea is still genius though. 😉

    Are you a fan of stained and painted combination pieces?

    pin-this-post-2

    Painted and Stained Furniture Ideas | Furniture Makeover DIY | Furniture Makeover Ideas | Stained Furniture Ideas | Stained Furniture DIY | Painted Furniture Ideas

    Disclosure: This post was a collaboration with HomeRight. However, all opinions and corny post titles are 100% mine.

    SaveSave

  • Business in the Front, Party on Top: 70’s Credenza Makeover

    Business in the Front, Party on Top: 70’s Credenza Makeover

    This post is sponsored by Velvet Finishes, however all opinions are 100% mine. Affiliate links may be contained in this post.

    I got my first and only Achy Breaky Heart t-shirt at the flea market in the middle of town.

    I was seven.

    It was heather gray, with a big multi-colored neon heart and multi-colored neon lettering on it.

    I was so damn proud of that t-shirt.

    Billy Ray Cyrus and his mullet essentially had overnight success with a song that had a terrible title.

    It was the age of the achy breaky heart craze.

    It wasn’t until I was in at least middle school, if not high school, that I realized the name for Billy Ray Cyrus’ infamous hairstyle was a mullet.

    And that people described it as business in the front, party in the back.

    Well that’s just what this credenza makeover is. Business in the front, but the party’s up top…

    Easy and pretty way to cover a surface that isn't in the best shape! 70's Credenza Makeover with Malachite Wrapping Paper / Velvet Finishes / Furniture Makeover / Furniture Painting

    Y’all I wish you could have seen me hauling this thing into the truck.

    I found it while I was riding solo thrifting one afternoon. A store employee helped me get it into the truck, but then he quickly realized the cluster that was about to happen and scooted off quickly.

    He was a smart man.

    This thing is heavy. And it ain’t small.

    First, I thought I would just let part of it hang out the back of the truck and use Grunt’s ratchet tie-downs to keep it in.

    Well, I knotted up that tie-down.

    So then I thought it could just go sideways and I could close the tailgate.

    It wouldn’t close by a hair. A hair.

    So I turned it back around and attempted to strap it in again with another tie-down.

    I didn’t get the tie down secured correctly, but I got it secured enough to get it home.

    There was only one close call on the way home. 

    When I got it home, I promptly had a beer and told Grunt Labor I would buy him new tie-downs because I was pretty sure we were going to have to cut his to get this piece out.

    But it was totally worth it.

    This piece was only $20.

    Easy and pretty way to cover a surface that isn't in the best shape! 70's Credenza Makeover with Malachite Wrapping Paper / Velvet Finishes / Furniture Makeover / Furniture Painting

    And if we are going to be really honest about it, I probably would have paid that for just the hardware. It’s so pretty.

    I originally intended to paint the entire piece. However, I decided that I really liked the stained drawers. The top though had to have something done to it…

    Easy and pretty way to cover a surface that isn't in the best shape! 70's Credenza Makeover with Malachite Wrapping Paper / Velvet Finishes / Furniture Makeover / Furniture Painting

    I think it must have had some other top on it at some point. Here’s what I did…

    Easy and pretty way to cover a surface that isn't in the best shape! 70's Credenza Makeover with Malachite Wrapping Paper / Velvet Finishes / Furniture Makeover / Furniture Painting

    I used:

    Step 1: 

    Since the top was so rough, I used my power sander to smooth it out as much as possible. It didn’t do a whole lot of smoothing but it did knock some big uneven chunks out of the way.

    Step 2: 

    I painted on a good, thick coat of Velvet Finishes Luxurious on the top and sides of the credenza.

    Easy and pretty way to cover a surface that isn't in the best shape! 70's Credenza Makeover with Malachite Wrapping Paper / Velvet Finishes / Furniture Makeover / Furniture Painting

    The paint helped to fill in a little more unevenness on the top and also worked as a primer of sorts for the deco-paste that would adhere the wrapping paper to the top of the credenza.

    Step 3: 

    Next, I cut the paper to the size of the top of the credenza. I did leave a little extra on the sides just in case.

    Easy and pretty way to cover a surface that isn't in the best shape! 70's Credenza Makeover with Malachite Wrapping Paper / Velvet Finishes / Furniture Makeover / Furniture Painting

    Step 4: 

    This is where a friend comes in handy. Luckily for me, one of main girls, Brittany had come over to work on some other projects. I painted on the Deco-Paste that would adhere the paper to the top, while Brittany held the paper up.

    Easy and pretty way to cover a surface that isn't in the best shape! 70's Credenza Makeover with Malachite Wrapping Paper / Velvet Finishes / Furniture Makeover / Furniture Painting

    The Deco-Paste dries really quickly, so you need to work in small sections. I would paint on a little bit, then firmly put the paper on top of it. After I had the whole top covered with the malachite paper, I went back over it and smoothed out any air bubbles firmly with my hands, then let the piece cure for the rest of they day.

    Step 5: 

    Once it was all dry, I came back with an X-Acto knife and cut off any excess overhang.

    Easy and pretty way to cover a surface that isn't in the best shape! 70's Credenza Makeover with Malachite Wrapping Paper / Velvet Finishes / Furniture Makeover / Furniture Painting

    Step 6: 

    Where there was any extra overhang that was too small to cut, I used fine grit sandpaper wrapped around a sanding block to smooth the edges.

    Easy and pretty way to cover a surface that isn't in the best shape! 70's Credenza Makeover with Malachite Wrapping Paper / Velvet Finishes / Furniture Makeover / Furniture Painting

    When you do this, you want to go straight down on the edge. Don’t go back and forth sideways or up and down vertically – go straight down and then again if needed. This helps to give the paper a clean, finished look.

    Step 7: 

    Finally, I topped the paper off with a coat of Protect.

    Business in the front.

    Easy and pretty way to cover a surface that isn't in the best shape! 70's Credenza Makeover with Malachite Wrapping Paper / Velvet Finishes / Furniture Makeover / Furniture Painting

    Party on top.

    Easy and pretty way to cover a surface that isn't in the best shape! 70's Credenza Makeover with Malachite Wrapping Paper / Velvet Finishes / Furniture Makeover / Furniture Painting

    This piece is destined for my office. I just gotta find someone to help me haul it there first. 😉

    Any takers?

    What do you think of the midas malachite touch?

    pin-this-post-2

    Credenza Makeover | Decoupaged Furniture | Wrapping Paper Furniture Makeover | How to Decoupage Furniture | How to Decoupage Wood | Furniture Makeover DIY

    blog-signature-summer-15

    You know you don’t wanna miss any of this crazy.

    Sign up to get my posts delivered to your inbox here. 

    Stalk Me Here:

    Bloglovin / Pinterest / Facebook / Twitter / Google+ / Instagram

    Disclosure: This post was a collaboration with Velvet Finishes. However, all opinions and references to Billy Ray Cyrus are 100% mine.

    SaveSave

  • How To Refinish Wood Furniture Without Sanding or Stripping

    How To Refinish Wood Furniture Without Sanding or Stripping

    This post is sponsored by Velvet Finishes, however all opinions are 100% mine. Affiliate links may be contained in this post.

    There once lived a man.

    He was a farmer who wore Liberty overalls.

    And he was a wood worker too.

    He made lamps and a baby cradle when his first granddaughter was born.

    The granddaughter slept in the cradle and her daughter slept in the cradle.

    And the granddaughter doesn’t remember a time when a lamp her pap made wasn’t in her grandparent’s den.

    They were floor lamps with a small table halfway up – nothing anyone would probably consider in style.

    Except her.

    A few months ago when the granddaughter went back home, she found her grandfather’s lamps in an outbuilding.

    And that just wouldn’t do.

    So along with a huge gold mirror and some old farm equipment that she just couldn’t let get thrown away, she brought the lamps home.
    How to Refinish Wood Furniture and Cover Stains without Sanding - must read if you want to keep something stained, but don't want to strip and sand it!

    The base and the poles were ok, but the table part, it was rough.

    But she was ready to make them shine again….

    How to Refinish Wood Furniture and Cover Stains without Sanding or Stripping

    Supplies & Materials Needed:

    How to Refinish Wood Furniture and Cover Stains without Sanding - must read if you want to keep something stained, but don't want to strip and sand it!

    Step 1: 

    If the piece you are working on has a glossy or shiny finish, spray it down with Ready, let it sit for a few minutes, then wipe the piece down with paper towels until its no longer shiny.

    Whether you used Ready or not, use a tack cloth to clean up any dust or dirt that might be on the piece.

    Step 2: 

    Put on the gloves (this will stain your hands if you don’t!) and pour a little Stain Restore onto a paper plate.

    How to Refinish Wood Furniture and Cover Stains without Sanding - must read if you want to keep something stained, but don't want to strip and sand it!

    Use the stain pad (it comes with the Stain Restore) and soak up some stain restore.

    Spread it onto the surface you are restoring.

    How to Refinish Wood Furniture and Cover Stains without Sanding - must read if you want to keep something stained, but don't want to strip and sand it!

    You can spread it around however you want to, but make sure your final swipes are in the direction of the wood grain.

    Step 3:

    Let the Stain Restore dry and repeat as many times as needed or to get the color you want. I did four coats of the Stain Restore to cover my lamp.

    How to Refinish Wood Furniture and Cover Stains without Sanding - must read if you want to keep something stained, but don't want to strip and sand it!

    You can just barely see the rings that were there in the beginning. I could have done another coat or two and covered them completely, but I didn’t want to go any darker with the lamp.

    How to Refinish Wood Furniture and Cover Stains without Sanding - must read if you want to keep something stained, but don't want to strip and sand it!

    Stain Restore dries to a shiny, polyurethane type finish. You can add on a topcoat of Protect for more protection.

    How to Refinish Wood Furniture and Cover Stains without Sanding - must read if you want to keep something stained, but don't want to strip and sand it!

    It may be considered out of style, but this girl is happy to have her Pap’s lamp in her living room.

    And she thinks it looks just right.

    Do you have any family heirlooms that need to be restored?

    pin-this-post-2

    How to Refinish Wood Furniture | How to Refinish Old Furniture | Restaining Wood Furniture | Restaining Furniture | Furniture Makeover DIY

    You know you don’t wanna miss any of this crazy.

    Sign up to get my posts delivered to your inbox here.

    Stalk Me Here:

    Bloglovin / Pinterest / Facebook / Twitter / Google+ / Instagram

    blog-signature-summer-15

    Disclosure: This post was a collaboration with Velvet Finishes. However, all opinions and love of my Pap’s lamps are 100% mine.

    SaveSave

  • Power Tools 101: The Ultimate Guide to Using a Paint Sprayer

    Power Tools 101: The Ultimate Guide to Using a Paint Sprayer

    I had a revelation the other day.

    A hold-the-phone-shut-the-front-door-smack-myself-on-the-head revelation.

    I realized that for two years I’ve been showing you all these awesome (if I do say so myself) furniture makeovers that I’ve completed with my paint sprayer, but never once have I actually told you how to use the paint sprayer from start to finish.

    See why I smacked myself on the head? 

    So here it is. The ultimate guide for how to use a paint sprayer from set-up to cleaning.

    Sorry for the two year delay.

    This post is sponsored by HomeRight, however all opinions are 100% mine. Affiliate links may be contained in this post.

    How to Use a Paint Sprayer | Using a Paint Sprayer on Furniture | Paint Sprayer Tips | Paint Sprayer for Furniture Makeovers

    This post contains affiliate links for your shopping convenience. Click here to read my full disclosure policy.

    How to Use a Paint Sprayer

    First off, let me say that the directions and tips in this post only pertain to the HomeRight Finish Max paint sprayer – the sprayer that I have used for the past two years. While other paint sprayers, may operate similar to this one, I can’t give exact instructions for those as I can this one. And yes, I am a HomeRight Brand Ambassador, but even if I weren’t, I would still use and sing the praises of the Finish Max. You are talking to the girl who tried three paint sprayers prior to finding the Finish Max and every single one of them went back to the store and she swore off paint sprayers forever.

    And then she ate her words. 

    But it was worth it.

    Before you get out your paint, first setup your painting area.

    The Ultimate Guide for How to Use a Paint Sprayer - from set-up to thinning the paint to an easy clean-up, its all here!

    The Spray Shelter is a little big gem. While there isn’t as much overspray as I’ve seen with other sprayers, there is still some with the Finish Max and this baby helps to contain it. Setup is easy and takes less than 10 minutes. The spray shelter doesn’t have a “bottom” so to speak, so if you are concerned about getting paint on your floor, you’ll want to put a tarp down under the shelter. As you can see, I don’t worry with that. A rainbow garage floor never bothered me.

    Also, if the piece I’m painting is smaller, I will set it up on sawhorses so I don’t break my back bending over.

    Now, let’s get down to business.

    Step 1:

    Unscrew the paint container from the sprayer and fill it with paint. If your paint is old (like a month or more), you will want to strain it.

    The Ultimate Guide for How to Use a Paint Sprayer - from set-up to thinning the paint to an easy clean-up, its all here!

    Once paint has been opened, it can sometimes get lumps that dry up in it and if not strained, those lumps will clog your sprayer. To strain my paint, I just use a cheap $3 strainer that I found at Target, I think.

    Fill the container about 1/2 to 3/4 full depending on the size of your project.

    Step 2: 

    Thin the paint.

    To thin the paint, all you need to do is add water. I usually try to have a cup of water nearby. Add a little at a time. Start with about 1/4 of a cup of water for thinner paints and 1/2 cup for thicker paints – you can always add more. Stir as you add water.

    The Ultimate Guide for How to Use a Paint Sprayer - from set-up to thinning the paint to an easy clean-up, its all here!

    The big question is always, “How do I know if I’ve thinned my paint enough?” Ya know what? That used to be my question too! One more reason I love this paint sprayer is because it takes the guesswork out of thinning.

    The Ultimate Guide for How to Use a Paint Sprayer - from set-up to thinning the paint to an easy clean-up, its all here!

    The Finish Max comes with a little tool called a viscosity cup. Once you’ve added water to your paint and mixed, dip the viscosity cup in the paint cup and time how long it takes the paint to run out of the cup. If you’re using a basic enamel paint, the paint is thinned enough if it all runs out of the viscosity cup in 25-40 seconds. If the paint doesn’t run out of the cup within that time frame, add more water, mix and test it again. Repeat until your paint is thinned properly.

    Let me stop here and talk about other materials you can use in the paint sprayer and whether or not you should thin them.

    You can use:

    Oil Based or Latex Based Paint – Needs to be thinned, 25 – 40 seconds run-out time.

    Clear Sealer (Polycrylic) – No thinning required.

    Polyurethane – No thinning required.

    Primer – Needs to be thinned, 30 – 45 seconds run-out time.

    Stain – No thinning required.

    Varnish – Needs to be thinned, 20 – 50 seconds run-out time.

    Its also important to note that many oil based paints recommend thinning with something besides water. Be sure to check the material’s label to see what it says about thinning the paint.

    Step 3: 

    Adjust your spray pattern.

    To adjust the spray pattern, turn the air cap on the front of the sprayer that has the “wings” as I like to call them.

    The Ultimate Guide for How to Use a Paint Sprayer - from set-up to thinning the paint to an easy clean-up, its all here!

    Turning the wings horizontally will give you a vertical spray pattern and turning them vertically will give you a horizontal spray pattern. If I intend on spraying something up and down as I spray, I use a horizontal spray. If I intend on spraying something from side to side, I use a vertical spray.

    You can also turn the wings at a 45 degree angle and spray horizontal or vertically, but honestly, I don’t think I’ve ever used that method.

    Step 4: 

    Plug in the sprayer and paint.

    Another one of my favorite features of the sprayer is that it doesn’t need an air tank – just an extension cord.

    how-to-use-a-paint-sprayer-12

    When you start spraying, hold the sprayer about 5-10 inches away from the piece you are painting. Pull the trigger and start painting. You want to move your entire arm – not just your hand – as you spray, and keep your arm in constant motion. Don’t stay in one place for too long.

    The Ultimate Guide for How to Use a Paint Sprayer - from set-up to thinning the paint to an easy clean-up, its all here!

    The sprayer won’t magically cover the entire piece in one coat. Typically, I have to do 2-3 light coats, but it takes far less time to spray those coats than hand paint them. There will probably be some small spots that don’t have paint on them the first go around – that’s ok  – you’ll get them next time. You can tilt the sprayer to get into hard to reach places, just try not to tip it anymore than 45 degrees. Let the paint dry between each coat. You can protect your paint job with a topcoat (see thinning instructions above), using the sprayer exactly the same way.

    Step 5:

    Clean-Up.

    After you are done painting, first clean out the paint container cup and the paint pick-up tube. If you did any tilting of the sprayer, you’ll also want to clean out the area where the container cup gets screwed on. Set the cup aside, but re-attach the paint pick-up tube. To clean the rest of the sprayer, attach the black faucet attachment end of the Rapid Clean to your water hose and the tube end to the pick-up tube. Clamp both ends.

    The Ultimate Guide for How to Use a Paint Sprayer - from set-up to thinning the paint to an easy clean-up, its all here!

    Turn on the water, pull the trigger and let the water run through the sprayer until it runs clear.

    The Ultimate Guide for How to Use a Paint Sprayer - from set-up to thinning the paint to an easy clean-up, its all here!

    And that’s it – the Rapid Clean makes cleaning the sprayer so easy.

    Have any of you used a Finish Max paint sprayer before? Any tips or tricks you can share with us?

    Want to come back to this paint sprayer guide later? Just pin the image below!

    How to Use a Paint Sprayer | Using a Paint Sprayer on Furniture | Paint Sprayer Tips | Paint Sprayer for Furniture Makeovers

    Before you hurry off…

    They used a paint sprayer to paint outdoor cushions, wicker furniture, metal furniture and more!!! Outdoor Furniture Makeovers that are easier than you think!

    Sign up to get my posts delivered to your inbox here.

    Stalk Me Here:

    Bloglovin / Pinterest / Facebook / Twitter / Google+ / Instagram

    blog-signature-summer-15

    Disclosure: This post was a collaboration with HomeRight. However, all opinions and creating post titles that are soap opera worthy are 100% mine.

    SaveSaveSaveSaveSaveSave