Tag: makeover

  • Mudroom & Laundry Room Combo Ideas

    Mudroom & Laundry Room Combo Ideas

    Do you have a laundry mudroom space in your home? Whether the two are combined in one space or separate, this makeover will give you mudroom laundry room ideas that are pretty, but most importantly, functional.

    This is one of those projects in which I eat my words.

    Full on crow.

    So here’s the thing.

    A few years back, when everyone and their mama was giving their laundry rooms these beautiful makeovers, I was like, “Nope. Totally not spending money to make my laundry room look better when no one ever sees it.”

    Also, I hate bandwagons. And that seemed like a kind of bandwagon thing. So I totally ran running in the opposite direction.

    Back then though, we lived in the Beloved Foreclosure. And the laundry room was in the garage, hence there really wasn’t a laundry room at all, more like a spot for the washer and dryer. So duh, totally not putting in pretty tile or an elaborate wallpaper there.

    And then we moved into the 70’s Landing Pad.

    And in the 70’s Landing Pad, we have a laundry room that opens to the den. And also to our backyard. So it also functions like a mudroom for us. We use this space a good bit. And when people are over, they see this space. And there was no door to close it all up.

    And it was looking like this…

    The mudroom laundry room before.
    The laundry room mudroom before.

    Disclosure: Aiden Lane provided me with the bench and ironing center. All opinions are 100% mine. This post contains affiliate links for your shopping convenience. Click here to read my full disclosure policy.

    It’s been two years since we moved into the house and y’all, we hadn’t done a thing to this space. Well, I had ripped down the curtains in a fit of anger one day, but besides that, the walls and trim were still adorned with cornflower blue.

    On top of it all, the room was just gross. The walls and tile floor all needed a good scrubbing like five years ago.

    Obviously, it was also ugly.

    I knew this space needed to look better. I couldn’t just close a door and it be hidden. And, I wanted it to look better.

    But I didn’t really know where to start or what I wanted to do with it besides that it needed to be a functional laundry room and it would be good to also use it as a mudroom to drop and store things that we take outside to play with and things for the pool.

    Mudroom Laundry Room

    Finally, inspiration struck and the whole design plan came together for this space in under 24 hours when I happened upon this wallpaper one afternoon.

    This light bulb moment is when it also became obvious to me that I was about to eat crow.

    Mudroom Laundry Room Ideas - swimmers wallpaper

    So I did what I said I wouldn’t do. I spent money on my laundry room. I also made it function as a mudroom to justify the costs more in my head. 😉

    The space is now light, bright, airy, colorful and I love every damn inch of it. As it turns out, that crow didn’t taste half bad.

    Laundry Mudroom Ideas

    Let’s start as you enter the room…

    Bright Fresh Paint and a Deep Cleaning

    Mudroom laundry room - beige walls, bright pops of color.

    Wall Paint / Beach Towel / DIY Island

    This is looking into the laundry / mudroom from the den. Obviously, I painted all the walls and trim. The trim and back door got a fresh coat of white paint and the walls got a coat of Vanilla Paste – bye bye cornflower blue. Now, I refused to replace the tile in here. Instead, I spent a few days scrubbing it clean with my SteamMachine and it’s brass brush attachment.

    Cleaning the tile in the laundry room.

    Y’all, this tile was disgusting – I wore out four of those brass brushes. I hadn’t realized just how bad it was. For the most part, it cleaned up really well. There are some spots on the grout that didn’t clean up, but I think they are permanent stains and that’s alright – it’s just a mudroom and laundry room.

    Maximize Storage

    Laundry mudroom ideas - hook storage on walls.

    Beach Towel / Leaf Hooks (similar)

    I tried to take advantage of just about every inch of wall space I had and maximize it for storage and function. On this wall, I hung three hooks to hold wet towels as people come in from the pool.  I also splurged on a new beach towel because it coordinated perfectly with that flamingo art print. Also, we use the heck out of beach towels around here with our pool so it won’t just be hanging there looking pretty.

    Make It Fun with Art

    Mudroom Ideas - fun art, flamingo print.

    Flamingo Print

    Since most of the walls in here are neutral, I wanted to bring in lots of playfulness and color with art. This flamingo print called Bird Bath fit the bill. I think it has a slight Palm Beach vintage type feel to it and y’all know, I’m a sucker for that. Plus, anytime I see a flamingo or a flamingo art print, I always think of the Circus at age two carrying around plastic flamingos from the screened in porch at our old house kissing and loving on them.

    Go for a Bold Wallpaper

    Mudroom Laundry Room Makeover using colorful swimming wallpaper.

    Swimmers Wallpaper

    This wallpaper was what spurred the whole makeover. I fell in love with its somewhat vintage, but colorful and playful feel. The fact that it was so colorful made it basically effortless to coordinate other things in the room with the wallpaper – I had a slew of colors to choose from that would work well with it.

    Don’t forget special art.

    Mudroom Laundry Room Ideas - swimmers on wallpaper

    Shadow Box

    Also on this wall, I added one single piece of “art” – one of the Circus’ swimsuits from when she was a baby. From the time I found the Swimmers wallpaper, I knew putting one of her swimsuits on the wall was only fitting. I bought this shadow box from Michael’s, ironed the swimsuit really well then used pins and double sided tape to mount it inside the frame.

    Squeeze in a bench with storage.

    Mudroom Ideas - Bench with Storage

    Hart Storage Bench

    Since this is the room where everyone usually heads to the pool and/or backyard from, a place to sit down and put some sunscreen on or take some muddy shoes off was needed. However, as I said earlier, I also wanted to create as much storage as I could for this space. This Hart Storage Bench from Target met both those criteria.

    Mudroom Laundry Room: Bench with Hidden Storage

    Hart Storage Bench

    First off, it’s gorgeous. To me, this bench has a classic feel that won’t easily date and I feel like it might also have a touch of Hampton/Nantucket style in there too. I’ve never been to either place, but ya know, that’s what this bench tells me. 😉 Second, it seems extremely  well made. You do have to put it together, but this thing is solid. Third, it has hidden storage! And last but not least, all that for under $150!

    Mudroom Laundry Room Ideas - White Bench with Hidden Storage

    Hart Storage Bench

    The seat of the bench is divided into two sections that each lift up for hidden storage. I stashed away all our extra beach towels in here and still have room left to grow.

    Incorporate a Workspace for Laundry or Small Outdoor Projects

    Turning to the right of the bench, is a backdoor that leads outside as well as the kitchen island from our previous house.

    Laundry Room Ideas - Island for folding clothes with buckets for storage underneath.

    DIY Island

    When my in-laws remodeled the kitchen at our old house (remember – they moved into the Beloved Foreclosure after we bought the 70’s Landing Pad), they wanted a kitchen island with more hidden storage. Since Grunt and I built the kitchen island that was there ourselves (while I was pregnant and with barn wood from my great grandfather’s barn), I wanted to hold on to the island. We brought it to our house and put it against this wall in the laundry room as a folding center of sorts.

    I found the red and aqua buckets at Target in their seasonal/summer section and was so excited to find them since they matched perfectly with the Swimmers wallpaper. They were just $6 a piece too! They hold work shoes and larger outdoor play items like basketballs, etc. – great storage space!

    Be Playful

    Mudroom Ideas - playful art, girl with a beach ball

    Play the Day Away Art Print

    When I found this Play the Day Away art print, it was obvious it would work perfectly in the mudroom laundry room, but I also loved it because it’s a little reminder to literally play the day away and have a good time right before you walk out the backdoor.

    Also, if you’ve seen any of my Instagram Stories lately, you know I’ve been working on my cut flower garden this summer. Those sunflowers were cut straight from that garden!

    Don’t try to hide the washer and dryer away.

    Mudroom Laundry Room Combination - workspace for folding clothes.

    Turning the corner again, is where our washer and dryer are housed.

    Mudroom Laundry Room Ideas for a Combined Space - washer and dryer in nook.

    If you remember from the before photo, this space had doors on it. We actually opted to take those doors off and get them out of the way to make it a little easier to do laundry. I should also state here that Grunt Labor does all our laundry and if taking doors off to make it easier makes him happier while doing the laundry, then I’ll do that and whatever else it takes so that I don’t have to do the laundry. Praise Jesus for men who do the laundry, because otherwise our family would be running around either naked or in smelly clothes.

    I did give this entire closet/now alcove a coat of paint to brighten it up. I also replaced the shelf that was above the washer and dryer as the old one was gross and one side was being held up with a vertical 1″ x 4″ coming up from the ground.

    Maximize Wall Space

    To the right of the washer /dryer area, we installed a wall mount ironing center.

    Laundry Room Ideas - Wall Mounted Ironing Center to save space.

    Wall Mount Ironing Center

    Previously, the ironing board was stashed to the side of the dryer and the iron was in the upstairs closet. I realize this made no sense at all. Needless to say, when something needed ironed, I really evaluated how badly it needed ironed before I lugged everything out. And more often than not, I ended up wearing something that was a little wrinkled. This ironing center makes it so much easier to get things ironed.

    Mudroom - Laundry Room Ideas - Ironing Center Mounted on Wall

    Wall Mount Ironing Center

    All you do is open the door, flip down the ironing board and pull out your iron, starch, whatever you need. It can all be stored right there in the cabinet. There’s even a couple of hooks for you to hang stuff on if needed.

    Mudroom - Laundry Room Makeover Ideas - storage baskets on wall.

    There was also another open closet area in this space when we first got the house. We opted to remove some of the trim around the opening in order to fit the refrigerator in here that had once been in the kitchen. This frig holds lots of cold drinks that people can easily run in and get when they are outside.

    Get Creative with Storage

    Mudroom Storage Ideas - vintage locker baskets mounted on wall for storage.

    There was a little wall space here left for claiming and I did just that by adding more storage here. I hung vintage metal locker baskets with cup hooks (be sure to hit studs or use anchors if you do this!) to hold more outdoor related items. The top one has all our sunscreens and the bottom one holds smaller pool toys like water guns, etc. I went with the cup hooks so that the whole basket could easily be taken off the wall to take outside and then just brought back in and popped up on the wall again.

    That’s it for this mudroom laundry room makeover, but probably not the first time I’ll have to eat my words. 😉

    Share any modern mudroom laundry ideas you have in the comments!

    Looking for more great ways to organize and maximize storage?

    DIY Clothes Rack – an easy fix for extra clothes storage!

    5 Simple Storage and Organization Ideas – simple, but effective and affordable!

    Colorful Mudroom Makeover – bright, colorful and super functional!

    10+ Kitchen Ideas for Decorating, Organizing and Storage – the hardest working room in the house!

    Want to remember these ideas for later? Just pin the image below!

    laundry and mudroom ideas
    Gift Ideas Signature
    Mudroom and Laundry Room Makeover Ideas

    SaveSaveSaveSave

  • Welcome to the jungle.

    Welcome to the jungle.

    There is one thing I really wish I could make happen when a person walks into our den.

    Either Guns N’ Roses Welcome to the Jungle or an Elvis song would start playing automatically.

    Alas, my skills aren’t capable of such an epic event.

    Either way, welcome to the jungle room, otherwise known as our den. It’s inspired by, you guessed it, Elvis’ jungle room, but has our own twist on it of course.

    Disclosure: Mohawk Home provided me with the rug for this space and Minted provided me with some of the art. However, all opinions and bringing paneling back in style are 100% mine. This post contains affiliate links for your shopping convenience. Click here to read my full disclosure policy.

    The Jungle Room Den Makeover

    We started with this….

    BEFORE: The Jungle Room Den Makeover

    And now we’re here…

    The Jungle Room Den Makeover inspired by Elvis' Jungle Room: They kept the paneling and it actually looks really good with the black trim! | Zebra Print Rug | Malachite Side Table | Black Leather Chesterfield couch | Black Painted Brick Fireplace | Paneled Walls

    Rug / Trim and Fireplace Color / Sofa / Light Fixture

    Yes, gasp, we kept the paneling. And we love it.

    Besides the furniture of course, all we actually did in here was switch out the light fixtures, paint the trim and the fireplace. Can you believe how different it looks just with those three changes?

    I really really wanted to give the paneling a try. Grunt Labor really didn’t. I had seen my friend, Kellie’s house where she kept the paneling and it looked great. Also, I didn’t want to spend any more money than we had to on the renovation. And it is the 70’s Landing Pad, I really wanted to give a nod to the house and it’s roots with the design and the paneling helped to do that. Grunt and I negotiated and came to an agreement that I could keep the paneling as long as he gets a bigger television by the end of the year. I think I got the better end of the deal, he thinks he did. So obviously it was a pretty good deal. 

    Let’s back up for a second though, before you enter the den, when you come down the stairs, you’re greeted by this..

    The Jungle Room Den Makeover inspired by Elvis' Jungle Room: Watercolor Sunglasses Art

    Ray Bans Art / Brass Wall Sconce

    I was trying to keep the den more “manly” than the living room so that Grunt Labor would have a space that was more him than me. I saw this sunglasses watercolor and knew it would be great for setting that tone before you entered the den. Grunt Labor has a pair of those glasses himself and I think it also lends a good vibe to the jungle room.

    The Jungle Room Den Makeover inspired by Elvis' Jungle Room: They kept the paneling and it actually looks good with the black trim! | Painted Fireplace | Paneled Walls | Black Interior Design

    I painted all the trim, bookshelves and fireplace in the den in semi-gloss Limousine Leather by Behr, which is my go-to black paint color.

    The Jungle Room Den Makeover inspired by Elvis' Jungle Room: Black Painted Brick Fireplace | Records as Art | Cowboy Boots as Decor

    I really wanted some pops of red off the black fireplace so I brought in the Shut Your Mouth art (it was just DIY art I made on PicMonkey) from the gallery wall at our previous house and threw up my little red boots from when I was a kid and also the same ones the Circus wore out. I snagged the single of mine and Grunt Labor’s song, Your Love, a while back and had been holding onto it forever. It found it’s perfect place on top of the mantel.

    The Jungle Room Den Makeover inspired by Elvis' Jungle Room: Black Painted Brick Fireplace | Cheetah Art | Cowboy Boots as Decor

    Cheetah Art / Fireplace Paint Color

    And since it is the jungle room, I of course had to give nods to some wild animals. I found this cheetah print on Minted and had it framed in a matte brass frame to pop off the fireplace and also coordinate with the light fixtures in the room.

    The most challenging aspect of this makeover for me were those built-in shelves.

    The Jungle Room Den Makeover inspired by Elvis' Jungle Room: They kept the paneling and it actually looks good with the black trim! | Painted Fireplace | Paneled Walls | Black Interior Design

    Y’all, larger scaled shelves elude me in terms of styling. The ones are the right weren’t so bad, they were actually smaller than the ones on the left.

    The Jungle Room Den Makeover inspired by Elvis' Jungle Room: They kept the paneling and it actually looks really good with the black trim!

    Brass Horse (similar ones) / Copper Frames

    I pretty easily styled those without making it look too cluttered. I just added in a few framed pictures and trinkets. One goal of mine in this house was to have more framed family photos, whether candid or posed out, so the shelves gave me the perfect opportunity for that. I put framed photos of the Circus and my Pap when he was a kid on the top shelf and a photo from our wedding on the bottom shelf. However, on the other side of the fireplace it seemed everything I did made the shelves look like a cluttered mess.

    The Jungle Room Den Makeover inspired by Elvis' Jungle Room

    Brass Horse Head Bookend (similar ones) / Magnifying Glass & Letter Opener Set  / Vintage Travel Clock (similar ones)

    Luck was on my side though and my father-in-law sent up a set of his old law books – all with beautiful green covers. I used those throughout the shelves and it worked out nicely. That photo there is my in-laws on their wedding day. It’s one of my favorite pictures. They laughed at me when I first framed it. 🙂

    The Jungle Room Den Makeover inspired by Elvis' Jungle Room: They kept the paneling and it actually looks really good with the black trim! | Zebra Print Rug | Malachite Side Table | Black Leather Chesterfield couch

    Sofa / Malachite Table / Navy Side Tables / Fur Throw / Rug

    If there was one thing that I got deals of a lifetime on with this house, it’s the sofas. The living room sofa was a steal of a deal and a beauty. This sofa, which is actually the Gordon Tufted Chesterfield Sofa from Home Decorators Collection was a Craigslist find. The lady selling it had ordered it for her bedroom sitting area and once she got it, she decided it was more for a den and didn’t want to use it in her bedroom. Yes please. I will take that off your hands for hundreds less than it would cost new. She had literally never used it one single time, y’all! I drug Grunt and Bill out in the freezing rain (literally, freezing rain) to buy it because I was so scared someone else would get it before I could.

    The Jungle Room Den Makeover inspired by Elvis' Jungle Room: They kept the paneling and it actually looks really good with the black trim! | Vintage Brass Lamp | Antlers | Palm Beach Art

    Ocean Avenue Art Print

    There’s a ledge that runs across the wall the couch is against. I created this small vignette just above the couch to create another focal point in the space as well. The brass lamp was a vintage find and I’ve had the antlers for quite a while. Grunt Labor picked out the vintage car and palm print, which is called Ocean Avenue. He said it reminded him of Isle of Palms, which is our favorite beach destination. A photo of Grunt and his Grandpa digging up dirt worked in perfectly with this vignette too.

    The Jungle Room Den Makeover inspired by Elvis' Jungle Room: They kept the paneling and it actually looks really good with the black trim! | Zebra Print Rug | Black Leather Chesterfield couch

    Navy End Table / Oversized Jack / Sofa

    For now, we have the navy end tables in here. I really love their lines and plan on keeping them, but not sure if I should paint them. I thought the navy might clash too much against the black, but it doesn’t seem to. What do you think? The tables are topped with the snakeskin lamps. I did have those in our master bedroom, but realized they most definitely fit in better in the jungle room. 😉

    The Jungle Room Den Makeover inspired by Elvis' Jungle Room: They kept the paneling and it actually looks really good with the black trim! | Zebra Print Rug | Malachite Side Table | Black Leather Chesterfield couch | Fur Throw

    Fur Throw/ Malachite Table

    The fur throw used to be in the guest room at our previous house. However, he wasn’t using it over here, so I snagged it for the den for now.

    The Jungle Room Den Makeover inspired by Elvis' Jungle Room: They kept the paneling and it actually looks really good with the black trim! | Zebra Print Rug | Malachite Side Table | Black Leather Chesterfield couch | Fur Throw

    Fur Throw / Malachite Table

    The malachite table was my birthday gift from my dad. He did good, right? He may or may not have gotten an email with the exact link to what I wanted. 😉

    The Jungle Room Den Makeover inspired by Elvis' Jungle Room: They kept the paneling and it actually looks really good with the black trim! | Vintage Black Pleather Chair | Fur Throw

    Down from the couch is the vintage black chair we had in our previous living room. Yes, I cheated and threw the fur throw on it for photos. #sorrynotsorry It just looks so good on both the couch and the chair.

    The Jungle Room Den Makeover inspired by Elvis' Jungle Room: They kept the paneling and it actually looks really good with the black trim! | Old Radio turned Bar | Vintage Black Pleather Chair | Fur Throw

    Radio turned Bar / Green Lamp / Giraffe Tray / Cow Print

    Opposite the fireplace is the vintage radio turned bar. Once more, not 100% sure about the blue in this space, but it works for now. The cow art used to be in our bedroom and the lamp used to be in Bill’s room, but neither was needed in those spaces this time around so the den took custody of them.

    The Jungle Room Den Makeover inspired by Elvis' Jungle Room: They kept the paneling and it actually looks really good with the black trim! | Zebra Print Rug | Malachite Side Table | Black Leather Chesterfield couch

    Rug

    The big statement piece in the room that really lets you know this is the jungle room is the rug. It’s the Waitsfield Zebra rug from American Rug Craftsmen. The rug is bold in pattern, but thick and plush in comfort. It gives a cozy feel to the space when you walk across it. The Circus has already claimed it as one of her favorite places to play on the floor. It’s got stain protection built into it as well, which we all know is good for the Circus.

    Alright, what do you guys think of the Jungle Room Den Makeover?

    I can’t wait to hear your thoughts – good or bad! ha!

    Shop the Jungle Room…

    [show_shopthepost_widget id=”1850871″]

    blog-signature-summer-15

    pin-this-post-2

    Jungle Room Inspired Den Makeover | Den Ideas | Den Decorating Ideas | Jungle Room Ideas | Elvis Jungle Room | Den Ideas with Fireplace

    SaveSave

  • 9 Simple and Easy Bed Makeovers and Hacks

    9 Simple and Easy Bed Makeovers and Hacks

    I can’t tell you how many times I’ve ran across DIY headboards on Pinterest.

    I’m confident DIY headboards could run Pinterest all by themselves.

    Now, I’m not bashing on DIY headboards at all.

    If you have patience and an insane amount of upholstery and tufting skills, then by all means make your own headboard.

    However, I don’t.

    I’m in favor of using what I’ve got.

    This could also mean that I’m cheap. That’s cool too. I’ll own it.

    I can paint a headboard faster than I can build one and cheaper too.

    No, it might not look as chic as a velvet upholstered one would, but if it looks like any of these bed makeovers, I wouldn’t turn my nose up at it.

    This post is sponsored by HomeRight, however all opinions are 100% mine. This post contains affiliate links for your shopping convenience. Click here to read my full disclosure policy.

    Simple and Easy Bed Makeovers and Hacks

    Americana style, anyone?

    Headboard Makeovers - Patriotic Shades, Red and Blue. Painted with the HomeRight Finish Max paint sprayer - gives a flawless finish and easy to use.

    That red. Oh my. Makely Home killed it with this bold red headboard. Gail from My Repurposed Life went with a classic navy for this twin headboard makeover. Navy is always a good pick – it will never fail you. Both of them used their HomeRight Finish Max Sprayers to makeover the beds.

    Shades of Green

    Headboard Makeovers: Shades of Green - Awesome furniture makeovers!

    I love the lines of Refresh Restyle’s headboard makeover, but I am also totally digging the bolder green hue on Jesse Coulter’s makeover.

    I know. Jenna likes the green. Imagine that.

    Play It Safe White

    Bed Makeovers: Shades of White

    Play it safe with a classic white like Finding Silver Pennies and 11 Magnolia Lane did.

    When in doubt, go for polka dots.

    Bed Makeovers: Easy to do polka dot bed.

    I’ve never been able to resist a good (and really easy to paint!) polka dot. After I sprayed this bed with my Finish Max, I popped on a few polka dots.

    And if you just have to make your own headboard…

    You can use these ideas to repurpose your old bed.

    Bed Hacks: Turn old headboards and footboards into benches and coat racks!

    Domestically Speaking made a charming bench from an old bed and My Repurposed Life made simple coat racks. So clever! They both used their paint sprayers to get in the nooks and crannies with ease.

    So are you a bed makeover or a DIY bed kinda person?

    pin-this-post-2

    Bed Makeover Ideas | Bed Makeover Paint | How to Paint a Bed Frame | Bed Makeover DIY | Bed Makeover DIY Head Boards

    You know you don’t wanna miss any of this crazy.

    Sign up to get my posts delivered to your inbox here.

    Stalk Me Here:

    Pinterest / Facebook / Twitter / Instagram

    blog-signature-summer-15

  • The Bold And The Beautiful Furniture Makeovers

    The Bold And The Beautiful Furniture Makeovers

    Yes, I did try to make that title sound like a soap opera on purpose.

    Why?

    Because these furniture makeovers deserve a title that is just as dramatic as they are.

    Because they are bold and beautiful.

    This post contains affiliate links. 

    The Bold and The Beautiful Furniture Makeovers

    Add a punch of color to your headboard.

    Bold and Beautiful Furniture Makeovers: Headboard Makeovers / Bed Makeovers / Painted Headboard

    Of course its no surprise that I would be quite smitten with that kelly green headboard from Jesse Coulter. Adding that hispanic vibe blanket on top is giving me some serious inspiration. And then there’s the red. Red is becoming a new favorite of mine as well. Makely Home knocked it out of the park with that color choice. Both of the headboards’ nooks and crannies were no match for the HomeRight Finish Max!

    Shades of Pink & Orange

    Bold and Beautiful Furniture Makeovers: Pastel Furniture Makeovers / Pink Furniture Makeovers

    I have no idea how Cuckoo for Design came up with such an amazing color combination for that midcentury modern dresser makeover, but its gorgeous. And while I’m not a huge fan of “little girl pink,” it definitely pairs well with gold hardware and a pop of pattern like the night stand makeover that 11 Magnolia Lane pulled off.

    When in doubt, black will never fail you.

    Bold and Beautiful Furniture Makeovers: Black Furniture Makeovers / Black and Gold / Black and Leopard Print

    Leopard Print Upholstery and Faux Black Bamboo. I die. This chair makeover from The Gathered Home has me drooling. Black + Gold will never fail you either. I gave this french country desk a modern, yet still classic makeover with my Finish Max paint sprayer.

    Go Aqua-licous

    Bold and Beautiful Furniture Makeovers: Aqua Furniture Makeovers The Shabby Creek Cottage gave her wood cabinet not only an aqua treatment, but also turned it into a great beverage center. Delicious and DIY gave her coffee table a super fun makeover, topped off with some gold stenciling details.

    Shades of Yellow

    Bold and Beautiful Furniture Makeovers: Yellow Furniture Makeovers / DIY Console Table / Mustard Furniture Makeovers

    Not only do I love the yellow shade that The Hunted Interior used for her console table, but I also love the fact that she made it – I totally want my own. Pneumatic Addict used a Finish Max Pro to complete her black and yellow dresser makeover.

    Bold Pink Furniture Makeovers

    Bold and Beautiful Furniture Makeovers: Bold Pink Furniture Makeovers / Dresser Makeover / Chair Makeover / Houndstooth Upholstery / Coral Dresser Makeover

    A good, bright, coral pink paired with gold never gets old. The Chronicles of Home updated this dresser with the perfect amount of gold detailing. And then there’s my bright pink chair paired with a classic houndstooth upholstery. Honestly, halfway through that makeover, I was a little worried, but I love the contrast in color and pattern.

    pin-this-post-2

    Bold and Beautiful Furniture Makeovers / Colorful Furniture Makeovers / Easy Furniture Makeovers

    Do you have any furniture that is just begging for a bold and beautiful makeover?

    Find more inspiration for furniture makeovers on my Knock-Your-Socks-Off Furniture Makeovers Pinterest board! 

    Follow Jenna @ Rain on a Tin Roof’s board Knock-Your-Socks-Off Furniture Makeovers & Hacks on Pinterest.

    Before you hurry off…

    They used a paint sprayer to paint outdoor cushions, wicker furniture, metal furniture and more!!! Outdoor Furniture Makeovers that are easier than you think!

    Sign up to get my posts delivered to your inbox here.

    Stalk Me Here:

    Bloglovin / Pinterest / Facebook / Twitter / Google+ / Instagram

    blog-signature-summer-15

    Disclosure: This post was a collaboration with HomeRight. However, all opinions and creating post titles that are soap opera worthy are 100% mine.

    SaveSaveSaveSaveSaveSave

  • Mid-Century Modern Lamp Makeover (A.K.A. I Dream of Jeannie Lamp)

    Mid-Century Modern Lamp Makeover (A.K.A. I Dream of Jeannie Lamp)

    I watched reruns of I Dream of Jeannie when I was a kid. It wasn’t one of my favorites, but I thought Barbara Eden was so pretty. And while Larry Hagman will always always always be J.R. Ewing in my mind, he was still pretty great in I Dream of Jeannie.

    Well over a year ago, I found a lamp that screamed “I Dream of Jeannie” at a yard sale.

    It was $2.

    It came home with me.

    And as most things do around here, it sat for a while until I had a great idea for it.

    And finally I did.

    If you follow me on Instagram, you may have seen this image where I asked YOU to tell me what to do with the lamp…

    Mid-Century Modern Lamp Makeover with Velvet Finishes

    Disclosure: This post was a collaboration with Velvet Finishes. However, all opinions and love of bright and cheery color schemes are 100% my own. This post contains affiliate links for your shopping convenience. Click here to read my full disclosure policy.

    You guys were just full of ideas.

    So many ideas that I was even more confused as to what to do to the lamp.

    Some of you even said to leave it as is, but that wasn’t an option – there were lots of chips in the finish and you know me – I needed some color.

    As I was pouring over my paint swatches stressing over what to do, the part-time child, Will, who insists on being called Bill on the blog (I know – I have no idea why either) walked over, played with the paint swatch for a while and said let’s do these colors…

    Velvet Finishes Exotic, Bold, and Minimalistic

    I looked at the colors and wondered how in the hell a 17 year old boy could come up with that great color combination in under five minutes.

    So we started painting. 

    Velvet Finishes Paint Lamp Makeover

    To do this lamp makeover, we used:

    • Paintbrushes of various sizes

    After sitting in my craft room for a year, this lamp was pretty dirty. So, to start with, we cleaned it up really well with Ready, which also primes pieces at the same time.

    Use Ready by Velvet Finishes to clean and prime before painting.

    I just sprayed the Ready onto a paper towel and wiped the lamp down. You can also spray it directly onto a piece, let it sit, then wipe it down.

    I gave the lamp a little while to dry and then started painting.

    Paint Velvet Finishes onto the piece.

    With all the nooks, crannies, and designs going on with this lamp, we used a variety of paint brush sizes. And I won’t lie, since we were using three different colors, it took a while to finish this lamp. I worked on it on and off for 30 minutes or so each day over the course of about five days. First, I painted all spots I wanted Bold, then I went back and painted the spots I wanted Exotic, and finally finished it off by painting some of the small details Minimalistic.

    Wow! That color combination is so pretty! Mid-Century Modern Lamp Makeover with Velvet Finishes Paint

    It wasn’t as hard as it looks to paint all the trim and details. When you use a small paintbrush, its actually pretty easy. I did have baby wipes on hand to quickly wipe up any paint if it got where it wasn’t supposed to be.

    I haven’t decided where I will put it just yet, but I’m thinking its the perfect color scheme for an outdoor living space – maybe the porch?

    Wow! That color combination is so pretty! Mid-Century Modern Lamp Makeover with Velvet Finishes Paint

    It also seems very Lilly Pulitizer-ish to me, which I won’t even get started on that whole Target fiasco.

    What do you think about this bold color scheme? 

    Need more lamp makeover ideas? 

    Don’t miss these 16 lamp ideas and makeovers  – they are so good.

    Find out how to make a lamp out of a bottle here.

    And see how easy it is to make your own gorgeous agate slice lamp finials here.

    You know you don’t wanna miss any of this crazy.

    Sign up to get my posts delivered to your inbox here.

    Stalk Me Here:

    Pinterest / Facebook / Twitter / Instagram

    pin-this-post

    Lamp Makeover Ideas | Painted Lamp Makeover Ideas | DIY Lamp Makeover | How to Paint a Lamp | Lamp Makeover DIY

  • DIY Countertops: 10 Countertop Makeover Ideas on a Budget

    DIY Countertops: 10 Countertop Makeover Ideas on a Budget

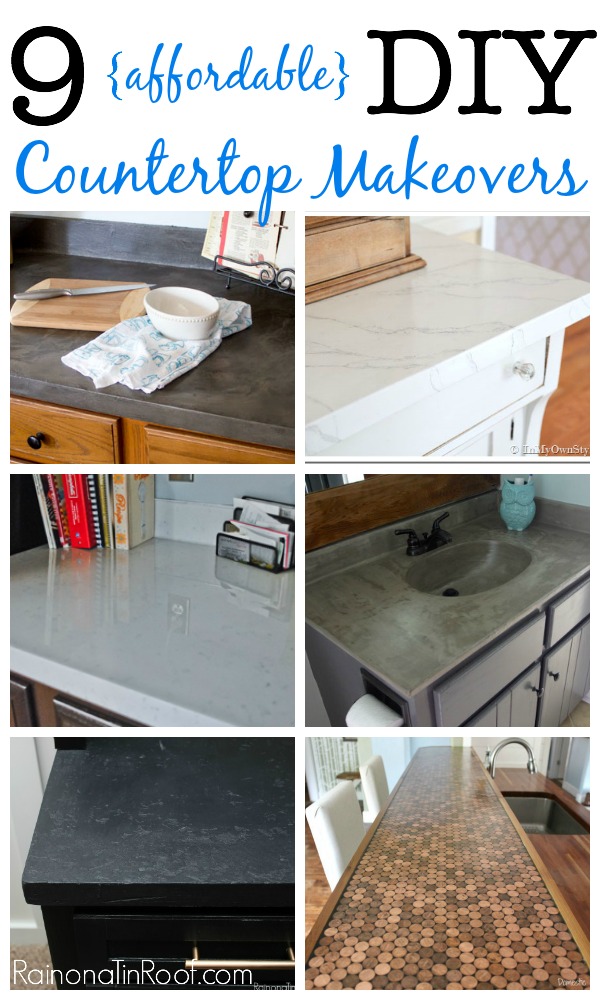
    Looking to update your countertops without breaking the bank? Give one of these DIY countertops a whirl then! These totally doable and cheap countertop makeover ideas will give your kitchen a whole new look in a weekend!

    I dream of marble countertops.

    I dream of having them in my kitchen and bathrooms.

    The dream is cut short when I realize two things:

    1. The high maintenance that is required to keep marble counters pristine.

    and

    2. The cost of marble countertops.

    New countertops, particularly stone counters, are expensive.

    The words “large” and “budget” are never put together when it comes to projects around our household.

    Since doing my faux soapstone countertops (link just below), I have found that the internets are filled with awesome DIY Countertop Makeovers. With these ideas, you can redo kitchen countertops without breaking the bank, but while still getting a whole new look in your space.

    DIY Countertops

    This post contains affiliate links for your shopping convenience. Click here to read my full disclosure policy.

    DIY Countertop Ideas

    These kitchen home improvement projects only look expensive…

    How to Make Your Laminate Counters Look Like Stone

    Countertop Makeover

    When Grunt Labor and I made over his man cave, we couldn’t afford a new countertop for his built-ins. Instead, I figured out a way (for only $15!) to turn them into “stone.” All you’ll need is a little elbow grease and some countertop paint!

    DIY Upholstered Countertop

    DIY Countertop Ideas

    Give your countertops an unexpected twist with upholstered countertops. Of course, this option is going to work best for built-in cabinetry countertops, not kitchen counters.

    DIY Faux Carrara Marble Countertops

    How to Redo Countertops

    There is nothing Diane from In My Own Style can’t do. Seriously – she is just amazing. Case in point, this faux carrara marble counter. Is that not stunning? And she painted it! If painting faux marble seems too daunting, you could always opt for marble contact paper like this.

    How to Redo Countertops Out of Wood Doors

    Redo Countertops

    Yep, those are actual doors. This kitchen counter makeover is sheer genius. The Mustard Ceiling made those counters out of wood doors. Nope, not even kidding. And aren’t they beautiful? I love a good piece of stained wood! Salvage yards often have doors for cheap!

    A Kitchen Countertop Makeover that Will Cost You Pennies

    Kitchen Counter Makeover

    Ashley from Domestic Imperfection is the queen of repurposing items. Not only did she use paper bags for flooring one time (for real!), but she also made a countertop from pennies. Pennies, people!

    DIY Painted Countertops

    Kitchen Countertop Makeover

    One of the more popular budget kitchen countertop options is to just paint them. Jacque and Matt, the husband and wife duo from The DIY Village, used an easy kit to take their counters from blah to bold. If you don’t have any DIY experience at all, then often a countertop kit is the way to go. I’ve used this countertop kit before and it’s really simple to use!

    Glossy Countertop Makeover

    DIY Countertop Makeover

    Designing Dawn got super creative with her cheap countertop makeover. She used a mixture of different paints and products to get a glossy countertop. It’s gorgeous! Glossy finishes always grab my heart and runs with it every single time!

    Granite Look Countertop Makeover

    Cheap Countertop Makeover

    Gail from My Repurposed Life gave her countertops a chic black stone makeover. The end result looks so much like the granite we had in one of our previous homes. This countertop paint kit will give you a similar look.

    Cheap Countertop Ideas in the Bathroom

    White Painted Countertop Makeover

    Redo Kitchen Countertops

    I’m Flying South painted both her vanity countertop and sink. I love the clean, crisp white. It gives the entire space a fresh, clean feel. So fresh and so clean clean. 😉 I’ve used this countertop paint before to give counters a uniform color.

    DIY Concrete Countertops

    Kitchen Countertop Options

    Tasha over at Designer Trapped in a Lawyer’s Body updated her vanity counter with concrete for a whopping $20. I’m generally not a huge fan of concrete in home decor, but I have to say – these look good!

    Do you have any cheap countertop ideas? Share them in the comments below!

    More budget kitchen and bathroom projects you might want to see…

    7 Kitchen Island Ideas You Haven’t Thought Of Yet.. – genius ideas for kitchen islands!

    10+ Kitchen Ideas for Decorating, Organizing and Storage – functional, but still pretty kitchen ideas!

    Bathroom Remodel Ideas on a Budget – nine different ways to save loads of money without compromising on style for your next bathroom remodel.

    High Style Low Budget Home Decor Projects – for when you’ve got champagne taste, but the beer budget.

    Want to remember these counter ideas for later? Just pin the image below!

    DIY Countertops on a Budget

    You know you don’t wanna miss any of this crazy.

    Sign up to get my posts delivered to your inbox here.

    Stalk Me Here:

    Pinterest / Facebook / Twitter / Instagram

    Affordable DIY Countertop Makeovers
  • IKEA Tarva Hack: Drink Bar

    IKEA Tarva Hack: Drink Bar

    If you follow me on Facebook, you may remember a month or so back when I posted this picture.

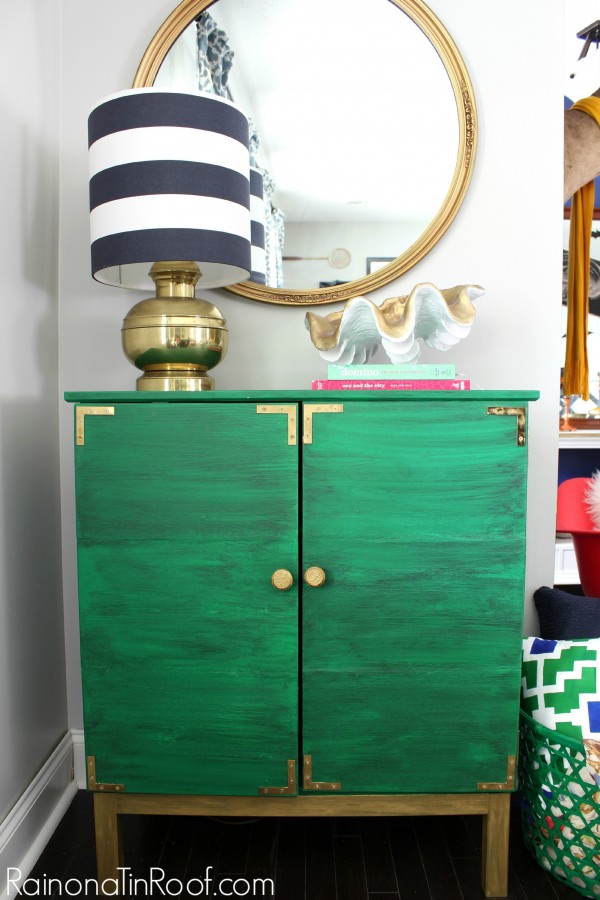
    IKEA Tarva turned Bar Cabinet

    Disclosure: This post is sponsored by HomeRight. However, all opinions and love of the color green is 100% mine. This post contains affiliate links for your shopping convenience. Click here to read my full disclosure policy.

    HomeRight offered a challenge to their brand ambassadors.

    They offered to send us one of the IKEA Tarva 3 drawer chests and then have at it – An IKEA Tarva Hack. 

    There are three things I have never passed up in life:

    1. A Good Challenge

    2. Free Furniture

    3. Cheap Beer

    My fingers and toes and arms and legs were crossed in hopes that I would be one of the five chosen ambassadors drawn from a hat for this challenge.

    And I was.

    *Insert 7th grade girl squeal here, along with fist bumps.*

    So what did I turn my chest into?

    A drink bar.

    A green one.

    With pretty gold accents.

    Bar Cabinet from an IKEA Tarva Chest
    To say that I’m happy with this piece is an understatement.

    I am still bouncing off the ceiling, throwing confetti, fist bumping the air excited about this piece.

    IKEA Tarva turned Bar Cabinet

    Steps

    #1: Put the “frame” together

    First off, I put the piece all together just as the directions from IKEA said to with the exception of the drawer slides. I just skipped that part. When the directions started telling me to put together the drawers, I stopped and had this:

    IKEA Tarva Hack: Turn It Into a Drink Bar via RainonaTinRoof.com

    #2: Construct the doors

    The second thing I did was construct the doors. I wanted to use as much of the wood as I possibly could from this piece so I used the drawer fronts to make the two doors.

    IKEA Tarva Hack: Turn It Into a Drink Bar via RainonaTinRoof.com

    I made the doors by first lining up all three of the drawer fronts and clamping them together. I measured to the middle of the top drawer front, then used our miter saw to cut right down the middle of all three drawer fronts. This left me with six pieces – three for each door. (#1 in the photo above.)

    Next, I found some pieces of wood that could be used to hold all three pieces of wood together to make a door. I used two drawer sides (that came with the Tarva) for each door and some scrap pieces I had laying around. (#2 in the photo above.)

    After I laid out the wood pieces to hold the backs of my doors together, I put glue on the pieces and clamped them down to the door front. (#3 in the photo above.)

    Finally, I ran some glue along the backside seams of the door as well (where the old drawer fronts meet). (#4 in the photo above.)

    I let the glue fully cure for one day, then I flipped the doors over and filled in the gaps of what were the drawer fronts with wood putty. I also filled the holes that had been pre-drilled for the hardware as well. After the putty was dry, I sanded it smooth.

    IKEA Tarva Hack: Turn It Into a Drink Bar via RainonaTinRoof.com

    #3: Construct the Shelves 

    The bottom shelf is pretty easy. All you do is measure the inside bottom of the frame and cut out a piece of MDF to that size. Leave about a 1/2 inch of clearance in the front so that those wood pieces (I’m sure there is a technical word for those, but you know I don’t do technical) on the back of your doors will have room. After you have your piece cut, run wood glue along the bottom inside edges of the chest and place your piece of wood on top.

    IKEA Tarva Hack: Turn It Into a Drink Bar via RainonaTinRoof.com

    The photo above doesn’t show it, but you will need to put some weight on the shelf to make sure it gets a good grip with the wood glue and the chest’s frame. I did this with the super technical resourceful method of stealing landscape bricks from my yard and placing a few around the edges.

    For the top shelf: 

    Take two of the remaining drawer sides that came with the chest and cut 3/4″ off the short sides. I once more clamped them together and did this with my miter saw. (#1 and #2 in the photo below.)

    IKEA Tarva Hack: Turn It Into a Drink Bar via RainonaTinRoof.com

    After they were cut, I measured 8 3/4″ down from the inside top of the chest and put the pieces there. Apply wood glue to the back of the pieces first, then clamp them to the chest’s frame making certain they are level. Use small screws to attach them to the frame and then remove the clamps. (#3 and #4 in the photo above.) Do this on both sides.

    Make the top shelf the same way you made the bottom one by measuring the inside of the chest. Apply wood glue to the wood pieces on the edges and then place your shelf on top and weight it down for a little while.

     IKEA Tarva Hack: Turn It Into a Drink Bar via RainonaTinRoof.com

    #4: Paint It, Baby! 

    Here’s the fun and easy part – paint it!

    IKEA Tarva Hack: Turn It Into a Drink Bar via RainonaTinRoof.com

    I used my HomeRight FinishMax Pro (which as you can see in the photo above works overtime for me) to paint this piece. The paint I used is a new find for me. It is called Velvet Finishes and requires no priming or topcoat. I used the Baroque color in my sprayer and gave the chest three light coats. The paint worked just fine in the sprayer – just needs watering down a bit. The sprayer gave the paint a flawless finish. After the paint dried, I used a dark glaze over the entire piece to give it a bit more dimension.

    #5: Attach the Doors

    I Grunt Labor did this with simple utility hinges that I picked up at our local hardware store. Screw them onto your doors first and then onto the edges of the chest that are facing you. (Make sense?)

    *I must pause here and give a big thank you to Grunt Labor and Bill. Remember how I said the easy part was painting the chest? It totally was. Making the doors and shelves were pretty easy too. However, for me the hardest thing was lining up the hinges correctly to make sure the doors were even. Grunt Labor and Bill swooped in and saved me from an imminent meltdown on that one. Thank you, guys.

    #6: Add the Hardware

    I used two of the knobs that came with the chest, but I gave them what I’m proclaiming to be a “gold nugget” look with my HomeRight Heat Gun. I’ll post the tutorial for those soon. I also added flat L corner braces to the corners of each of the doors.

    And the result is…

    IKEA Tarva Three Drawer Chest Hack

    Gorgeousness.

    Sheer gorgeousness.

    IKEA Tarva Hack: Turn It Into a Drink Bar via RainonaTinRoof.com

    See those gold nugget beauties?

    IKEA Tarva Hack: Turn It Into a Drink Bar via RainonaTinRoof.com

    I added a towel hook on the back of one door for easy towel access and (more importantly) easy bottle opener access.

    I also spiced up the back interior of the cabinet with black and gold polka dotted wrapping paper.

    IKEA Tarva Hack: Turn It Into a Drink Bar via RainonaTinRoof.com

    Love a great home decor hack? 

    Be sure to see how I turned this bookcase into a dress up closet for my kiddo.

    Don’t miss these 14+ painted rug hacks either.

    And here are five more IKEA Tarva hacks!

    IKEA Tarva Hack | IKEA Hack | Furniture Makeover DIY | Furniture Makeover Ideas | DIY Drink Bar | DIY Bar | Furniture Makeover Before and After

    Stalk Me Here:

    Pinterest / Facebook / Twitter /Instagram

    SaveSave

  • Preppy meets Hollywood Regency Bathroom Makeover

    Preppy meets Hollywood Regency Bathroom Makeover

    I never intended to do an entire bathroom makeover when I started this a couple months ago.

    It really hasn’t been that long since the last bathroom makeover.

    I just wanted a bit more color.

    It started with the ceiling.

    I thought to myself, “Self, you should scrape off the popcorn and paint the ceiling pink.”

    Self responded with a very enthusiastic, “YES.”

    So I did.

    But then the gray paint on the walls didn’t go with the pink very well like I thought it would.

    So I painted the walls.

    And then I realized the vanity had these weird yellowy patches on it.

    So I painted the vanity.

    And then I looked at the old shower curtain – it could be a bit more stylish.

    So I made a new shower curtain and cornice.

    And then I thought to myself, “Self, what about some new artwork?”

    You can guess what Self said.

    That non-makeover escalated quickly.

    Friends, welcome to my new Preppy meets Hollywood Regency Bathroom that wasn’t supposed to be.

    Preppy meets Hollywood Regency Bathroom Makeover via RainonaTinRoof.com #bathroom

    (more…)