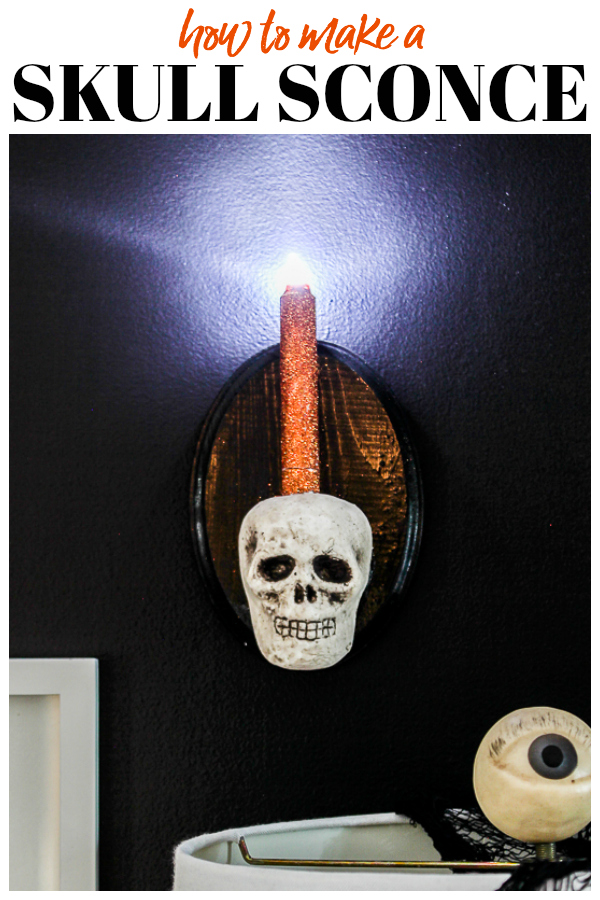
If you’ve got 15 minutes to spare, you can easily whip up this DIY skull sconce to add to your Halloween decor! It lends a touch of spook for not a lot of money!
Halloween is in full force at my house. The decorations are out and the costumes are being planned! Grunt Labor has actually said he thinks this is one of the best Halloween decorating years at our house – and I’m not even finished yet! *insert witch’s cackle here*
I have whipped up a few new pieces of Halloween decor this year – this DIY Skull Sconce being one of them.

I made him using items from the Dollar Tree and Michael’s, so it doesn’t cost much at all and it took me about 15 minutes to make – not including paint dry time. P.S. Paint dry times are perfect for beer breaks. 😉
How to Make a Skull Sconce
This post contains affiliate links for your shopping convenience. Click here to read my full disclosure policy.
Materials and Supplies:
- Small Wood Plaque – I used one of these in the oval shape.
- Black Spray Paint – I used this glossy one.
- Hanging Hardware – I used a small D-ring like this.
- Small Styrofoam Skull – I used the $1.99 ones that I found in-store at Michael’s.
- Battery Operated Candlestick – snag a 2-pack of these for $1 at The Dollar Tree
- Orange Glitter
- Mod Podge
- Hot Glue Gun
- X-Acto knife
- Cutting Board and Knife
Steps
Step 1
Spray paint the wood plaque. You can do any color you wish, but since mine was for Halloween decor, I opted for black. Let it dry. After the plaque is dry, attach hanging hardware to the back of it.

Step 2
Brush Mod Podge on the candlestick. While the Mod Podge is still wet, sprinkle orange glitter on it and let it dry.

Again, you can do any color, but orange was my pick. I do think it would also look cool with purple glitter against the black wood plaque.
Step 3
Remove the tag and small round hook from the top of the skull. Lay the skull on the cutting board and cut off a small portion of the back of the skull head as shown below.

This is to make him lay flat against the wood plaque.
Step 4
Once the candlestick is dry, place it on top of the skull’s head and trace around its base onto the skull with a pen or pencil.

Use the X-Acto knife to cut out the circle and remove about 1/4″ to 1/2″ of the styrofoam below.
Step 5
Place a good amount of hot glue on the back of the skull. Place him in the lower middle portion of the wood plaque and press him firmly in place.

Once dry, place the candlestick in the hole on top of the skull and hang it on the wall.

The candlestick is battery operated, but does not have a switch to turn on and off. I just leave the candlestick partially untwisted at the bottom where the battery connection is to keep it off and twist it closed when I want to turn it on. You’ll see what I mean when you get the candlestick.
Happy Halloween Crafting and Decorating, Friends Witches! Will you be making a skull sconce?
Need more Halloween decorating ideas? I’m your girl!
Easy DIY Halloween Decorations– my favorite Halloween decorations that don’t cost a fortune to make and are easy to complete too!
DIY Witch Broom – of the sparkly variety. 😉 Made using stuff from your yard and the Dollar Tree!
DIY Skull Drink Stirrers – so easy, you won’t believe it! Perfect for parties, as well as decor!
Want to come back to the instructions later? Just pin the image below!


Stephanie Sheridan says
Ok now you have me making something new. I am gettingthings out tomorrow
Jenna says
Oh goody!!! Happy to have got you going!!
Jenny says
Great idea for spooky halloween decor. I’ll be featuring it tonight at Merry Monday.
Jann Olson says
Spooky fun!! Thanks for sharing with SYC.
hugs,
Jann
Kippi says
Really cool idea. I think I need to think out-side-the-box too. Happy Fall, Kippi