It’s always fun to be a villain on Halloween, right? This DIY Cruella Deville costume was made from a few thrift store finds, some simple makeup and a few perfect (but budget friendly!) accessories.
It’s one of my favorite times of the year, folks – Halloween! Y’all know, the Circus and I start planning out our Halloween costumes in the summer, ok, sometimes the spring. haha!
While my witch costume from a couple years back is one of my all time favorites – you can never go wrong with a good witch! – my Cruella costume from last year was really fun to put together as well.
101 Dalmatians wasn’t ever really one of my favorite movies growing up, but Cruella has most definitely grown on me over the years. Well, Glenn Close as Cruella has grown on me – she was just fabulous in that movie!
I don’t buy readymade costumes unless it just makes more sense to – homemade ones tend to be soooo much better, right? This Cruella costume DIY was easy to put together and affordable – half of it came from the thrift store!
This post contains affiliate links for your shopping convenience. Click here to read my full disclosure policy.
Cruella Deville Costume
If you don’t want to read all the details about how I put it all together, here are “ingredients”:
Long Black Dress – Look in the formal section at your local thrift stores. I scored mine for $4 and one day, it just might double as an Ursula costume.
Fur Coat – Again, thrift store! I actually already had my black and white fur coat on hand (I have a thing for furs.), but it was purchased at a thrift store and that’s where I have found most of my furs.
I don’t go crazy on makeup with Halloween costumes. I wasn’t going to paint my face white or gray to give it that true Cruella skin color. All that paint just annoys the heck out of. So, as I did with my witch makeup last year, I just put on my regular base of makeup, perhaps a bit more heavy and then embellished with eyeshadow and lipstick.
I loaded up my eyes with green eyeshadow, black eyeliner and gave those brows a good thick coat of eyebrow mascara as well. And of course, red lips are a must for Cruella!
There are quite a few different black and white wigs out there to choose from. I actually tried three different ones and this one worked best for me. It held it’s shape nicely and had that Cruella flair. Be sure to use a wig cap with it – makes putting the wig on so much easier!
Cruella Clothing and Accessories
For the base of my Cruella outfit, I just found a long formal black dress from the thrift store. It certainly doesn’t have to be a formal dress, but when it’s only $4, you go for it. I paired it with a black and white fur coat I already had as well, but had found at a thrift store a few months back.
Don’t forget to accessorize! Red gloves and a cigarette holder are no-brainers for Cruella. I also opted to glam her up a bit as well with some oversized costume jewelry.
I’ve had those clip on earrings for years and this costume turned out to be the perfect chance to wear them.
And if you have a significant other like mine who prefers extreme comfort in his Halloween costume, you can get him this Dalmatian costume…Find it here.
Looking for another fun Halloween costume? Here’s one of my all time favorite DIY witch costumes.
And this DIY witch broom is a must for accessorizing your witch costume AND decorating with!
If you want to wow guests with your Halloween decor, but don’t have a lot of time or money, then these Halloween decoration ideas are for you! Who said cheap Halloween decorations can’t be fab too?!
We just got back from spending a few days in New Orleans and that only put me more in the Halloween spirit. I love New Orleans all the time – it’s my favorite – but being down there during October with everyone getting into the Halloween spirit was a real treat.
This was the Circus’ first trip to New Orleans and she has now proclaimed it her favorite as well. I can now consider my parenting style a complete success. 🙂
I haven’t had time to photograph the whole house for Halloween and share all our Halloween decorations, but I was able to snap a few favorite scenes and setups around the house.
My Halloween decoration ideas are easy to copy and/or put your own unique twist on. So many of my decorations have either been DIYed, thrift store finds or twists on Dollar Tree halloween items, so they are really affordable too.
This post contains affiliate links for your shopping convenience. Click here to read my full disclosure policy.
Cheap Halloween Decorations
1. Create a Witch’s Workspace
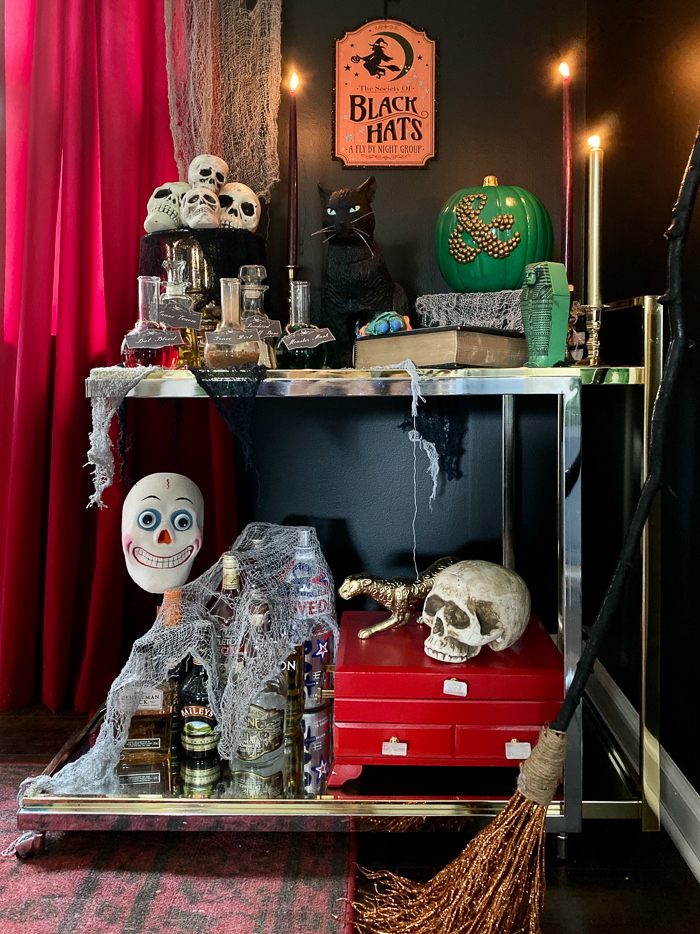
This is always one of my most favorite parts of decorating for Halloween – creating a space for the house witch to mix up her potions.
I clean off my bar cart for this, throw creepy cloth and candles about and lots of skulls. And don’t forget the witch’s broom, of course – here’s how I made that one above.
Of course, potions are a must as well. Grab these free printable potion labels to adorn your own potion bottles. For the actual bottles, I have these and a few ones I’ve found at thrift stores as well. Just always be on the lookout for creepy/older looking glass bottles.
2. Put skulls anyplace you can stick ’em.
You may have noticed the mounded skulls coming out of my champagne bucket on the witch’s table. I love to use my “everyday” decor and even serving pieces during this time of year and fill them up with creepy skulls or other Halloween items.
No reason to spend a fortune here. Most all my skulls are from the Dollar Tree.
Just having them peek out in random spots throughout the house is always fun.
P.S. Don’t worry about polishing all that brass and silver – it looks creepier with a little tarnish!
This year I put one up in between two windows using a command strip. It looks down on us as we’re eating dinner. 😆
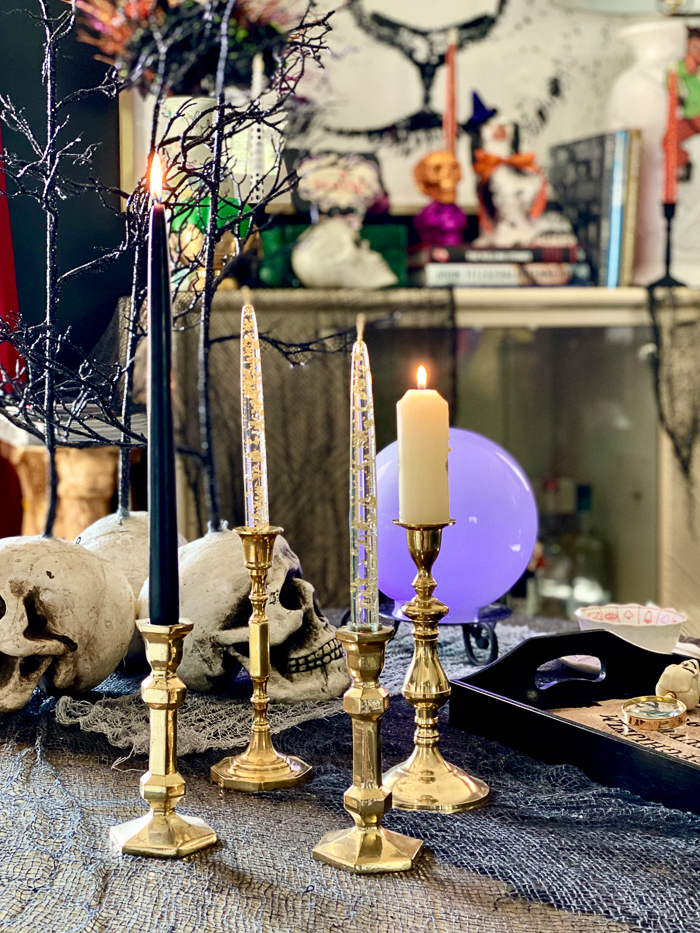
3. Pull out all your candles.
Literally. Pull out every single candle you own and put them all around your house. Grouped together or solo, they add an instant Halloween feel to a space.
Again, don’t worry with polishing the candlestick holders!
4. And then embellish those candles.
I found this fantastic washi tape this Halloween season and snatched it up as fast as I could. I cut out single eyes and placed them on a few candles throughout my decor. The tape is also great for embellishing books, trays, etc. for the season.
This stuff instantly makes anything Halloween ready. I like to drape it over tables to create a spooky base and then layer on more Halloween decor.
I also like to put it over things that I want to keep close at hand – liquor – but want to spook up a bit. 🙂
6. Load up on creepy “beings.”
Throughout the year, I’m always on the hunt for anything that would work well in my Halloween decor – ok, basically any seasonal decor. 😂
The pumpkin man and mummy were both yard sale finds. They work great on my witch’s table.
Of course, no witch is complete without her black cat. This cat was an addition to our Halloween decor courtesy of the Circus.
I made this mohawk lollipop holder several years ago and it always makes an appearance for Halloween. It adds a little punk touch to the decor and the kids love getting suckers out of the “head.”
7. Get regular “beings” in the Halloween spirit.
If it has a head, it’s going to get some form of Halloween treatment around here. This bust got adorned this year with my DIY witch hat.
Both the Buddha and the Staffordshire dog got mini-witch’s hats.
I topped the rest of the busts with witch’s hats and one – with devil horns. 😬
8. Make art spooky.
Again, I like to work with my everyday decor rather than switching everything out. I put a mini-skull over the head of the lady in this art print with a command strip.
I bought a few of these eye picks and stick them anywhere I can. This one is popping out of a flower arrangement.
10. Vintage Halloween cut-outs are the best.
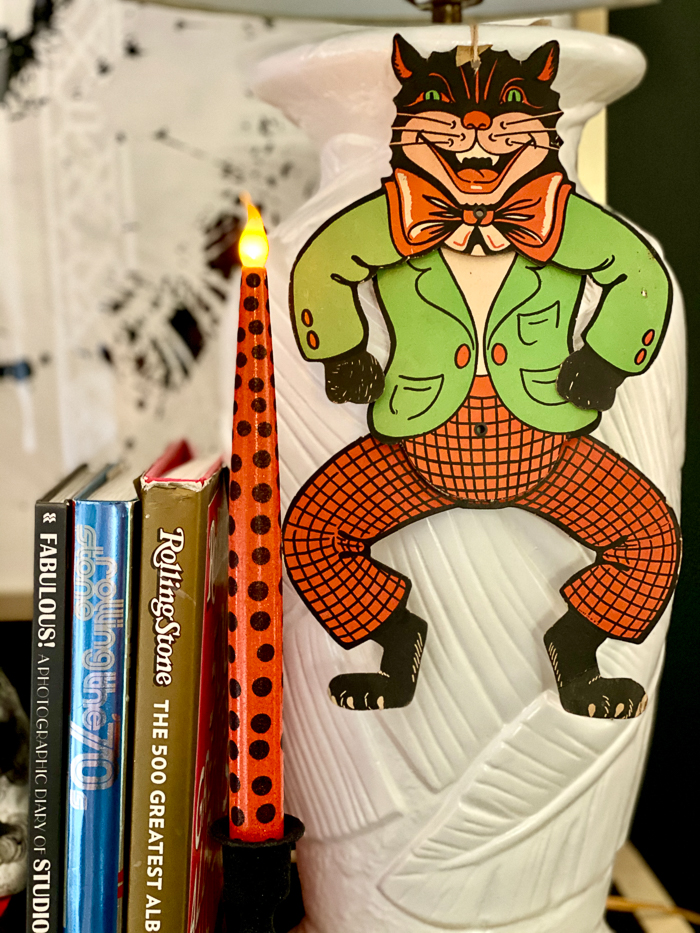
If you can get your hands on vintage or vintage-style Halloween cutouts, snatch them up. They are THE best for creepy Halloween decor. I have a couple that belong to my husband’s grandparents and I adore them. My father-in-law remembers his mom hanging them up when they were young, so these are pretty special to us. Fun fact: this one still has the price tag on the back of it – a whopping $0.09!This set isn’t vintage, but it has a vintage feel and I like them as well.
11. Be on the hunt for weathered or old looking books all year long.
While the book above may look old, it’s actually new and a yard sale find! Works perfect for Halloween!
12. Elevate with books and candleholders.
Speaking of books – I like to use them all over during Halloween and really anytime in general to elevate other items.
Sometimes I leave them as is and sometimes, I cover them with creepy cloth….
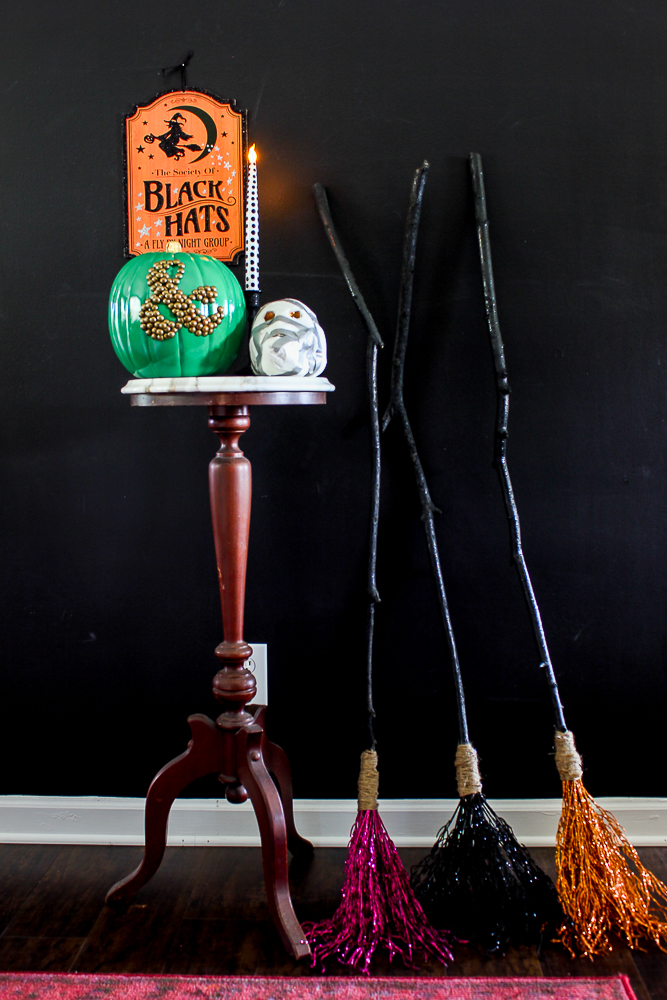
I stacked lots of books together here and covered with creepy cloth to elevate the DIY ampersand pumpkin and give it more of a presence.
I will also use spare candleholders to elevate smaller items like these little Halloween heads or even mini pumpkins.
13. Create a psychic / fortune telling table.
This year, I transformed my coffee table into a creepy fortune telling space.
I layered on creepy cloth, a few candles in varying heights, my skull tree and the “tools of the trade”…
This is one of my favorite scenes this year and Grunt loves it too.
14. Toss Witch’s Brooms wherever you can.
I think it’s looks a little more authentic if you just lean them up against walls in random locations – kind of like the witch just walked in and dropped her broom. Tutorial for these witch’s brooms is here.
15. Don’t forget the spell book.
In this girl’s opinion, Halloween isn’t complete without a spell book! Grab an old book and this printable spell book cover to create your own!
16. Flowers are for Halloween too….
Creepy flowers anyway – and lots of black leaves and bright filler picks. 🙂
Create this skull vase by carving out the back of a styrofoam skull and placing the vase within the cut-out section.
17. Embellish basic skulls.
A super simple trick I’ve been doing for years is buying skulls from the Dollar Tree and then dressing them up just a bit with glitter and/or spray paint. On the one above, I simply added purple glitter to his eyes for a touch of glam.
I’ve also upgraded skulls by painting them and then placing them on candlestick holders with hot glue – tutorial for that here.
18. Hang something from above…
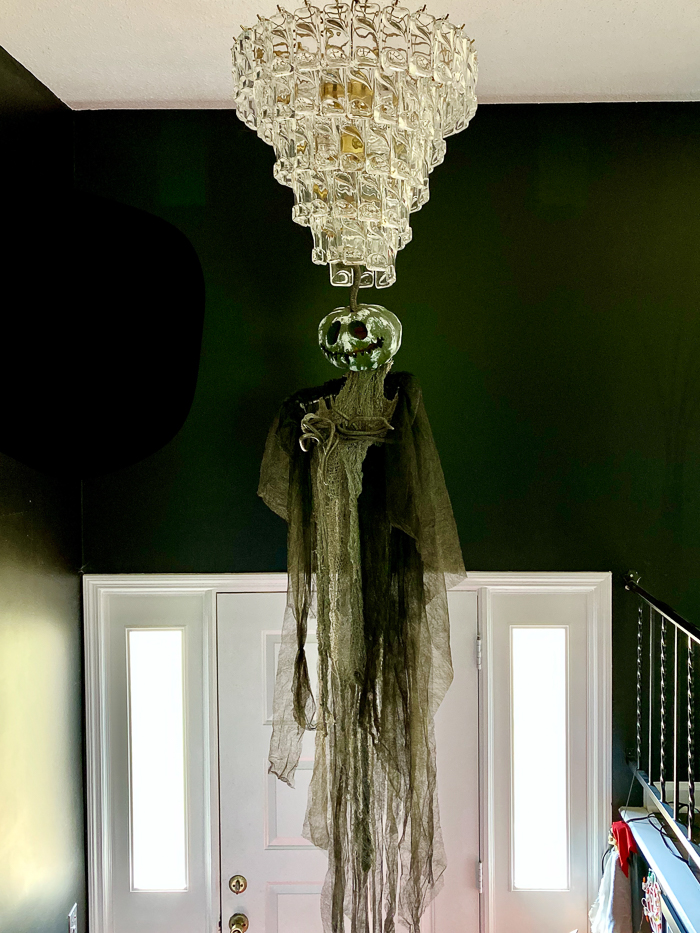
I love to hang Halloween decor from the ceiling whenever I can. This creepy guy – another thrift store find – is hanging from the chandelier right when you enter our front door.
Do you have any go-to cool Halloween decorations?
Want more ideas for Halloween? Be sure to see these….
We’re five days into October – is your home in Halloween mode yet?
As most of you know, mine is – and it’s been there for a while! *insert evil laugh*
I still have more halloween decorating ideas to share with you, but today I thought I’d share some of my own favorites from years past and some from other bloggers. All of our styles are a little different, so if my Halloween style isn’t to your liking, some of these might just be…
Easy DIY Halloween Decorations
If you’re looking for simple, but unique Halloween decorations to add to your Halloween arsenal, take a peek at these easy DIY halloween decorations. There are 15 different halloween decorating projects there ranging from printables to Dollar Tree halloween crafts and more. Make your own witch’s broom that sparkles, your own spell book with a printable, a creepy skull candle holder or something else!
3 Ways to add Halloween to Your Fall Decor
I don’t really do any decorating for just fall. My “fall” decor is my Halloween decor. 😂 I just found that when I went to go put up my Halloween decorations I was always having to put away lots of my fall decor because the two didn’t work together. However, Brendt from She Gave it a Go is a pro at effortlessly mixing the two together. I love her ideas for adding Halloween style to your fall decor – some just as simple as using key colors! Read about her Halloween-Fall Decor Ideas here.
Fun Halloween Porch
So I really stepped my outdoor halloween decorating game up this year. I can’t wait to show ya’ll, but in the meantime I’ve got a couple other gal’s outdoor halloween decor to give you some ideas. I love this fun Halloween porch from Kelly at The Tattered Pew. It has just the perfect amount of spook, but it also has a super fun Halloween feel that any trick-or-treaters are going to love walking up to!
Frightful Front Porch
Merichelle from We’re the Joneses went with a chic, modern Halloween decor feel on her Halloween porch. It’s definitely spooky with lots of black, but the shiny black tones add a glam feel and the punches of purple take it to the next level. I don’t think there’s a witch who wouldn’t mind “sitting a spell” here.
Now plot out your plan of attack and get your house Halloween ready!
Keep up with our Halloween shenanigans on social media:
Something’s brewing! And it only takes five minutes to whip up! Add a witch’s touch to your Halloween decorations with this glowing cauldron!
You know what I love?
Something that can pull double duty.
And in it’s time, this pot has done a fantastic job of pulling double duty.
While we don’t know it’s age for sure, but we’re guessing closer to 100 years than not, it’s produced cracklins, rendered lard, and probably done countless other tasks that are lost with generations who have passed on.
For the last few decades, it was sitting in a basement, and guessing from the tiny shredded pieces of paper found in the bottom of it when I pulled it out, it has also served to keep a mouse or two warm at night. The lengths I will go to for a good Halloween decoration.
Proving it’s double duty value, this Halloween season, the ancient black pot is parading around as a witch’s glowing cauldron.
This post contains affiliate links for your shopping convenience. Click here to read my full disclosure policy.
So cool, right?
How to Make a Cauldron Glow
Materials and Supplies Needed
Cauldron – if you can’t get your hands on the real thing, there are lots of plastic and ceramic ones out at stores right now for Halloween
If you have a cauldron similar in size to mine or larger, you’ll want to fill in the bottom of it with materials to push all the glowing goodness to the top.
I mashed some Target boxes all into mine. Super technical, folks.
Step 2
Arrange the green lights on top of the fillers or in the base of a smaller cauldron.
Step 3
Loosely twirl the tulle around in the pot on top of the lights.
You just want it fluffed in the cauldron. Don’t stuff it down in there.
Don’t serve up Halloween cocktails without these creepy-glam Halloween coasters! Your guests will be impressed, but only you’ll know how easy they were to make using a free printable!
No detail left untouched around here when it comes to Halloween!
I shared the how-to for my Ouija Board Tray the other day for serving drinks up on and today, here are some fantastic Halloween coasters you can make for guests to rest their drink on!
This post contains affiliate links for your shopping convenience. Click here to read my full disclosure policy.
I love how creepy these turned out, yet still have a bit of glam with the floral touches. So, we’ll call them creepy-glam coasters.
You can get the printable from my Printable Library. To access the printable library, you’ll need to be an email subscriber to Rain on a Tin Roof.
If you’re already an email subscriber, go to the Printable Library here and enter the password which you can find at the bottom of the latest email from me, which would most likely be about these coasters. Scroll down until you see the printable coaster images, download and print it using the links.
If you’re not already an email subscriber to Rain on a Tin Roof, simply click here and sign up. After signing up, you’ll receive an email to confirm your subscription. After doing this, you’ll be directed to the Printable Library where you can download the coaster printables and then print.
Printing Notes
The coaster images are made to be printed on standard size 8.5″ x 11″ paper. I suggest using card stock for printing for sturdier images and better color quality.
Step 2
Paint the coasters. I did three coats of spray paint.
Step 3
Cut out the images for the coasters.
The images were made to be slightly bigger than the coasters I used. Depending on the size of your coasters, you may have to trim a bit more or less off the edges. Just hold your coaster over your images and trace around it, then cut it out. No rocket science degree required.
Step 4
Apply Mod Podge onto all the coasters.
Immediately following this, place one of the coaster images on each of the coasters, then put another coat of Mod Podge over the coaster.
Let dry.
Step 5
Apply two more coats of Mod Podge to each coaster. Let dry, then serve up some drinks.
Wickedly good Halloween drinks, that is.
Cheers, witches! 😉
Halloween one of your favorite holidays too? Don’t miss some of my favorite DIY Halloween decorations then:
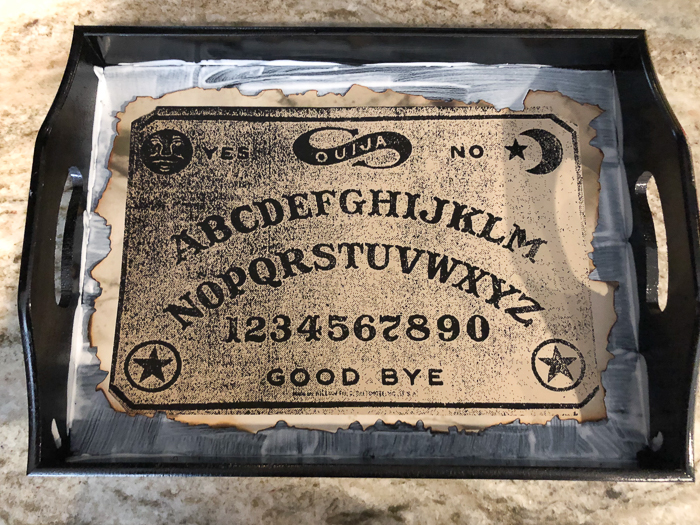
If you love the spooky feeling a ouija board can add to your Halloween decor, then this is the project for you! This DIY ouija board Halloween tray adds a creepy touch and is also great to use as a serving tray at your Halloween party!
So I got a comment on the blog post about my witch costume the other day from a lady quoting scripture about how the Lord will put an end to witchcraft, fortune tellers, pagan cities and the such.
Folks, it’s the Halloween season. I’m not out here dancing around nude in the dark offering up my soul to the devil. I just love a damn good witch costume and Halloween.
I mean, we all know I need prayer for a whole lot of things but my witch costume and halloween decorations aren’t one of them.
All that being said, this ouija board tray will not be used to summon spirits. And even if I wanted to, I’m not sure the thick coat of Mod Podge I put on the bad boy would even let any spirits through.
This tray however can be seen throughout this glorious Halloween season adorning my coffee table, serving drinks, and just generally satisfying all my Halloween decorating dreams. 😆
This post contains affiliate links for your shopping convenience. Click here to read my full disclosure policy.
Isn’t it spooky? It looks old and creepy and I love it for all that and more.
This tray is easily made using a pre-fab tray, a printable I’ve got for you and a couple other things.
You can get the printable from my Printable Library. To access the printable library, you’ll need to be an email subscriber to Rain on a Tin Roof.
If you’re already an email subscriber, go to the Printable Library here and enter the password which you can find at the bottom of the latest email from me, which would most likely be about this tray. Scroll down until you see the ouija board printable, download and print it using the links.
If you’re not already an email subscriber to Rain on a Tin Roof, simply click here and sign up. After signing up, you’ll receive an email to confirm your subscription. After doing this, you’ll be directed to the Printable Library where you can download the ouija board and then print.
Printing Notes
I used this public domain ouija board image and created two different sizes from it to use for the tray. If you go with the same tray size I used, I would recommend using the 8.5″ x 14″ size that I made. If you go with a smaller tray, you can use the 8.5″ x 11″ size. Both are available for download in my printable library.
Step 2
Paint the tray. I did two coats of spray paint.
Step 3
Cut out the printable.
If you go with the same size tray and printable I used, the printable is going to be longer than the tray. To cut it out, I just placed the printable in the tray, then creased where I should cut.
Now, I am not recommending that you do the next part exactly how I did it. I don’t want none of you coming back and blaming me for burning yourself.
After I cut the printable down some, I burned some of the paper along the edges to give it an authentic spooky Halloween look. Again, I don’t recommend you do this. If you do it, you are doing so at your own risk.
Step 4
Apply a good coat of Mod Podge onto the bottom of the tray, then immediately place the ouija board on top of it.
Apply a coat of Mod Podge over the ouija board.
Let dry, then add 1-2 more coats of Mod Podge. I did three coats total.
As you can see, I had a couple of wrinkles in my paper. I tried to get them out, but failed. However, in the end, I think it just added more to the overall “old” look of the project.
Oooo, I just love it!
Isn’t it so fun for Halloween?
I’m off to give this thing a whirl and see who all I can conjure up!
Just kidding!
Will you be adding this touch of ouija board decor to your Halloween home?
Want more Halloween projects to get your house creepy-fied?
This magic crystal ball really GLOWS! And guess what, it only requires three things and takes just about five minutes to make! Get ready to be the belle of the Halloween ball with this fortune teller crystal ball – no one will ever believe you made it yourself!
Oh man, oh man, oh man! Am I excited about this new little piece of Halloween decor I’ve added to the collection this year!
I love for my Halloween decorations to look as real as possible. Real as in super spooky, authentic looking pieces that’d you see if you rolled up into the Sanderson sisters house.
And this one, well this one fits all that criteria.
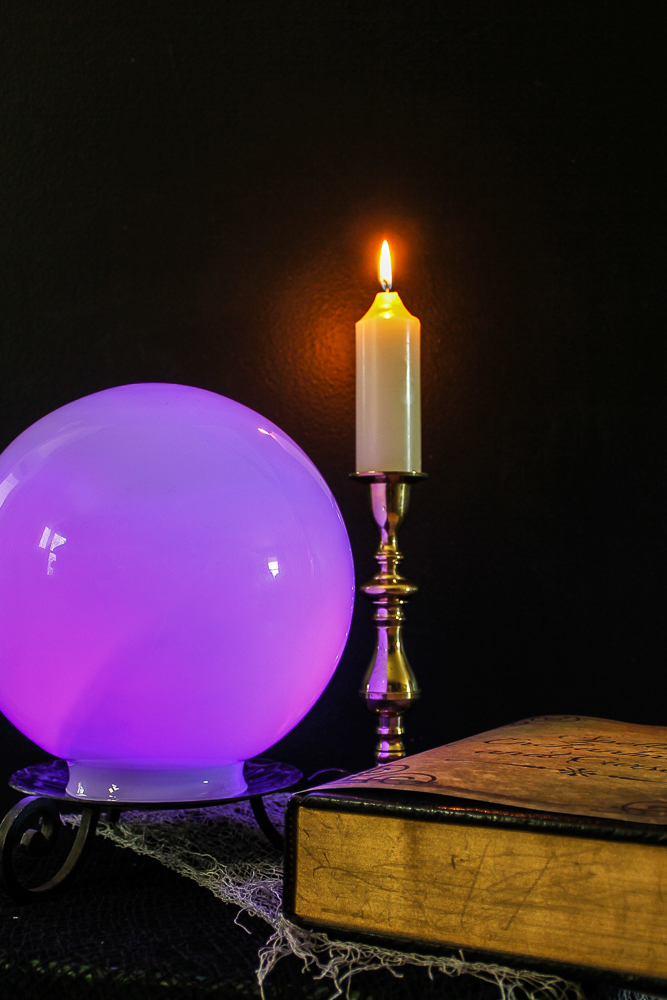
It’s a glowing crystal ball.
Folks, it really glows! And it is probably one of the easiest Halloween decorations I’ve ever made!
This post contains affiliate links for your shopping convenience. Click here to read my full disclosure policy.
How fun is that? I just keep expecting to see a spirit’s face emerge within the ball any moment now. 😉
How to Make a Crystal Ball
Materials Needed:
White Globe Glass Light Shade – like the one found here; you can buy the globe separately in-store.
Battery Powered LED String Lights in Purple – I used these.
Batteries for String Lights – the ones I used needed two AA batteries.
Holder / Platform for the Globe – I used a pillar candle holder I found at a thrift store.
Steps
Step 1
Remove the LED lights from the package and insert the batteries.
Wind the string lights into a circle.
Step 2
Turn on the string lights. Place the string lights and battery pack through the opening on the bottom of the glass globe. The lights should go more into the globe and the battery pack should be at the base opening of the globe.
While holding the battery pack still inside the globe, lower and tilt the globe onto whatever you are using for your globe holder. As you’re putting the globe down, you can carefully let go of the battery pack. It will sit just fine on the holder; you just don’t want it banging around in the globe while you’re putting it on it’s holder.
That’s it! So easy, right?
I love the purple glow this fortune teller ball gives off. It’s just perfect for Halloween and looks great beside my spell book (grab that printable spell book cover here if you haven’t already!)
Will you being gazing into a DIY crystal ball this Halloween?
Ready to up your Halloween game this year? Take a look at these then…
DIY Witch Brooms – sparkly, spooky and made with items from your backyard and the Dollar Tree!
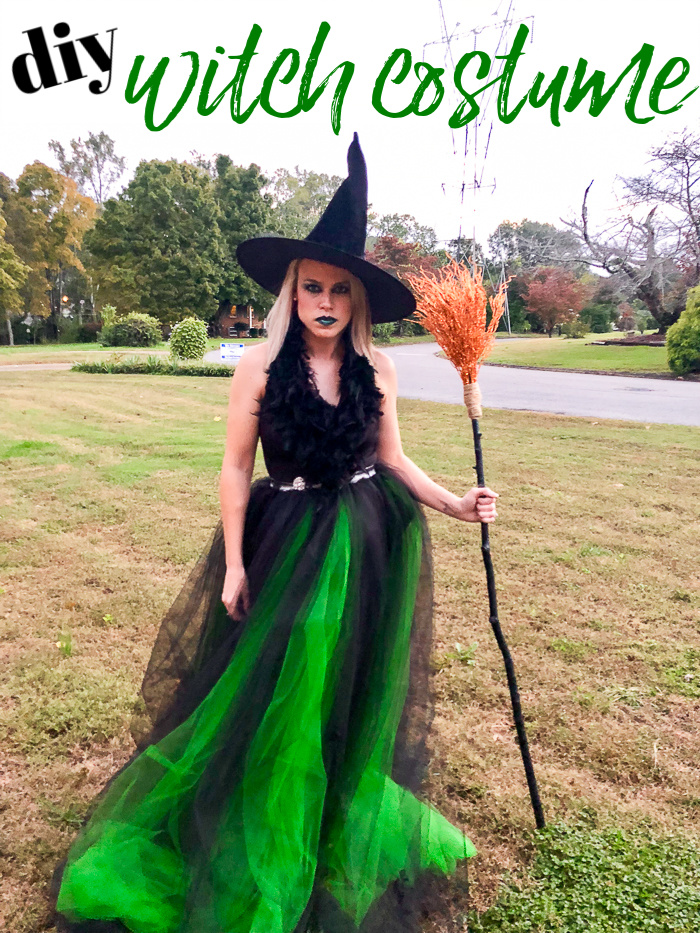
Ready to cast spells in style this Halloween? That’s exactly what you’ll be doing in this DIY witch costume! You’ll need a couple of thrift store finds, some tulle and a few other basic materials to whip up this homemade witch costume!
The Circus and I were chatting about our Halloween costumes the other day. When I showed Grunt a picture in the direction I was thinking about going, his response was, “Oh yea, I forgot how extra you are at Halloween.”
Halloween is mine and the kid’s jam. Go big or go home.
Last year, the Circus had three different Halloween costumes and I did two different variations of a witch costume – one more fancied up for our Halloween party and one more laid back for trick or treating.
In my opinion, a good witch costume is always a winner at Halloween. And while there are some great store bought Halloween costumes out there, I feel like a DIY costume always kicks things up a notch or two.
I put together this halloween costume with a couple of thrift store finds, an easy-to-make tulle skirt and a few other fanciful accessories.
This post contains affiliate links for your shopping convenience. Click here to read my full disclosure policy.
DIY Witch Costume for Adults
I’m going to break this down by top, skirt, makeup and accessories.
For the Witch’s Top
You’ll Need:
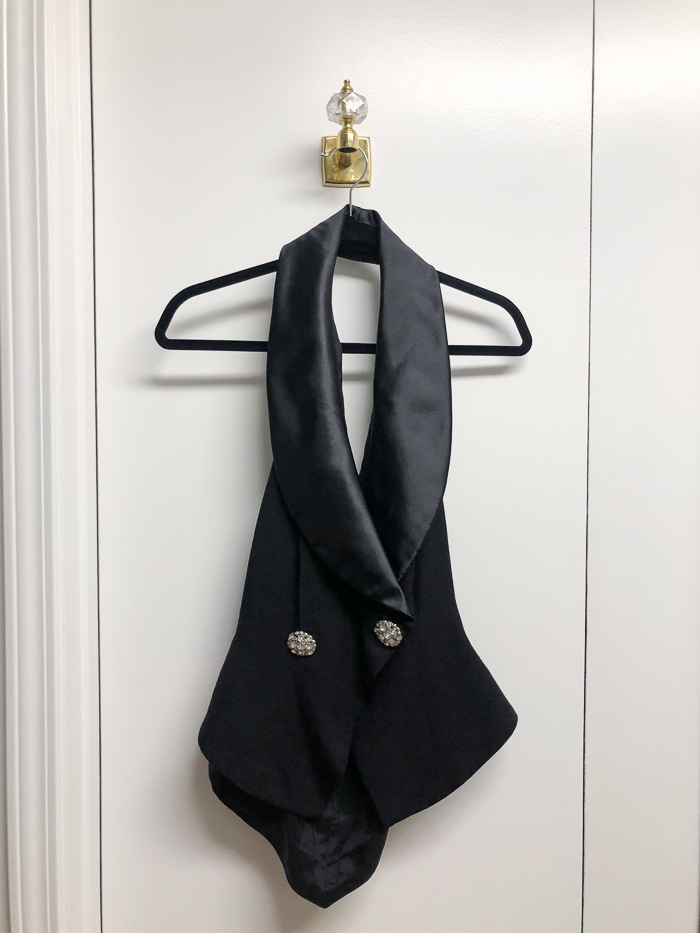
The top portion of a halter-style top two piece formal dress or another black fancy-ish top. (See below for more details and ideas.)
For the top I found a black formal two piece dress with a halter style top.
I see these kind of dresses at thrift stores all the time. If you can’t find one though, just keep your eyes open for a fancier style black top.
To embellish the top, wrap the feather boa around the halter neck securing with safety pins. If there’s excess boa, then you can snip it off or tuck it into your skirt.
If you can’t find a halter style top, you could still easily embellish the neckline with a feather boa, just follow along the neckline and secure with safety pins.
For the Witch’s Skirt
Folks, I’m not a seamstress. That being said, if I can make this skirt, anyone can.
You’ll Need:
Tulle – lots of it. 😀 I used green and black strips. I had a total of 20 strips that were 48″ long and 58″ wide. You can adjust as needed – more details below.
2 inch Wide Elastic Band that will fit snugly around your waist when sewn together – more details below. You can buy this by the yard at fabric stores.
Sew your elastic band together, end to end, to create the waist of your skirt. Hold the band around your waist to determine how big to make it. This isn’t rocket science, you want the band to fit snugly around your waist so your skirt doesn’t fall, but not too tight that your uncomfortable.
Step 2
Cut your tulle into strips. I left the width of the tulle alone, I just cut strips that were 48″ long. You can cut these strips longer or shorter depending on your height. For reference, I’m about 5′ 3″. Again, I did twenty strips total – more black than green. I wanted the green to pop against the black, thus why I did fewer of those.
Step 3
Turn your sewn-together elastic band inside out.
Take a tulle strip and gather it together at the top, then sew it to the band.
This doesn’t have to be perfect. It doesn’t have to be pretty. When you’re done sewing all the strips to the inside of the band, you’re going to flip it right side out and no one is ever going to see your elementary sewing skills.
Continue sewing tulle strips to the skirt until your satisfied with how it looks.
Step 4
This really isn’t a step, but it’s an important part of the outfit, unless you’re planning to moon someone.
When you go to wear the skirt, be sure to wear a black slip under it. Obviously, the tulle strips don’t form a solid covering around your rear end, so the slip takes care of this.
For the Witch’s Makeup
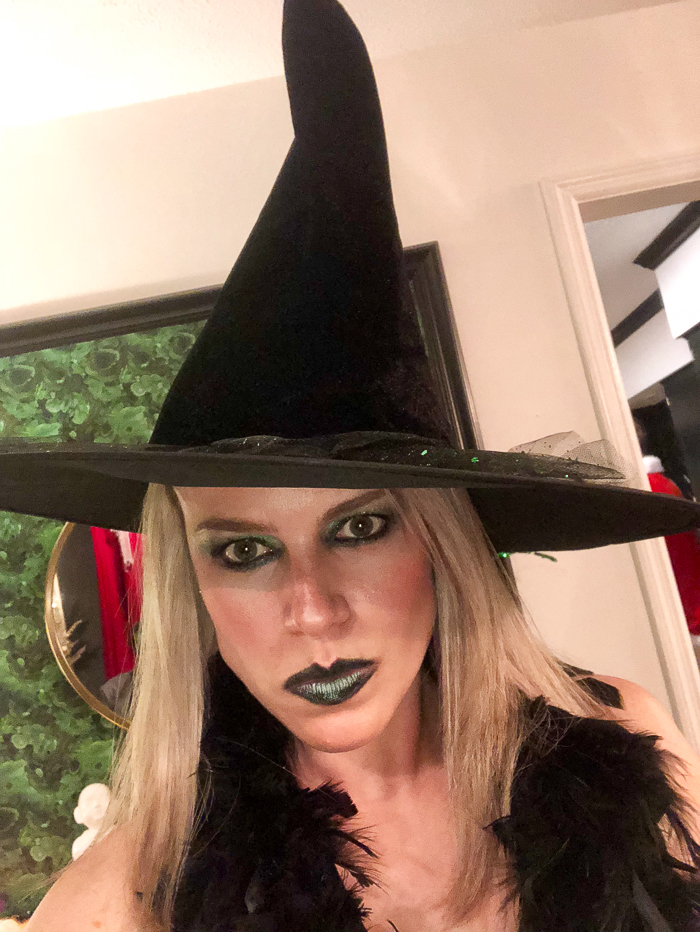
I opted to go with greens and black for my makeup to keep with the green and black in my skirt. You can of course go with whatever colors you’d like. For my more casual take on this costume, I did purples and greens.
Full disclosure: I am not a makeup guru, folks. I’m not even that good with it. I have no idea how to contour and all that other shit. So trust me, this is not complicated. I just played around with mine and added/blended/wiped away, etc., until it looked good. I did find that more is definitely more with this look though – it is Halloween, right?
Green Cream Lipstick – I used this one in Out of This World.
Step 1
Apply your primers, concealers and foundation as usual.
Step 2
Apply eyeshadow primer and let dry. Apply black eyeshadow on your eyelid. Come back with green eyeshadow around the edges of your eyelid and onto your brow bone blending out. Add more black or green to create more depth/color or to however you like it.
Line your eyes, top and bottom, with heavy black eyeliner. Lightly smudge out the eyeliner using the black eyeshadow, then go lightly over the eyeliner again with a little of the green eyeshadow.
Apply eyebrow mascara. Apply a couple coats of lash mascara. You’ve got lots of eyeshadow going on here, so don’t skimp on the layers of eyebrow and eyelash mascara, folks.
Step 3
Apply blush
Step 4
Apply highlighter along the bridge of your nose, above your Cupid’s bow, the center of your forehead, your cheekbones and chin. I just used my finger to do this as it made it a bit more defined than using a brush.
Step 5
Apply black lipliner heavily around your lips.
Apply black lipstick all over your lips, but more heavily along the edges.
In the center of your lips, apply the green lipstick. Blend as needed. You’re going for a fading of black to green look here.
For the Witch’s Accessories
You’ll need:
A witch’s hat of course!
A broom
I just went with a classic witch hat for this costume. You can find these all over the place during Halloween.
For my broom, I used one of the DIY witch’s brooms I made, which honestly, I love more than any other store bought witch brooms I’ve found.
That’s it! Pretty basic stuff, but packs a serious punch when put together!
And what’s on tap for this Halloween? You’ll just have to wait and see….it does include a fur coat though, and black and white hair. 😉
Have you made your own witch costume before?
Ready to get in the Halloween spirit? Be sure to see these then…
It’s looked like Halloween around here for quite a while now (since early-mid September-ish!), and now the weather is actually starting to feel like Halloween as well! It was still crazy hot here in the South up until about last week. When we got back from fall break, we were so excited to find that fall had actually arrived to our neck of the woods!
Besides regular Halloween festivities, this year we are also hosting a Halloween party at our house. I love decorating for Halloween anyway, but with the party, I wanted this year’s decorations to be a little “extra.” Our Halloween home definitely has spooky touches to it, but there’s also a bit of glitter and shine to make all the decor a little more fun than typical Halloween decorations…
Glam and Spooky Halloween Home Tour
This post contains affiliate links for your shopping convenience. Click here to read my full disclosure policy.
The Dollar Tree and I were BFFs this Halloween season. They have these fantastic orange feather boas, which I ran along the handrails in the main entryway of my house.
I also placed Dollar Tree skulls on every corner and end of the handrails. I just hot-glued some ribbon to the bottom of the skulls, then tied them on the handrails. Creepy + Glam, right?
While I love the look of the faux spiderwebs that you can get and spread out all around your house and then to the moon and back, I don’t love the mess they make. Instead of the spiderwebs, I just throw creepy cloths everywhere and then add in spiders.
I always bring out my mohawk lollipop holder for Halloween too and fill it with red or orange suckers. I think it adds a touch of funny/creepy to everything.
I think the colors I have in my living room also lend themselves well to Halloween decor. Funny enough, they also seem to work well when Christmastime rolls around. 🙂
I filled my gold snake bowl with plastic eyeballs and mini skulls. I found the glittery black mirror at Goodwill. I spent no less than 1,263 hours mulling over where to hang it on the wall and then finally decided it was best as a tray of sorts on the coffee table. Go figure.
I don’t even think you’ve seen this console table since I’ve had it – and I’ve had it since earlier this year! I knew I wanted a console table for this space, but could never find one that was quite right. I happened upon these console table plans and thought it might just be perfect for the space. I knew building this was too far above my skill level though. I handed it (and a case of beer) off to my two “resident builders,” Wayne and Ron and they took care of it, doing an impeccable job as always. I’m so lucky to have those two guys to bounce my ideas off of and then build them for me if I can’t do it – especially when they take beer as payment!
I glittered the stems on some white pumpkins and arranged them with another one of those orange feather boas on a pedestal tray.
Don’t they go nicely with the Studio54 jeans advertisement? 😉
I’ve had those Halloween head candles for years. I usually just scatter them around, but this year, I popped them on top of candlestick holders and I think I like them much better that way.
I made the skull floral arrangement by cutting out the back of a styrofoam skull then gluing a vase to it. It’s one of my favorite pieces this year.
This guy is one of my just for fun decorations. I bought a skeleton, then propped him up in front of the window, complete with a sombrero. As you can tell from the looks of him and the empty tequila bottle, he had one too many margaritas.
I left the dining room table clear except for the skull candleholder. We eat in here most every night so I didn’t want to have to clear decorations off of it all the time.
The Circus is all about lighting these candles while we’re eating. 🙂
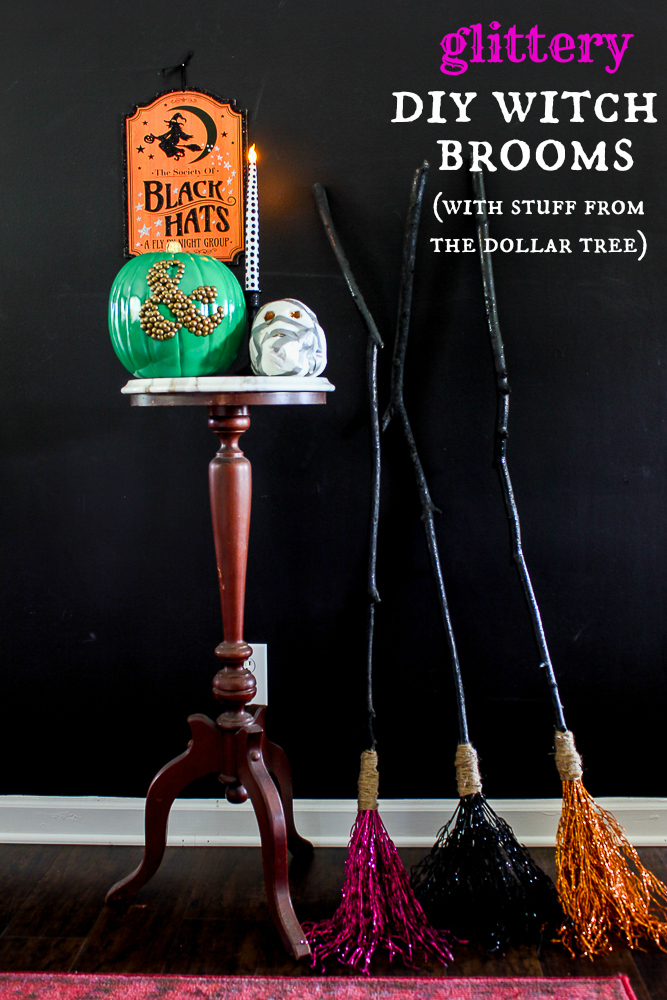
Learn how to make a witches broom using items from the Dollar Tree and your own yard! It’s so simple to make this sparkly DIY witch broom that you’ll only be sorry you didn’t make one sooner!
This year for Halloween, I’m going to be a (not-so-basic) witch! Personally, I don’t think dressing up as a witch for Halloween ever goes out of style and I’m really excited to put my own personal spin on it this year. The Circus says she’s going to be my black cat, but then some days, she says she’ll be a witch with me and then some days, she’s just going to be a dog. So who knows what she will actually end up being?
Every witch of course, needs a broom. If you ask me or the Circus, we’ll tell you that we prefer brooms of the glittery and sparkly variety.
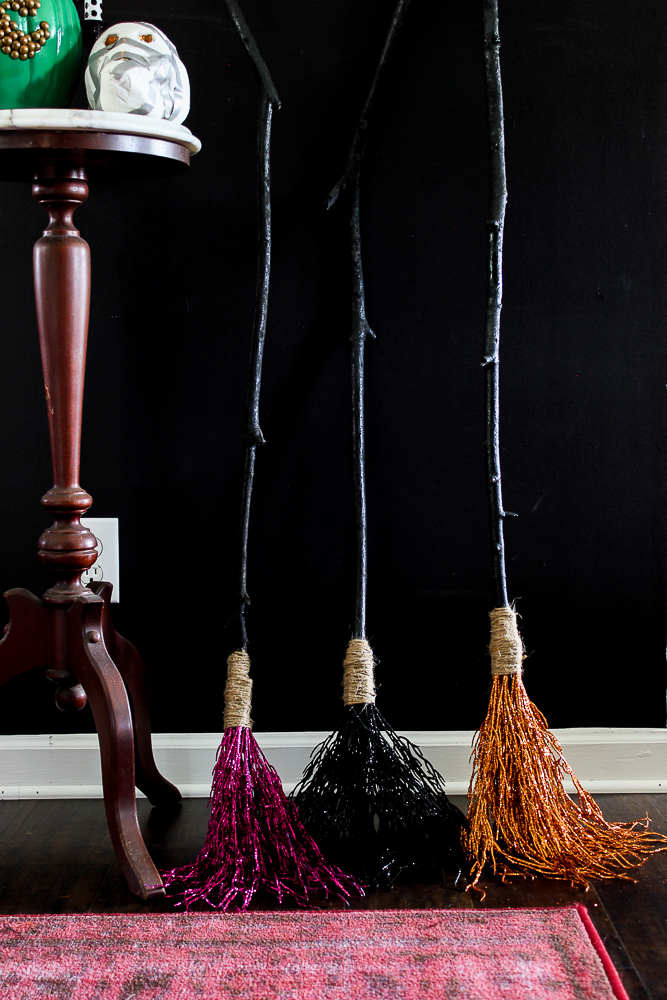
And glittery brooms, we have! I made these using supplies from my own backyard and The Dollar Tree. And you know what – I think these actually look better than a store bought glittery broom I bought a couple years back! Grunt agrees, so I’ll just go ahead and say it’s fact. 😉
Here’s how you can whip up your own glittery, sparkly DIY witch broom this Halloween!
How to Make a Witches Broom
This post contains affiliate links for your shopping convenience. Click here to read my full disclosure policy.
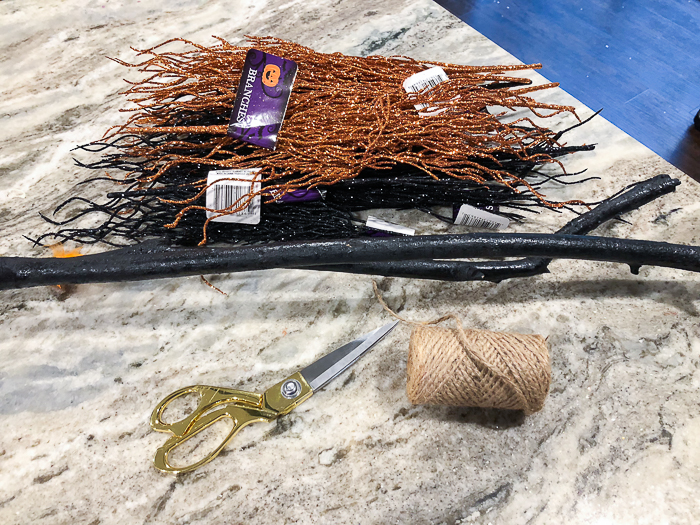
Supplies & Tools Needed Per Broom:
1 tree branch from your yard roughly four feet long and about 1 inch in diameter
Remove all the smaller twigs and leaves from your large tree branch. Cut to size if needed. Spray paint the tree branch black.
Step 2
After the branch has dried, run a bead of hot glue on one glittery branch stem and glue it onto your tree branch near the bottom.
Place the glittery branch so that where it breaks off into smaller branches and fans out is right near where the real tree branch ends. Hold the glittery branch in place until the glue dries.
Step 3
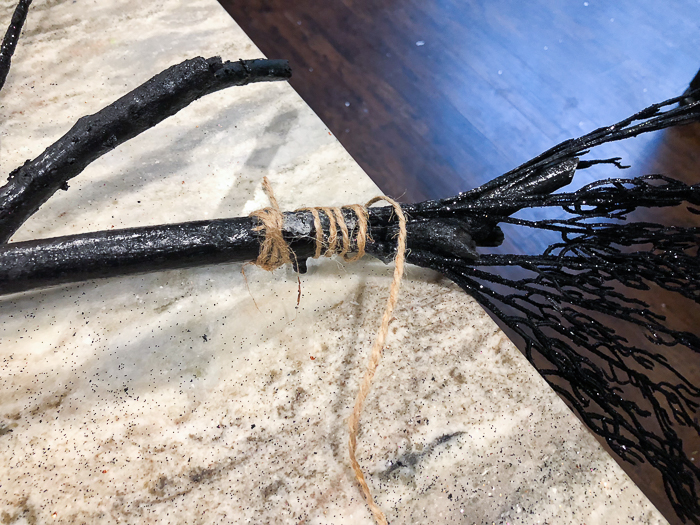
Wrap twine tightly around where the two branches are glued together a few times.
Step 4
Repeat steps 2-3 until you have covered your tree branch end with enough glittery branches for your liking. I used about 5-7 glittery branches per actual tree branch.
Step 5
Once you have put all the glittery branches you want on your tree branch, wrap more twine around where the tree branch and glittery branches meet. Cover any spots of glitter or black that may be coming through where the glittery branches are glued.
Cut the twine when you are finishing wrapping and hot glue the end tightly in place.
Fair warning – these do shed glitter, especially as you are putting them together. A little glitter never hurt anyone though. 😉
The Circus has already staked claim on the pinky-purple one if she’s a witch, so I’ll be flying on the black or orange one. 😉
If you’ve got 15 minutes to spare, you can easily whip up this DIY skull sconce to add to your Halloween decor! It lends a touch of spook for not a lot of money!
Halloween is in full force at my house. The decorations are out and the costumes are being planned! Grunt Labor has actually said he thinks this is one of the best Halloween decorating years at our house – and I’m not even finished yet! *insert witch’s cackle here*
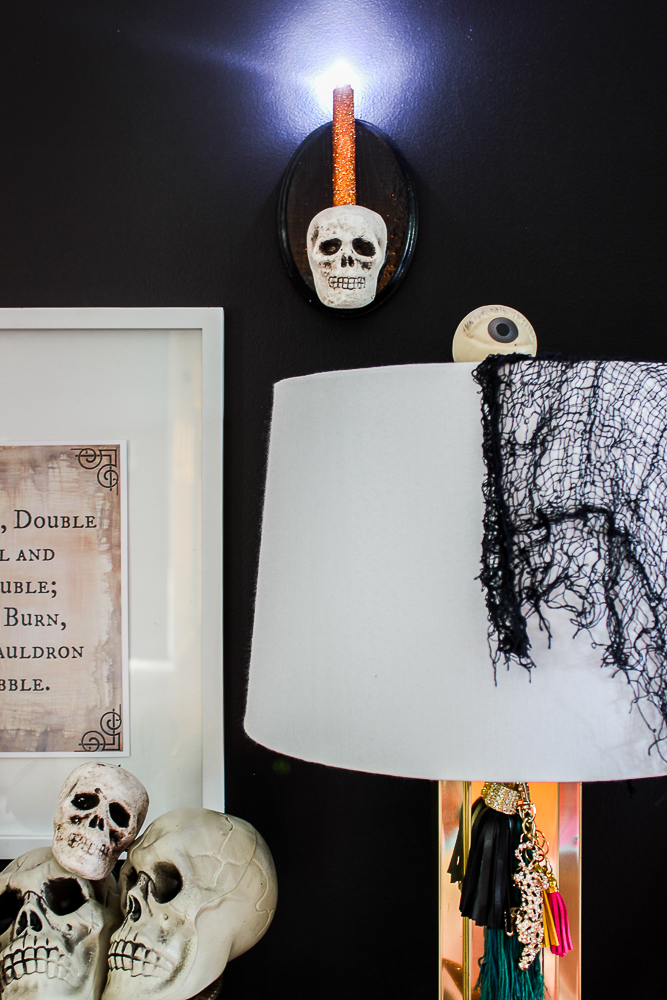
I have whipped up a few new pieces of Halloween decor this year – this DIY Skull Sconce being one of them.
I made him using items from the Dollar Tree and Michael’s, so it doesn’t cost much at all and it took me about 15 minutes to make – not including paint dry time. P.S. Paint dry times are perfect for beer breaks. 😉
How to Make a Skull Sconce
This post contains affiliate links for your shopping convenience. Click here to read my full disclosure policy.
Spray paint the wood plaque. You can do any color you wish, but since mine was for Halloween decor, I opted for black. Let it dry. After the plaque is dry, attach hanging hardware to the back of it.
Step 2
Brush Mod Podge on the candlestick. While the Mod Podge is still wet, sprinkle orange glitter on it and let it dry.
Again, you can do any color, but orange was my pick. I do think it would also look cool with purple glitter against the black wood plaque.
Step 3
Remove the tag and small round hook from the top of the skull. Lay the skull on the cutting board and cut off a small portion of the back of the skull head as shown below.
This is to make him lay flat against the wood plaque.
Step 4
Once the candlestick is dry, place it on top of the skull’s head and trace around its base onto the skull with a pen or pencil.
Use the X-Acto knife to cut out the circle and remove about 1/4″ to 1/2″ of the styrofoam below.
Step 5
Place a good amount of hot glue on the back of the skull. Place him in the lower middle portion of the wood plaque and press him firmly in place.
Once dry, place the candlestick in the hole on top of the skull and hang it on the wall.
The candlestick is battery operated, but does not have a switch to turn on and off. I just leave the candlestick partially untwisted at the bottom where the battery connection is to keep it off and twist it closed when I want to turn it on. You’ll see what I mean when you get the candlestick.
Happy Halloween Crafting and Decorating, Friends Witches! Will you be making a skull sconce?
Need more Halloween decorating ideas? I’m your girl!
Easy DIY Halloween Decorations– my favorite Halloween decorations that don’t cost a fortune to make and are easy to complete too!
DIY Witch Broom – of the sparkly variety. 😉 Made using stuff from your yard and the Dollar Tree!
DIY Skull Drink Stirrers – so easy, you won’t believe it! Perfect for parties, as well as decor!
Want to come back to the instructions later? Just pin the image below!
These easy DIY Halloween decorations will add a touch of Halloween splendor to your home in no time! These spooky decorations are simple to make and each costs under $10 for supplies! Here’s to Halloween – DIY style!
It’s September! In my world, that means I’m busting out the skulls, spell book and witch’s hat among other things.
I’m definitely not one to rush time, it already goes by far too fast for my liking, but I am excited about the upcoming holiday season and am ready to kick it off with Halloween.
And if we’re being honest, I’ve had a full size fake skeleton sitting at my dining room table for three weeks now.
Had to take advantage of that 50% off coupon at Michael’s while I could – those skeletons aren’t cheap! The Circus hooked him up with her Tilly Witch book.
Also, he rode home right beside me. In the passenger seat. Strapped in.
Honestly, I just wanted to freak people out on my way home and think about how much I would be talked about by complete strangers as the crazy lady driving with the skeleton in the passenger seat. I tried real hard to make it to where he was looking right out the passenger window with his hand up waving at people, but while he’s posable, he just wasn’t that posable. Bummer.
Anywho, Halloween, Christmas and the 4th of July are my top three holidays. There’s magic in each (of different varieties) and when each one rolls around, I always say, “This one is my favorite.” But then the next rolls around and I say the same damn thing, so I guess all three are tied for favorite holiday in my book.
I have quite a few new halloween decor ideas I’m working on this week, but to kick off this most wonderful time of the year (no, I don’t care that that song technically refers to Christmas), here are some of my favorite easy Halloween DIY projects I’ve done in the past.
Let’s get our spook on, y’all, or as my Circus told me just this morning, “It’s almost Double Double Toil and Trouble time!”
P.S. None of these should set you back more than $10 and most of them are less than $5! You’re welcome.
This post contains affiliate links for your shopping convenience. Click here to read my full disclosure policy.
Such an easy halloween decoration to make, but that packs a serious punch! This crystal ball really glows! You’ll need just three things to make this bad boy and about five minutes!
If you’ve got five minutes to spare, then you can whip up this fantastically spooky Halloween decoration! Add a witchy touch to your decor with this tutorial for a glowing cauldron!
I love hitting up dollar stores for their cheap Halloween decor and then adding to it or manipulating it in some way to make it awesome. That’s exactly what I did here. I bought three skulls at the Dollar Tree, then made them into a candleholder. One of the easiest and cheapest pieces of DIY halloween decor I’ve ever done and damn it, one of my favorites. The tutorial for it is here.
I made these brooms for Halloween decor using items from my yard and the Dollar Tree! Super easy to make and I love the shimmery, glittery look of these witches brooms. See how to make them here.
This skull sconce was made using a combination of items from the Dollar Tree and Michael’s. The candlestick is battery operated, so no having to worry about flames with this one. The tutorial for this sconce is here.
Obviously, this printable combined with what I told you my daughter said to me this morning lets you know that “Double Double Toil and Trouble” is one of our favorite Halloween sayings. The Circus is also a big fan of the Double Double Toil and Trouble movie from the 90’s with Mary Kate and Ashley Olsen in it. Ok fine, I’m a big fan too. Freaking loved it when I was little. Me and Amanda Henry had that shit on repeat all through the Halloween season. Anyway, I felt that needed to be commemorated in our Halloween decor, so I made this printable. You can download it for free as well. Your welcome.More details on it here.
Also, I made that green ampersand pumpkin too. Tutorial for it is here. I love it because it can work well with basic fall decor like regular pumpkins and leaves, but then it can also look creepy when paired with Halloween decorations.
The little black pumpkins are also finds from the Dollar Tree. They always have these little orange styrofoam pumpkins every year and I just bought some one year, painted them black and glittered their stem to make them creepy.
These little things are probably one of the easiest things you could ever make. Seriously, you’d have them done in less than five minutes. The tutorial for them is here. Obviously, they do work great for drink stirrers, but for us, they double as decor until the Halloween party comes around!
Last year, the Circus and I created our own “potions” to use as Halloween decor. You can’t make potions without a spell book, so I whipped us up one of those too. You can get the printable files for these here.
This isn’t one of my Halloween projects, but I love it so much, I wanted to share it. My friend Kellie made this fun Halloween sign – love this for parties! See how she made it here!
This is an old project, thus the bad photography, but still a goodie. Again, I love those skulls from the Dollar Tree! I bought a few, spray painted them and then attached them atop thrift store candlestick holders. See more about them here.
Eat, Drink and Be Scary Sign
No tutorial for this one, but you don’t really need one! I spray painted some wood plaques, then Mod-Podged on a Halloween sticker I found at Hobby Lobby. To top it off, I added a glittery spider to the edge. This is perfect on top of our bar.
These are more cutesy DIY halloween decor. I used Frogtape to paint some patterns on pumpkins, then my Silhouette to cut out the letters and polka dots. The full how-to is here.
The little witch’s hat on the corner of the bar cart is another favorite Halloween decoration of mine. It adds a touch of sparkle wherever I put it. See how I made it here.
Will you be adding any easy Halloween decorations to your home this Halloween?
Affiliate links may be included in this post, which means if you purchase something through one of those links, I may earn a small commission, but you won’t pay a dime more.
To round out this week of all things Halloween, I thought I’d give you a tour of our Halloween decorated home in all it’s spooky goodness.
I haven’t had a chance to decorate the exterior entry yet (it’s still so hot here!), but here’s where we are inside….
I think it’s safe to say we are ready for Halloween here!
I’ll be taking the next week off to spend time with Grunt Labor and the Circus over their fall breaks. Keep up with our fall break adventure on my Instagram stories! See ya back here after that!
Get instant easy Halloween decor by snagging this free printable Double Double Toil and Trouble quote art!
As I’ve already said this week, I’ve been enthralled with ghosts and witches since I can remember. I started watching scary movies at a far younger age than I probably ever should have. But I turned out alright. 😉
One of my favorite Halloween movies as a small child was Double Double Toil and Trouble, with yes, Mary Kate and Ashley Olsen. Now, I’m not a Mary Kate and Ashley fan really, but the whole storyline of that movie with Sophia being trapped by her evil twin, Agatha in the mirror just reeled me.
And while it was William Shakespeare thru his witches that first coined the Double Double Toil and Trouble line, it was first introduced to me by that movie.
And every Halloween when I take out my witch’s hat to hand out candy in, it’s that line that I say over and over again.
This post contains affiliate links for your shopping convenience. Click here to read my full disclosure policy.
So I decided it was finally time to hang it on the wall.
How to Get the Double Double Toil and Trouble Free Printable
If you’re one of my email subscribers, then you can snag the Double Double Toil and Trouble printable for free in my printable library! Remember, the password is going to be at the bottom of the last email you received from me, which was probably about this post!
If you aren’t already a Rain on a Tin Roof subscriber, you can subscribe here now or click the image below to signup.
Once you sign up and confirm your subscription, you’ll get a confirmation email. In that email are instructions for accessing the printable library to get this free printable and all my other free printables.
Tips for Printing and Hanging the Double Double Toil and Trouble Printable
This piece is made to be printed out on a piece of 8 1/2″ x 11″ paper. I suggest using card stock.
You will probably have a small amount of white around the edges of the print. Just cut that off if you don’t like it. I left mine because it was going on a white mat and frame anyway, so you can’t tell too much and also, I don’t have the ability to cut a straight line.
I opted to tape my printable to the outside of a frame that already had a piece of art in it. Since it’s for Halloween, it’s only going to be out for a month, so I didn’t see a reason to totally frame it behind glass for that month. If you do want to frame it in an 8×10 frame, then just scale the print down to where it is centered on your sheet of paper before centering it. This will leave more white space.
This is also the year the Circus will be introduced to Double Double Toil and Trouble. So far, she’s loved all the other classics I’ve made her watch, so I have high hopes for this one too. 😉
Fire Burn & Cauldron Bubble!
Looking for more great halloween decorating ideas? I’ve got ya…
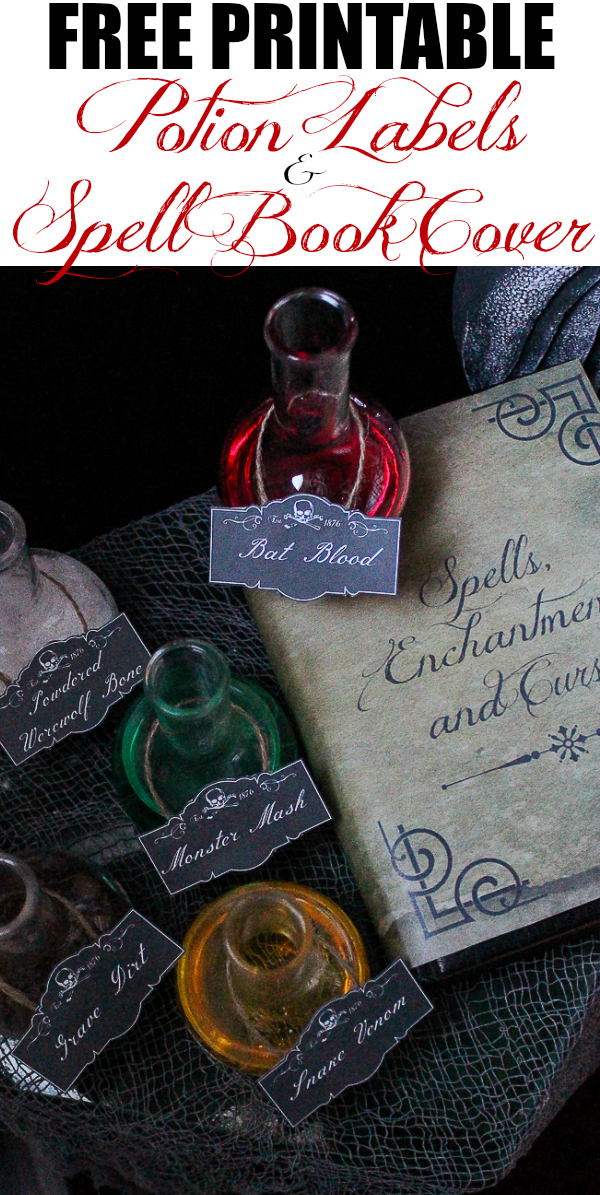
Time to cook up some spells this Halloween! We can’t do that without our spell book and potions, right? Use this free printable spell book cover and potion labels to complete your Halloween decorating – and cast a spell or two!
Grunt Labor is totally weirded out by my love for witches, ghosts and such. If I’m reading a book about any sort of spooky thing like that, I usually catch him rolling his eyes a time or two.
Luckily, he’s let me drag him through ghost tours in Savannah and Marie Laveau’s grave in New Orleans.
I have loved witches and ghosts ever since I can remember, even as a little kid. They’ve never scared me, only intrigued me.
This Halloween with my decorations, I really went for more authentic-like spooky decor, rather than cutesy stuff. I have a few cute things here and there, but I really upped the legit spooky factor this year – this spell book and potion vignette being one of those things…
This post contains affiliate links for your shopping convenience. Click here to read my full disclosure policy.
P.S. I had a really bad lighting situation going on when I photographed this, so just overlook the graininess of some of these photos!
I took a little corner in our entryway and created this little Halloween nook. I bought “potion bottles” and then created the labels. I’m offering these labels as a free printable if you’re one of my email subscribers.
Why yes, that is real bat blood. Not Karo syrup mixed with red food coloring.
And powdered werewolf bone. It doesn’t taste like flour at all.
That monster mash….oh my. It tastes slightly familiar though – maybe water mixed with green food coloring?
The snake venom. Very syrupy…perhaps with a little yellow coloring.
And the grave dirt. Who knew we had a grave right in our front flower bed?
You can also snag the Spells, Enchantments and Curses printable spell book cover for free as an email subscriber as well.
A girl who loves witches and spells as much as I do, needs a proper spell book, right? 😉
How to Get the Printable Potion Labels + Spell Book Cover
To get access to my Printable Library, which contains both the potion labels and the spell book cover, you’ll need to be a subscriber of Rain on a Tin Roof. If you aren’t already a subscriber, you can subscribe here now.
Once you sign up and confirm your subscription, you’ll get a confirmation email. In that email are instructions for accessing the printable library to get these free printables and other free printables.
Already a subscriber? Look at the bottom of the last email you received from me. There, you should find instructions for accessing the printable library.
Tips for Printing the Potion Labels
There are actually three more surprise potion labels included on the printable that I didn’t use on my potion bottles, so there ya go!
I suggest printing the labels out on a piece of card stock, then just cut out around the labels.
I took a piece of jute twine, positioned it in a half circle behind the label, then hot-glued both ends to the back of the label to make it where I could hang the labels on the bottles.
Tips for Printing the Spell Book Cover
The spell book cover is designed to be printed out on a piece of 8 1/2″ x 14″ legal size paper. Also, mine printed out lighter than what the design shows, so just be aware of that.
The trick to the spell book cover is finding a book that it best fits around. Cut the cover out after you print it, then grab a few books and see which one fits the cover best. The book I used still shows some of the front cover’s edges and didn’t wrap entirely around the back of the book, but that didn’t matter since it doesn’t show. To hold the cover in place, I just put tape on the back of the cover and taped it to the book.
I will be formally declaring this week as the week of all things Halloween.
Well, I’ll be formally declaring that here on this blog because ya know, that’s all I really have control over, although technically I feel I deserve much more say-so in this world. 😉 Don’t you think so too?
With the exception of Tuesday (which is when I’m planning to share the farmhouse’s bathroom remodel!), I’ll have a new, easy and cheap Halloween craft and/or printable for ya here on the blog each day!
So, happy all things Halloween week minus one day!
As I said last week, in the post about my DIY creepy skull candleholder, I have finally regained my creative surge for fall – it just doesn’t include orange pumpkins and leaves.
It includes skulls, ghosts, witches and other wonderful things of that nature.
Like these skull drink stirrers…
This post contains affiliate links for your shopping convenience. Click here to read my full disclosure policy.
I love these little guys! They are freaky and spooky and creepy and that just makes my Halloween heart happy!
It literally took about five minutes to make these little gems for Halloween.
Insert a straw into each of the holes you made with the X-Acto knife.
That’s it!
Your skull heads should fit on the straws pretty snug as long as you didn’t make your holes too big. If you did make some too big, then put a bead of hot glue around where the skull and straw meet.
Next year, you can either make them all over again, or ask people who use the stirrers to simply pop the skull head off before tossing the stirrer, then you can wash them and use them to make more stirrers next year.
This skull candle holder won’t cost more than $5 to make and won’t take but about 10 minutes to put together. I’m willing to bet, it’s going to be one of your favorite Halloween decorations this year!
It finally happened.
It took giving up for it to finally happen, but it happened.
I love witches. And ghosts. And haunted houses. And basically anything else that screams creepy and/or haunted.
I’m that girl.
And while walking through the Halloween decor at the Dollar Tree, I slowly felt that vaguely familiar feeling creeping back into me again – the need to go all out for Halloween.
And that made me all giddy inside like Tilly Witch when she finally remembered how to be a witch again.
And so I bought nearly all the skulls the Dollar Tree had in both glitter and non-glitter varieties. And then I headed over to Michael’s and proceed to buy even more Halloween things and then asked the clerk if she could check the back for more.
I was back.
I came home and then turned our living room into Halloween amazingness.
But before we jump into a whole house Halloween tour, let’s first start with this creepy DIY skull candle holder!
This post contains affiliate links for your shopping convenience. Click here to read my full disclosure policy.
Using the X-Acto knife, cut out an “X” into the top of each skull.
Step 2
Arrange the skulls in a triangle type formation and hot-glue them together where each one touches. It’s totally ok to go overboard with the glue here as it will just look like wax droppings from candles.
Let the hot glue fully dry, then stick a candle into each X that you made with the X-Acto knife. Apply a good bit of hot glue where the candle and skull meet.
In the photo below, you can see both where I applied the hot glue to connect the skulls and where I secured the candles.
I layered in some creepy cloth from the Dollar Tree under the skulls as well to add a bit more to this cheap and easy Halloween table centerpiece.
If you wanted to add a sparkly touch to your candle holder, you could also glitter the eye sockets of the skulls.
The Circus has insisted on eating dinner by light of the skull candleholder every night since I’ve made it. I’m cool with that. She’s beginning to love all things Halloween and spooky like her mama. 😉
This also makes a great table centerpiece for a spooky Halloween party!
Who else is ready to just skip all this fall leaves and pumpkin decorating and just go straight for the spooky stuff?
Want more great Halloween decorating ideas and projects?
If you’ve read my fall decor posts, you know I’m a Halloween girl.
I love it.
I live for it.
Well, I live for it and cheap beer.
Oh, yea, and Grunt Labor and the kid.
This post contains affiliate links for your shopping convenience. Click here to read my full disclosure policy.
I believe it started early on with my love for ghosts and scary movies. I’ve spent a ridiculous amount of time in my life reading about ghosts and witches and such. I’ll blame it on Mrs. Maxwell, my elementary school librarian who read us a story about the Bell Witch.
I’ve been hooked ever since.
It could also be due to staying up late as a nine year old entranced by Freddy Krueger on USA’s Up All Night show with that Gilbert Gottfried guy.
I’m warped.
And I fully embrace it.
Let us begin now.
One, two, Freddy’s coming for you…
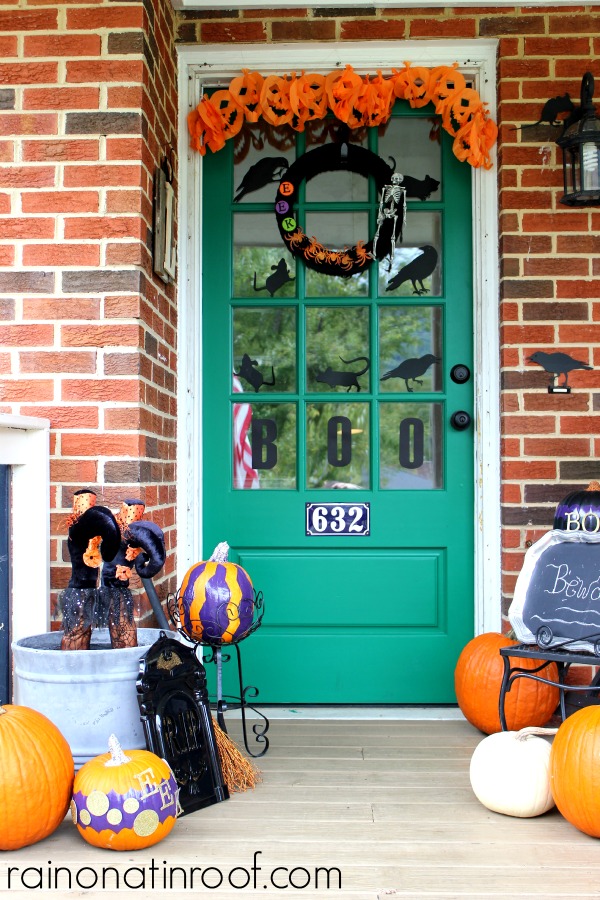
I didn’t realize how many Halloween decorations I had on my front porch until I started photographing it.
I created a “witch’s grave” with an upcycled tombstone from the Dollar Tree and by sticking her feet upside down in the flower pot.
For the gravestone, I just spray painted it black and stuck gold glittery cardstock, left over from my DIY cheers banner, behind the letters to make them pop.
The “feet” are actually two chair leg covers I purchased at Pier 1 Imports a few years back. They are designed to go around table legs or chair legs to look like a witch is sitting there, but I like them better sticking straight up on my porch.
On the other side of the door is my BOO scalloped pumpkin, as well as a skeleton entombed in a lantern. The glitter on the pumpkins stems came from Meyers-Imports. They are a glitter mecca!
Watch out, he may be waiting for you…
A little closer….
The pumpkin was a find at Kirkland’s on clearance after Halloween. That’s when I make a lot of seasonal decorating purchases. You can save tons of money and if you’re like me, when you open up your Halloween stuff the next year, its a big surprise because you forgot about what you bought!
The skeleton is from the Dollar Tree. He came in a wierd greenish glowy shade when I got him, so I gave him a coat of white spray paint to make him more skeleton-y.
I don’t know that there is any room left to decorate on my front door.
I cut out the “BOO” on my Silhouette.
The orange pumpkin garland came from a local store, Chrysalis, a couple years ago. It has a fun vintage feel.
I made the wreath last year from yarn, a skeleton from an old wreath, and other Halloween decor I found at Hobby Lobby.
Here’s hoping the front porch creeps some trick or treaters out this year…
Shall we continue this fright-tastic Halloween tour inside, now?
I’ve ranted and raved over Frogtape®’s new chevron Shape Tape™. In fact, you may be sick of me going on and on about it and may be sick of seeing my ridiculously easy chevron tray and chevron witch hat.
But, now, I’m going to blow your mind with Shape Tape™ again.
Friends, let me introduce you to Frogtape® Scallop Shape Tape™.
This is a sponsored post written by me on behalf of FrogTape. All opinions are 100% mine. This post contains affiliate links for your shopping convenience. Click here to read my full disclosure policy.
I’ll give you a second to collect yourselves.
Yep, not only is there chevron Shape Tape™, but there is also a scallop pattern, which is what I used to make these fabulous scalloped pumpkins.
Making these was, just like my chevron tray and witch’s hat, ridiculously simple.
I started out with the tape and two pumpkins.
One pumpkin is real and one is a faux one I picked up at a local craft store. We’ll start with the faux black one.
First, I put a band of Shape Tape™ around the middle of the pumpkin. Since this was a curved surface, you have to work in sections to keep it level, or from turning downward. After it was level, I pressed the tape down really well to remove any air bubbles.
I repeated this with two more bands of tape along the top and bottom of the pumpkin. However, with these I left half of the tape (on the top, the half going toward the stem, and on the bottom the half going toward the bottom) open. I wanted to keep this part black, so I put plastic wrap over those portions, then pressed the tape down around the plastic wrap.
With the real pumpkin, I put two bands of Shape Tape™ around the top and bottom, once more leaving half of it open where I could apply plastic wrap. I also turned this tape with the scallop points inward to change up the pattern a bit.
After I put the plastic wrap around the top and bottom, I pressed the tape down well again to remove air bubbles and spray painted both pumpkins purple. Just like regular FrogTape®, ShapeTape™ has PaintBlock® Technology which means when it meets paint, it forms a gel barrier to prevent paint bleed.
After spray painting the pumpkins, I removed the tape and plastic wrap. To snaz up the stems some, I added some glitter. I also added some gold embelishments to the pumpkins to “spook” them up a bit.
These fabulous pumpkins were so easy to make and took less than an hour! An easy and stylish Halloween craft!
If you run out to your local Dollar Tree, you may find these skulls in this state:
He’s definitely not bad as is.
He’s freaky looking.
And freaky looking for Halloween is good.
But, you guys know I love me some glitter and maybe even a little more freakishness than the average person.
As Carrie Bradshaw would say, “Let your freak flag fly.”
I’m beginning to think I should add “Sex and the City references” to my blog description. Hmmm…
Anyway, to add more of those two things, glitter and freakishness, I gave him a good coat of this glossy black spray paint, and then used glue in his eye sockets to adhere some orange glitter.
But that wasn’t good enough.
I felt this skull needed to really be put on display. He wanted to be noticed.
He didn’t just want his freak flag to fly, he wanted it to soar.
I pulled out a couple of thrift store candlestick holders and spray painted them orange.
Just like with the chevron witch’s hat, I threw some glitter on them while the paint was still wet.
The candlestick holders took a full day to really dry. When they were dry, I added some hot glue around the top rims and stuck those skulls on there.
The disco ball skull, as I call him, is not a Dollar Tree upcycle. I bought him a few years back after Halloween when he was on clearance for a few bucks. I felt him and the other skulls could be great freakshows together.
When Grunt Labor saw it, he said, “Whoa, those are freaky.”
Disclosure: This post is sponsored by FrogTape, but y’all know how I roll, all opinions are 100% mine. This post contains affiliate links for your shopping convenience. Click here to read my full disclosure policy.
Just like my chevron tray, this was so simple! I started with this cardboard witch’s hat I picked up at a local craft store for a few bucks.
It was screaming for chevron and glitter, don’t you think?
Before putting on any shape tape, I spray painted the entire hat glossy black, then pulled out my chevron shape tape and got to work.
To get the round, contoured cut on the tape where the cone meets the hat brim, I cut lightly with an X-Acto blade. And just like with my chevron tray, I used a small piece of the tape to measure the distance between where I applied the tape. After all the tape was where I wanted it, I made sure to press it down hard and remove any air bubbles, so there was a secure seal. Shape Tape is just like regular FrogTape, it has the PaintBlock® Technology that forms a barrier to keep the paint from bleeding!
This is what I came up with:
I apologize for the blurriness, but you get the idea.
I took it out to the garage and gave it coat of orange spray paint. Right after I gave it a coat of spray paint, I threw some orange glitter (throw some glitter, make it rain!) on it, to accentuate that fabulous chevron effect.
So now my garage floor sports not only green, navy, white and orange colors, but glitter as well.
I let it sit for 5 minutes or so and then pulled off the tape.
The base looked fabulous, however, I didn’t like how I had positioned the shape tape on the cone, so I taped off the base and sprayed the entire cone orange and added glitter to it.
And then, I had this fabulous end result:
Grunt Labor came home and asked if I had really made that.
Oh, ye, of little faith. He was pretty impressed. I don’t know if he has figured out about the shape tape yet and just how easy that makes projects. Maybe I won’t tell him just yet….It’s good to be queen.
The hat is the perfect topper to my upcycled skull, which I’ll be telling you about next week.
And because I love me some chevron so much, I just had to do a chevron pumpkin:
Beware, I still have some chevron shape tape left, there may be more chevron-ness in the future!


























 For the gravestone, I just spray painted it black and stuck gold glittery cardstock, left over from my DIY cheers banner, behind the letters to make them pop.
 The “feet” are actually two chair leg covers I purchased at


 A little closer….
 The pumpkin was a find at Kirkland’s on clearance after Halloween. That’s when I make a lot of seasonal decorating purchases. You can save tons of money and if you’re like me, when you open up your Halloween stuff the next year, its a big surprise because you forgot about what you bought!
 I cut out the “BOO” on my Silhouette.
 Here’s hoping the front porch creeps some trick or treaters out this year…


 He’s definitely not bad as is.
 Just like with the
 The disco ball skull, as I call him, is not a Dollar Tree upcycle. I bought him a few years back after Halloween when he was on clearance for a few bucks. I felt him and the other skulls could be great freakshows together.


 Yep, I made a chevron witch hat with my beloved
 It was screaming for chevron and glitter, don’t you think?

 To get the round, contoured cut on the tape where the cone meets the hat brim, I cut lightly with an
 I apologize for the blurriness, but you get the idea.
 So now my garage floor sports not only green, navy, white and orange colors, but glitter as well.
 The hat is the perfect topper to my upcycled skull, which I’ll be telling you about next week.
 Beware, I still have some chevron shape tape left, there may be more chevron-ness in the future!