Blog

  • Simple Bunny Vases for Easter

    Simple Bunny Vases for Easter

    Disclosure: This post was a collaboration with Astrobrights Papers, however all opinions and love of bright colors for Easter decorating are 100% mine….and the Circus’. 

    If we’re being honest – and we’re always honest around here – my Valentine’s Day wreath just came off my front door three days ago. The Circus proclaimed that “The Easter Bunny will be at the mall soon, Mama. It’s not Valentine’s anymore.”

    Thanks for reminding me how on top of my game I am, kid. 

    She went on to say it was time to decorate for Easter. So we got out our Easter decor and suddenly something came over me and I found myself in the Easter spirit, plotting out cute little DIY bunny vases…

    Oh my word! These are just too darn adorable - she shows you exactly how to make them and they are just SO easy! Make This: Simple Bunny Vases for Easter | Easter Crafts | Easter Crafts for Kids | Simple Easter Crafts

    After making these simple bunny vases and filling them with flowers, I think it’s safe to say the LaFevor household is officially ready for Easter, per the Circus. Here’s how we made these cute little vases – they’re really simple and a great way to dress up your Easter table with hardly any effort.

    Simple Bunny Vases

    Affiliate links may be contained in this post.

    Materials & Supplies Needed:

    Make This: Simple Bunny Vases for Easter | Easter Crafts | Easter Crafts for Kids | Simple Easter Crafts

    *I ended up not using the glitter as shown in the image above in favor of the small pom-poms.

    Step 1:

    First, you’ll need a bunny template. If you do a quick search on Google, you can easily find loads of different styles of bunnies you can print out and size up or down to your liking. You can print those out, then trace it onto your paper and cut out or you could even print them right onto your Astrobrights paper and then cut them out.  I wanted to make these vases a touch more personal though, so I got my Artist-In-Residence to sketch out a bunny drawing for me.

    Make This: Simple Bunny Vases for Easter | Easter Crafts | Easter Crafts for Kids | Simple Easter Crafts

    Bill sketched it right onto the Astrobrights paper, then I cut it out, traced it multiple times onto all the different colors of paper we were using, then cut those out.

    Make This: Simple Bunny Vases for Easter | Easter Crafts | Easter Crafts for Kids | Simple Easter Crafts

    I let the Circus choose what colors. Of course, blue was the #1 choice (Lunar Blue, specifically) and she was ok with purple and pink to coordinate with it (Venus Violet and Fireball Fuchsia). Astrobrights Papers are a really vibrant line of colored papers and seeing as how we always do things colorful and vibrant around here, these papers worked perfectly for our project.

    Step 2:

    After cutting out your bunnies, use the foam brush and apply Mod-Podge to your vase, then carefully place the bunny onto the vase and cover him with another coat of Mod-Podge.

    Make This: Simple Bunny Vases for Easter | Easter Crafts | Easter Crafts for Kids | Simple Easter Crafts

    You can do however many bunnies you like or that will fit on your vase, I opted to do three on each of ours.

    Place a small pom-pom on the bunny right where the tail would be. If you don’t have pom-poms on hand, you could always use glitter. That’s what I was going to do initially, but decided the pom-pom would be more fun.

    Let the vases fully dry, then fill them with flowers.

    Oh my word! These are just too darn adorable - she shows you exactly how to make them and they are just SO easy! Make This: Simple Bunny Vases for Easter | Easter Crafts | Easter Crafts for Kids | Simple Easter Crafts

    In the Circus’ words, “Mama these work perfectly for Easter.” Seriously. I couldn’t make that up if I tried. 

    Oh my word! These are just too darn adorable - she shows you exactly how to make them and they are just SO easy! Make This: Simple Bunny Vases for Easter | Easter Crafts | Easter Crafts for Kids | Simple Easter Crafts

    We are all colorized for Easter! How will you colorize your Easter?

    You can find more inspiration and ideas to colorize your life on the Astrobrights Papers Facebook page!

    pin-this-post-2

    DIY Bunny Vases for Easter | Easy Easter Crafts | Easter Decorations | Bunny Crafts for Easter | Bunny Mason Jar Vases

    blog-signature-summer-15

    Disclosure: This post was a collaboration with Astrobrights Papers, however all opinions and love of bright colors for Easter decorating are 100% mine….and the Circus’. 

    SaveSave

  • How to Paint a Plaid Pattern for Lazy Gals

    How to Paint a Plaid Pattern for Lazy Gals

    This post is sponsored by Velvet Finishes, however all opinions are 100% mine. 

    You guys. You guys. You guys.

    No. Really. You guys.

    I did something.

    I did something I wasn’t sure I could do at all. I was sure it would be an utter failure. I held my breath with each brushstroke and removal of FrogTape.

    But it wasn’t a failure.

    It. Was. A. WIN.

    That table is PAINTED - she PAINTED on that plaid pattern and it actually looks really easy. She even tells you how to do it without having to measure anything! How To Paint a Plaid Pattern | Furniture Makeovers | Furniture Painting | DIY Projects | Painting Patterns

    You see that plaid beauty? I painted it. It’s not a stencil, it’s not contact paper, it’s paint!

    And I didn’t measure one iota of a thing to do it….because I’m lazy…and bad at math.

    How to Paint a Plaid Pattern Without Measuring

    Affiliate links may be contained in this post.

    Materials & Supplies:

    How To Paint a Plaid Pattern WITHOUT Measuring - you will not believe how easy it is! Furniture Makeover | Furniture Painting | DIY Projects | Plaid Pattern

    Step 1:

    Prep your painting surface. My little table had a leopard print I stenciled on it a couple years back. It had resided on the screened-in porch, but never really got used all that often. I didn’t want to part with the table as I really liked it’s bones, so I opted to re-do it with a plaid print. First, I used Ready to prime the table.

    How To Paint a Plaid Pattern WITHOUT Measuring - you will not believe how easy it is! Furniture Makeover | Furniture Painting | DIY Projects | Plaid Pattern

    Just spray it on, let it sit for a few minutes, then wipe down the surface. Ready will remove any shine the previous finish may have had and any dust or dirt as well.

    Step 2:

    Give the surface a few coats of Vivid.

    How To Paint a Plaid Pattern WITHOUT Measuring - you will not believe how easy it is! Furniture Makeover | Furniture Painting | DIY Projects | Plaid Pattern

    Reds are always hard to even out in color, so it might take a few more coats than with other colors. It took three for my table. Let the final coat dry overnight.

    Step 3:

    Place your yardstick in the middle of the table. It doesn’t have to be perfect – I eyeballed mine. On each side of the yardstick run a piece of 1.5″ Delicate Surface FrogTape along the length of the table. The yardstick I have from Home Depot is almost the exact same size as the 1.5″ FrogTape, thus why I suggested it – it makes the spaces between your tape and the tape almost identical in size, thus no measuring!

    How To Paint a Plaid Pattern WITHOUT Measuring - you will not believe how easy it is! Furniture Makeover | Furniture Painting | DIY Projects | Plaid Pattern

    You do want to make sure you use Delicate Surface tape as this paint is still relatively fresh. Delicate Surface tape is made for painted surfaces that are just a few days old.

    After running two pieces of FrogTape along each side of the yardstick, remove the yardstick and place it on one side of either piece of tape, then run another piece of tape along the side of the yardstick that doesn’t have tape.

    How To Paint a Plaid Pattern WITHOUT Measuring - you will not believe how easy it is! Furniture Makeover | Furniture Painting | DIY Projects | Plaid Pattern

    Continue moving your yardstick and running your tape until your table has strips of tape all across it as shown above.

    After all your tape has been ran, firmly run your finger or a credit card edge along the edges of the FrogTape to seal it. Do not skip this step! If you don’t do this, you risk having the paint bleed through the tape.

    Step 4:

    Paint two coats of Luxurious in between the tape pieces on your surface.

    How To Paint a Plaid Pattern WITHOUT Measuring - you will not believe how easy it is! Furniture Makeover | Furniture Painting | DIY Projects | Plaid Pattern

    Remove the FrogTape immediately after brushing on your final coat. Let dry overnight.

    Step 5: 

    Place your yardstick in the center of the surface perpendicular to the black stripes you painted. Once more, run two pieces of 1.5″ Delicate Surface FrogTape along both sides of the yardstick.

    How To Paint a Plaid Pattern WITHOUT Measuring - you will not believe how easy it is! Furniture Makeover | Furniture Painting | DIY Projects | Plaid Pattern

    Just like you did before, move the yardstick to one side of a tape strip and then place another tape strip along the other edge of the yardstick. Repeat this over the entire surface until your surface resembles the image shown below.

    How To Paint a Plaid Pattern WITHOUT Measuring - you will not believe how easy it is! Furniture Makeover | Furniture Painting | DIY Projects | Plaid Pattern

    Remember to firmly press down along the edges of the FrogTape after you have applied it to seal the edges.

    Step 6:

    Using the 1″ Delicate Surface FrogTape, cover the black stripes on your surface.

    How To Paint a Plaid Pattern WITHOUT Measuring - you will not believe how easy it is! Furniture Makeover | Furniture Painting | DIY Projects | Plaid Pattern

    The easiest way I found to do this was to take a piece of the 1″ FrogTape and run it along on edge of the black and then run another piece of tape along the other edge of the black. The tape will overlap in the middle. Repeat this until your Luxurious stripes are covered and you have lots of little squares. Once more, remember to firmly push down on the edges of the FrogTape to seal it.

    Step 7:

    Within the squares you created with the tape, paint a couple coats of Timeless.

    How To Paint a Plaid Pattern WITHOUT Measuring - you will not believe how easy it is! Furniture Makeover | Furniture Painting | DIY Projects | Plaid Pattern

    Remove the FrogTape immediately after applying your final coat. Your surface should look similar to the image below after you remove the tape.

    How To Paint a Plaid Pattern WITHOUT Measuring - you will not believe how easy it is! Furniture Makeover | Furniture Painting | DIY Projects | Plaid Pattern

    Let dry overnight.

    Step 8:

    Using the 1″ Delicate Surface FrogTape, run strips of tape just a little outside each black edge. This should create small lines of black within the tape as shown below. Once more, I didn’t measure this at all – I just eyeballed it.

    How To Paint a Plaid Pattern WITHOUT Measuring - you will not believe how easy it is! Furniture Makeover | Furniture Painting | DIY Projects | Plaid Pattern

    Firmly seal the edges of the tape with your finger or the edge of a credit card.

    Step 9:

    Brush on a couple coats of Minimalistic between the tape where the black is.

    How To Paint a Plaid Pattern WITHOUT Measuring - you will not believe how easy it is! Furniture Makeover | Furniture Painting | DIY Projects | Plaid Pattern

    Immediately remove the tape after your final coat. Let it dry overnight.

    Step 10: 

    Repeat the previous two steps above, except this time on the gray areas on your surface.

    How To Paint a Plaid Pattern WITHOUT Measuring - you will not believe how easy it is! Furniture Makeover | Furniture Painting | DIY Projects | Plaid Pattern

    Paint Minimalistic between the pieces of tape. Remove the tape after your final coat. Let dry overnight.

    Step 11:

    Velvet Finishes paint does not always require an additional topcoat as there is already a topcoat built into the paint. However, if you have painted something that is going to get a lot of action and use, then an additional topcoat is suggested. I plan on this going into either the den/man cave or Bill’s room as a side table or night stand at the 70’s Landing Pad, so I opted for the extra protection.

    how-to-paint-a-plaid-pattern-14

    I just brushed on one coat of Protect to give the surface more protection and even a bit of shine.

    That table is PAINTED - she PAINTED on that plaid pattern and it actually looks really easy. She even tells you how to do it without having to measure anything! How To Paint a Plaid Pattern | Furniture Makeovers | Furniture Painting | DIY Projects | Painting Patterns

    This table turned out more awesome than I ever dreamed. I fully realize that sounds corny and I fully don’t give a damn.

    That table is PAINTED - she PAINTED on that plaid pattern and it actually looks really easy. She even tells you how to do it without having to measure anything! How To Paint a Plaid Pattern | Furniture Makeovers | Furniture Painting | DIY Projects | Painting Patterns

    Ok, what are you going to plaid up?

    You might also want to see…

    How to Make Colored Furniture Glaze: 11 Colorful Furniture Makeovers

    How to Make Furniture Glaze in Any Color

    DIY Tuxedo Bar | Learn how to paint a bar front or any piece of furniture with a mostly flat front to look like a tuxedo jacket. Awesome idea for a furniture makeover!

    DIY Tuxedo Painted Bar

    pin-this-post-2

    How to Paint a Plaid Pattern | DIY Furniture Makeovers | DIY Painting Ideas | Painting Techniques | Painted Furniture Ideas

    blog-signature-summer-15

    Disclosure: This post was a collaboration with Velvet Finishes, however all opinions and over-excitement about painting a plaid pattern all by myself are 100% mine. 

    SaveSave

  • My Favorite Green Decorating Moves

    My Favorite Green Decorating Moves

    I make no bones about my love of the color green in decorating. I will fully own up to the fact that I use it often and maybe too much for some people. I don’t care though. I’m not a quitter.

    Meg from Green with Decor emailed me a couple months back and asked if I wanted to join in on a St. Patrick’s Day blog hop featuring green decor.

    Ummm….hello….it’s like I was made to do this blog hop.

    Of course, I said yes, but also told her that since we were moving to the 70’s Landing Pad, I might not have very many “new” green decorating tricks to share, but I could share my favorite green decorating moves. She was cool with that, so here we are and here are my favorite green decorating moves I’ve done. If you’re a fan of decorating with green like me, you can hop around to the other blogs featuring their green decor at the end of this post.

    Decorating with Green

    Affiliate links may be contained in this post.

    I feel it would be a sin to not honor the very first project that sparked my love of green…

    Decorating with Green: Kate Spade Inspired Lamp Makeover

    Kate Spade Inspired Lamp

    Had it not been for this beauty, I may never have discovered just how much I loved green in decorating. Or it would have taken me a long time. This single lamp, as ridiculously corny as it sounds, is what helped me figure out what my own style truly was – not what a magazine or Pinterest said it should be. And moving on…

    Decorating with Green: Green pillow paired with black and white graphic pillow and vintage cowboy blanket against a fun and modern confetti wall treatment.

    Confetti Wall / Green Velvet Pillow / Black & White Pillow

    This vignette is one of my favorites, mainly because of the vintage cowboy blanket that’s a family heirloom in my book, but also because of how random everything is, yet it worked so perfectly together. I thought for sure putting a cowboy hat and blanket against a gold confetti wall and throwing in a bold black and white graphic pillow and green velvet pillow would be a mistake. I’m so glad I was wrong though.

    Decorating with Green: Green Barstools against a Navy and White Kitchen

    My Barstools / DIY Island / Navy and White Kitchen

    And then, there’s my barstools. Don’t they just look gorgeous popping off that navy and white kitchen? They were also a simple makeover.

    Decorating with Green: Malachite topped Credenza - an easy furniture makeover and DIY project

    Malachite Credenza

    I have likened this piece to a mullet – business in the front, party on top (instead of the back). The green malachite on top is actually wrapping paper.

    Decorating with Green: IKEA Tarva turned Bar Cabinet | IKEA Hack | DIY Bar

    IKEA Tarva Turned Bar Cabinet

    This IKEA Tarva three-drawer dresser got turned into a bar cabinet – with a little help from green paint.

    Decorating with Green: DIY Malachite Tray - you'll never believe how easy it is.

    DIY Malachite Tray Tutorial

    Obviously, malachite and I are pretty tight. This malachite tray wasn’t made with malachite at all – just paint. And it was so easy.

    Decorating with Green: Green, Black and White Chair Makeover | French Country but bold

    Green, Black and White French Country Chair Makeover

    Hands down, probably, so not really hands-down, but you know what I mean, my favorite color combination is green paired with black and white – like in this modern french country chair makeover.

    Decorating with Green: DIY Faux Jadeite - you won't believe how easy it is!

    DIY Jadeite Tutorial

    Not my favorite shade of green, but I won’t turn my nose up at it, this DIY jadeite was another easy project.

    Decorating with Green: Green Pillow paired with Plaid Throw against a black wall.

    Green Pillow / Plaid Blanket (similar)

    My favorite green velvet pillow also pairs perfectly with a plaid blanket.

    Decorating with Green: Green curtains paired with a pop of coral.

    Green Drapes / Brass Duck

    The minute I saw these green drapes I knew they were destined for my living room. I love the combination of the green against the coral as well. Don’t look too close at my rug though – it obviously needs to be vacuumed. 😉

    Decorating with Green: Cane Inspired Accent Wall | Painted Wall Patterns | Painting Patterns

    Cane Inspired Accent Wall / Bust (Similar) / Acrylic Vase (Similar)

    This green and white cane inspired accent wall gave a punch of color and pattern to my previously all-white bathroom.

    Decorating with Green: Banana Leaves Watercolor Printables - the printables are free! | Banana Leaves | Palm Prints

    Banana Leaf Watercolor Printables

    This banana leaf watercolor print helped to tie in the green accent wall in my bathroom. These watercolor prints are actually FREE printables you can find HERE!

    Obviously, my love for green runs deep! You?

    blog-signature-summer-15

    SaveSave

  • Snazzy Painted Planter Pots

    Snazzy Painted Planter Pots

    I am willing spring to come with this project. Willing the cold cold cold air of yesterday to go away and the warmth that we enjoyed just on Monday to return. Living in the Tennessee valley, you literally never know what the weather may bring.

    And now, I just realized I sound like an old man talking about the weather.

    Let’s move on to the snazzy painted planter pots, shall we?

    I actually made these toward the end of last summer. Thus why, when you see the images, it’s all bright and sunny. However, when I went to post them, the weather had quickly changed and I decided it would be best to wait – so here they are now, getting thrown into internet land along with a little wish for spring.

    Instead of paying $50 on a planter pot, buy a cheap one and dress it up with spray paint! Easy Painted Planter Pots | Gardening | Fiddle Leaf Fig | Geometric | Painting Patterns

    Snazzy Painted Planter Pots

    Affiliate links may be contained in this post.

    Materials & Supplies Needed:

    Step 1: 

    To make the planter that has vertical triangles that meet in the middle, start by creating the pattern below with the smaller width FrogTape®.

    Instead of paying $50 on a planter pot, buy a cheap one and dress it up with spray paint! Easy Painted Planter Pots | Gardening | Fiddle Leaf Fig | Geometric | Painting Patterns

    I didn’t really measure on these much, just eyeballed it.

    Step 2: 

    Next, you will want to use your craft knife to trim up all the edges of the tape.

    Instead of paying $50 on a planter pot, buy a cheap one and dress it up with spray paint! Easy Painted Planter Pots | Gardening | Fiddle Leaf Fig | Geometric | Painting Patterns

    For the largest triangle, you will want to cut out the section where the triangles meet as shown below.

    Instead of paying $50 on a planter pot, buy a cheap one and dress it up with spray paint! Easy Painted Planter Pots | Gardening | Fiddle Leaf Fig | Geometric | Painting Patterns

    Step 3: 

    Begin creating the same pattern as you did at the top, except on the bottom of the pot now.

    Instead of paying $50 on a planter pot, buy a cheap one and dress it up with spray paint! Easy Painted Planter Pots | Gardening | Fiddle Leaf Fig | Geometric | Painting Patterns

    Step 4: 

    After you have created the pattern, tape off the surrounding area of the planter with the larger width FrogTape®.

    Instead of paying $50 on a planter pot, buy a cheap one and dress it up with spray paint! Easy Painted Planter Pots | Gardening | Fiddle Leaf Fig | Geometric | Painting Patterns

    Use your fingernail to firmly adhere the FrogTape® edges to the planter.

    Step 5:

    For the other planter, simply place six strips of the 0.94″ FrogTape® on the side of the planter in triangle formations as shown below.

    Instead of paying $50 on a planter pot, buy a cheap one and dress it up with spray paint! Easy Painted Planter Pots | Gardening | Fiddle Leaf Fig | Geometric | Painting Patterns

    Step 6: 

    Even up your edges with a craft knife and tape off the rest of the planter with the 1.88″ FrogTape®.

    Instead of paying $50 on a planter pot, buy a cheap one and dress it up with spray paint! Easy Painted Planter Pots | Gardening | Fiddle Leaf Fig | Geometric | Painting Patterns

    Step 7: 

    Use your fingernail to firmly apply pressure to all the edges of the FrogTape® to create a good seal.

    Instead of paying $50 on a planter pot, buy a cheap one and dress it up with spray paint! Easy Painted Planter Pots | Gardening | Fiddle Leaf Fig | Geometric | Painting Patterns

    Step 8: 

    Spray paint your designs.

    Step 9: 

    After your last coat of spray paint (I did two coats), immediately remove the FrogTape®.

    Let the planters fully dry, then fill them with your favorite plants.

    Instead of paying $50 on a planter pot, buy a cheap one and dress it up with spray paint! Easy Painted Planter Pots | Gardening | Fiddle Leaf Fig | Geometric | Painting Patterns

    Instead of paying $50 on a planter pot, buy a cheap one and dress it up with spray paint! Easy Painted Planter Pots | Gardening | Fiddle Leaf Fig | Geometric | Painting Patterns

    Instead of paying $50 on a planter pot, buy a cheap one and dress it up with spray paint! Easy Painted Planter Pots | Gardening | Fiddle Leaf Fig | Geometric | Painting Patterns

    Instead of paying $50 a pop, you’ve spent about $15 per planter.

    Not too shabby.

    Now, come on spring!!

    Do you have any great pattern ideas for planters? 


    You might also wanna check out…

    DIY Cedar Planter Box  – using a simple snap-together frame!

    Tips & Tricks for the Perfect Container Garden

    Teapot Planter – turn an old teapot into an adorable planter!

    My Green Thumb Trick

    pin-this-post-2

    DIY Painted Planter Pots | Flower Pot Ideas | Flower Pot Crafts | DIY Flower Pots | Planter Ideas | DIY Planter Ideas | DIY Planter Pots

    blog-signature-summer-15

    frogtape-disclosure

  • Finding the Good Stuff on Craigslist and Facebook Marketplace

    Finding the Good Stuff on Craigslist and Facebook Marketplace

    Lately, I’ve been stalking thrift stores, Craigslist, Close5, Facebook yard sale pages and every other second-hand selling outlet known to mankind.

    Ok, let’s be honest, I’m always stalking those places. But the 70’s Landing Pad has given me a more valid excuse to stalk and buy more. Yea, so there’s that. P.S. You can see some of my new purchases here.

    Anywho, there tends to be a lot of crap out there that people want to get rid of – particularly on Craigslist. Now, I’m a believer in the “one man’s junk is another man’s treasure” motto, but really I just don’t need your passenger side car door from a 1997 Nissan Altima or your used hairbrush. Yep, I saw a hairbrush for sale on the Craigslist yesterday, folks. Now, I’m sure both the Altima car door and hairbrush could be very valuable to many people. However, I’m not one of them. While I would love to have enough time everyday to just scroll through all the newly listed for sale items on places like Craigslist, Facebook yard sale pages, etc., and find that little gem among all the other crap, I don’t. What I do have time for though is to search for specific keywords that help me find what I’m looking for – or what I suddenly realized I was looking for when I find it. 

    You HAVE GOT to read this before you search for anything again on Craigslist! The #1 Tip for Finding the Good Stuff on Craigslist and other online selling platforms!

    My #1 Tip for Finding The Good Stuff

    Affiliate links may be contained in this post.

    Keywords

    Instead of just going and scrolling through all the sale items in the furniture or housewares or whatever section, I search for certain keywords that relate to things I like. Here are a few keywords I search for….

    Brass 

    As we all know, I love brass. Using this single keyword is how I found an arched three arm vintage brass floor lamp for a whopping $50. I would show you a picture, but it’s currently residing between a circa 1982-ish bar I scored for $30 and a sofa table and would be too difficult to move at the moment.

    Lucite

    Ahhh, lucite you elude me. While I haven’t purchased any lucite items I’ve found (they’ve either been too far outta my league money-wise or I really had no place for it), just know I’m not a quitter.

    Vintage / Retro

    These terms relate to my style, so they are often in rotation. You could also use ‘antique,’ I just don’t because I find that keyword pulls up really old stuff that just isn’t my style.

    Brand Names

    I’m a big fan of Home Decorators Collection, CB2, Anthropologie, etc. I often search for just those brand names and see what comes up. I searched for Home Decorators Collection last week and found a brand-new tufted black leather sofa for $600. I drug Grunt Labor, Bill and the Circus out in the freezing rain (literally, it was freezing rain) to go pick it up because I couldn’t chance losing it.

    Think about items in your decor, or life in general, that you just really love. Then search for whatever keyword would relate to those items. For your keywords, think somewhere between broad and specific. The reason I search for just ‘brass’ rather than ‘brass home decor’ is because most people aren’t going to list something as brass home decor. Make sense? Here’s another example, which is totally un-related to decorating, but shows you what I mean. The Circus has entered the Barbie stage. She loves them. She wants a Barbie house sooooo bad. Instead of searching for ‘Barbie house’, I’ve been searching for Barbie in case something like a Barbie pool came up for sale because she wants one of those too. Also, do any of you have a Barbie house for sale for less than $200? Because that’s what a new one costs and Mama ain’t payin’ that. 

    Variations of Keywords

    Ok, so really I guess I’m giving you two tips, but they kind of go together, so here ya go. I’ve been wanting to get a new (new-to-me) couch for the living room at the 70’s Landing Pad. While I call a couch a couch, some call it a sofa and list it on selling platforms as such. So I search for both sofa and couch separately, instead of just one. Also, people can spell words differently like nightstand – some spell it in two separate words, night stand, so I search for both. Here are more examples…

    Couch / Sofa

    Bar Stool / Barstool

    Nightstand / Night Stand

    Bar Cart / Tea Cart / Bar

    Chandelier / Light Fixture / Ceiling Light / Lighting

    Cowhide / Cow Hide

    Accent Chair / Occasional Chair

    Dresser / Chest of Drawers / Bureau

    Headboard / Bed

    Side Tables / End Tables

    Lucite / Acrylic

    See what I mean? While, I’m going to call a bar cart a bar cart, the good Baptist lady down the road might call it a tea cart. Bless her heart.

    pin-this-post-2

    How to Find the Good Stuff on Craigslist | How to Use Craigslist | Craigslist Tips | Tips for Buying on Craigslist

    blog-signature-summer-15

  • How I Never Do It All Every Single Day

    How I Never Do It All Every Single Day

    In the survey responses, there were a couple of people who asked me how I managed my time and said they would love to see one of the “day in the life” posts. Y’all, everyday is a whole new ballgame around here. I try to plan out my time wisely, but it never fails that when I do that something else hits the fan and I’m dealing with that.

    So my new time management theory is to just get as much shit done as I can during the allotted time.

    This may mean I only cross one or two things off my ever-growing to-do list. It may mean I cross off four or five things.

    It may also mean I throw my hands up in the air, while flipping the bird to no one or nothing in particular but the imaginary “man” who seems to always be against me and my getting work done. If this happens, then most likely nothing gets crossed off the list and I will consider 2pm an acceptable time to drink a beer.

    In theory, and I really want to emphasize the theory part, this is how my typical day goes – if it’s a good day and the man is on my side for once. This also just pertains to Tuesdays, Wednesdays and Thursdays when the Circus is at preschool. Mondays and Fridays are nothing but straight up survival of the fittest. I usually lose on those days.

    5:30 a.m. – 6 a.m.: At some point during this timeframe, I will have hopefully only hit snooze once, maybe twice. Despite my alarms having motivational and inappropriate names, it seems they still don’t stand much of a chance somedays.

    Funny Alarm Names

    My goal every weekday morning is to be watching the coffee pour forth from the Keurig at 6 a.m. and then stumble to my office, coffee cup in hand afterward.

    6 a.m. – Whatever time the Circus decides to start her day (usually anywhere from 7:30 – 8:00 a.m.): During this time, I schedule some social media if I have a new post up, check and respond to emails (there’s usually a minimum of 75 new ones to sort through) and if time permits, I edit photos or work on writing new posts. Time usually doesn’t permit that. Sometimes, like this morning with this post, I’m still writing it even though I wanted it to go live at 6 a.m. 

    Whatever time the Circus Rises – 9:20ish: Hang out with the Circus – A.K.A. be her personal servant by bringing her apple juice and a princess gummy as soon as she situates herself on the couch. Fix her breakfast 30 minutes or so after she wakes up as she does not take her breakfast immediately upon awakening. Most likely, she will hardly touch her breakfast, so I will spend a ridiculous amount of time spoon feeding her and telling her to chew and not just hold it in her mouth. Then, I’ll brush my teeth and wash my face and find sweats to wear that I didn’t wear the previous day so that the preschool teachers won’t judge me too much. Around this time, I’ll remember that I forgot to let Zoe, our dog, out of her dog apartment and feed her. I’ll run around the house – possibly half naked – doing this. After that, I’ll get the Circus ready. She’ll fight me on brushing her teeth and her hair. Right before it’s time to walk out the door, I’ll remember that I still haven’t made her lunch for the day. I’ll go to toss a bag of Funyuns, a jelly sandwich that I constructed in under 15 seconds and a YooHoo into her lunch box and realize I didn’t clean out her lunchbox from last week’s last lunch and the smell that greets me upon unzipping the lunchbox will be nothing short of toxic.

    9:45 a.m. – 1:50 p.m.: After I drop the Circus off, I usually head home – unless I haven’t been thrifting in a few days. If I haven’t been thrifting in a few days, then I’ll tell myself I’m only hitting a few, but end up going down a rabbit hole because I tell myself that I really need to be on the lookout for stuff for the 70’s Landing Pad. Two hours later, I will have found nothing except damn napkin rings which I really didn’t need, but wanted and will have essentially wasted two whole hours of precious work time.

    If I don’t go thrifting, then I head straight home and work. Depending on what needs to be done for the week (projects, taking photos, editing photos, writing posts, etc.) I will work on that during this nearly 4 1/2 hour block. Usually I’m running back and forth between the garage and my office. I’ll be painting something and while the paint is drying, I’m typing about something or editing photos.

    There’s also a good chance during this timeframe that Bill is going to text me and say he needs something to eat, forgot something, etc. and I’ll be running around fixing that situation.

    1:50 p.m. – 5:00 p.m.: During this time, I pick up the kid. We go get a slush at Sonic or make a milkshake at home afterward just for the hell of it. We play or watch cartoons until 3:00p.m. At 3 p.m., I make her go to her room. She can watch a movie, but I tell her she has to stay in bed. The idea is that I squeeze in a little more work time, while she takes a much needed nap. However, only half the time does she end up taking a nap. The other half, my words have no bearing on her whatsoever and she ends up frolicking all around the house. If by the grace of God, she naps, then I do computer work like photo-editing, post writing, etc. If the man is against me that day and she refuses to nap, then I try to do a little work in between being a dinosaur or the bad guy, helping her change princess costumes or putting Ken’s head back on for the 108th time that day.

    At 5:00 p.m., I usually call it quits and start making dinner. Grunt Labor will usually be home around this time with Bill in tow. After dinner, if there is something work related which is time sensitive and didn’t get done that day, then Grunt Labor will watch the Circus while I work a little more. Right now, we are winding down with basketball season, so for the past few months, we’ve had basketball games at least two nights a week right after dinner. If there’s no ball games and I don’t need to work, then we all chill around the house. The Circus will be in bed by 9 p.m. and Grunt Labor and I will watch a little television after that and then are usually in bed around 10 p.m.

    Please note nowhere in that schedule does it mention cleaning. Or washing clothes. Or dishes. My house is rarely clean y’all. Don’t let my pretty pictures fool you for a second, my floors are usually disgusting most days and there’s a protective cover of dust a few inches thick on my furniture. I clean the entire house maybe once a month or prior to visitors. And even then, Grunt Labor usually does the floors. I don’t wash clothes or dishes – Grunt Labor does that. The bed is never made unless Grunt Labor does it. Essentially, we would be living in a pigsty if it weren’t for him.

    Messy Bedroom

    See, I wasn’t lying. These are un-edited, un-clean and un-styled photos. Real life, y’all. And lord, I know those sheets are hideous, but damn they are so warm and cozy during the winter. And yes, all my art is down from above the bed because I highjacked it for the hall.

    My dresser is always cluttered.

    Dresser

    There’s a stack of books, some of which I’ve read and some of which I haven’t, a fallen down piece of art behind the green bust and a #BO$$BABE sticker that’s falling off the mirror.

    Messy Desk

    My desk is one hot mess and so am I most days.

    Radio

    Barbies have taken up residence in the vintage radio in the living room and apparently some freakish-head-moving-talking unicorn is their protector.

    There is rarely a pretty “styled” surface around here.

    Dog

    For example, the Circus felt the dog holding a (broken) picture frame was better suited wearing Snow White baby’s bow and residing in the living room next to scratch-off lottery tickets that I’m not sure are worth anything or not or how they came to be there.

    I don’t do it all.

    I don’t do it all every single day.

    But I do the best I can everyday and that’s good enough.

    I don't do it all everyday. But I do the best I can and that's good enough.

    blog-signature-summer-15


  • How to Start a Fire Fast

    How to Start a Fire Fast

    This post is sponsored by HomeRight, however all opinions are 100% mine. Affiliate links may be contained in this post.

    I didn’t fall in love with Grunt Labor on a fire pit night. But he definitely got a few brownie points the first time we set around a fire pit.

    There are many things that seem to be imprinted on your DNA when you are born in the country. One of those things is a love for fire pit nights. There aren’t many things better than a weekend night spent around a fire pit with good friends, good drinks and good music. In fact, I feel I should also write you a fire pit playlist now that I think about it. But I digress. A good fire is imperative though to the night’s success. You need it big, but not too big and you don’t want to have to waste too much time starting it. So let me introduce you to the coolest new fire lighting tool you have ever seen…

    How to Start a Fire FAST - takes 2-3 minutes and not a single match is required! You won't believe this!!

    HomeRight’s latest toy, the Electro-Light Fire Starter. The Electro-Light makes it possible for you to light up your fire pit, charcoal grill or anything else you want to add a little heat to in 2-3 minutes flat. Without lighting a single match.

    Now, before we go any farther. Let’s get a few things straight. I am not responsible if you catch yourself on fire or catch something else on fire that wasn’t supposed to be set on fire. Follow the instructions included with the tool and use caution and common sense, y’all. Do not get too close to fires. Do not let children be around fires without supervision. Make sure there isn’t anything around the fire that could easily catch on fire. Got it?

    How to Start a Fire FAST - takes 2-3 minutes and not a single match is required! You won't believe this!!

    All you do is plug it in (no lighter fluid or anything like that required) and push the red button. You will start to hear a sound that resembles a vacuum. The Electro-Light is actually blowing 1300°F air onto your wood or charcoal. After 2-3 minutes, you should have a good fire going. If the flames start to die out, just turn the Electro-Light back on and fan the flames.

    We tested it out a few weeks back when the Circus insisted upon roasting marshmallows, but neglected to eat a single one of them that she roasted. #imaginethat

    How to Start a Fire FAST - takes 2-3 minutes and not a single match is required! You won't believe this!!

    That picture was after we already had the fire going. I started taking a video after we had the Electro-Light going for about a minute before any of the fire had started. It’s really cool to see it light up.

    [adthrive-in-post-video-player video-id=”2zLXF63I” upload-date=”Wed Jul 20 2016 13:33:20 GMT+0000 (Coordinated Universal Time)” name=”Rain on a Tin Roof – How to Start a Fire Fast” description=”How to Start a Fire Fast by Rain on a Tin Roof”]

    Isn’t that awesome? P.S. Great fire starter helpers are evergreen branches from old Christmas trees and lint. 🙂

    This bad boy will probably be making the rounds as a gift to quite a few of our fire pit loving friends and grill loving guys. You can find it on Amazon.

    Are you a fire pit lover? 

    How to Start a Fire FAST - takes 2-3 minutes and not a single match is required! You won't believe this!!

    blog-signature-summer-15

    You know you don’t wanna miss any of this crazy.

    Sign up to get my posts delivered to your inbox here.

    Stalk Me Here:

    Pinterest / Facebook / Twitter / Google+ / Instagram

    Disclosure: This post was a collaboration with HomeRight. However, all opinions and love of fire pit nights are 100% mine.

    SaveSave

  • DIY Painted and Patterned Doors

    DIY Painted and Patterned Doors

    This post is sponsored by FrogTape, however all opinions are 100% mine. Affiliate links may be contained in this post.

    After you complete a project and you look at it and say, “Hello, lover,” you know it’s good.

    For example, “Hello, lover” doesn’t exactly fit with removing popcorn ceilings or ripping out tile. But it does fit perfectly for closet doors…when they look like these…

    Sliding Closet Doors Makeover | Painted Closet Door Ideas | Painted Doors Ideas | Interior Door Ideas | Interior Doors Painted

    Hello, lover…

    You just said it, didn’t you? I knew you would. They are totally Carrie Bradshaw / Sex and the City worthy.

    So these doors are the closet doors in my office at the 70’s Landing Pad. Yes, I said this is the 70’s Landing Pad and yes, there is a rug on the floor and a semi-styled bar cart. This is the one room that, sans furniture (besides a bar cart turned craft cart and rug), is finished.

    Did you just feel me across the world jumping up and down with glee? Because I did.

    While most of this room is all white because I’ll be using it quite a bit for photos and white backgrounds never fail me for those, I needed something to be a wow factor in here – enter flat front closet doors.

    Stunning - AND she did it with paint and FrogTape! DIY Painted and Patterned Doors / Black and White Design / Black and White Decor / Interior Design

    You could practically feel the sadness radiating from them. So I fixed that.

    DIY Painted and Patterned Doors

    Materials Needed:

    Step 1

    Run FrogTape® all along the edges of each door.

    Stunning - AND she did it with paint and FrogTape! DIY Painted and Patterned Doors / Black and White Design / Black and White Decor / Interior Design

    Since this is a set of sliding closet doors, part of the door on the back is behind the front door. I just acted like that part didn’t even exist and ran the FrogTape on that door right along where the front door met the back door as shown in the photo below.

    Stunning - AND she did it with paint and FrogTape! DIY Painted and Patterned Doors / Black and White Design / Black and White Decor / Interior Design

    Step 2

    Find the center of each door and run a piece of FrogTape® right down the center.

    Step 3

    On the center piece of tape, come down 8″ and mark with a pencil. From the 8″ mark, come down 11.5″ and mark with a pencil.

    On the outer pieces of FrogTape, come down 14″ and mark with a pencil.

    Stunning - AND she did it with paint and FrogTape! DIY Painted and Patterned Doors / Black and White Design / Black and White Decor / Interior Design

    Run pieces of tape diagonally as shown in the image above to make a diamond. As long as your diagonal pieces are meeting on the marks you made, they should be even.

    With the second door, the one that is slightly behind the front door, since the length of the doors didn’t change any with the measurements, only the width, I still made my vertical 8″, 11.5″ and 14″ marks. The tape strips that make up the diamonds, the 11.5″ strips, will only be slightly shorter, but you shouldn’t have to actually measure those as long as you meet up the strips on your vertical marks.

    Step 4

    Use a craft knife and ruler or other straight edge to remove the excess tape as shown on the right door below.

    Stunning - AND she did it with paint and FrogTape! DIY Painted and Patterned Doors / Black and White Design / Black and White Decor / Interior Design

    Your doors will look like this when you are finished removing the excess tape:

    Stunning - AND she did it with paint and FrogTape! DIY Painted and Patterned Doors / Black and White Design / Black and White Decor / Interior Design

    Step 5

    Firmly press along all edges of the FrogTape® to seal the tape against paint bleed.

    Stunning - AND she did it with paint and FrogTape! DIY Painted and Patterned Doors / Black and White Design / Black and White Decor / Interior Design

    Step 6

    Paint over the doors with a small paint roller.

    Stunning - AND she did it with paint and FrogTape! DIY Painted and Patterned Doors / Black and White Design / Black and White Decor / Interior Design

    I used a small paintbrush to paint around the handles.

    Step 7

    Remove the FrogTape® immediately after you paint the last coat. Do not wait for it to dry.

    Stunning - AND she did it with paint and FrogTape! DIY Painted and Patterned Doors / Black and White Design / Black and White Decor / Interior Design

    Step back, and in your best Carrie Bradshaw voice say, “Hello, lover.”

    Stunning - AND she did it with paint and FrogTape! DIY Painted and Patterned Doors / Black and White Design / Black and White Decor / Interior Design

    Well done, my friend, well done.

    Stunning - AND she did it with paint and FrogTape! DIY Painted and Patterned Doors / Black and White Design / Black and White Decor / Interior Design

    By far, these babies are one of my most favorite painted pattern projects. P.S. I also seem to like alliteration. 

    What do you think? 


    Are you a painted pattern fiend too? You might want to see these then…

    Criss-Cross Accent Wall for $30 or Less via RainonaTinRoof.com #diy

    Criss-Cross Accent Wall

    STUNNING Black and White Gallery Wall! Simple to do - such a great accent wall!

    Black & White Gallery Wall

    DIY Cane Inspired Accent Wall done for around $25. Gorgeous kelly green wall treatment in this bathroom.

    Cane Inspired Accent Wall

    Super easy to make and fun! Easy Confetti Accent Wall

    Easy Confetti Accent Wall

    pin-this-post-2

    Sliding Closet Doors Makeover | Painted Closet Door Ideas | Painted Doors Ideas | Interior Door Ideas | Interior Doors Painted

    blog-signature-summer-15

    You know you don’t wanna miss any of this crazy.

    Sign up to get my posts delivered to your inbox here.

    Stalk Me Here:

    Pinterest / Facebook / Twitter / Instagram

    Disclosure: This post was a collaboration with FrogTape®. However, all opinions and mentions of Sex and the City quotes are 100% mine.

  • How to Coordinate Paint Colors Throughout Your House

    How to Coordinate Paint Colors Throughout Your House

    I can’t begin to tell you how many times I’ve attempted to select a paint color and it has ended in either tears, drinking or both.

    Usually both.

    Throwing of hands in the air, slamming of fists on tables and/or walls is typical as well.

    Obviously, buying sample pots of paint and testing those out on your walls is the way to go, but if I bought a sample pot of paint for every color I thought may work, I would have a closet full of sample paint pots.

    One of my biggest challenges is often coordinating paint colors throughout my house – thus why there is a lot of black and white in my home. However, a few months back I went to a meet-up at the Behr paint headquarters in Atlanta and had an ‘Ah ha’ moment.

    Also, Behr isn’t paying me to tell you this, I just think that everyone in America should know this so we don’t all spend a combined $1 trillion dollars on paint samples and/or doctor’s bills that resulted from hitting walls after still not being able to find a paint color after 20 freakin’ samples.

    How to Coordinate Paint Colors

    This post contains affiliate links for your shopping convenience. Click here to read my full disclosure policy.

    Seriously, you’re gonna love me for all time after I tell you this.

    Ok, this is the Behr color center at Home Depot.

    how-to-coordinate-paint-colors-behr-color-center

    The color center is broken down into eight horizontal rows.

    How to Coordinate Paint Colors Throughout Your House - oh my goodness, I SO wish I would have known about this trick sooner!! It would have saved me so much time and paint samples!

    Rumor has it that every paint color within rows one and two coordinate with each other. The same is true of rows three and four, rows five and six and rows seven and eight.

    How to Coordinate Paint Colors Throughout Your House - oh my goodness, I SO wish I would have known about this trick sooner!! It would have saved me so much time and paint samples!

    Therefore, if you select paint colors from within the same row group (i.e. rows 1 & 2 or row 3 & 4 or row 5 & 6 or row 7 & 8), then all those colors will coordinate or harmonize well throughout your house.

    I know, right, mind blown. Or at least mine was.

    So I tested their theory. I went to Home Depot and randomly grabbed paint chips from the various rows, noting what rows they came from. These are all paint chips from rows one and two:

    How to Coordinate Paint Colors Throughout Your House - oh my goodness, I SO wish I would have known about this trick sooner!! It would have saved me so much time and paint samples!

    Y’all. They weren’t lying. The top picture consists of all the color cards I got from those two rows and the bottom images are just cards I pulled out to show that the theory really is true.

    Now, not everyone loves that much color. Here are paint chips from rows five and six – more muted tones:

    How to Coordinate Paint Colors Throughout Your House - oh my goodness, I SO wish I would have known about this trick sooner!! It would have saved me so much time and paint samples!

    Once more, they all harmonize well together.

    I also grabbed some color cards from rows seven and eight:

    How to Coordinate Paint Colors Throughout Your House - oh my goodness, I SO wish I would have known about this trick sooner!! It would have saved me so much time and paint samples!

    And those worked too! As you work your way down the color center, the colors tend to get less bright. I failed to get color cards from rows three and four as the employees started looking at me a little funny, so I just took what paint chips I had and ran.

    Isn’t that so cool? While I will always love a good black and white paint combination, I am so glad to know this little trick because it will come in handy at the 70’s Landing Pad since I haven’t figured out all the paint colors there just yet.

    Did you know about this? Please don’t tell me I’ve been living under a rock for the last 10+ years of my painting life!

    Here are more home decorating posts you’ll find helpful too…

    How to Make a Moodboard for Room Designs – making these boards are easy and they are great for helping you determine what will and won’t work in your design!

    Decorating on a Budget – 5 Ways for Decorating Your Entire Home on a Tiny Budget!

    6 Decorating Ideas to Distract from Popcorn Ceilings – before you make a mess and go scraping them off, read this first!

    Free Printable Project Planner – a printable planner that will help you plot out your next room makeover and stay on budget.

    blog-signature-summer-15

    You know you don’t wanna miss any of this crazy.

    Sign up to get my posts delivered to your inbox here.

    Stalk Me Here:

    Pinterest / Facebook / Twitter /Instagram

    pin-this-post-2

    Coordinate Paint Colors Throughout Your Home | Home Painting Ideas | Home Paint Colors | Home Paint Schemes | Paint Colors for Home

    SaveSave

  • When in doubt…go polka dots.

    When in doubt…go polka dots.

    This post is sponsored by Velvet Finishes, however all opinions are 100% mine. 

    I’m ashamed to tell you how long I’ve had this chair sitting in the garage ready to be made over. I’ll say it’s been the better part of a year at the least. It was one of those purchases that went like this:

     It’s $10! I can’t pass it up for $10!

    But you don’t need it Jenna.

    I know that. But it’s $10!!!

    You don’t need it.

    $10.

    Make a smart decision, Jenna. 

    Ok. I’m buying it. 

    Said conversation was between myself and myself of course.

    So since I really had no clue what to do with it or where I would put it, it just sat for a while. And then one day, I got a wild hair and decided I would attempt to paint the upholstery on this piece rather than re-upholstering it since I’d never tried painting it before. I only had $10 to lose.  Here’s how it turned out…

    Simple Polka Dot Chair Makeover - She used Velvet Finishes to paint the chair and upholstery! So adorable and very Kate Spade inspired!

    Not half bad! I didn’t set out for it to turn out so preppy / Kate Spade-ish, but I think it works with the chair pretty well. Here’s what I did…

    Polka Dot Chair Makeover

    Affiliate links may be contained in this post.

    What I Used: 

    Step 1

    The upholstery of this piece was not in great condition. It looked like a cat had maybe clawed around the edges a bit, so I cleaned up that with some scissors first.

    Simple Polka Dot Chair Makeover - She used Velvet Finishes to paint the chair and upholstery! So adorable and very Kate Spade inspired!

    After that, I actually got out my shop vac and vacuumed really well in all the nooks and crannies of the upholstery since I knew I was going to paint it.

    Step 2 

    After vacuuming, I painted the wood portions of the chair with Velvet Finishes Handsome.

    Simple Polka Dot Chair Makeover - She used Velvet Finishes to paint the chair and upholstery! So adorable and very Kate Spade inspired!

    Handsome is the same color I used on my kitchen cabinets. It’s a classic navy shade. I just used my paintbrush and painted right onto the wood. If you have a really shiny finish to begin with, you can prime your piece with Ready, which is a simple to use spray primer, before painting it. If you don’t have a shiny finish, then you usually won’t need a primer with Velvet Finishes. I did two coats of Handsome.

    Step 3

    I let the Handsome dry overnight, then the next day, I tackled the upholstery. First, I taped off around the woodwork so I wouldn’t get any paint there, then I just slapped on some Glamorous with my paintbrush.

    Simple Polka Dot Chair Makeover - She used Velvet Finishes to paint the chair and upholstery! So adorable and very Kate Spade inspired!

    It took about four coats of paint on the upholstery, which I expected since I knew the upholstery would absorb so much of the paint.

    Step 4

    After the upholstery dried it was a little bit “tough” so to speak. Kellie had told me that sanding it with a fine grit sandpaper would loosen it up.

    Simple Polka Dot Chair Makeover - She used Velvet Finishes to paint the chair and upholstery! So adorable and very Kate Spade inspired!

    So that’s what I did. I lightly sanded over all the upholstery with about a 150 grit sandpaper. It made the upholstery feel less “tough” and more like a faux leather type upholstery.

    Step 5

    After sanding, I thought the chair was a little boring – it needed some pattern or something to make it pop, so I added in polka dots.

    Simple Polka Dot Chair Makeover - She used Velvet Finishes to paint the chair and upholstery! So adorable and very Kate Spade inspired!

    I just used a medium sized pouncer and Minimalistic and randomly placed polka dots all over the upholstery.

    Simple Polka Dot Chair Makeover - She used Velvet Finishes to paint the chair and upholstery! So adorable and very Kate Spade inspired!

    And all of a sudden, it became an incredibly cute chair.

    You can still see some of the upholstery’s pattern through the paint, but unless you are painting plain fabric, I think that’s gonna happen.

    Simple Polka Dot Chair Makeover - She used Velvet Finishes to paint the chair and upholstery! So adorable and very Kate Spade inspired!

    The pillow is from Target – it’s the first purchase for the Circus’ new room at the 70’s Landing Pad. It went with the chair perfectly, so I couldn’t resist not using it in the photos.

    What do you think of the preppy polka dotted chair?

    pin-this-post-2

    Painted Chair Makeover | How to Paint Upholstery | Furniture Makeover Ideas | Furniture Painting Ideas | Furniture Painting Techniques

    blog-signature-summer-15

    You know you don’t wanna miss any of this crazy.

    Sign up to get my posts delivered to your inbox here.

    Stalk Me Here:

    Pinterest / Facebook / Twitter / Instagram

    Disclosure: This post was a collaboration with Velvet Finishes, however all opinions and hoarding of chairs I don’t need are 100% mine.

    SaveSave

  • How to Install Nucore Flooring

    How to Install Nucore Flooring

    Want to save money and install your own luxury vinyl flooring? That’s exactly what we did. This Nucore flooring installation guide will walk you through the process step-by-step.

    YOU GUYS.

    The 70’s Landing Pad is actually starting to not look like a construction zone.

    Well, it’s starting to not look like a construction zone in the living room, dining room and hallway anyway.

    After getting paint on the walls week before last, we’ve been putting down the new flooring in the  hallway, living and dining rooms. This flooring will also go in the kitchen, stair landing and in the downstairs foyer as well, we just haven’t gotten that far yet. I’m finally moving past the point of “Oh my word, what have we gotten ourselves into?” to “Oh my word, it actually looks like a house and it’s pretty!” We still have quite a ways to go in the overall renovation, but there is a light at the end of the tunnel, y’all.

    This post is sponsored by Floor & Decor, however all opinions are 100% mine. Affiliate links may be contained in this post.

    The flooring we are using for the kitchen, dining room, living room, hallway and all those other places where there’s going to be a lot of foot traffic is NuCore from Floor & Decor.

    How to install NuCore Flooring - no nails or glue required, installs over most existing floors and it's completely waterproof.

    NuCore is an engineered floor that has a tough top layer of luxury vinyl adhered to a stable, rigid, and waterproof core. I’ll be the first to say there isn’t a thing about this flooring that looks cheap or even like vinyl – I’ll also admit I had my doubts in the beginning. I partnered with Floor & Decor on the flooring and after a slew of emails full of questions about NuCore between myself and Sarah from Floor & Decor, we finally opted to go with the NuCore Cocoa Oak Handscraped Planks.

    One of my doubts was how easy installation was supposed to be. Word on the street was that it snapped together (tongue and groove), no glue or nailing required and it could go over most any existing floor, with the exception of carpet.

    Word on the street was accurate.

    How to Install NuCore Flooring

    You’ll need:

    How to install NuCore Flooring - no nails or glue required, installs over most existing floors and it's completely waterproof.

    Step 1

    Unlike hardwood, NuCore does not have to acclimate to your home’s temperature before being installed. You can start as soon as you get it.

    You can install NuCore over most existing flooring. Carpet is an exception. If you want to put it where carpet currently is, you will need to remove the carpet first, which is what we had to do. Pull up any staples that are left from the carpet pad and remove any carpet tack strips.

    For your first row, you will simply snap the short edges of the flooring together, which easily lock into one another. After finishing the first row, place a few pieces of the flooring vertically along the baseboard of the room. Put your first row flush against these pieces. This will keep your first few rows of flooring from sliding in the beginning.

    How to install NuCore Flooring - no nails or glue required, installs over most existing floors and it's completely waterproof.

    Step 2

    For the second row of flooring, you will snap the tongue and groove into each other.

    How to install NuCore Flooring - no nails or glue required, installs over most existing floors and it's completely waterproof.

    Simply hold a piece of NuCore at a 45° angle and snap it into the piece in front of it.

    How to install NuCore Flooring - no nails or glue required, installs over most existing floors and it's completely waterproof.

    Step 3

    Use a rubber mallet to secure the joints.

    How to install NuCore Flooring - no nails or glue required, installs over most existing floors and it's completely waterproof.

    You do want to make sure you stagger your joints as shown below.

    How to install NuCore Flooring - no nails or glue required, installs over most existing floors and it's completely waterproof.

    You will have to cut pieces in order to do this sometimes and obviously you will have to cut pieces as you get to the end of rows. To cut NuCore, measure to determine what length you need, mark it on the plank, score it with a utility knife and snap it at the cut.

    How to install NuCore Flooring - no nails or glue required, installs over most existing floors and it's completely waterproof.

    Super simple.

    After installing all the flooring, you will want to trim out around the edges with quarter round molding to cover the small gap. If you have to go around door trim or jambs, you can cut the wood with a jigsaw. Mark where you need to cut, drill a small hole to get you started, then use the jigsaw to cut the flooring.

    Grunt Labor and I made a quick video to show you how to install NuCore.

    [adthrive-in-post-video-player video-id=”EmAIvJzB” upload-date=”Wed Jun 29 2016 14:23:39 GMT+0000 (Coordinated Universal Time)” name=”Rain on a Tin Roof – How to Install NuCore Flooring” description=”How to Install NuCore Flooring by Rain on a Tin Roof”]

    It is really as simple as it looks. And when it’s installed, it looks just like hardwood. It’s gorgeous. I’m also pretty pumped about the fact that it’s waterproof, so that when the Circus doesn’t tell me she spilled her juice hours later, it won’t be that big of a deal. 🙂

    UPDATE: I DID A REVIEW OF OUR NUCORE FLOORING ONE YEAR LATER. YOU CAN READ ABOUT IT HERE.

    Want to easily come back to this flooring installation guide later? Just pin the image below!

    How to Install NuCore Flooring | Luxury Vinyl Wood Flooring | Luxury Vinyl Flooring | Luxury Laminate Flooring | Luxury Vinyl Plank Flooring
    blog-signature-summer-15

    You know you don’t wanna miss any of this crazy.

    Stalk Me Here:

    Pinterest / Facebook / Twitter / Instagram

    SaveSaveSaveSaveSaveSave

  • How to Clean Copper

    How to Clean Copper

    This post is sponsored by Bar Keepers Friend, however all opinions are 100% mine. Affiliate links may be contained in this post.

    I’m not even gonna lie – I had to google what copper was supposed to look like to make sure I was just cleaning it and not stripping it off this cookie jar.

    That’s how bad it was.

    Or how pathetic I am.

    I picked up this sweet little cookie jar (that has never once housed cookies, only applesauce pouches and fruit snacks) on a Goodwill excursion a few years back. It was actually a half-off Goodwill day and I found it at the end of the day for a whopping $3 so not only was I shocked it was still there, but it was a great deal.

    I had originally thought I might spray paint it in order to cover up all the spots on it. I’m not sure what all the “spots” were as it didn’t look like rust, but I figured it was beyond the point of no return. Not wanting to loose the copper feel though, I left it as is on my counter for the past three years.

    How to Clean Copper and Restore It using water, one product, and a little elbow grease will make your copper look new in no time. A MUST TRY! Great cleaning tip!

    I’m really glad I never went crazy with the spray paint on it. Because it looks like this now…

    How to Clean Copper and Restore It using water, one product, and a little elbow grease will make your copper look new in no time. A MUST TRY! Great cleaning tip!

    I know, right?

    Here’s how I did it…

    How to Clean Copper

    You’ll Need:

    Step 1

    Rub the damp cloth over the copper to make it slightly wet.

    How to Clean Copper and Restore It using water, one product, and a little elbow grease will make your copper look new in no time. A MUST TRY! Great cleaning tip!

    Step 2

    If you haven’t already, put the gloves on. Speaking from personal experience, if you do this without gloves, the cleanser will dry your hands out, so I don’t recommend going without the gloves.

    Sprinkle Bar Keepers Friend Cleanser & Polish onto the copper. If you are working with a medium to larger sized item, work in small sections like I did.

    How to Clean Copper and Restore It using water, one product, and a little elbow grease will make your copper look new in no time. A MUST TRY! Great cleaning tip!

    Using the damp cloth, scrub the cleanser all around on the copper until you see the true shade of the copper appear.

    How to Clean Copper and Restore It using water, one product, and a little elbow grease will make your copper look new in no time. A MUST TRY! Great cleaning tip!

    On those spots I had, I did have to use a little more elbow grease to remove them, but they eventually came off just fine.

    The image below was about halfway through my cleaning.

    How to Clean Copper and Restore It using water, one product, and a little elbow grease will make your copper look new in no time. A MUST TRY! Great cleaning tip!

    You can see the right side has been cleaned and polished with Bar Keepers Friend and the left has not.

    Step 3

    After you have cleaned the entire piece with Bar Keepers Friend, I suggest rinsing, then washing it with a little dishwashing liquid to remove any cleanser residue. Dry it with a towel afterwards to prevent water spots.

    How to Clean Copper | Restore Copper | Clean Copper Pots | Cleaning Tip | Cleaning Hack | Kitchen Cleaning Tip

    Crazy, right?

    How to Clean Copper | Restore Copper | Clean Copper Pots | Cleaning Tip | Cleaning Hack | Kitchen Cleaning Tip

    Grunt Labor saw it afterwards and said he never even knew it was supposed to look like that.

    I didn’t tell him I had to go look up what copper was supposed to look like so I would know. 😉

    Have you used Bar Keepers Friend before?

    You might also wanna see…

    How to remove rust from chrome

    How to Remove Rust from Chrome

    Update Furniture Hardware with Barkeeper's Friend - instead of painting the hardware, this gives it a deep cleaning.

    How to Restore Hardware

    pin-this-post-2

    How to Clean Copper | Restore Copper | Clean Copper Pots | Cleaning Tip | Cleaning Hack | Kitchen Cleaning Tip

    blog-signature-summer-15

    You know you don’t wanna miss any of this crazy.

    Sign up to get my posts delivered to your inbox here.

    Stalk Me Here:

    Bloglovin / Pinterest / Facebook / Twitter / Google+ / Instagram

    Disclosure: This post was a collaboration with Bar Keepers Friend, however all opinions and admittance of not knowing what copper was supposed to look like are 100% mine.


    SaveSave

  • More Favorite Southern Books

    More Favorite Southern Books

    As I’ve told you before, there are fewer things in life better than a good southern book. Losing myself in a good book is by far, for me, the best way to relax. I am a go-go-go person. Being idle is not in my blood. Being wrapped up in a good book though – well that’s one of the few things that can make me actually sit down for a while.

    Towards the end of the summer last year, I wrote about some of my favorite southern books. Well, I’ve read more since then and have a whole new list for you. And ya’ll – these are good.

    More Favorite Southern Books

    This post contains affiliate links for your shopping convenience. Click here to read my full disclosure policy.

    Karen White’s House on Tradd Street Series

    Favorite Southern Books: Karen White's The House on Tradd Street Series - set in Charleston's historic district with a ghost or two.

    The House on Tradd Street / The Girl on Legare Street / The Strangers on Montagu Street / Return to Tradd Street

    I just discovered Karen White and I can’t believe I didn’t find her sooner. I just finished reading The House on Tradd Street and it was amazing. I nearly peed my pants with excitement when I got to the end and discovered that there were three more books in the series. You can bet your bottom dollar that those other three books are already ordered and on their way to me. The House on Tradd Street is set in historic Charleston, South Carolina and centers around Melanie Middleton who can see ghosts. She is a realtor who specializes in selling old homes, but despises old homes. Much to her surprise, an old man whom she barely even knows leaves her his house (a historic Charleston home, hundreds of years old) in his will. The house has a few ghosts with a story to tell – Melanie and her friend, Jack just have to figure it out. Apparently, Karen White also has a new book out, The Forgotten Room, which sounds great as well. It’s not set in the south, but it sounds like it has just as much mystery as the Tradd Street series.

    My Southern Journey by Rick Bragg

    Favorite Southern Books: My Southern Journey by Rick Bragg - a collection of his short stories. You can't get more southern than this!

    My Southern Journey

    As you guys well know, Rick Bragg is hands-down my favorite southern author. There’s not a soul in this world who can string words together about the south like he can – and I fully intend on telling him that when I meet him next Thursday! Yep, I just said that! He is coming to Chattanooga as part of the South Bound Lectures and I grabbed my ticket as soon as I heard. Ya’ll I cannot wait! Anywho, his new book, My Southern Journey is a collection of his short stories that have been published in Southern Living magazine and other magazines and media outlets during his writing career. I had already read many of the stories in there, but had forgotten about quite a few. No doubt, this book is a keeper. In true Rick Bragg fashion, he can have you belly laughing one minute and squaling like a baby the next. If you’ve never read Rick Bragg before, start with All Over But the Shoutin‘. I’ve also got more of my favorite books by him here.

    Sleep No More & Blood Memory by Greg Iles

    Favorite Southern Books: Greg Iles, Sleep No More and Blood Memory- thrillers both set in Natchez, Mississippi - AMAZING reads, you won't be able to put the book down!

    Sleep No More / Blood Memory

    While I have been impatiently awaiting the third book in the Natchez Burning series (A MUST READ!) by Greg Iles, I dove into a couple of his other books – Sleep No More and Blood Memory. Both books were thrillers that I just couldn’t put down. Both are set in southern Mississippi (where many of Iles’ books are set) and full of twists and turns that you never see coming. Sleep No More is centered around John who meets a woman who reminds him of an ex-girlfriend who’s been dead for quite a while. Turns out the woman is the ex-girlfriend. Blood Memory centers around Cat who discovers bloody footprints in her childhood bedroom after dropping some chemicals onto the floor. The discovery leads her to revisit the tragedy that occurred during her childhood and discovers that what she’s believed for all these years isn’t actually true.

    Madam by Cari Lynn and Kellie Martin

    Favorite Southern Books: Madam, a fictional book based on the life of Madam Josie Arlington, one of the most successful madams of Storyville in New Orleans

    Madam

    Madam was suggested to me after I posted the first round of my favorite southern books. As many of you may know, New Orleans has my heart and all the history of Storyville and madams intrigues me like nothing else. Madam is a fiction book but it is based on Josie Arlington, one of the most successful madams of Storyville. While others may see her as nothing but a whore, I see her as a smart woman who learned how to break through that glass ceiling females are often left hitting long before the term glass ceiling was ever heard of. Madam proves my point.

    Two other New Orleans books that have been suggested to me are Out of the Easy and Hell or High Water. I haven’t been able to dive into either yet, but both show great promise. There are more of my favorite NOLA based books here.

    Once There Was a Farm by Virginia Bell Dabney

    Favorite Southern Books: Once There was a Farm - a memoir about growing up on a farm and the struggle to survive

    Once There Was a Farm

    I checked this book out ten years ago from the public library. I checked it out at least two more times after that and finally bought it for myself a couple years back. Once There Was a Farm doesn’t have any ghosts in it, it isn’t a thriller and there isn’t much drama at all. It’s just a sweet story about a little girl who grew up on a farm and her independent mother who ran the farm by herself. I probably love this book so much because it reminds me of home. There’s no doubt – I’m sure to read it countless more times in my life.

    South of Broad by Pat Conroy

    Favorite Southern Books: Pat Conroy, South of Broad - set in Charleston

    South of Broad

    I literally just started this book. Once more, when I wrote about my favorite southern books there were a ton of you guys who said I must read Pat Conroy. I looked over his work and settled on South of Broad to read first. This one is also set in Charleston. I am literally on like the fifth page, so you can read the summary of this one here if you want to.

    Alright, as always I want your suggestions! Share your favorite books – southern, not southern, anything goes (although I really LOVE ghosts and witches) in the comments! Help me fill up my Amazon cart  – but make sure we have a little money left over for booze, mmkay?

    You might also want to read…

    The Best Southern Books - A list of books about or set in the south that every lover of the south should read! Really great book recommendations!

    Favorite Southern Books – Round 1

    And don’t miss these posts about two of the best southern cities…

    Amazing city full of fun! Must Do's in New Orleans

    The Must Do’s of New Orleans

    Things to do in Nashville TN • Nashville Attractions • Fun things to do in Nashville • Nashville Tourism • Nashville TN Attractions

    Things To Do In Nashville

    pin-this-post-2

    Favorite Southern Books: List of amazing books based in the south with unforgettable characters and plots!

    blog-signature-summer-15

    You know you don’t wanna miss any of this crazy.

    Sign up to get my posts delivered to your inbox here.

    Stalk Me Here:

    Pinterest / Facebook / Twitter / Instagram

    SaveSave

  • Lighting for $300 or Less: Chandeliers, Flushmounts and Sconces

    Lighting for $300 or Less: Chandeliers, Flushmounts and Sconces

    There are two things I’ve wanted to tear my hair out over with the renovation of the 70’s Landing Pad – the master bathroom renovation and lighting. Oh wait, I forgot about wallpaper removal. Make that three things. And then there was the paint color selections. Hell, let’s just go on and admit that this whole reno is going to send me to the looney bin sooner than I expected.

    Anyway, this post is supposed to be about lighting. To date, I have bought one single light fixture for the 70’s Landing Pad – a lucite chandelier (just like this one) from a local antique store. You guys aided in that purchase by telling me to go ahead and just buy it when we were chatting about the kitchen plans. When I went to go buy it, it was marked down and I got an extra 10% off, so it ended up being $150. Thanks for enabling me, y’all. I am madly in love with it, but can’t decide the best place to put it. Entry? Dining Room? Kitchen?

    And then I started looking for lighting for the rest of the house.

    And that’s when I lost my shit and preceded to find the nearest corner to go into the fetal position and cry.

    Lighting is expensive. Or maybe I should say pretty lighting is expensive. I mean I could just go with the single bare bulb look complete with white ceramic base in every room and it would only set me back $10 each, but where’s the fun in that?

    So I scoured the internet. I promise you, there is not a single solitary lighting site (or lighting store within a 100 mile radius) that I haven’t looked for affordable and pretty lighting at.

    While I haven’t necessarily set a lighting budget, I knew right off the bat I can’t (nor do I think I could ever bring myself to) spend $800 on a ceiling light – not even a chandelier. In my head, I was looking to spend $300 or less on bigger fixtures – chandeliers, pendants, and flush mount lights. For sconces, I didn’t want to spend anymore than $100. So here is what I’ve come up with…

    Lighting for $300 or Less

    This post contains affiliate links for your shopping convenience. Click here to read my full disclosure policy.

    Chandeliers & Pendants for $300 or lessAffordable Chandeliers | Affordable Pendants | Affordable Lighting Fixtures | Affordable Light Fixtures | Affordable Lights

    1 / 2 / 3 / 4 / 5 / 6 / 7 / 8 / 9 / 10

    Chandeliers are my weakness. Seriously, if I could put a chandelier, preferably a lucite or crystal one, in every room I probably would. Unfortunately, my pocketbook doesn’t agree with me…nor does Grunt Labor.

    1. Acrylic Framework Chandelier, $300 – this one is begging to be put over my kitchen banquette area, no? There is also a larger rectangle version available, but it’s a bit more pricier at $374.

    2. Black Geometric Pendant, $196 – this one could also work over the banquette area, although it isn’t quite as glam. It does come in more colors as well.

    3. Millau 9 Light Chandelier, $215 – This chandelier gets the best bang for your buck award. It’s huge and only $215. I’m not a fan of the fabric shades on chandeliers because they can be a pain in the butt to clean, but I’m wondering how this one would look without the shades. I’ve got one ordered to find out. Stay tuned…There is also a smaller five light version available for $155.

    4. Top Hat Pendant, $94 – this is in the running for the light fixture in the Circus’ room – how fun is it?! A top hat as a light! And now that I think about this, I may just be able to DIY it…hmmmm

    5. Nested Pendant, $274 – a bit crazy, a bit glam, but fun.

    6. Penn Brass Pendant, $97 – these are smaller sized pendants, so they won’t work well for over a dining table, but are great for islands. The hall bathroom in the 70’s Landing Pad has two pendants on either side of the mirror and I’m thinking these would work perfectly for that space.

    7. Geometric Pendant, $80 – also a smaller pendant and now that I look at them more closely, maybe they would work better in the hall bathroom. And this is why I have only purchased one single fixture. I effing hate lighting decisions. Thoughts?

    8. Teardrop Chandelier, $129 (on sale right now) – You’ll never believe where this one is from – PB Teen! The store might be geared for teens, but I love a lot of their pieces for myself.

    9. Black & White Drum Pendant, $200 – This is another contender for the Circus’ room. I think the stripes give it a “circus” feel, but could also grow with her.

    10. Botanica Drum Pendant Light, $300 – I just found this one and think it would be perfect for the kitchen with that pop of green. There’s also a smaller version for $229. See – I can’t make up my mind in the slightest.

    Flush and Semi-Flush Mount Lighting for $300 or Less

    Affordable Flush Mount Lights | Affordable Semi-Flush Mount Lights | Affordable Lighting Fixtures | Affordable Light Fixtures | Affordable Lights

    1 / 2 / 3 / 4 / 5 / 6

    1. Bell White Flush Mount, $60 – the award for best bang for the buck in flush mounts goes to this baby. It’s pretty and it’s a hell of a great deal. This light will be gracing the hallway and most likely the master bathroom.

    2. Tekoa Semi-Flush, $258 – I’m totally digging the geometric shape of this fixture.

    3. Tear Drop Flush Mount, $109 (on sale right now) – another great option from PB Teen. This one may make into our master bedroom.

    4. Vega Flush Mount, $249 – this flush-mount is kind of like a chandelier to me – and I like that. A lot. This bad boy is going in my living room at the 70’s Landing Pad.

    5. Midtown Vogue, $98 – It does slightly resemble the “boob” lights, but it’s a bit more chic.

    6. Cadence Flush Mount, $115 – oh how I wish this one were in brass – it would be a no brainer.

    Wall Sconces for $100 or Less

    Affordable Sconces | Affordable Sconce Lights | Affordable Lighting Fixtures | Affordable Light Fixtures | Affordable Lights

    1 / 2 / 3 / 4 / 5 / 6 / 7 / 8

    Shockingly – all of these came from Wayfair. I thought Wayfair was more pillows and accessories and some furniture, had no clue they had such great lighting. By far, their prices on sconces were the best for what I was looking for.

    1. Margeaux 1 Light Wall Sconce, $89 – to me, this one has a “bamboo” feel to it. It is also available in a double sconce here. These were a top contender for my master bathroom.

     2. The Saber Wall Sconce, $69 – I am 99% sure this is what will end up in the master bathroom.

    3. Dunwoody Wall Sconce, $48 – brass may be my first love, but a good shiny chrome is my 2nd.

    4. Urban Renewal Sconce, $98 – a brass industrial feel

    5. Winston Sconce, $99 – these had me at hello. The only problem was that I was worried they wouldn’t give off enough light with those tiny bulbs.

    6. March Sconce, $61 – another pretty chrome option.

    7. Chrome Sconce, $66 – and another chrome option.

    8. Digby Sconce, $62 – the touch of black with the shade is nice on this one.

    We will still need one more sconce for a wall in the den/man cave and I have no clue what will go there yet, but I’m willing to bet it will be one of these.

    Ok, what are your thoughts? Which ones do you love/hate/think I should use?

    pin-this-post-2

    Affordable Lighting Fixtures | Affordable Light Fixtures | Affordable Sconces | Affordable Chandeliers | Affordable Flush Mount Lighting

    blog-signature-summer-15

    You know you don’t wanna miss any of this crazy.

    Sign up to get my posts delivered to your inbox here.

    Stalk Me Here:

    Pinterest / Facebook / Twitter / Google+ / Instagram

    SaveSave

  • Masculine Bedroom + Office Makeover Full Source List

    Masculine Bedroom + Office Makeover Full Source List

    Affiliate links may be contained in this post.

    I realize it’s been well over a month since I first showed you the masculine guest bedroom and office makeover – A.K.A. Bill’s room.

    Essentially, Christmas threw up everywhere and this post kept getting pushed to the back burner.

    This room is by far one of my favorites and really, I just pulled it together, Bill came up with the plan and he knocked it outta the park. We used a mix of new items with ones we already had, we DIYed a thing or two and of course, we mixed in a few yard sale and thrift store finds. Here’s the full source list for everything in the space – if something is no longer being made, I tried to find a similar version for ya.

    Masculine Bedroom + Office Makeover Full Source List / Black and White Bedroom / Black and White Interior Design / Vintage Inspired Interior Design

    Faux Sheepskin Area Rug (Chocolate Color, We went with an 8′ x 11′)

    We also removed the footboard and added feet to the box spring to eliminate the need for bed rails.

    Masculine Bedroom + Office Makeover Full Source List / Black and White Bedroom / Black and White Interior Design / Vintage Inspired Interior Design / Fur Blanket / Black Wall

    Faux Fur Blanket / White Quilt  / Green & White Pillow (similar one, mine originally came from Target about a year ago.)

    Paint Colors: Limousine Leather & Bit of Sugar

    I’ll be honest – I didn’t think that white quilt would work at all. Bill was very specific about not getting a comforter because it made him too hot, but he didn’t want something too thin either. He found the white quilt and when we got it home, I was so surprised at how well it worked in the space. I do think though that without the fur throw it would have been too stark.

    Masculine Bedroom + Office Makeover Full Source List / Black and White Bedroom / Black and White Interior Design / Vintage Inspired Interior Design

     White Side Table  / White and Black Faux Fur Pillow (Similar) / Jack Accent  / White Deer Head (similar and similar)

    The black and chrome chair is vintage and was a yard sale find that was once covered in rust. This chair is actually the exact same one – minus the rust mine had. Wassily chairs are also very similar and honestly, prettier, but more expensive. The drapes are just your basic white ones from IKEA.

    Masculine Bedroom + Office Makeover Full Source List / Black and White Bedroom / Black and White Interior Design / Vintage Inspired Interior Design / Green Glass Lamp

    Green Glass Lamp

    Masculine Bedroom + Office Makeover Full Source List / Black and White Bedroom / Black and White Interior Design / Vintage Inspired Interior Design / Vintage Dresser / Dog Statue

    Framed Art

    The dresser is vintage. For local Chattanooga folks, it came from the Insyde Outsyde Shop. I wasn’t using the mirror that goes with our master bedroom furniture, so I propped it on top of Bill’s dresser.

    Masculine Bedroom + Office Makeover Full Source List / Black and White Bedroom / Black and White Interior Design / Vintage Inspired Interior Design / DIY Bookshelf

    DIY Bookshelf / Vintage Record Holder (Similar) 

    We made the bookshelf ourselves after we saw a similar one for $1000 that I just couldn’t bring myself to spend that much money on. I found the record holder at a yard sale. Urban Outfitters has a similar new option and Etsy is full of vintage ones.

    The horse print was a yard sale find and unfortunately, I can’t find any similar ones online. The vintage pennant was a gift from a friend, but you can find lots of those on Etsy.

    And finally, my office portion of the room…
    Masculine Bedroom + Office Makeover Full Source List / Black and White Bedroom / Black and White Interior Design / Vintage Inspired Interior Design / Office Space / Comfortable but Stylish Office Chair

    Desk Chair / DIY Desk

    I’ve also got a post about stylish and comfortable desk chairs here if ya need that.

    If I left anything out, let me know y’all!

    And can I just say  – I’m really glad the Christmas decorating hoopla is winding down… #thisgirlneedsatimeout

    And if you didn’t see the full before and after of Bill’s room, you probably should. He kinda killed it.

    Masculine Bedroom Makeover - This room functions as a Guest Room, Teenage Boy's Room, and an Office. Lots of great ideas for making a room function for multiple uses.

    Masculine Bedroom Makeover

    blog-signature-summer-15

    You know you don’t wanna miss any of this crazy.

    Sign up to get my posts delivered to your inbox here.

    Stalk Me Here:

    Pinterest / Facebook / Twitter / Instagram

    SaveSave

  • Christmas Home Tour: The Finale

    Christmas Home Tour: The Finale

    Have you seen the Geico commercial where Europe is performing The Final Countdown?

    It’s a fantastic commercial.

    Well, I kind of feel like I should be doing a parody of Europe’s song with this post.

    It’s the final Christmas tour. 

    This finale is filled with really simple holiday decor ideas, a few memories (because it wouldn’t be one of my Christmas home tours without them) and of course – some quirk.

    I’m also teaming up with more bloggers and Home Decorators Collection on this finale tour to give you loads more of holiday inspiration if you didn’t already have enough. Be sure to visit the other tours and enter the giveaway at the end!

    Let’s start in the kitchen…

    Affiliate links may be contained in this post.

    The Kitchen: Christmas Home Tour / Holiday Decorating / Christmas Decorating / Holiday Decor / Christmas Decor

    Normally, I do nothing in the kitchen in terms of holiday decorating. This year though, I didn’t have a place to put my little elf wreath so I thought, why not hang him over the stove? So I did.

    And that’s when I fell down the rabbit hole.

    The Kitchen: Christmas Home Tour / Holiday Decorating / Christmas Decorating / Holiday Decor / Christmas Decor

    My next move was to go outside and get some boxwood clippings…

    The Kitchen: Christmas Home Tour / Holiday Decorating / Christmas Decorating / Holiday Decor / Christmas Decor

    …Which I promptly hot glued into bundles and then hung over the cabinets.

    In this girl’s opinion, that classic red and green Christmas combination never gets old.

    And then I turned my sights on the open shelving.

    The Kitchen: Christmas Home Tour / Holiday Decorating / Christmas Decorating / Holiday Decor / Christmas Decor

    I scattered some ornaments around the shelves and threw in the two little deer that were my sweet next-door neighbor’s before she passed.

    And right now, as I sit here and write this post, I’m kicking myself for not hanging ornaments from the antlers. 

    Also, I just found it ironic that I have a vintage plastic deer right beside antlers from an actual used-to-be-alive deer. 

    The Kitchen: DIY Mohawk Candy Holder / Christmas Home Tour / Holiday Decorating / Christmas Decorating / Holiday Decor / Christmas Decor

    Of course, the shelf wouldn’t be complete without the mohawk candy holder topped off with vibrantly colored candy canes.

    Christmas Home Tour / Holiday Decorating / Christmas Decorating / Holiday Decor / Christmas Decor

    Below the shelf, I placed a framed magazine page that Mama saved for me. I love this little gal. We are kindred spirits. Both of us are wondering when the heck the madness will end.

    The ceramic Christmas tree reminds me of my Grannie. Her ceramic Christmas tree is one of my fondest memories from childhood Christmases. This one isn’t hers, but is similar.

    Also, I think she would relate with the woman in the frame as well. 

    And then there’s the dining room…

    Christmas Home Tour / Holiday Decorating / Christmas Decorating / Holiday Decor / Christmas Decor / Dining Room

    Not too much going on it here either – but just enough.

    Bottle Brush Wreath / Tinsel Tree / Christmas Home Tour / Holiday Decorating / Christmas Decorating / Holiday Decor / Christmas Decor

    Lighted Tinsel Tree / Vintage Style Bottle Brush Wreath

    I did add two new holiday decor additions to my stash this year, which is rare for me. I really have to love something to decorate with it during Christmastime. There are two things that I am usually a sucker for – tinsel and bottle brush decor items.

    Needless to say the lighted tinsel tree and bottle-brush vintage style wreath from Home Decorators Collection sucked me right in.

    Bottle Brush Christmas Wreath /Christmas Home Tour / Holiday Decorating / Christmas Decorating / Holiday Decor / Christmas Decor

    Vintage Style Bottle Brush Wreath

    I hung it off-centered on the mirror and used my Silhouette to cut out “jolly” to hang on the other side.

    Ornament Clusters on Lamp / Christmas Home Tour / Holiday Decorating / Christmas Decorating / Holiday Decor / Christmas Decor

    You’ve already seen this shot of the lamp with the small ornament clusters around it, but it’s one of my favorite decorations so I couldn’t resist sharing it again.

    My favorite part of the dining room though is…

    Record Player with Christmas Albums / Christmas Home Tour / Holiday Decorating / Christmas Decorating / Holiday Decor / Christmas Decor

    Crosley Cruiser Turntable

    …the sled corner.

    Yes, I did move the sled from beside the tree and over here. We actually had to make more room for seating during our holiday party, so I had to bring up a chair and move the sled. I topped the sled off with my record player and some of my favorite holiday albums – Alabama Christmas and Alvin and Chipmunks Christmas. The Circus loves this little spot too – she’s learned how to work the record player by herself and turns on Alvin anytime she pleases.

    #thatsmygirl

    That’s a wrap for this gal and her Christmas decorating, y’all!

    Disclosure: This post was sponsored by Home Decorators Collection and part of the #HDCholidayhomes tour, however all opinions are 100% mine. 

    SaveSave

  • DIY Agate Slice Lamp Finials

    DIY Agate Slice Lamp Finials

    Y’all.

    I’m kinda of really super duper especially excited about this project.

    It was one of those where I cooked it up in my head and I was like OMG. THAT IS AN AWESOME IDEA, JENNA.

    And then I was like. Wait. Will it really work?

    And then I tried it.

    And I was like OH. MY. STARS. IT REALLY DID WORK. I CANNOT BELIEVE IT.

    I really hope you can sense all this excitement I am feeling by my overuse of bolded capital letters.

    You can also picture me with this face:

    Happy Donkey

    source

    So in the whole realm of things, this is like a really small (literally) and simple project and I’m probably just over-reacting about it.

    It’s the little things in life, y’all. Literally.

    I made these.

    DIY Agate Slice Lamp Finials: GORGEOUS - and simple to make! / DIY Projects / Crafts / Home Decor Projects

    DIY Agate Slice Lamp Finials

    Well, not the agate itself, but I made them into finials. I think I would have to be God to make agates.

    And the icing on the cake is that this is part of Stacy at Not Just a Housewife’s Styled X3 series. Stacy sent myself and Allison from Two-Thirty-Five Designs the same agate slices and she got some for herself as well. Today, all three of us are showing how we styled them. Cool concept, no?

    styledx3-banner

    Here’s how I made my agate slices into lamp finials…

    Supplies: 

    Affiliate links may be contained in this post.

    DIY Agate Slice Lamp Finials: GORGEOUS - and simple to make! / DIY Projects / Crafts / Home Decor Projects

      • Small Paintbrush
      • Small Bowl of Rice

    Step 1:

    Choose which agate slices to use. You want to try and use smaller-ish ones with either a pointed end somewhere or a narrow end – those work best. With the small paintbrush, carefully paint the edges of your agate slices gold and let them dry.

    DIY Agate Slice Lamp Finials: GORGEOUS - and simple to make! / DIY Projects / Crafts / Home Decor Projects

    Carefully open up the prongs of the finial bases as shown in the image above.

    Step 2: 

    Place a small amount of E6000 glue into the base of the lamp finial just within the prongs. Place one end of the agate slice into the finial where the glue is and push the prongs around the agate slice. Firmly hold / push the prongs onto the agate slice with your fingers.

    DIY Agate Slice Lamp Finials: GORGEOUS - and simple to make! / DIY Projects / Crafts / Home Decor Projects

    A small amount of glue may squish out. That’s ok. When it dries, you should be able to easily scrape it off.

    Step 3: 

    This is when those mini clamps come in handy. At this point, you can either go turn on your favorite television show and watch it while you are still firmly holding the prongs against the agate slice or you can clamp the prongs onto the agate slice. I highly recommend the clamp method.

    DIY Agate Slice Lamp Finials: GORGEOUS - and simple to make! / DIY Projects / Crafts / Home Decor Projects

    Just clamp right where the prongs are, then rest the finials in a bowl of rice to steady them.

    I let my finials dry for a full 48 hours before putting them to use.

    DIY Agate Slice Lamp Finials: GORGEOUS - and simple to make! / DIY Projects / Crafts / Home Decor Projects

    I’m kind of smitten.

    DIY Agate Slice Lamp Finials: GORGEOUS - and simple to make! / DIY Projects / Crafts / Home Decor Projects

    And also, I now want one in every single color.

    Don’t forget to go see what Not Just a Housewife and Two Thirty Five Designs did with their agate slices!


    You are probably going to want to see these projects too…

    Crystal Finials | DIY Crystal Lamp Finial | How to Make Lamp Finials | How to Make Crystals | DIY Faux Crystals | DIY Lamp Finial

    How to Make a Crystal Lamp Finial

    These are GORGEOUS! And I had no clue they were SO simple to make! How to Make Lamp Tassels in Five Minutes | Easy Crafts | Easy Home Decor Projects | DIY Home Accessories | DIY Tassels

    How to Make Lamp Tassels in Five Minutes

    You can literally turn ANY fabric into a lampshade! Think of all the possibilities! How to Make a Lampshade & Finial via RainonaTinRoof.com

    How to Make Your Own Lampshade and Finial

    pin-this-post-2

    DIY Agate Slice Lamp Finial | How to make lamp finials | Agate Slice Crafts | DIY Lamp Finials | Stone Lamp Finials | Easy Craft Ideas

    blog-signature-summer-15

    You know you don’t wanna miss any of this crazy.

    Sign up to get my posts delivered to your inbox here.

    Stalk Me Here:

    Pinterest / Facebook / Twitter / Instagram

    SaveSave

  • The Annual Christmas Party Comeback

    The Annual Christmas Party Comeback

    Thank you Crate & Barrel for sponsoring this post. While this was a sponsored opportunity from Crate & Barrel all content and opinions expressed here are my own. Affiliate links may be contained in this post.

    When Grunt Labor and I first got together, he always threw an annual Christmas party.

    Y’all, I had struck gold.

    Not only was he good lookin’, but he hosted a Christmas soiree each year.

    #howdidigetsolucky

    Now, there was one catch to this Christmas party – one could only attend if they brought a toy for a kid who might not otherwise get a Christmas gift.

    I know – and he has a heart!

    When you come through the door with that toy though, you are entitled to all the booze and food you can handle – or until we run out.

    I was on board with this party faster than a hot knife through butter.

    So that year and each year after, we hosted an annual Christmas party.

    And then the Circus came.

    And a circus + a Christmas party don’t always add up very well.

    This year though, I really wanted to have one more Christmas party in the beloved foreclosure before we pack it up and move to the 70’s Landing Pad.

    And so we did.

    It was all decided less than two weeks before the party date, so it was nothing short of a miracle that more than one person showed up.

    We set up a makeshift bar in the living room, just near the liquor cabinet for easy access.

    The Holiday Bar / Entertaining / Holiday Parties / Christmas Parties

    We did some furniture swapping when we set-up and changed the location of the Christmas tree this year. We moved the console table downstairs and brought up the vintage radio cabinet – I’m so mad I didn’t think of doing this sooner. It’s like that piece was made for that spot. The radio made the perfect place to set up a bar area for people to mix up drinks.

    The Holiday Bar / Entertaining / Holiday Parties / Christmas Parties

    The ice bucket is vintage, but the glasses and shaker are new from Crate & Barrel.

    The Holiday Bar / Entertaining / Holiday Parties / Christmas Parties

    Orb Copper Shaker

    I was a little worried that the copper and gold tones wouldn’t mesh well together – but I think it works out just fine.

    The Holiday Bar / Entertaining / Holiday Parties / Christmas Parties

    Gala Double Old-Fashioned Glasses

    The glasses made quick friends with Jack – If you know what I mean. 😉 They have a great vintage look to them.

    I put everything on top of a marble pastry slab to protect the surface of the radio. I’m a sucker for marble and I especially love how it paired perfectly with the blue on the radio.

    To the side of the radio, I set up a “sweets” station.

    Yes, I’m fully aware that I may be the only one in the world who loves chocolate with her beer and/or Jack.

    The Holiday Bar / Entertaining / Holiday Parties / Christmas Parties

    Two Tier Marble Server / Nutcracker Appetizer Plate

    I used a two-tiered marble server over here to pair well with the marble slab on the radio. I also picked up a set of four adorable nutcracker appetizer plates to use as small serving dishes. However, the Circus is trying to eat off the nutcracker plates as she has discovered what they are this holiday season. Go figure.

    The Holiday Bar / Entertaining / Holiday Parties / Christmas Parties

     The best part of the party though?

    Everyone came through the door with a toy.

    Cheers, friends and happy holiday entertaining!

  • Decorating with Memories and Vintage Finds

    Decorating with Memories and Vintage Finds

    If it wasn’t already apparent from round one of my Christmas home tour and my Christmas tree, I’m declaring this year’s Christmas theme as decorating with memories.

    And also random items such as an Elvis bust.

    Oh, and vintage things too – because vintage Christmas decor makes my heart go pitter patter. 

    These theme(s) have always been at the heart of my holiday decor, but this year I’m on a mission to get everyone to embrace their own holiday decor rooted in memories and good times – because that’s what Christmas is about.

    So here’s part two of my Christmas tour – our living room – in all its (random) glory.

    If you are following along on the Christmas Home Tours hosted by Marty from A Stroll Thru Life (isn’t she just a little gem? Love her to pieces!) and just came over from Doreen at Hymns & Verses, hello!! Her vintage holiday decor is always one of my favorites, so hopefully you’ll like my take on holiday decorating as well.

    Affiliate links may be contained in this post.

    Decorating with Memories...And Vintage Finds: Christmas Home Tour Part 2 / Holiday Decorating / Christmas Decorating / Holiday Home Tour

    This year, we opted to move the Christmas tree into the corner. Last year, it was right in the middle of the windows, which is pretty to see from the outside at night, but when you sat in the black chair and tried to watch t.v., you had to crane your neck to see.

    Decorating with Memories...And Vintage Finds: Christmas Home Tour Part 2 / Holiday Decorating / Christmas Decorating / Holiday Home Tour

    However, things were tight once we put up the tree and the white console table was still in the middle of the windows, so in a move where we had no idea whether or not it would work, we switched the console table out for the vintage radio cabinet.

    Decorating with Memories...And Vintage Finds: Christmas Home Tour Part 2 / Holiday Decorating / Christmas Decorating / Holiday Home Tour

    Vintage Radio turned Bar / DIY Cowhide Rug / Coral Lamp / Double Old Fashioned Glasses / Green Curtains

    And it worked like a charm.

    P.S. I’m a little pissed we didn’t do this sooner. It’s like it was made to be in this space. 

    We don’t have a fireplace here, so our stockings hang in the window. All but one is vintage (of course, Bill had to have a Tennessee Vols stocking) and none of them match, but each of them represents the person it belongs to nicely.

    And also they look really pretty from outside at nighttime. 

    Decorating with Memories...And Vintage Finds: Christmas Home Tour Part 2 / Holiday Decorating / Christmas Decorating / Holiday Home Tour

    There was even enough room to put my father-in-law’s old sled by the tree and load it down with gifts. I was planning to decorate with it on the front porch, but I’m terrified someone would steal it. I realize being terrified someone will steal a sled and not your television isn’t exactly normal.

    #ineverclaimedtobenormal

    Decorating with Memories...And Vintage Finds: Christmas Home Tour Part 2 / Holiday Decorating / Christmas Decorating / Holiday Home Tour

    The Meaningful Decorated Christmas Tree / DIY Vintage Storybook Garland / Unusual but Meaningful Christmas Tree Ornaments

    You won’t find any matching ornaments on our tree. Instead, you’ll find things like stuffed animals, old car keys, PEZ dispensers, Barbie and G.I. Joe figurines. There are some “real” ornaments, but they must hold a special meaning to be on our tree.

    Decorating with Memories...And Vintage Finds: Christmas Home Tour Part 2 / Holiday Decorating / Christmas Decorating / Holiday Home Tour

    DIY Vintage Ornament Tree / How to Make Ornaments Clusters

    I do have a vintage ball ornament addiction – but instead of putting them on our tree, I make them into clusters that I wrap on lamps and other surfaces.

    And just to liven things up, I adorned David with a purple tinsel scarf.

    Decorating with Memories...And Vintage Finds: Christmas Home Tour Part 2 / Holiday Decorating / Christmas Decorating / Holiday Home Tour

    David Bust (similar)

    Because why not?

    christmas-home-tour-17-cropped

    Swing Arm Wall Sconce / Bonkers Print

    Or maybe it’s because we’re all bonkers.

    Decorating with Memories...And Vintage Finds: Christmas Home Tour Part 2 / Holiday Decorating / Christmas Decorating / Holiday Home Tour

    Black & White Gallery Wall / Refinished Buffet

    And last but not least…

    christmas-home-tour-15

    Swing Arm Wall Sconce / Ornament Clusters / Vintage Santa (similar)

    I’ve never met a vintage Santa I didn’t like…

    Merry Christmas, Y’all! Hope you decorate with lots of memories and randomness this season! 

    The next stop on the Christmas Tour of Homes is Chelsea from Making Home Base – she NEVER disappoints!

    pin-this-post-2

    Colorful Christmas Decorations | Christmas Decor DIY | Christmas Decor Ideas | Unique Christmas Decorations | Colorful Christmas Tree

    blog-signature-summer-15

    You know you don’t wanna miss any of this crazy.

    Sign up to get my posts delivered to your inbox here.

    Stalk Me Here:

    Pinterest / Facebook / Twitter / Instagram

    SaveSave

  • Decorate with Memories…and Random Stuff

    Decorate with Memories…and Random Stuff

    If you didn’t already figure it out from the post about my Christmas tree, we don’t do trendy Christmas decor around here.

    In fact, some might consider some of our holiday decor tacky.

    And I don’t know that I wouldn’t disagree with them – but that doesn’t mean I will part with my multi-colored-plastic-melted-together-christmas-tree. It was my Grannie’s – and I’m a bit of a sentimentalist…and a hoarder too.

    So if you are following along on this Blogger Stylin’ Home Tours series and popping over from The White Buffalo Styling Co. or Desert Domicile, welcome – I hope I’m not too much of a disappointment to you. I’m a bit of a different kind of holiday home tour – around here, we decorate with memories during Christmastime. 

    And also completely random items that aren’t meant to be Christmas decor.

    Welcome to the freak show.

    Affiliate links may be contained in this post.

    Christmas Home Tour / Christmas Decorating / Holiday Decorating / Holiday Home Tour

    We turn crates into wagons and add in melted together plastic Christmas trees.

    We are also proclaiming that wrapping paper – still on its roll – be Christmas decor as well.

    Because we all know it doesn’t get moved off the dining room table until December 24th.

    Christmas Home Tour / Christmas Decorating / Holiday Decorating / Holiday Home Tour

    We also believe that a vintage santa nestled in a simple tinsel wreath – simple and easy – is the best kind of wreath.

    Christmas Home Tour / Christmas Decorating / Holiday Decorating / Holiday Home Tour

    Furthermore, a cowboy blanket your Grannie made can always be worked into your decor.

    Christmas Home Tour / Christmas Decorating / Holiday Decorating / Holiday Home Tour

    And so can Pap’s cowboy hat.

    Christmas Home Tour / Christmas Decorating / Holiday Decorating / Holiday Home Tour

    Green Pillow / Merry & Bright Pillow (similar) / DIY Raffle Ticket Christmas Card Holder / Confetti Accent Wall

    I won’t pretend for a second that I didn’t move that merry & bright pillow from the front porch to the entry. It’s just a multi-tasking pillow, ya’ll.

    Christmas Home Tour / Christmas Decorating / Holiday Decorating / Holiday Home Tour

    And if we’re gonna pull out the cowboy hat, we might as well pull out Grannie’s guitar too and put it right beside the rocking chair that once belonged to my great-grandmother and me and now the Circus.

    And if it makes it through the Circus, it will be nothing short of a miracle, y’all. 

    We’ll top the rocking chair off with Grunt Labor’s elf hat.

    And then we can’t forget about the king…

    Christmas Home Tour / Christmas Decorating / Holiday Decorating / Holiday Home Tour

    Elvis Bust (similar) / DIY Lucite Frame + Gone with the Wind Print

    …who is sporting a purple tinsel scarf.

    Or the deer…

    Christmas Home Tour / Christmas Decorating / Holiday Decorating / Holiday Home Tour

    How to Make Ornament Clusters (The Deer’s Statement Necklace) 

    …who is sporting a statement necklace and the Christmas lights that I insisted on putting up on my Pap’s front porch every Christmas…much to his dismay.

    Although secretly, I think he liked them.

    I’m not too sure how the deer feels about it though.

    I hope you decorate your home with memories this Christmas…as well as completely random things.

    The next tour stop is Michaela Noelle Designs! Enjoy!

    pin-this-post-2

    Christmas Home Tour / Christmas Decorating / Holiday Decorating / Holiday Home Tour

    blog-signature-summer-15

    You know you don’t wanna miss any of this crazy.

    Sign up to get my posts delivered to your inbox here.

    Stalk Me Here:

    Pinterest / Facebook / Twitter / Instagram

    SaveSaveSaveSaveSaveSaveSaveSaveSaveSaveSaveSaveSaveSaveSaveSaveSaveSaveSaveSaveSaveSaveSaveSaveSaveSaveSaveSaveSaveSaveSaveSaveSaveSaveSaveSave

  • The Christmas Tree Trend Everyone Should Embrace…

    The Christmas Tree Trend Everyone Should Embrace…

    I’ve never been one to follow trends.

    In fact, I think trends are overrated.

    There. I said it. So sue me.

    Yes, trends may be new and pretty, but after a while, once everyone is following the trend, it tends to loose its luster.

    There is one trend though, one that in my personal, somewhat educated opinion, I think should make a comeback.

    I’m calling it the Meaningful Decorated Christmas Tree Trend.

    I should probably come up with a trendier name though.

    You see, this trend is never overused and doesn’t lose its luster.

    Never ever.

    Because the ornaments you place on your tree with this trend are unique and meaningful to only a few people in the world – you and your family.

    Now this does mean you will have to be comfortable with a few things…

    1. The decorations on your tree may not all match.

    Gasp.

    Can you handle that?

    2. Your tree may even consist of a few decorations some would consider weird or even ugly.

    To each their own, fellow freak.

    And the most important thing you’ll have to be ok with…

    3. When you look at each ornament on your tree, your heart will smile. 

    And really, I think that’s all that matters.

    Disclosure: Tree Classics provided me with a Christmas tree, however all opinions and trying to create meaningful trends are 100% mine. This post contains affiliate links for your shopping convenience. Click here to read my full disclosure policy.

     This year, we got a new Christmas tree from Tree Classics.

    The Christmas Tree Trend Everyone Should Embrace...Christmas Decorating

    We went for a Colorado Blue Spruce Snap Tree – and y’all, it’s so cool. It literally does just snap together, but get this…it’s base is on rollers. So after the holidays, you just take your ornaments off, put the cover right over the tree and roll it on into storage.

    #mymindwasblown

    On top of all that – the branches look and even feel real. I’ve always wanted to have a real Christmas tree, but unless I want to sneeze my head off all through the holiday season, it ain’t happening. This tree is the best of both worlds for us.

    But even with a new fancy tree, we didn’t change one thing about our tree decorating habits.

    You will still find Barbie and G.I. Joe nestled in the branches…

    The Christmas Tree Trend Everyone Should Embrace...Christmas Decorating

    …they were our wedding cake toppers.

    Stuffed animals from the 1980’s are also among the ornaments…

    The Christmas Tree Trend Everyone Should Embrace...Christmas Decorating

    …because my Grannie used to put them on the tree for me.

    The caped crusader is found keeping watch in PEZ dispenser form alongside a Care Bear and the Circus’ hand painted Rudolph…

    The Christmas Tree Trend Everyone Should Embrace...Christmas Decorating

    Oh, and there’s Elvis too. Who could forget Elvis?

    And since we are southerners and get overly attached to vehicles…

    The Christmas Tree Trend Everyone Should Embrace...Christmas Decorating

    …you’ll also find car keys gracing our Christmas tree.

    The Circus’ first pair of Nikes…

    The Christmas Tree Trend Everyone Should Embrace...Christmas Decorating

    …can be found beside the HeeHaw ornament.

    God bless HeeHaw.

    And the manger is being threatened by a Little Tikes car…

    The Christmas Tree Trend Everyone Should Embrace...Christmas Decorating

    …and dinosaurs.

    I think Baby Jesus can take ’em though.

    Now, the Meaningful Decorated Christmas Tree Trend doesn’t mean you can’t buy new ornaments or just ornaments you love ever again.

    Oh no.

    You should always add in ornaments that make you smile…you just shouldn’t worry about whether or not it goes with your color scheme. 🙂

    The Christmas Tree Trend Everyone Should Embrace...Christmas Decorating

    Among other things, these snowmen ornaments are a new addition to our tree this year. You see, the Circus is especially partial to Snowmen this year and she loves these little guys.

    The Christmas Tree Trend Everyone Should Embrace...Christmas Decorating

    Our tree isn’t color coordinated.

    And many of the ornaments don’t make much sense at all to most folks.

    The Christmas Tree Trend Everyone Should Embrace...Christmas Decorating

    But it makes all the sense in the world to us.

    The Christmas Tree Trend Everyone Should Embrace...Christmas Decorating

    And that’s all that really matters.

    I hope your heart smiles when you look at your Christmas tree this year. 

    You might also want to see…

    So sweet and simple to make! Vintage Storybook Garland via RainonaTinRoof.com

    How to Make a Vintage Storybook Garland

    Oh my goodness - I had NO idea it was so easy! How to Make Ornament Clusters / Easy Holiday Decorating / Christmas Decorating Ideas

    How to Make Ornament Clusters

    blog-signature-summer-15

    You know you don’t wanna miss any of this crazy.

    Sign up to get my posts delivered to your inbox here.

    Stalk Me Here:

    Pinterest / Facebook / Twitter / Instagram

    SaveSave

  • How to Make Ornament Clusters

    How to Make Ornament Clusters

    I am a Christmas ornament whore.

    Not all ornaments though – only vintage ball ornaments.

    And they never go on my tree – the tree is reserved for really meaningful ornaments – instead, these ornaments get scattered throughout the house and in clusters. My favorite is the clusters though.

    Now, these clusters could be nothing new to you. It may just be that I was living under a rock for a very long time and when this idea dawned on me awhile back, it just seemed like the best thing ever. So, if you already knew how to do this…then why the hell didn’t you tell me?! If you didn’t, here you go.

    ornament ball cluster

    Christmas Ornament Ball Clusters

    This post contains affiliate links for your shopping convenience. Click here to read my full disclosure policy.

    Materials

    • Traditional Round Ornaments – breakable or shatter resistant. I use breakable because they are shinier.
    • Ribbon – you can use basic curling ribbon or prettier grosgrain or satin ribbon.

    Steps

    Step 1

    Cut a long piece of ribbon. I cut mine longer than I need because I use the curly ribbon usually and like the long curly spiral on the end. String however many ornaments your little heart desires onto the ribbon.

    how to make ornament clusters

    I suggest random sizes with more smaller ones than larger ones. If you get too many larger ones, then sometimes the ornaments will pop off.

    Don’t line all the same size up side-by-side – alternate.

    Step 2

    Tie the ends of the ribbon together to form a ball.

    Christmas ball clusters

    You don’t want to tie it super tight, but enough to where a larger ball of sorts or cluster is formed.

    Step 3

    Make it rain ornament clusters everywhere…

    Christmas ornament clusters

    Beside busts.

    DIY Christmas ornament clusters for decor

    On sconces.

    Christmas Decor Ideas - Ball Clusters

    And lamps.

    And of course…

    Ornament Clusters

    The Buck.

    Where will you make it rain?

    Ornament clusters of course. 

    Want to rain more easy holiday decorating around your house? I got you….

    Christmas Decoration Ideas – simple and affordable, but still gorgeous holiday decorating ideas and tips!

    DIY Christmas Ornament Drink Stirrers – so easy and so fun for holiday parties!

    DIY Stocking Holder – if you’ve got five minutes, you can make these super fun, nostalgic stocking holders!

    Want to remember this Christmas decor tutorial for later? Just pin the image below!

    You know you don’t wanna miss any of this crazy.

    Sign up to get my posts delivered to your inbox here.

    Stalk Me Here:

    Pinterest / Facebook / Twitter / InstagramSaveSave
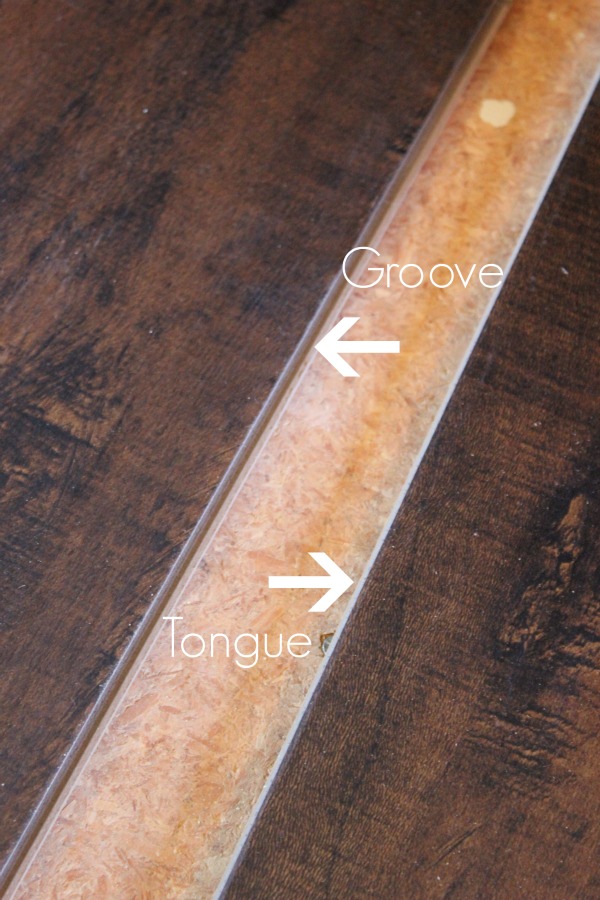
    blog-signature-summer-15
    How to Make Ornament Clusters | Easy Holiday Decorating | Christmas Decorating Ideas | Christmas Decor DIY | DIY Christmas Crafts | Decorating with Ornaments Xmas
  • My Favorite Things Gift Guide

    My Favorite Things Gift Guide

    This post is one of my most favorite ones to do all year long.

    It’s my favorite things gift guide post.

    I just wish I was rich like Oprah and could give each and every one of you one of my favorite things, instead of only showing you my favorite things.

    But ya know, I do kinda need to send my kids to college, rather than give each and every one of you a sarcastic coffee mug.

    But it is a damn good mug. 

    The Ultimate Gift Guides…

    Affiliate links may be contained in this post.

    Gift Ideas for The Fun Lovin’ Gal

    The Ultimate Holiday Gift Guide / Gift Ideas for Her / Gift Ideas for Girls

    1/ Heart Shaped Umbrella • 2/ Jazz Dancer Wine Stopper • 3/ Charm Bracelet • 4/ Flamingo Charm • 5/ Pink David Bust • 6/ Red Cowboy Boots  

    Who thinks of a heart shaped umbrella? WHO? I might actually parade around in the rain just to flaunt it.

    Have I told you I used to take jazz lessons? Yep, that’s right – I’m all jazzy like that. That wine stopper has my name all over it.

    Every girl deserves a charm bracelet. I just got mine this year and I love it – I only wish I got it sooner. The pink flamingo charm as well as many others are on my wish list this year.

    And a pink David bust. Enough said.

    Red cowboy boots? Also on my wish list.

    Gift Ideas for The Hard-To-Buy-For Guy

    The Ultimate Holiday Gift Guide / Gift Ideas for Men / Gift Ideas for Him

    1/ Smartphone Projector Kit • 2/ Crosley Turntable • 3/ iPad Pillow Stand • 4/ State Pillow • 5/  Personalized Leather Travel Bag • 6/ Gun Bookends

    Ok. Here’s the deal. While these gifts are perfect for guys – a lot of them are also great for gals. And I may or may not already own a few of them myself.

    Project videos from your smartphone onto a wall with this fancy contraption.

    As we’ve previously discussed, vinyl is back. And I’ve already bought myself this Crosley turntable – and it hasn’t stopped playing since I got it – except when I’m sleeping.

    For all the techies in your life – an iPad pillow stand – it also works for nooks and kindles.

    While some might say these embroidered state pillows might be considered too decor-ish for a guy’s gift, I disagree. What guy wouldn’t want a cool reminder of where he’s from?

    Every man needs a good travel bag – preferably a pretty leather one with their monogram on it.

    And gun bookends. Channeling John Wayne. You can also get him these gun shaped soaps for his stocking. WHO thought of gun shaped soaps?!

    Gift Ideas for The Couple

    The Ultimate Holiday Gift Guide / Gift Ideas for Couples

    1/ Mixtape Door Mat • 2/ Plaid Throw • 3/ Black & Gold Stemless Wine Glasses • 4/ Monogram Wine Coaster & Stopper Set • 5/ HomeRight Steam Machine • 6/ Casper Arm Chair •  7/ Custom Canvas Art • 8/ Merican Dream Doormat 

    Update: The black and gold wine glasses and wine coaster and stopper set is no longer available. 

    A doormat that looks like those mixtapes which defined your life during the 80’s and 90’s – need I say more?

    A plaid throw with green accents. #cometomama

    And then give them something to clean up all that holiday partying with – a steam machine. I have one of these and swear by it.

    The classic ghost chair – the perfect “starter” chair for couples – it works anywhere with any decor.

    Give something personal with custom canvas art. The print you see in the lower left hand corner above is a canvas print of my wedding shoes. I found a printable download on Etsy, then uploaded it to Pear Tree Greetings and turned it into canvas art. This is great for doing with wedding photos – both for young and older couples.

    The Merican Dream doormat. I could never choose between the mixtape doormat and the Merican dream one. I want both.

    Gift Ideas for The DIYer

    The Ultimate Holiday Gift Guide / Gift Ideas for the DIYer

    1/ HomeRight Finish Max Paint Sprayer • 2/ HomeRight Spray Shelter • 3/ Velvet Finishes Paint • 4/ Tool Combo Kit • 5/ FrogTape • 6/ Duck Tape • 7/ Ryobi Battery Powered Staple Gun • 8/ Ryobi Battery Powered Finish Nailer

    It wouldn’t be a favorite things post without my favorite DIY tools…

    I plan on being buried right alongside my paint sprayer – you can use the spray shelter as cover if it rains at my funeral. Also, I would prefer the sprayer to be filled with Velvet Finishes paint.

    I love power tools. We’ve had our Ryobi combo set for about five years now and it still works like it did the first day. I just got the battery powered staple gun and finish nailer in the past year and I can’t figure out where they had been all my life.

    My two favorite tapes – FrogTape & Duck Tape. The former allows you to make pretty things with paint. The latter allows you to just make pretty things. These also make fantastic stocking stuffers.

    Gift Ideas for The Person Who Already Has Everything

    The Ultimate Holiday Gift Guide / Gift Ideas for People Who Have Everything / Gift Ideas for Hard to Buy For People

    1/ Custom House Drawing • 2/ The NIMBUS Pot • 3/ Fruit • 4/ State Towel • 5/ Personalized Tervis Tumblers • 6/ The Bathroom Guest Book

    What better gift could you give someone than a custom hand-drawn portrait of their beloved home?

    For the person who has a green thumb or a black thumb – the NIMBUS self-watering pot.

    Fruit. I’m not crazy. My grandfather, who had everything he could possibly need, received the best oranges for Christmas as a gift – we both gobbled them up. And I’m not even an orange person.

    Pretty state towels to commemorate home.

    Know what makes Tervis Tumblers even better? When they are personalized Tervis Tumblers with grandbaby’s photos. They are huge hits – trust me.

    A guest book for the bathroom. You know you want one of these for yourself.

    and my personal favorite…

    Gift Ideas for the Sarcastic Person

    The Ultimate Holiday Gift Guide / Gift Ideas for the Sarcastic Person

    1/ Cards Against Humanity • 2/ Everyday I’m Hustlin’ Pouch • 3/ Bad Bitches Pillow • 4/ Inappropriate Coasters • 5/ Say It Sarcastically Mug • 6/ Epic Shit Print

    The Cards Against Humanity Game. Have you played it? You should. However, it’s definitely not for the faint of heart.

     Everyday I’m hustlin’. Que the music and give me the pouch.

    I love bad bitches. They get stuff done. Like this stellar pillow.

    Inappropriate coasters for inappropriate people. Needless to say – I have these and love them.

    Let’s be sarcastic together, darling. Is there any other way to be? This mug and I say no.

    Do epic shit print. Because we should all be reminded that we are capable of changing the world with our epic-ness.

    And to top it all off, put all your gifts into adorable little wagons made from crates…

    How to Make Wagons Out of Crates - Easy DIY project that kids will love to play with! Also works great to hold gifts during the holidays - doubles as holiday decor!

    SaveSave

  • DIY Wagons in 10 Minutes from Crates

    DIY Wagons in 10 Minutes from Crates

    Create your own “custom” wagons from crates in just minutes using this tutorial. It’s so simple and perfect for kids, holiday decorating and more! Find out how to make a wagon that can be used for all sorts of things below!

    The Circus loves to carry things on herself.

    Have you ever seen a kid with a pink turtle zipped up in her jacket with its head popping out like it was a baby in one of those wrap things?

    Well, you could have all day yesterday.

    She also likes to load up a doll, perhaps a stuffed animal or two, her juice cup, probably a cash register as well and a few other random items in boxes, clothes baskets and other “carrying” devices and drag them across the house.

    So if I told you that these wagons were still on the front porch and decorated just like this, I’d be lying.

    However, I can say that these wagons – made out of crates – are quite easy to make and really do make pretty holiday decor when loaded up with various holiday items sans a princess cash register.

    how to make a wagon - play wagons made out of prefab crates.

    This post is sponsored by Crates and Pallets, however all opinions are 100% mine. Affiliate links may be contained in this post.

    How to Make a Toy Wagon

    This post contains affiliate links for your shopping convenience. Click here to read my full disclosure policy.

    Materials & Tools Needed for the Wagon: 

    Step 1:

    Paint the crates your desired colors and let them dry.

    how to make a toy wagon out of crates - painting crates red, blue and green.

    Step 2:

    Attach the caster wheels to the base of the wagon with your drill. Use a small drill bit first to drill a hole to prevent the wood from cracking, then attach the wheels with the 3/4″ wood screws.

    toy wagon made out of a crate - attaching wheels to the base.

    The screws may come through the bottom slats just a bit, so don’t put anything that you may not want snagged in these. You could also purchase shorter screws and use them rather than using the screws that come with the caster wheels.

    Set aside the wagons and start making the handles.

    Related: See how I made a DIY Lemonade Stand using these same crates too!

    DIY Wagon Handle

    Materials and Tools Needed for the Pull Handle:

    Steps

    Step 1:

    Take one piece of the 1/2″ x 2′ PVC Pipe and cut four pieces that are approximately 1″ – 2″ in length. The length doesn’t have to be perfect on these. Lay out your pipe as shown in the image below.

    diy wagon handle made out of pipe

    If you want to make the handle shorter, cut down the main piece of 1/2″ PVC pipe. I left it full length on one wagon and cut it down a bit on the other two.

    The second photo above shows how everything will fit together. Before fitting everything together, apply PVC cement to the joints as shown below and then fit them together.

    attaching pipe fittings to make toy wagon handles.

    Don’t try to put the cement on all the joints all at once – do it one joint at a time and fit it together, then move onto another joint. Let the handle dry for a bit and then you can remove the excess cement with a baby wipe.

    Step 2:

    Spray paint the handles and PVC strap for each wagon black.

    Step 3:

    After the handles and straps have fully dried,  attach a strap to the side of each wagon. I attached mine lower, however if you wanted your handles to be higher up, you can attach them higher.

    attaching wagon handles made from pipe

    Attach the strap on one side only first, then gently lift the un-attached side and slide the handle under the strap where the small piece of PVC is between the cap and 90° PVC elbow and screw the other side of the strap into place.

    Load ’em up with whatever your little heart desires…

    DIY wagons made from prefab crates

    Also, I am proclaiming that wrapping paper rolls be designated as holiday decor even if it isn’t on a present. I mean – those rolls are essentially out all season long (at my house anyway) so why not put them into multiple use?

    easy crate projects - making wagons out of crates.

    And yes, those are real, live wrapped presents. Like actual gifts – not just boxes I wrapped up. I’m on top of my gift-giving game. #winning Fantastic and unique gift ideas are HERE!

    DIY wagons in red, green and blue

    I think it would be really fun to fill these up with gifts for people who you gift more than one present or for couples. If it’s not for a kid, you could leave the handles off and then the person has a handy little crate to use as part of their gift too.

    These could also make fantastic garden carts for gardeners! Load them up with a few gardening essentials and you’ll make their day!

    Any other ideas you have to put these wagons to use?

    Looking for more creative DIY upcycles?

    DIY Faux Jadeite – looks just like the real thing, but uses thrift store finds.

    DIY Kitchen Island – using reclaimed barn wood and old porch posts.

    Locker Baskets turned Shelving – vintage metal locker baskets turned decorative and functional shelving.

    How to Make a Lamp Out of a Bottle – did you know you can pretty easily turn just about any bottle into a lamp? Here’s how.

    Want to remember these wagons for later? Just pin the image below!

    How to use prefab crates to make wagons

    Stalk Me Here:

    Pinterest / Facebook / Twitter / Instagram

    blog-signature-summer-15