Blog

  • DIY Corbel Shelving

    DIY Corbel Shelving

    I love corbels. I love old corbels, new corbels, white corbels, red corbels, big corbels, small corbels. Get the point? I really love old corbels with some history, but they have been super expensive when I have found them anywhere. So, alas, I must settle for Home Depot corbels. For our master bedroom makeover, I really wanted a corbel shelf. So, I got one. Grunt Labor and I just had to make it. We all know I’m too cheap to buy a pre-made $50 one.
    DIY Corbel Shelving:
    Easy DIY Corbel Shelf
    This was so simple y’all. We started out with an old floating shelf we had laying around.

    We bought two corbels at Home Depot like this.

    Corbel for DIY Shelving
    Source

    We added trim, like the kind we used on our built in bathroom shelving, to the edges of the floating shelf and attached the corbels to the bottom. I spray painted the whole thing with basic white spray paint. I WAS NOT going to try and coat every nook and cranny of those corbels with a paint brush. Here’s a closeup of the underside of the shelf so you can see how it all went together.

    DIY Shelf with Corbel Bracket

    Please accept my apologies for no pictures of us actually making this thing. There was a baby to contend with and we just wanted to get it done. But, this is so simple y’all, you really don’t need step by step photos.

    Grunt Labor finally hung it on the wall:

    DIY Corbel Shelving

    Whadda ya think? By the way, that julep cup and lamp are both Goodwill finds! Score!

    Need more shelving ideas? Be sure to see these then: 

    Simple Built-In Bathroom Shelving – easy and costs around $25!

    DIY Modern Rustic Bookshelf – a great bookshelf for storage that looks good and is easy to build!

    How to Build Wall-to-Wall Shelving – I did these in my daughter’s playroom and they’ve been a lifesaver!

  • DIY Metal Basket Shelving

    DIY Metal Basket Shelving

    With the new year upon us, it seems that everyone is into organization and storage, myself included. You guys should see the crap I’ve cleaned out of my closets! Since my Coke Crate Tie Organizer was such a big hit, I thought I would update an older post, DIY Metal Basket Shelving.
    DIY Metal Basket Shelving
    Vintage Locker Baskets turned Shelves
    Metal Basket Shelves with Vintage Locker Baskets
    I just mounted (super easy!) old metal baskets to the wall and they became cookbook storage in my kitchen.
    Cheap, easy, functional, and full of character!  Read all about how to do it here.

    You know you don’t wanna miss any of this crazy.

    Sign up to get my posts delivered to your inbox here.

    Stalk Me Here:

    Pinterest / Facebook / Twitter / Instagram

  • Coke Crate Tie Holder

    Coke Crate Tie Holder

    I wanted to share with you guys how we store my husband’s ties.
    It’s very simple, decorative, and creative!
    A Coke crate tie holder!
    Store ties in a vintage coke crate.
    Storing ties in a vintage coke crate.
    I must admit, this was not our idea. A friend of ours uses this method and showed us.
    That Ponder is a genius. But, don’t tell him I said that!
    Coke Crate Tie Holder Storage
    As you can see, he also uses it for his belts.
    Coke Crate Tie Holder
    Coke Crate Tie Storage
    How does your hubby store his ties?
    Need more organizing ideas? 
    This is such an easy organizing idea and it holds family members accountable for their mess! Color Coded Organization
    Ideas & Projects for Organizing Your Home via RainonaTinRoof.com
    Follow along:
  • DIY Metal Basket Shelving (With Old Locker Baskets)

    DIY Metal Basket Shelving (With Old Locker Baskets)

    As most of you know, I have an un-ending love for galvanized metal. This is particularly true of galvanized metal baskets. I especially love those old gym locker baskets. By love, I mean, if I see one for sale, my soul cries out, “You can’t leave it behind. (As long as its a reasonable price.)” I had a few that were sitting on the bottom of my entry table, basically un-used except for decoration. So I took them, turned them on their sides, bolted them to the wall, and they became cookbook holders.
    Metal Basket Shelving from Vintage Locker Baskets
    I heart them. And they were soooo easy to do. All we (ok, Grunt Labor) did was buy really big washers and put them on each side of the basket. (See below.) Make sure the washers are as big or bigger than the holes in the basket. One washer goes on the back of the basket and one on the corresponding front side. A smaller washer goes on top of the larger one in the front and a screw goes through it all. Easy peasy. We also used drywall anchors to make sure the baskets could hold plenty of weight.
    Mounting vintage locker baskets to make shelves.
    Mounting vintage locker baskets to make shelves.
    DIY Metal Basket Shelving
    DIY Metal Basket Shelving
    Metal Basket Shelving
    How to Make Metal Basket Shelving from Vintage Locker Baskets
    Simple, galvanized storage. Ahhh……
    What do you think about my basket shelving?
    Need more organizing & storage ideas? 
    Color Coded Organization  – simple, but effective at keeping the whole family’s clutter contained!
    12 Ideas for Organizing Your Home – great ideas that are doable!
    15 Days to a Clutter-Free Home – banish the clutter in just over two weeks!
    Coke Crate Tie Holder – creative storage for ties!
    You know you don’t wanna miss any of this crazy.

    Sign up to get my posts delivered to your inbox here.

    Stalk Me Here:

    Pinterest / Facebook / Twitter / Instagram

  • DIY Bathroom Shelves: Built In Bathroom Shelves for $25

    DIY Bathroom Shelves: Built In Bathroom Shelves for $25

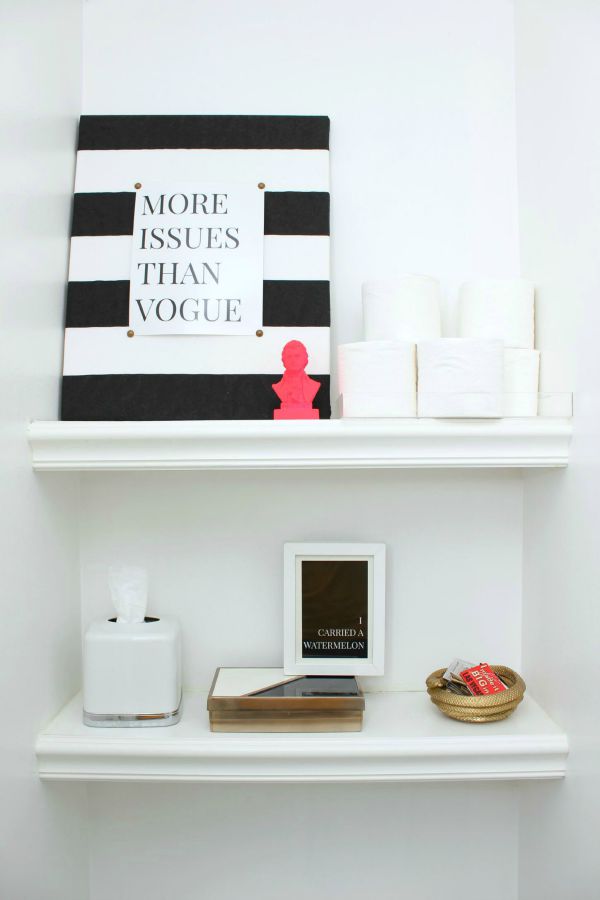
    Everyone can always use a little more storage space, right? These DIY bathroom shelves are a great storage solution for your bathroom! Take advantage of that empty wall behind your toilet and build these bathroom shelves over the toilet for only $25. 

    Who else has one of those wasted spaces above the toilet?

    Ya know, the space where you hang a pretty picture trying to fill the void?

    Who else needs more bathroom storage?

    Who doesn’t?

    Well, I used to have one of those spaces above the toilet….

    and I used to need more bathroom storage……

    But then, Grunt Labor (being the powerful force he is) made these great bathroom shelves above the toilet to fit between the walls.

    DIY Bathroom Shelves Above Toilet

    Built-In Bathroom Shelves

    This post contains affiliate links for your shopping convenience. Click here to read my full disclosure policy.

    Materials and Supplies Needed:

    *Obviously, these shelves will vary in size depending on your space. Therefore, I have made notes as to how much to get in terms of how big your shelves are.1″ x 2″ x 8ft Furring Strips (supports for shelves – get 22 inches of this per shelf )

    • 1″ x 12″ x 10ft Common Boards (actual shelf surface – get pieces as wide as your shelves will be.)
    • Decorative Molding – I used basic chair rail. You’ll need as much of this as each shelf is wide.
    • Stud Finder
    • Nail Gun & Nails or Hammer and Finish Nails
    • Saw (either a miter saw, circular saw or handsaw. I used our miter saw. You could also pre-measure and have the pieces cut at your local home improvement store.)
    • Level
    • Measuring Tape
    • Pencil
    • Paint Color Of Your Choice

    Steps

    Step 1

    Cut two pieces of the furring strips at 11 inches long each.

    Mark your studs on the side walls.

    Using a nail gun or hammer and nails, attach one strip to each side wall where you want a shelf, making sure the strip is level.

    Built In Bathroom Shelves Over Toilet
    Step 2
    Cut your shelf tops, the 1″ x 12″, down to the opening size you have between the two walls or the measurement from edge to edge of the furring strip.
    Place the 1″ x 12″ on top of the furring strips and secure them down with nails.
    Bathroom Shelves Over Toilet

    Step 3

    Cut your molding to the same length as your shelves. Attach it to the front of the shelves using a nail gun or finish nails and a hammer.

    Step 4

    Repeat for as many shelves as you want, then finish with paint.

    Bathroom Shelf Storage Ideas

    It only cost about $25 to make both of these shelves. We did have some scrap wood laying around, but it shouldn’t cost you much more than that. Check the scrap lumber bins at Home Depot and Lowe’s for great deals.

    This open shelving makes great extra storage for toilet paper, decorative items and other bathroom necessities. On top of that, this a great space saver for bathrooms and helps to get things up off the floors!

    See how I built these same shelves, but bigger for storage in my daughter’s playroom HERE!

    Need more bathroom inspiration? You’ll want to see these then…

    Remodeling a Bathroom on a Budget – without compromising on style!

    Classic Blue and White Bathroom Remodel – on a budget!

    1st DIY Bathroom Renovation – on a budget too! This one was even featured in This Old House Magazine!
    2nd Bathroom Makeover – a little preppy, a little old school Hollywood glam!
    Want to come back to this tutorial later? Just pin the image below!
    Bathroom Shelves Above Toilet

    Sign up to get my posts delivered to your inbox here. 

    You know you don’t wanna miss any of this crazy.

    Stalk Me Here:

    Pinterest / Facebook / Twitter / Instagram

    DIY Built In Bathroom Shelves Above Toilet
  • DIY Tissue Paper Pom Poms (Easy and Fun)

    DIY Tissue Paper Pom Poms (Easy and Fun)

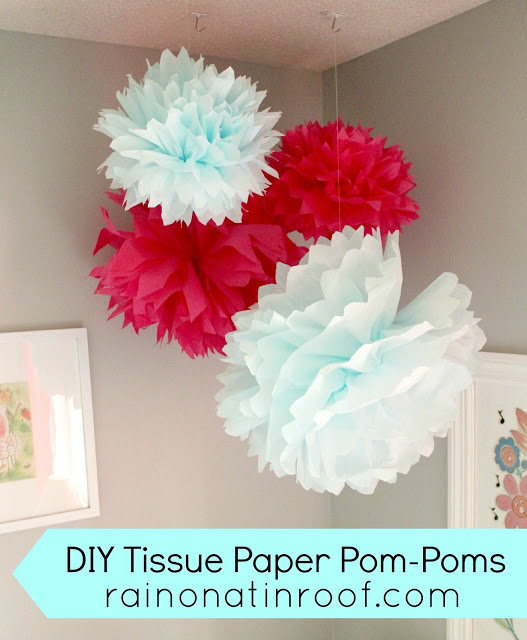
    Aren’t these tissue paper pom poms so fun?

    How to Make Tissue Paper Pom Poms
    Instead of a mobile in the vintage style nursery, I thought these would be much more pretty and stylish! And, we all know, my kid has gotta have style!
    DIY Tissue Paper Pom Poms
    I used this simple tutorial from Martha Stewart, that you can find here. All you need is tissue paper, floral wire and fishing line.
    Way easy and CHEAP!!!
    Tissue Paper Pom Poms Tutorial
    I also made some of these for my daughter’s blue and pink birthday party. And notice those little tissue paper flowers in the mason jar, there? I used the same tutorial for those as I did the poms, I just made them on a smaller scale.
    Looking for more great nursery ideas on a budget? Be sure to see these nine nursery ideas that won’t break the bank!

    Sign up to get my posts delivered to your inbox here. 

    You know you don’t wanna miss any of this crazy.

    Stalk Me Here:

    Pinterest / Facebook / Twitter / Instagram

  • DIY Vintage Nursery Rhyme Prints

    DIY Vintage Nursery Rhyme Prints

    If you remember, I bought some vintage nursery rhyme books and made this cute tissue box cover for the nursery….

    Vintage Nursery Rhyme Tissue Box Holder
    I also chose 6 of the nursery rhymes to frame. I bought simple white frames at Micheal’s and used scrapbook paper as the background.
    Framed Vintage Nursery Rhyme
    Vintage Nursery Rhymes Framed
    Framed Vintage Nursery Rhymes - Nursery Art
    Vintage Nursery Rhyme Prints for Nursery Decor
    Simple, cute, and vintage. How can you go wrong with that combination?
    What do you think of the bambino’s vintage nursery rhymes framed prints?

    Looking for more easy wall decor? Check these out:

    How to Make a Silhouette the Easy Way – you seriously won’t believe how stinkin’ easy this is!

    Sassy Fabric Covered Message Board – a fun way to display family reminders!

    Monogram Photo Art – turn family photos into monogram art!

    Song Lyrics as Wall Art – take your favorite song lyrics and make them art!

    DIY Wall Art with Picmonkey – can’t find the art you want, make it then!

    You know you don’t wanna miss any of this crazy.

    Sign up to get my posts delivered to your inbox here. 

    Stalk Me Here:

    Pinterest / Facebook / Twitter / Instagram

  • Kitchen Reveal – The Kitchen Renovation is complete!

    Kitchen Reveal – The Kitchen Renovation is complete!

    Don’t miss more posts like this! Sign up to get my posts delivered to your inbox here. 

    It is finally done. We have conquered the kitchen renovation. I’m thrilled to show you our kitchen reveal.
    This post contains affiliate links for your shopping convenience. Click here to read my full disclosure policy.
    Rustic Kitchen | White Kitchen | Kitchen Remodel | Kitchen Ideas | DIY Kitchen Ideas | Painted Kitchen Cabinets | DIY Kitchen Island
    **Update: There have been a couple questions about my faucet. It is Pegasus Lyndhurst Series by Glacier Bay. We’ve had it from the beginning of our re-model and love it! No problems with it at all!
    **Update: You can see more (and better) photos of the kitchen and improvements here! Thanks for stopping by!

    Kitchen Reveal

    The kitchen is finally finished! I posted a month or so back about the new countertops. Well, this is the big kitchen reveal. It’s. all. finished. Backsplash, countertops, cabinets, island, everything!
    Kitchen Reveal
    This is what it looked like when we first purchased the house back in June.
    Kitchen Before
    Kitchen Before
    On the opposite wall across from the window, there was a wall, which had to go.
    Kitchen Remodel
    And we knocked another wall down as well.
    Kitchen Remodel
    Luckily, what I did like about the kitchen were the cabinets. I love having the smaller ones on top of the larger ones on the wall. Gives the space lots of character. So, all they needed were some paint and new hardware, which saved us a TON of money!! I used Rust-Oleum‘s Cabinet Transformation kit to paint the cabinets. No priming or sanding required!
    We also saved money by going to Ikea for our cabinet hardware. It was about 40 – 50% cheaper there than at other places. We repositioned the refrigerator to the opposite wall, as well, ending up with this. You can see how we covered the old hardware holes on the cabinets here.
    Kitchen Remodel
    Kitchen Remodel
    After taking out one wall and moving the refrigerator, we had an exposed open cabinet. I called a cabinet maker and he made me two new doors and a drawer that match my others exactly for only $125! I honestly thought it would be much more than that! We also removed the wall cabinets on one side to make way for some open shelving. And I spray painted the counter tops black to keep me satisfied while waiting for new counter tops. Yes, spray painted.  And then my husband built me a beautiful kitchen island made out of old barn wood and porch posts and in December we got new counter tops!
    Kitchen Makeover - DIY Island
    Kitchen Reveal - Countertops
    We chose Silestone in Bianco River because it has a marble-y look. I really wanted marble, but knew that it didn’t hold up too well in kitchens without some routine sealing that I knew I wouldn’t do like I should. For Christmas, we got a Lowe’s gift card, which meant…..back splash!!!! We chose white subway tile. I. LOVE. SUBWAY. TILE. This is what our kitchen looks like now.
    Kitchen Reveal
    Kitchen Reveal
    Kitchen Reveal
    That’s our big kitchen reveal! What do ya think?
    Need more kitchen ideas? I’ve got you covered…

    You know you don’t wanna miss any of this crazy.

    Sign up to get my posts delivered to your inbox here. 

    Stalk Me Here:

    Pinterest / Facebook / Twitter / Instagram

  • How to Make a Lamp Out of a Bottle (Easier than you think!)

    How to Make a Lamp Out of a Bottle (Easier than you think!)

    Seen a few bottle lamps around that you love, but not the price tag? Learn how to make a lamp out of a bottle yourself! It’s actually pretty easy! 
    I’m sure you’ve seen many bottle lamps around. Aren’t they gorgeous? I just love them. However, they tend to have a high price tag. Luckily though, I’m going to show you how to make a bottle lamp yourself.
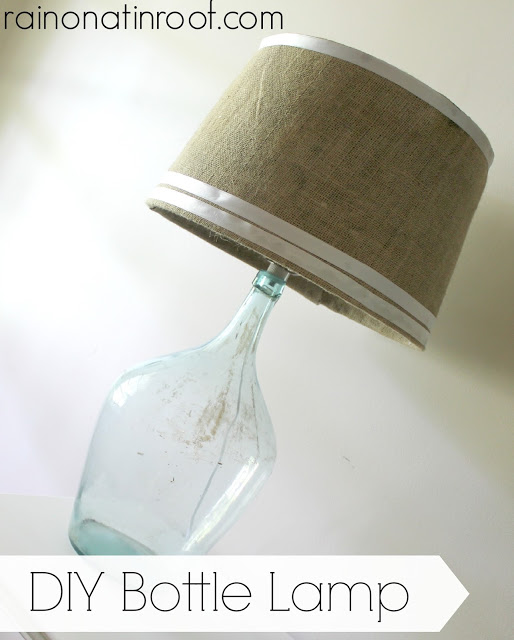
    DIY Bottle Lamp

    Making a lamp from a bottle is actually pretty easy!

    DIY Bottle Lamp

    Affiliate links included in this post.

    Materials Needed: 

    Steps

    Step 1

    Get your stuff together. Remember that awesome old wine bottle I bought at the Insyde Outsyde shop back in September?

    DIY Bottle Lamp
    Pottery Barn sells these bottles for a ridiculous amount of $$$, but luckily I found a great deal on one. I decided to turn it into a lamp!
    Step 2
    Follow the instructions on the bottle lamp kit.
    Turn a bottle into a lamp.
    The lamp kit is way easy to do. You’ll select the best size plug to go into your bottle top. An Xacto knife may be helpful to trim the plug if it’s a little too big. You’d rather it be too big than too small though.
    Once you find the correct size plug, you’ll attach the socket and wire as the directions say.
    How to Make a Lamp Out of a Bottle
    I also ran a bead of super glue around where the plug goes into the bottle to keep it nice and securely in there.
    Step 3
    Top it with a shade!
    I had a lampshade I’d found at a thrift store that I covered with burlap to work nicely with my lamp. I also added a ribbon detail along the edge.
    Make a bottle lamp.
    Finally, I had my very own DIY bottle lamp.
    How to Make a Lamp Out of a Bottle

    Did you know making a lamp from a bottle was so easy?

    Love a great DIY lamp or lamp hack? You’ll want to see these too then! 

    16 Lamp Ideas and Makeovers – you won’t believe some of these easy, but gorgeous lamp ideas!

    How to Make Your Own Lampshade and Finial – turn any fabric into a lampshade!

    DIY Agate Slice Lamp Finial – these are SO gorgeous, yet so simple to make!

  • How to Make Chalk Paint and Results of Paint

    How to Make Chalk Paint and Results of Paint

    Don’t miss more posts like this! Sign up to get my posts delivered to your inbox here. 

    I’m sure you have heard of the Annie Sloan Chalk paint……everyone says it is THE WAY to paint furniture. I don’t doubt them a bit. However, I just can’t bring myself to fork over $35 for a quart of the paint!! I am cheap and not afraid to say it. The paint is supposed to be the best because it usually takes only one coat, no primer or sanding needed, and it sands off in a chalky manner to distress furniture easily. It also dries a flat finish. I found a recipe online for home made chalk paint and decided I would try it out on this $5 yard sale table I have.
    how to make chalk paint
    This was originally stained, but I painted it a french country blue and then realized I had no idea what to do with it. Poor thing, it has been living in my garage for the past 6 months. With the baby on the way, I decided I would move the current guest bedroom nightstand into the baby’s room and put this one in there. However, the color would never do. I wanted to go with a gray color.

    How to Make Chalk Paint

    DIY Chalk Paint Recipe
    I mixed a cup of the Stonington Gray from the nursery and 1 tablespoon of non-sanded white grout (about $7 at Home Depot).  I mixed enough to get the lumps out. You can also add a little water to the tablespoon of grout to begin with and mix it together to form a paste, then add your paint in and mix well.  If the grout is extra lumpy this step helps.
    If you have problems with the paint drying out too quickly, add a little water as needed to keep it wet longer. You have to brush this on, there is no rolling with this paint. I did not prime or sand any part of the table before painting. The home made version stuck to it amazingly! Yay!! It also dries really fast. By the time I was done with the first coat, I could tell there were a few places that  needed a bit more paint. It didn’t really need a full second coat, I would say it took 1 1/2 coats. By that point, all that brushing had me wore out, so I went to bed! The next day, I applied a wax finish on the table to protect it.
    Finishing DIY Chalk Paint
    It’s just a nice clear coat to protect the finish. I wanted to keep the flat look of the paint on the table.
    ***Update: I have since found an easier way to wax furniture! Read about it here!**
    And the result was…..
    How to Make Homemade Chalk Paint
    DIY Chalk Paint
    DIY Chalk Paint and Results
    I am very pleased with it – especially considering the fact that the whole thing took less than an hour to complete. I will definitely use the home made version of the chalk paint again. I have a shutter that will match the table to become a head board in the guest bedroom.
    That’s my take on how to make chalk paint. Anyone else out there used home made chalk paint before?
    More DIY Chalk Paint Pieces you might want to see…
    DIY Numbered Chest – features a cool way to add detail to furniture pieces with numbers!
    DIY Gray Chalk Paint Table – simple, but adorable!
    French Country Dresser Makeover – two-toned love going on here!
    French Country Chest Makeover – the gorgeous lines on the furniture are accentuated with white detail on this one!
    Two Toned Rustic Dresser – with a DIY shelf that took the place of a missing drawer!

    You know you don’t wanna miss any of this crazy.

    Sign up to get my posts delivered to your inbox here. 

    Stalk Me Here:

    Pinterest / Facebook / Twitter / Instagram

  • DIY Ornament Tree

    DIY Ornament Tree

    If you have a few spare ornaments on your hands this holiday season, you should add this DIY ornament tree to your project list! It’s simple to make and adds a fun touch to any holiday decor!

    This little Christmas tree has been one of my favorite holiday decorations for years now. The best part about it though? It was so easy to make!

    Did I mention that it also just cost me $6 to make as well? Thank you thrift stores!

    DIY Ornament Tree

    Don’t you just love great little decorations like these that are easy to make and become your favorites? Me too.

    Make your own using the tutorial below!

    This post contains affiliate links for your shopping convenience. Click here to read my full disclosure policy.

    Vintage Ornament Tree Tutorial

    Supplies Needed:

    Steps

    Step 1

    Remove the hooks from your ornaments. Like I said, vintage ornaments or store bought ornaments will work just fine. You could even spray paint plastic ornaments to colors of your liking! I prefer the colorful glass ornaments just because of the extra shine they have.

    Unwrap the styrofoam cone.

    Vintage Ornament Tree

    Step 2

    Starting at the base of the cone with your largest size ornaments, stick an ornament halfway into the cone. Put a healthy dose of hot glue around the top of the ornament and where it will meet the styrofoam, then push it into the styrofoam cone the rest of the way.

    Glass Ornaments used to make Ornament Tree

    If you are using breakable ornaments, do be careful not to push too hard on the ornaments and break them.

    Step 3

    Repeat Step 2 working your way up the cone, fully covering the cone as you go. As you move up the cone, use smaller ornaments.

    Making your own ornament tree.

    Step 4

    Once your cone is covered with ornaments, you can weave tinsel garland into visible holes the ornaments didn’t cover.

    DIY Vintage Ball Ornament Tree

    Step 5

    Embellish with a tree topper if you wish!

    How to Make an Ornament Tree

    I opted for a cute little elf I had on hand.

    Of course, if you’d like your tree to be more neutral, you can also just go with 2-3 colors of ornaments. Where would the fun in that be though? 😉

    Want more easy holiday crafts and decorating ideas?

    15+ Simple and Affordable Christmas Decoration Ideas – easy and cheap holiday decorations that are still gorgeous!

    How to Make Ornament Clusters – easily create gorgeous clusters of ornaments to spread throughout your home and add instant holiday cheer! These are beautiful!

    Raffle Ticket Christmas Card Holder – a fun spin on a Christmas card holder!

    Elf Hat Tree Topper – need a tree topper in a pinch? This one takes no time and is a super fun holiday craft for kids too!

    Vintage Storybook Garland – one of our family’s most beloved holiday decorations made from vintage Christmas storybooks – the kids will LOVE this one!

    Want to come back to these instructions for making your own ornament tree later? Just pin the image below!

    DIY Vintage Ball Ornament Tree

    Follow on social media for more of our holiday decorations!

    Facebook | Instagram | Pinterest | Twitter

  • Super Easy Tinsel Wreath

    Super Easy Tinsel Wreath

    Tinsel will forever be a holiday classic – in my book anyway! You can easily whip up this tinsel wreath in 30 minutes or less. It adds some fun vintage Christmas charm to holiday decor!

    Anytime you want a cute, super easy holiday wreath to make, tinsel is the way to go.

    Tinsel Wreath

    I was recently inspired by one of my friends, Ashley, after she made the tinsel wreath you see below.

    Retro Christmas Wreath

    She purchased a wreath at Goodwill and re-worked it to make this beauty.

    Retro Christmas Wreath

    Luckily, Goodwill is overflowing with wreaths and tinsel at the moment! All I had to do was make a trip to my local Goodwill to find a very ugly, but still useful, wreath and a lot of tinsel.

    Old Wreath turned into a Tinsel Wreath

    It’s so circa 1990, right? But it was just $1. All I had to do was pull the rags out of the wreath. Some were held in with pins, others just shoved in there.

    Easy DIY Tinsel Wreath

    I was a little worried at first that some the straw might poke through. Luckily though, I was wrong.

    How to Make a Tinsel Wreath

    Enter lots and lots of and lots of tinsel. Ashley had already warned me it would take more than I thought it would. She was right. All I did was hot glue one edge of tinsel to the wreath and start wrapping it around.

    After I made it around the whole wreath, I filled in some not-so-fluffy spots with more tinsel, just hot-gluing it on.

    DIY Santa Tinsel Wreath

    So I’m going to admit I have this thing for vintage Santas. I love the small ones with velvet suits and round bellies. I have a few of these lying around that I’ve picked up at thrift stores, so I put one in the center of the wreath. I just dug out a little hole in the straw and hot glued that bad boy in.

    Retro Santa Christmas Wreath

    I love the contrast of the red Santa suit against the silver tinsel. I may add some ornaments or some red ribbon to hang it with, but I also just really love it like this.

    Want more easy Christmas crafts with a retro vibe?

    Don’t miss this easy to make vintage ornament tree topped with a super cute little elf!

    Here is an adorable Christmas tree garland made from vintage holiday storybooks – the kids will LOVE it!

    And don’t miss these simple and affordable Christmas decoration ideas!

    If you want to come back to this tinsel wreath later, just pin the image below!

    DIY Vintage Santa Christmas Wreath

    Keep up with our Christmas fun on social media:

    Facebook | Instagram | Pinterest | Twitter

  • Bathroom Renovation on a Budget

    Bathroom Renovation on a Budget

    When we moved into the foreclosure, we knew a bathroom remodel was in order for the hall bath. Of course, we didn’t have much money, so it all had to be done on a budget.
    I’m happy to say we were successful with our bathroom renovation on a budget.

    Bathroom Renovation on a Budget

    DIY Bathroom Renovation {rainonatinroof.com} #bathroom #renovation #makeover #diy

    As most of you know, my husband and I moved into a new home (a cash guzzling lovely foreclosure) this past June. Everything in the house needed some serious upgrades. It was stuck in 1970. However, everything, pretty much anyway, was in working order, including my bathroom. So, the bathroom sat untouched for a bit while dust progress was being created elsewhere.

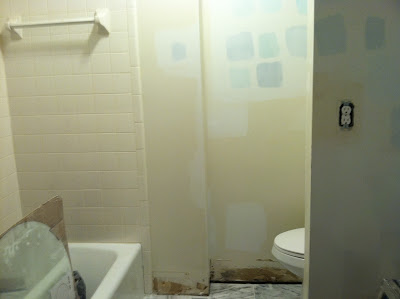
    Here are a few rough pictures of where we started with the bathroom…

    DIY Bathroom Makeover on a Budget

    Bathroom Makeover
    Renovating a Bathroom on a Budget
    You saw right, that was a bowl in the sink. There were plumbing issues in the kitchen. Definitely an experience.
    There wasn’t much money left after taking out a wall in the kitchen for a professional to do the bathroom reno. So, we pulled a DIY bathroom renovation. As you can tell, the bathroom was plain, very plain. I did really like the solid cast iron tub though. It would be nice if it were free standing, but it worked and is in great condition, so I couldn’t let myself rip it out.
    About a month into the renovation, I got to start on my very own, husband-doesn’t-set-foot-in-it bathroom. As you will see, the result of the bathroom consists of my tastes, there isn’t a speck of him there. The vanity and mirror were ripped out and then the tile was hammered out. There was about 2 lovely, dusty inches of concrete underneath that tile. Joy.
    DIY Bathroom Renovation on a Budget
    Renovating a Bathroom on a Budget
    The hubby did an amazing job on the tile. Of course, I was instrumental in handing him the pieces and supervising. Marble is such a classic stone, I had to have it for my bathroom. Since it is a smaller bathroom, the cost wasn’t outrageous. Yay!
    The tile that surrounded my bathtub was horrendous. Like I say…..I’ll paint anything.
    How to Paint a Tile Shower
    I painted my bathroom tile. I used Rust-Oleum‘s tub and tile paint.
    Painting a Tiled Shower
    Renovating a Bathroom on a Budget
    After, the first coat, there were still some beige specks coming through, so after another coat and incredibly toxic fumes, the result was….
    Painting over Tile in a Shower
    Yay!!! White tile! It’s not my pick, which would have been subway, but its white like subway tile! I’ll take it!
    The vanity in my bathroom is my most favorite thing in there….I think, it was a mere $125.
    Budget Bathroom Makeover
    Bathroom Renovation on a Budget
    Bathroom Renovation on a Budget
    Bathroom Renovation on a Budget
    The open storage was supposed to be drawers, but those were missing, so towel storage, it is!
    Bathroom Renovation on a Budget
    I used the same Behr custom color match in my bathroom that I used in the nursery.
    Budget Bathroom Makeover
    Grunt Labor built some shelving above the toilet for extra storage.
    DIY Bathroom Shelving - Budget Bathroom Makeover
    Budget Bathroom Makeover
    I’m still dreaming of a floating soaking tub……but I’ll keep dreaming.
    What do you think of the bathroom renovation?
    Wanna snoop around my house more? Right this way, please….

    You know you don’t wanna miss any of this crazy.

    Sign up to get my posts delivered to your inbox here. 

    Stalk Me Here:

    Pinterest / Facebook / Twitter / Instagram