Don’t miss more posts like this! Sign up to get my posts delivered to your inbox here.
I’m sure you have heard of the Annie Sloan Chalk paint……everyone says it is THE WAY to paint furniture. I don’t doubt them a bit. However, I just can’t bring myself to fork over $35 for a quart of the paint!! I am cheap and not afraid to say it. The paint is supposed to be the best because it usually takes only one coat, no primer or sanding needed, and it sands off in a chalky manner to distress furniture easily. It also dries a flat finish. I found a recipe online for home made chalk paint and decided I would try it out on this $5 yard sale table I have.

This was originally stained, but I painted it a french country blue and then realized I had no idea what to do with it. Poor thing, it has been living in my garage for the past 6 months. With the baby on the way, I decided I would move the current guest bedroom nightstand into the baby’s room and put this one in there. However, the color would never do. I wanted to go with a gray color.
How to Make Chalk Paint
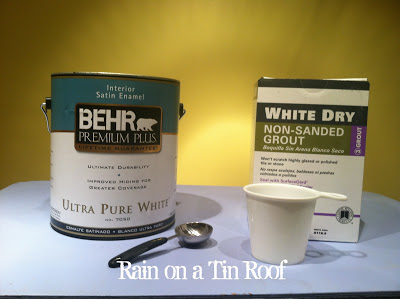
I mixed a cup of the Stonington Gray from the nursery and 1 tablespoon of non-sanded white grout (about $7 at Home Depot). I mixed enough to get the lumps out. You can also add a little water to the tablespoon of grout to begin with and mix it together to form a paste, then add your paint in and mix well. If the grout is extra lumpy this step helps.
If you have problems with the paint drying out too quickly, add a little water as needed to keep it wet longer. You have to brush this on, there is no rolling with this paint. I did not prime or sand any part of the table before painting. The home made version stuck to it amazingly! Yay!! It also dries really fast. By the time I was done with the first coat, I could tell there were a few places that needed a bit more paint. It didn’t really need a full second coat, I would say it took 1 1/2 coats. By that point, all that brushing had me wore out, so I went to bed! The next day, I applied a wax finish on the table to protect it.

It’s just a nice clear coat to protect the finish. I wanted to keep the flat look of the paint on the table.
***Update: I have since found an easier way to wax furniture! Read about it here!**
And the result was…..


I am very pleased with it – especially considering the fact that the whole thing took less than an hour to complete. I will definitely use the home made version of the chalk paint again. I have a shutter that will match the table to become a head board in the guest bedroom.
That’s my take on how to make chalk paint. Anyone else out there used home made chalk paint before?
More DIY Chalk Paint Pieces you might want to see…
DIY Numbered Chest – features a cool way to add detail to furniture pieces with numbers!
DIY Gray Chalk Paint Table – simple, but adorable!
French Country Dresser Makeover – two-toned love going on here!
French Country Chest Makeover – the gorgeous lines on the furniture are accentuated with white detail on this one!
Two Toned Rustic Dresser – with a DIY shelf that took the place of a missing drawer!
Lauren @ My Wonderfully Made says
Lovely! I am so going to try this . . . been putting it off but I’m now out of chalk paint and yes, it is expensive.
phoenix az painter says
This comment has been removed by a blog administrator.
Cortney says
Thank you soooo much for sharing. I think we all share the same sentiment when it comes to the price tag!!
Did you end up doing the headboard?!?
Cortney
Rain on a Tin Roof says
Cortney, thanks for stopping by! No, I didn’t end up doing the shutter headboard. My uncle gave me another bedroom set, so I didn’t need the shutter headboard any longer!
lespetitesbouchees says
I have been using this chalk paint recipes with AMAZING results! Annie who??? LOL!!! I just started following your blog and would love it if you dropped in om mine! Fondly, Heidi
Rain on a Tin Roof says
Heidi, I love this recipe! It is great! I just can’t bring myself to pay $30+ for a quart of paint, not even a gallon!! I’m so happy to have you following along! Headed your way!
melissa martinez says
I tried this homemade chalk paint on a dresser this weekend and it worked wonders!! I painted a dark brown dresser with an antique grey color and it looks amazing!!! No sanding, no primer just paint!!! Thanks so much this saved my pocket lots of grief!
Jenna @ Rain on a Tin Roof says
That is awesome, Melissa!! I am so happy to hear it!
Joan says
I just discovered you on OPC’s Better Half and love your style as I’m not so much into the distressed look of things. I was wondering if you have a take on using plaster of paris in lieu of tile grout. Does it make a difference?
Thanks,
Joan
Jenna @ Rain on a Tin Roof says
Thanks, Joan! I have never made chalk paint with the plaster of paris before, but I’ve heard good things about it!
Jillian @ Sealed With Lovely says
Hi Jenna!
I have heard that sanding homemade chalk paint that uses non-sanded grout releases toxic fumes. Do you know anything about this?
I tried to find some info on it, but couldn’t find anything helpful about it- hope you can help!
Jenna @ Rain on a Tin Roof says
No, Jillian, I haven’t heard this, but now you’ve got me wondering! I’m going to have to do some research on it! Thanks so much for telling me! Where did you hear about it?
Jillian @ Sealed With Lovely says
I don’t remember the website, but I was looking for recipes for homemade chalk paint, and one of the recipes said not to use non-sanded grout because it is toxic when you sand it. I just wanted your opinion before I used it. Is there a substitute that you know of?
Jenna @ Rain on a Tin Roof says
You can use Plaster of Paris instead. I don’t know the exact recipe, but I’m sure you can find it on Pinterest. I’ve never made chalk paint with it before, but I’ve heard good things.